

When Halloween rolls around, it’s all about crafting a dessert table that’s both enchanting and delicious. Think of eerie eyeball cupcakes with candy eyes staring right back at you. Or ghostly meringue pops that seem to float effortlessly. Each treat offers a delightful spin on classic flavors. Trust me, these desserts will leave your guests completely spellbound!
Eerie Eyeball Cupcakes

Eerie Eyeball Cupcakes are the perfect ghoulish treat for your Halloween festivities. These spooky cupcakes aren’t only fun to look at, but they’re also deliciously sweet, making them a hit with both kids and adults.
The base of the cupcake is a rich, moist chocolate cake, topped with a swirl of creamy, blood-red frosting. To complete the eerie look, a candy eyeball is added on top, staring back at your guests as they bite into these frighteningly good desserts.
Creating these creepy confections is a fun project that you can enjoy with family or friends. They’re designed to serve 4-6 people, and you can easily adjust the quantities if you’re hosting a larger Halloween party.
With simple ingredients and straightforward steps, you’ll have an eye-popping dessert ready in no time. Whether you’re hosting a Halloween gathering or just looking to add some spooky flair to your dessert table, these Eerie Eyeball Cupcakes are sure to impress.
Ingredients (Serves 4-6):
- 1 cup all-purpose flour
- 1/2 cup unsweetened cocoa powder
- 1 cup granulated sugar
- 1 teaspoon baking powder
- 1/2 teaspoon baking soda
- 1/4 teaspoon salt
- 1/2 cup unsalted butter, softened
- 2 large eggs
- 1 teaspoon vanilla extract
- 1/2 cup buttermilk
- 1/2 cup boiling water
- Red food coloring
- 2 cups powdered sugar
- 1/4 cup heavy cream
- 12 candy eyeballs
Cooking Instructions:
- Preheat the Oven: Begin by preheating your oven to 350°F (175°C). Line a cupcake pan with paper liners to prepare it for the cupcake batter.
- Mix Dry Ingredients: In a large mixing bowl, whisk together the flour, cocoa powder, sugar, baking powder, baking soda, and salt until well combined.
- Cream Butter and Sugar: In a separate bowl, cream together the softened butter and granulated sugar until light and fluffy. Add the eggs one at a time, beating well after each addition, and then stir in the vanilla extract.
- Combine Mixtures: Gradually add the dry ingredients to the butter mixture, alternating with the buttermilk, beginning and ending with the dry ingredients. Mix until just combined.
- Add Boiling Water: Carefully stir in the boiling water until the batter is smooth. The batter will be thin, but this is expected.
- Fill and Bake: Pour the batter into the prepared cupcake liners, filling each about 2/3 full. Bake for 18-20 minutes or until a toothpick inserted into the center comes out clean. Allow the cupcakes to cool completely on a wire rack.
- Prepare Frosting: In a medium bowl, beat together the powdered sugar and heavy cream until smooth. Add a few drops of red food coloring and mix well to achieve a blood-red hue.
- Decorate Cupcakes: Once the cupcakes are completely cool, pipe or spread the red frosting on top of each cupcake. Place a candy eyeball on top of each cupcake, pressing gently to adhere.
Extra Tips:
When making Eerie Eyeball Cupcakes, make sure that your cupcakes are completely cool before frosting to prevent the icing from melting.
If you want a more intense red frosting, add additional drops of food coloring slowly until you reach the desired shade.
For an extra eerie effect, you can drizzle some red gel icing around the eyeballs to create a bloodshot look.
Store any leftover cupcakes in an airtight container to keep them fresh for the next day. Enjoy your spooky creations!
Ghostly Meringue Pops
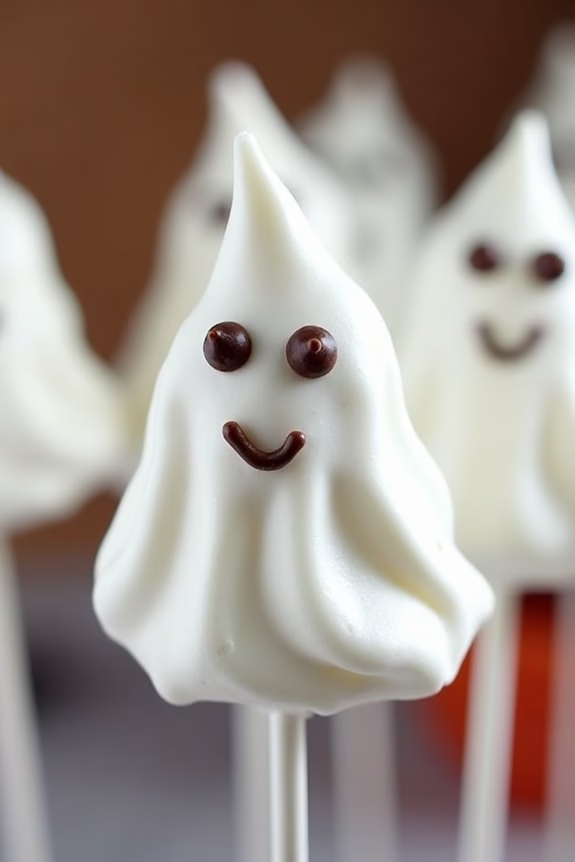
Ghostly Meringue Pops are the perfect spooky treat to delight both kids and adults during Halloween festivities. These whimsical pops aren’t only visually appealing with their ghostly shapes, but they also offer a delightful melt-in-your-mouth texture. Made from simple ingredients, these meringue pops are light, airy, and sweet, making them an ideal dessert option for your Halloween party spread. Their ethereal appearance captures the Halloween spirit perfectly, offering a fun and tasty experience.
Creating Ghostly Meringue Pops involves piping meringue into ghost shapes and adding little chocolate eyes for a hauntingly cute effect. The meringues are slowly baked to achieve their crisp texture without browning, guaranteeing they remain as white as a ghost. These pops are served on lollipop sticks, making them easy to handle and even easier to enjoy. This recipe serves 4-6 people, making it perfect for a small gathering or to offer as a special treat at a Halloween party.
Ingredients:
- 4 large egg whites
- 1 cup granulated sugar
- 1/4 teaspoon cream of tartar
- 1 teaspoon vanilla extract
- 1/4 cup mini chocolate chips
- 12 lollipop sticks
Instructions:
- Preheat the Oven: Begin by preheating your oven to 200°F (93°C). Line a baking sheet with parchment paper to prevent sticking.
- Prepare the Meringue: In a clean, dry mixing bowl, beat the egg whites on medium speed until foamy. Gradually add the cream of tartar. Increase the speed to high and slowly add the granulated sugar, a tablespoon at a time, beating until stiff peaks form. This should take about 5-7 minutes. Add the vanilla extract and beat for another minute.
- Pipe the Ghosts: Transfer the meringue into a piping bag fitted with a large round tip. Pipe ghost shapes onto the prepared baking sheet, making them about 2-3 inches tall. Leave a little space between each ghost for hot air circulation.
- Add the Eyes: Gently press two mini chocolate chips into each ghost to create eyes. Be careful not to deflate the meringue.
- Bake: Insert a lollipop stick into the base of each ghost, about halfway up. Bake the meringues in the preheated oven for 1.5 to 2 hours, or until they’re dry and can easily be lifted from the parchment paper.
- Cool: Turn off the oven and let the meringues cool completely inside the oven with the door slightly open. This will prevent cracking from a sudden temperature change.
Extra Tips: When making meringue, make sure your mixing bowl and beaters are completely clean and dry; any grease or moisture can prevent the egg whites from whipping properly. If the meringue mixture is too soft, continue beating until the peaks hold their shape. The low baking temperature is vital to avoid browning the meringues, making sure they stay ghostly white. If you don’t have a piping bag, you can use a zip-top bag with a small corner snipped off. Store these meringue pops in an airtight container to keep them crisp and fresh.
Creepy Crawly Spider Cookies
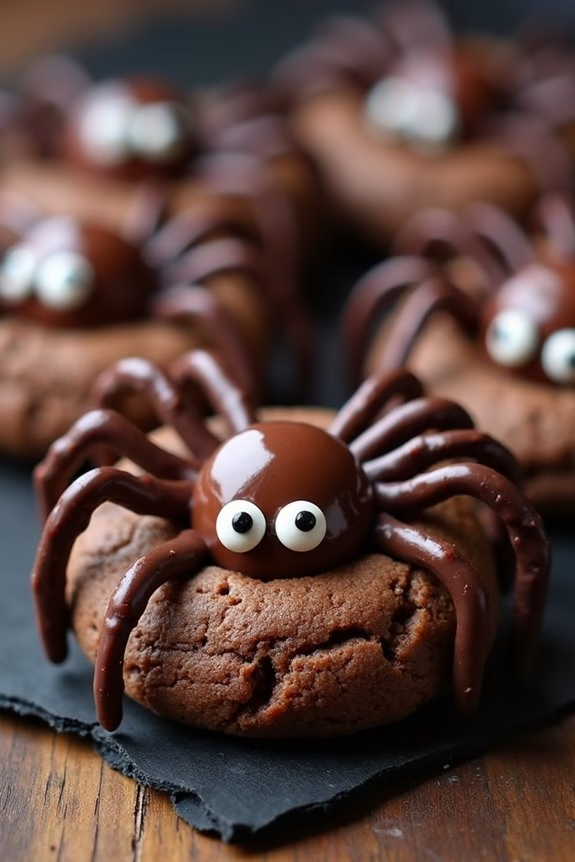
Creepy Crawly Spider Cookies are the perfect treat to spook and delight your Halloween party guests. These cookies aren’t only delicious but also visually striking, resembling little spiders crawling across your dessert table. They’re fun to make and even more fun to eat, making them an excellent activity for the whole family to enjoy together.
Whether you’re hosting a Halloween gathering or simply want to create a seasonal treat, Creepy Crawly Spider Cookies will surely be a hit.
The combination of a rich, chocolatey cookie base with playful decorations makes these cookies irresistible. Each cookie is adorned with chocolate spider legs and candy eyes, adding a whimsical and eerie touch. The cookies are soft and chewy, providing the perfect contrast to the crunchy candy decorations.
Best of all, the recipe is straightforward, allowing even novice bakers to achieve impressive results. Here’s how you can make Creepy Crawly Spider Cookies for 4-6 people.
Ingredients:
- 1 cup unsalted butter, softened
- 1 cup granulated sugar
- 1 cup light brown sugar, packed
- 2 large eggs
- 2 teaspoons vanilla extract
- 3 cups all-purpose flour
- 1 teaspoon baking soda
- 1/2 teaspoon baking powder
- 1/2 teaspoon salt
- 1 cup semi-sweet chocolate chips
- 1 cup mini chocolate chips
- 24 chocolate truffles (such as Lindor)
- 48 candy eyes
- Black decorating gel or melted chocolate for spider legs
Instructions:
- Preheat the Oven: Start by preheating your oven to 350°F (175°C). Line two baking sheets with parchment paper to prevent the cookies from sticking and guarantee even baking.
- Cream the Butter and Sugars: In a large mixing bowl, cream together the softened butter, granulated sugar, and brown sugar until the mixture is light and fluffy. This should take about 3-4 minutes with an electric mixer on medium speed.
- Add the Wet Ingredients: Beat in the eggs one at a time, making sure each is fully incorporated before adding the next. Mix in the vanilla extract until well combined.
- Combine Dry Ingredients: In a separate bowl, whisk together the flour, baking soda, baking powder, and salt. Gradually add this dry mixture to the wet ingredients, mixing on low speed until just combined. Be careful not to overmix.
- Fold in Chocolate Chips: Gently fold in the semi-sweet and mini chocolate chips using a spatula or wooden spoon, ensuring they’re evenly distributed throughout the dough.
- Form the Cookies: Use a tablespoon to scoop the dough onto the prepared baking sheets, spacing each cookie about 2 inches apart. Press a chocolate truffle gently into the center of each cookie.
- Bake: Place the cookies in the preheated oven and bake for 10-12 minutes or until the edges are golden brown, and the centers are set. Remove from the oven and let cool on the baking sheets for 5 minutes before transferring them to a wire rack to cool completely.
- Decorate the Spiders: Once the cookies are completely cool, use the black decorating gel or melted chocolate to draw spider legs extending from the truffles. Place two candy eyes on each truffle to complete the spider look. Allow the decorations to set before serving.
Extra Tips:
To make the spider legs more realistic, use a fine-tipped piping bag for precision. If you don’t have candy eyes, you can substitute with white chocolate chips and a dot of black gel.
Make sure the cookies are fully cooled before decorating to prevent the chocolate from melting. You can store the cookies in an airtight container for up to a week, but they’re best enjoyed fresh.
For an extra festive touch, consider adding a few drops of orange food coloring to the dough. Enjoy your spooky treats!
Wicked Witch Hat Cones

Wicked Witch Hat Cones are a perfect Halloween treat that combines whimsical fun with delicious flavors. These edible witch hats aren’t only a delight to look at but are also incredibly easy to make. The base of the hat is a sugar cone, and the brim is made from chocolate or cookie wafers. Filled with your favorite candies and topped with colorful decorations, these cones are certain to be a hit at any Halloween party.
The great thing about Wicked Witch Hat Cones is that they can be customized to suit your taste. You can choose different colors for the frosting, different types of candies to fill the cones, and even switch up the decorations on top. Whether you’re making them for a Halloween party or just as a fun dessert for your family, these cones are bound to impress.
They’re not just a treat, but a fun activity to do with kids or friends, bringing out the creativity in everyone involved.
Ingredients (Serving size: 4-6 people):
- 6 sugar cones
- 6 large chocolate wafer cookies
- 1 cup of semi-sweet chocolate chips
- 1/2 cup of assorted small candies (e.g., mini M&M’s, candy corn)
- 1/4 cup of frosting (any color)
- 1/4 cup of colored sprinkles
- 1 tube of black decorating gel
Instructions:
- Prepare the Chocolate Base: Begin by melting the chocolate chips in a microwave-safe bowl. Microwave them in 30-second intervals, stirring in between, until completely melted and smooth.
- Create the Hat Brim: Dip the rim of each sugar cone into the melted chocolate and immediately press the cone onto the center of a chocolate wafer cookie. This creates the brim of the witch’s hat. Let them set on a parchment-lined baking sheet.
- Fill the Cones: Once the chocolate has set, fill each cone with your choice of small candies. This adds a surprise element to the treat.
- Seal the Cones: Use a small amount of frosting around the rim of the cone where it meets the cookie. This helps to secure the two parts together and adds an extra layer of flavor.
- Decorate the Hat: Use the black decorating gel to draw a band around the base of each sugar cone. Then, sprinkle colored sprinkles over the top for a magical touch.
- Let It Set: Allow the cones to sit for about 15 minutes to confirm everything is set and the decorations are secure.
Extra Tips:
For an added twist, consider adding a small amount of food coloring to the melted chocolate for a unique look. If you want to make the cones more stable, you can use a small amount of frosting inside the cone before adding the candies, which will help to hold them in place.
Additionally, if you’re preparing these cones in advance, store them in an airtight container to keep the cookies and cones crisp. Remember, creativity is key, so feel free to experiment with different colors and candy combinations to make these Wicked Witch Hat Cones truly your own.
Pumpkin Patch Brownie Bites
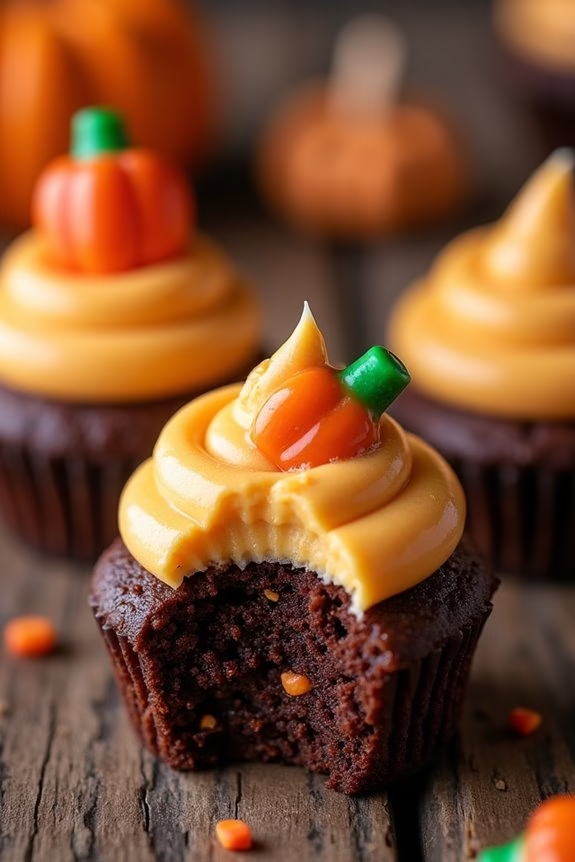
Pumpkin Patch Brownie Bites are the perfect treat to bring a touch of Halloween spirit to your dessert table. These whimsical desserts combine the rich, fudgy texture of brownies with a festive pumpkin patch theme. Each bite-sized brownie is topped with a creamy pumpkin frosting and garnished with candy pumpkins or candy corn, making them not only delicious but also visually appealing.
They’re easy to make and certain to be a hit at any Halloween gathering. The recipe is designed to serve 4-6 people, making it ideal for small parties or family gatherings. The flavors of chocolate and pumpkin complement each other wonderfully, creating a perfect balance of sweetness and spice.
Plus, the small size of each brownie bite means they’re easy to eat and portion, allowing guests to enjoy them without needing a plate or fork. Whether you’re hosting a Halloween party or simply looking to indulge in a festive dessert, Pumpkin Patch Brownie Bites are the perfect choice.
Ingredients:
- 1 cup all-purpose flour
- 1 cup granulated sugar
- 1/2 cup unsalted butter, melted
- 2 large eggs
- 1/3 cup unsweetened cocoa powder
- 1 teaspoon vanilla extract
- 1/4 teaspoon salt
- 1/2 cup canned pumpkin puree
- 1/4 teaspoon pumpkin pie spice
- 1 1/2 cups powdered sugar
- 1/4 cup cream cheese, softened
- Candy pumpkins or candy corn for decoration
Instructions:
1. Preheat the Oven: Start by preheating your oven to 350°F (175°C). This guarantees that your oven is at the right temperature when you’re ready to bake the brownies.
2. Prepare the Brownie Batter: In a medium bowl, combine the melted butter, granulated sugar, and vanilla extract. Mix until smooth. Add the eggs one at a time, stirring well after each addition.
In a separate bowl, whisk together the flour, cocoa powder, and salt. Gradually add the dry ingredients to the wet mixture, stirring until just combined. Be careful not to overmix.
3. Bake the Brownies: Pour the brownie batter into a greased 9×9 inch baking pan. Smooth the top with a spatula. Bake in the preheated oven for 20-25 minutes, or until a toothpick inserted into the center comes out with a few moist crumbs.
Allow the brownies to cool completely in the pan on a wire rack.
4. Make the Pumpkin Frosting: While the brownies are cooling, prepare the pumpkin frosting. In a medium bowl, beat together the cream cheese and pumpkin puree until smooth. Gradually add the powdered sugar and pumpkin pie spice, beating until the frosting is light and fluffy.
5. Assemble the Brownie Bites: Once the brownies are completely cool, cut them into bite-sized squares. Spread a generous amount of pumpkin frosting on each brownie bite. Top with a candy pumpkin or a piece of candy corn for decoration.
6. Serve and Enjoy: Arrange the Pumpkin Patch Brownie Bites on a festive platter and serve. Enjoy the compliments from your delighted guests!
Extra Tips:
To achieve the perfect fudgy brownie texture, avoid overbaking. Check the brownies a couple of minutes before the recommended baking time to prevent them from drying out.
For a more intense pumpkin flavor, you can add a touch more pumpkin pie spice to the frosting. If you prefer a smoother frosting, sift the powdered sugar before adding it to the mixture.
These brownie bites can be made a day in advance and stored in an airtight container in the refrigerator; just allow them to come to room temperature before serving for the best flavor.
Monster Mouth Apple Slices
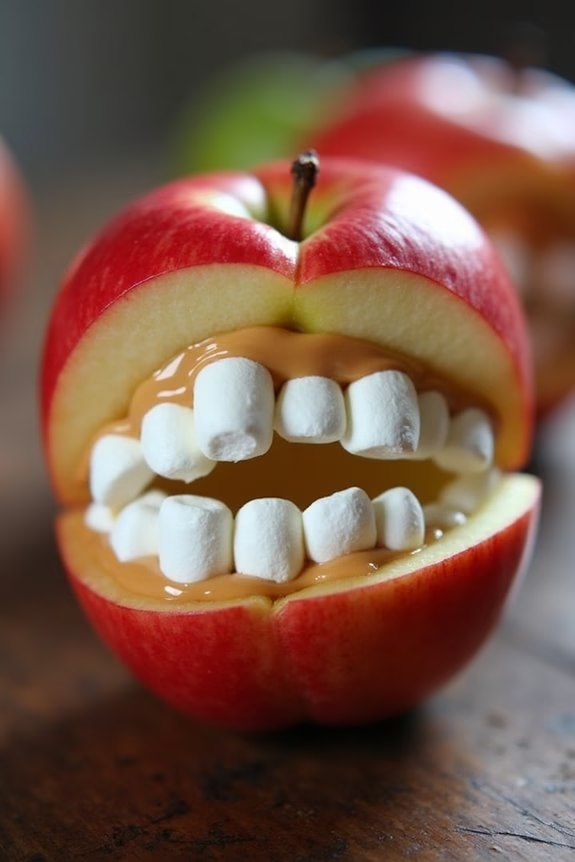
Monster Mouth Apple Slices are a delightful and spooky treat perfect for Halloween celebrations. These fun and healthy snacks aren’t just for kids but are sure to delight adults as well. The combination of crisp apples, creamy peanut butter, and sweet marshmallows creates a delicious balance of flavors and textures.
They’re easy to make and offer a creative way to enjoy the Halloween spirit without relying solely on candy. Ideal for parties or a festive snack at home, Monster Mouth Apple Slices can be made quickly with minimal ingredients.
The process involves slicing apples into mouth-like shapes, filling them with peanut butter, and using marshmallows to create “teeth”. This recipe isn’t only visually appealing but also nutritious, offering a good source of fiber and protein. Whether you’re looking for a healthy treat to bring to a Halloween gathering or a fun project to do with the kids, these monster mouths are a fantastic choice.
Ingredients for 4-6 servings:
- 3 large apples (preferably red or green for a spooky effect)
- 1/2 cup creamy peanut butter
- 1/4 cup mini marshmallows
- 1 tablespoon lemon juice (optional, to prevent apple browning)
- Toothpicks (optional, for assembling)
Instructions:
- Prepare the Apples: Wash the apples thoroughly and dry them with a clean towel. Slice each apple into quarters, and then cut each quarter into half to create mouth-like slices. If desired, lightly brush the apple slices with lemon juice to prevent browning.
- Apply Peanut Butter: Spread a generous amount of creamy peanut butter on one side of each apple slice. The peanut butter will act as the “gums” of the monster mouth and help the marshmallows stick.
- Assemble the Mouth: Place mini marshmallows along the peanut butter on one apple slice, positioning them to resemble teeth. Top with another apple slice, peanut butter side down, to create the mouth. If the apple slices aren’t staying together, consider using a toothpick to hold them in place.
- Finishing Touches: Arrange the completed Monster Mouth Apple Slices on a serving platter. Make sure they’re stable and ready to serve. If desired, you can create additional decorations on the plate with extra marshmallows or fruit for a more festive presentation.
Extra Tips:
When making Monster Mouth Apple Slices, feel free to experiment with different varieties of apples to suit your taste preferences. Green apples add a tart flavor that contrasts nicely with the sweetness of the marshmallows.
If you have peanut allergies, consider using almond butter or sunflower seed butter as alternatives. Additionally, you can get creative with the “teeth” by using sliced almonds or raisins for a different look. The lemon juice is optional, but it helps maintain the fresh appearance of the apples, especially if you’re preparing them in advance for a party.
Bloody Red Velvet Cake
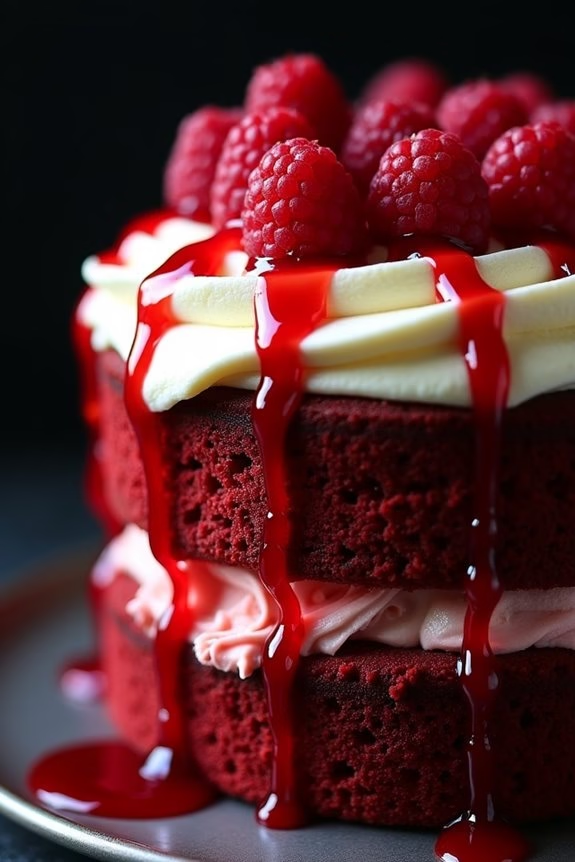
Immerse yourself in the spooky spirit of Halloween with this decadent Bloody Red Velvet Cake. Known for its rich, velvety texture and vibrant red hue, this cake takes on a ghoulish twist perfect for any Halloween gathering. The combination of cocoa and buttermilk creates a moist and tender crumb, while a luscious cream cheese frosting adds a tangy balance to the sweetness. Dripping with a raspberry coulis as the “blood,” this dessert is both visually striking and utterly delicious.
The Bloody Red Velvet Cake is perfect for serving a crowd, making it an ideal choice for parties or a special Halloween-themed dinner. The cake not only looks the part but also tastes irresistibly delightful. The deep red color and creamy frosting are only enhanced by the eerie drizzle of blood-red sauce, creating a dessert that’s both fun and frightful. This recipe yields a cake that serves 4-6 people, guaranteeing everyone gets a slice of the Halloween festivities.
Ingredients (Serving Size: 4-6 people)
For the Cake:
- 1 1/4 cups all-purpose flour
- 1 cup granulated sugar
- 1 tablespoon unsweetened cocoa powder
- 1/2 teaspoon baking soda
- 1/2 teaspoon salt
- 1 large egg
- 3/4 cup vegetable oil
- 1/2 cup buttermilk
- 1 tablespoon red food coloring
- 1/2 teaspoon vanilla extract
- 1/2 teaspoon white vinegar
For the Cream Cheese Frosting:
- 8 oz cream cheese, softened
- 1/2 cup unsalted butter, softened
- 2 cups powdered sugar
- 1 teaspoon vanilla extract
For the “Blood” Raspberry Coulis:
- 1 cup fresh or frozen raspberries
- 2 tablespoons granulated sugar
- 1 tablespoon lemon juice
Cooking Instructions
1. Preheat the Oven:
Preheat your oven to 350°F (175°C). Grease and flour two 9-inch round cake pans, or line them with parchment paper for easy removal.
2. Prepare the Cake Batter:
In a large mixing bowl, whisk together the flour, sugar, cocoa powder, baking soda, and salt. In a separate bowl, beat the egg, then add the vegetable oil, buttermilk, red food coloring, vanilla extract, and vinegar. Mix well until combined.
3. Combine Ingredients:
Gradually add the wet ingredients to the dry ingredients, stirring until just combined, making sure there are no lumps. Be careful not to overmix, as this can lead to a dense cake.
4. Bake the Cake:
Divide the batter evenly between the prepared cake pans. Bake for 25-30 minutes or until a toothpick inserted into the center comes out clean. Allow the cakes to cool in the pans for 10 minutes before transferring them to a wire rack to cool completely.
5. Make the Cream Cheese Frosting:
In a medium bowl, beat the softened cream cheese and butter together until creamy and smooth. Gradually add the powdered sugar and vanilla extract, continuing to beat until the frosting is light and fluffy.
6. Prepare the Raspberry Coulis:
In a small saucepan over medium heat, combine the raspberries, sugar, and lemon juice. Cook until the raspberries break down and the mixture thickens slightly, about 10 minutes. Press through a fine-mesh sieve to remove seeds, then cool completely.
7. Assemble the Cake:
Place one cake layer on a serving plate and spread a thick layer of cream cheese frosting on top. Place the second layer on top and frost the entire cake with the remaining frosting. Drizzle the raspberry coulis over the cake to resemble dripping blood.
Extra Tips
For the most vibrant red color, use gel food coloring instead of liquid, as it provides a more intense hue without altering the batter’s consistency.
When making the raspberry coulis, make sure you strain it well to remove all seeds for a smooth sauce that drips elegantly.
If you find your frosting too soft to work with, refrigerate it for a few minutes to let it firm up slightly.
Finally, for an added touch of Halloween flair, consider decorating the cake with edible Halloween-themed toppers or black sprinkles for an extra spooky effect.
Graveyard Pudding Cups
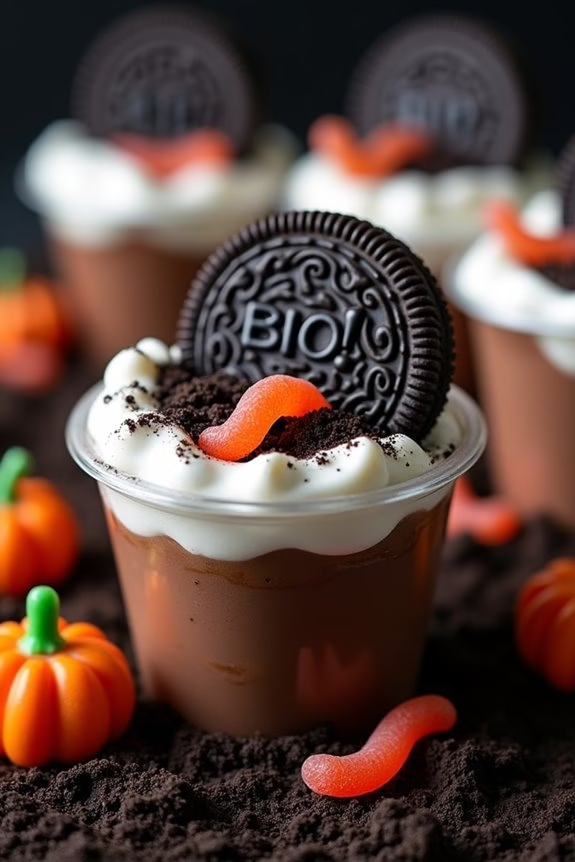
Graveyard Pudding Cups are a spooky and fun dessert perfect for any Halloween celebration. These layered treats aren’t only visually delightful with their eerie graveyard theme, but they also offer a delicious combination of flavors and textures. Imagine creamy chocolate pudding nestled under a dusting of crushed Oreo cookies, mimicking the appearance of fresh soil, with tombstone-shaped cookies standing guard over this ghostly graveyard.
These pudding cups are easy to make, requiring only a few simple ingredients, and they’re bound to be a hit with both kids and adults alike. Creating these Graveyard Pudding Cups is a great way to involve the whole family in some festive fun. Whether you’re hosting a Halloween party or simply want to surprise your loved ones with a themed dessert, these pudding cups are an ideal choice.
They offer the perfect balance of chocolatey goodness and playful decoration, making them not only a treat for the taste buds but also a feast for the eyes. Get ready to delight your guests with these ghoulishly good desserts that are as fun to make as they’re to eat.
Ingredients (serving size: 4-6 people):
- 1 package (3.9 oz) instant chocolate pudding mix
- 2 cups cold milk
- 1 package (14.3 oz) Oreo cookies
- 1 package (7 oz) Pepperidge Farm Milano or any oval-shaped cookies
- 1 tube black decorating gel
- 1 can (8 oz) whipped topping
- Gummy worms and candy pumpkins (optional, for decoration)
Cooking Instructions:
- Prepare the Pudding: In a large mixing bowl, combine the instant chocolate pudding mix with 2 cups of cold milk. Whisk the mixture for about 2 minutes until it thickens. Let it stand for 5 minutes to further set. This will be the base layer of your graveyard.
- Crush the Oreos: Place the Oreo cookies in a large resealable plastic bag and crush them using a rolling pin until they resemble soil. Set aside. This will serve as the “dirt” topping for your pudding cups.
- Assemble the Cups: Divide the prepared pudding evenly among 4-6 clear plastic cups. Leave some space at the top for the “dirt” layer. Sprinkle a generous amount of the crushed Oreos over the pudding in each cup to create the graveyard soil effect.
- Decorate the Tombstones: Use the black decorating gel to write spooky messages like “RIP” or “Boo!” on one end of each Milano cookie. These will serve as the tombstones. Stick one or two decorated cookies into the pudding of each cup, standing upright.
- Add Final Touches: Top the pudding cups with a dollop of whipped topping to resemble ghostly apparitions or mist. For extra decoration, add gummy worms crawling out of the “soil” and candy pumpkins around the tombstones to enhance the graveyard scene.
Extra Tips:
When making Graveyard Pudding Cups, feel free to get creative with your decorations. You can use different types of cookies for tombstones or add edible eyes to the whipped topping ghosts for an extra spooky effect.
If serving these at a party, prepare the pudding and cookie decorations ahead of time, but assemble the cups right before serving to guarantee the cookies remain crunchy. For a dairy-free version, substitute the milk and whipped topping with plant-based alternatives. Enjoy creating this chillingly delightful treat that captures the spirit of Halloween!
Sinister Skull Sugar Cookies
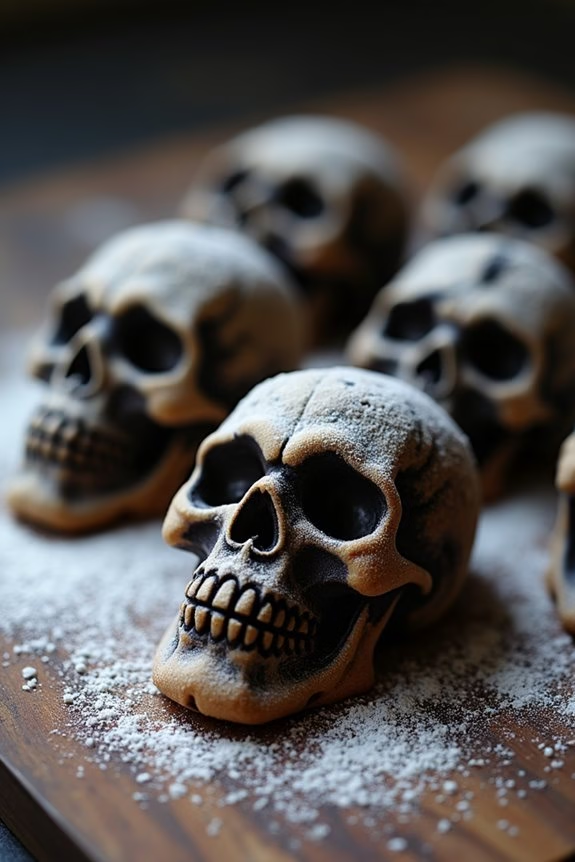
Sinister Skull Sugar Cookies are the perfect treat to bring a spooky and delicious twist to your Halloween festivities. These cookies aren’t only fun to make but also delightfully tasty, with a vanilla-flavored sugar base that’s sure to satisfy both kids and adults alike.
With a few simple ingredients and some creativity, you can transform ordinary sugar cookies into eerie skull-shaped delights, perfect for any Halloween party or as a ghoulishly good snack. The key to these cookies is in the decoration. By carving out sinister expressions and adding a touch of dark icing, you can create cookies that are both festive and frightfully fun.
Whether you’re an experienced baker or a beginner, you’ll find this recipe easy to follow and rewarding. The recipe yields enough cookies for 4-6 people, making it ideal for a small gathering or as a special treat for your family. Let’s plunge into the ingredients and steps needed to make these hauntingly good cookies.
Ingredients (Serves 4-6):
- 2 1/2 cups all-purpose flour
- 1/2 teaspoon baking powder
- 1/4 teaspoon salt
- 3/4 cup unsalted butter, softened
- 1 cup granulated sugar
- 1 large egg
- 1 teaspoon vanilla extract
- Black food coloring gel
- 1 cup powdered sugar
- 2 tablespoons milk
Instructions:
- Prepare the Dry Ingredients: In a medium bowl, whisk together the all-purpose flour, baking powder, and salt. This mixture will form the base of your cookie dough and guarantee even distribution of the rising agents.
- Cream the Butter and Sugar: In a large mixing bowl, use an electric mixer to beat the softened butter and granulated sugar together until light and fluffy. This should take about 2-3 minutes. The creamed mixture should be pale in color and smooth in texture.
- Add Wet Ingredients: Beat in the egg and vanilla extract into the butter and sugar mixture. Mix until well combined, making sure the egg is fully incorporated for a smooth dough.
- Combine Ingredients: Gradually add the dry ingredients to the wet mixture, mixing on low speed until a dough forms. Be careful not to overmix, which can make the cookies tough.
- Shape and Chill the Dough: Divide the dough into two portions and flatten each into a disk. Wrap in plastic wrap and refrigerate for at least 1 hour. Chilling helps the dough hold its shape during baking.
- Preheat and Prepare Baking Sheets: Preheat your oven to 350°F (175°C). Line two baking sheets with parchment paper or silicone baking mats.
- Roll and Cut the Dough: On a lightly floured surface, roll out one disk of dough to about 1/4 inch thick. Use a skull-shaped cookie cutter to cut out shapes, and place them on the prepared baking sheets.
- Bake the Cookies: Bake for 8-10 minutes or until the edges are lightly golden. Allow the cookies to cool on the baking sheet for 5 minutes before transferring them to a wire rack to cool completely.
- Prepare the Icing: In a small bowl, mix the powdered sugar with enough milk to reach a thick but spreadable consistency. Add black food coloring until you achieve the desired shade.
- Decorate the Cookies: Once the cookies are completely cool, use a piping bag or a small ziplock bag with a corner snipped off to pipe sinister eyes, noses, and mouths onto each skull cookie with the black icing.
Extra Tips: When rolling out the dough, make sure it’s evenly thick to prevent uneven baking. If the dough becomes too soft while handling, return it to the fridge to firm up.
For an extra spooky touch, try using edible glitter or colored sugars to accent the eyes or add creepy details. Finally, if you don’t have a skull-shaped cookie cutter, you can use a round cutter and create the skull features by hand with a knife. Enjoy your Sinister Skull Sugar Cookies and have a haunt-tastic Halloween!
Bat Wing Chocolate Bark
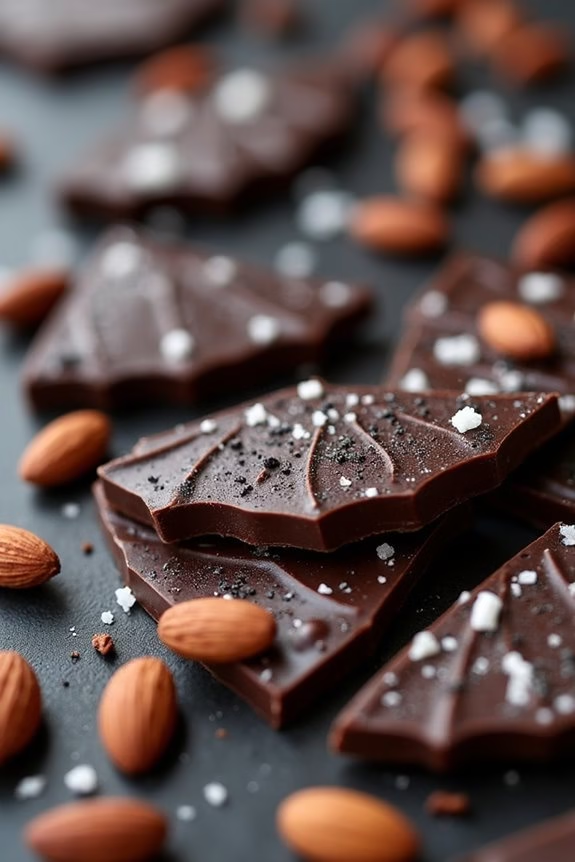
Bat Wing Chocolate Bark is a spooktacular treat perfect for your Halloween festivities. This easy-to-make dessert combines rich, luxurious chocolate with a touch of spooky creativity, making it a fun and delicious addition to any Halloween party. The combination of dark chocolate, eerie decorative elements, and a hint of sea salt creates a perfect balance of flavors that will delight children and adults alike.
Whether you’re dressing up for a big bash or simply want a themed snack while watching horror movies, this Bat Wing Chocolate Bark will definitely be a hit.
Making this treat is a breeze, requiring minimal ingredients and effort. The main component is high-quality dark chocolate, which acts as the canvas for your spooky masterpiece. With a sprinkle of creativity, you can transform this simple dessert into a chilling Halloween offering.
The use of slivered almonds and edible glitter adds a bat-winged effect, giving it a creepy yet appetizing appearance. Whether you’re a novice or an experienced home cook, this recipe promises a frightfully fun cooking experience.
Ingredients for Bat Wing Chocolate Bark (Serving Size: 4-6 People):
- 12 oz dark chocolate chips or chunks
- 1/4 cup slivered almonds
- 1 tablespoon edible black glitter or sprinkles
- 1/2 teaspoon sea salt
- 1/4 cup white chocolate chips (optional for decoration)
Cooking Instructions:
- Prepare the Baking Sheet: Line a baking sheet with parchment paper. This will prevent the chocolate from sticking and make it easier to remove the bark once it has solidified.
- Melt the Chocolate: In a microwave-safe bowl, melt the dark chocolate chips in 30-second intervals, stirring in between each interval until smooth. Alternatively, you can use a double boiler on the stove for a gentle melt.
- Create the Base: Pour the melted dark chocolate onto the prepared baking sheet. Use a spatula to spread it evenly to about 1/4 inch thickness, creating a rectangle or any desired shape.
- Add the Embellishments: While the chocolate is still warm, sprinkle the slivered almonds over the top, arranging them to resemble bat wings. Next, sprinkle the edible black glitter or sprinkles to add a spooky touch.
- Add Sea Salt: Lightly sprinkle sea salt over the top to enhance the flavor and add a touch of sophistication to your chocolate bark.
- Optional Decoration: For extra decoration, melt the white chocolate chips in a similar manner as the dark chocolate. Drizzle or pipe it over the bark in a web-like pattern for a ghostly effect.
- Chill the Bark: Place the baking sheet in the refrigerator for about 30 minutes, or until the chocolate has completely hardened.
- Break and Serve: Once the bark is set, remove it from the refrigerator and break it into irregular pieces. Serve on a decorative platter for a Halloween treat that’s both delicious and visually appealing.
Extra Tips:
For best results, make sure all your ingredients are at room temperature before you begin, as this helps the chocolate melt more evenly. If you prefer a sweeter chocolate bark, you can substitute some of the dark chocolate with milk chocolate.
Feel free to get creative with your toppings—dried cranberries, pumpkin seeds, or candy eyes can add an extra layer of Halloween fun. Store any leftovers in an airtight container in a cool place to retain the chocolate’s texture and flavor. Happy haunting!
Zombie Finger Pretzels
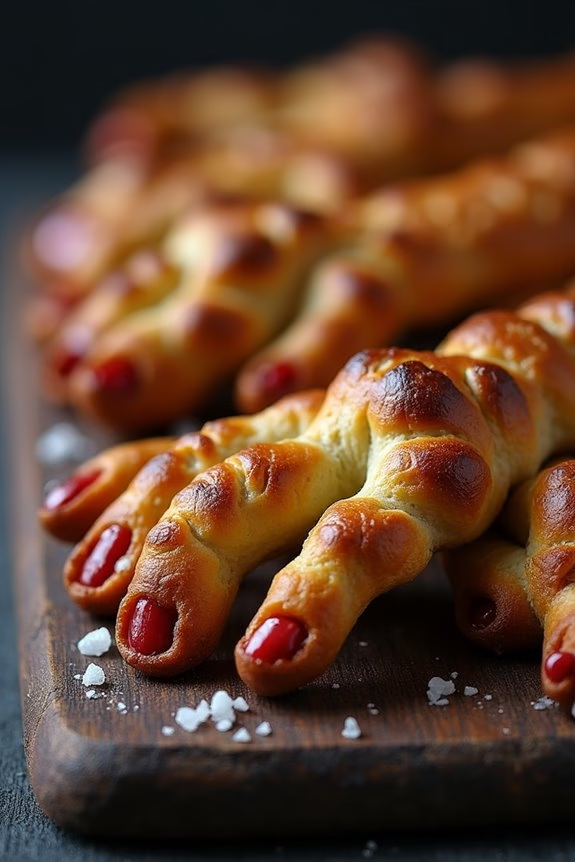
Zombie Finger Pretzels are a fun and spooky treat perfect for Halloween festivities. These eerie delights aren’t only visually striking but also incredibly delicious. Made with soft pretzel dough shaped into gnarled fingers, they’re adorned with almond “fingernails” and brushed with a savory egg wash that gives them a creepy, yet inviting appearance.
Perfect for a Halloween party or a chilling snack for the family, these pretzels will surely be a hit with both kids and adults. The texture of the pretzels is satisfyingly chewy, and the added touch of coarse salt makes them irresistible. The process of shaping each finger and adding the nail details is a delight for those who enjoy getting creative in the kitchen.
Not only do these Zombie Finger Pretzels look the part, but they also offer a delightful blend of flavors that capture the essence of a classic soft pretzel with a spooky twist.
Ingredients (Serves 4-6)
- 1 1/2 cups warm water
- 1 packet active dry yeast (2 1/4 teaspoons)
- 1 tablespoon granulated sugar
- 4 cups all-purpose flour
- 1 teaspoon salt
- 1/4 cup unsalted butter, melted
- 10 cups water
- 2/3 cup baking soda
- 1 egg, beaten
- 24 whole almonds
- Coarse sea salt
Cooking Instructions
1. Prepare the Dough: In a large bowl, combine the warm water and sugar, then sprinkle the yeast on top. Allow it to sit for about 5 minutes until it becomes foamy.
Add the flour, salt, and melted butter to the yeast mixture. Mix until the dough begins to come together, then knead for about 8-10 minutes until smooth and elastic.
2. First Rise: Place the dough in a lightly oiled bowl, cover with a clean kitchen towel, and let it rise in a warm place for about an hour or until it doubles in size.
3. Preheat and Prepare Baking Soda Bath****: Preheat your oven to 450°F (232°C). In a large pot, bring 10 cups of water and the baking soda to a boil.
4. Shape the Fingers: Turn the dough out onto a floured surface and divide it into 24 equal pieces. Roll each piece into a finger shape, about 4-5 inches long, adding creases and knuckles to mimic fingers.
Press an almond into one end of each finger to resemble a nail.
5. Baking Soda Bath: Carefully place each finger into the boiling baking soda water for about 30 seconds. Remove with a slotted spoon and place on a baking sheet lined with parchment paper.
6. Egg Wash and Salt: Brush each finger with the beaten egg to create a shiny finish. Sprinkle with coarse sea salt for added flavor and texture.
7. Bake: Arrange the fingers on the baking sheet so they aren’t touching. Bake in the preheated oven for 12-15 minutes or until golden brown. Allow them to cool slightly before serving.
Extra Tips
For extra authenticity, you can add a touch of red food coloring around the almond nails to mimic blood. Be sure to monitor the baking soda bath closely, as over-boiling can lead to an unpleasant taste.
If you find your dough too sticky while shaping the fingers, lightly flour your hands and the working surface to prevent sticking. Finally, serve these pretzels with a side of mustard or cheese sauce for a delicious complement to their savory flavor.
Haunted House Cake Pops

If you’re looking to add a spooky yet delightful touch to your Halloween dessert spread, Haunted House Cake Pops are the perfect treat. These cake pops aren’t only delicious but also provide an opportunity for creative decoration, making them a fun activity for both kids and adults.
Imagine serving these eerie treats at your Halloween party, complete with tiny ghosts and goblins adorning each pop. Their bite-sized nature makes them an ideal addition to any dessert table, guaranteeing your guests can enjoy a sweet treat while mingling.
Creating these Haunted House Cake Pops involves crafting a rich, moist cake that’s crumbled and mixed with a creamy frosting, then shaped into bite-sized balls. These balls are then attached to lollipop sticks, dipped in melted chocolate, and decorated with spooky designs. The end result is a delightful combination of flavor and fun, sure to impress and thrill your guests.
This recipe yields about 24 to 30 cake pops, perfect for serving 4-6 people.
Ingredients:
- 1 box of chocolate cake mix (plus ingredients listed on the box)
- 1 cup of chocolate frosting
- 1 package of lollipop sticks
- 2 cups of dark chocolate melts
- 1 cup of white chocolate melts
- Edible gel pens in black, orange, and green
- Assorted Halloween sprinkles and candies for decoration
Instructions:
1. Prepare the Cake:
Preheat your oven to the temperature specified on the cake mix box. Follow the instructions to bake the chocolate cake. Once baked, let it cool completely.
2. Crumble the Cake:
Once the cake has cooled, crumble it into a large mixing bowl using your hands or a fork until you achieve a fine crumb texture.
3. Mix with Frosting:
Add the chocolate frosting to the crumbled cake. Mix thoroughly using a spatula or your hands until the mixture is well combined and can hold its shape.
4. Shape the Cake Balls:
Roll the mixture into small balls, about 1 inch in diameter. Place the balls on a baking sheet lined with parchment paper. Once all the cake balls are formed, refrigerate them for at least 30 minutes.
5. Prepare the Chocolate Coating:
Melt the dark chocolate melts in a microwave-safe bowl, heating in 30-second intervals and stirring in between until smooth.
6. Insert Sticks:
Dip the tip of each lollipop stick into the melted chocolate and then insert it halfway into a cake ball. Place them back on the baking sheet.
7. Coat the Cake Pops:
Once the sticks are secure, dip each cake pop into the melted dark chocolate, making sure it’s fully coated. Allow any excess chocolate to drip off before placing it back on the parchment paper.
8. Decorate:
Melt the white chocolate melts and use them to create ghostly drizzles over the cake pops. Use the edible gel pens and sprinkles to add spooky faces, eyes, and other designs to each pop. Get creative with your decorations to suit the haunted theme.
9. Set the Cake Pops:
Allow the cake pops to set at room temperature or refrigerate them briefly until the chocolate hardens.
Extra Tips:
For a smoother cake pop finish, make certain your cake balls are thoroughly chilled before dipping in chocolate. If your chocolate coating is too thick, add a small amount of vegetable oil to thin it out, making it easier to coat the cake pops evenly.
To avoid cracks in the chocolate coating, let the cake pops come to room temperature before serving. Feel free to experiment with different designs and colors to customize your Haunted House Cake Pops to your liking.