

As Halloween approaches, I’m so excited to share some spooktacular food ideas that will make your kids’ party one to remember. Think spooky spider pizzas and mummy hot dogs that will steal the show. Little ones will be thrilled with creepy crawly cupcakes and pumpkin patch dirt cups. These treats are not only visually enchanting but also packed with fun and flavor. Ready to discover more deliciously festive creations?
Spooky Spider Pizzas
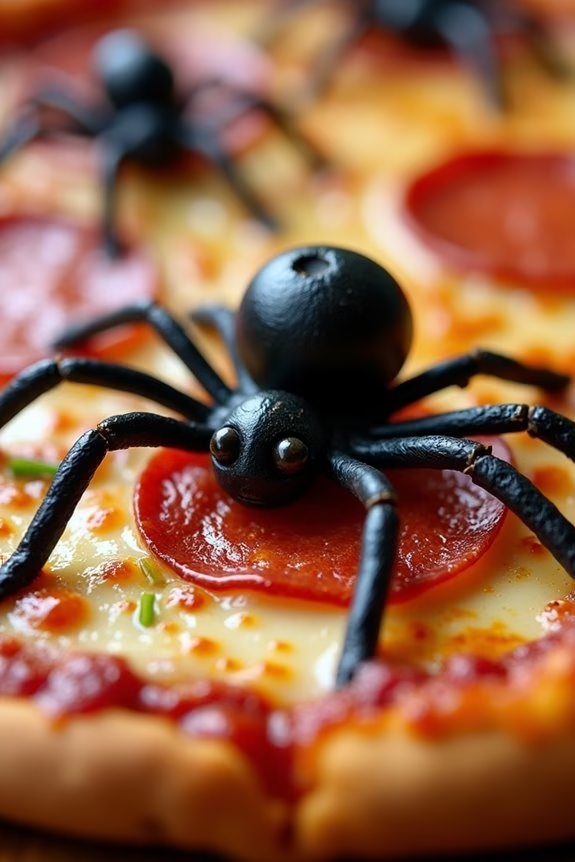
Looking for a fun and delicious way to celebrate Halloween with the little ones? Spooky Spider Pizzas are the perfect treat to delight and entertain kids at any Halloween party.
These mini pizzas aren’t only adorable but also easy to make, allowing kids to get involved in the preparation process. With a few simple ingredients, you can transform ordinary pizza bases into creepy, crawly delights that will surely be the hit of the party.
The beauty of Spooky Spider Pizzas lies in their versatility. You can customize them with your favorite toppings and sauces, making them suitable for even the pickiest of eaters.
Whether you’re hosting a party or simply looking for a fun family activity, these pizzas are guaranteed to bring smiles and satisfy hungry tummies. Let’s plunge into the recipe and create a spook-tacular feast that will be remembered long after Halloween is over.
Ingredients (serves 4-6 people):
- 4-6 mini pizza bases or English muffins
- 1 cup pizza sauce
- 2 cups shredded mozzarella cheese
- 24 black olives
- 1 green bell pepper
- 1 red bell pepper
- 24 pepperoni slices (optional)
Cooking Instructions:
- Preheat the Oven: Begin by preheating your oven to 375°F (190°C). This guarantees that the pizzas cook evenly and achieve a crispy base.
- Prepare the Pizza Bases: Lay out the mini pizza bases or split English muffins on a baking sheet lined with parchment paper. This will prevent sticking and make cleanup a breeze.
- Spread the Sauce: Use a spoon to evenly spread a thin layer of pizza sauce over each base. Be sure to leave a small border around the edges for a crust.
- Add Cheese: Generously sprinkle shredded mozzarella cheese on top of the sauce. The cheese will act as the backdrop to your spider creations.
- Create the Spiders: Slice the black olives in half lengthwise. Use one half as the spider’s body and slice the other half into thin strips to form the legs. Arrange the olives on the pizzas to resemble spiders.
- Add Pepperoni (Optional): If desired, place pepperoni slices on the pizzas as additional decoration or as spider bases.
- Decorate with Peppers: Use a knife to cut the green and red bell peppers into small shapes, like triangles or circles, to add extra color and detail to your pizzas.
- Bake the Pizzas: Place the baking sheet in the preheated oven and bake for about 10-12 minutes, or until the cheese is melted and bubbly and the edges are golden brown.
- Serve and Enjoy: Remove the pizzas from the oven and let them cool slightly before serving. Enjoy your spooky creations!
Extra Tips:
For a healthier twist, consider using whole wheat pizza bases or muffins. You can also experiment with different toppings to suit your guests’ preferences, such as using spinach or mushrooms for added nutrition.
If you’re short on time, pre-made pizza bases can be a great time-saver. Finally, let the kids participate in decorating their own pizzas—it’s a fun way to encourage creativity and get them excited about eating what they’ve made!
Monster Mouth Apples
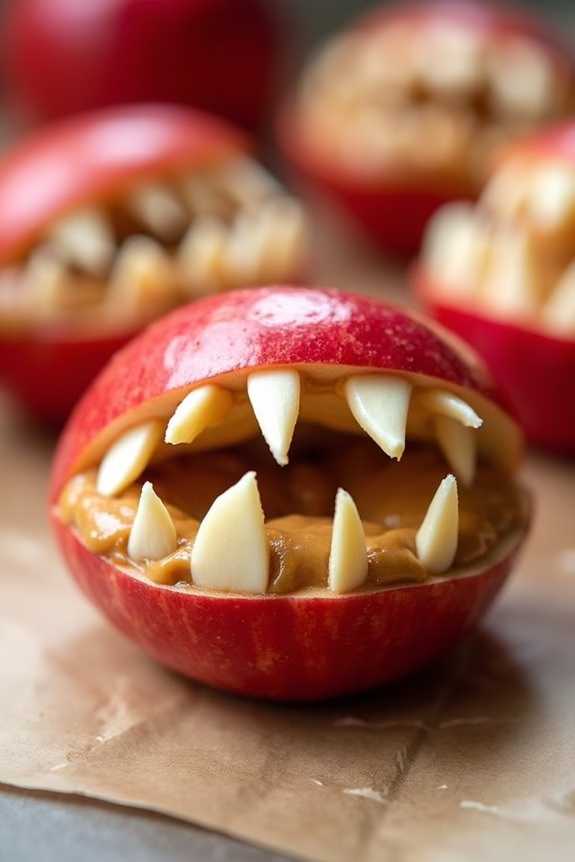
Monster Mouth Apples are a fantastic, healthy, and spooky treat perfect for your kids’ Halloween party. These fun and creepy apple snacks aren’t only simple to make but also provide a nutritious alternative to the usual sugary sweets. With their bright red “lips” and sharp almond “teeth,” Monster Mouth Apples will be a hit with the little ones and add a creative twist to your Halloween spread.
These apple snacks are visually appealing and require minimal ingredients, making them an easy choice for a party. They can be prepared in advance, which is a bonus for busy parents planning a Halloween celebration. The combination of apples, peanut butter, and almonds creates a delicious blend of flavors and textures, guaranteeing that these monster mouths are both tasty and fun to eat.
Ingredients (serving size: 4-6 people):
- 3 large red apples (such as Red Delicious or Fuji)
- 1/2 cup of peanut butter
- 1/4 cup of slivered almonds
- 1 tablespoon of lemon juice (optional)
Cooking Instructions:
- Prepare the Apples: Start by washing the apples thoroughly under running water. Once clean, slice each apple into quarters and remove the core. To prevent browning, you can brush the apple slices with lemon juice if desired.
- Slice the Apples: Cut each apple quarter into two thinner slices. You’ll end up with about 6 slices per apple quarter. These slices will form the “lips” of your monster mouths.
- Assemble the Monster Mouths: Spread a generous amount of peanut butter on one side of each apple slice. The peanut butter will act as the adhesive to hold the almond “teeth.”
- Add the Teeth: Press several slivered almonds into the peanut butter on one apple slice for each pair, with the pointy ends sticking out to resemble teeth. Position the almonds randomly or in a jagged line for a more monstrous appearance.
- Complete the Mouths: Take another apple slice and gently press it on top of the almond-studded slice so that the peanut butter sides are touching. This will complete the monster mouth look.
- Serve: Arrange the Monster Mouth Apples on a platter and serve immediately, or store them in an airtight container in the fridge for up to a few hours before the party.
Extra Tips:
When making Monster Mouth Apples, it’s important to choose apples that are firm and crispy to guarantee that the slices hold their shape. If peanut butter isn’t an option due to allergies, consider using almond butter or sunflower seed butter as a substitute.
For added creativity, you can insert small candy eyes above the “mouth” to make them even more monstrous or use mini marshmallows for teeth if you want a sweeter version. Remember to keep the apple slices thin for easier biting by little mouths, and enjoy these spooky treats with your kids!
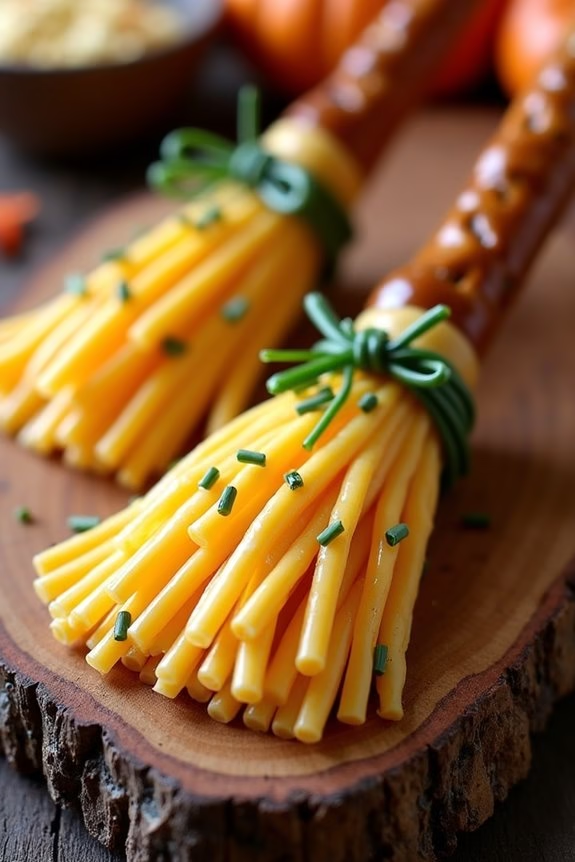
Witch’s Broomstick Pretzels
Get ready to delight your little ghouls and goblins with a fun and easy Halloween treat: Witch’s Broomstick Pretzels. This whimsical snack isn’t only a hit among the kids, but it also adds a festive touch to your Halloween party table.
With just a few ingredients and minimal preparation time, these broomsticks are perfect for busy parents seeking to create a magical atmosphere without a lot of hassle.
Witch’s Broomstick Pretzels combine the salty crunch of pretzel sticks with the savory flavor of cheese to create a snack that’s both satisfying and fun to eat. The cheese forms the bristles of the broom, while the pretzel serves as the handle.
They’re a great finger food option, providing a delightful mix of textures and flavors that children and adults alike will enjoy. Plus, they make for a fantastic DIY activity for the kids to help with during the party preparations.
Ingredients (Serves 4-6):
- 24 pretzel sticks
- 12 string cheese sticks
- Chives or thin strips of leek for tying
- Optional: mustard or softened cream cheese for dipping
Cooking Instructions:
- Prepare the Cheese: Take each string cheese and cut it into two equal pieces. This will form the broom bristles. Gently peel each half into thin strips, leaving about 1 inch at the top unpeeled so that it holds together.
- Attach the Pretzel Sticks: Insert a pretzel stick into the unpeeled end of each cheese piece. Push gently to verify it stays in place but be careful not to break the pretzel.
- Secure with Chives: Take a chive or a thin strip of leek and tie it around the top of the cheese, just below where it meets the pretzel. This will help keep the cheese strips in place and add an authentic look to your broomstick. Trim any excess chive or leek for a neat appearance.
- Serve and Enjoy: Arrange the Witch’s Broomstick Pretzels on a platter. You can add a small bowl of mustard or softened cream cheese on the side for dipping. Serve immediately or refrigerate and cover until ready to serve.
Extra Tips:
For a more colorful presentation, consider using different types of cheese, such as cheddar or Colby Jack, which will add a pop of color to your broomsticks.
Be sure to use fresh chives or leek strips as they’re more pliable and will hold the cheese better. If serving to very young children, consider cutting the pretzel sticks in half to make them easier to handle and eat.
Enjoy your spooky, tasty treat!
Mummy Hot Dogs
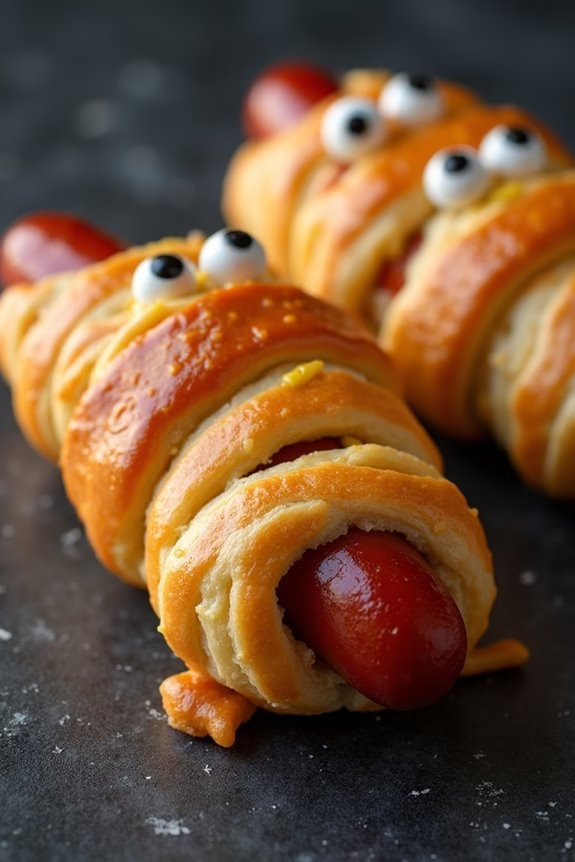
Mummy Hot Dogs are a fun and spooky treat that’s perfect for a Halloween kids party. These delightful snacks aren’t only easy to make but also add a creative twist to the usual hot dogs, making them a hit among children. The transformation of regular hot dogs into mummies wrapped in golden-brown crescent dough can add an element of surprise and excitement to your party spread.
Whether served with ketchup “blood” or mustard “bandages,” these Mummy Hot Dogs are sure to be a favorite among your young guests. This recipe is designed to serve 4-6 people, making it ideal for a small gathering. The preparation is straightforward, allowing you to involve your kids in the process as a fun activity.
This not only makes for a great bonding experience but also encourages creativity in the kitchen. Kids will love wrapping the dough around the hot dogs and seeing them come to life in the oven. With just a few ingredients and simple steps, you can whip up these adorable mummies in no time.
Ingredients:
- 8 hot dogs
- 1 can of refrigerated crescent roll dough
- 2 tablespoons of mustard
- 2 tablespoons of ketchup
- 16 candy eyes (optional)
Instructions:
- Preheat the Oven: Begin by preheating your oven to 375°F (190°C) to guarantee it reaches the correct temperature by the time you’re ready to bake.
- Prepare the Dough: Unroll the crescent roll dough on a clean surface. Separate it into 8 rectangles by pinching together two triangles of dough along their perforation line to form a single rectangle.
- Cut the Dough: Using a pizza cutter or a knife, slice each rectangle into thin strips, about 1/4 inch wide. These strips will be used to wrap around the hot dogs to create the mummy effect.
- Wrap the Hot Dogs: Take a hot dog and wrap strips of dough around it, leaving small gaps to mimic the look of mummy bandages. Leave a small space at one end for the face where the eyes will be placed. Repeat this process for all 8 hot dogs.
- Bake the Mummies: Place the wrapped hot dogs on a baking sheet lined with parchment paper. Bake in the preheated oven for 12-15 minutes, or until the dough is golden brown and cooked through.
- Add the Eyes and Serve: Remove the mummies from the oven and allow them to cool slightly. Add candy eyes to each mummy using a dab of mustard or ketchup to help them stick. Serve with additional mustard and ketchup for dipping.
Extra Tips:
When wrapping the dough around the hot dogs, don’t worry about making it perfect; the unevenness adds to the mummy’s spooky charm. If you don’t have candy eyes, you can simply dot two small mustard or ketchup eyes on the face area.
For a healthier version, consider using turkey or chicken hot dogs and whole wheat dough. These Mummy Hot Dogs are best served warm, so try to bake them just before serving time for the best taste and texture.
Creepy Crawly Cupcakes

Creepy Crawly Cupcakes are the perfect addition to any Halloween kids’ party, combining the deliciousness of cupcakes with a fun and spooky twist. These cupcakes are sure to be a hit with children, featuring edible creepy crawlers that bring an exciting and slightly eerie element to the table. The cupcakes themselves are rich and moist, topped with a smooth frosting that acts as the perfect backdrop for the gummy worms and candy spiders that adorn them.
Making Creepy Crawly Cupcakes is a wonderful opportunity to get creative and have fun. The recipe is simple enough for children to help with the decoration process, allowing them to express their creativity by placing the gummy worms and spiders in imaginative ways. This not only makes for a delicious treat but also an engaging activity for kids at the party, making the whole process of creating these cupcakes as enjoyable as eating them.
Ingredients (Serves 4-6)
- 1 cup all-purpose flour
- 1 cup granulated sugar
- 1/2 cup unsweetened cocoa powder
- 1 teaspoon baking powder
- 1/2 teaspoon baking soda
- 1/4 teaspoon salt
- 1/2 cup milk
- 1/4 cup vegetable oil
- 1 teaspoon vanilla extract
- 1 large egg
- 1/2 cup boiling water
- 1 cup butter, softened (for frosting)
- 3 cups powdered sugar (for frosting)
- 2 teaspoons vanilla extract (for frosting)
- 2 tablespoons milk (for frosting)
- Black food coloring
- Gummy worms
- Candy spiders
Cooking Instructions
- Prepare the Oven and Cupcake Liners: Preheat your oven to 350°F (175°C). Line a cupcake pan with paper liners.
- Mix Dry Ingredients: In a large bowl, combine the flour, sugar, cocoa powder, baking powder, baking soda, and salt. Mix well to guarantee all ingredients are evenly incorporated.
- Combine Wet Ingredients: In another bowl, whisk together the milk, vegetable oil, vanilla extract, and egg until smooth.
- Create the Batter: Gradually add the wet mixture to the dry ingredients, stirring until well combined. Carefully stir in the boiling water until the batter is smooth.
- Fill the Cupcake Liners: Pour the batter into the prepared cupcake liners, filling each about two-thirds full.
- Bake the Cupcakes: Place the cupcake pan in the preheated oven and bake for 18-20 minutes, or until a toothpick inserted into the center of a cupcake comes out clean.
- Prepare the Frosting: While the cupcakes are baking, beat the softened butter in a large bowl until creamy. Gradually add the powdered sugar, vanilla extract, and milk, beating until the frosting is smooth and fluffy. Add black food coloring, mixing until the desired color is achieved.
- Cool and Decorate: Once the cupcakes are baked, remove them from the oven and let them cool completely on a wire rack. Frost the cooled cupcakes with the prepared black frosting.
- Add Creepy Decorations: Decorate each cupcake with gummy worms and candy spiders, placing them in fun and spooky arrangements that resemble creepy crawlers on the cupcakes.
Extra Tips
For an extra creepy effect, consider using a piping bag with a grass tip to create a textured look on the frosting, resembling grass or a nest for the creepy crawlers.
Make sure the cupcakes are completely cooled before frosting to prevent the frosting from melting. When adding food coloring to the frosting, start with a small amount and gradually add more until the desired shade of black is achieved. This will help prevent the frosting from becoming too dark or overly saturated with color.
Ghostly Fruit Skewers
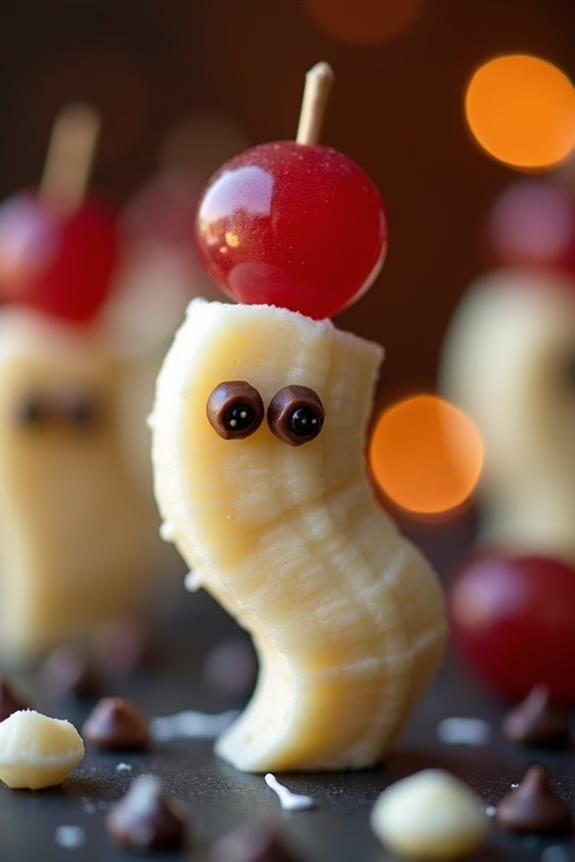
Hosting a Halloween party for kids is an exciting opportunity to get creative with food and make nutritious choices that are still fun and festive. Ghostly Fruit Skewers are the perfect addition to your Halloween spread, offering a spooky twist on a healthy snack. These skewers aren’t only visually appealing with their ghostly design but also packed with vitamins and minerals, making them a guilt-free treat that parents will appreciate.
The concept is simple: using readily available fruits and a few decorative touches, you can transform ordinary fruit skewers into a delightful Halloween treat. The key is to choose fruits that kids love, like bananas and grapes, and then add spooky features to give them a Halloween makeover. This recipe is easy to prepare, requires minimal cooking skills, and is sure to be a hit with little ones who might otherwise be overwhelmed by sugary treats.
Ingredients (Serves 4-6):
- 4 ripe bananas
- 24 seedless grapes (green or red)
- 12 wooden skewers
- 1/4 cup mini chocolate chips
- 1/4 cup white chocolate chips (optional, for melting)
- 1 lemon
Instructions:
- Prepare the Bananas: Begin by peeling the bananas and slicing each one into three equal parts. This will create the body of the ghost. To prevent the bananas from browning, squeeze the juice of one lemon over them and gently toss to coat evenly.
- Create the Ghost Eyes: For the ghost’s eyes, take mini chocolate chips and gently press two chips into each banana slice on one side. Position them as eyes to give your ghostly fruit some character.
- Assemble the Skewers: Take a wooden skewer and thread it through the banana slice with the eyes facing outward. Add two grapes on top of each banana slice to form the head and hat of the ghost. Repeat this process until all skewers are assembled.
- Optional Decoration: If you’d like to add a little extra flair, melt white chocolate chips in a microwave-safe bowl in 30-second intervals, stirring in between, until smooth. Drizzle the melted chocolate over the assembled skewers for a ghostly drizzle effect.
- Serve: Arrange the finished skewers on a platter. For added fun, consider serving them on a themed Halloween plate or around a small pumpkin to enhance the festive atmosphere.
Extra Tips:
To make the skewers even more festive, consider using different types of fruit to add color and variety, such as strawberries or blueberries. If you’re concerned about allergies or dietary restrictions, you can substitute chocolate chips with a small piece of raisin or a dab of black icing for the eyes.
Additionally, verify the skewers aren’t too sharp on the ends to keep them child-friendly. These skewers are best made fresh on the day of the party to guarantee the fruit remains fresh and vibrant.
Bloody Eyeball Punch
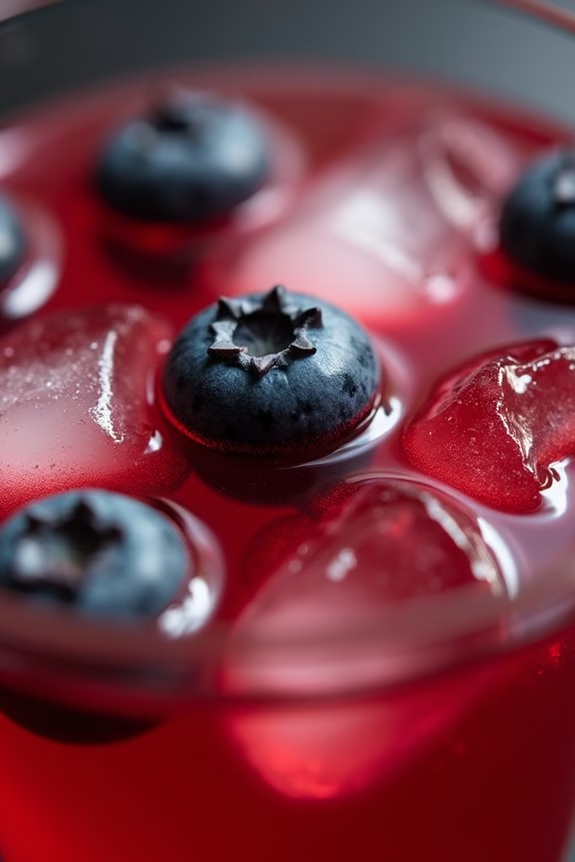
Creating this punch is straightforward and can be done ahead of time, saving you from last-minute party stress. The secret to the “bloody” appearance lies in the combination of cranberry juice and the floating eyeballs made from lychees and blueberries.
The result is an eerie red drink that will delight the kids and add a festive flair to your Halloween decorations. It’s not just a beverage; it’s an experience that will have everyone talking!
Ingredients (Serving Size: 4-6 people)
- 1 can of lychees, drained
- 24 fresh blueberries
- 4 cups cranberry juice
- 3 cups lemon-lime soda
- 1 cup orange juice
- 1/2 cup grenadine syrup
- Ice cubes
Cooking Instructions
- Prepare the Eyeballs: Begin by taking the drained lychees and gently inserting a blueberry into the center of each lychee. This will form the “eyeball” effect. Set these aside in a bowl.
- Mix the Punch Base: In a large punch bowl, combine the cranberry juice, lemon-lime soda, and orange juice. Stir gently to mix the flavors without losing the soda’s fizziness.
- Add the ‘Bloody’ Effect: Slowly pour the grenadine syrup into the punch mixture. It will sink to the bottom and gradually mix as it’s stirred, creating a layered, bloody effect in the punch.
- Chill the Punch: Add ice cubes to the punch to keep it cold. For an extra spooky touch, you can freeze some of the lychee eyeballs in ice cubes and add them to the punch.
- Finalize and Serve: Just before serving, carefully add the lychee and blueberry eyeballs to the punch. They’ll float on top, providing the creepy, floating eyeball effect.
Extra Tips
For an added chilling effect, consider freezing some of the punch mixture into a large ice mold and using it as a centerpiece in the punch bowl. This will keep the punch cold without diluting it too quickly.
If you want to make the punch a bit sweeter, you can add more grenadine syrup. Make sure any leftover punch is stored in the refrigerator, as it will stay fresh for up to 3 days.
Finally, if you’re serving adults or older kids, consider adding a few drops of red food coloring to intensify the bloody appearance.
Frankenstein Rice Krispie Treats
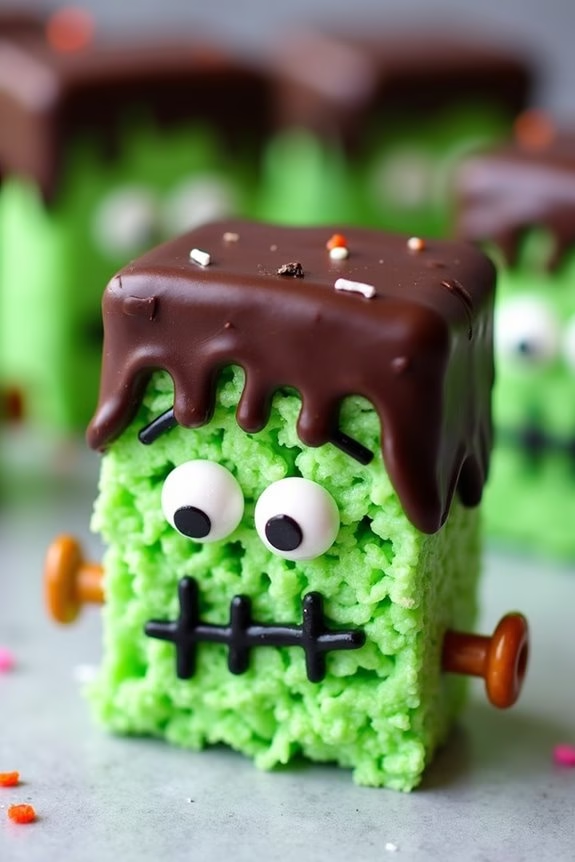
Frankenstein Rice Krispie Treats are a spooky and fun way to delight kids at a Halloween party. These treats are a creative twist on the classic Rice Krispie Treats, transforming them into adorable little Frankenstein monsters that are sure to be a hit with the little ones. With a vibrant green hue and quirky candy decorations, these treats aren’t only delicious but also a festive addition to any Halloween spread.
The process of making Frankenstein Rice Krispie Treats is simple and enjoyable, making it a perfect activity to involve kids in the kitchen. They’ll love helping with the decorating process, using candy eyes and chocolate to bring their Frankenstein creations to life. These treats are also a fantastic choice for a party because they can be made ahead of time and are easy to serve.
Here’s how you can make a batch to serve 4-6 people:
Ingredients:
- 6 cups of Rice Krispies cereal
- 3 tablespoons of unsalted butter
- 1 package (10 oz) of mini marshmallows
- Green food coloring
- 1 cup of melting chocolate or chocolate chips
- Candy eyes
- Black licorice or chocolate sprinkles for hair
- Pretzel sticks for neck bolts
Instructions:
- Melt the Butter and Marshmallows: In a large saucepan, melt the butter over low heat. Once melted, add the mini marshmallows, stirring constantly until fully melted and the mixture is smooth and creamy.
- Add Color: Remove the saucepan from heat and add a few drops of green food coloring to the melted marshmallow mixture. Stir well until the color is evenly distributed. Adjust the amount of food coloring until you achieve the desired shade of green for your Frankenstein treats.
- Combine with Cereal: Gently fold in the Rice Krispies cereal, mixing thoroughly to guarantee all the cereal pieces are well coated with the green marshmallow mixture.
- Shape and Cool: Pour the mixture into a greased 9×13-inch pan. Use a greased spatula or wax paper to press the mixture evenly into the pan. Allow it to cool at room temperature until set, about 30 minutes.
- Cut and Prepare for Decoration: Once set, cut the Rice Krispie treats into rectangles, roughly the size of a small candy bar, to form the body of Frankenstein.
- Melt Chocolate: Melt the chocolate in a microwave-safe bowl in 30-second intervals, stirring between each until smooth.
- Decorate: Dip the top part of each rectangle into the melted chocolate to create Frankenstein’s hair. Use the candy eyes to give him a face, and add a small amount of melted chocolate for a mouth. Insert pretzel sticks into the sides of each rectangle for neck bolts.
- Add Final Touches: If desired, use black licorice or chocolate sprinkles to create additional hair details.
Extra Tips:
When making Frankenstein Rice Krispie Treats, it’s important to work quickly when incorporating the food coloring and cereal, as the marshmallow mixture can set rapidly.
For a cleaner and less sticky process, grease your hands or the utensils used for shaping and pressing the treats. Feel free to get creative with decorations; you can use various candies to give each Frankenstein its own unique personality.
If the treats start to harden before you finish decorating, a quick 10-second microwave session can make them pliable again. Happy Halloween crafting!
Jack-o’-Lantern Quesadillas

Creating a festive Halloween treat that kids will love is easy with these Jack-o’-Lantern Quesadillas. Not only do they bring a smile to any child’s face with their spooky fun appearance, but they’re also delicious and simple to make. The quesadillas are crafted to resemble a jack-o’-lantern, complete with cut-out eyes and a mouth, making them the perfect centerpiece for a Halloween party. Filled with a cheesy, gooey interior and the option to add in your favorite fillings, these quesadillas are sure to be a hit.
This dish combines the classic flavors of a traditional Mexican quesadilla with a playful Halloween twist. The preparation is straightforward and quick, making it an ideal activity for involving children in the kitchen. Whether you choose to keep them simple with just cheese or add in some protein and vegetables, these Jack-o’-Lantern Quesadillas are a versatile dish that can be tailored to suit your child’s taste buds. Below is the recipe to make enough for a serving size of 4-6 people.
Ingredients:
- 8 large flour tortillas
- 2 cups shredded cheddar cheese
- 1 cup cooked and shredded chicken (optional)
- 1 cup black beans, drained and rinsed (optional)
- 1 cup diced bell peppers (preferably orange or green)
- Olive oil for brushing
- Salsa, sour cream, or guacamole for dipping
Instructions:
- Prepare the Tortillas: Lay out the flour tortillas on a flat surface. Use a sharp knife or a small cookie cutter to create jack-o’-lantern faces on half of the tortillas. Cut out eyes, a nose, and a mouth for each one. These will be the tops of your quesadillas.
- Assemble the Quesadillas: On the remaining uncut tortillas, sprinkle a generous amount of shredded cheddar cheese. If using, add an even layer of cooked chicken, black beans, and diced bell peppers on top of the cheese.
- Top with Faces: Place the tortillas with the jack-o’-lantern faces over the filled tortillas, aligning them so that the edges match up.
- Cook the Quesadillas: Heat a large skillet or griddle over medium heat. Brush the top of each quesadilla lightly with olive oil to help them crisp up. Place the quesadillas in the skillet, cooking each side for about 3-4 minutes, or until the cheese has melted and the tortillas are golden brown.
- Serve: Remove the quesadillas from the skillet and let them cool slightly before slicing. Serve the Jack-o’-Lantern Quesadillas with salsa, sour cream, or guacamole for dipping.
Extra Tips: To make the cutting of the jack-o’-lantern faces easier, consider using a small, sharp paring knife or a pumpkin carving tool. You can also prepare the fillings ahead of time and store them in the refrigerator until you’re ready to assemble the quesadillas. If you’re preparing these for a party, keep them warm in a low oven until ready to serve. Experiment with different fillings like mushrooms or spinach for a unique twist.
Vampire Donuts
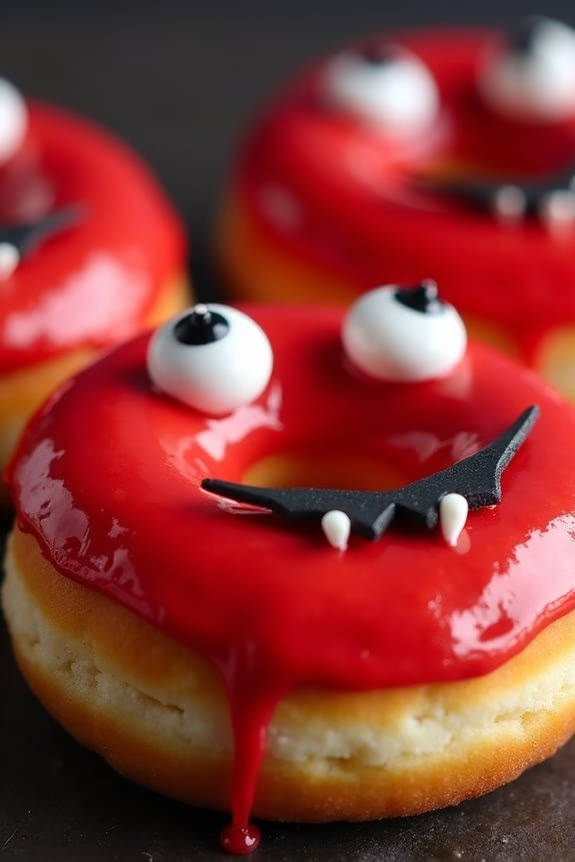
Halloween is the perfect time to get creative with spooky and fun treats that will delight kids. Vampire Donuts are a delicious and entertaining addition to any kid’s party, combining the classic taste of donuts with a playful vampire twist. These donuts are designed to look like little vampire faces, complete with fangs and red “blood” icing, making them both tasty and visually appealing.
Not only are they easy to make, but they also serve as a great activity for kids to get involved in decorating. The base of Vampire Donuts can be store-bought donuts or homemade ones, giving you flexibility in preparation. The decoration process is where the magic happens, transforming ordinary donuts into charming vampire faces. This recipe is both simple and fun, ensuring that your Halloween party is a hit with young guests.
With a serving size that caters to 4-6 people, these Vampire Donuts are perfect for small gatherings or family celebrations.
Ingredients (Serves 4-6):
- 6 plain donuts (store-bought or homemade)
- 1 cup powdered sugar
- 2 tablespoons milk
- Red food coloring
- 12 plastic vampire fangs
- 24 candy eyes
- 1 tube black decorating gel
- 1 tube red decorating gel
Cooking Instructions:
- Prepare the Icing: Begin by making the icing. In a small bowl, combine the powdered sugar and milk, stirring until smooth. Add a few drops of red food coloring to achieve a bright blood-red color. Mix well until the color is evenly distributed.
- Decorate the Donuts: Take each plain donut and dip the top half into the red icing, allowing any excess to drip off. Place the donuts on a wire rack to set.
- Add the Vampire Fangs: Once the icing is slightly set but still sticky, carefully insert the plastic vampire fangs into the center of each donut, creating an open mouth appearance.
- Attach the Candy Eyes: Use a small drop of black decorating gel to attach two candy eyes above each set of fangs on the donut, giving them a playful and spooky expression.
- Finalize the Details: Use the red decorating gel to add extra “blood” details around the mouth area, enhancing the vampire effect. Allow the donuts to sit until the icing and gels are fully set.
Extra Tips:
For a more homemade touch, you can opt to bake your own donuts using a simple vanilla or chocolate donut recipe. This allows you to adjust the sweetness and flavor to your preference.
Additionally, if you can’t find plastic vampire fangs, you can use marshmallows cut into small triangles to create fangs. Make sure to supervise young children during the decorating process, especially when handling small candy pieces or plastic fangs.
Enjoy your Vampire Donuts as a spooky treat that’s sure to bring smiles and maybe a playful scare to your Halloween festivities!
Skeleton Veggie Platter
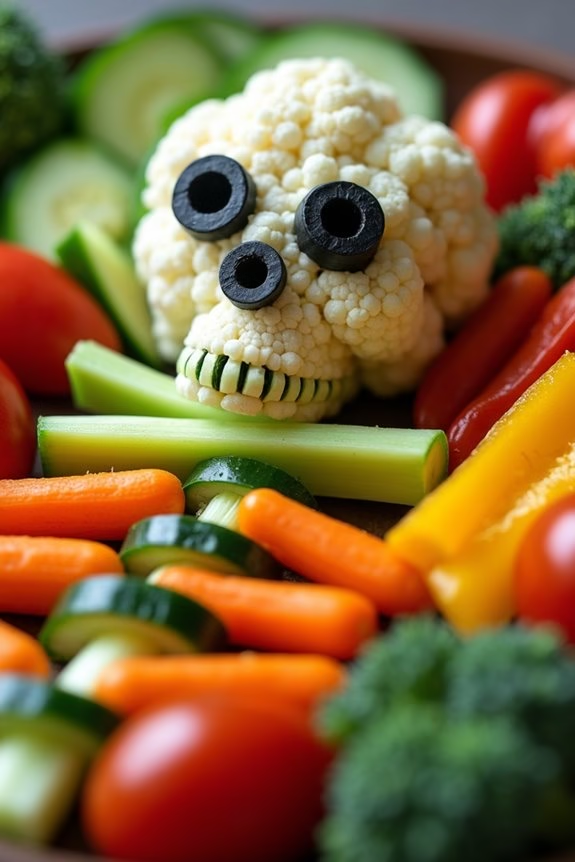
Hosting a Halloween party for kids can be a fun and exciting experience, especially when you incorporate creative and healthy food options. A Skeleton Veggie Platter is a perfect way to add a spooky touch to your party while guaranteeing the little ones enjoy some nutritious snacks. This platter uses a variety of fresh vegetables arranged in the shape of a skeleton, creating a visually appealing and playful snack that both kids and adults will love.
It’s a versatile dish that can easily be customized with your choice of vegetables, making it a colorful centerpiece for your Halloween spread. The Skeleton Veggie Platter isn’t only fun to look at but also simple to assemble. It requires no cooking, making it an ideal last-minute addition to your party menu.
With a little creativity and a few basic ingredients, you can create a platter that’s as delicious as it’s festive. Perfect for serving 4 to 6 people, this dish is a great way to encourage kids to eat their veggies, and it can be paired with a tasty dip for an extra burst of flavor.
Ingredients:
- 1 head of cauliflower
- 1 bunch of celery
- 1 cucumber
- 1 red bell pepper
- 1 yellow bell pepper
- 1 bunch of baby carrots
- 1 pint of cherry tomatoes
- 1 small bunch of broccoli
- 1 cup of hummus or ranch dressing (for dipping)
- 1 black olive (for eyes)
Instructions:
- Prepare the Head: Start by cutting the cauliflower into florets. Arrange the florets in a circular shape at the top of your platter to form the skeleton’s skull. Guarantee the florets are tightly packed to give a cohesive look.
- Create the Rib Cage: Slice the celery into long, thin strips. Lay them out horizontally below the cauliflower head to form the rib cage. You can layer them on top of each other for a fuller appearance.
- Assemble the Spine: Slice the cucumber into rounds and line them up vertically beneath the rib cage to create the spine. This will provide structure to your skeleton.
- Form the Arms and Legs: Use red bell pepper strips for the arms and yellow bell pepper strips for the legs. Position them on either side of the spine, bending slightly at the joints to mimic arm and leg positions.
- Add Hands and Feet: Place baby carrots at the ends of the arms and legs to represent hands and feet. You can use smaller pieces or carve them into finger shapes for added detail.
- Position the Pelvis: Arrange broccoli florets at the base of the spine to create the pelvis. This adds a pop of color and texture to your skeleton.
- Finish with Details: Use cherry tomatoes as the joints, placing them at the connections between the arms, legs, and the spine. Finally, slice the black olive into rings and place them on the cauliflower head for eyes.
- Serve with Dip: Place your choice of hummus or ranch dressing in a small bowl or ramekin and set it next to the skeleton for dipping.
Extra Tips:
When assembling your Skeleton Veggie Platter, make sure to use a large platter or tray to give yourself plenty of room to arrange the vegetables. Feel free to substitute with your favorite veggies or what you have on hand.
For instance, snap peas can replace celery, or red cabbage can add a splash of purple. This platter is best served fresh, so try to assemble it shortly before your guests arrive. To save time, you can pre-cut the vegetables a day in advance and store them in airtight containers in the refrigerator.
Enjoy the creativity of this healthy Halloween treat!
Pumpkin Patch Dirt Cups
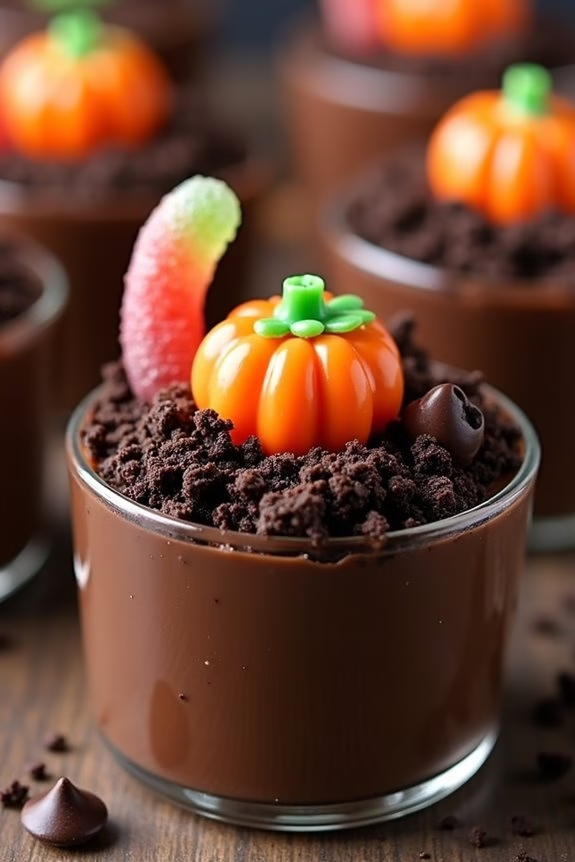
Pumpkin Patch Dirt Cups are a delightful and spooky treat perfect for a kids’ Halloween party. These cups are a fun twist on the classic dirt cup dessert, featuring a rich chocolate pudding base, crushed cookies to mimic soil, and playful pumpkin decorations.
This no-bake dessert isn’t only easy to make but also allows kids to get creative with the decoration process, making it a fun and interactive experience for everyone involved.
This recipe serves 4-6 people and is a great option for a festive gathering. The chocolatey goodness combined with the sweet and crunchy toppings makes it an irresistible treat. Whether you’re hosting a party or simply want to surprise your little ones with a Halloween-themed dessert, Pumpkin Patch Dirt Cups are sure to be a hit.
Gather your ingredients and get ready to dig into this deliciously spooky dessert!
Ingredients:
- 2 cups cold milk
- 1 package (3.9 ounces) instant chocolate pudding mix
- 1 package (14.3 ounces) chocolate sandwich cookies
- 1 cup whipped topping
- 1 cup candy pumpkins
- 1 cup gummy worms
- 1/4 cup mini chocolate chips
Instructions:
- Prepare the Pudding: In a medium-sized mixing bowl, whisk together the cold milk and instant chocolate pudding mix. Continue to whisk until the mixture is smooth and begins to thicken. Let it set for 5 minutes to reach the desired consistency.
- Crush the Cookies: Place the chocolate sandwich cookies in a large zip-lock bag. Using a rolling pin, crush the cookies into fine crumbs, resembling soil. Reserve a small portion of the crumbs for topping.
- Assemble the Dirt Cups: In clear plastic cups, start by adding a layer of crushed cookies at the bottom. Follow this with a generous layer of chocolate pudding. Alternate layers of cookies and pudding until each cup is almost full, ending with a layer of cookie crumbs on top.
- Decorate the Cups: Top each cup with a dollop of whipped topping. Arrange candy pumpkins on the surface to create a pumpkin patch effect. Add a few gummy worms to each cup for an extra spooky touch. Sprinkle mini chocolate chips over the top for added texture.
- Chill and Serve: Refrigerate the assembled dirt cups for at least 30 minutes before serving. This allows the flavors to meld and the pudding to firm up. Serve chilled and enjoy the festive dessert!
Extra Tips:
For an extra festive touch, consider using Halloween-themed cups or add a few drops of green food coloring to the whipped topping to mimic grass.
If you want to make the dessert more interactive, set up a decorating station with various candies and toppings, allowing kids to customize their own dirt cups.
Additionally, you can use different flavored puddings or mix in some crushed nuts for a nutty flavor. Enjoy experimenting with this versatile and fun Halloween dessert!