

Halloween parties need treats that are easy to prepare and popular with guests. These recipes use simple ingredients and steps that fit into a busy schedule. They focus on options that hold up well at a gathering and get eaten fast. You will find a range of sweet ideas that work for both kids and adults. Pick a few to make based on what you already have on hand.
Helpful Tips Before You Start
These treats work best when you plan for quick serving and easy grabbing at a busy party.
Make a Double Batch
Most of these recipes disappear in the first hour. Prepare extra so you are not stuck refilling an empty tray.
Keep Portions Small
Cut bars, cookies, and snacks into two-bite sizes. Guests can try several kinds without filling up too fast.
Prep Components Ahead
Bake bases or mix fillings the day before. Assemble the final spooky touches right before guests arrive.
Use Clear Labels
Mark any treats that contain nuts or gluten. This helps everyone grab what they can eat without stopping to ask.
Ghostly Meringue Cookies with Chocolate Eyes
These meringue cookies bring a light, spooky touch to any Halloween spread. Their airy texture and cute ghost shapes make them a hit at parties where guests grab a handful without thinking twice.
The flavor is sweet with a hint of vanilla, and the chocolate eyes add just enough richness to balance the crisp meringue. They work best when you need something that looks festive but stays simple to make ahead.

Serves 4 people.
Ingredients
- 2 large egg whites
- 1/2 cup granulated sugar
- 1/4 teaspoon cream of tartar
- 1/2 teaspoon vanilla extract
- 24 mini chocolate chips
Instructions
- Preheat the oven to 200°F and line a baking sheet with parchment paper.
- In a clean mixing bowl, beat the egg whites and cream of tartar with an electric mixer on medium speed until the mixture becomes foamy.
- Increase the speed to high and slowly add the granulated sugar, one tablespoon at a time, until stiff peaks form and the meringue looks glossy.
- Mix in the vanilla extract on low speed until just combined.
- Spoon the meringue into a piping bag fitted with a round tip and pipe small ghost shapes onto the prepared baking sheet.
- Bake for 90 minutes, then turn off the oven and leave the cookies inside to cool completely for at least one hour.
- Once cooled, press two mini chocolate chips into each ghost to create the eyes.
Extra Tips
Pipe the ghosts with a slightly wider base so they stand upright after baking. Store the finished cookies in an airtight container at room temperature to keep them crisp for up to three days. If the meringue starts to weep during whipping, make sure the bowl and beaters are completely grease-free before starting again. Course: Dessert Cuisine: American Equipment: Mixing bowl, Electric mixer, Piping bag, Baking sheet, Parchment paper
Pumpkin Cheesecake Brownie Bars
These bars combine a fudgy chocolate brownie base with a creamy pumpkin cheesecake layer swirled on top. The result gives a nice contrast of rich chocolate and spiced pumpkin that fits right into a Halloween party spread. They hold up well on a dessert table and slice cleanly once cooled.

Serves 4 people.
Ingredients
- ½ cup butter
- 1 cup sugar, divided
- 2 eggs, divided
- 1 teaspoon vanilla extract, divided
- ½ cup all-purpose flour
- ⅓ cup cocoa powder
- ¼ teaspoon salt
- 4 ounces cream cheese, softened
- ½ cup pumpkin puree
- 1 teaspoon pumpkin pie spice
Instructions
- Preheat the oven to 350 degrees and line an 8×8 pan with parchment paper.
- Melt the butter in a medium bowl. Stir in ¾ cup sugar until combined. Add one egg and ½ teaspoon vanilla, then mix in the flour, cocoa powder, and salt until smooth. Spread the brownie batter evenly in the prepared pan.
- In a separate bowl, beat the cream cheese with the remaining ¼ cup sugar until creamy. Add the second egg, the remaining ½ teaspoon vanilla, pumpkin puree, and pumpkin pie spice. Mix until fully blended.
- Drop spoonfuls of the pumpkin mixture over the brownie batter. Use a knife to gently swirl the two layers together for a marbled look.
- Bake for 25 to 30 minutes until the center is set. Remove from the oven and let the bars cool completely in the pan before slicing.
Extra Tips
For the cleanest cuts, chill the cooled bars for 30 minutes before slicing. If you want a stronger pumpkin flavor, add an extra ¼ teaspoon pumpkin pie spice to the cheesecake layer. Store leftovers in an airtight container in the fridge for up to three days. Course: Dessert Cuisine: American Equipment: Mixing Bowls, 8×8 Baking Pan, Oven, Whisk
Witch Finger Almond Biscotti
These almond biscotti come shaped like witch fingers with whole almonds pressed in as nails. They make a crunchy, lightly sweet snack that works well at Halloween parties where guests want something to nibble between other treats. The twice-baked method gives them a firm texture that holds up on a platter without getting soft right away.
They pair nicely with coffee or hot cider and add a simple spooky touch without extra decoration. The flavor stays focused on almond, and the finger shape makes them easy to pick up and eat.
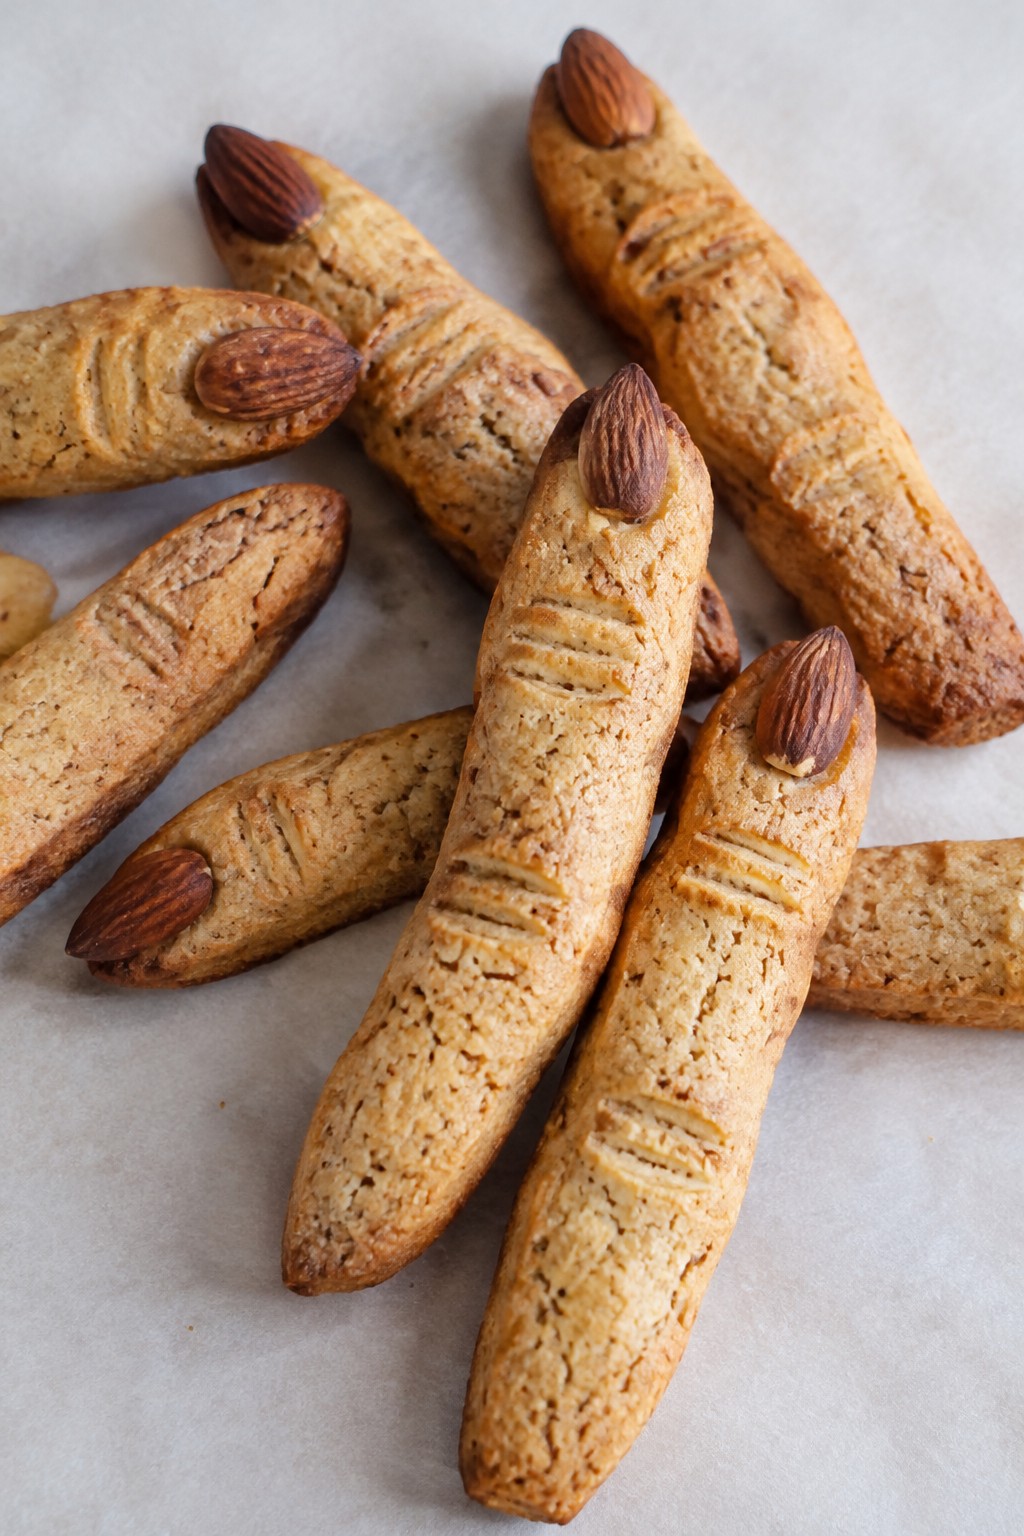
Serves 4 people.
Ingredients
- 1 cup all-purpose flour
- 1/2 cup granulated sugar
- 2 large eggs
- 1 teaspoon almond extract
- 1/2 teaspoon baking powder
- 1/4 teaspoon salt
- 16 whole almonds
Instructions
- Preheat the oven to 350 degrees and line a baking sheet with parchment paper.
- In a mixing bowl, stir together the flour, sugar, baking powder, and salt. In a separate bowl, whisk the eggs with the almond extract until smooth. Pour the wet mixture into the dry ingredients and stir until a stiff dough forms.
- Divide the dough into four equal pieces. Roll each piece into a thin log about 4 inches long. Place the logs on the baking sheet and gently press a whole almond into one end of each log to form a nail. Use a knife to score two shallow lines across each log for knuckles.
- Bake for 20 minutes until the logs are lightly golden. Remove from the oven and let them cool for 10 minutes. Slice each log on a diagonal into finger-length pieces. Return the slices to the baking sheet cut side down and bake for another 10 minutes until crisp.
Extra Tips
Score the knuckles lightly so they show after the second bake but do not cut all the way through. Cool the biscotti fully on a rack before serving to keep the crunch. Store leftovers in an airtight container at room temperature for up to five days. Course: Dessert Cuisine: Italian Equipment: Mixing Bowl, Baking Sheet, Parchment Paper
Black Cocoa Bat Cupcakes
These cupcakes stand out at Halloween parties with their deep black color from black cocoa and simple bat decorations on top. They bring a moist crumb and bold chocolate flavor that guests enjoy without any extra fuss. Serve them when you need a treat that looks themed but stays easy to make in small batches.
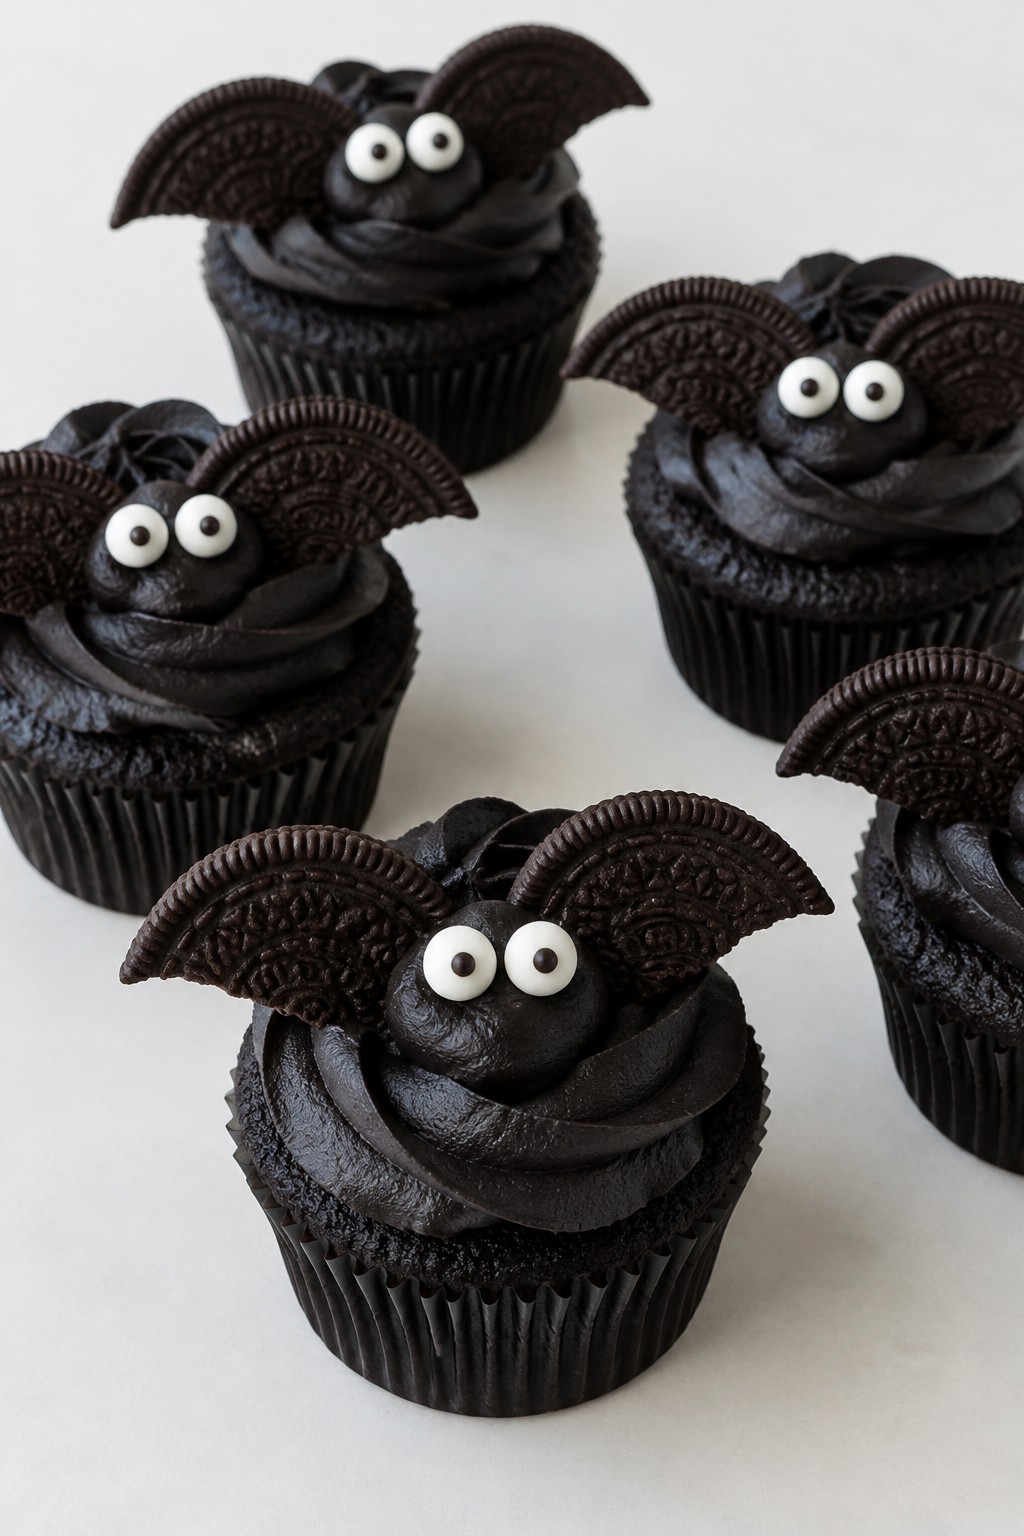
Serves 4 people.
Ingredients
- 1/2 cup all-purpose flour
- 1/4 cup black cocoa powder
- 1/2 teaspoon baking powder
- 1/4 teaspoon salt
- 1/4 cup unsalted butter, softened
- 1/2 cup granulated sugar
- 1 egg
- 1/4 cup milk
- 1 teaspoon vanilla extract
- 1 cup powdered sugar
- 1/4 cup unsalted butter, softened
- 2 tablespoons black cocoa powder
- 8 candy eyes
- 8 chocolate cookie halves
Instructions
- Preheat the oven to 350 degrees and line a cupcake pan with four paper liners.
- In a bowl, whisk together the flour, 1/4 cup black cocoa powder, baking powder, and salt.
- In a second bowl, beat 1/4 cup softened butter with the granulated sugar until light. Add the egg, milk, and vanilla extract and mix until smooth.
- Stir the dry ingredients into the wet mixture until just combined. Divide the batter among the four liners.
- Bake for 18 to 20 minutes, or until a toothpick comes out clean. Let the cupcakes cool completely.
- For the frosting, beat 1/4 cup softened butter with the powdered sugar and 2 tablespoons black cocoa powder until creamy. Spread or pipe the frosting over each cooled cupcake.
- Press two chocolate cookie halves into the frosting on each cupcake to form wings. Add two candy eyes in the center to finish the bat shape.
Extra Tips
Black cocoa gives the cupcakes their color and a less sweet taste, so skip regular cocoa if you want the same dark result. The cookie halves hold best when pressed into slightly firm frosting. Store leftovers in an airtight container at room temperature for up to two days. Course: Dessert Cuisine: American Equipment: Mixing Bowl, Cupcake Pan, Oven
Caramel Apple Crumble Cups
Caramel Apple Crumble Cups turn classic fall flavors into easy-to-grab portions that work well for Halloween parties. Guests can pick one up and enjoy it without extra plates or utensils, which helps them disappear quickly from the table.
The soft baked apples soak up caramel while the oat topping stays crisp on top. Each cup balances tart apple with sweet caramel and a buttery crunch that feels satisfying without being heavy.
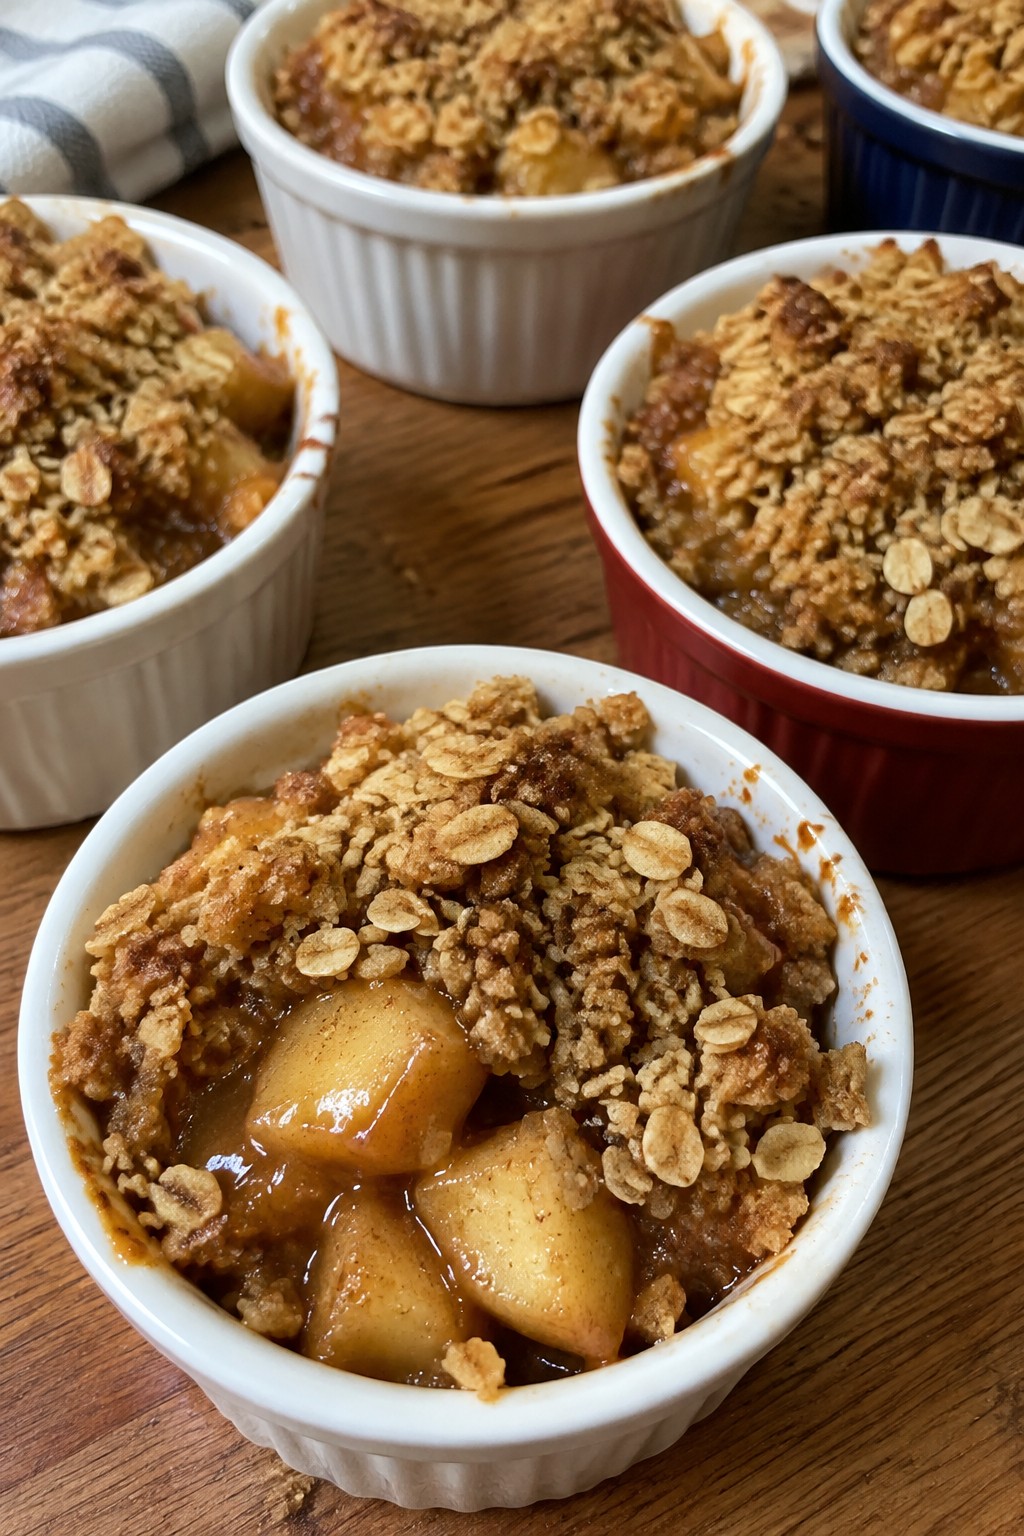
Serves 4 people.
Ingredients
- 4 medium apples, cored and chopped
- 1/2 cup caramel sauce, divided
- 3/4 cup rolled oats
- 1/2 cup all-purpose flour
- 1/4 cup brown sugar
- 1/4 cup unsalted butter, melted
- 1 teaspoon ground cinnamon
- 1/4 teaspoon salt
Instructions
- Preheat the oven to 350°F. In a mixing bowl, combine the chopped apples with 1/4 cup of the caramel sauce and the cinnamon until the apples are evenly coated.
- Divide the apple mixture evenly among four ramekins or small baking cups.
- In a second mixing bowl, stir together the rolled oats, flour, brown sugar, and salt. Pour in the melted butter and mix until the topping forms clumps.
- Sprinkle the oat mixture evenly over the apples in each cup.
- Bake for 20 to 25 minutes, until the topping turns golden and the apples soften.
- Remove from the oven and drizzle the remaining 1/4 cup caramel sauce over the tops before serving.
Extra Tips
Make the crumble topping ahead and keep it in the fridge so it stays dry until you are ready to assemble and bake. If the apples release a lot of juice during baking, let the cups rest for five minutes so the caramel thickens slightly. Reheat leftovers in a 300°F oven for a few minutes to bring back the crisp texture. Course: Dessert Cuisine: American Equipment: Mixing Bowls, Ramekins, Oven
Spiderweb No-Bake Cheesecake Bites
These bites combine a creamy cheesecake filling with a crisp cookie base and a simple chocolate spiderweb on top. They work well for Halloween parties because they require no oven time and can be made ahead. The texture stays smooth and rich while the chocolate adds a light crunch.
The flavor stays classic with vanilla and cream cheese balanced by a touch of chocolate. They disappear quickly when served on a platter at a gathering.
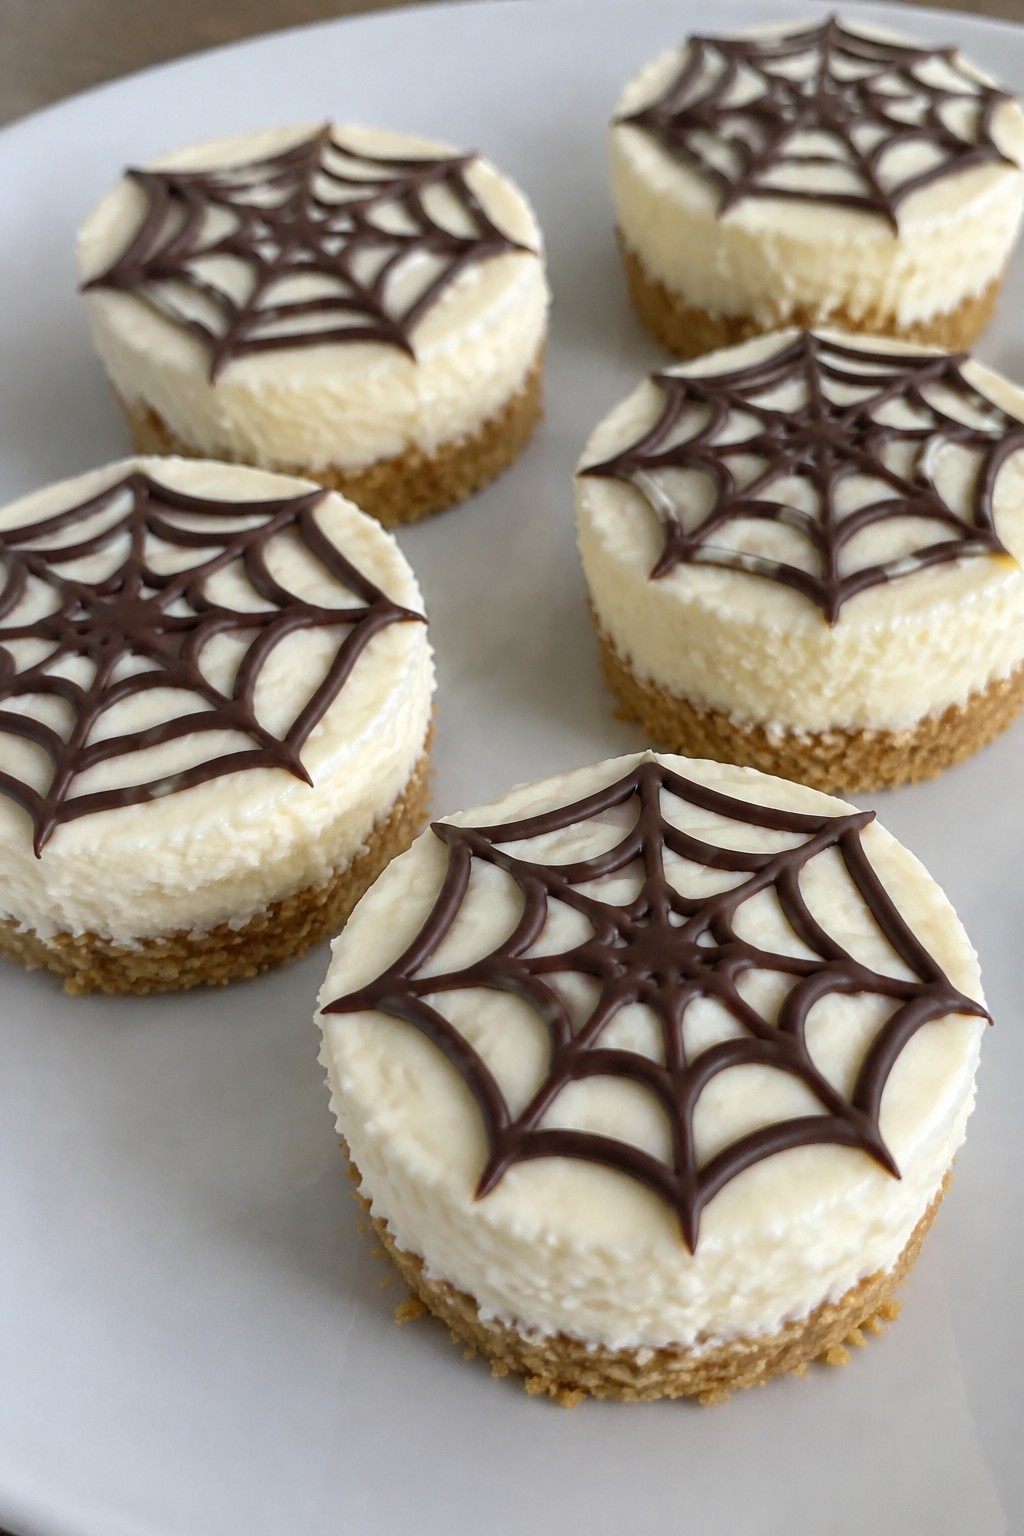
Serves 4 people.
Ingredients
- 1 cup graham cracker crumbs
- 3 tablespoons unsalted butter, melted
- 8 ounces cream cheese, softened
- 1/4 cup powdered sugar
- 1 teaspoon vanilla extract
- 1/2 cup heavy cream
- 1/2 cup semisweet chocolate chips
Instructions
- Line a baking sheet with parchment paper and set aside.
- Mix the graham cracker crumbs with the melted butter in a bowl until the crumbs hold together when pressed. Divide the mixture among 8 mini muffin liners and press firmly into the bottoms to form the crust.
- Beat the cream cheese, powdered sugar, and vanilla in a mixing bowl until smooth. Add the heavy cream and beat again until the mixture thickens and holds soft peaks.
- Spoon the filling over the crusts and smooth the tops. Place the bites in the freezer for 2 hours to set.
- Melt the chocolate chips in a microwave-safe bowl in 20-second bursts, stirring between each until smooth. Transfer to a small piping bag or zip-top bag with a tiny corner cut. Pipe thin lines across each bite in a web pattern. Return the bites to the freezer for 10 minutes to let the chocolate set.
Extra Tips
Use a toothpick to drag the chocolate lines into a clearer web shape right after piping if the lines look too thick. Store leftovers in an airtight container in the fridge for up to two days. Swap the graham cracker crumbs for crushed chocolate cookies if you want a darker base that matches the Halloween theme. Course: Dessert Cuisine: American Equipment: Mixing Bowl, Hand Mixer, Baking Sheet
Monster Marshmallow Cereal Treats
These Monster Marshmallow Cereal Treats add a lighthearted touch to any Halloween spread. The bright green squares stand out on a party table and give guests a simple way to grab a sweet bite without extra fuss.
The bars stay crisp from the cereal while the melted marshmallows keep them chewy. Candy eyes pressed on top turn each piece into a quick monster face that fits the holiday theme.

Serves 4 people.
Ingredients
- 2 tablespoons butter
- 3 cups mini marshmallows
- 4 cups crispy rice cereal
- Green food coloring
- 24 candy eyes
Instructions
- Grease an 8×8 inch baking pan and set it aside.
- Melt the butter in a large saucepan over low heat.
- Add the mini marshmallows and stir until they are fully melted and smooth.
- Stir in several drops of green food coloring until the marshmallow mixture reaches a bright green shade.
- Remove the pan from heat and fold in the crispy rice cereal until every piece is coated.
- Transfer the mixture to the prepared pan and press it down evenly with a spatula or greased hands.
- While the mixture is still warm, press pairs of candy eyes onto the surface to form monster faces.
- Let the treats cool completely before cutting into squares.
Extra Tips
Press the candy eyes in place right after spreading the mixture so they stick without extra icing. Cut the squares slightly larger if you want fewer but bolder monster faces. Store leftovers in a single layer inside an airtight container to keep the cereal crisp. Course: Dessert Cuisine: American Equipment: Large saucepan, 8×8 inch baking pan, Spatula
Bloody Red Velvet Cake Pops
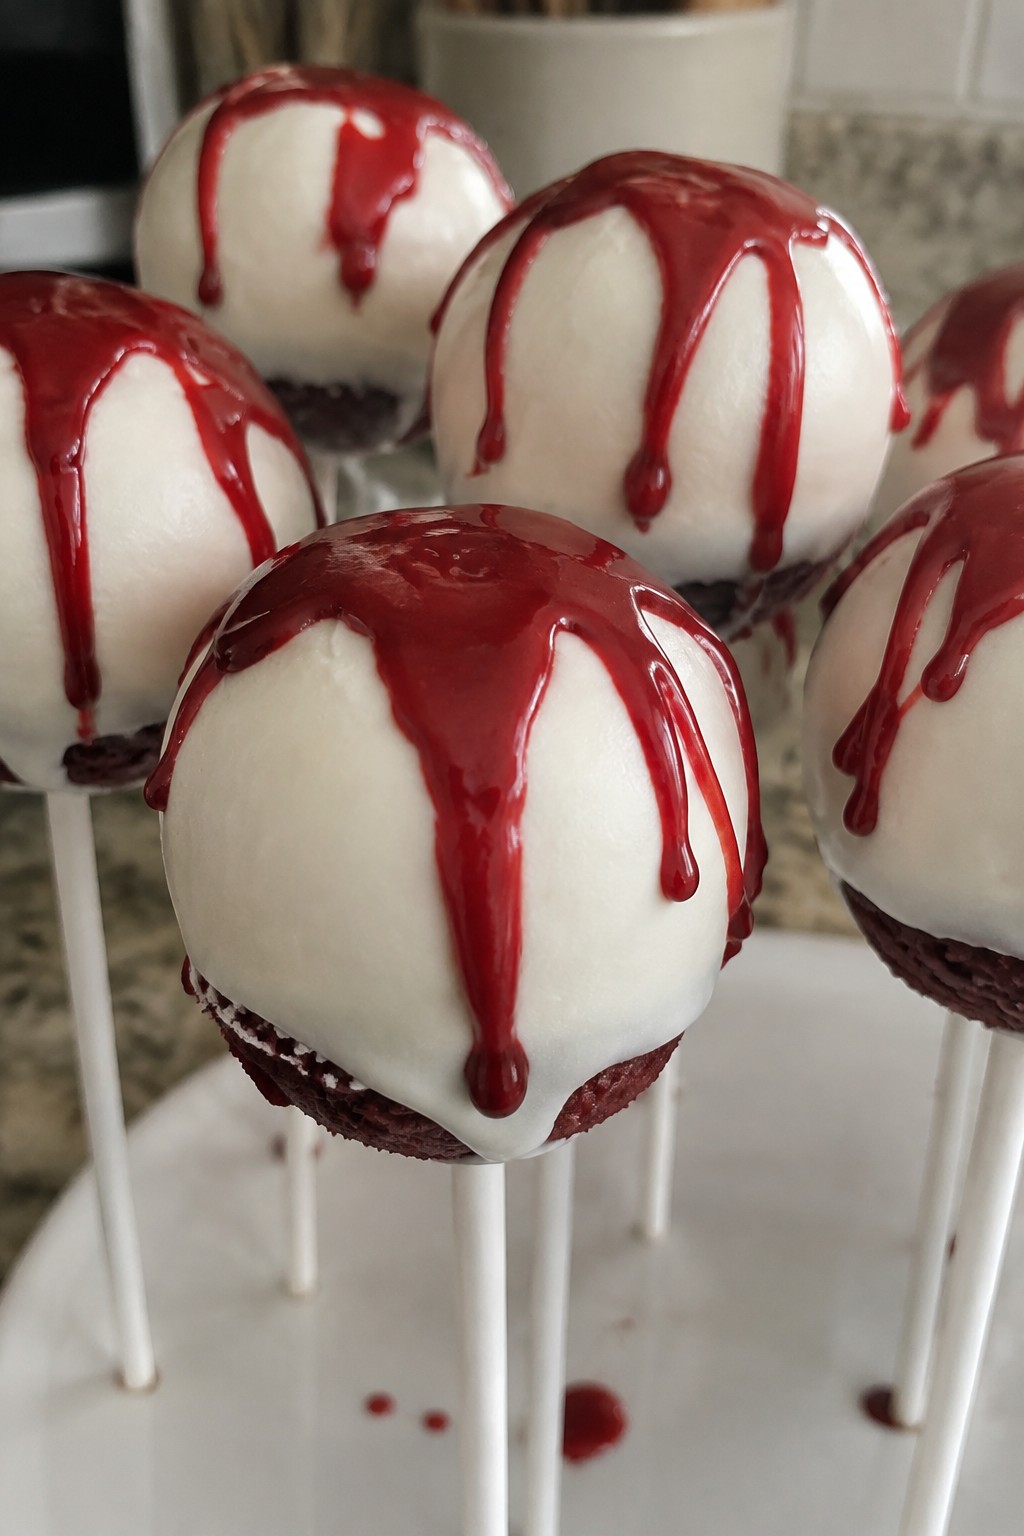
These cake pops bring a fun Halloween twist to classic red velvet. The moist cake and creamy frosting center pair with a crisp white chocolate shell, finished with red drips that give them a bloody look. They work well for parties since they are easy to grab and eat in one or two bites.
The flavor stays rich and slightly tangy from the cream cheese frosting, while the texture balances soft cake with a firm outer coating. Guests tend to reach for seconds quickly, which fits the theme of treats that vanish fast at gatherings.
Serves 4 people.
Ingredients
- 1 (15.25-ounce) box red velvet cake mix
- 3 large eggs
- 1/2 cup vegetable oil
- 1 1/4 cups water
- 1/2 cup cream cheese frosting
- 12 ounces white chocolate candy melts
- 1/4 cup red candy melts
- 12 cake pop sticks
Instructions
- Preheat the oven and prepare the red velvet cake mix with the eggs, oil, and water according to package directions. Bake in a 9×13 pan and let the cake cool completely.
- Crumble the cooled cake into a large bowl. Add the cream cheese frosting and mix until the mixture holds together when pressed.
- Roll the mixture into 12 balls, each about 1 inch wide. Insert a cake pop stick into each ball. Place the pops on a tray and chill in the refrigerator for 30 minutes.
- Melt the white chocolate candy melts in a microwave-safe bowl, stirring until smooth. Dip each chilled cake pop into the white chocolate to coat fully. Let excess drip off and return the pops to the tray.
- Melt the red candy melts in a separate bowl. Drizzle the red coating over the white-coated pops in thin lines to create a bloody effect. Let the coating set before serving.
Extra Tips
Chill the cake balls thoroughly before dipping to help the coating set evenly without cracking. If the red drizzle looks too thick, add a tiny drop of oil to loosen it. Store finished pops in an airtight container in the fridge for up to two days. Course: Dessert Cuisine: American Equipment: Mixing bowl, Baking pan, Microwave-safe bowl, Cake pop sticks
Vampire Bite Strawberry Donuts
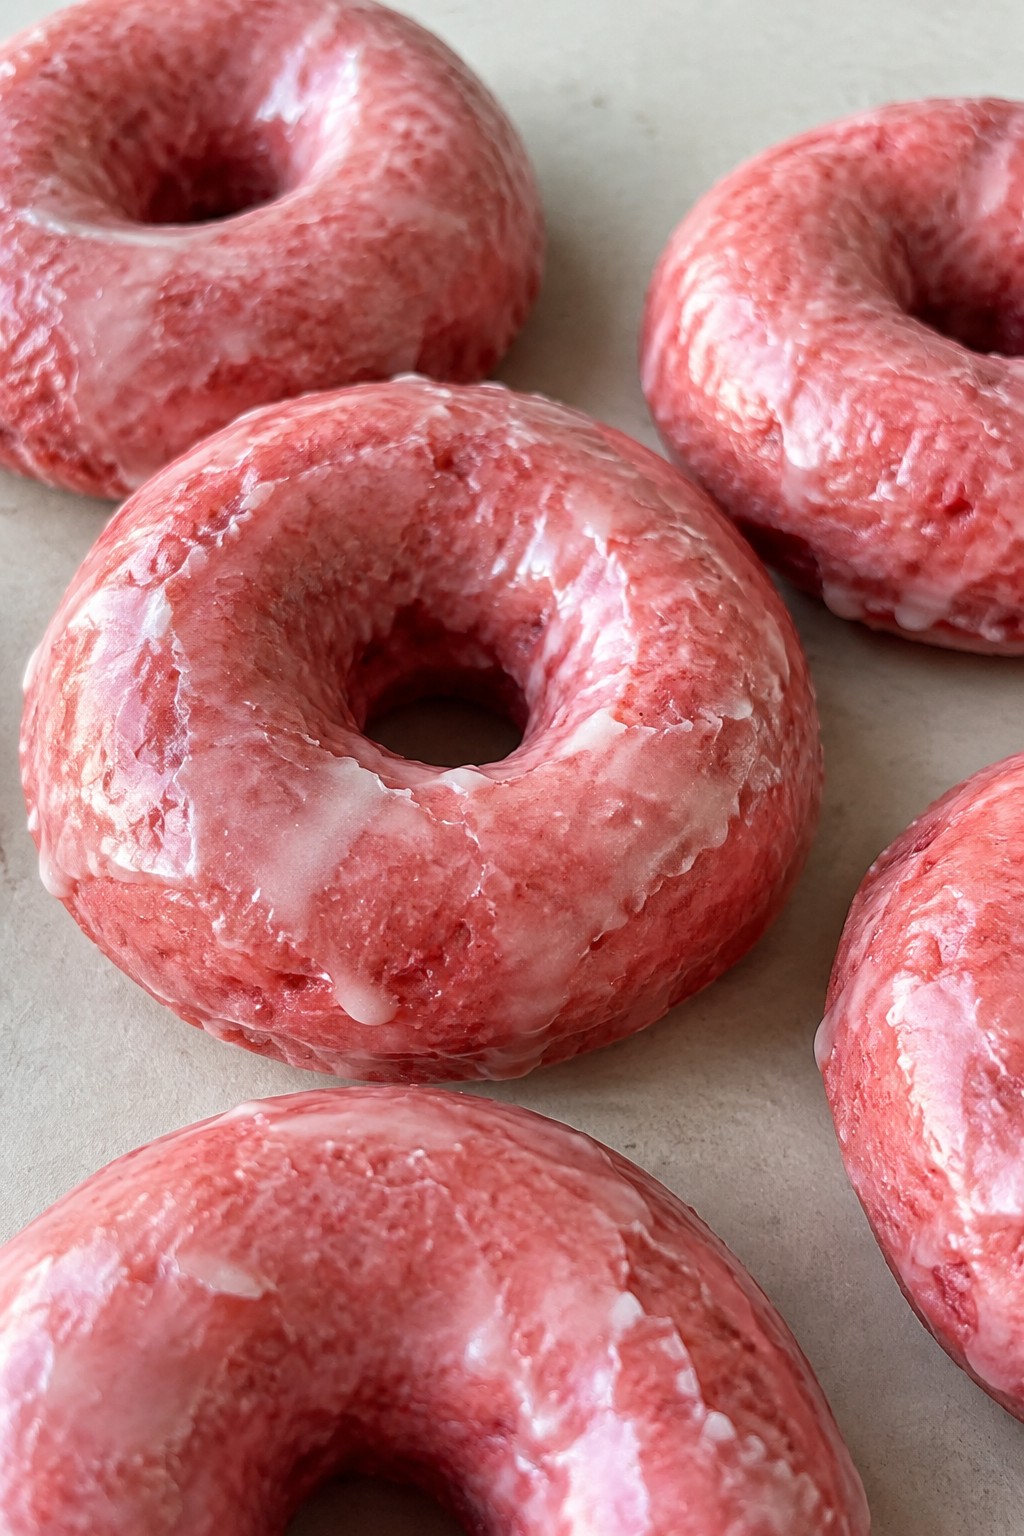
These donuts bring a fun Halloween touch to any party spread with their bright strawberry color and simple shape that guests grab without thinking twice. They work well for last-minute gatherings since the batter comes together quickly and bakes in one pan. The finished donuts taste lightly sweet with fresh berry flavor and stay soft inside with a thin glazed shell on top.
Serves 4 people.
Ingredients
- 1 cup all-purpose flour
- 1/4 cup granulated sugar
- 1 teaspoon baking powder
- 1/2 teaspoon salt
- 1/2 cup milk
- 1 large egg
- 2 tablespoons butter, melted
- 3/4 cup fresh strawberries, pureed and divided
- 1 cup powdered sugar
Instructions
- Preheat the oven to 350 degrees and lightly grease a four-cavity donut pan.
- In a mixing bowl, whisk together the flour, granulated sugar, baking powder, and salt.
- In a separate bowl, stir the milk, egg, melted butter, and 1/2 cup of the strawberry puree until smooth.
- Pour the wet mixture into the dry ingredients and stir just until no dry streaks remain.
- Spoon the batter evenly into the prepared donut pan, filling each cavity about three-quarters full.
- Bake for 12 to 14 minutes until the donuts spring back when lightly pressed.
- Let the donuts cool in the pan for 5 minutes, then transfer them to a wire rack.
- While the donuts cool, mix the powdered sugar with the remaining 1/4 cup strawberry puree to form a thick glaze.
- Dip the top of each cooled donut into the glaze and let the excess drip off before serving.
Extra Tips
Use very ripe strawberries for the brightest color in both the batter and glaze. If the glaze feels too thin, add a spoonful more powdered sugar until it coats the donuts evenly. These taste best the same day but can be stored in an airtight container at room temperature for up to one day. Course: Dessert Cuisine: American Equipment: Mixing bowls, Donut pan, Whisk, Wire rack
Graveyard Chocolate Pudding Parfaits
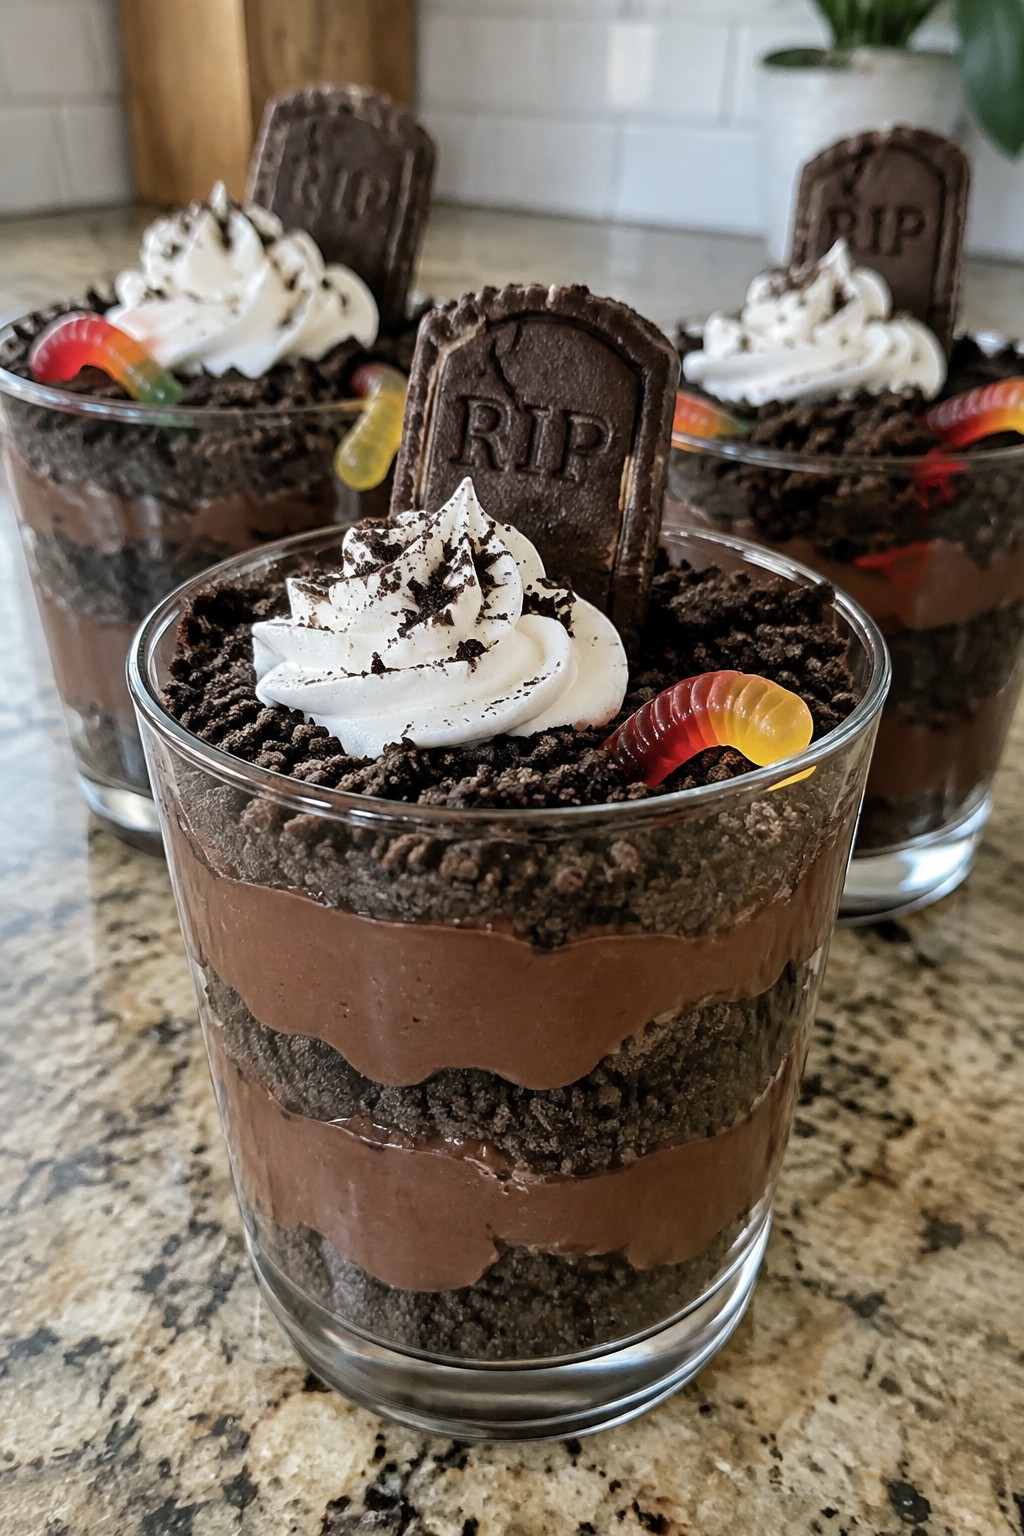
These chocolate pudding parfaits bring a fun graveyard theme to any Halloween spread. Guests enjoy the mix of creamy pudding, cookie crumbs, and playful toppings that look like fresh dirt and buried surprises. The recipe works well for parties because it can be prepped in advance and still looks striking on the table.
The finished dessert has a smooth chocolate base with crunchy cookie layers and a light whipped topping. Gummy worms and cookie tombstones add the spooky detail that makes each glass stand out without extra fuss.
Serves 4 people.
Ingredients
- 1 box (3.9 oz) instant chocolate pudding mix
- 2 cups cold milk
- 20 Oreo cookies
- 1 cup whipped topping
- 4 rectangular chocolate cookies
- 8 gummy worms
Instructions
- Pour the cold milk into a mixing bowl and add the instant chocolate pudding mix. Whisk for two minutes until the mixture thickens.
- Place the Oreo cookies in a zip-top bag and crush them with a rolling pin until they form fine crumbs.
- Spoon a layer of pudding into the bottom of each of four glasses. Add a layer of crushed Oreo crumbs on top.
- Repeat the pudding and cookie layers once more so each glass has two full sets.
- Spread a spoonful of whipped topping over the final cookie layer in each glass.
- Press one rectangular chocolate cookie upright into the whipped topping of each parfait to act as a tombstone. Tuck two gummy worms into the topping near the cookie.
Extra Tips
Crush the Oreos right before layering so they stay crisp against the pudding. If you need to prepare the parfaits ahead, keep the cookie crumbs and whipped topping separate until just before serving. Swap the rectangular cookies for any plain chocolate rectangle you have on hand, but avoid flavored varieties that could clash with the chocolate pudding. Course: Dessert Cuisine: American Equipment: Mixing Bowl, Whisk, 4 Parfait Glasses
Skeleton Bone White Chocolate Pretzels
These pretzels get a white chocolate coating that turns ordinary rods into fun bone shapes for Halloween. They come together quickly and offer a nice mix of salty crunch and sweet coating that guests grab without thinking twice. Serve them at parties where finger foods need to hold up on a table for a while.
This recipe serves 4 people. – 12 pretzel rods – 12 ounces white chocolate melting wafers – 1 tablespoon coconut oil – Black decorating icing
### Instructions 1. Line a baking sheet with parchment paper and set it aside. 2. Place the white chocolate melting wafers and coconut oil in a microwave-safe bowl. Heat in 30-second intervals, stirring after each, until fully melted and smooth. 3. Dip each pretzel rod into the melted white chocolate, leaving about one inch uncovered at one end to act as the bone tip. Let excess chocolate drip back into the bowl. 4. Place the coated pretzels on the prepared baking sheet. Use a spoon to add a small extra dollop of white chocolate near the center and at both ends to create simple bone joints. 5. Let the chocolate set at room temperature until firm, about 20 minutes. Pipe thin lines with black decorating icing across the joints to add skeleton details.
### Extra Tips Pipe the black icing lines right after the chocolate firms but before it gets too hard so the lines stay neat. Store leftovers in an airtight container at room temperature for up to three days. If the white chocolate thickens while dipping, warm it for 10 seconds in the microwave and stir again.
Course: Snack Cuisine: American Equipment: Microwave-safe bowl, Baking sheet, Parchment paper

Serves 4 people.
Instructions
- Line a baking sheet with parchment paper and set it aside.
- Place the white chocolate melting wafers and coconut oil in a microwave-safe bowl. Heat in 30-second intervals, stirring after each, until fully melted and smooth.
- Dip each pretzel rod into the melted white chocolate, leaving about one inch uncovered at one end to act as the bone tip. Let excess chocolate drip back into the bowl.
- Place the coated pretzels on the prepared baking sheet. Use a spoon to add a small extra dollop of white chocolate near the center and at both ends to create simple bone joints.
- Let the chocolate set at room temperature until firm, about 20 minutes. Pipe thin lines with black decorating icing across the joints to add skeleton details.
Extra Tips
Pipe the black icing lines right after the chocolate firms but before it gets too hard so the lines stay neat. Store leftovers in an airtight container at room temperature for up to three days. If the white chocolate thickens while dipping, warm it for 10 seconds in the microwave and stir again. Course: Snack Cuisine: American Equipment: Microwave-safe bowl, Baking sheet, Parchment paper
Jack-O’-Lantern Stuffed Cookie Cups
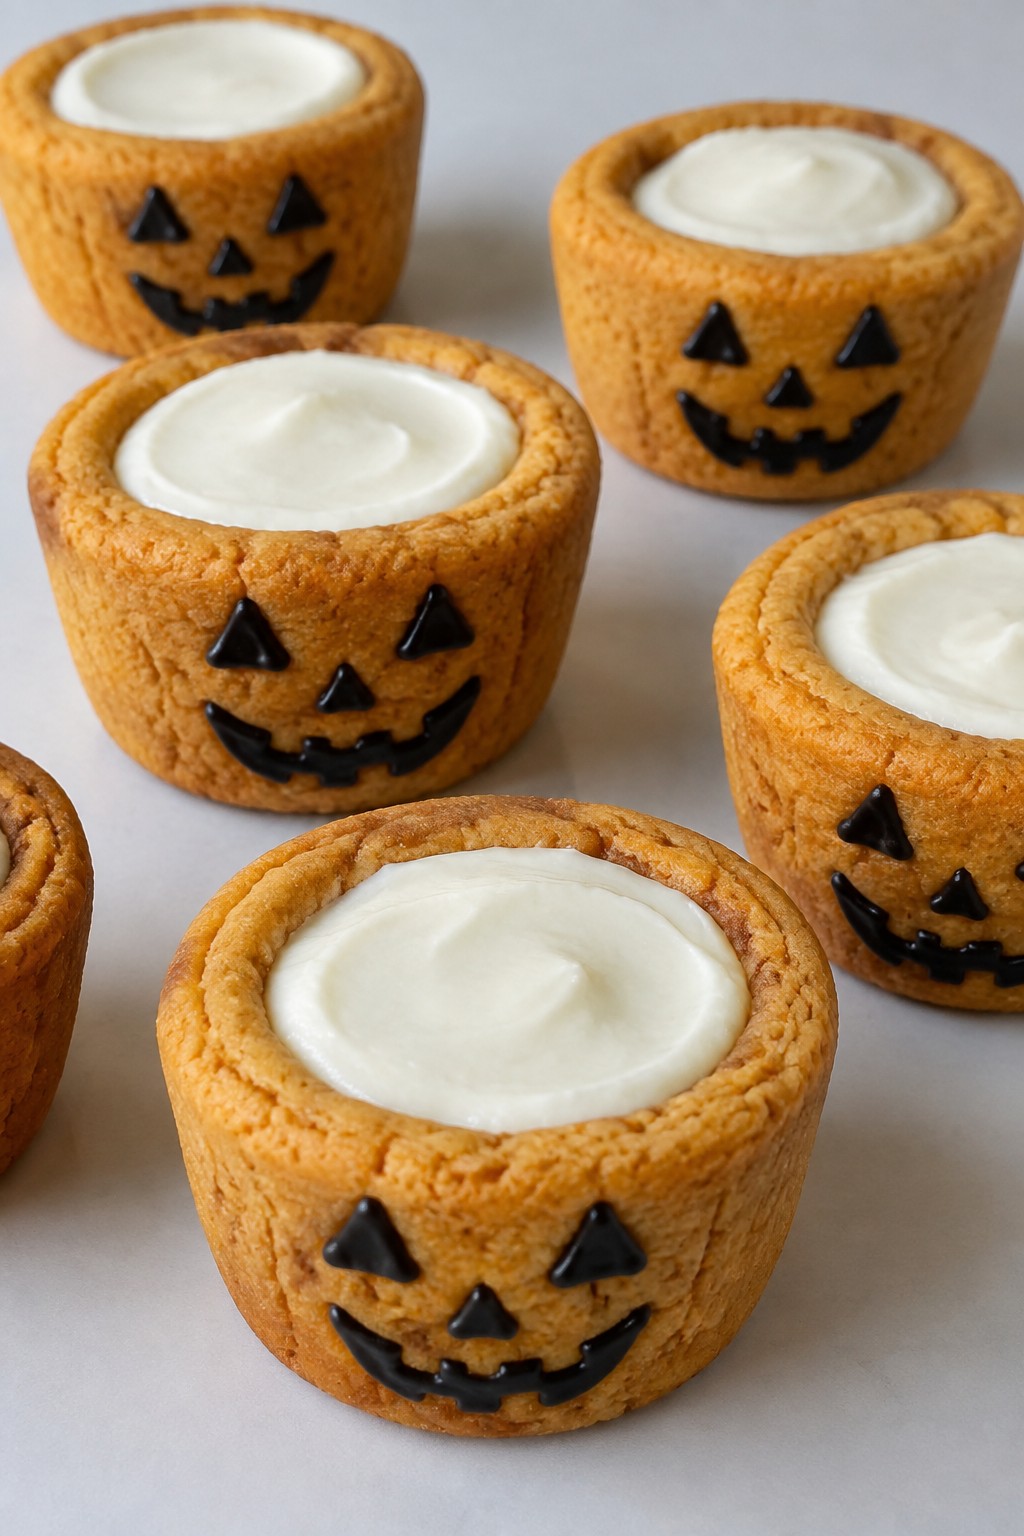
These cookie cups bring a playful Halloween touch to any party spread. Shaped like mini jack-o’-lanterns and filled with a smooth cream cheese center, they offer a mix of chewy cookie and creamy filling that guests grab quickly.
The orange-tinted dough bakes into sturdy cups that hold their shape, while the simple filling adds a sweet contrast without extra fuss. They work well for make-ahead prep and travel easily to gatherings.
Serves 4 people.
Ingredients
- 1 cup all-purpose flour
- 1/2 teaspoon baking soda
- 1/4 teaspoon salt
- 1/2 cup unsalted butter, softened
- 1/2 cup granulated sugar
- 1 large egg
- 1 teaspoon vanilla extract
- 1/4 teaspoon orange food coloring
- 4 ounces cream cheese, softened
- 3/4 cup powdered sugar
- 2 tablespoons black decorating gel
Instructions
- Preheat the oven to 350 degrees F and grease a 12-cup muffin tin.
- In a medium bowl, whisk together the flour, baking soda, and salt.
- In a large bowl, beat the butter and granulated sugar until light. Add the egg and vanilla extract, then mix in the orange food coloring until the color is even.
- Stir the dry ingredients into the wet mixture until a dough forms. Divide the dough into 4 equal portions and press each into the bottom and up the sides of 4 muffin cups to form shells.
- Bake for 10 to 12 minutes until the edges turn golden. Let the cups cool in the tin for 10 minutes, then remove and cool completely on a wire rack.
- In a small bowl, beat the cream cheese with the powdered sugar until smooth. Spoon the filling into each cooled cookie cup.
- Use the black decorating gel to draw jack-o’-lantern faces on the sides of each cup.
Extra Tips
Press the dough evenly so the cups keep their shape after baking. Chill the filled cups for 15 minutes before serving if the filling feels soft. The decorating gel holds up best when applied right before the party. Course: Dessert Cuisine: American Equipment: Mixing bowls, Muffin tin, Electric mixer, Wire rack
Poison Green Apple Tartlets
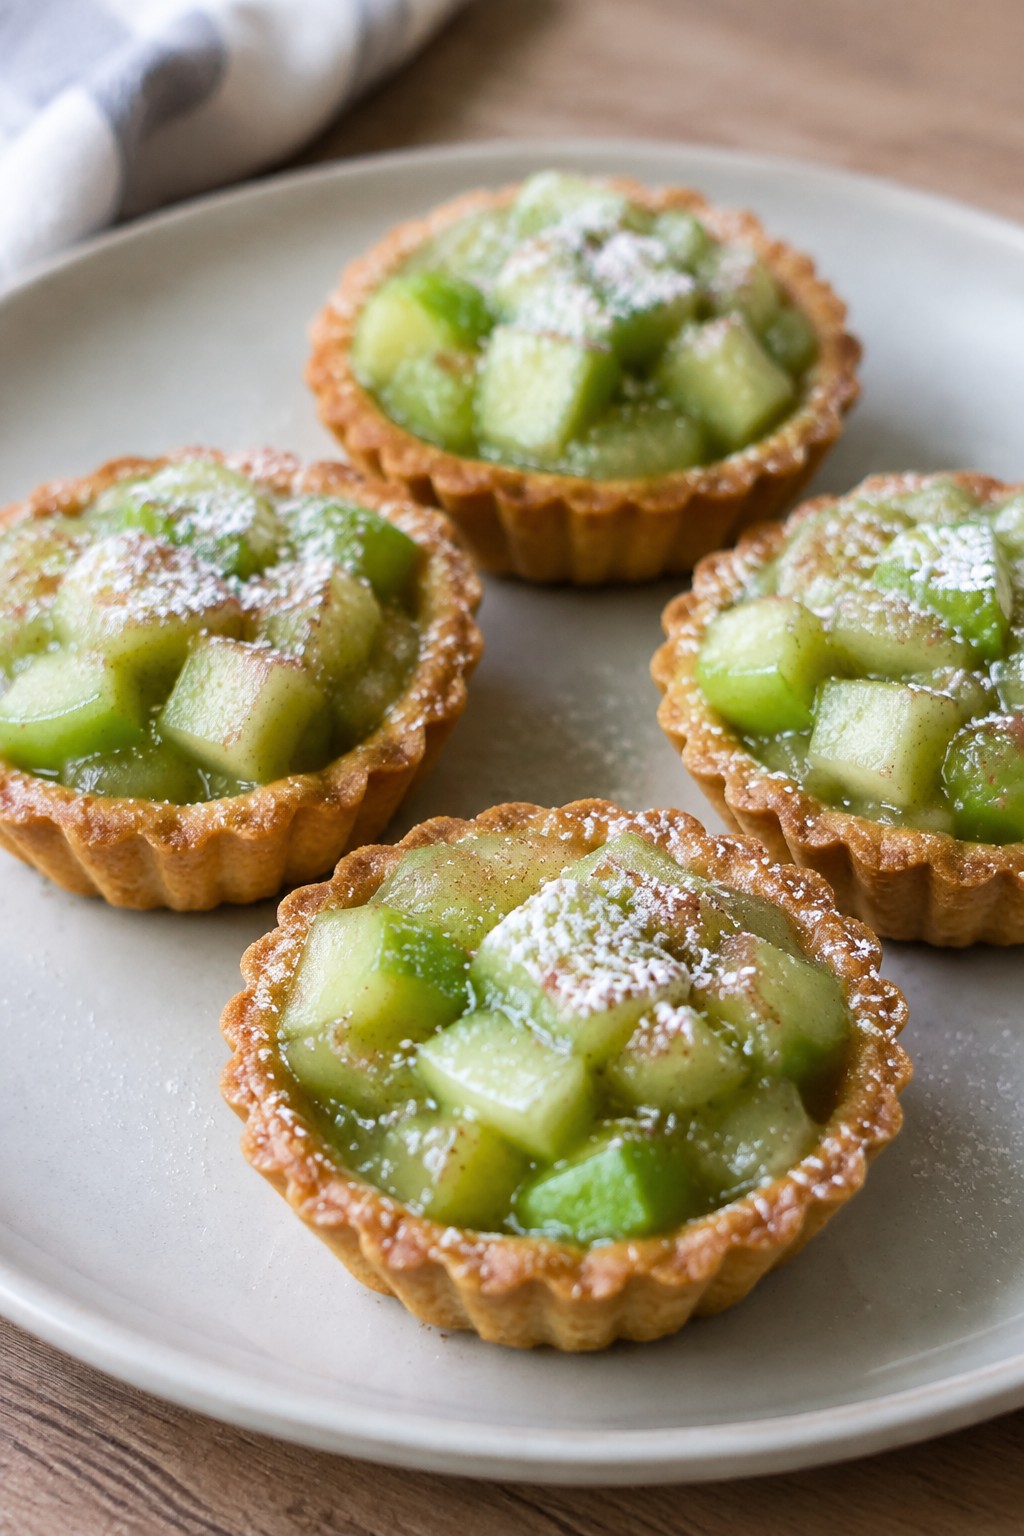
These Poison Green Apple Tartlets add a fun visual pop to any Halloween table. The small size makes them easy for guests to grab while the sharp apple taste inside a crisp shell gives a nice sweet-tart balance that stands out from heavier desserts.
They suit parties because they hold up well on a platter and do not require forks. The bright green filling draws attention without extra decoration.
Serves 4 people.
Ingredients
- 4 mini tartlet crusts
- 2 Granny Smith apples, peeled and diced
- 3 tablespoons granulated sugar
- 1 tablespoon butter
- 1 teaspoon lemon juice
- 8 drops green food coloring
- 1 tablespoon powdered sugar
Instructions
- Heat the oven to 350 degrees and place the tartlet crusts on a baking sheet.
- Melt the butter in a skillet over medium heat. Add the diced apples, granulated sugar, and lemon juice.
- Cook the mixture for 6 to 8 minutes, stirring now and then, until the apples soften but still hold their shape.
- Remove the skillet from the heat and stir in the green food coloring until the filling reaches a bright, even green.
- Spoon the warm filling evenly into the four tartlet crusts.
- Bake for 8 minutes, then remove from the oven and let them cool slightly on the baking sheet.
- Dust the tops with powdered sugar right before serving.
Extra Tips
Use a firm Granny Smith apple so the pieces stay distinct after cooking. Prepare the filling up to two hours ahead and keep it covered, then fill and bake the tartlets just before guests arrive so the crusts stay crisp. If the green looks too dark, add one or two extra drops of coloring while the filling is still warm. Course: Dessert Cuisine: American Equipment: Baking sheet, Skillet, Knife
Candy Corn Layered Fudge Squares
These Candy Corn Layered Fudge Squares stand out at Halloween parties with their stacked colors that echo the classic candy. They come together quickly in one pan and slice cleanly into small squares that guests pick up right away.
The result is a creamy white chocolate fudge with mild vanilla taste across three distinct layers. The top gets finished with candy corn pieces for extra crunch and visual pop.

Serves 4 people.
Ingredients
- 12 ounces white chocolate chips
- 1/2 cup sweetened condensed milk
- 1 teaspoon vanilla extract
- Yellow gel food coloring
- Orange gel food coloring
- 12 candy corn pieces
Instructions
- Line a small loaf pan with parchment paper and set it aside.
- Place the white chocolate chips and sweetened condensed milk in a saucepan over low heat. Stir steadily until the chips melt and the mixture becomes smooth.
- Remove the pan from heat and stir in the vanilla extract.
- Divide the mixture evenly into three small bowls. Leave one bowl plain. Stir yellow gel food coloring into the second bowl until the color looks bright. Stir orange gel food coloring into the third bowl until the color looks bright.
- Pour the yellow layer into the prepared pan and spread it flat. Place the pan in the freezer for 10 minutes to set.
- Pour the orange layer over the yellow layer and spread it flat. Return the pan to the freezer for another 10 minutes.
- Pour the plain white layer on top and spread it flat. Press the candy corn pieces into the surface while the fudge is still soft.
- Chill the pan in the refrigerator for at least 1 hour until fully firm. Lift out the fudge and cut it into squares.
Extra Tips
Chill the layers between pours to keep the colors from blending. If the fudge feels too soft when slicing, return it to the freezer for 15 minutes first. Store leftovers in an airtight container in the fridge for up to four days. Course: Dessert Cuisine: American Equipment: Saucepan, Mixing bowls, Loaf pan
Mummy-Wrapped Cinnamon Roll Bites
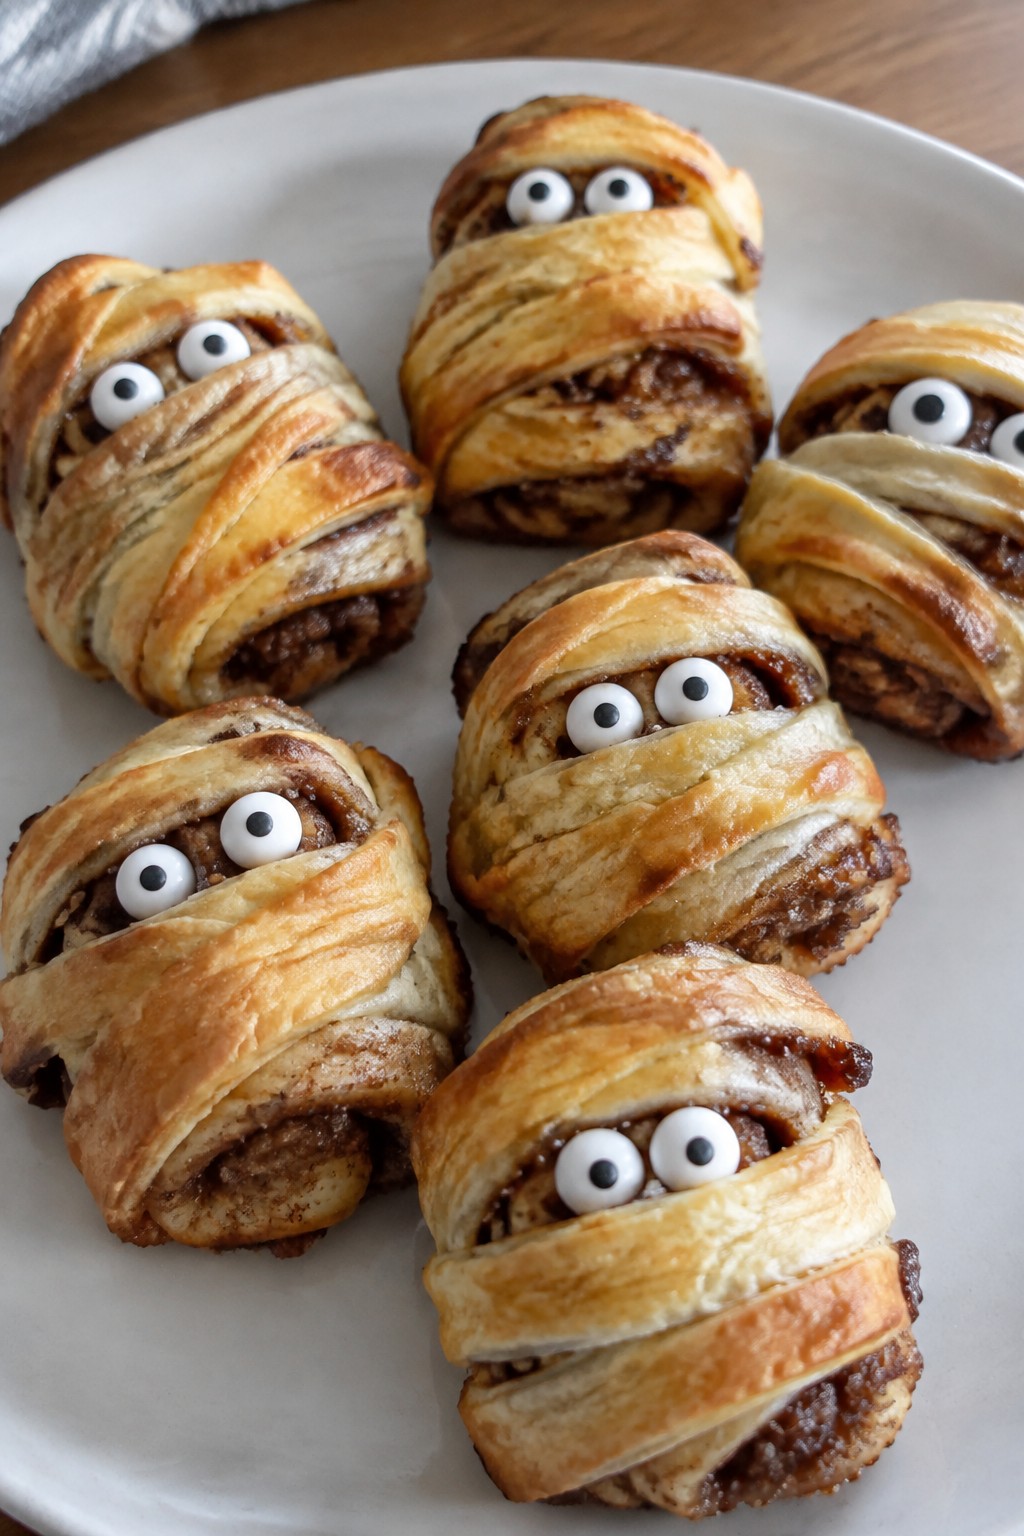
These bites turn store-bought cinnamon roll dough into a quick Halloween snack that fits right on a party table. The crescent dough strips create a wrapped look that holds up well when served in batches, and the cinnamon filling stays soft inside the crisp layers.
The result gives a sweet, spiced bite with a bit of crunch from the outer dough. They suit Halloween parties because they come together fast and look themed without extra fuss.
Serves 4 people.
Ingredients
- 1 can (8 oz) refrigerated cinnamon rolls with icing
- 1 can (8 oz) refrigerated crescent roll dough
- 16 candy eyes
Instructions
- Heat the oven to 375 degrees and line a baking sheet with parchment paper.
- Open the cinnamon roll can and separate the rolls. Cut each roll into four even pieces to make 16 bites total.
- Open the crescent roll can and unroll the dough. Cut it into thin strips about one-quarter inch wide.
- Wrap two or three strips around each cinnamon roll bite, leaving small gaps so the cinnamon dough shows through like mummy bandages.
- Place the wrapped bites on the baking sheet and bake for 10 to 12 minutes until the dough turns golden.
- Let the bites cool for five minutes. Warm the icing packet from the cinnamon rolls and use a small amount to attach two candy eyes to each bite.
Extra Tips
Cut the crescent strips evenly so they stay in place during baking. If the strips loosen, press them lightly before the pan goes in the oven. Store leftovers in an airtight container at room temperature for one day and warm them briefly to refresh the texture. Course: Dessert Cuisine: American Equipment: Baking Sheet, Knife, Oven
