
Oh, Halloween! Isn’t it just the most enchanting time of year? 🎃 As we prepare for a spooktacular potluck at work, I’ve gathered some fabulous ideas that will surely wow your colleagues. From savory Vampire Bat Wings to adorable Mummy Hot Dogs, there’s a little magic for everyone. And don’t forget a bubbling Witch’s Brew Punch to add some extra flair. Let’s make this Halloween truly unforgettable with these delightful treats!
Vampire Bat Wings
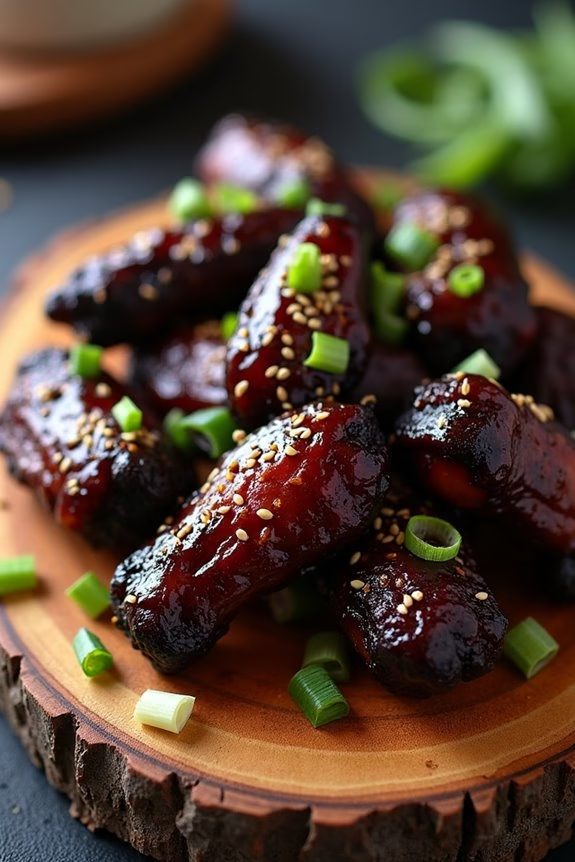
Vampire Bat Wings are the perfect spooky addition to any Halloween potluck. These delectable wings aren’t only delicious but also visually striking, thanks to their dark, glossy glaze that gives them an eerie, otherworldly appearance. The secret to achieving the perfect “bat wing” look is in the marinade, which combines soy sauce, hoisin sauce, and a touch of dark food coloring to create a rich, sinister hue.
These wings are sure to be a hit at your work party, providing a delightful mix of sweet, savory, and spicy flavors that will have your colleagues coming back for more.
Preparing Vampire Bat Wings is surprisingly simple, making them an ideal choice for a quick and easy potluck dish. The marinade infuses the chicken wings with bold flavors while ensuring they remain tender and juicy. The addition of garlic, ginger, and a hint of chili powder adds depth and a little kick to the wings, making them irresistibly tasty.
Whether you’re a seasoned cook or new to the kitchen, this recipe is straightforward and guaranteed to impress. With just a bit of preparation the day before, you’ll have a crowd-pleaser ready to bring to your Halloween gathering.
Ingredients (Serving Size: 4-6 people):
- 2 pounds of chicken wings
- 1/2 cup soy sauce
- 1/4 cup hoisin sauce
- 2 tablespoons honey
- 1 tablespoon rice vinegar
- 1 tablespoon sesame oil
- 2 cloves garlic, minced
- 1 teaspoon fresh ginger, grated
- 1 teaspoon chili powder
- 1/2 teaspoon black food coloring gel
- Sesame seeds for garnish
- Green onions, chopped, for garnish
Instructions:
- Prepare the Marinade: In a large mixing bowl, combine the soy sauce, hoisin sauce, honey, rice vinegar, and sesame oil. Stir in the minced garlic, grated ginger, and chili powder, mixing until all ingredients are well combined.
- Color the Marinade: Add the black food coloring gel to the marinade, stirring thoroughly until the color is evenly distributed. Adjust the amount of coloring to achieve the desired dark hue.
- Marinate the Wings: Add the chicken wings to the bowl, ensuring they’re fully coated with the marinade. Cover the bowl with plastic wrap and refrigerate for at least 4 hours, or overnight for best results.
- Preheat the Oven: When ready to cook, preheat your oven to 400°F (200°C). Line a baking sheet with aluminum foil and lightly grease it to prevent sticking.
- Bake the Wings: Arrange the marinated wings on the prepared baking sheet in a single layer. Bake in the preheated oven for 25-30 minutes, turning once halfway through, until the wings are cooked through and have a nice caramelized color.
- Garnish and Serve: Once cooked, remove the wings from the oven and let them rest for a few minutes. Garnish with sesame seeds and chopped green onions before serving.
Extra Tips:
For an extra layer of flavor, consider grilling the wings instead of baking them. This will add a smoky essence to the wings, enhancing their overall taste.
If you’re short on time, you can use a store-bought teriyaki sauce as a substitute for the marinade ingredients, but be sure to add the black food coloring to achieve the signature vampire bat look.
When serving, provide napkins or wet wipes, as these wings can get a bit messy – a small price to pay for their deliciousness!
Mummy Hot Dogs

Mummy Hot Dogs are a fun and spooky addition to any Halloween potluck, especially perfect for a workplace gathering. These playful treats are a twist on the classic pigs in a blanket, where hot dogs are wrapped in crescent roll dough to resemble mummies. Not only are they easy to make, but they also add a festive touch to your potluck spread, delighting both adults and kids alike with their whimsical appearance.
Perfect for a serving size of 4-6 people, Mummy Hot Dogs are an excellent choice for a small group gathering. The combination of savory hot dogs and buttery crescent dough is always a hit, and with a few simple touches, these mummies come to life with just a bit of creativity. Whether you’re looking to contribute something unique or you simply want to bring a smile to your coworkers’ faces, these Mummy Hot Dogs will definitely do the trick.
Ingredients:
- 8 hot dogs
- 1 package refrigerated crescent roll dough
- 1 egg (optional, for egg wash)
- 1 tablespoon water (optional, for egg wash)
- Mustard or ketchup for decorating
Instructions:
- Preheat the Oven: Begin by preheating your oven to 375°F (190°C). This guarantees that your mummies bake evenly and achieve a nice, golden brown color.
- Prepare the Crescent Dough: Unroll the crescent roll dough and separate it into triangles. Use a sharp knife to slice each triangle lengthwise into thin strips, about 1/4 inch wide. These strips will become the mummy’s “bandages.”
- Wrap the Hot Dogs: Take each hot dog and wrap it with the crescent roll strips, leaving a small space unwrapped at one end for the face. Overlap the strips slightly to create a bandage effect. Be sure to wrap them snugly, but not too tight, as the dough will expand while baking.
- Prepare for Baking: Place the wrapped hot dogs on a baking sheet lined with parchment paper. If desired, mix the egg with a tablespoon of water to create an egg wash and lightly brush it over the dough. This will give your mummies a glossy finish.
- Bake: Bake the mummies in the preheated oven for 12-15 minutes or until the dough is puffed and golden brown. Keep an eye on them to confirm they don’t overbake.
- Decorate: Once baked and slightly cooled, use mustard or ketchup to dot eyes onto the face space of each mummy. You can use a toothpick or the tip of a squeeze bottle for precision.
Extra Tips:
For an even more creative touch, you can add additional features to your Mummy Hot Dogs. Consider using small pieces of black olives or edible candy eyes for the eyes instead of mustard or ketchup.
If you’re preparing these in advance, you can wrap the hot dogs and store them in the refrigerator until you’re ready to bake. Just bring them to room temperature before baking for the best results.
Additionally, if you prefer a different type of dough, puff pastry can be a delightful alternative for a flaky texture. Remember, these Mummy Hot Dogs are all about having fun, so don’t be afraid to get creative with your decorating!
Witch’s Brew Punch
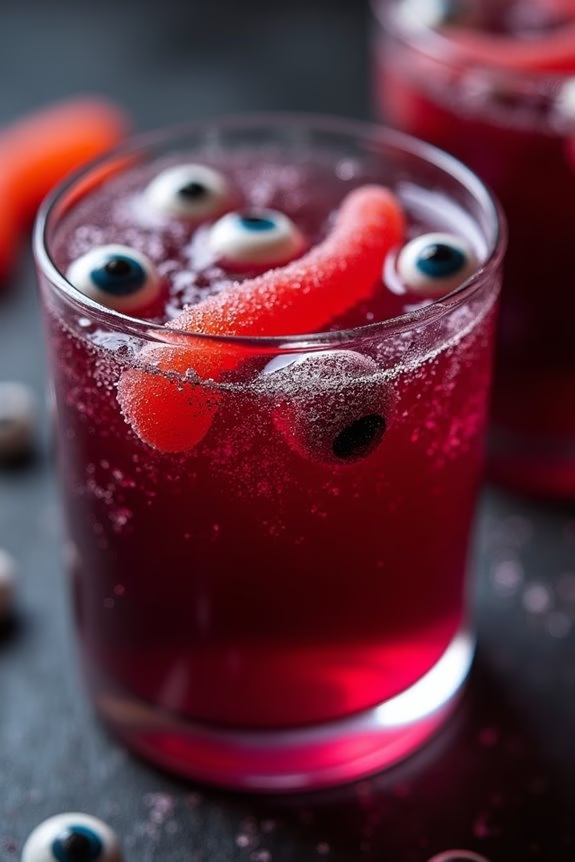
Witch’s Brew Punch is the perfect spooky beverage to serve at your Halloween office potluck. This eerie and enchanting drink won’t only quench the thirst of your colleagues but also add a touch of festive fun to your gathering. The deep colors and mysterious flavors of this punch are sure to be a hit, intriguing everyone with its appearance and delightful taste.
Whether served in a cauldron-like punch bowl or a simple glass pitcher, Witch’s Brew Punch will definitely be a conversation starter at any Halloween event. This punch is a blend of fruity flavors with a hint of fizz, creating a revitalizing and flavorful drink that can be enjoyed by adults and children alike.
It’s easy to prepare and can be made ahead of time, allowing you to focus on other potluck preparations. The recipe makes enough for 4-6 people, making it ideal for small gatherings or as a part of a larger selection of drinks. With just a few simple ingredients, you can create a magical beverage that captures the spirit of Halloween.
Ingredients (serving size: 4-6 people):
- 4 cups cranberry juice
- 2 cups pineapple juice
- 1 liter lemon-lime soda (e.g., Sprite or 7-Up)
- 1 cup grape juice
- 1/2 cup fresh lime juice
- 1/4 cup grenadine syrup
- Ice cubes
- Gummy worms or candy eyeballs for garnish (optional)
Instructions:
- Prepare the Base: In a large punch bowl or pitcher, combine the cranberry juice, pineapple juice, and grape juice. Stir the mixture well to verify that all the juices are evenly mixed.
- Add the Fizz: Pour in the lemon-lime soda gradually. Stir gently to maintain the carbonation, which gives the punch its delightful fizz.
- Incorporate the Lime: Add the fresh lime juice to the punch. The lime juice will add a revitalizing tartness that balances the sweetness of the other juices.
- Sweeten with Grenadine: Slowly pour in the grenadine syrup, stirring gently to mix it throughout the punch. The grenadine won’t only add sweetness but also deepen the color of the punch, enhancing its spooky appearance.
- Chill the Punch: Add ice cubes to the punch to keep it cool. You can also refrigerate the punch for at least an hour before serving if you prefer to prepare it in advance.
- Serve with a Touch of Spookiness: Just before serving, garnish the punch with gummy worms or candy eyeballs for a fun, creepy effect. These garnishes will float atop the punch, adding to its Halloween charm.
Extra Tips:
To enhance the Halloween theme, consider serving the Witch’s Brew Punch in a black cauldron or a large glass container with dry ice underneath for a smoky effect. If you choose to use dry ice, verify it’s placed in a separate container and not directly in the punch to avoid any safety hazards.
You can also customize the punch by adding different fruit juices or using flavored sodas for a unique twist. Adjust the amount of grenadine to suit your sweetness preference, and feel free to experiment with the garnishes to make the punch even more eye-catching.
Spooky Spider Deviled Eggs
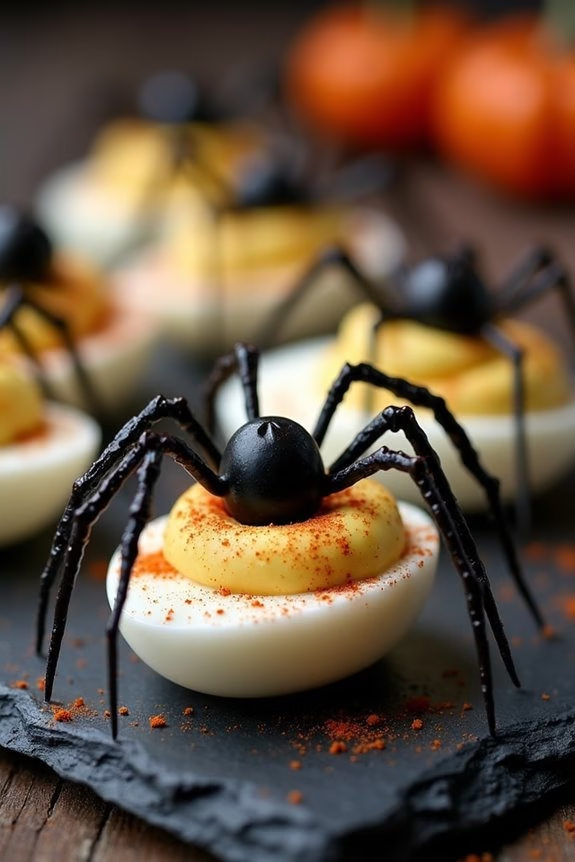
Halloween is the perfect time to get creative with your cooking, and Spooky Spider Deviled Eggs add a frightful yet delicious touch to any work potluck. This festive dish is a spooky twist on the classic deviled egg, with the addition of black olive spiders crawling across each egg. Not only are they visually striking, but they’re also incredibly tasty and easy to prepare, making them a hit at any Halloween gathering.
These creepy crawly deviled eggs are a great way to bring some fun and flavor to your office celebration. The creamy and tangy filling pairs perfectly with the slight saltiness of the olives, creating a delightful bite that everyone will enjoy. Plus, this recipe serves 4-6 people, making it an ideal contribution to a potluck where sharing is key. Get ready to impress your coworkers with this eerie yet delectable treat!
Ingredients (Serving Size: 4-6 people):
- 6 large eggs
- 3 tablespoons mayonnaise
- 1 teaspoon Dijon mustard
- 1 teaspoon white vinegar
- Salt and pepper to taste
- Paprika, for garnish
- 12 black olives
Cooking Instructions:
- Boil the Eggs: Place the eggs in a medium saucepan and cover them with cold water. Bring the water to a boil over medium-high heat. Once boiling, reduce the heat to low, cover the pan, and let the eggs simmer for 10 minutes.
- Cool and Peel: After boiling, transfer the eggs to a bowl of ice water to cool for about 5 minutes. This will make peeling easier. Once cooled, gently crack the shells and peel the eggs.
- Prepare the Filling: Slice each egg in half lengthwise and carefully remove the yolks, placing them in a separate bowl. Add mayonnaise, Dijon mustard, white vinegar, salt, and pepper to the yolks. Mash and mix the ingredients until smooth and creamy.
- Fill the Egg Whites: Spoon or pipe the yolk mixture back into the hollow of each egg white.
- Make the Spiders: Slice the black olives in half lengthwise. Use one half for the spider’s body and cut the other half into thin strips to create the legs. Arrange one half-olive on top of each filled egg to form the spider’s body, then place 3-4 strips on each side to form the legs.
- Garnish and Serve: Lightly sprinkle paprika over the filled eggs for a touch of color and flavor. Arrange the deviled eggs on a spooky-themed platter and serve.
Extra Tips:
To guarantee perfectly boiled eggs, start with cold water and bring it to a gentle boil. This method helps prevent cracking and results in a tender egg white.
If you’re short on time, you can prepare the deviled eggs a day in advance; just store them covered in the refrigerator and add the olive spiders right before serving.
Feel free to experiment with the filling by adding a dash of hot sauce or a sprinkle of smoked paprika for an extra kick.
Pumpkin Cheese Ball
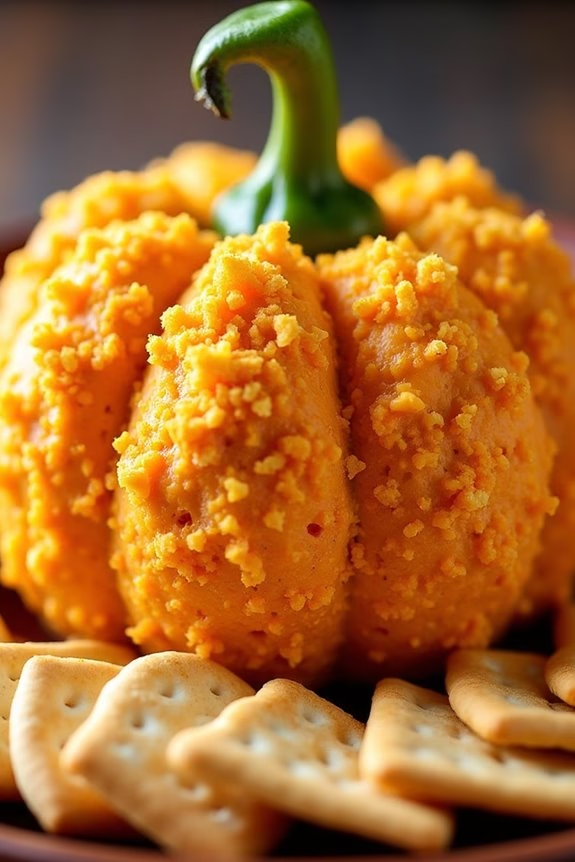
The Pumpkin Cheese Ball is a delightful and festive addition to any Halloween potluck at work. Its fun pumpkin shape and delicious cheesy flavor make it a crowd-pleaser that’s certain to impress your colleagues. This dish combines creamy cheeses with a hint of spice, rolled in crushed nacho cheese chips for the ultimate party snack. Not only is it tasty, but it also makes for a great centerpiece on your potluck table.
The preparation of the Pumpkin Cheese Ball is simple and requires minimal cooking skills, making it perfect for those who want to bring something unique without spending hours in the kitchen. This recipe serves 4-6 people, making it ideal for small office gatherings. With just a few ingredients and a touch of creativity, you’ll have a festive and flavorful treat ready in no time.
Ingredients (serving size: 4-6 people):
- 2 cups sharp cheddar cheese, shredded
- 8 oz cream cheese, softened
- 2 tablespoons sour cream
- 1 teaspoon Worcestershire sauce
- 1 teaspoon garlic powder
- 1/2 teaspoon smoked paprika
- 1/4 teaspoon cayenne pepper (optional, for extra spice)
- 1 cup crushed nacho cheese chips
- 1 bell pepper stem for decoration
- Crackers, for serving
Instructions:
- Mix the Cheeses: In a large mixing bowl, combine the shredded cheddar cheese, softened cream cheese, and sour cream. Use a hand mixer or a sturdy spatula to blend the cheeses until smooth and well combined.
- Add Flavoring: Stir in the Worcestershire sauce, garlic powder, smoked paprika, and cayenne pepper (if using). Mix until the spices are evenly distributed throughout the cheese mixture.
- Shape the Cheese Ball: Place the cheese mixture onto a large piece of plastic wrap. Wrap the cheese tightly and shape it into a round ball. Refrigerate for at least 2 hours, or until firm.
- Coat with Chips: Once the cheese ball is firm, remove it from the refrigerator. Roll it in the crushed nacho cheese chips until it’s completely coated, pressing gently to confirm the chips adhere.
- Decorate: Transfer the cheese ball to a serving plate. Insert the bell pepper stem at the top to mimic a pumpkin stem. This will give your cheese ball a festive pumpkin appearance.
- Serve: Arrange crackers around the cheese ball and serve immediately, or refrigerate until ready to serve.
Extra Tips:
For an added touch of flavor, consider mixing in some finely chopped green onions or chives into the cheese mixture. If you don’t have nacho cheese chips, you can substitute with any other crunchy chips or even crushed pretzels for a different texture.
To make shaping the cheese ball easier, lightly oil your hands or use a piece of parchment paper. Remember to let the cheese ball rest at room temperature for about 15 minutes before serving, so it’s easier to spread on crackers.
Ghostly Fruit Kabobs
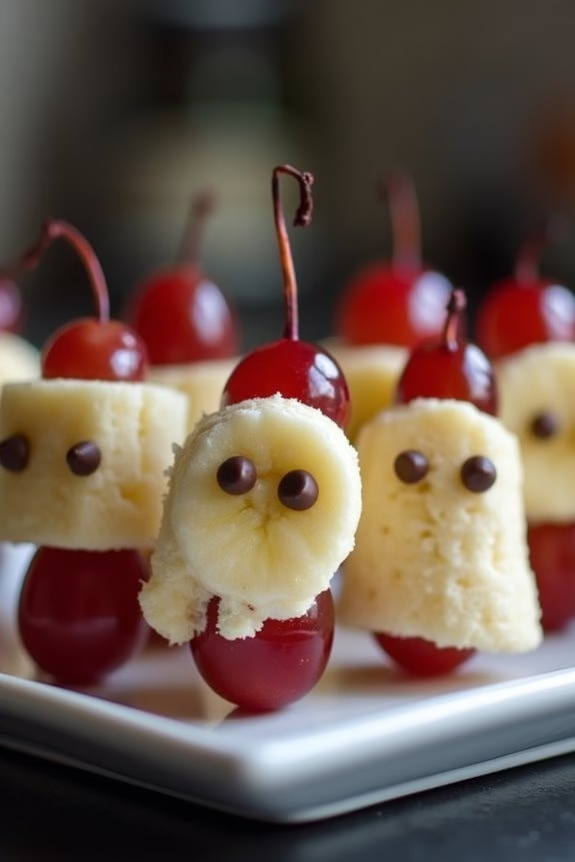
When it comes to Halloween potluck ideas for work, you want something that’s festive, easy to make, and appealing to a variety of tastes. Ghostly Fruit Kabobs fit the bill perfectly; they aren’t only healthy but also visually striking, making them a standout option for any office gathering. The whimsical design of these kabobs, featuring ghostly bananas and plump grapes, guarantees they’ll be a hit among both kids and adults alike.
These kabobs are as easy to assemble as they’re fun to eat. The combination of sweet, ripe bananas and juicy grapes provides a balanced flavor profile that’s both invigorating and satisfying. Plus, the simplicity of the ingredients allows you to prepare them quickly, leaving you more time to focus on other Halloween preparations. This recipe, designed to serve 4-6 people, will add a spooky yet delightful touch to your Halloween potluck spread.
Ingredients for 4-6 servings:
- 3 ripe bananas
- 24 seedless grapes (red or green)
- 12 mini chocolate chips
- 12 kabob sticks or skewers
Cooking Instructions:
- Prepare the Bananas: Peel the bananas and cut each one into four equal-sized pieces. These will form the ghostly bodies on your kabobs.
- Add Eyes to the Bananas: Press two mini chocolate chips into each banana slice to create eyes. Confirm they’re firmly embedded so they stay in place.
- Thread the Fruits onto Skewers: Start by sliding a grape onto the skewer, followed by a banana piece with the chocolate chip eyes facing outward. Repeat this process until you’ve filled the skewer, ideally with three banana pieces and three grapes per stick.
- Complete the Kabobs: Make sure to end each skewer with a grape to secure the fruits in place. This not only adds color but also keeps the bananas from sliding off.
- Chill Before Serving: Arrange the completed kabobs on a platter and chill them in the refrigerator for at least an hour before serving. This helps keep the fruit fresh and firm.
Extra Tips:
For an added touch of Halloween fun, consider using a small drizzle of melted dark chocolate to draw small ghostly mouths on the bananas. If you’re preparing these kabobs in advance, coat the banana slices lightly with lemon juice to prevent browning.
Additionally, if you want more variety, feel free to add other fruits like strawberries or melon balls. Remember, the key to a successful potluck dish isn’t only the taste but also the presentation, so have fun arranging these spooky treats!
Monster Eyeball Tacos

Monster Eyeball Tacos are a spooky, fun twist on traditional tacos, perfect for a Halloween potluck at work. These tacos not only taste delicious, but they also add a ghoulish flair to the table with their creepy yet edible eyeball decorations. The combination of seasoned ground beef, fresh toppings, and imaginative garnishes makes this dish both enjoyable to eat and visually engaging.
Creating Monster Eyeball Tacos is an excellent way to showcase your creativity in the kitchen while providing a hearty meal for your coworkers. The recipe is straightforward, allowing you to prepare the components ahead of time and assemble them quickly before serving. With just a little bit of effort, you can present a dish that’s sure to be the talk of the potluck and delight everyone with its imaginative presentation.
Ingredients (serving size: 4-6 people):
- 1 pound ground beef
- 1 packet taco seasoning mix
- 12 small soft taco shells
- 1 cup shredded lettuce
- 1 cup diced tomatoes
- 1 cup shredded cheddar cheese
- 1/2 cup sliced black olives
- 1/2 cup sour cream
- 1/4 cup sliced jalapeños
- 1/4 cup cherry tomatoes, halved
- Toothpicks
Cooking Instructions:
- Prepare the Meat: In a large skillet over medium heat, cook the ground beef until it’s browned, making sure to break it into small crumbles with a spatula. Drain any excess grease from the skillet.
- Season the Meat: Add the taco seasoning mix to the cooked beef, along with the recommended amount of water specified on the seasoning packet. Stir well to combine and let the mixture simmer for about 5 minutes, or until the sauce thickens.
- Heat the Taco Shells: While the beef is simmering, preheat the oven to 350°F (175°C). Wrap the taco shells in aluminum foil and place them in the oven to warm for about 5-7 minutes.
- Assemble the Tacos: Once the taco shells are warm, begin assembling the tacos. Start by spreading a layer of the seasoned beef into each shell, followed by a layer of shredded lettuce, diced tomatoes, and shredded cheddar cheese.
- Create the Eyeballs: To make the eyeballs, place a dollop of sour cream on top of each taco. Gently press a sliced black olive into the sour cream to serve as the pupil. For a more terrifying touch, use a slice of jalapeño beneath the olive for a green iris effect.
- Add Monster Features: Use the halved cherry tomatoes to create a monstrous mouth by placing them along the edges of the tacos. Secure the cherry tomato halves with toothpicks if necessary.
Extra Tips:
To enhance the spooky presentation of your Monster Eyeball Tacos, consider using a black serving tray or a platter decorated with fake cobwebs. If you want to add more heat, provide hot sauce on the side for those who enjoy a spicier kick.
Additionally, you can customize the toppings to cater to different dietary preferences, such as using ground turkey or black beans as a meat alternative. Preparing the components in advance and assembling the tacos just before serving will guarantee they remain fresh and intact for your potluck.
Creepy Crawly Pasta Salad
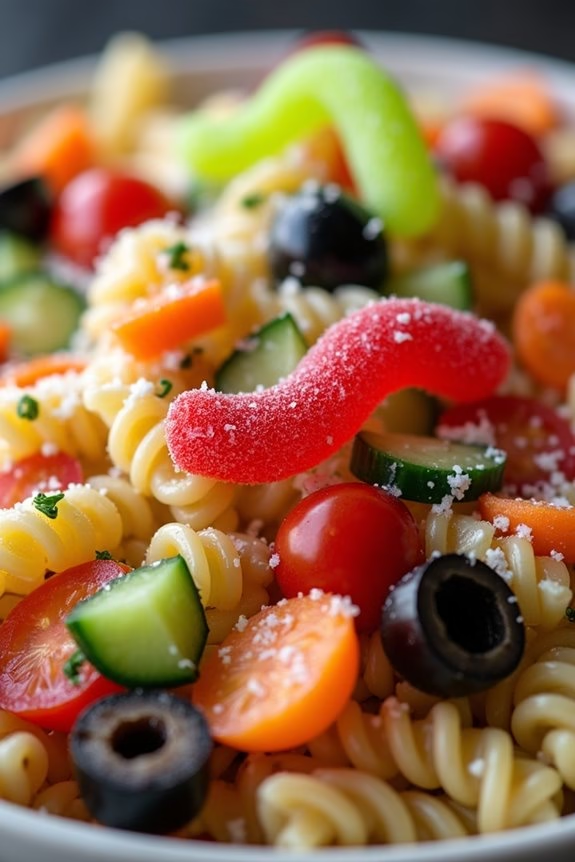
Halloween is the perfect time to get creative in the kitchen, and what better way to do so than with a dish that embodies the fun and spooky spirit of the holiday? Introducing the Creepy Crawly Pasta Salad – a delightful and eerie dish that will surely be a hit at your work potluck.
This pasta salad isn’t only delicious but also features a fun theme that will impress your colleagues. The combination of colorful pasta, fresh vegetables, and creepy-crawly gummy worms makes it a standout dish on any Halloween buffet table.
Whether you’re a seasoned cook or a novice in the kitchen, this recipe is easy to follow and requires minimal cooking time, allowing you to focus on the fun and creative aspect of food presentation. The gummy worms add a playful touch, while the flavorful dressing ties all the ingredients together beautifully.
Perfect for a serving size of 4-6 people, this dish is both visually appealing and palate-pleasing, making it an ideal choice for your Halloween celebration at work.
Ingredients:
- 8 oz rotini pasta
- 1 cup cherry tomatoes, halved
- 1 cup black olives, sliced
- 1 cup shredded carrots
- 1 cup diced cucumber
- 1/2 cup Italian dressing
- 1/4 cup grated Parmesan cheese
- 1/4 cup chopped fresh basil
- 1 cup gummy worms
- Salt and pepper to taste
Instructions:
1. Cook the Pasta:
Begin by cooking the rotini pasta according to the package instructions. Make certain to cook it until it’s al dente, as you want the pasta to have a bit of a bite and not be too soft.
Once cooked, drain the pasta and rinse it under cold water to stop the cooking process and to cool it down for the salad.
2. Prepare the Vegetables:
While the pasta is cooling, prepare the vegetables. Halve the cherry tomatoes, slice the black olives, shred the carrots, and dice the cucumber.
These colorful vegetables will add both texture and flavor to your pasta salad.
3. Mix the Salad:
In a large mixing bowl, combine the cooled pasta, cherry tomatoes, black olives, shredded carrots, and diced cucumber.
Toss all the ingredients together to guarantee they’re evenly distributed throughout the bowl.
4. Add the Dressing:
Pour the Italian dressing over the pasta and vegetable mixture. Use a large spoon or salad tongs to toss everything together, ensuring that the dressing coats all the ingredients evenly.
Add salt and pepper to taste.
5. Incorporate the Cheese and Basil:
Sprinkle the grated Parmesan cheese and chopped fresh basil over the salad.
These ingredients will add a rich, savory flavor to the dish. Gently toss the salad once more to mix everything thoroughly.
6. Add the Gummy Worms:
Finally, scatter the gummy worms over the top of the salad.
These will be the “creepy crawlies” that give the dish its Halloween theme. You can either mix them into the salad or leave them on top for decoration.
Extra Tips:
For an extra spooky touch, consider using black or orange pasta if you can find it, as it will add even more Halloween flair to the dish.
If you want your salad to be more filling, you can add some diced cooked chicken or tofu. Also, feel free to experiment with different types of dressings if you prefer a different flavor profile.
Make sure to assemble the dish shortly before serving to prevent the gummy worms from getting too soft. Enjoy your Creepy Crawly Pasta Salad and have a fun and festive Halloween potluck!
Frankenstein Rice Krispie Treats
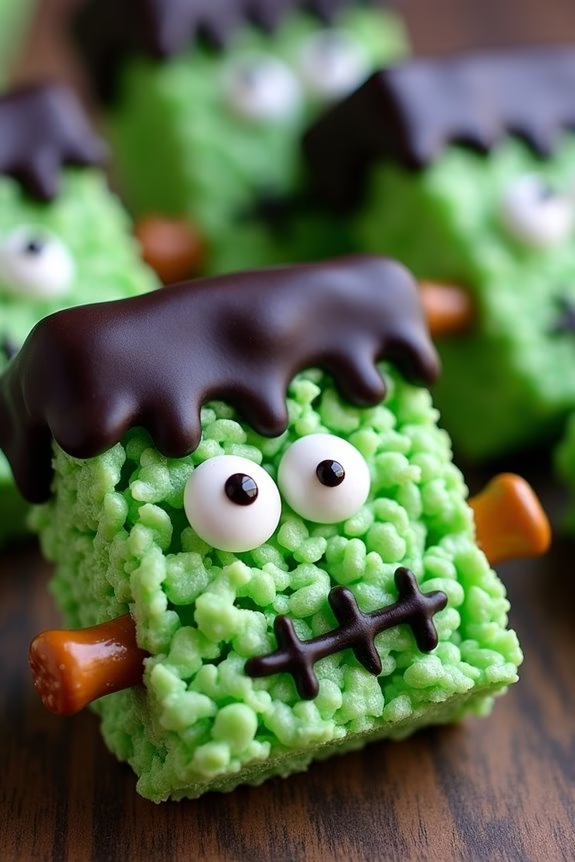
Frankenstein Rice Krispie Treats are a spooktacular addition to any Halloween potluck, especially at work where creativity and fun are key. This ghoulishly delightful treat combines the classic taste of Rice Krispie treats with a monstrous twist, perfect for adding a bit of festive fright to your gathering. Shaped and decorated to resemble everyone’s favorite green monster, these treats are sure to be a hit among your colleagues and add a playful touch to the snack table.
The beauty of Frankenstein Rice Krispie Treats lies not only in their whimsical appearance but also in their simplicity and deliciousness. They’re easy to make, requiring minimal ingredients and effort, which is ideal for busy professionals. The recipe yields about 4-6 servings, making it a great choice for sharing with your workmates. With a few clever decorations, these treats will be transformed into adorable mini monsters that are as fun to eat as they’re to look at.
Ingredients (for 4-6 servings):
- 4 cups mini marshmallows
- 3 tablespoons unsalted butter
- 6 cups Rice Krispies cereal
- Green food coloring
- 1/2 cup white chocolate chips
- Black icing or gel
- Candy eyes
- Pretzel sticks
Cooking Instructions:
- Prepare the Mixture: Begin by melting the butter in a large saucepan over low heat. Once melted, add the mini marshmallows, stirring continuously until they’re completely melted and smooth.
- Add Color: Remove the saucepan from heat and add a few drops of green food coloring to the melted marshmallow mixture. Stir well until the color is evenly distributed, adding more coloring if needed to achieve the desired Frankenstein green.
- Combine with Cereal: Gradually add the Rice Krispies cereal to the marshmallow mixture, stirring until all the cereal is well coated with the green marshmallow mixture.
- Shape the Treats: Pour the mixture into a greased 9×13 inch pan. Use a greased spatula or parchment paper to press the mixture evenly into the pan. Allow it to cool for about 15 minutes.
- Cut and Decorate: Once set, cut the treats into rectangular shapes to form Frankenstein’s head. Melt the white chocolate chips in a microwave-safe bowl, in 30-second intervals, stirring in between until smooth.
- Create the Face: Dip the top of each rectangle into the melted white chocolate to create Frankenstein’s hair. Use black icing or gel to add a mouth, scars, and other facial details. Attach candy eyes using a small dab of melted chocolate or icing.
- Add Bolts: Break pretzel sticks in half and insert one on each side of the rectangles to mimic Frankenstein’s bolts. Allow the treats to set completely before serving.
Extra Tips:
When making Frankenstein Rice Krispie Treats, make certain that you work quickly when shaping and decorating the treats, as the marshmallow mixture can harden quickly once it cools.
To prevent sticking, keep your hands or utensils lightly greased when handling the mixture. If you want to add more detail to Frankenstein’s face, consider using additional edible decorations like colored icing or candy for more elaborate features.
Bloody Finger Cookies
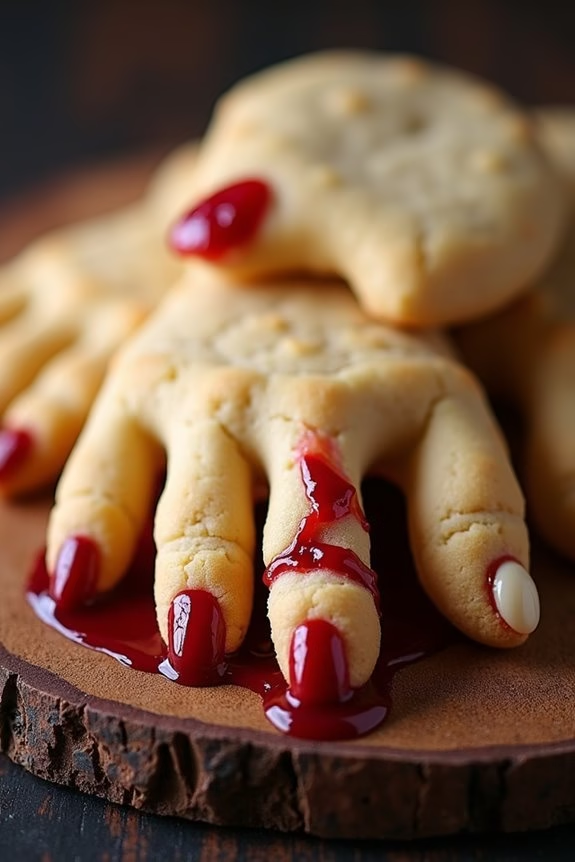
Bloody Finger Cookies are a spooky treat perfect for a Halloween potluck at work. These cookies not only taste delicious but also add a touch of eerie fun to any gathering. Shaped like severed fingers and complete with bloody details, they’re sure to be a hit with your colleagues.
With a buttery taste and a hint of almond, these cookies will quickly become a Halloween favorite. The key to making these cookies truly terrifying lies in the details. By shaping the dough into fingers and using almonds for fingernails, you create a realistic effect that’s both creepy and delightful.
Adding a touch of red food coloring gel or jam for blood completes the look, making these cookies a must-have for any Halloween event. Follow this recipe to create 24-30 Bloody Finger Cookies, perfect for serving a group of 4-6 people.
Ingredients:
- 1 cup unsalted butter, softened
- 1 cup powdered sugar
- 1 large egg
- 1 teaspoon almond extract
- 1 teaspoon vanilla extract
- 2 2/3 cups all-purpose flour
- 1 teaspoon baking powder
- 1 teaspoon salt
- 3/4 cup whole blanched almonds
- Red food coloring gel or strawberry jam
Instructions:
- Prepare the Dough: In a large mixing bowl, cream together the softened butter and powdered sugar until light and fluffy. Add the egg, almond extract, and vanilla extract, and mix until well combined.
- Mix Dry Ingredients: In a separate bowl, whisk together the all-purpose flour, baking powder, and salt. Gradually add the dry ingredients to the wet mixture, stirring until a dough forms. Cover the dough with plastic wrap and refrigerate for 30 minutes to firm up.
- Shape the Fingers: Preheat your oven to 325°F (165°C) and line a baking sheet with parchment paper. Take about a tablespoon of dough and roll it into a finger shape, about 3 inches long. Press an almond firmly into one end of the finger to create a fingernail.
- Create Knuckle Details: Using a small knife, make three slashes in the middle of each finger to create knuckle details. Make two more slashes below the almond to complete the finger look.
- Bake the Cookies: Place the shaped cookies on the prepared baking sheet, leaving some space between each one. Bake in the preheated oven for 20-25 minutes, or until the cookies are lightly golden.
- Add Blood Effect: Once the cookies are baked and cooled slightly, remove the almond, add a small amount of red food coloring gel or strawberry jam in the nail bed, and press the almond back into place.
Extra Tips:
For an even more realistic effect, you can use a skewer to add wrinkles to the fingers before baking. If you prefer a less sweet cookie, reduce the amount of powdered sugar slightly.
To make the cookies more gruesome, use a bit of jam around the knuckles and fingertips for added bloodiness. These cookies can be made a day in advance and stored in an airtight container, making them a convenient choice for a Halloween potluck.
Haunted Graveyard Brownies
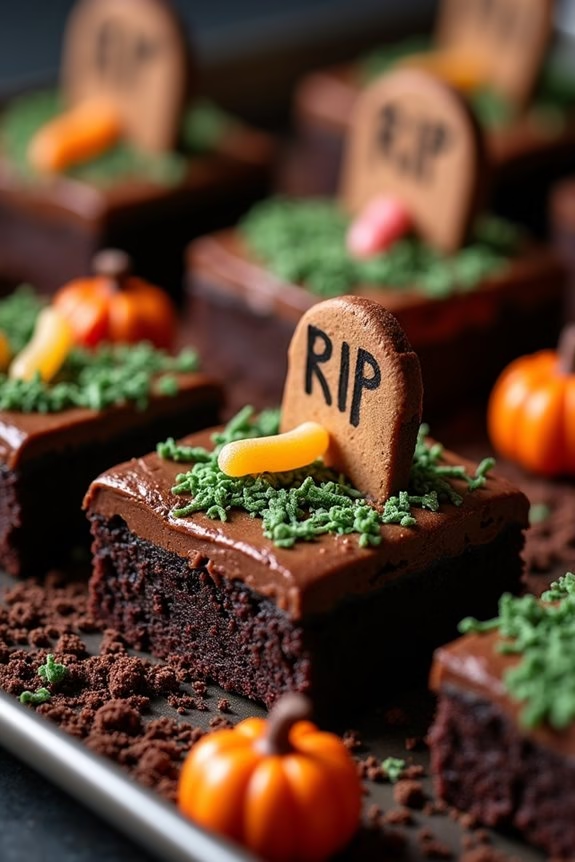
Haunted Graveyard Brownies are the perfect spooky treat for your Halloween potluck at work. These rich, fudgy brownies are transformed into a chilling graveyard scene with the help of some creative decorations that are as fun to make as they’re to eat.
With a blend of chocolatey goodness and eerie embellishments, these brownies will definitely become a conversation starter at the party. Tailor-made for a serving size of 4-6 people, this recipe guarantees everyone gets a deliciously haunting bite.
Whether you’re a baking novice or a seasoned pro, this recipe is straightforward and enjoyable to make. You’ll begin by whipping up a batch of classic brownies, and then let your creative side shine as you decorate with cookie tombstones, gummy worms, and candy pumpkins.
The end result is both delightful and ghoulish, perfectly capturing the Halloween spirit. Get ready to impress your coworkers with this unique and tasty dessert.
Ingredients for 4-6 servings:
- 1 cup unsalted butter
- 2 cups granulated sugar
- 4 large eggs
- 1 cup all-purpose flour
- 1 cup unsweetened cocoa powder
- 1/2 teaspoon salt
- 1 teaspoon vanilla extract
- 1/2 cup mini chocolate chips
- 6 chocolate sandwich cookies (for tombstones)
- 8-10 gummy worms
- 4-6 candy pumpkins
- 1/2 cup chocolate frosting
- 1/4 cup green-tinted shredded coconut (optional)
- Edible writing gel (to write on tombstones)
Cooking Instructions:
- Preheat and Prep: Preheat your oven to 350°F (175°C). Grease a 9×13 inch baking pan or line it with parchment paper for easy removal.
- Mix Wet Ingredients: In a large microwave-safe bowl, melt the butter. Add the sugar and mix well until combined. Let it cool slightly, then add in the eggs one at a time, beating well after each addition. Stir in the vanilla extract.
- Incorporate Dry Ingredients: In a separate bowl, sift together the flour, cocoa powder, and salt. Gradually add this dry mixture to the wet ingredients, stirring just until combined. Be careful not to overmix.
- Add Chocolate Chips: Fold in the mini chocolate chips to the batter. This will add extra gooeyness and texture to your brownies.
- Bake: Pour the brownie batter into the prepared baking pan and smooth the top with a spatula. Bake for 25-30 minutes, or until a toothpick inserted into the center comes out with a few moist crumbs.
- Cool and Prepare Decorations: Allow the brownies to cool completely in the pan on a wire rack. Meanwhile, prepare your decorations. Split the chocolate sandwich cookies in half and use the edible writing gel to write spooky messages on the flat side of each cookie half like “RIP”.
- Decorate: Spread a thin layer of chocolate frosting over the cooled brownies. Arrange the cookie tombstones standing up in the frosting. Scatter gummy worms and candy pumpkins around the tombstones. For a grass-like effect, sprinkle green-tinted shredded coconut around the decorations.
- Serve: Cut into squares and serve. Enjoy the hauntingly delicious treat!
Extra Tips:
For an added touch of realism, you can use crushed chocolate cookies or graham crackers to resemble dirt, sprinkling them around the base of the tombstones.
If you want to save time, you can use a boxed brownie mix as the base and focus your effort on the creative decorations. Adjust the sweetness by reducing the sugar slightly if desired, or try adding a pinch of espresso powder to enhance the chocolate flavor.
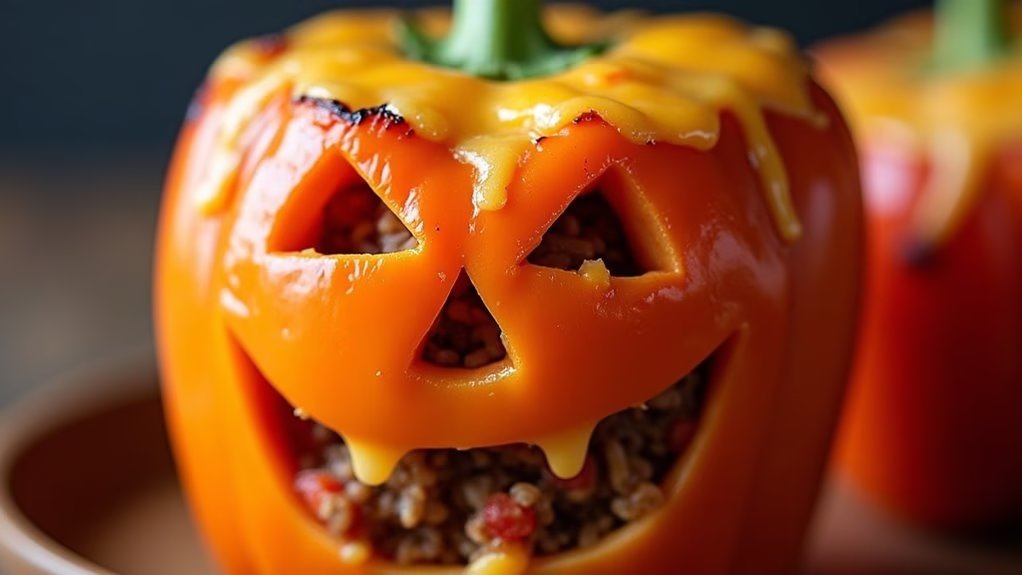
Jack-o’-Lantern Stuffed Peppers
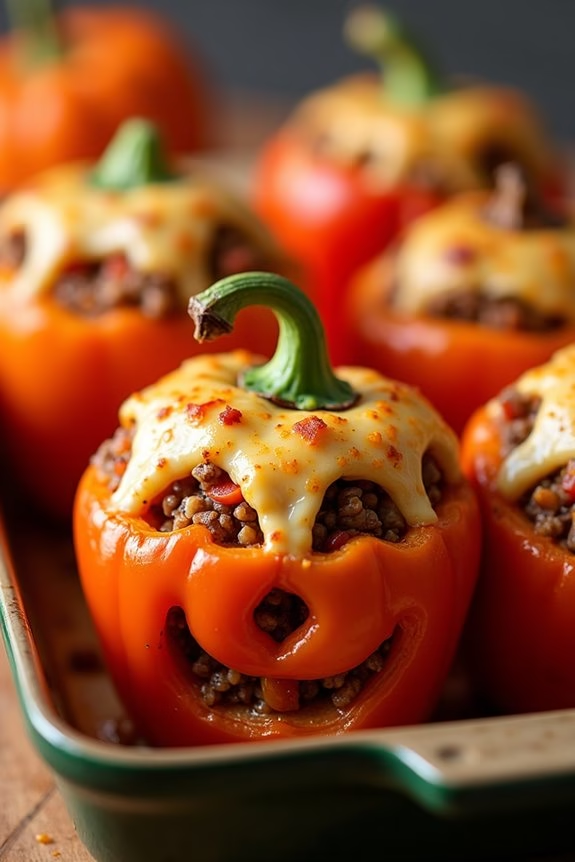
Celebrate Halloween at work with these festive and delicious Jack-o’-Lantern Stuffed Peppers. They aren’t just visually appealing, but also packed with a savory and hearty filling that everyone will enjoy. This dish combines the fun of Halloween with the warmth of a home-cooked meal, making it a perfect addition to any Halloween potluck at the office.
The peppers are carved like Jack-o’-Lanterns, adding a spooky touch to your potluck spread, and are filled with a flavorful mixture of rice, ground meat, vegetables, and spices. These stuffed peppers aren’t only a treat for the eyes but also customizable to suit various dietary preferences. You can use ground beef, chicken, turkey, or even opt for a vegetarian version by using beans or lentils.
The combination of rice and meat, along with the aromatic spices, guarantees that these stuffed peppers are both filling and flavorful. Designed to serve 4-6 people, they’re perfect for sharing and are sure to be a hit at your Halloween office party.
Ingredients for 4-6 servings:
- 6 medium-sized orange bell peppers
- 1 pound ground beef or turkey
- 1 cup cooked rice
- 1 small onion, diced
- 2 cloves garlic, minced
- 1 can (15 ounces) diced tomatoes, drained
- 1 cup shredded cheddar cheese
- 1 tablespoon olive oil
- 1 teaspoon salt
- 1/2 teaspoon black pepper
- 1 teaspoon paprika
- 1 teaspoon dried oregano
- 1/2 teaspoon cumin
- 1/2 cup water
Cooking Instructions:
- Prepare the Peppers: Start by preheating your oven to 375°F (190°C). Carefully slice the tops off the bell peppers and remove the seeds and membranes. Carve out Jack-o’-Lantern faces on each pepper using a small, sharp knife, being careful not to cut too large or too close to the edges to maintain structural integrity.
- Cook the Filling: In a large skillet, heat olive oil over medium heat. Add the diced onion and minced garlic, sautéing until the onion is translucent. Add the ground beef or turkey, breaking it up with a spoon, and cook until browned. Drain any excess fat.
- Season the Mixture: Stir in the drained diced tomatoes, cooked rice, salt, pepper, paprika, oregano, and cumin. Mix well and cook for an additional 5 minutes, allowing the flavors to meld together.
- Stuff the Peppers: Place the carved peppers upright in a baking dish. Spoon the meat and rice mixture into each pepper, packing it lightly. Top each filled pepper with a sprinkle of shredded cheddar cheese.
- Bake the Peppers: Pour 1/2 cup of water into the bottom of the baking dish to help steam the peppers. Cover the dish with aluminum foil and bake in the preheated oven for 30 minutes. Remove the foil and bake for an additional 10-15 minutes, or until the peppers are tender and the cheese is bubbly and golden.
Extra Tips:
For a vegetarian version, replace the ground meat with a can of black beans or lentils, and add corn or chopped mushrooms for extra texture. If you prefer your peppers to have a bit of a kick, consider adding a pinch of cayenne pepper or some chopped jalapeños to the filling.
To make the carving easier, you can use a small paring knife or a pumpkin carving tool. Confirm the peppers are evenly sized for uniform cooking, and feel free to experiment with different cheese varieties for a unique flavor twist.