

Let’s talk about planning the ultimate work party with some truly spooktacular treats. Think creepy, creative, and oh-so-delicious dishes that will have everyone talking. Spooky spider deviled eggs and mummy jalapeño poppers are just a taste of what’s in store. And don’t forget the bat wing chicken drumsticks that will fly off the table. Get ready to enchant your co-workers with these hauntingly delicious recipes!
Spooky Spider Deviled Eggs

Get ready to delight and fright your colleagues with these Spooky Spider Deviled Eggs at your next work Halloween party. This playful twist on the classic deviled eggs will add a creepy yet delicious touch to your festive spread. The combination of creamy deviled egg filling accompanied by black olive spiders is sure to be a hit among your coworkers, making it a memorable addition to the party table.
The spooky aesthetic of these deviled eggs is achieved effortlessly with a few simple ingredients. Whether you’re a seasoned cook or a kitchen newbie, you’ll find this recipe easy to follow and fun to prepare. Best of all, you can whip up these spooky treats in less than an hour, leaving you ample time to focus on your costume or other party preparations. This recipe serves 4-6 people, making it perfect for small gatherings or as part of a larger buffet.
Ingredients (for 4-6 people):
- 6 large eggs
- 1/4 cup mayonnaise
- 1 teaspoon Dijon mustard
- 1 teaspoon white vinegar
- Salt, to taste
- Black pepper, to taste
- Paprika, for garnish
- 12-15 large black olives
Cooking Instructions:
- Boil the Eggs: Place the eggs in a saucepan and cover them with cold water. Bring the water to a boil over medium-high heat. Once boiling, cover the saucepan, remove from heat, and let the eggs sit for 10-12 minutes. This method guarantees perfectly hard-boiled eggs.
- Cool and Peel: After the eggs are done, transfer them to a bowl of ice water to cool for about 5 minutes. Once cooled, gently crack and peel the eggs. Rinse to remove any shell fragments.
- Prepare the Filling: Slice each egg in half lengthwise. Carefully remove the yolks and place them in a small mixing bowl. Set the egg whites aside on a serving platter.
- Make the Filling: Mash the yolks with a fork until crumbly. Add mayonnaise, Dijon mustard, white vinegar, salt, and pepper. Mix until smooth and creamy. Taste and adjust seasoning if necessary.
- Fill the Egg Whites: Using a spoon or a piping bag, fill each egg white half with the yolk mixture. Mound the filling slightly for a spooky effect.
- Decorate with Olive Spiders: Cut the olives in half. Use one half for the spider’s body and slice the remaining halves into thin strips to form the legs. Arrange one body on top of each deviled egg and position 8 legs around it to complete the spider look.
- Garnish and Serve: Lightly sprinkle paprika over the eggs for a touch of color and extra flavor. Serve immediately or refrigerate until ready to serve.
Extra Tips:
For an even spookier presentation, consider placing the Spooky Spider Deviled Eggs on a bed of lettuce or kale to mimic a creepy forest floor.
If you want to add more flavor or color to the filling, try mixing in some finely chopped chives or a dash of hot sauce for a kick.
Be sure to use a pitted variety of black olives to make slicing easier.
Finally, if you’re preparing these eggs in advance, store them covered in the refrigerator and add the olive spiders just before serving to maintain their fresh appearance.
Mummy Jalapeño Poppers

Mummy Jalapeño Poppers are a fun and spooky treat perfect for any Halloween-themed work party. These poppers are a playful twist on the classic appetizer, with a ghoulishly delightful appearance that’s certain to impress your colleagues. Wrapped in crescent roll dough and stuffed with a creamy cheese filling, these poppers resemble little mummies, complete with edible eyes.
They’re not only visually appealing but also offer a spicy kick that balances well with their creamy interior. This recipe is designed to serve 4-6 people, making it ideal for a small gathering or as part of a larger spread of Halloween-themed dishes.
The jalapeños are hollowed out and filled with a mixture of cream cheese and cheddar cheese, then wrapped in strips of dough to create the mummy effect. A pair of candy eyes adds the finishing touch, transforming these snacks into a creepy yet cute addition to your Halloween festivities.
Ingredients for 4-6 servings:
- 12 large jalapeño peppers
- 8 oz cream cheese, softened
- 1 cup shredded cheddar cheese
- 1/2 teaspoon garlic powder
- 1/4 teaspoon salt
- 1 can (8 oz) refrigerated crescent roll dough
- 24 small candy eyes
Cooking Instructions:
- Prepare the Jalapeños: Begin by preheating your oven to 375°F (190°C). Cut each jalapeño in half lengthwise and remove the seeds and membranes to reduce the heat level, unless you prefer them extra spicy.
- Make the Filling: In a mixing bowl, combine the softened cream cheese, shredded cheddar cheese, garlic powder, and salt. Mix until the ingredients are well blended and smooth.
- Fill the Jalapeños: Spoon the cheese mixture into each jalapeño half, packing it in tightly to guarantee they’re fully stuffed.
- Wrap the Mummies: Unroll the crescent roll dough and separate it into four rectangles. Pinch the perforations to seal them. Cut each rectangle into thin strips, about 1/4 inch wide. Wrap two or three strips around each stuffed jalapeño, leaving space for the eyes.
- Bake: Place the wrapped jalapeños on a baking sheet lined with parchment paper. Bake in the preheated oven for 12-15 minutes, or until the dough turns golden brown and the cheese is melted.
- Add the Eyes: Remove the jalapeño poppers from the oven and let them cool slightly. Press two candy eyes into the cheese filling near the top of each jalapeño to create the appearance of a mummy.
Extra Tips: To make these Mummy Jalapeño Poppers ahead of time, you can prepare them up to the point of baking and refrigerate them until you’re ready to pop them in the oven. Just be sure to add a few extra minutes to the baking time if they go into the oven cold.
For a less spicy version, consider using mini sweet peppers instead of jalapeños. Also, be cautious when handling the jalapeños, as the oils can irritate your skin and eyes—wearing gloves can help prevent this.
Ghostly Cheese Platter
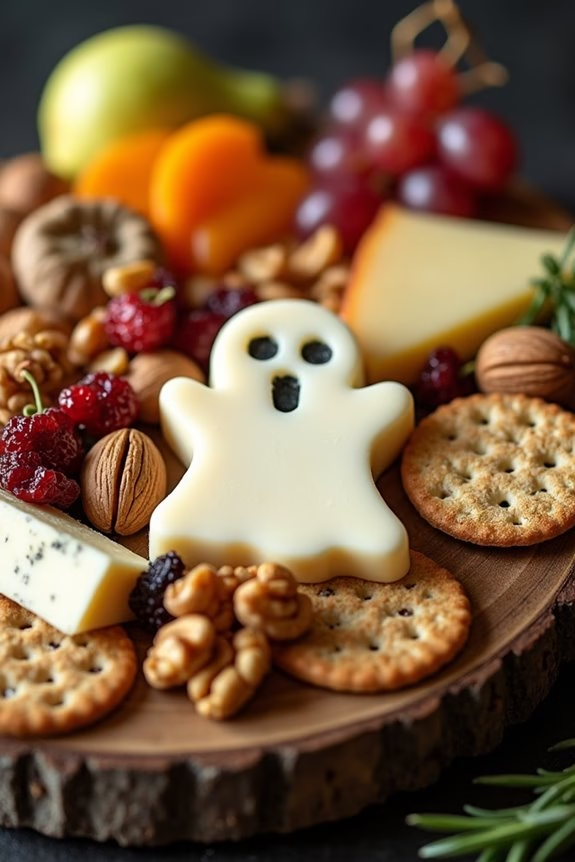
A Ghostly Cheese Platter is an enchanting and delicious addition to any Halloween-themed work party. This platter combines a variety of cheeses, crackers, fruits, and nuts, all arranged to create a spooky yet sophisticated display. The key is to choose cheeses that vary in texture and flavor, and to incorporate ghostly decorations that bring a festive touch. This dish isn’t only visually appealing but also offers a delightful assortment of tastes that will please any crowd.
The Ghostly Cheese Platter is designed to serve 4-6 people, making it perfect for a small gathering or as part of a larger spread. The platter can be customized to suit different dietary preferences and can include both savory and sweet elements. The addition of ghost-shaped cheese slices or crackers, along with creatively carved fruits, adds an element of fun and whimsy to the presentation. Whether you’re hosting a party in the office or simply want to impress your coworkers, this platter is sure to be a hit.
Ingredients (serving size: 4-6 people):
- 200g of brie cheese
- 200g of cheddar cheese (ghost-shaped if possible)
- 150g of gouda cheese
- 150g of blue cheese
- 1/2 cup of almonds or walnuts
- 1/2 cup of dried cranberries or apricots
- 1 cup of seedless grapes
- 1 small apple, sliced
- 1 small pear, sliced
- Variety of crackers (ghost-shaped if available)
- Fresh rosemary or thyme sprigs for garnish
Cooking Instructions:
- Prepare the Cheese: Start by slicing the cheeses. For the cheddar, if you have ghost-shaped cutters, use them to cut out ghost shapes. If not, slice into small, bite-sized pieces. Cut the brie into wedges, and slice the gouda and blue cheese into thin pieces.
- Arrange the Cheeses: On a large platter or wooden board, arrange the cheeses in separate sections. Place the ghost-shaped cheddar slices at the center to be the focal point of the platter.
- Add Fruits and Nuts: Place the almonds or walnuts and dried cranberries or apricots in small piles around the cheese. Arrange the grapes, apple, and pear slices around the platter, ensuring they’re evenly distributed.
- Include Crackers: Place a variety of crackers around the cheese and fruit. If you have ghost-shaped crackers, position them near the ghost-shaped cheese for thematic consistency.
- Garnish the Platter: Add fresh rosemary or thyme sprigs for a touch of greenery. This not only enhances the presentation but also adds a subtle aroma to the platter.
Extra Tips:
To keep the apple and pear slices from browning, dip them in a little lemon juice before arranging them on the platter. If carving ghost shapes is too challenging, simply use a mix of cheese types and focus on a creative layout.
Be sure to bring the cheeses to room temperature before serving, as this enhances their flavors. Additionally, feel free to experiment with different types of cheeses and accompaniments to match your preferences and any dietary restrictions of your guests.
Witch’s Broomstick Snacks

Halloween is the perfect occasion to get creative with your culinary delights, and Witch’s Broomstick Snacks are a charming addition to any work party spread. These whimsical snacks not only look festive but are also deliciously savory, making them a hit among both kids and adults. The combination of pretzel sticks and cheese creates a crunchy, cheesy treat that’s easy to assemble and delightful to eat.
Ideal for a serving size of 4-6 people, these Witch’s Broomstick Snacks are simple to prepare and require minimal ingredients, making them a quick fix for those busy Halloween days. Whether you’re hosting a work party or contributing to a communal snack table, these broomsticks will add a touch of magic and enchantment to the festivities. The best part is, you don’t have to be a culinary wizard to whip them up!
Ingredients (for 4-6 servings):
- 12 pretzel sticks
- 6 string cheese sticks
- Fresh chives (about 12 stalks)
Cooking Instructions:
- Prepare the Cheese: Take each string cheese stick and cut it in half to create 12 small sticks. For each piece, use your fingers to gently fan out the bottom half, creating the bristles of the broomstick.
- Attach the Pretzel Sticks: Insert one pretzel stick into the un-fanned end of each cheese piece. Push gently until securely in place; this will form the handle of the broomstick.
- Secure with Chives: Wrap a fresh chive around the cheese, just above the fanned out section, and tie it to look like a broom binding. If needed, you can trim any excess chive length for a neater appearance.
- Chill and Serve: Place the broomsticks on a platter. You can chill them for a few minutes in the refrigerator to firm up the cheese slightly before serving. This will help the broomsticks hold their shape and make them easier to handle.
Extra Tips:
For best results, use fresh cheese and pretzels to guarantee your broomsticks are as tasty as possible. If you find the chives difficult to tie, blanch them briefly in hot water to make them more pliable, then quickly cool them in ice water. This will make wrapping them around the cheese much easier.
Additionally, feel free to get creative with the presentation; arranging the broomsticks on a plate with some Halloween-themed decor can add a spooky touch to your snack table. Enjoy your magical munchies!
Pumpkin Patch Cupcakes

Pumpkin Patch Cupcakes are a festive and delicious treat perfect for any Halloween work party. These delightful cupcakes not only taste like autumn with their rich pumpkin flavor but also look the part, decorated to resemble a miniature pumpkin patch. The creamy frosting and creative decoration make them an eye-catching addition to the party table, certain to impress colleagues and add to the festive spirit of Halloween.
The recipe is straightforward and allows for some fun and creativity with the decorations. You’ll start by making a moist pumpkin-flavored cupcake base and topping it with a cream cheese frosting that pairs perfectly with the spices in the cake. Finally, the cupcakes are adorned with cute pumpkin decorations, which can be made with fondant or candy. This recipe serves 4-6 people, making it ideal for small to medium-sized gatherings.
Ingredients:
- 1 cup all-purpose flour
- 1 teaspoon baking powder
- 1/2 teaspoon baking soda
- 1/2 teaspoon ground cinnamon
- 1/4 teaspoon ground nutmeg
- 1/4 teaspoon ground ginger
- 1/4 teaspoon salt
- 1/2 cup canned pumpkin puree
- 1/4 cup vegetable oil
- 1/4 cup brown sugar
- 1/4 cup granulated sugar
- 1 large egg
- 1 teaspoon vanilla extract
- 4 ounces cream cheese, softened
- 1/4 cup unsalted butter, softened
- 1 cup powdered sugar
- 1/2 teaspoon vanilla extract
- Green food coloring
- Orange fondant or candy pumpkins for decoration
Instructions:
- Preheat and Prepare: Preheat your oven to 350°F (175°C). Line a cupcake pan with cupcake liners to get them ready for the batter.
- Mix Dry Ingredients: In a medium bowl, whisk together the flour, baking powder, baking soda, cinnamon, nutmeg, ginger, and salt. This will guarantee all the spices are evenly distributed in the batter.
- Combine Wet Ingredients: In a separate large bowl, combine the pumpkin puree, vegetable oil, brown sugar, granulated sugar, egg, and vanilla extract. Whisk until the mixture is smooth and well combined.
- Create the Batter: Gradually add the dry ingredients to the wet ingredients, mixing just until combined. Be careful not to overmix to keep the cupcakes light and fluffy.
- Fill the Liners: Divide the batter evenly among the prepared cupcake liners, filling each about two-thirds full.
- Bake: Place the cupcake pan in the preheated oven and bake for 18-20 minutes, or until a toothpick inserted into the center comes out clean. Allow the cupcakes to cool completely on a wire rack.
- Make the Frosting: In a medium bowl, beat together the softened cream cheese and butter until smooth. Gradually add the powdered sugar and vanilla extract, beating until the frosting is creamy and smooth.
- Decorate: Add a small amount of green food coloring to the frosting and mix until you achieve the desired shade for your pumpkin vines. Spread or pipe the frosting onto the cooled cupcakes. Finish by placing orange fondant or candy pumpkins on top to create the pumpkin patch look.
Extra Tips:
For an even more adorable presentation, consider using small pretzel sticks as pumpkin stalks, or add little green fondant leaves for extra detail. If you don’t have orange fondant, candy corn or orange-colored chocolate candies can make great substitutes for the pumpkin decorations.
Additionally, if you’re short on time, you can use a boxed spice cake mix as a base and simply add the pumpkin and spices for a quick and easy shortcut. Enjoy the process, and remember that these cupcakes are meant to be fun and festive, so feel free to get creative with the decorations!
Monster Mash Popcorn Mix
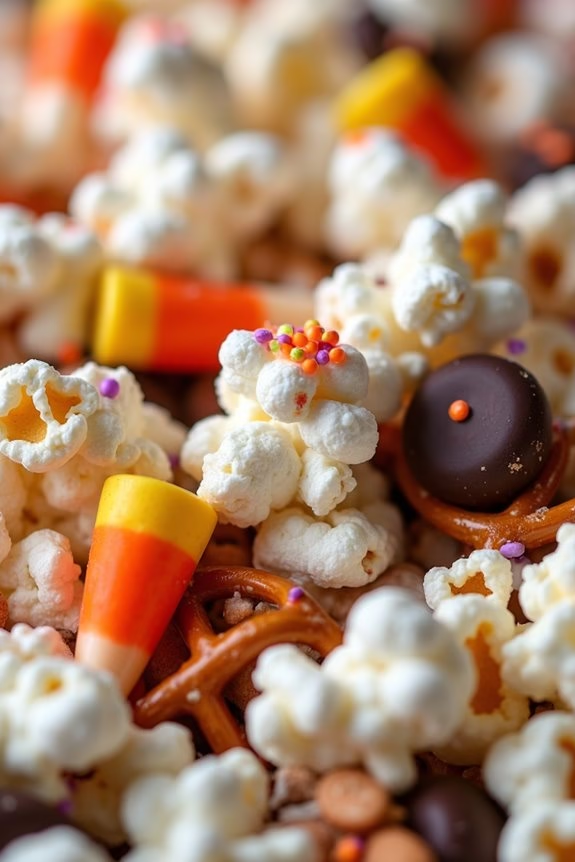
Monster Mash Popcorn Mix is a delicious, spooky treat perfect for Halloween work parties. This colorful and fun snack combines sweet and salty flavors, making it an absolute favorite among all age groups.
It’s not only easy to make, but it also adds a festive touch to your party spread with its vibrant colors and varied textures. Whether you’re planning a large gathering at the office or a smaller team celebration, this recipe is bound to be a hit.
This Monster Mash Popcorn Mix can be prepared quickly and requires minimal cooking time, which is ideal for those last-minute party preparations. The combination of popcorn, candy, and pretzels creates a delightful munch that everyone will enjoy.
Plus, it’s easy to customize with your favorite sweets and treats. This recipe serves 4-6 people, making it suitable for sharing among colleagues.
Ingredients:
- 8 cups of popped popcorn
- 1 cup of pretzel sticks
- 1 cup of candy corn
- 1 cup of chocolate-coated candies (like M&Ms)
- 1/2 cup of mini marshmallows
- 1/2 cup of peanuts (optional)
- 1/2 cup of white chocolate chips
- 1/4 cup of Halloween-themed sprinkles
Instructions:
- Prepare the Popcorn: Begin by popping your popcorn. You can use microwave popcorn or air-pop your own. Make sure to remove any unpopped kernels to guarantee the mix is safe and pleasant to eat.
- Mix the Dry Ingredients: In a large bowl, combine the popcorn, pretzel sticks, candy corn, chocolate-coated candies, mini marshmallows, and peanuts (if using). Stir gently to guarantee an even distribution of all the ingredients.
- Melt the Chocolate: In a microwave-safe bowl, melt the white chocolate chips in 30-second intervals, stirring in between, until smooth and completely melted. Be careful not to overheat the chocolate, as it can become lumpy and hard to work with.
- Combine and Coat: Drizzle the melted white chocolate over the popcorn mixture. Use a spatula or spoon to gently fold the mixture until everything is coated with chocolate. This helps to bind the ingredients together and adds a sweet touch.
- Add Sprinkles: Quickly before the chocolate sets, add the Halloween-themed sprinkles to the mix. The melted chocolate will help the sprinkles adhere to the popcorn and other ingredients, adding extra color and festive flair.
- Set and Serve: Spread the mixture out on a large baking sheet lined with parchment paper. Allow it to set at room temperature for about 20-30 minutes, or until the chocolate has hardened. Once set, break into clusters and serve.
Extra Tips:
For an even more festive touch, you can add a few drops of food coloring to the melted white chocolate before drizzling it over the mix. This allows you to create custom colors that match your Halloween theme.
Feel free to substitute or add different types of candies and nuts based on your preferences. If you prefer a less sweet version, reduce the amount of candy or choose unsweetened popcorn.
Store any leftovers in an airtight container to keep the popcorn fresh and crunchy for a couple of days. Enjoy your spooky snack!
Graveyard Pudding Cups
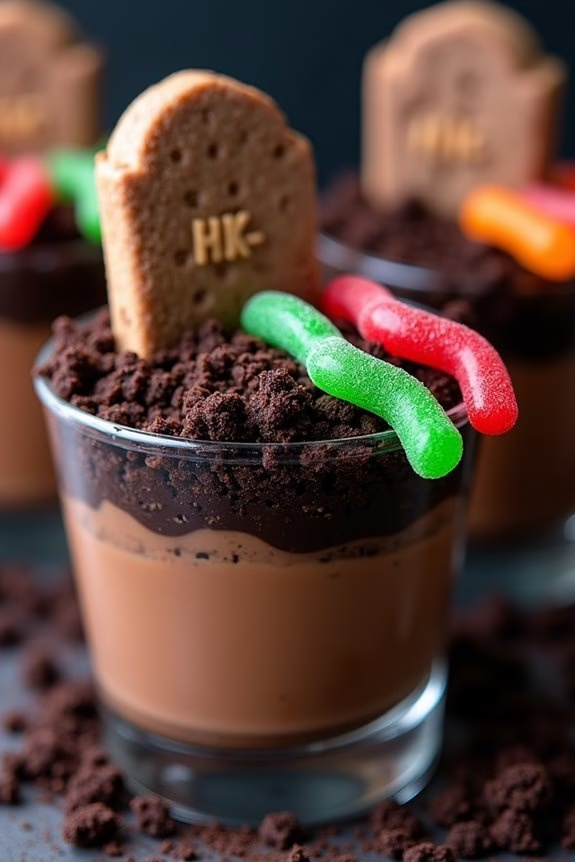
Graveyard Pudding Cups are a delightful and spooky treat perfect for Halloween work parties. These dessert cups not only offer a deliciously creamy and chocolatey flavor but also provide a fun, thematic presentation with a graveyard twist.
Each cup is topped with cookie “dirt,” gummy worms, and tombstone-shaped cookies, making them a hit among both kids and adults. They’re easy to assemble, require no baking, and can be made in advance, making them a convenient choice for busy party planners.
This recipe is designed to serve 4-6 people, making it ideal for small gatherings or office parties. The ingredients are simple and can be found at most grocery stores. The preparation involves layering pudding and cookie crumbs, then decorating with Halloween-themed treats. The end result is a creative and delicious treat that will be the talk of your Halloween celebration.
Ingredients for 4-6 servings:
- 2 cups cold milk
- 1 package (3.9 ounces) instant chocolate pudding mix
- 1 package (14 ounces) chocolate sandwich cookies
- 1 cup whipped topping
- 6 gummy worms
- 6 oval-shaped cookies (for tombstones)
- Edible markers or icing to decorate tombstones
Cooking Instructions:
- Prepare the Pudding: In a large mixing bowl, whisk together the cold milk and instant chocolate pudding mix for about 2 minutes or until the mixture thickens. Set aside for 5 minutes to allow the pudding to set.
- Crush the Cookies: Place the chocolate sandwich cookies in a sealed plastic bag. Use a rolling pin to crush the cookies into fine crumbs. These crumbs will act as the “dirt” for your graveyard pudding cups.
- Layer the Pudding Cups: In each serving cup, start by adding a layer of chocolate pudding. Follow this with a layer of cookie crumbs. Repeat the layers until the cups are filled, ending with a layer of cookie crumbs on top.
- Decorate the Tombstones: Using edible markers or icing, write spooky messages or names on the oval-shaped cookies to resemble tombstones. Insert one decorated tombstone into each pudding cup.
- Add Gummy Worms: Place one gummy worm on top of the cookie “dirt” in each cup, letting it dangle over the edge of the cup for effect.
- Finish with Whipped Topping: Add a dollop of whipped topping to one side of each cup for extra creaminess and decoration.
Extra Tips:
For an extra touch, consider using clear cups to showcase the layered effect of the pudding and cookie crumbs. This visual appeal can enhance the graveyard theme.
If you want to make the dessert more indulgent, consider adding a layer of chocolate mousse or using chocolate ganache as a topping.
Always refrigerate the pudding cups until ready to serve to confirm they remain fresh and the texture stays perfect. If you’re preparing these ahead of time, add the gummy worms and whipped topping just before serving to maintain their freshness and texture.
Bat Wing Chicken Drumsticks

Halloween is the perfect time to get creative with your culinary skills, especially when preparing food for work parties. One of the standout dishes that will surely impress your colleagues is the Bat Wing Chicken Drumsticks. These drumsticks aren’t only delicious but also visually fitting for the spooky theme of Halloween. The dark and crispy exterior of the drumsticks, achieved by using a special marinade and cooking technique, gives them an eerie bat-wing appearance that’s sure to be a talking point among party guests.
To prepare Bat Wing Chicken Drumsticks, you’ll need to marinate the chicken in a mixture of soy sauce, balsamic vinegar, and dark food coloring to attain the desired dark hue. The marinated drumsticks are then baked to crispy perfection, making them both flavorful and fun to eat. This recipe serves 4-6 people, making it ideal for a small office party or gathering.
Ingredients (for 4-6 servings):
- 12 chicken drumsticks
- 1 cup soy sauce
- 1/2 cup balsamic vinegar
- 1 tablespoon black food coloring or squid ink
- 1 tablespoon garlic powder
- 1 tablespoon onion powder
- 1 teaspoon smoked paprika
- 1 teaspoon black pepper
- 1 teaspoon salt
- 2 tablespoons olive oil
Cooking Instructions:
- Prepare the Marinade: In a large mixing bowl, combine the soy sauce, balsamic vinegar, black food coloring, garlic powder, onion powder, smoked paprika, black pepper, and salt. Stir the mixture until all the ingredients are well combined.
- Marinate the Chicken: Add the chicken drumsticks to the bowl and guarantee each drumstick is thoroughly coated with the marinade. Cover the bowl with plastic wrap and refrigerate for at least 2 hours, preferably overnight, to allow the flavors to penetrate the meat.
- Preheat the Oven: Preheat your oven to 400°F (200°C). Line a baking sheet with aluminum foil and place a wire rack on top to allow for even cooking.
- Prepare for Baking: Remove the drumsticks from the marinade and let any excess drip off. Arrange the drumsticks on the wire rack in a single layer, making sure they don’t touch each other. Drizzle the olive oil over the drumsticks for added crispiness.
- Bake the Drumsticks: Place the baking sheet in the preheated oven and bake for 35-40 minutes, turning the drumsticks halfway through, until they’re fully cooked and the skin is crispy and darkened.
- Serve and Enjoy: Once cooked, remove the drumsticks from the oven and let them rest for a few minutes before serving. The drumsticks can be served hot or at room temperature.
Extra Tips:
When preparing Bat Wing Chicken Drumsticks, consider using squid ink as an alternative to black food coloring for a more natural option. If you’re unable to find black food coloring, you can mix blue and green food coloring to achieve a similar dark hue.
Be sure to marinate the chicken for enough time to let the flavors develop fully. When baking, using a wire rack ensures that the drumsticks cook evenly and stay crispy all around. Finally, serve these spooky drumsticks with a side of your favorite dipping sauce to add an extra layer of flavor.
Eyeball Caprese Skewers
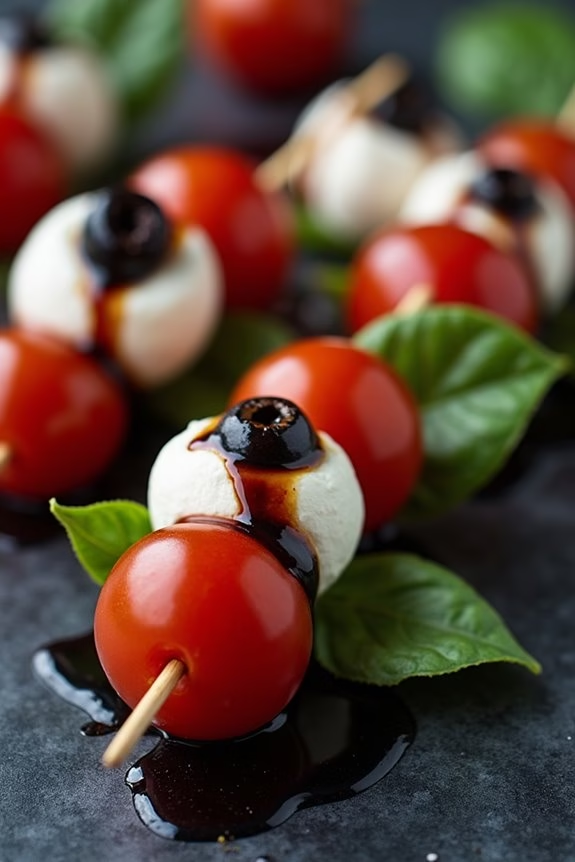
Halloween is the perfect opportunity to get creative in the kitchen, especially when it comes to work parties where festive spirit and fun are key ingredients. Eyeball Caprese Skewers are a spooky twist on the classic Italian Caprese salad, offering a blend of fresh flavors and a playful presentation that will surely be a hit among your colleagues.
These skewers aren’t only delicious but visually striking, making them an ideal addition to your Halloween spread. The base of this dish is the traditional Caprese ingredients: juicy cherry tomatoes, creamy mozzarella balls, and fragrant fresh basil leaves.
However, the spooky twist comes from the addition of a little creativity when assembling the skewers. With a touch of balsamic glaze for a hint of sweetness and an eerie appearance, these skewers are as delightful to eat as they’re to look at. Serve them as an appetizer or as part of a larger Halloween-inspired buffet.
Ingredients for 4-6 servings:
- 12 cherry tomatoes
- 12 mozzarella balls (bocconcini)
- 12 fresh basil leaves
- 12 black olives (pitted)
- 2 tablespoons balsamic glaze
- 12 small wooden skewers or toothpicks
- Salt and pepper to taste
Instructions:
- Prepare Ingredients: Start by washing and drying the cherry tomatoes and basil leaves. Drain the mozzarella balls and pat them dry with a paper towel to remove excess moisture. This will help the other ingredients adhere better.
- Create the Eyeballs: Take a mozzarella ball and place a basil leaf on top. Then, slice a black olive in half and place one half on top of the basil leaf, pressing gently to create a mozzarella-basil-olive “eyeball.” Repeat this with all the mozzarella balls.
- Assemble the Skewers: Begin by sliding a cherry tomato onto the skewer or toothpick, followed by your mozzarella “eyeball.” Make sure the olive is facing outward for the best effect. Repeat this process, alternating between tomato and mozzarella, until all ingredients are used.
- Season and Garnish: Lightly season the skewers with salt and pepper. Drizzle balsamic glaze over the skewers for added flavor and a spooky, blood-like appearance.
- Chill and Serve: Place the assembled skewers on a platter and chill in the refrigerator for at least 15 minutes before serving. This will allow the flavors to meld together and keep the skewers fresh and crisp.
Extra Tips: For the best presentation, use a fresh bunch of basil to find leaves that are similar in size to your mozzarella balls. This will help create uniform “eyeballs.”
If you prefer a stronger flavor, consider marinating the mozzarella balls in a little olive oil mixed with garlic and herbs before assembling the skewers. Additionally, if you want to add a bit of color variation, try using a mix of red and yellow cherry tomatoes.
This dish is best served chilled, so keep it in the fridge until just before your work party begins.
Candy Corn Fruit Parfaits

Halloween is a time for fun and creativity, and what better way to celebrate at work than with a colorful, festive treat? Candy Corn Fruit Parfaits are the perfect addition to any Halloween work party. These delightful parfaits mimic the look of classic candy corn using layers of fruit and yogurt, offering a healthier alternative that still captures the spirit of the holiday.
With vibrant layers of pineapple, mandarin oranges, and creamy yogurt, these parfaits are visually appealing and deliciously invigorating. Not only do Candy Corn Fruit Parfaits bring a pop of color to the table, but they’re also incredibly easy to prepare and serve.
This recipe is designed for a serving size of 4-6 people, making it ideal for sharing among colleagues. Whether you’re looking to impress your coworkers with a festive dish or simply want to enjoy a sweet treat without the guilt, these parfaits are a great choice. Let’s plunge into the ingredients you’ll need and the steps to create this delightful Halloween party dish.
Ingredients (serving size: 4-6 people):
- 1 ½ cups fresh pineapple chunks
- 1 ½ cups canned mandarin oranges, drained
- 2 cups vanilla yogurt
- ½ cup whipped cream (optional)
- ¼ cup granola (optional)
- 6 clear parfait cups or glasses
Cooking Instructions:
- Prepare the Pineapple Layer: Start by dividing the pineapple chunks evenly among the 6 parfait cups. This will be the bottom yellow layer, representing the bottom of the candy corn.
- Add the Mandarin Orange Layer: Next, layer the drained mandarin oranges on top of the pineapple in each cup. This creates the middle orange layer of the candy corn look.
- Top with Yogurt: Spoon the vanilla yogurt over the mandarin oranges, filling the cups almost to the top. The yogurt serves as the white top layer of the candy corn.
- Optional Toppings: If desired, add a dollop of whipped cream on top of each parfait for extra creaminess. You can also sprinkle a bit of granola on top for added texture and crunch.
- Chill Before Serving: Place the parfaits in the refrigerator for at least 30 minutes to chill before serving. This allows the flavors to meld and the parfaits to become invigorating and cool.
Extra Tips:
To create an even more festive look, consider serving the parfaits in clear cups to highlight the candy corn layers. You can also customize the fruit layers with other seasonal fruits such as mango or peaches if preferred.
For those with dietary restrictions, use dairy-free yogurt alternatives to accommodate all guests. Remember to keep the parfaits refrigerated until just before serving to maintain their freshness and taste.
These Candy Corn Fruit Parfaits not only add a healthy twist to your Halloween celebrations but also guarantee that everyone can enjoy a guilt-free indulgence.