

With Halloween just around the corner, I’ve been on the lookout for finger foods that bring a touch of elegance to the spooky season. Think about serving Spooky Smoked Salmon Canapés or Ghostly Goat Cheese and Herb Stuffed Mushrooms at your next gathering. Each bite offers a perfect mix of sophistication and festive fun. Ready to wow your guests with Halloween-themed gourmet delights? I’ve got some exciting recipes that will make your celebration unforgettable.
Spooky Smoked Salmon Canapés

Get ready to impress your guests with these sophisticated yet eerie Spooky Smoked Salmon Canapés, perfect for an adult Halloween gathering.
These canapés combine the luxurious flavor of smoked salmon with a haunting presentation that will leave your guests both intrigued and delighted. The interplay of smooth cream cheese, tangy capers, and fresh dill enhances the rich, smoky flavor of the salmon, making these little bites irresistible.
Arranged with a creepy yet classy flair, they’re sure to be the star of your Halloween spread. Crafting these canapés is as much about creativity as it’s about taste.
The base of the canapé is a crisp, toasted round that adds a satisfying crunch, creating a delightful contrast to the soft toppings. The visual appeal comes from the artful positioning of the toppings to mimic the look of a spooky eye, complete with a caper at the center to resemble a pupil.
These canapés aren’t only easy to assemble but also provide a wonderful balance of flavors and textures. Plus, they can be prepared ahead of time, allowing you to enjoy your party without last-minute stress.
Ingredients for 4-6 servings:
- 12 slices of baguette, cut into 1/2-inch thick rounds
- 4 ounces of cream cheese, softened
- 1 tablespoon fresh dill, finely chopped
- 1 tablespoon lemon juice
- 8 ounces smoked salmon, thinly sliced
- 12 small capers
- Black food coloring gel (optional, for added spookiness)
- Fresh dill sprigs for garnish
Cooking Instructions:
- Prepare the Baguette Rounds: Preheat your oven to 350°F (175°C). Arrange the baguette slices on a baking sheet and bake for about 5-7 minutes until they’re golden and crisp. Remove from the oven and allow them to cool completely.
- Make the Cream Cheese Spread: In a small bowl, combine the softened cream cheese, chopped dill, and lemon juice. Mix well until smooth and creamy. If you want to add an extra spooky touch, mix in a drop or two of black food coloring gel to tint the cream cheese a ghoulish shade.
- Assemble the Canapés: Spread a generous layer of the cream cheese mixture onto each baguette round. Top with a slice of smoked salmon, folding it slightly to create a textured appearance. Place a caper in the center of the salmon to resemble an eye pupil.
- Garnish and Serve: Arrange the canapés on a serving platter. For an elegant touch, add a small sprig of fresh dill on top of each canapé. Serve immediately, or cover and refrigerate until ready to serve.
Extra Tips:
To save time, you can prepare the cream cheese mixture a day in advance and store it in the refrigerator. This will also allow the flavors to meld together, enhancing the taste.
When selecting smoked salmon, opt for high-quality slices to guarantee the best flavor and texture. If you want to add even more spookiness, consider using black rye bread instead of baguette slices for a darker, more dramatic effect.
Finally, remember to serve the canapés slightly chilled, as this enhances the invigorating taste of the salmon and cream cheese combination.
Ghostly Goat Cheese and Herb Stuffed Mushrooms

Ghostly Goat Cheese and Herb Stuffed Mushrooms are the perfect Halloween finger food for adults, offering a spooky yet sophisticated touch to your festive gathering. These bite-sized treats combine earthy mushroom caps with a creamy, flavorful filling of goat cheese and fresh herbs, making them an irresistible appetizer that will delight your guests.
The ghostly appearance of the stuffed mushrooms adds to the Halloween theme, while the rich taste and smooth texture guarantee they’ll be a hit at any party. The tanginess of the goat cheese is beautifully complemented by the aromatic herbs, creating a harmonious blend of flavors. The mushrooms serve as the ideal vessel, providing a delightful umami base that enhances the overall taste profile.
This dish isn’t only easy to prepare but also allows for creative presentation, making it a wonderful addition to your Halloween spread. Whether you’re hosting a large gathering or an intimate get-together, these Ghostly Goat Cheese and Herb Stuffed Mushrooms are sure to impress.
Ingredients for 4-6 servings:
- 24 medium-sized button mushrooms
- 8 ounces goat cheese, softened
- 2 tablespoons fresh chives, finely chopped
- 2 tablespoons fresh parsley, finely chopped
- 1 tablespoon fresh thyme leaves
- 2 cloves garlic, minced
- 2 tablespoons olive oil
- Salt and pepper to taste
- 1/4 cup breadcrumbs
- 2 tablespoons grated Parmesan cheese
Cooking Instructions:
- Preheat Oven: Start by preheating your oven to 375°F (190°C). This will guarantee that your mushrooms cook evenly and have a lovely golden finish.
- Prepare the Mushrooms: Carefully clean the mushrooms with a damp paper towel to remove any dirt. Gently remove the stems and set them aside. You can finely chop the stems and add them to the filling mixture if desired.
- Make the Filling: In a medium bowl, combine the softened goat cheese, chopped chives, parsley, thyme, minced garlic, and a pinch of salt and pepper. Mix until all ingredients are well incorporated and the mixture is smooth.
- Stuff the Mushrooms: Using a small spoon or a piping bag, fill each mushroom cap with the goat cheese mixture, mounding it slightly for a generous fill.
- Top with Breadcrumbs and Parmesan: In a small bowl, mix the breadcrumbs with the grated Parmesan cheese. Sprinkle this mixture over the top of each stuffed mushroom for a crispy, cheesy crust.
- Bake: Arrange the stuffed mushrooms on a baking sheet lined with parchment paper. Drizzle a bit of olive oil over the top to help them brown. Bake in the preheated oven for 20-25 minutes, or until the mushrooms are tender and the tops are golden brown.
- Serve: Allow the mushrooms to cool slightly before serving. They can be enjoyed warm or at room temperature.
Extra Tips:
To guarantee your Ghostly Goat Cheese and Herb Stuffed Mushrooms have the perfect texture, avoid overloading the mushrooms with filling, as this can cause them to become soggy. If you prefer a hint of heat, consider adding a pinch of red pepper flakes to the goat cheese mixture.
Additionally, these mushrooms can be prepared a few hours in advance and baked just before serving, making them a convenient option for party planning. If you have some leftover filling, it works wonderfully as a spread on crackers or as a dip for vegetables.
Wickedly Wild Mushroom Tartlets

Wickedly Wild Mushroom Tartlets are the perfect Halloween finger food for adults, blending rich earthy flavors with a tantalizingly flaky pastry base. These tartlets are designed to captivate your guests with their gourmet taste and intriguing presentation, making them an ideal addition to your spooky soirée.
Their warm, umami-rich mushroom filling is complemented by a subtle hint of herbs and a creamy cheese topping, crafting an exquisite bite-sized treat that’s both elegant and festive. Whether you’re hosting a grand Halloween party or a cozy gathering, these tartlets will surely enchant your guests and leave them hungry for more.
These tartlets aren’t only delicious but also fairly simple to prepare, allowing you to spend more time enjoying the festivities. By using pre-made puff pastry, you can greatly cut down on prep time without sacrificing flavor or texture.
The filling, made with a medley of wild mushrooms, shallots, garlic, and fresh herbs, is quickly sautéed to perfection. Once assembled, the tartlets are baked until golden brown, creating a crispy, buttery crust that contrasts beautifully with the savory filling. Serve these wickedly wild mushroom tartlets as a part of your Halloween spread for a sophisticated touch that’s sure to impress.
Ingredients (Serves 4-6):
- 1 sheet of puff pastry, thawed
- 2 tablespoons olive oil
- 1 shallot, finely chopped
- 2 cloves garlic, minced
- 8 ounces mixed wild mushrooms, chopped
- 1 teaspoon fresh thyme leaves
- 1 teaspoon fresh rosemary, chopped
- Salt and pepper to taste
- 1/4 cup crème fraîche or heavy cream
- 1/4 cup grated Parmesan cheese
- 1 egg, beaten (for egg wash)
Cooking Instructions:
1. Preheat the Oven:
Preheat your oven to 400°F (200°C). Line a baking sheet with parchment paper to prevent the tartlets from sticking.
2. Prepare the Puff Pastry:
Roll out the thawed puff pastry on a lightly floured surface. Cut the pastry into 12 equal squares or circles, depending on your preference, and place them on the prepared baking sheet.
3. Sauté the Aromatics:
Heat the olive oil in a large skillet over medium heat. Add the chopped shallot and garlic, and sauté until the shallot becomes translucent and aromatic, about 2-3 minutes.
4. Cook the Mushrooms:
Add the chopped wild mushrooms to the skillet. Stir occasionally and cook until the mushrooms release their moisture and become golden brown, approximately 5-7 minutes.
5. Season and Add Herbs:
Stir in the fresh thyme and rosemary, followed by salt and pepper to taste. Continue to cook for another minute to let the flavors meld.
6. Incorporate the Cream:
Reduce the heat to low and stir in the crème fraîche or heavy cream until well combined. Cook for an additional 2 minutes, then remove from heat.
7. Assemble the Tartlets:
Spoon the mushroom mixture evenly onto each piece of puff pastry, leaving a small border around the edges. Sprinkle grated Parmesan cheese over the top of each tartlet.
8. Apply Egg Wash:
Brush the edges of the puff pastry with the beaten egg to encourage a golden, glossy finish.
9. Bake the Tartlets:
Place the baking sheet in the preheated oven and bake for 15-20 minutes, or until the pastry is puffed and golden brown.
10. Serve:
Allow the tartlets to cool slightly before serving. These are best enjoyed warm for ideal flavor and texture.
Extra Tips:
When making Wickedly Wild Mushroom Tartlets, consider using a mix of your favorite wild mushrooms such as shiitake, cremini, or oyster for varied textures and flavors.
If you prefer a more pronounced cheese flavor, try adding a stronger cheese like Gruyère or blue cheese. For an extra touch of elegance, garnish the tartlets with a sprig of fresh thyme or a light sprinkle of truffle salt before serving.
These tartlets can be made ahead of time and reheated in a warm oven before your guests arrive, ensuring you can enjoy the festivities without being tied to the kitchen.
Enchanted Black Olive Tapenade Crostini

Enchanted Black Olive Tapenade Crostini is an elegant and flavorful appetizer perfect for an adult Halloween gathering. Combining the rich, briny taste of black olives with a hint of garlic and fresh herbs, this dish delivers an otherworldly experience in every bite. The tapenade is served on crispy crostini, providing a delightful contrast of textures that’s bound to enchant your guests.
Whether you’re hosting a sophisticated soirée or a cozy get-together, these crostini are a surefire way to impress. The beauty of this recipe lies in its simplicity and the quality of its ingredients. By using fresh, high-quality olives and bread, you can create a dish that feels both luxurious and approachable.
The tapenade can be made ahead of time, allowing you to focus on other aspects of your event, and the crostini can be easily assembled just before serving. This makes Enchanted Black Olive Tapenade Crostini a stress-free addition to your Halloween menu, allowing you to enjoy your evening with ease.
Ingredients for 4-6 people:
- 2 cups pitted black olives
- 2 tablespoons capers
- 2 cloves garlic
- 2 tablespoons fresh lemon juice
- 1/4 cup extra-virgin olive oil
- 1/4 teaspoon black pepper
- 1/4 teaspoon red pepper flakes (optional)
- 1 tablespoon fresh parsley, chopped
- 1 baguette, sliced into 1/4-inch rounds
- Olive oil for brushing
Cooking Instructions:
- Prepare the Tapenade: In a food processor, combine the black olives, capers, garlic, lemon juice, and black pepper. Pulse the mixture until coarsely chopped. Slowly drizzle in the olive oil while continuing to pulse until the mixture is well combined but still slightly chunky.
- Add Fresh Herbs: Transfer the tapenade to a bowl and stir in the chopped parsley. Taste and adjust seasoning if necessary. If you prefer a bit of heat, add red pepper flakes to taste. Cover and refrigerate the tapenade for at least 30 minutes to allow the flavors to meld.
- Prepare the Crostini: Preheat your oven to 375°F (190°C). Arrange the baguette slices on a baking sheet and brush each slice lightly with olive oil. Bake for 8-10 minutes or until golden and crisp, turning halfway through to guarantee even browning.
- Assemble the Crostini: Once the crostini are cooled, generously spread the black olive tapenade on each slice. Arrange on a serving platter and garnish with additional parsley if desired.
Extra Tips: For a more robust flavor, consider adding a few anchovy fillets to the tapenade mixture before processing. Additionally, the quality of the olives plays a significant role in the final taste, so opt for high-quality or specialty olives if possible.
If you’re making the crostini in advance, store them in an airtight container to keep them crispy until you’re ready to serve. Finally, feel free to experiment with the presentation by using different shaped bread or adding garnishes like roasted red peppers or a sprinkle of feta cheese for added depth.
Bewitching Beetroot and Feta Phyllo Cups

Looking to create a Halloween finger food that combines gourmet flair with a touch of spooky sophistication? Try making Bewitching Beetroot and Feta Phyllo Cups. This dish offers a delightful blend of earthy beetroot and creamy feta cheese, all encased in a crispy phyllo pastry shell. The vibrant colors of the beetroot mimic a hauntingly beautiful blood-red hue, perfect for an adult Halloween gathering.
These phyllo cups aren’t only visually stunning but also bursting with flavors that will captivate your taste buds. The combination of beetroot and feta is a classic pairing, with the sweet, earthy notes of the beetroot complementing the salty, tangy flavor of the feta cheese. The phyllo dough adds a delicate crunch, creating a textural contrast that elevates this dish to a gourmet experience.
Perfect as an appetizer or as part of a Halloween spread, these phyllo cups are sure to impress your guests and add a touch of elegance to your spooky celebrations.
Ingredients (serves 4-6):
- 1 package of phyllo dough (approximately 20 sheets)
- 3 medium-sized beetroots, boiled and peeled
- 200 grams feta cheese, crumbled
- 2 tablespoons olive oil
- 1 tablespoon lemon juice
- 1 tablespoon honey
- 1 teaspoon fresh thyme leaves
- Salt and pepper to taste
- Melted butter or cooking spray for brushing
Instructions:
- Prepare the Phyllo Dough: Preheat your oven to 375°F (190°C). Unroll the phyllo dough and cover it with a slightly damp cloth to prevent it from drying out. Take one sheet of phyllo dough and brush it lightly with melted butter or cooking spray. Place another sheet on top and repeat the process until you have a stack of 4 sheets.
- Cut and Shape the Dough: Cut the stacked phyllo sheets into squares, approximately 4×4 inches. Gently press each square into the cups of a muffin tin to form little pastry cups. Continue this process until you have filled the muffin tin.
- Bake the Phyllo Cups: Place the muffin tin in the preheated oven and bake for about 8-10 minutes, or until the phyllo cups are golden brown and crispy. Remove from the oven and let them cool completely.
- Prepare the Filling: While the phyllo cups are baking, dice the boiled beetroots into small cubes. In a mixing bowl, combine the beetroot cubes, crumbled feta cheese, olive oil, lemon juice, honey, thyme leaves, salt, and pepper. Mix well to guarantee the ingredients are evenly coated.
- Assemble the Cups: Once the phyllo cups have cooled, spoon the beetroot and feta mixture into each cup. Be generous with the filling, making sure each cup is full.
- Serve: Arrange the filled phyllo cups on a serving platter. These can be served immediately or kept at room temperature for a few hours before serving.
Extra Tips:
To make the phyllo cups even more visually appealing, consider garnishing them with a small sprig of thyme or a drizzle of balsamic glaze before serving.
You can also prepare the beetroot and feta mixture a day in advance and store it in the refrigerator, making the assembly process quick and easy on the day of your event. If you prefer a more intense flavor, roast the beetroots instead of boiling them; this will enhance their natural sweetness and add a depth of flavor to the dish.
Hauntingly Good Pumpkin and Sage Arancini

Transform your Halloween party into an elegant affair with these Hauntingly Good Pumpkin and Sage Arancini. These Italian-inspired rice balls are stuffed with creamy pumpkin and fresh sage, then fried to golden perfection. The combination of sweet pumpkin, fragrant sage, and a crispy outer layer makes these arancini an irresistible finger food for adults.
Perfectly bite-sized, they make for a sophisticated snack that pairs well with a variety of drinks, giving your Halloween celebration a deliciously spooky twist.
The key to these delightful arancini is infusing the rice with the rich flavors of pumpkin and sage, while guaranteeing the texture remains creamy on the inside and crispy on the outside. This recipe is designed for a serving size of 4-6 people, making it an ideal choice for a small gathering. Whether served as an appetizer or a main dish, these arancini will leave your guests enchanted and enthusiastic for more.
Ingredients (Serves 4-6):
- 1 cup Arborio rice
- 2 tablespoons olive oil
- 1 small onion, finely chopped
- 2 cloves garlic, minced
- 1 cup pumpkin puree
- 1/2 cup grated Parmesan cheese
- 1 tablespoon chopped fresh sage
- 1/2 teaspoon salt
- 1/4 teaspoon black pepper
- 1/2 cup breadcrumbs
- 2 eggs, beaten
- 1 cup all-purpose flour
- Vegetable oil for frying
- Additional sage leaves for garnish (optional)
Cooking Instructions:
- Prepare the Risotto Base: Heat the olive oil in a large pan over medium heat. Add the onion and garlic, sautéing until translucent and fragrant, about 3-4 minutes. Add the Arborio rice and cook for an additional 2 minutes, stirring constantly to coat the rice in the oil.
- Incorporate the Pumpkin: Stir in the pumpkin puree and cook for 1 minute. Gradually add water or broth, a ladle at a time, allowing the rice to absorb the liquid before adding more. Continue until the rice is tender and creamy, about 18-20 minutes.
- Season and Cool the Mixture: Remove the pan from heat and stir in Parmesan cheese, fresh sage, salt, and pepper. Transfer the mixture to a tray or baking sheet to cool, spreading it out evenly to speed up the cooling process.
- Shape the Arancini: Once the rice mixture is cool enough to handle, scoop about 2 tablespoons into your hand and shape it into a ball. Repeat with the remaining mixture.
- Coat the Arancini: Set up three bowls – one with flour, one with beaten eggs, and one with breadcrumbs. Roll each rice ball first in flour, then dip in the egg, and finally coat in breadcrumbs. Confirm each ball is thoroughly coated.
- Fry the Arancini: Heat vegetable oil in a deep pan or fryer to 350°F (175°C). Carefully add the arancini in batches, frying until golden brown and crispy, about 3-4 minutes. Use a slotted spoon to remove them and drain on paper towels.
- Serve: Arrange the arancini on a serving platter. Garnish with additional fresh sage leaves if desired. Serve warm.
Extra Tips: For a smoother preparation process, make the risotto base a day ahead and refrigerate overnight. This allows the flavors to meld and the mixture to firm up, making it easier to shape into balls.
Additionally, when frying, guarantee the oil is at the correct temperature to avoid greasy arancini. If you prefer a cheesy surprise, consider placing a small cube of mozzarella inside each arancini before shaping into balls for a deliciously gooey center.
Chilling Charcuterie and Cheese Platter
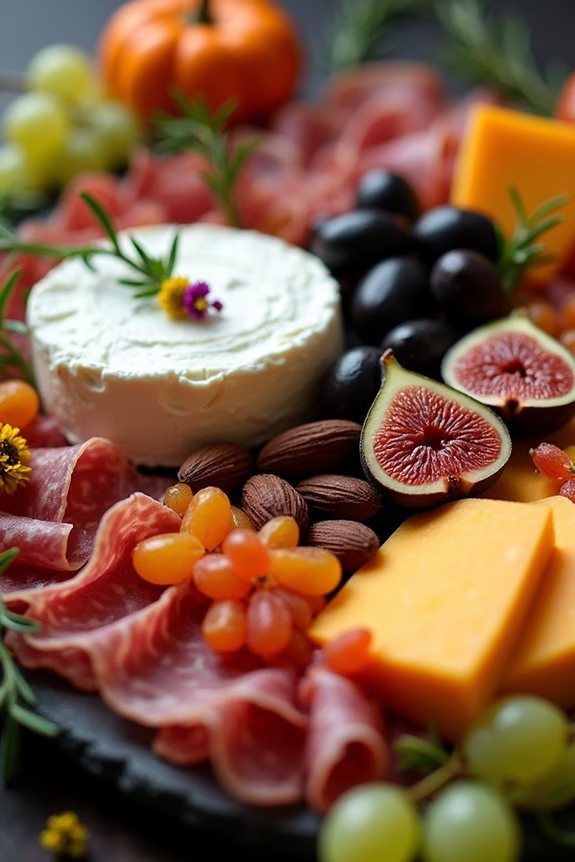
This Halloween, elevate your spooky soirée with a Chilling Charcuterie and Cheese Platter that’s both sophisticated and frightfully fun. Perfect for adults, this platter combines an assortment of cheeses, cured meats, and themed accompaniments to create a visually stunning and delicious centerpiece for your gathering.
The key is to balance flavors and textures while incorporating eerie elements that evoke the spirit of Halloween.
The Chilling Charcuterie and Cheese Platter is designed to serve 4-6 people, making it an ideal choice for intimate gatherings or as part of a larger Halloween feast. To create a platter that’s both visually appealing and delicious, select a variety of cheeses and meats, and then complement them with seasonal fruits, nuts, and embellishments that nod to the holiday’s spooky theme.
By arranging everything thoughtfully, you can transform a classic appetizer into a conversation starter that will delight your guests.
Ingredients:
- 3 types of cheese (e.g., brie, aged cheddar, blue cheese)
- 3 types of cured meats (e.g., prosciutto, salami, chorizo)
- Black olives
- Green grapes
- Dried apricots
- Fresh figs, halved
- Dark chocolate almonds
- Assorted crackers and breadsticks
- Fresh rosemary sprigs
- Edible flowers (optional for decoration)
- Small pumpkins or gourds for decoration
- Halloween-themed cocktail picks
Instructions:
- Prepare the Base: Begin by selecting a large, flat platter or wooden board as the base for your charcuterie and cheese arrangement. Confirm it’s clean and dry.
- Arrange the Cheeses: Place the three types of cheeses on different sections of the board. To create visual interest, vary the sizes and shapes. For example, leave the brie whole, cut the cheddar into cubes, and crumble the blue cheese.
- Layer the Meats: Fold or roll the cured meats and arrange them around the cheeses. This helps to create texture and adds a variety of colors to the platter.
- Add Fruit and Nuts: Scatter black olives, green grapes, dried apricots, fresh figs, and dark chocolate almonds across the board. These elements add sweetness and contrast to the savory meats and cheeses.
- Place Crackers and Breadsticks: Position the assorted crackers and breadsticks around the platter, ensuring they’re easily accessible for guests to pair with the cheeses and meats.
- Garnish and Decorate: For a Halloween touch, garnish the platter with fresh rosemary sprigs and edible flowers. Add small pumpkins or gourds for decoration, and use Halloween-themed cocktail picks to enhance the spooky aesthetic.
Extra Tips:
When assembling a Chilling Charcuterie and Cheese Platter, consider the balance of flavors and textures. Aim for a variety of mild, sharp, and creamy cheeses, and meats that range from spicy to mild.
Additionally, pay attention to color contrast to make the platter visually appealing. If you want to add more Halloween flair, consider using cookie cutters to shape cheeses or fruits into ghost or pumpkin shapes.
Finally, be sure to provide small plates and napkins for guests to comfortably enjoy their selections.
Phantom Prawn and Avocado Cocktail

Phantom Prawn and Avocado Cocktail is a spooky twist on the classic shrimp cocktail, perfect for Halloween gatherings. This dish blends the delicate flavors of prawns with the creamy richness of avocado, creating a delightful appetizer that will impress your guests. The unique presentation, echoing the eerie ambiance of Halloween, sets the mood for a thrilling culinary experience.
This recipe is designed to serve 4-6 people, making it an ideal choice for intimate gatherings or larger parties. The combination of fresh prawns and ripe avocados is complemented by a zesty cocktail sauce, infused with a hint of lime and a dash of spice. The visual appeal of this dish is enhanced by using black food coloring to give the prawns an eerie, phantom-like appearance, making it a fantastic addition to your Halloween menu.
Follow the recipe below to create this festive and flavorful dish that both delights the taste buds and adds a touch of Halloween magic to your table.
Ingredients:
- 500g large prawns, peeled and deveined
- 2 ripe avocados, diced
- Juice of 2 limes
- 1 cup tomato ketchup
- 2 tablespoons horseradish sauce
- 1 teaspoon Worcestershire sauce
- 1/2 teaspoon hot sauce (optional)
- Black food coloring
- Salt and pepper to taste
- Fresh cilantro, chopped, for garnish
- Lime wedges for serving
Instructions:
- Prepare the Prawns: Begin by boiling a pot of water with a pinch of salt. Once the water is boiling, add the prawns and cook for 2-3 minutes until they turn pink and opaque. Drain and rinse under cold water to stop the cooking process. Pat the prawns dry with paper towels.
- Color the Prawns: Place the cooked prawns in a bowl and add 3-4 drops of black food coloring. Gently toss the prawns until they’re evenly coated and take on a dark, phantom-like color. Set aside.
- Make the Cocktail Sauce: In a separate bowl, combine the tomato ketchup, horseradish sauce, Worcestershire sauce, and lime juice. Mix well until all ingredients are fully incorporated. Add hot sauce if you prefer a spicier cocktail, and season with salt and pepper to taste.
- Prepare the Avocado: Dice the avocados and gently toss them with a bit of lime juice to prevent browning. This will also add a revitalizing tang to the avocado.
- Assemble the Cocktail: In individual serving glasses, layer the diced avocado at the bottom. Spoon a generous amount of cocktail sauce over the avocado, then top with the colored prawns.
- Garnish and Serve: Garnish each glass with chopped cilantro and a wedge of lime. Serve immediately while the prawns are chilled and the avocados are fresh.
Extra Tips:
To guarantee the best presentation, use clear glassware to showcase the layers of avocado, sauce, and phantom prawns. For extra effect, consider adding a few drops of dry ice to the serving platter for a smoky, spooky look.
Additionally, if you’re concerned about the food coloring staining other ingredients, keep it minimal or skip it altogether in favor of serving the prawns in a dimly lit setting to enhance the eerie atmosphere.
Sinister Sweet Potato and Black Bean Bites

Elevate your Halloween party with a spooky and delicious treat that’s perfect for adults: Sinister Sweet Potato and Black Bean Bites. These finger foods aren’t only visually enthralling with their dark and mysterious appearance, but they’re also packed with rich flavors and nutrients.
Sweet potatoes offer a natural sweetness that pairs beautifully with the earthy undertones of black beans, while the addition of spices brings a hint of warmth and complexity to the dish. Serve these bites as a hauntingly delightful appetizer that will surely impress your guests.
These bites aren’t only easy to make but also a healthier alternative to traditional party snacks. They’re perfect for those looking to enjoy a guilt-free treat during the Halloween festivities. With a crunchy exterior and a creamy, flavorful interior, these Sinister Sweet Potato and Black Bean Bites are sure to become a party favorite.
Whether you’re hosting a Halloween gathering or simply looking for a unique dish to enjoy with friends, these bites are the perfect addition to your spooky spread.
Ingredients for 4-6 servings:
- 2 medium sweet potatoes
- 1 can (15 oz) black beans, drained and rinsed
- 1/2 cup corn kernels (fresh, canned, or frozen)
- 1/4 cup chopped red onion
- 2 cloves garlic, minced
- 1 teaspoon ground cumin
- 1/2 teaspoon smoked paprika
- 1/4 teaspoon cayenne pepper
- Salt and pepper to taste
- 1/2 cup breadcrumbs
- 1 tablespoon olive oil
- Fresh cilantro for garnish
- Sour cream or Greek yogurt for dipping (optional)
Cooking Instructions:
1. Prepare the Sweet Potatoes: Preheat your oven to 400°F (200°C). Wash the sweet potatoes and pierce them several times with a fork. Place them on a baking sheet and bake for about 40-45 minutes, or until they’re tender when pierced with a fork.
Once done, remove them from the oven and let them cool slightly.
2. Mash the Sweet Potatoes: Once the sweet potatoes are cool enough to handle, peel them and place the flesh in a large mixing bowl. Use a fork or potato masher to mash them until smooth.
3. Combine Ingredients: Add the drained black beans, corn, chopped red onion, minced garlic, cumin, smoked paprika, cayenne pepper, salt, and pepper to the mashed sweet potatoes. Mix well to combine all the ingredients evenly.
4. Form the Bites: Gradually add the breadcrumbs to the sweet potato mixture, mixing as you go until the mixture holds together. Take small portions of the mixture and shape them into bite-sized balls or patties.
5. Cook the Bites: Heat olive oil in a large skillet over medium heat. Once hot, add the sweet potato and black bean bites in batches, making sure not to overcrowd the pan. Cook each side for about 3-4 minutes or until golden brown and crisp.
Transfer to a paper towel-lined plate to drain any excess oil.
6. Serve: Arrange the Sinister Sweet Potato and Black Bean Bites on a serving platter. Garnish with fresh cilantro and serve with a side of sour cream or Greek yogurt for dipping, if desired.
Extra Tips:
When forming the bites, if you find the mixture is too sticky, you can add a little more breadcrumbs to reach the desired consistency. For a spicier kick, feel free to adjust the amount of cayenne pepper or add some finely chopped jalapeños.
To save time, you can prepare the sweet potato mixture a day in advance and refrigerate it until you’re ready to cook. Enjoy these bites warm for the best flavors and textures.
Eerie Eggplant and Red Pepper Roll-Ups
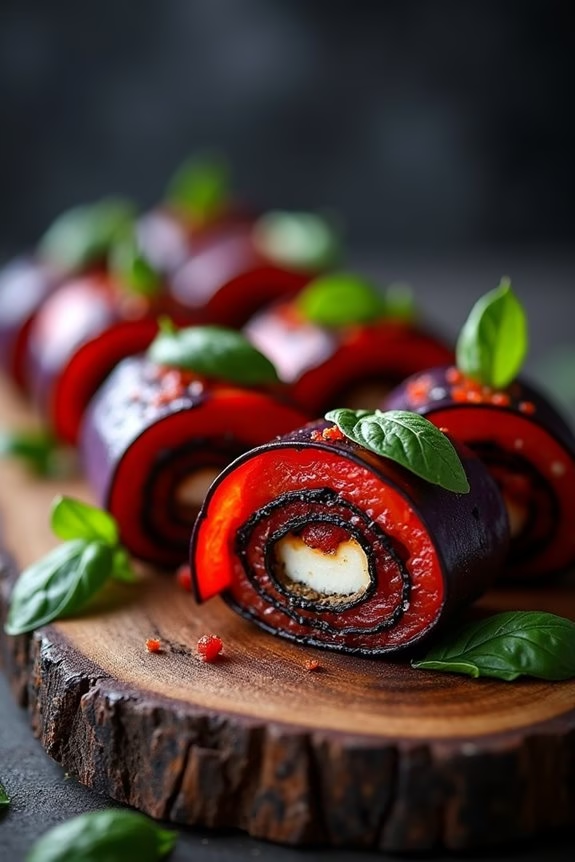
These Eerie Eggplant and Red Pepper Roll-Ups are the perfect addition to your Halloween finger food spread for adults. With their dark, smoky eggplant and vibrant red pepper filling, they offer both a visually appealing and flavorful experience.
These roll-ups aren’t only delicious but also easy to prepare, making them a convenient choice for any Halloween gathering. The combination of creamy goat cheese and the roasted vegetables provides a delightful contrast of textures and flavors that will surely impress your guests.
Ideal for serving 4-6 people, these roll-ups can be prepared ahead of time, allowing you to focus on enjoying the festivities. The spooky aesthetic of these finger foods will add a touch of Halloween flair to your party table, while the sophisticated flavors cater to an adult palate.
Whether served as an appetizer or as part of a larger spread, these Eerie Eggplant and Red Pepper Roll-Ups are sure to be a hit among your guests.
Ingredients:
- 2 medium eggplants
- 3 large red bell peppers
- 8 oz goat cheese
- 1/4 cup fresh basil leaves
- 2 tablespoons olive oil
- Salt and pepper to taste
- 1 teaspoon smoked paprika
- 1 tablespoon balsamic vinegar
Cooking Instructions:
- Prepare the Vegetables: Preheat your oven to 400°F (200°C). Slice the eggplants lengthwise into 1/4-inch thick slices. Halve the red bell peppers and remove the seeds and membranes. Place the vegetable slices on a baking sheet lined with parchment paper.
- Roast the Vegetables: Drizzle the eggplant and red pepper slices with olive oil and sprinkle with salt, pepper, and smoked paprika. Roast in the preheated oven for 20-25 minutes, or until the vegetables are tender and slightly charred.
- Cool and Fill: Once roasted, remove the vegetables from the oven and let them cool slightly. In a bowl, mix the goat cheese with balsamic vinegar until smooth. Spread a thin layer of the goat cheese mixture over each eggplant slice.
- Assemble the Roll-Ups: Place a strip of roasted red pepper on top of the goat cheese-covered eggplant slice. Add a few fresh basil leaves. Carefully roll the eggplant slice from one end to the other to enclose the filling.
- Secure and Serve: Secure each roll-up with a toothpick. Arrange them on a serving platter and serve warm or at room temperature.
Extra Tips:
For an intensified smoky flavor, consider grilling the eggplant and peppers instead of roasting them. This method will add a nice char to the vegetables, enhancing the overall taste of the roll-ups.
Additionally, you can prepare these roll-ups a day in advance and store them in the refrigerator, covered, until you’re ready to serve. Just make sure to bring them to room temperature before serving to maximize their flavors.
If goat cheese isn’t to your liking, feta cheese can be a good alternative, offering a similar creamy texture with a slightly tangier taste.