

It’s almost Halloween and time to plan some treats for the kids and parties. I put together a list of recipes that are simple to make but still fun. Each one has clear steps and common ingredients. You can pick and choose based on what you have on hand. These ideas work well for last minute prep too.
Helpful Tips Before You Start
These tips will help your Halloween treats come together without extra stress.
Gather All Decorations First
Set out sprinkles, candies, and piping bags before you start. This keeps the process moving once the treats are ready to finish.
Chill Dough or Batter When Needed
Many cookie and candy recipes hold their shape better after 30 minutes in the fridge. Check each recipe for this step.
Work in Batches
Make one or two recipes at a time instead of all ten at once. This avoids overcrowding counters and keeps ingredients fresh.
Store Finished Treats Properly
Place cooled items in airtight containers with parchment between layers. Most hold well for one to two days at room temperature.
Ghostly Meringue Kisses with Chocolate Dip
These light meringue cookies take on a playful ghost shape that fits right into a Halloween spread. They come out crisp on the outside with a soft center and pair well with a simple chocolate dip for contrast. The recipe works for a small gathering or as one item on a bigger dessert table.
The flavor stays mildly sweet from the meringue with a rich cocoa note from the dip. Kids and adults both reach for them because they look fun without needing much decoration.
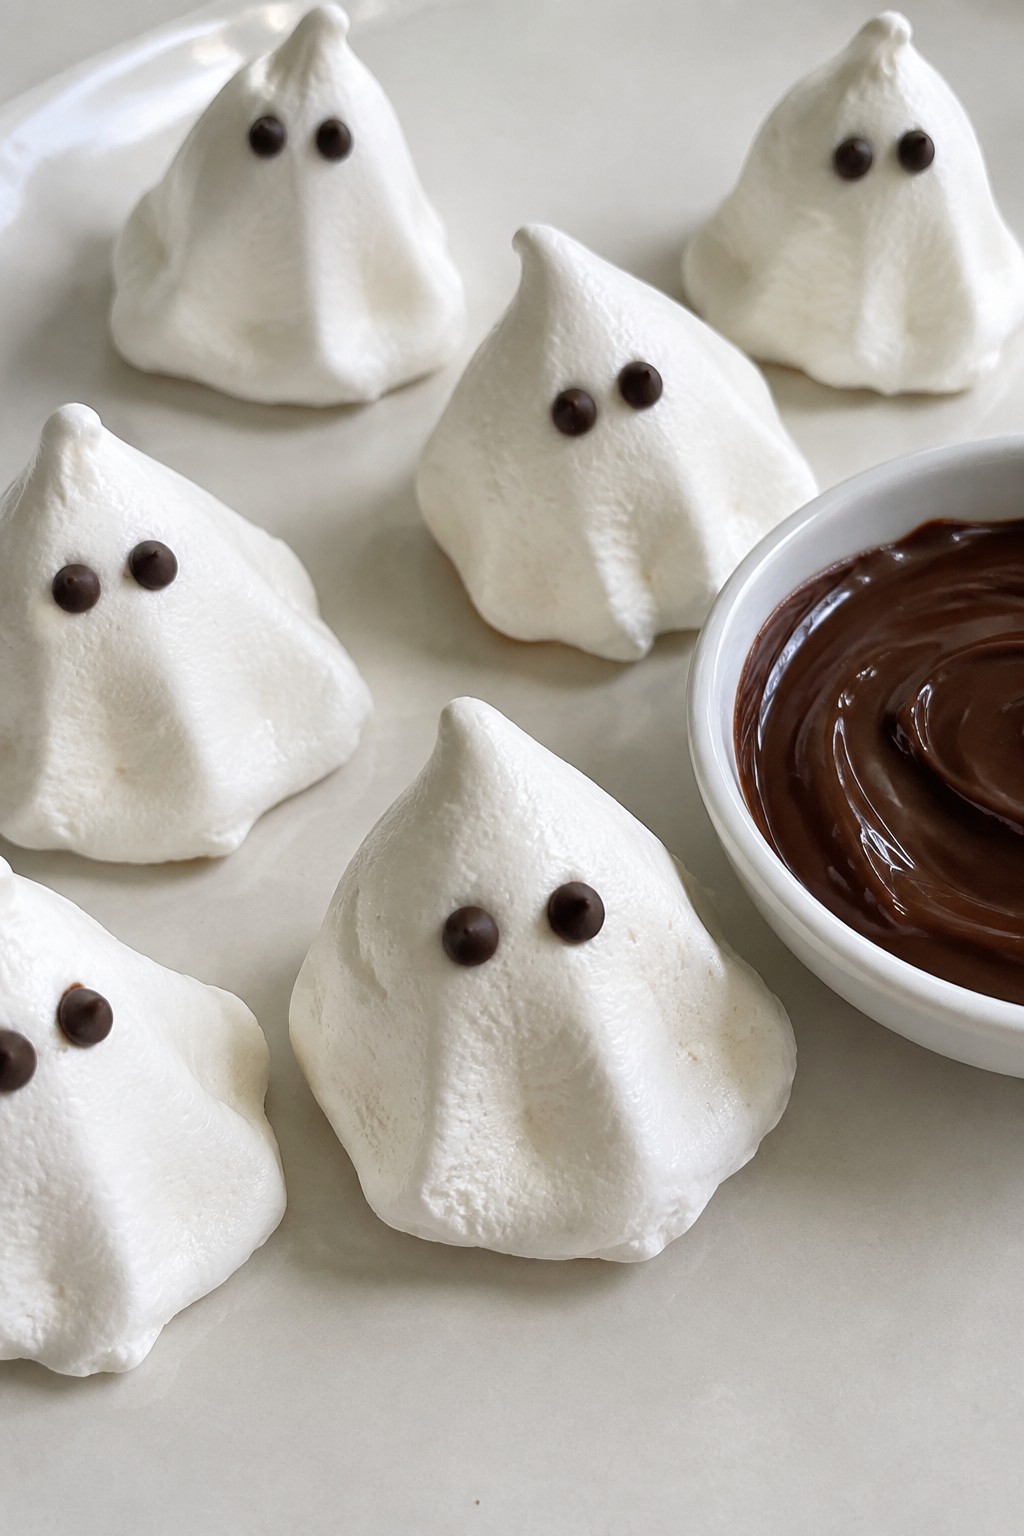
Serves 4 people.
Ingredients
- 2 large egg whites
- 1/2 cup granulated sugar
- 1/4 teaspoon cream of tartar
- 1 teaspoon vanilla extract
- 4 ounces semisweet chocolate, chopped
- 2 tablespoons heavy cream
- 16 mini chocolate chips
Instructions
- Preheat the oven to 200 degrees F and line a baking sheet with parchment paper.
- In a clean mixing bowl, beat the egg whites and cream of tartar on medium speed until soft peaks form.
- Gradually add the sugar while beating on high speed until stiff, glossy peaks develop.
- Mix in the vanilla extract on low speed until just combined.
- Spoon the meringue into a piping bag fitted with a round tip. Pipe small ghost shapes about 2 inches tall onto the prepared sheet.
- Bake for 1 hour and 30 minutes until the meringues feel dry and lift easily from the paper. Turn off the oven and let them cool inside with the door closed.
- While the meringues cool, place the chopped chocolate and heavy cream in a small saucepan over low heat. Stir until smooth and fully melted.
- Once the meringues are cool, press two mini chocolate chips into each one to create eyes. Serve with the warm chocolate dip.
Extra Tips
Pipe the ghosts with a slight taper at the bottom so they stand upright after baking. The meringues hold their shape best when stored in an airtight container at room temperature for up to two days. If the chocolate dip thickens while sitting, warm it gently over low heat and stir in a splash of cream to loosen it. Course: Dessert Cuisine: American Equipment: Mixing Bowl, Electric Mixer, Piping Bag, Baking Sheet, Small Saucepan
Pumpkin Spice Cheesecake Brownie Squares
These pumpkin spice cheesecake brownie squares combine a fudgy chocolate base with a creamy pumpkin layer. They work well for Halloween parties or a simple fall dessert at home. The result gives a balance of rich brownie texture and spiced cheesecake flavor in each bite.
The squares hold up nicely for sharing and travel well if you need to bring something to a gathering. A light pumpkin swirl adds color without overpowering the chocolate.
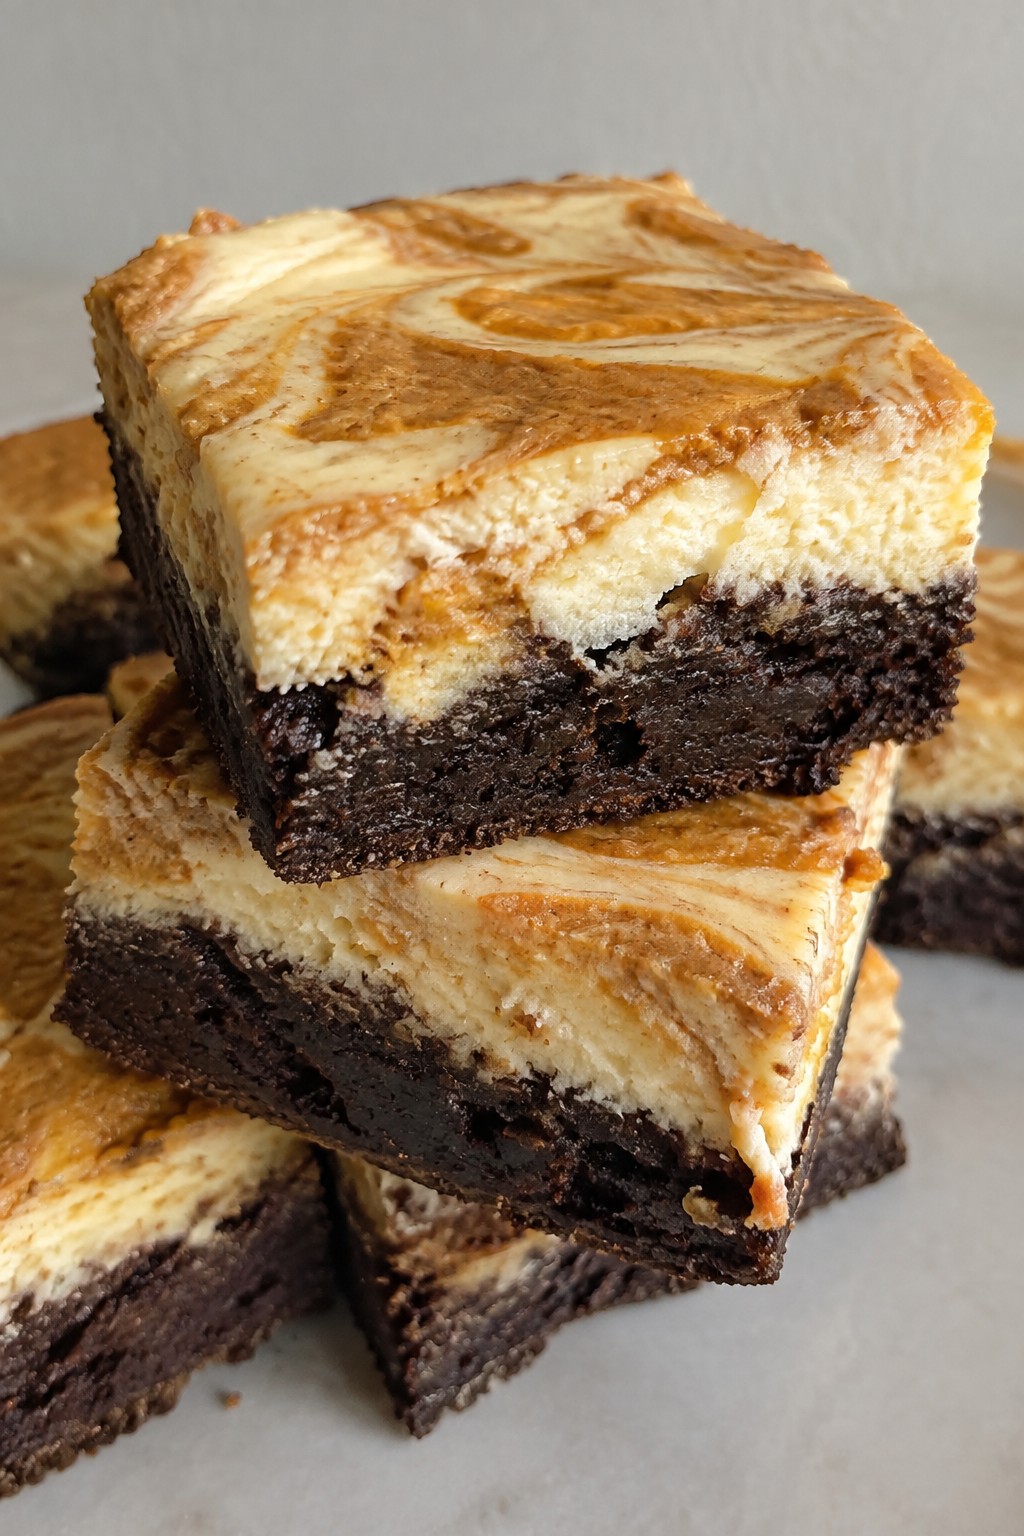
Serves 4 people.
Ingredients
- 1/2 cup unsalted butter, melted
- 1 cup granulated sugar
- 2 large eggs
- 1/2 cup all-purpose flour
- 1/3 cup cocoa powder
- 1/4 teaspoon salt
- 8 ounces cream cheese, softened
- 1/4 cup pumpkin puree
- 1/4 cup granulated sugar
- 1 teaspoon pumpkin pie spice
- 1 large egg
- 1 teaspoon vanilla extract
Instructions
- Preheat the oven to 350 degrees and line an 8×8 baking pan with parchment paper.
- In a mixing bowl, stir together the melted butter and 1 cup sugar until smooth. Add the 2 eggs and mix well.
- Add the flour, cocoa powder, and salt to the butter mixture. Stir until just combined, then spread the batter evenly in the prepared pan.
- In a separate bowl, beat the cream cheese until creamy. Add the pumpkin puree, 1/4 cup sugar, pumpkin pie spice, 1 egg, and vanilla extract. Mix until smooth.
- Drop spoonfuls of the pumpkin mixture over the brownie batter. Use a knife to gently swirl the two layers together.
- Bake for 30 to 35 minutes until the center is set. Cool completely in the pan before cutting into squares.
Extra Tips
Chill the cooled squares in the fridge for an hour before slicing to get cleaner edges and firmer texture. Store leftovers covered in the refrigerator for up to three days. For a stronger pumpkin taste, increase the pumpkin pie spice by half a teaspoon next time you make them.
Course: Dessert Cuisine: American Equipment: Mixing Bowl, Baking Pan, WhiskSpiderweb Caramel Apple Tartlets
These Spiderweb Caramel Apple Tartlets turn a simple apple dessert into a Halloween-ready treat. Flaky tart shells hold warm spiced apples and gooey caramel, while a white chocolate web on top gives them a playful spooky look. They fit well on a party dessert table or as an after-dinner bite during fall gatherings.
The finished tartlets offer a mix of crisp pastry, soft baked apples, and sticky caramel with a light chocolate finish. The design stays simple yet eye-catching for the season.

Serves 4 people.
Ingredients
- 4 mini tart shells
- 2 large apples, peeled and thinly sliced
- 1/2 teaspoon cinnamon
- 1/2 cup caramel sauce, divided
- 1/4 cup white chocolate chips
- 1 teaspoon vegetable oil
Instructions
- Heat the oven to 375°F and place the tart shells on a baking sheet.
- Toss the apple slices with cinnamon in a bowl.
- Arrange the apple slices inside each tart shell and drizzle with 1/4 cup of the caramel sauce.
- Bake for 15 to 20 minutes until the apples soften and the edges of the shells turn golden.
- While the tartlets bake, combine the white chocolate chips and vegetable oil in a microwave-safe bowl. Heat in 20-second bursts, stirring between each, until smooth.
- Remove the tartlets from the oven and let them cool for 5 minutes. Drizzle or pipe the melted white chocolate in circles over the caramel on each tartlet.
- Use a toothpick to drag lines from the center outward to form a web pattern. Finish with a light drizzle of the remaining caramel sauce.
Extra Tips
Melt the white chocolate just until smooth so it pipes cleanly without seizing. Work quickly when drawing the webs because the chocolate sets fast on the warm caramel. Store any leftovers in an airtight container in the fridge for up to two days and bring them to room temperature before serving to soften the caramel again. Course: Dessert Cuisine: American Equipment: Baking Sheet, Mixing Bowl, Microwave-Safe Bowl
Monster Marshmallow Cereal Treat Bars
These bars turn a simple cereal treat into a Halloween favorite with bright green color and candy eyes that give each piece a playful monster look. They come together quickly on the stovetop and work well for school parties or a weekend baking session with kids. The texture stays chewy in the center with a light crisp from the cereal.
The flavor stays mild and sweet, which pairs nicely with the added decorations. Cut them into squares so each bar gets its own set of eyes.

Serves 4 people.
Ingredients
- 2 tablespoons unsalted butter
- 3 cups mini marshmallows
- 3 cups crispy rice cereal
- 1 teaspoon green food coloring
- 8 candy eyes
Instructions
- Melt the butter in a large saucepan over low heat. Add the mini marshmallows and stir until they are fully melted and smooth.
- Remove the pan from the heat and stir in the green food coloring until the mixture turns an even shade. Add the crispy rice cereal and stir quickly until every piece is coated.
- Press the mixture into an 8 by 8 inch pan lined with parchment paper. Use a spatula or lightly greased hands to spread it evenly and flatten the top.
- Let the bars cool at room temperature for 30 minutes. Once set, cut into four squares. Press two candy eyes onto each square while the surface is still slightly soft.
Extra Tips
Press the candy eyes on right after cutting so they stick without extra frosting. If the mixture starts to firm up too fast during mixing, return the pan to low heat for a few seconds and stir again. Store leftovers in an airtight container at room temperature for up to three days. Course: Dessert Cuisine: American Equipment: Large Saucepan, Mixing Bowl, 8×8 Baking Pan
Witch’s Cauldron Chocolate Truffles
These truffles deliver a deep chocolate taste with a dark, textured coating that gives them a mysterious look. They fit well for Halloween gatherings or as a simple make-ahead treat for October parties.
The inside stays creamy while the outside adds a light crunch. The overall flavor stays rich and chocolate-focused without extra sweetness.
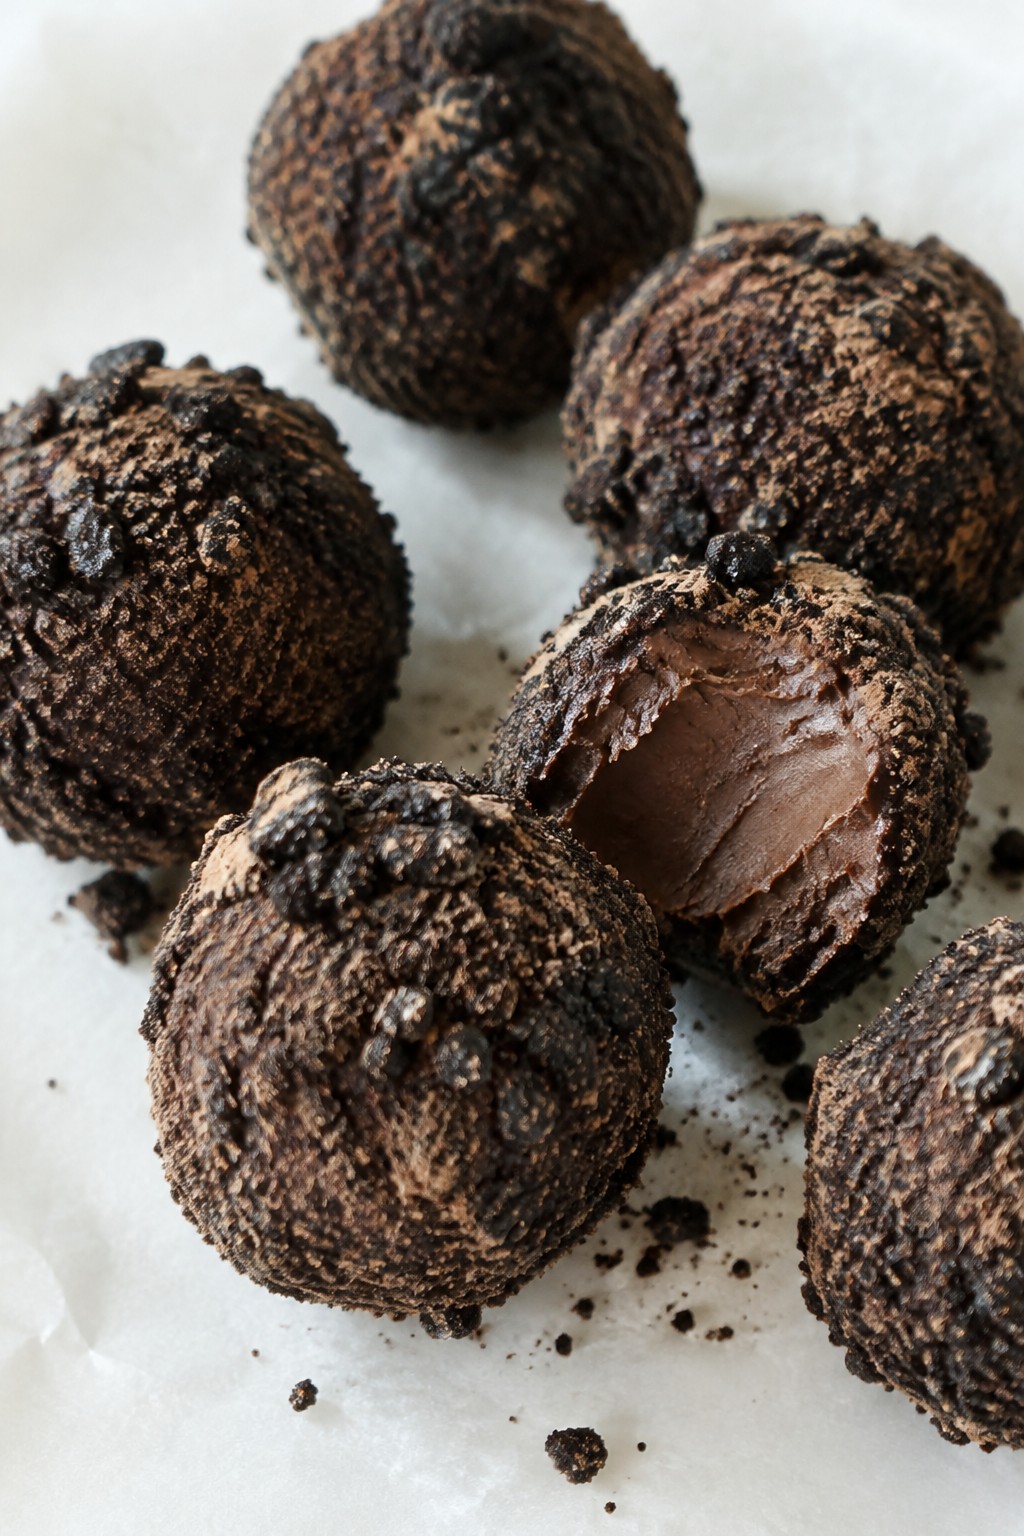
Serves 4 people.
Ingredients
- 8 ounces dark chocolate, finely chopped
- 1/2 cup heavy cream
- 1 tablespoon unsalted butter
- 1/4 cup crushed chocolate sandwich cookies
- 2 tablespoons cocoa powder
Instructions
- Place the dark chocolate in a heatproof bowl. Heat the heavy cream in a small saucepan over medium heat until it just begins to simmer.
- Pour the hot cream over the chocolate and let it sit for one minute. Add the butter and stir until the mixture becomes smooth and fully combined.
- Cover the bowl and place it in the refrigerator for two hours until the mixture firms up enough to handle.
- Scoop the chilled mixture into small balls using a teaspoon or melon baller. Roll each ball between your palms to create a smooth shape.
- Combine the crushed chocolate sandwich cookies and cocoa powder in a shallow dish. Roll each truffle in the mixture until fully coated.
- Place the finished truffles on a plate or tray and return them to the refrigerator for 30 minutes before serving.
Extra Tips
Roll the truffles in the cookie and cocoa mixture right after shaping to help the coating stick better. Store them in an airtight container in the refrigerator for up to five days. Let them sit at room temperature for five minutes before serving to soften the texture slightly. Course: Dessert Cuisine: American Equipment: Mixing Bowl, Saucepan, Baking Sheet
Graveyard Dirt Pudding Parfaits
These layered parfaits turn simple chocolate pudding into a fun Halloween dessert. Crushed cookies create the look of fresh dirt while gummy worms peek out from the layers. They work well for parties or a family night because they come together quickly and need no baking.
The texture combines smooth pudding with crunchy cookie pieces and a light whipped topping. Kids enjoy assembling their own, and the finished glasses look festive on a dessert table.
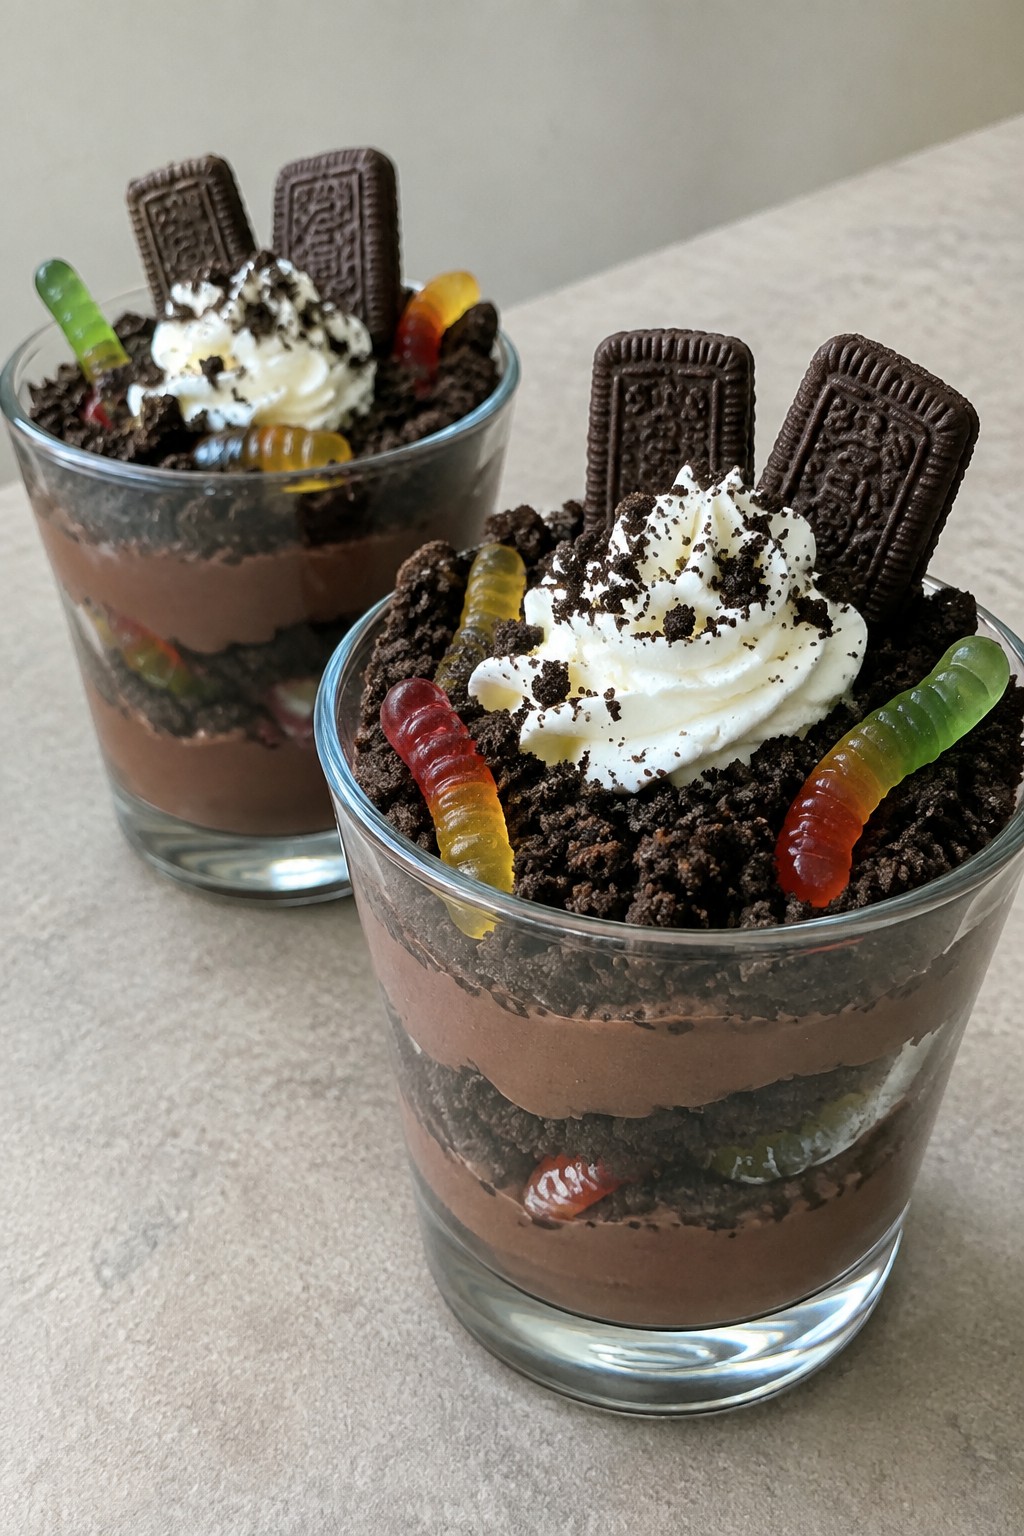
Serves 4 people.
Ingredients
- 1 package (3.9 oz) instant chocolate pudding mix
- 2 cups cold milk
- 20 Oreo cookies
- 1 cup whipped cream
- 8 gummy worms
- 4 rectangular chocolate cookies
Instructions
- Pour the instant chocolate pudding mix and cold milk into a mixing bowl. Whisk for two minutes until the mixture thickens.
- Place the Oreo cookies in a zip-top bag and crush them with a rolling pin until they form fine crumbs.
- Spoon a layer of pudding into the bottom of each of four glasses. Add a layer of cookie crumbs on top.
- Repeat with another layer of pudding and a second layer of cookie crumbs in each glass.
- Top each parfait with a spoonful of whipped cream. Press two gummy worms into the crumbs on each glass so they appear to be coming out of the dirt.
- Stand one rectangular chocolate cookie upright in the whipped cream of each glass to act as a tombstone.
Extra Tips
Crush the Oreos right before layering so the crumbs stay dry and textured. If you make the parfaits ahead, add the whipped cream, worms, and cookie tombstones just before serving to keep the top layer crisp. Course: Dessert Cuisine: American Equipment: Mixing Bowl, Whisk, Rolling Pin, 4 Glasses
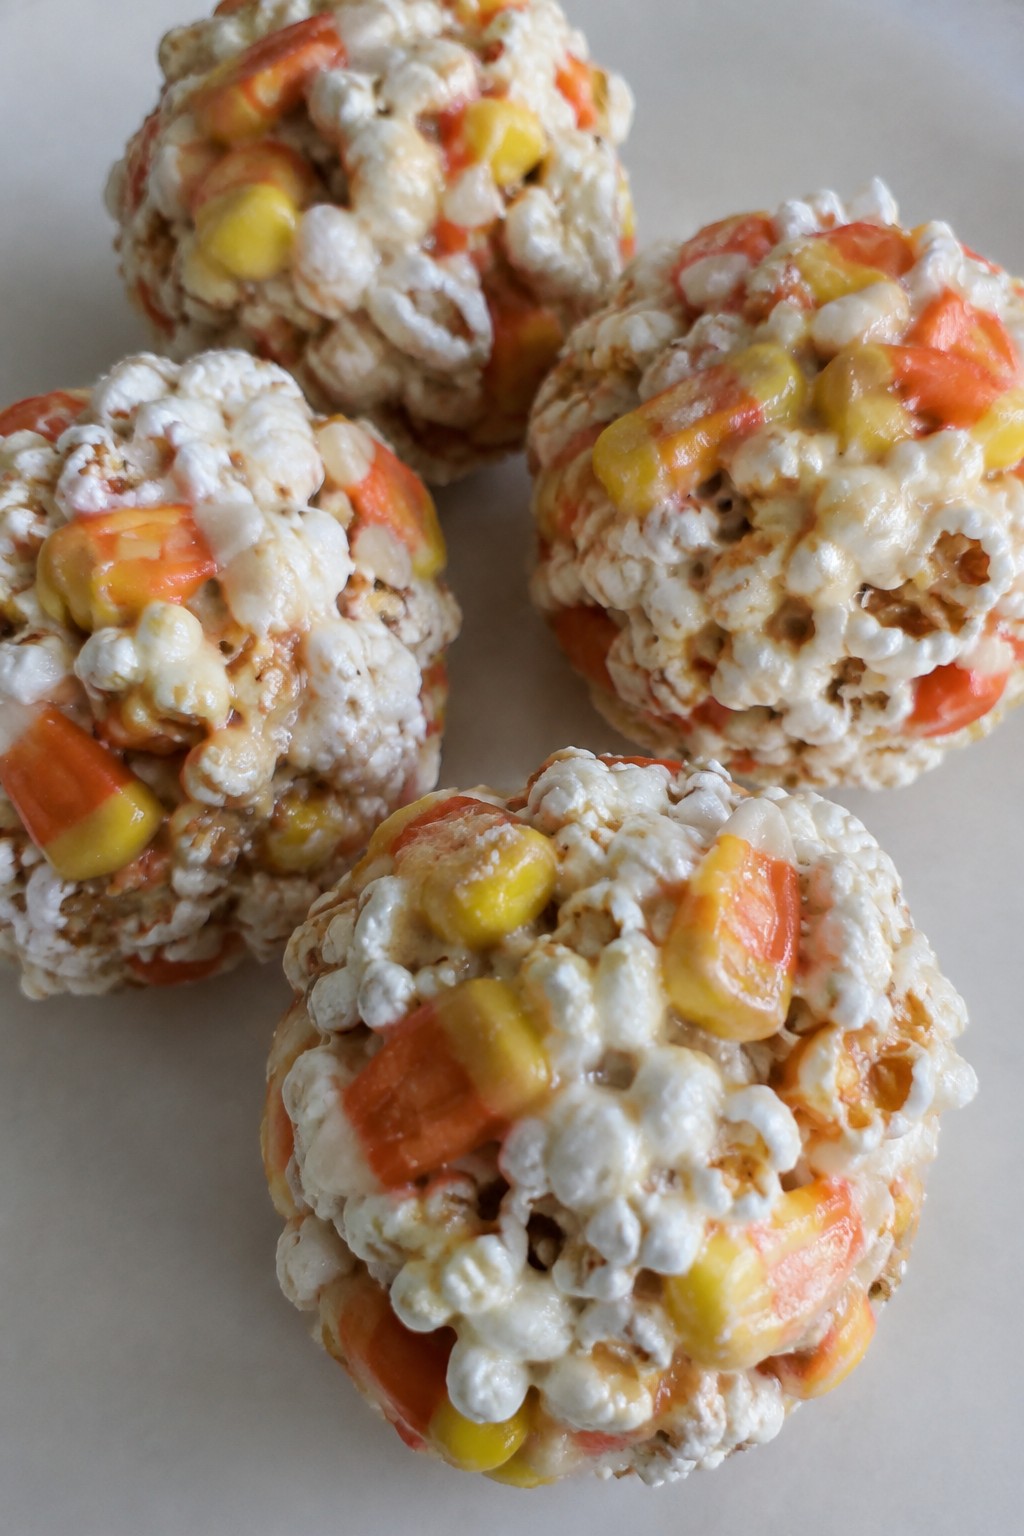
Candy Corn Popcorn Balls
These popcorn balls mix crunchy popcorn with chewy candy corn for a simple Halloween snack. They come together quickly and hold their shape well once cooled.
They work well for parties, movie nights, or handing out to kids. The flavor balances sweet candy corn with a light saltiness, and the texture stays chewy with some crunch.
Serves 4 people.
Ingredients
- 8 cups popped popcorn
- 1 cup candy corn
- 3 tablespoons unsalted butter
- 3 cups mini marshmallows
- 1 teaspoon vanilla extract
- 1/4 teaspoon salt
Instructions
- Place the popped popcorn and candy corn in a large mixing bowl. Set it aside while you prepare the marshmallow mixture.
- Melt the butter in a medium saucepan over medium heat. Add the mini marshmallows and stir until fully melted and smooth.
- Remove the pan from the heat. Stir in the vanilla extract and salt until combined.
- Pour the marshmallow mixture over the popcorn and candy corn. Use a spatula to coat everything evenly.
- Lightly grease your hands with butter or cooking spray. Scoop portions of the mixture and press them into balls. Place each ball on a sheet of parchment paper to set.
Extra Tips
Work quickly when shaping the balls because the mixture firms up fast as it cools. Store leftovers in an airtight container at room temperature for up to two days to keep them from drying out. Course: Snack Cuisine: American Equipment: Large mixing bowl, Medium saucepan, Spatula, Parchment paper
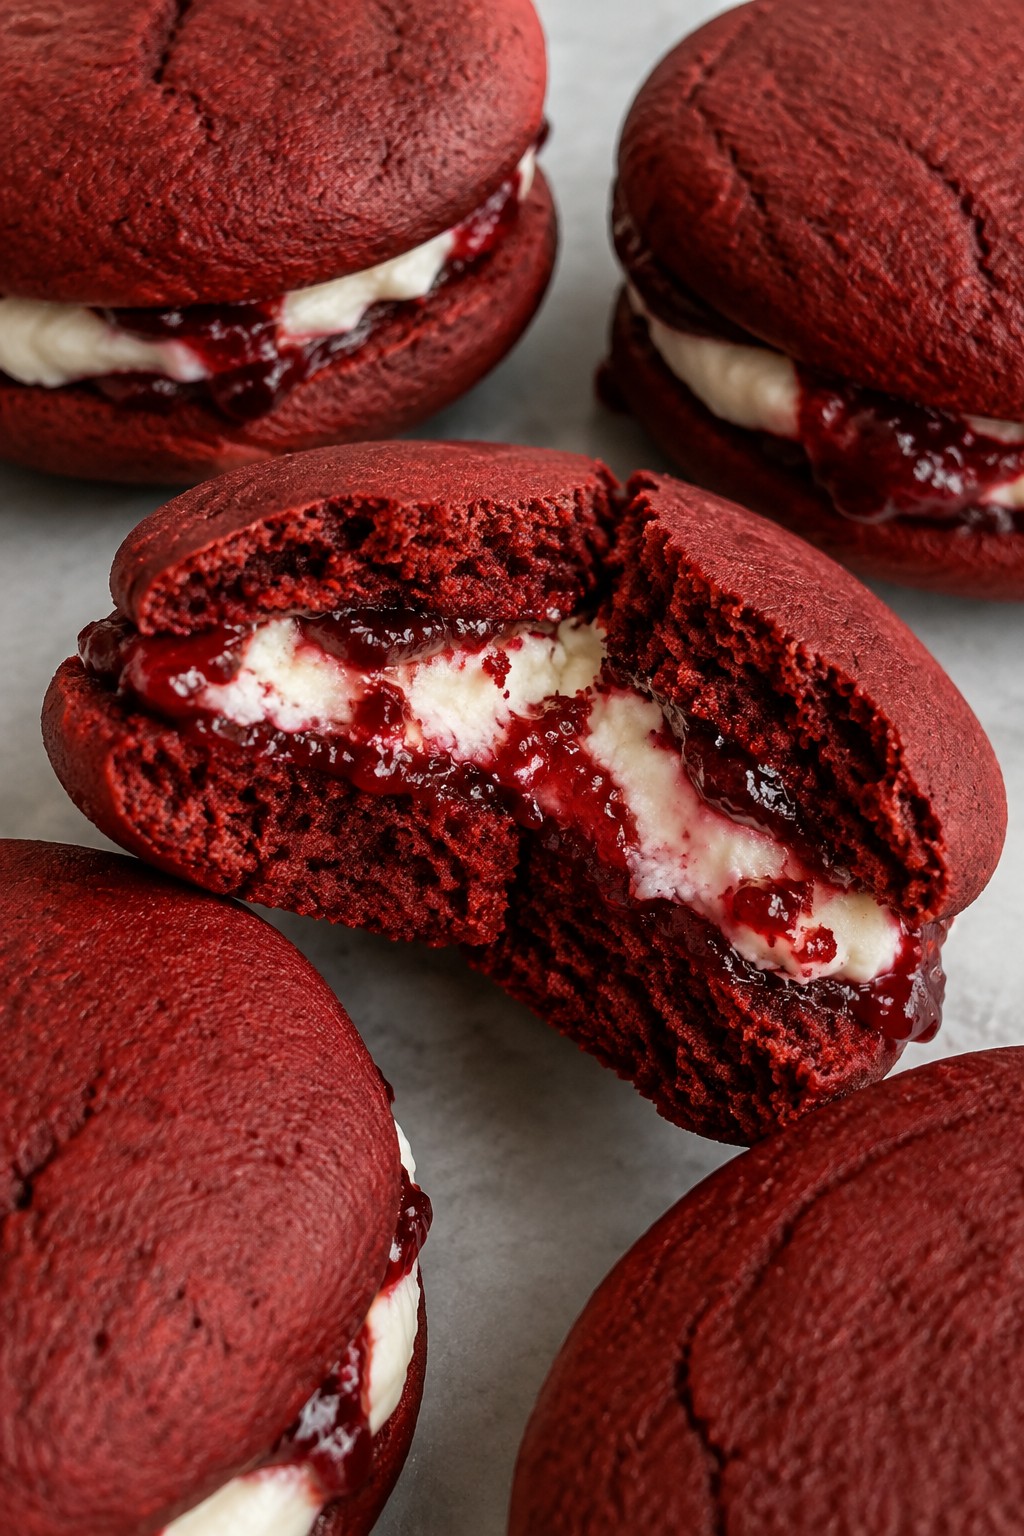
Bloody Red Velvet Whoopie Pies
These whoopie pies turn classic red velvet into a Halloween dessert with a bright red cake and a filling that gives a bloody effect when sliced. They suit a party spread or an after-dinner treat when you want something festive but still simple to prepare. The cakes stay soft with a light cocoa taste while the filling adds creaminess and a touch of fruit.
Serves 4 people.
Ingredients
- 1 1/4 cups all-purpose flour
- 2 tablespoons unsweetened cocoa powder
- 1/2 teaspoon baking soda
- 1/4 teaspoon salt
- 1/4 cup unsalted butter, softened
- 3/4 cup granulated sugar
- 1 large egg
- 1 teaspoon vanilla extract
- 1/2 cup buttermilk
- 1 tablespoon red food coloring
- 1 teaspoon white vinegar
- 8 ounces cream cheese, softened
- 1/4 cup unsalted butter, softened
- 1 1/2 cups powdered sugar
- 1 teaspoon vanilla extract
- 3 tablespoons raspberry jam
Instructions
- Preheat the oven to 350 degrees F and line a baking sheet with parchment paper.
- In a bowl, whisk together the flour, cocoa powder, baking soda, and salt.
- In a second bowl, beat the softened butter and granulated sugar until light. Add the egg and vanilla extract, then mix in the buttermilk, red food coloring, and white vinegar.
- Stir the dry ingredients into the wet mixture until just combined. Drop rounded tablespoons of batter onto the baking sheet, spacing them 2 inches apart, and bake for 10 to 12 minutes until the cakes spring back when touched. Cool completely on a wire rack.
- For the filling, beat the cream cheese and softened butter until smooth. Add the powdered sugar and vanilla extract and mix until creamy. Stir in the raspberry jam just until streaks of red remain.
- Spread the filling on the flat side of half the cooled cakes and top with the remaining cakes to form the whoopie pies.
Extra Tips
Press the cakes together gently so a little filling shows at the edges for the bloody look. If the jam is too thick, warm it for a few seconds in the microwave before stirring it in. Store assembled whoopie pies in an airtight container in the refrigerator for up to two days and let them sit at room temperature for 10 minutes before serving. Course: Dessert Cuisine: American Equipment: Mixing Bowl, Baking Sheet, Oven
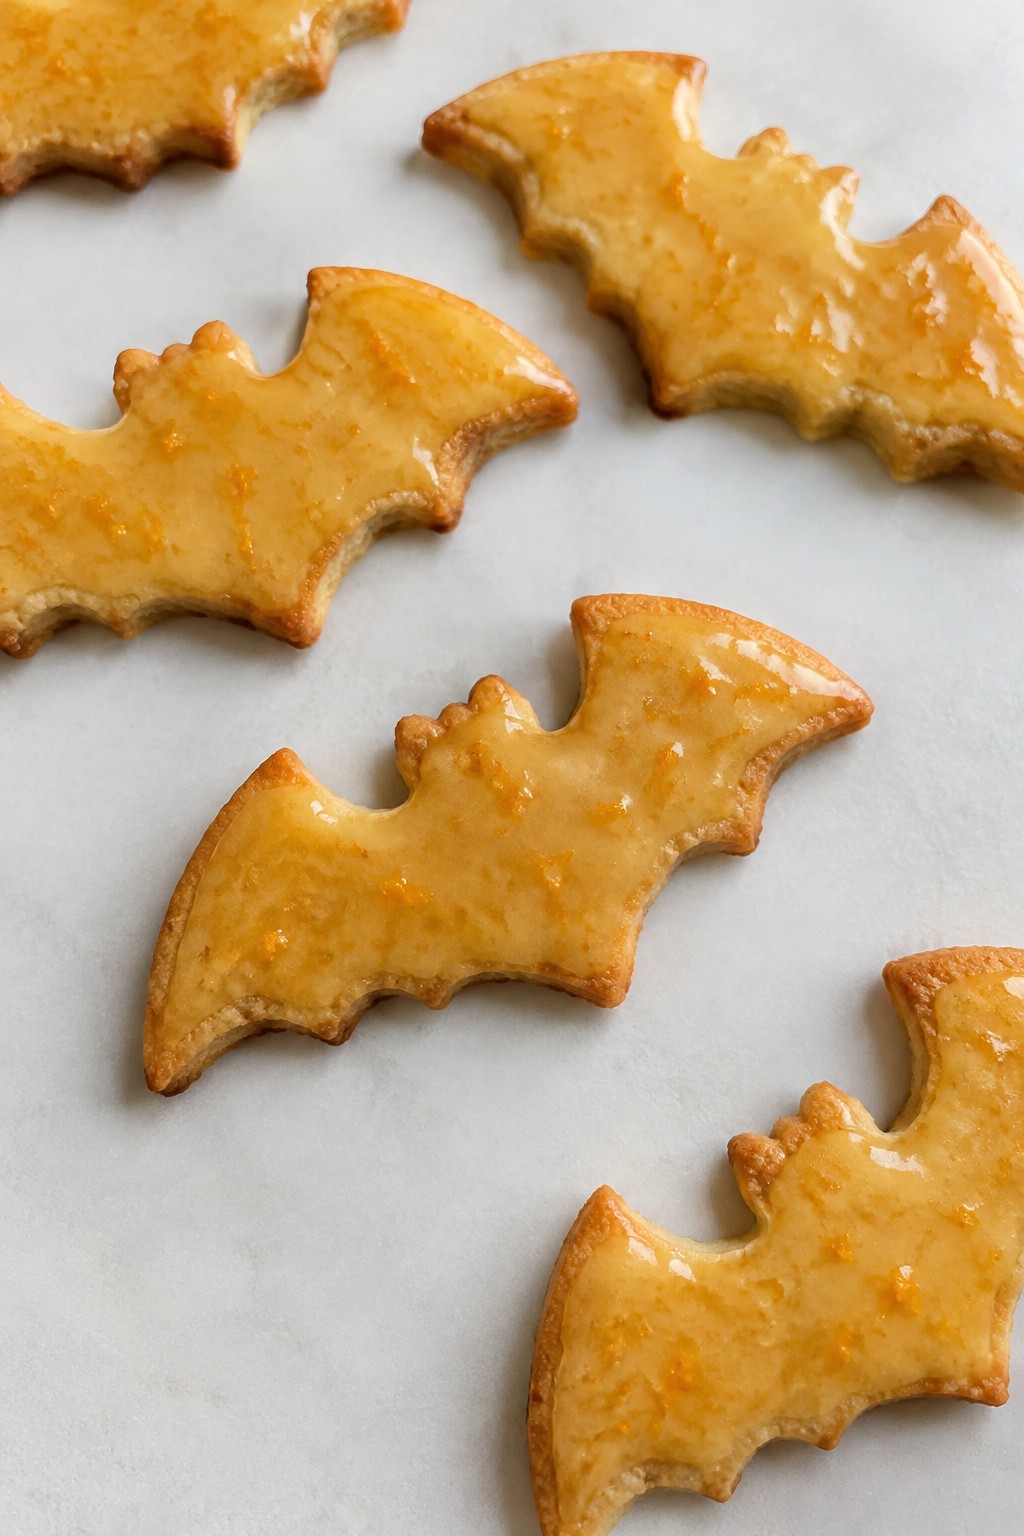
Bat-Shaped Shortbread Cookies with Orange Glaze
These cookies bring a simple Halloween touch to any table. The buttery shortbread holds a crisp edge while the orange glaze adds a bright citrus note that balances the sweetness. They work well for an afternoon bake with kids or as a last-minute addition to a party spread.
The texture stays tender inside with a light snap at the edges. The glaze sets to a thin sheen that shows off the bat shapes without overpowering the cookie itself.
Serves 4 people.
Ingredients
- 1 cup all-purpose flour
- 1/2 cup unsalted butter, softened
- 1/4 cup granulated sugar
- 1/2 teaspoon vanilla extract
- Pinch of salt
- 1 cup powdered sugar
- 2 tablespoons orange juice
- 1 teaspoon orange zest
Instructions
- Preheat the oven to 350 degrees and line a baking sheet with parchment paper.
- In a mixing bowl, cream the softened butter with the granulated sugar until light and smooth.
- Stir in the vanilla extract and salt.
- Add the flour and mix until a soft dough forms.
- Roll the dough to about 1/4 inch thick between two sheets of parchment paper.
- Cut out bat shapes with a cookie cutter and place them on the prepared baking sheet.
- Bake for 12 to 14 minutes until the edges turn lightly golden.
- Let the cookies cool on the sheet for 5 minutes, then move them to a wire rack.
- In a small bowl, whisk the powdered sugar with the orange juice and orange zest until smooth.
- Dip the top of each cooled cookie into the glaze and let the excess drip off. Set aside until the glaze firms.
Extra Tips
Chill the cut shapes for 10 minutes before baking if the dough feels soft. This keeps the bat wings from spreading. The glaze thickens as it sits, so add a few drops of orange juice if it becomes too stiff to dip. Store finished cookies in a single layer between sheets of parchment so the glaze stays intact. Course: Dessert Cuisine: American Equipment: Mixing bowl, baking sheet, parchment paper, cookie cutter, wire rack
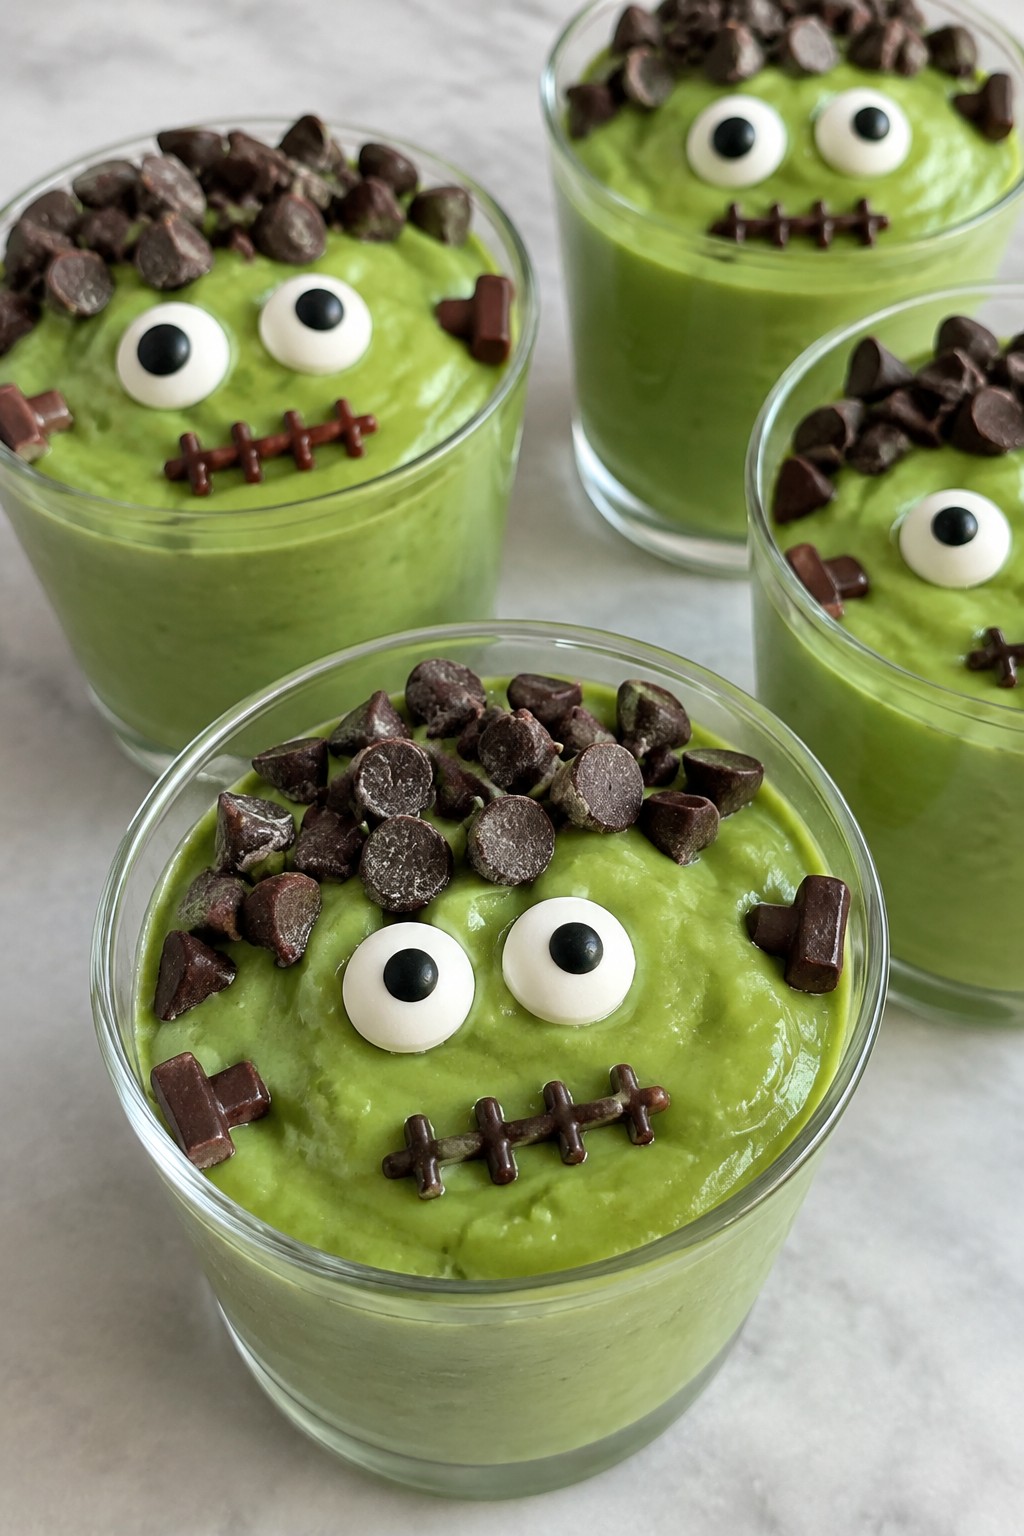
Frankenstein Avocado Chocolate Pudding Cups
These Frankenstein Avocado Chocolate Pudding Cups turn a simple chocolate pudding into a playful Halloween dessert. The bright green color comes naturally from avocado, which also gives the pudding a thick and creamy texture that pairs well with cocoa.
They suit after-school snacks or small Halloween gatherings where you want something lighter than cake. The chocolate flavor stays rich while the avocado keeps each bite smooth without any dairy heaviness.
Serves 4 people.
Ingredients
- 2 ripe avocados, pitted and peeled
- 1/4 cup unsweetened cocoa powder
- 3 tablespoons maple syrup
- 1/2 cup milk of choice
- 1 teaspoon vanilla extract
- 1/4 cup chocolate chips
- 8 candy eyes
Instructions
- Place the avocados, cocoa powder, maple syrup, milk, and vanilla extract in a blender. Blend on high until the mixture is completely smooth and no green flecks remain.
- Spoon the pudding evenly into four small cups or glasses. Smooth the tops with the back of a spoon.
- Melt the chocolate chips in a microwave-safe bowl in 20-second bursts, stirring between each burst until fully liquid. Let the chocolate cool slightly so it is not too hot.
- Use a toothpick or the tip of a spoon to dab small dots of melted chocolate on the sides of each cup and press two chocolate chips into them to form bolts. Add two candy eyes near the top of each cup, securing them with a tiny bit of melted chocolate if needed. Let the chocolate set for a few minutes before serving.
Extra Tips
Ripe avocados give the best color and creaminess, so choose ones that yield slightly when pressed. If the pudding tastes too bitter, add a little more maple syrup after the first blend. The cups keep well in the refrigerator for up to two days, though the candy eyes soften over time so add those just before serving. Course: Dessert Cuisine: American Equipment: Blender, Microwave-safe bowl, Serving cups
