
Start your day on a fresh and healthy note with these 14 amazing breakfast ideas.
From vibrant berry-licious smoothie bowls to zesty avocado toast, each option is quick to prepare and full of flavor.
These breakfasts will keep you energized all morning.
Ready to shake up your morning routine with some delicious inspiration?
Let’s explore these mouthwatering ideas together!
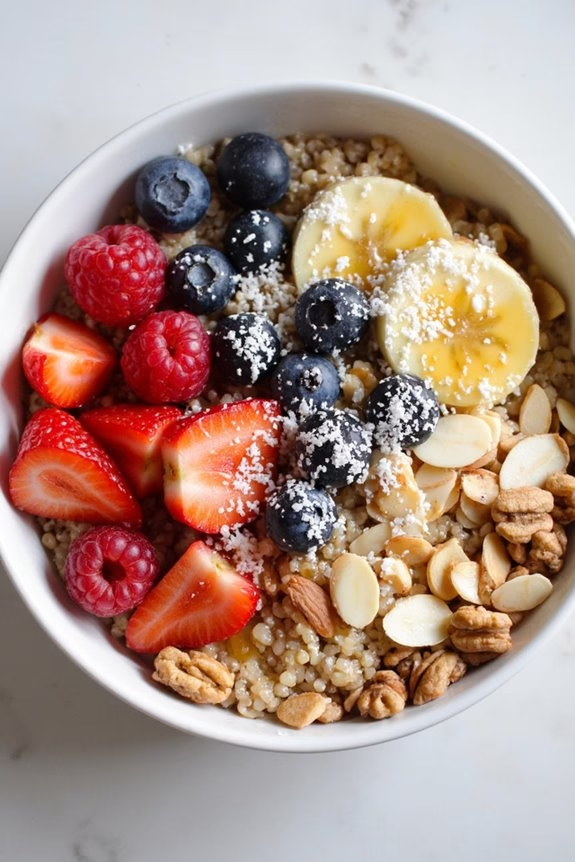
Berry-licious Smoothie Bowl
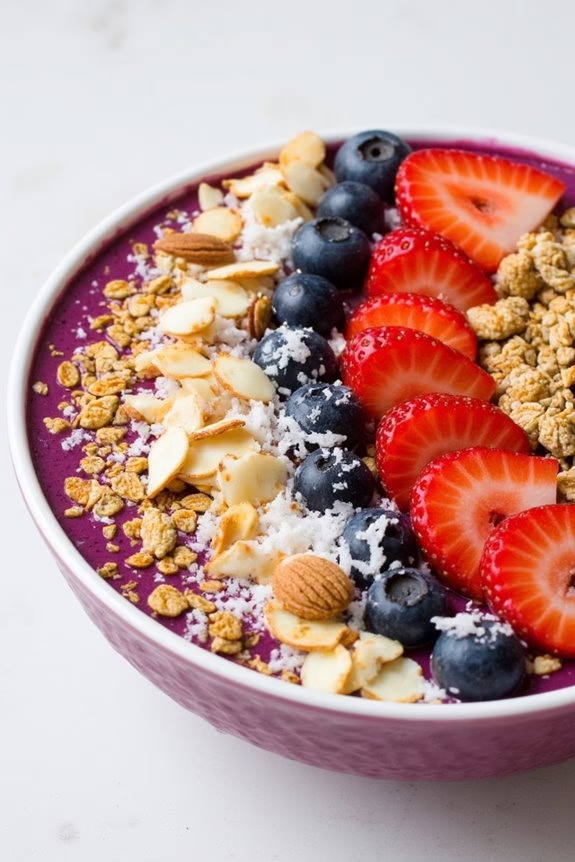
The Berry-licious Smoothie Bowl is a vibrant and invigorating breakfast option that’s not only visually appealing but also packed with nutrients. This delightful dish combines the natural sweetness of berries with the creaminess of yogurt, creating a perfect balance of flavors and textures. Ideal for a busy morning, this smoothie bowl can be prepared quickly and customized with your favorite toppings to suit your taste preferences.
Start your day with this nutrient-dense breakfast that provides a boost of antioxidants, vitamins, and minerals. Berries are known for their high content of vitamin C and fiber, while the yogurt adds a dose of probiotics and protein. Topped with crunchy granola and fresh fruits, this smoothie bowl is a complete meal that will keep you satisfied and energized throughout the morning.
Ingredients (Serving Size: 4-6 people)
- 2 cups frozen mixed berries
- 2 ripe bananas
- 1 cup Greek yogurt
- 1/2 cup almond milk (or milk of choice)
- 2 tablespoons honey or maple syrup
- 1 teaspoon vanilla extract
- 1/4 cup chia seeds
- 1/2 cup granola
- 1/2 cup sliced almonds
- Fresh berries (blueberries, strawberries, etc.) for topping
- Sliced banana for topping
- Shredded coconut for topping
Cooking Instructions
- Prepare the Base: In a blender, combine the frozen mixed berries, ripe bananas, Greek yogurt, almond milk, honey or maple syrup, and vanilla extract. Blend until smooth and creamy. If the mixture is too thick, add more almond milk, a little at a time, until the desired consistency is reached.
- Thicken the Mixture: Pour the blended mixture into a large bowl and stir in the chia seeds. Allow the mixture to sit for about 5 minutes. The chia seeds will expand and thicken the smoothie base, giving it a pudding-like texture.
- Assemble the Smoothie Bowls: Divide the thickened smoothie mixture evenly into serving bowls. Use the back of a spoon to smooth out the surface.
- Add Toppings: Decorate each bowl with your choice of toppings. Sprinkle granola and sliced almonds for crunch, and add fresh berries and sliced banana for freshness. Finish with a sprinkle of shredded coconut for an extra layer of flavor and texture.
- Serve Immediately: The Berry-licious Smoothie Bowl is best served fresh. Enjoy it right away to experience the full spectrum of flavors and textures.
Extra Tips
To make your Berry-licious Smoothie Bowl even more nutritious, consider adding a scoop of your favorite protein powder or a tablespoon of nut butter to the blender for added protein and healthy fats.
If you prefer a sweeter smoothie bowl, adjust the sweetness by adding more honey or maple syrup. Feel free to experiment with different toppings such as cacao nibs, pumpkin seeds, or dried fruits to keep your breakfast exciting and varied.
Remember to serve the smoothie bowls immediately after preparation to maintain their freshness and vibrant appearance.
Avocado Toast With a Twist
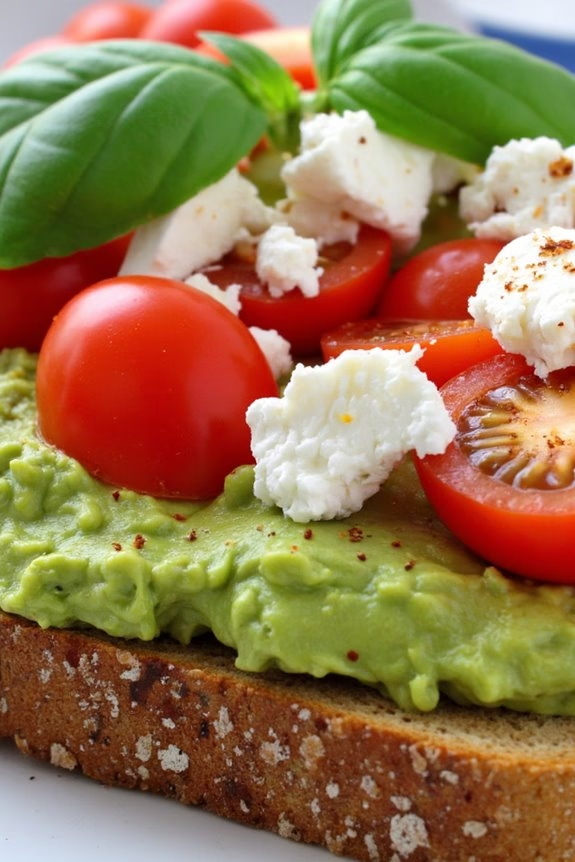
Avocado Toast With a Twist is a delightful variation on the traditional breakfast staple that combines creamy avocados with a medley of unexpected flavors and textures. This dish not only satisfies your taste buds but also provides a nutritious start to your day.
By incorporating a few unique ingredients, you can elevate your avocado toast to a gourmet level, perfect for a weekend brunch or a special weekday breakfast.
This recipe brings together the richness of avocados, the crunch of toasted bread, and a zesty kick from a hint of lime, topped with a sprinkle of feta cheese and cherry tomatoes for a vibrant, savory profile. It’s easy to make, packed with healthy fats, and sure to become a favorite in your breakfast rotation.
Whether you’re feeding a family or hosting friends, this Avocado Toast With a Twist caters to a serving size of 4-6 people, making it ideal for any gathering.
Ingredients:
- 4 ripe avocados
- 8 slices of whole-grain bread
- 2 tablespoons olive oil
- Juice of 1 lime
- 1 cup crumbled feta cheese
- 1 cup cherry tomatoes, halved
- 1 teaspoon red pepper flakes
- Salt and pepper to taste
- Fresh basil leaves for garnish
Cooking Instructions:
1. Prepare the Bread: Begin by preheating your oven to 375°F (190°C). Lay out the slices of whole-grain bread on a baking sheet. Brush each slice lightly with olive oil on both sides.
Place the baking sheet in the oven and bake for 8-10 minutes, or until the bread is golden brown and crispy. Remove from the oven and let cool slightly.
2. Prepare the Avocado Mixture: While the bread is toasting, cut the avocados in half and remove the pits. Scoop the flesh into a bowl and mash it roughly with a fork, leaving some chunks for texture.
Add the lime juice, salt, and pepper to taste, mixing well until combined.
3. Assemble the Toast: Once the bread has cooled slightly, spread a generous amount of the mashed avocado mixture over each slice. Confirm the avocado is evenly distributed for a consistent flavor in every bite.
4. Add Toppings: Sprinkle the crumbled feta cheese evenly over each slice of toast. Then, add the halved cherry tomatoes on top, distributing them evenly.
For an added kick, sprinkle a pinch of red pepper flakes over each toast.
5. Garnish and Serve: Finish by garnishing each toast with fresh basil leaves. Serve immediately for the best taste and texture.
Extra Tips:
For the best results, use ripe avocados that yield slightly when pressed. If your avocados are too firm, place them in a paper bag with a banana for a day to speed up ripening.
Experiment with different types of bread like sourdough or multigrain for varying textures and flavors. To enhance the presentation, consider drizzling a balsamic glaze over the top before serving.
Finally, confirm the bread is toasted just right—a crispy base is essential for holding up the toppings without becoming soggy. Enjoy your Avocado Toast With a Twist fresh for the ultimate breakfast experience.
Chia Seed Pudding Parfait
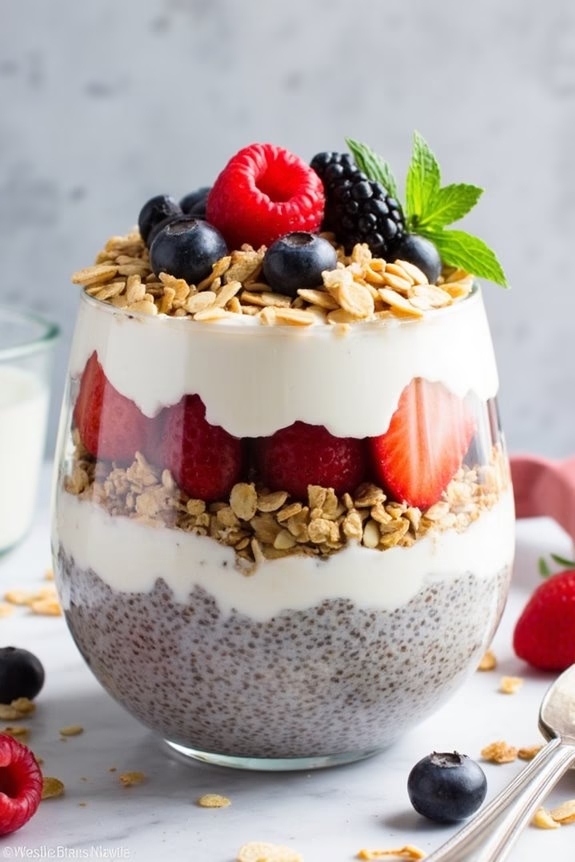
Chia Seed Pudding Parfait is a delightful and nutritious way to start your day. This breakfast dish combines the rich texture of chia seed pudding with layers of fruit and yogurt for a balanced meal that provides energy and satisfaction. The chia seeds are soaked overnight, creating a pudding-like consistency that’s both creamy and filling. This makes the parfait not only delicious but also convenient, as much of the prep work can be done ahead of time. Perfect for busy mornings or as a leisurely weekend breakfast, this dish is versatile enough to suit a range of tastes and dietary preferences.
The beauty of a Chia Seed Pudding Parfait lies in its adaptability. You can tailor it to include your favorite fruits, nuts, and spices, making it a breakfast that can change with the seasons or your mood. Not only is it rich in fiber and omega-3 fatty acids, but it also provides a substantial dose of antioxidants and vitamins from the fruits. Whether you’re serving it to a family or a small group of friends, this recipe will serve 4-6 people, making sure everyone gets a hearty and delicious start to their day.
Ingredients:
- 1 cup chia seeds
- 4 cups almond milk (or any preferred milk)
- 2 teaspoons vanilla extract
- 1/4 cup maple syrup or honey
- 2 cups Greek yogurt
- 1 cup granola
- 2 cups mixed berries (strawberries, blueberries, raspberries)
- 1/2 cup sliced almonds or other nuts
- Fresh mint leaves for garnish (optional)
Cooking Instructions:
- Prepare the Chia Seed Pudding:
- In a large mixing bowl, combine the chia seeds, almond milk, vanilla extract, and maple syrup or honey. Stir well to make certain the seeds are fully immersed in the liquid.
- Cover the bowl and refrigerate for at least 4 hours, or ideally overnight, allowing the chia seeds to absorb the liquid and form a pudding-like consistency.
- Assemble the Parfaits:
- Once the chia seed pudding is set, begin layering the parfaits in serving glasses or bowls. Start with a layer of chia seed pudding at the bottom.
- Add a layer of Greek yogurt on top of the chia pudding, followed by a layer of granola.
- Top the granola with a generous helping of mixed berries.
- Repeat the layers until the glass is filled, ending with a layer of berries on top.
- Finish and Serve:
- Sprinkle sliced almonds or your choice of nuts over the top layer of berries.
- Garnish with fresh mint leaves for an added touch of freshness and color, if desired.
- Serve immediately, or keep refrigerated for up to a couple of hours before serving.
Extra Tips:
For a creamier texture, try using coconut milk instead of almond milk. You can also experiment with different flavorings, such as adding cinnamon or nutmeg to the chia seed pudding for a warm, spiced flavor. If you’re in a rush, the chia seed pudding can be made in advance and stored in the fridge for up to 5 days, allowing you to quickly assemble the parfaits when needed.
Additionally, using seasonal fruits won’t only enhance the taste but also provide the freshest and most nutritious options.
Veggie-Packed Omelet

Start your morning off right with a nutritious and delicious Veggie-Packed Omelet. This breakfast option is perfect for those looking to incorporate more vegetables into their diet while enjoying the satisfying taste of a classic omelet. Made with a variety of colorful vegetables and fluffy eggs, this dish isn’t only visually appealing but also packed with vitamins and nutrients essential for a healthy start to the day.
This Veggie-Packed Omelet serves 4-6 people, making it an ideal choice for a family breakfast or a weekend brunch with friends. You can easily adjust the vegetables to suit your preferences or whatever you have on hand, guaranteeing a fresh and tasty meal every time. With a few simple steps, you’ll have a wholesome breakfast ready in no time.
Ingredients (serving size: 4-6 people):
- 12 large eggs
- 1/2 cup milk
- Salt and pepper to taste
- 1 tablespoon olive oil
- 1 cup diced bell peppers (any color)
- 1 cup chopped spinach
- 1/2 cup diced onions
- 1 cup sliced mushrooms
- 1 cup cherry tomatoes, halved
- 1 cup shredded cheese (such as cheddar or mozzarella)
- Fresh herbs (such as parsley or chives) for garnish
Cooking Instructions:
1. Prepare the Eggs: In a large bowl, whisk together the eggs, milk, salt, and pepper until well combined. This mixture will form the base of your omelet, so make sure the eggs are fully integrated with the milk.
2. Heat the Pan: In a large non-stick skillet, heat the olive oil over medium heat. This will prevent the omelet from sticking and guarantee even cooking.
3. Sauté the Vegetables: Add the diced bell peppers, onions, and mushrooms to the skillet. Sauté for about 4-5 minutes until the vegetables are soft and the onions are translucent.
Stir in the chopped spinach and halved cherry tomatoes, cooking for an additional 2 minutes until the spinach is wilted.
4. Cook the Eggs: Pour the egg mixture over the sautéed vegetables in the skillet. Tilt the pan gently to guarantee the eggs cover all the vegetables evenly. Cook without stirring for about 4-5 minutes until the edges start to set.
5. Add the Cheese: Sprinkle the shredded cheese evenly over the top of the omelet. Cover the skillet with a lid and continue cooking for another 2-3 minutes until the cheese is melted and the center of the omelet is set.
6. Serve and Garnish: Carefully slide the omelet onto a large serving plate. Garnish with your choice of fresh herbs, such as parsley or chives, for added flavor and a pop of color.
Extra Tips:
For a fluffier omelet, try separating the egg whites from the yolks and beat them separately before gently folding them back together.
If you prefer a spicier version, consider adding a pinch of red pepper flakes or some chopped jalapeños to the vegetable mix.
Also, feel free to experiment with different cheese varieties or add a protein like diced ham or turkey for a heartier meal.
Remember to keep the heat at medium to prevent the omelet from browning too quickly and guarantee even cooking throughout. Enjoy your healthy and delicious Veggie-Packed Omelet!
Quinoa Breakfast Bowl
Starting your day with a nutritious and delicious breakfast can set the tone for the rest of the day. One such hearty option is a Quinoa Breakfast Bowl. Quinoa, a protein-packed grain, provides a perfect base for this dish, offering a satisfying texture and a mild flavor that pairs well with a variety of toppings. Whether you’re looking to fuel up before a busy day or simply seeking a healthy breakfast option, this quinoa breakfast bowl is an ideal choice.
This recipe combines cooked quinoa with a medley of fresh fruits, nuts, and a hint of sweetness to create a balanced meal. The natural sweetness from fruits paired with the crunch of nuts not only elevates the dish’s flavor profile but also adds an array of nutrients. Prepare a large batch of this breakfast bowl to serve 4-6 people, making it a perfect option for family breakfasts or meal prepping for the week ahead.
Ingredients for 4-6 Servings:
- 2 cups quinoa
- 4 cups water
- 1/4 teaspoon salt
- 1 cup almond milk (or milk of choice)
- 2 tablespoons honey or maple syrup
- 1 teaspoon vanilla extract
- 1 teaspoon ground cinnamon
- 1 cup fresh berries (such as blueberries, strawberries, or raspberries)
- 1/2 cup sliced almonds or walnuts
- 1/2 cup sliced bananas
- 1/4 cup shredded coconut (optional)
- Extra honey or syrup for drizzling (optional)
Cooking Instructions:
- Rinse and Cook Quinoa: Begin by rinsing the quinoa under cold water using a fine-mesh strainer. This step is essential to remove the natural coating called saponin, which can make quinoa taste bitter. Once rinsed, combine the quinoa, water, and salt in a large saucepan over medium-high heat. Bring to a boil.
- Simmer and Fluff: Once boiling, reduce the heat to low, cover the saucepan, and let the quinoa simmer for about 15 minutes, or until all the water is absorbed. Remove from heat and let it sit, covered, for an additional 5 minutes. Afterward, fluff the quinoa with a fork to separate the grains.
- Prepare the Quinoa Base: In a separate pot, warm the almond milk over low heat. Stir in honey or maple syrup, vanilla extract, and ground cinnamon. Once warmed and well combined, pour this mixture over the fluffed quinoa and stir gently to incorporate.
- Assemble the Bowls: Divide the quinoa mixture evenly among serving bowls. Top each bowl with a generous portion of fresh berries, sliced bananas, and nuts of your choice. If desired, sprinkle with shredded coconut for an additional layer of flavor and texture.
- Finish and Serve: Drizzle a little more honey or maple syrup over the top for added sweetness if desired. Serve immediately while warm and enjoy your nutritious quinoa breakfast bowl.
Extra Tips:
For added convenience, consider preparing the quinoa the night before and storing it in the refrigerator. In the morning, simply reheat the quinoa with the milk mixture before adding your toppings.
Feel free to customize the toppings based on what you have available; dried fruits, seeds, or even a dollop of yogurt can be excellent additions. This dish is incredibly versatile, allowing you to adjust it according to your taste preferences and dietary needs.
Overnight Oats With a Zesty Kick
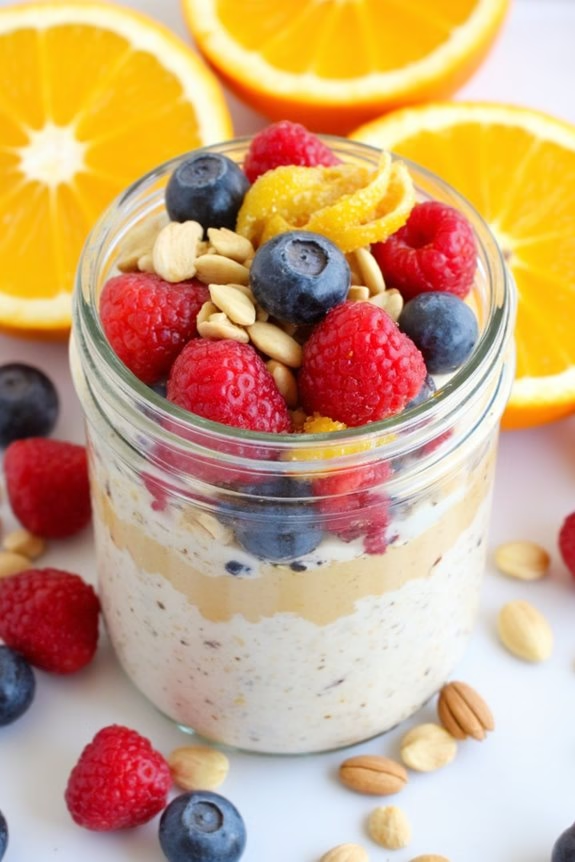
Start your day with a burst of flavor and energy with our Overnight Oats With a Zesty Kick. This delicious breakfast option not only satisfies your taste buds but also provides a nutritious start to your morning. Perfect for busy mornings, these oats can be prepared the night before, allowing the flavors to meld together, guaranteeing a creamy and delightful consistency.
The zesty kick comes from the combination of citrus and spices, adding a revitalizing and invigorating touch to the traditional overnight oats. The versatility of this dish means you can adjust the ingredients to suit your taste preferences or dietary needs. Whether you prefer a touch of sweetness or an extra zing, this recipe is easily customizable.
The key to a successful batch of overnight oats is the balance of flavors and the quality of ingredients used. For a serving size of 4-6 people, gather the ingredients listed below and follow the step-by-step instructions for a breakfast that’s both satisfying and simple to prepare.
Ingredients (Serves 4-6):
- 3 cups rolled oats
- 3 cups almond milk (or milk of choice)
- 2 tablespoons chia seeds
- 1/4 cup honey or maple syrup
- 1 tablespoon freshly grated orange zest
- 1 teaspoon vanilla extract
- 1/2 teaspoon ground cinnamon
- 1/4 teaspoon ground nutmeg
- 1/4 teaspoon salt
- 1 cup Greek yogurt
- 1 cup mixed berries (strawberries, blueberries, raspberries)
- 1/2 cup chopped nuts (almonds, walnuts, or pecans)
- Additional orange slices for garnish (optional)
Instructions:
- Mix the Base: In a large mixing bowl, combine the rolled oats, almond milk, and chia seeds. Stir well to guarantee the oats and seeds are evenly distributed in the liquid.
- Add Flavorings: Stir in the honey or maple syrup, freshly grated orange zest, vanilla extract, cinnamon, nutmeg, and salt. Mix thoroughly to incorporate all flavors evenly.
- Transfer to Containers: Divide the oat mixture evenly into individual jars or airtight containers. Leave some space at the top for expansion and toppings.
- Chill Overnight: Seal the jars or containers with lids and place them in the refrigerator overnight (or for at least 6 hours) to allow the oats to absorb the liquid and flavors.
- Prepare Toppings: Before serving, gently fold the Greek yogurt into the oat mixture in each jar. Top with a generous helping of mixed berries and chopped nuts.
- Serve and Garnish: Garnish with additional orange slices if desired. Serve chilled and enjoy the invigorating zesty kick to start your day.
Extra Tips:
For a creamier texture, consider adding a splash of extra almond milk before serving if the oats have absorbed too much liquid overnight. Feel free to experiment with different fruits and nuts to suit your taste.
If you prefer a sweeter dish, adjust the amount of honey or maple syrup to your liking. To save time, you can prepare the toppings in advance and store them separately, adding them just before serving for freshness.
Nut Butter Banana Sandwich
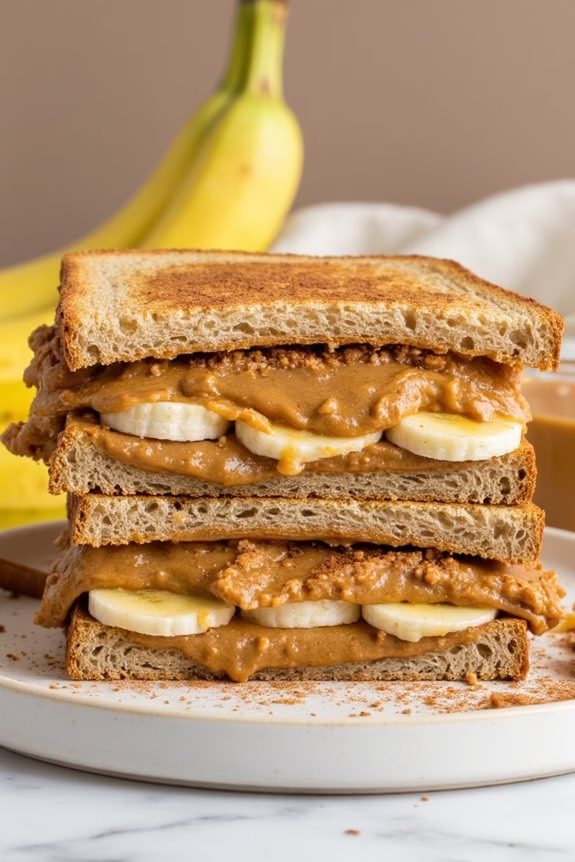
Start your morning with a nutritious and delicious Nut Butter Banana Sandwich, perfect for a quick and wholesome breakfast. This sandwich combines the creamy texture of nut butter with the natural sweetness of ripe bananas, offering a satisfying and energizing start to your day.
Whether you’re in a rush or have time to savor your breakfast, this simple recipe is both versatile and packed with nutrients. Ideal for all ages, this Nut Butter Banana Sandwich can be customized with your favorite type of nut butter and bread, making it a family favorite.
You can use any nut butter you like, such as almond, peanut, or cashew, and pair it with wholegrain, multigrain, or gluten-free bread based on your dietary preferences. The natural sugars from ripe bananas not only add flavor but also provide a healthy dose of potassium and fiber to keep you feeling full longer.
Ingredients for 4-6 Servings:
- 8-12 slices of wholegrain bread
- 1 cup of nut butter (almond, peanut, or cashew)
- 4-6 ripe bananas
- 4 tablespoons of honey or maple syrup (optional)
- ½ teaspoon of cinnamon powder (optional)
- 2 tablespoons of butter or margarine (for toasting, optional)
Cooking Instructions:
- Prepare the Bread: Lay out the slices of wholegrain bread on a clean surface. If you like your sandwiches toasted, lightly spread butter or margarine on one side of each slice.
- Slice the Bananas: Peel the bananas and slice them into thin, even rounds. This will help them spread evenly across the sandwich.
- Spread the Nut Butter: Evenly spread a generous amount of your chosen nut butter on the unbuttered side of half of the bread slices. Make certain the nut butter reaches the edges to keep the sandwich together.
- Add Bananas: Layer the banana slices evenly over the nut butter-covered slices of bread. If desired, drizzle honey or maple syrup over the bananas for added sweetness.
- Sprinkle with Cinnamon: If using cinnamon, sprinkle a light amount over the bananas for extra flavor.
- Assemble the Sandwich: Place the remaining bread slices on top, buttered side up, to complete the sandwiches.
- Toast the Sandwiches (optional): Heat a skillet or griddle over medium heat. Place the sandwiches in the skillet and toast on each side for 3-4 minutes or until golden brown and crisp.
- Serve: Remove the sandwiches from the skillet, slice them in halves or quarters, and serve warm.
Extra Tips:
For an extra crunch, consider adding sliced almonds, walnuts, or chia seeds inside the sandwich. If you’re including these ingredients, make sure to press down lightly when assembling the sandwich to keep everything in place.
To keep the sandwiches from becoming soggy, prepare them shortly before serving, especially if you’re adding honey or syrup. If preparing in advance, toast and cut them just before serving to maintain crispness.
Enjoy your Nut Butter Banana Sandwich with a side of fresh fruit or a glass of milk for a balanced breakfast.
Sweet Potato Breakfast Hash

Sweet Potato Breakfast Hash is a delightful and nutritious way to start your day. This hearty dish combines the natural sweetness of sweet potatoes with savory ingredients like onions, bell peppers, and spices to create a balanced and satisfying breakfast. Whether you’re serving it for a weekend brunch or a busy weekday morning, this hash is bound to please.
It’s also a versatile recipe that can be easily adapted to include your favorite vegetables or protein sources, making it a great go-to option for anyone looking to enjoy a wholesome meal.
The vibrant colors and flavors of Sweet Potato Breakfast Hash aren’t only appealing to the eye but also packed with nutrients. Sweet potatoes are rich in vitamins A and C, while the addition of bell peppers and onions provides antioxidants and flavor. This dish is perfect for feeding a crowd, serving 4-6 people, and can easily be doubled for larger gatherings.
Whether you’re a seasoned cook or a beginner in the kitchen, this recipe is simple to follow and yields delicious results every time.
Ingredients for 4-6 servings:
- 2 large sweet potatoes, peeled and diced
- 1 large onion, diced
- 1 red bell pepper, diced
- 1 green bell pepper, diced
- 2 tablespoons olive oil
- 1 teaspoon smoked paprika
- 1/2 teaspoon garlic powder
- Salt and pepper to taste
- 4-6 eggs
- Fresh parsley for garnish (optional)
Cooking Instructions:
- Prepare the Vegetables: Begin by peeling and dicing the sweet potatoes into small, even cubes. Dice the onion and bell peppers into similar-sized pieces for even cooking.
- Heat the Oil: In a large skillet, heat the olive oil over medium heat. Once the oil is hot, add the diced onions and sauté for about 3-4 minutes until they become translucent.
- Cook the Sweet Potatoes: Add the diced sweet potatoes to the skillet with the onions. Stir well to coat the sweet potatoes in the oil. Season with smoked paprika, garlic powder, salt, and pepper. Cover the skillet with a lid and allow the sweet potatoes to cook for about 10 minutes, stirring occasionally, until they start to soften.
- Add the Bell Peppers: Once the sweet potatoes are partially cooked, add the diced bell peppers to the skillet. Stir everything together and continue to cook uncovered for another 5-7 minutes, or until the sweet potatoes are tender and the bell peppers have softened.
- Cook the Eggs: Make small wells in the hash for each egg. Crack one egg into each well. Cover the skillet again and cook for about 3-5 minutes, or until the eggs are cooked to your desired doneness.
- Serve and Garnish: Once the eggs are cooked, remove the skillet from the heat. Garnish the hash with freshly chopped parsley if desired. Serve hot and enjoy!
Extra Tips:
To guarantee even cooking, make sure to dice the sweet potatoes and other vegetables uniformly. For a crispy texture, you can increase the heat slightly towards the end of cooking and let the hash brown a bit, but be cautious not to burn it.
If you prefer a spicier hash, consider adding a pinch of cayenne pepper or a few dashes of hot sauce. Additionally, you can customize this dish by adding cooked bacon, sausage, or other vegetables like spinach or mushrooms.
This Sweet Potato Breakfast Hash isn’t only delicious but also adaptable to suit your personal preferences.
Greek Yogurt and Fruit Parfait
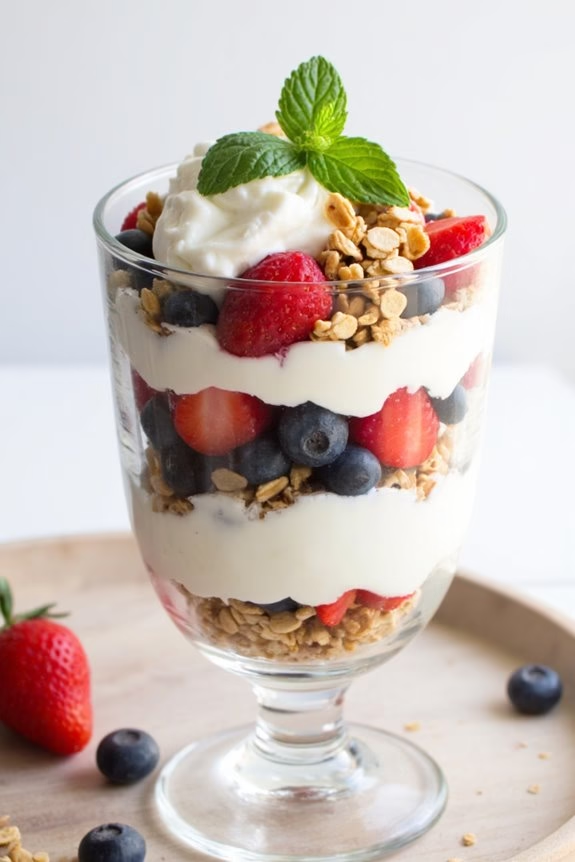
A Greek Yogurt and Fruit Parfait is a delicious and nutritious breakfast option that can be enjoyed by the entire family. This dish combines the creamy texture of Greek yogurt with the natural sweetness of fresh fruits and the crunchy texture of granola. Not only is it visually appealing with its colorful layers, but it’s also packed with protein, vitamins, and fiber, making it a perfect start to your day.
Whether you’re preparing a quick breakfast on a busy morning or a leisurely brunch over the weekend, this parfait is sure to please. This recipe is versatile and can easily be adjusted based on the fruits that are in season or your personal preferences. You can even prepare it the night before for a grab-and-go breakfast.
The following recipe will serve 4-6 people, making it ideal for a family breakfast or a small gathering. With just a few simple ingredients, you can create a satisfying and healthful dish that everyone will love.
Ingredients for 4-6 servings:
- 4 cups of plain Greek yogurt
- 2 cups of mixed fresh berries (such as strawberries, blueberries, and raspberries)
- 1 cup of granola
- 2 tablespoons of honey
- 1 teaspoon of vanilla extract
- Fresh mint leaves for garnish (optional)
Instructions:
- Prepare the Yogurt Mixture: In a medium-sized bowl, combine the Greek yogurt, honey, and vanilla extract. Stir until the mixture is smooth and well combined.
- Wash and Prepare the Fruits: Rinse the berries thoroughly under cold water. Pat them dry with a paper towel. If using strawberries, hull and slice them into thin pieces.
- Layer the Parfait: In a tall glass or parfait glass, start by spooning a layer of the yogurt mixture at the bottom. Follow this with a layer of mixed berries and then a layer of granola. Repeat these layers until the glass is full, finishing with a layer of berries on top.
- Repeat for Additional Servings: Continue the layering process for the remaining servings, using additional glasses.
- Garnish and Serve: Optionally, add a sprig of fresh mint on top of each parfait for a touch of color and freshness. Serve immediately to enjoy the crunchy texture of the granola.
Extra Tips:
When making Greek Yogurt and Fruit Parfait, consider using fruits that are in season for the best flavor and nutritional benefits. If you prefer a sweeter parfait, you can add a bit more honey or a sprinkle of brown sugar.
For added texture, you can include nuts or seeds, such as almonds or chia seeds, in the layers. To save time in the morning, you can prepare the yogurt and fruit layers the night before and add the granola just before serving to keep it crunchy. Enjoy customizing your parfait to suit your taste!
Whole Grain Pancakes With Fresh Berries

Whole Grain Pancakes With Fresh Berries are a delicious and nutritious option for those looking to start their day on a healthy note. These pancakes are made with whole grain flour, which provides more fiber and nutrients than traditional white flour. The addition of fresh berries not only enhances their flavor but also adds a burst of vitamins and antioxidants. This dish is perfect for a weekend breakfast or brunch, offering a satisfying start that will keep you energized throughout the morning.
When making Whole Grain Pancakes With Fresh Berries, it’s important to balance the heartiness of the whole grains with a touch of sweetness and moisture to guarantee the pancakes are fluffy and flavorful. The recipe offers a wonderful contrast of textures, with the soft pancakes and the juicy burst from the berries.
Whether you’re cooking for a family or a small group of friends, this recipe is sure to be a hit. Let’s take a look at the ingredients needed to prepare this wholesome breakfast for a serving size of 4-6 people.
Ingredients:
- 2 cups whole grain flour
- 2 tablespoons sugar
- 2 teaspoons baking powder
- 1/2 teaspoon baking soda
- 1/2 teaspoon salt
- 2 cups buttermilk
- 2 large eggs
- 1/4 cup unsalted butter, melted
- 1 teaspoon vanilla extract
- 1 cup mixed fresh berries (such as blueberries, strawberries, and raspberries)
- Additional butter or oil for cooking
Cooking Instructions:
- Prepare the Dry Ingredients: In a large mixing bowl, combine the whole grain flour, sugar, baking powder, baking soda, and salt. Whisk together until well mixed, ensuring there are no lumps.
- Mix the Wet Ingredients: In a separate bowl, whisk together the buttermilk, eggs, melted butter, and vanilla extract until fully blended.
- Combine the Mixtures: Slowly pour the wet ingredients into the bowl of dry ingredients, stirring gently with a spatula or wooden spoon until just combined. Don’t overmix; it’s okay if the batter is slightly lumpy.
- Preheat the Griddle: Heat a non-stick griddle or large skillet over medium heat. Lightly coat it with butter or oil to prevent sticking.
- Cook the Pancakes: Pour 1/4 cup of batter onto the hot griddle for each pancake. Scatter a few fresh berries on top of each pancake before the batter sets. Cook until bubbles form on the surface and the edges look dry, about 2-3 minutes.
- Flip and Finish Cooking: Carefully flip the pancakes and cook for another 2-3 minutes, until golden brown and cooked through. Adjust the heat if necessary to prevent burning.
- Serve: Transfer the cooked pancakes to a plate and keep warm. Repeat the process with the remaining batter, adding more butter or oil to the griddle as needed. Serve the pancakes hot, topped with additional fresh berries and a drizzle of maple syrup if desired.
Extra Tips:
For the fluffiest pancakes, verify your baking powder and baking soda are fresh. If the batter seems too thick, add a splash more buttermilk to reach your desired consistency.
Feel free to experiment with different types of whole grain flour, such as spelt or rye, for varied flavors. Additionally, frozen berries can be used if fresh ones aren’t available, but make sure to thaw and drain any excess liquid before adding them to the pancake batter. Enjoy your wholesome breakfast creation!
Savory Breakfast Burrito

Savory Breakfast Burrito is a delightful morning dish that combines hearty ingredients with a burst of flavors. Perfect for a weekend brunch or a quick weekday breakfast, this burrito is loaded with protein, vegetables, and spices to kickstart your day.
With its warm, soft tortilla enveloping a savory filling, it’s sure to become a favorite in your breakfast rotation. Ideal for serving 4-6 people, this recipe allows for customization to suit different tastes.
Whether you prefer a spicier kick or a milder flavor, the Savory Breakfast Burrito can be easily adjusted. Pair it with a fresh fruit salad or a revitalizing smoothie for a complete and balanced breakfast.
Ingredients (for 4-6 people):
- 6 large flour tortillas
- 8 large eggs
- 1 cup shredded cheddar cheese
- 1 cup cooked and crumbled bacon or sausage
- 1 red bell pepper, diced
- 1 small onion, chopped
- 1 cup black beans, drained and rinsed
- 1 avocado, sliced
- 1/2 cup salsa
- 2 tablespoons olive oil
- Salt and pepper to taste
- Fresh cilantro, chopped (optional)
Cooking Instructions:
- Prepare the Ingredients: Begin by prepping all your ingredients. Dice the red bell pepper, chop the onion, and crumble the cooked bacon or sausage. Rinse and drain the black beans, and slice the avocado.
- Cook the Vegetables: Heat 1 tablespoon of olive oil in a large skillet over medium heat. Add the diced red bell pepper and chopped onion, sautéing them for about 5 minutes until they’re soft and fragrant. Stir in the black beans and cook for another 2 minutes to warm through.
- Scramble the Eggs: In a separate bowl, beat the eggs with a pinch of salt and pepper. Heat the remaining 1 tablespoon of olive oil in another pan over medium heat. Pour in the eggs and cook, stirring gently, until they’re scrambled and just set.
- Assemble the Burritos: Lay each tortilla flat and evenly distribute the scrambled eggs, sautéed vegetables, crumbled bacon or sausage, and shredded cheddar cheese across each one. Top with avocado slices and a spoonful of salsa.
- Fold the Burritos: Fold in the sides of the tortilla and then roll it up tightly from the bottom to enclose the filling. Repeat with the remaining tortillas.
- Serve: Warm the burritos on a skillet or in the oven if desired, then cut in half and serve with additional salsa and a sprinkle of fresh cilantro, if using.
Extra Tips:
For a spicier version, consider adding jalapeños or a dash of hot sauce to the filling. If you prefer a vegetarian option, simply omit the bacon or sausage and add extra beans or veggies like mushrooms or spinach.
To make ahead, you can assemble the burritos, wrap them in foil, and store in the refrigerator for up to 2 days or freeze for longer storage. Reheat them in the oven or microwave when you’re ready to eat. Enjoy experimenting with different fillings to keep your breakfast burrito exciting and tailored to your taste!
Baked Egg Cups With Spinach and Feta

Baked Egg Cups With Spinach and Feta are a delightful and nutritious option for a healthy breakfast. These portable, protein-packed cups are perfect for busy mornings or leisurely brunches. Combining the rich flavor of feta cheese with the health benefits of spinach, these egg cups are both delicious and good for you.
Plus, they’re easy to make and can be prepped in advance, making them a convenient option for those with a hectic schedule. This recipe yields enough to serve 4-6 people, making it ideal for family breakfasts or small gatherings. The ingredients are simple, and the process is straightforward.
You’ll only need a muffin tin and a few kitchen staples to whip up these tasty bites. Whether you’re looking to impress guests or just want a wholesome start to your day, these Baked Egg Cups With Spinach and Feta are sure to satisfy.
Ingredients (serves 4-6):
- 8 large eggs
- 1 cup fresh spinach, chopped
- 1/2 cup feta cheese, crumbled
- 1/4 cup diced red bell pepper
- 1/4 cup diced onion
- Salt and pepper to taste
- Non-stick cooking spray
Instructions:
- Preheat the Oven: Preheat your oven to 375°F (190°C). This guarantees the egg cups will cook evenly and have a nice texture.
- Prepare the Muffin Tin: Lightly spray a 12-cup muffin tin with non-stick cooking spray. This will help prevent the egg cups from sticking and make them easier to remove once baked.
- Beat the Eggs: In a large mixing bowl, crack the eggs and beat them until the yolks and whites are fully combined. Season the beaten eggs with salt and pepper to taste.
- Add the Ingredients: Stir in the chopped spinach, crumbled feta cheese, diced red bell pepper, and diced onion into the beaten eggs. Mix well to guarantee the ingredients are evenly distributed.
- Fill the Muffin Cups: Carefully pour the egg mixture into the prepared muffin cups, filling each about three-quarters full. This allows room for the eggs to expand as they cook.
- Bake the Egg Cups: Place the muffin tin in the preheated oven and bake for 18-20 minutes, or until the egg cups are set and slightly golden on top. You can check for doneness by inserting a toothpick into the center of an egg cup—it should come out clean.
- Cool and Serve: Once baked, remove the muffin tin from the oven and allow the egg cups to cool for a few minutes. Gently remove the egg cups from the tin using a small spatula or knife. Serve warm, and enjoy!
Extra Tips:
Feel free to customize these egg cups with other ingredients you have on hand, such as mushrooms, tomatoes, or different cheeses. For added flavor, try incorporating herbs like dill or parsley.
If you’re preparing these egg cups in advance, allow them to cool completely before storing them in an airtight container in the refrigerator for up to three days. To reheat, simply microwave them for 20-30 seconds or until warmed through.
These egg cups can also be frozen for longer storage—just thaw in the refrigerator overnight before reheating.
Almond Flour Banana Muffins
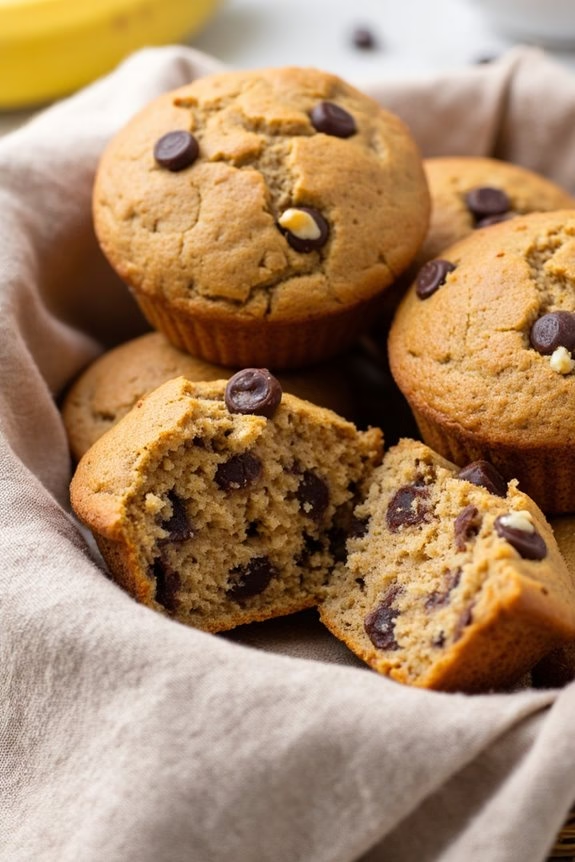
A healthy and delicious way to start your morning is with Almond Flour Banana Muffins. These muffins aren’t only gluten-free but are also packed with the natural sweetness of ripe bananas, making them a delightful treat for breakfast or a snack.
Almond flour adds a rich, nutty flavor and provides a dose of healthy fats and protein, which can keep you full and energized throughout the morning. The combination of ingredients creates a moist and tender muffin that’s sure to be a hit with family and friends.
Perfect for a serving size of 4-6 people, these Almond Flour Banana Muffins are simple to make and can be prepared in under an hour. They’re a great option for those looking to enjoy a breakfast that’s both satisfying and nutritious.
Whether you’re hosting a brunch or looking for a quick grab-and-go breakfast option, these muffins are sure to become a favorite in your household.
Ingredients:
- 2 cups almond flour
- 3 ripe bananas, mashed
- 3 large eggs
- 1/4 cup honey or maple syrup
- 1 teaspoon vanilla extract
- 1 teaspoon baking soda
- 1/2 teaspoon salt
- 1 teaspoon cinnamon
- 1/2 cup chopped walnuts or pecans (optional)
- 1/2 cup dark chocolate chips (optional)
Cooking Instructions:
- Preheat the Oven: Start by preheating your oven to 350°F (175°C). Line a muffin tin with paper liners or lightly grease it with cooking spray to prevent sticking.
- Mash the Bananas: In a large mixing bowl, mash the ripe bananas using a fork or potato masher until smooth. The bananas should be very ripe to guarantee sweetness and moisture in the muffins.
- Mix the Wet Ingredients: Add the eggs, honey (or maple syrup), and vanilla extract to the mashed bananas. Stir until all the ingredients are well combined and the mixture is smooth.
- Combine Dry Ingredients: In a separate bowl, whisk together the almond flour, baking soda, salt, and cinnamon. Make sure there are no lumps in the flour mixture.
- Combine Wet and Dry Ingredients: Gradually add the dry ingredients to the wet ingredients, stirring gently until just combined. Be careful not to overmix, as this can lead to dense muffins.
- Add Optional Ingredients: If you’re using walnuts or pecans and dark chocolate chips, fold them into the batter gently until evenly distributed.
- Fill the Muffin Tin: Spoon the batter into the prepared muffin tin, filling each cup about three-quarters full. This will allow space for the muffins to rise as they bake.
- Bake the Muffins: Place the muffin tin in the preheated oven and bake for 20-25 minutes, or until a toothpick inserted into the center of a muffin comes out clean.
- Cool and Serve: Once baked, remove the muffins from the oven and let them cool in the tin for about 5 minutes. Transfer them to a wire rack to cool completely before serving.
Extra Tips:
For best results, use very ripe bananas with brown spots, as these are sweeter and add more moisture to the muffins.
You can customize these muffins by adding your favorite nuts, seeds, or dried fruits. If you prefer a dairy-free option, replace chocolate chips with dried fruits like raisins or cranberries.
Store leftover muffins in an airtight container in the refrigerator for up to a week, or freeze them for longer storage. Simply reheat them in the microwave or oven for a quick breakfast treat any day of the week.
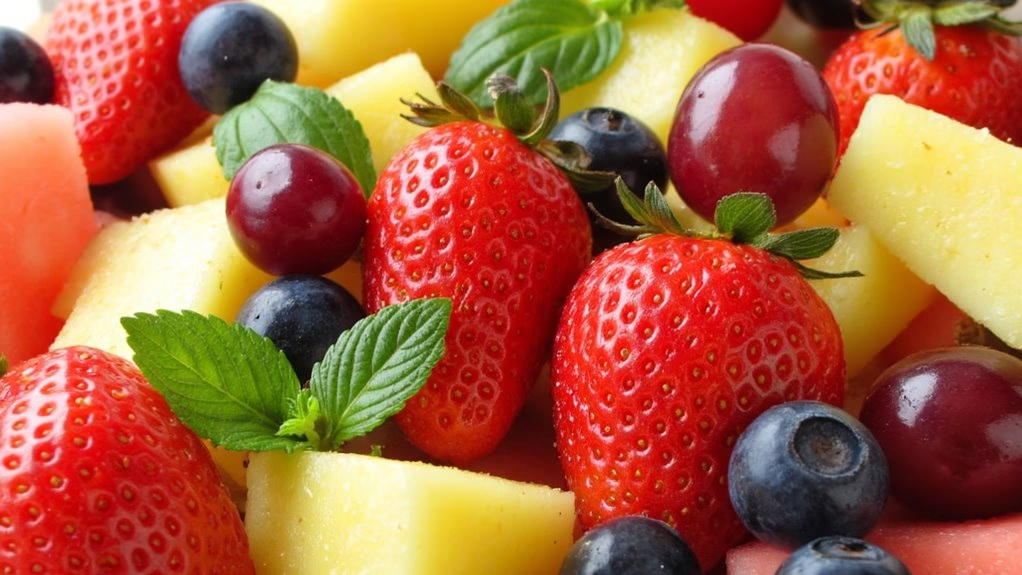
Fresh Fruit Salad With Mint and Lime
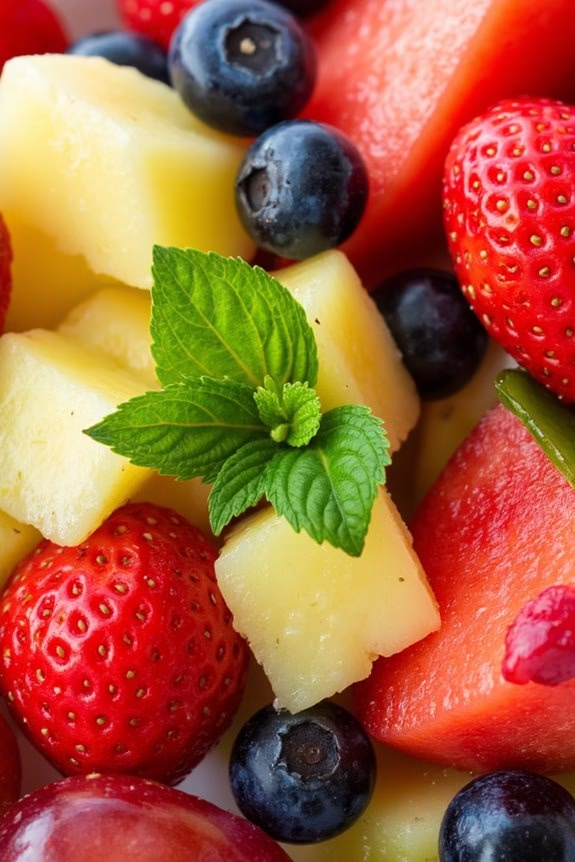
Start your day with a revitalizing and vibrant Fresh Fruit Salad With Mint and Lime. This delightful dish combines a variety of colorful fruits with the zesty tang of lime and the aromatic freshness of mint. It’s a perfect choice for a healthy breakfast that’s both satisfying and invigorating. The natural sweetness of the fruits is complemented by the citrusy lime, while the mint adds a subtle yet alluring fragrance, making this fruit salad a feast for both the eyes and the palate.
The Fresh Fruit Salad With Mint and Lime isn’t only delicious but also incredibly easy to prepare, requiring minimal time and effort. It’s a versatile dish that can be adapted to use whatever fruits are in season, making it a sustainable choice throughout the year. Whether you’re enjoying a leisurely breakfast at home or need a quick and nutritious option on the go, this fruit salad is sure to become a staple in your morning routine.
Ingredients for 4-6 servings:
- 2 cups of strawberries, hulled and halved
- 2 cups of pineapple, cut into bite-sized pieces
- 2 cups of blueberries
- 2 cups of watermelon, cubed
- 1 cup of grapes, halved
- 1 lime, juiced
- 2 tablespoons of honey
- A handful of fresh mint leaves, chopped
Instructions:
- Prepare the Fruits: Begin by washing all the fruits thoroughly under running water. Hull and halve the strawberries, cut the pineapple into bite-sized pieces, cube the watermelon, and halve the grapes. Confirm all the fruits are roughly the same size to guarantee even mixing and presentation.
- Mix the Fruits: In a large mixing bowl, combine the strawberries, pineapple, blueberries, watermelon, and grapes. Gently toss the fruits together using a large spoon or your hands, ensuring they’re evenly mixed.
- Prepare the Dressing: In a small bowl, mix the lime juice and honey together until well combined. The honey should dissolve completely in the lime juice, creating a sweet and tangy dressing.
- Add the Dressing: Pour the lime and honey mixture over the mixed fruits. Toss the fruits gently to ensure they’re all coated with the dressing. This will enhance the natural flavors of the fruit and add a revitalizing tang to the salad.
- Garnish with Mint: Sprinkle the chopped mint leaves over the top of the fruit salad. Toss lightly to distribute the mint throughout the salad, releasing its aromatic oils and infusing the salad with its fresh scent.
Extra Tips:
For the best flavor and texture, use ripe and fresh fruits. If you prefer a sweeter salad, you can adjust the amount of honey to taste. Consider chilling the salad in the refrigerator for about 30 minutes before serving to allow the flavors to meld and for an extra revitalizing touch.
Feel free to experiment with different fruits such as mango, kiwi, or oranges, depending on availability and personal preference. This salad is best enjoyed fresh, so try to consume it within a day or two of preparation.