
When it comes to Halloween treats, I love keeping things simple yet eye-catching. With recipes like Ghostly Marshmallow Pops and Witch Hat Cookies, I’ve curated a stunning lineup that’s sure to make your Halloween gathering unforgettable. Each treat is crafted to be fun, quick, and stress-free, making it perfect for bringing the whole family together. Are you ready to explore some spook-tacular ideas and impress your guests while saving time? Let’s get started!
Ghostly Marshmallow Pops
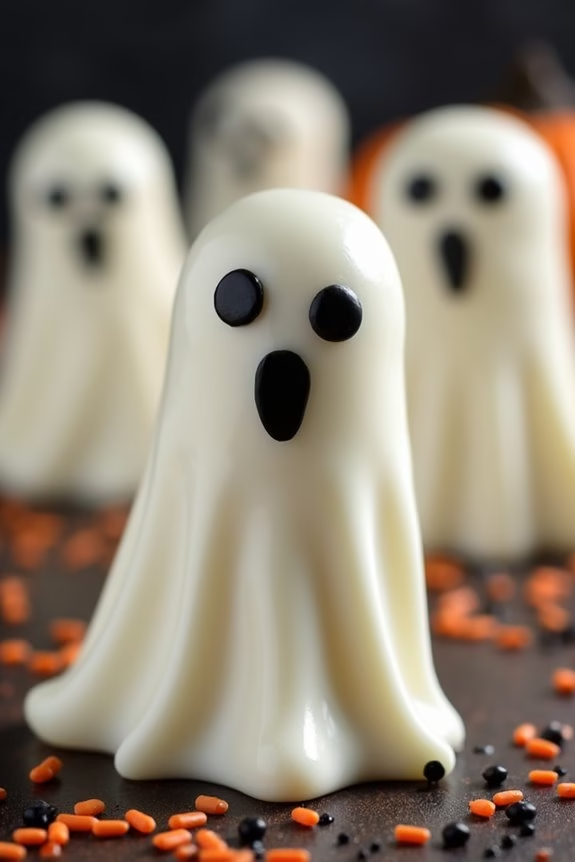
Ghostly Marshmallow Pops are a delightful and spooky addition to any Halloween celebration. These treats aren’t only easy to make but also a fun project for both kids and adults. The combination of fluffy marshmallows, creamy white chocolate, and a touch of decorative spooky designs makes them a hit at parties or as delightful snacks for trick-or-treaters.
With just a few ingredients and some creativity, you can create a batch of these ghostly goodies that are certain to please everyone with their whimsical appearance and sweet taste.
Each marshmallow pop is designed to resemble a little ghost, complete with eerie eyes and mouth, making them perfect for the Halloween season. The process involves dipping marshmallows in melted white chocolate and then decorating them to bring each ghostly character to life.
This recipe provides a serving size of 4-6 people, making it ideal for smaller gatherings or as a special treat for your family. You can easily scale up the recipe if you need to serve a larger crowd.
Ingredients for Ghostly Marshmallow Pops (Serving Size: 4-6)
- 12 large marshmallows
- 1 cup white chocolate chips
- 12 lollipop sticks
- 1 tablespoon coconut oil or vegetable shortening
- Black edible marker or black icing gel for decoration
- Sprinkles (optional)
Instructions
- Prepare the Lollipop Sticks: Start by inserting a lollipop stick into each marshmallow, making sure it’s secure but not piercing through the other end.
- Melt the White Chocolate: In a microwave-safe bowl, combine the white chocolate chips and coconut oil (or vegetable shortening). Microwave in 20-second intervals, stirring between each interval, until the chocolate is completely melted and smooth.
- Dip the Marshmallows: Hold each marshmallow by the stick and dip it into the melted white chocolate, guaranteeing it’s fully coated. Allow any excess chocolate to drip off before placing it on a parchment-lined baking sheet.
- Decorate the Ghosts: Once the chocolate coating has slightly set but is still tacky, use the edible marker or black icing gel to draw spooky ghost faces on each marshmallow. You can also add sprinkles for additional decoration if desired.
- Set the Pops: Allow the decorated marshmallow pops to set completely at room temperature or in the refrigerator until the chocolate hardens.
- Serve and Enjoy: Once the chocolate has set, arrange the Ghostly Marshmallow Pops in a jar or on a plate for serving. Enjoy these delightful treats as part of your Halloween celebration!
Extra Tips
To guarantee your Ghostly Marshmallow Pops are a success, make sure your chocolate doesn’t overheat as it can seize and become unusable. If you’re having trouble with the chocolate consistency, adding a bit more coconut oil or shortening can help achieve a smoother dip.
Additionally, if you can’t find edible markers, black icing gel or melted dark chocolate applied with a toothpick can work well for creating the ghostly faces. Finally, feel free to get creative with the decorations—add mini chocolate chips for eyes or use colored sprinkles to give your ghosts different personalities.
Monster Rice Krispie Treats
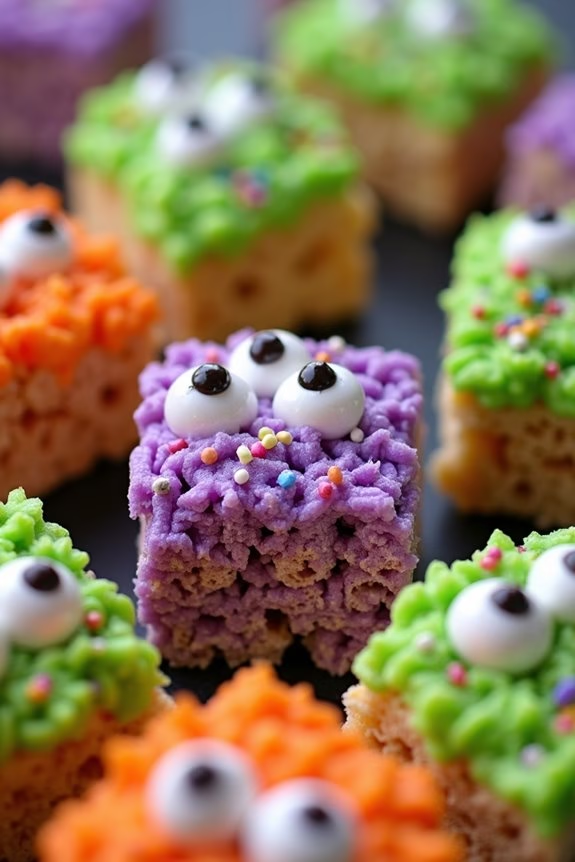
Monster Rice Krispie Treats are a spooky and delightful addition to any Halloween celebration. These treats aren’t only easy to make, but they also allow for a splash of creativity that can be fun for both kids and adults. Perfect for serving at a Halloween party or simply enjoying at home, these monster-themed snacks are sure to be a hit with their colorful appearance and marshmallowy goodness.
The process of making Monster Rice Krispie Treats involves a classic Rice Krispie recipe with a twist. By incorporating food coloring and a few decorative elements, you can transform ordinary treats into scary, silly, or even cute little monsters. These treats are designed to cater to a serving size of 4-6 people, guaranteeing everyone gets their share of Halloween fun.
Ingredients:
- 6 cups of Rice Krispies cereal
- 4 tablespoons of unsalted butter
- 1 package (10 oz) of mini marshmallows
- Food coloring (green, purple, orange, or desired colors)
- Candy eyeballs
- Assorted colored icing or gel frosting
- Chocolate chips or sprinkles (optional)
Instructions:
- Prepare the Pan: Lightly grease a 9×13-inch baking dish with butter or non-stick spray to prevent the treats from sticking.
- Melt the Butter: In a large saucepan, melt the butter over low heat. This should take about 2 minutes. Stir occasionally to make sure it doesn’t burn.
- Add Marshmallows: Once the butter is melted, add the mini marshmallows to the saucepan. Stir continuously until the marshmallows are completely melted and smooth.
- Color the Mixture: Divide the melted marshmallow mixture into separate bowls depending on how many colors you want to use. Add a few drops of food coloring to each bowl and mix until you achieve the desired hues.
- Mix with Cereal: Add 2 cups of Rice Krispies cereal to each colored bowl and stir until the cereal is well coated with the colored marshmallow mixture.
- Assemble in Pan: Pour each colored mixture into the prepared baking dish side by side or layered, pressing down gently with a spatula to flatten and compact the mixture.
- Decorate: While the mixture is still warm, press candy eyeballs onto the treats to create monster faces. Use icing or gel frosting to add mouths, hair, or other monster features. Add chocolate chips or sprinkles for extra decoration if desired.
- Cool and Cut: Allow the treats to cool completely in the pan. Once set, cut into squares or desired shapes for serving.
Extra Tips:
To add more detail to your monsters, consider using pretzel sticks for arms or legs, or mini marshmallows for teeth.
If you want to make the treats even more festive, try using flavored marshmallows or adding a pinch of cinnamon or vanilla extract to the melted marshmallows for extra flavor.
Be sure to work quickly when adding decorations so that the treats don’t set before you’re finished. Store any leftover treats in an airtight container to keep them fresh and chewy.
Witch Hat Cookies
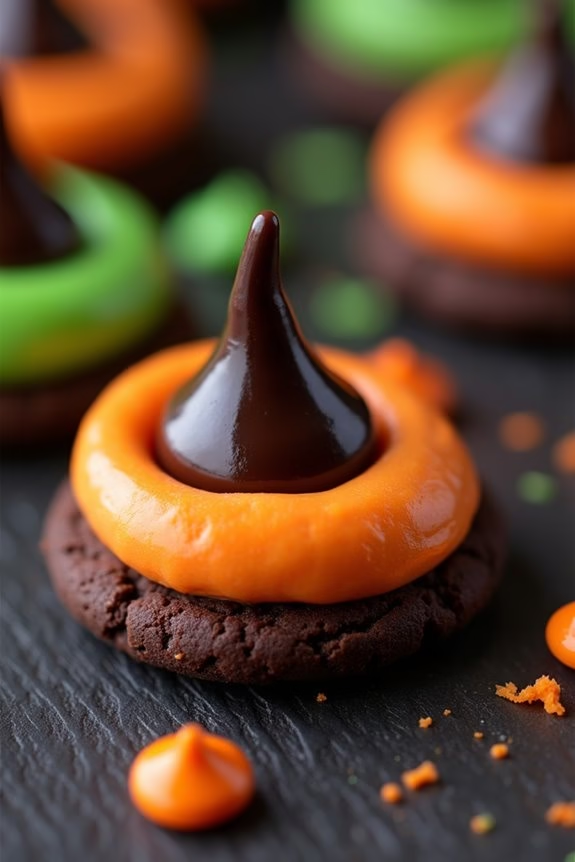
Witch Hat Cookies are a delightful and whimsical treat that are perfect for Halloween festivities. These cookies aren’t only easy to make but also a fun activity for both kids and adults. A combination of chocolate cookies, icing, and colorful candies, these treats resemble witch hats, making them a festive addition to any spooky celebration.
Best of all, the recipe requires minimal ingredients and time, allowing you to whip them up quickly for a party or a cozy night in with family.
The magic of Witch Hat Cookies lies in their creative presentation. With a base of chocolate cookies and a pointed candy kiss on top, they look just like miniature witch hats. The addition of brightly colored icing around the base of the candy adds a pop of color and a touch of whimsy.
These cookies are sure to be a hit with all your guests, and with a serving size of 4-6 people, you can easily scale the recipe up or down depending on your needs.
Ingredients (serving size: 4-6 people):
- 12 chocolate wafer cookies
- 12 chocolate candy kisses
- 1 cup of colored icing (orange or green are popular choices)
- 1 tube of black decorating gel
- 12 small candy-coated chocolates (like M&Ms or similar)
Cooking Instructions:
- Prepare the Cookies: Lay out the chocolate wafer cookies on a flat surface or baking sheet. This will be the base of your witch hats.
- Apply the Icing: Using the colored icing, pipe a small circle in the center of each chocolate wafer. This will serve as the glue to help the candy kiss adhere to the cookie.
- Attach the Candy Kisses: Press a chocolate candy kiss onto the icing circle on each cookie. Hold it for a few seconds to make sure it sticks properly.
- Decorate the Hat’s Band: Using the black decorating gel, pipe a thin line around the base of each candy kiss to create the look of a hat’s band.
- Add the Candy Embellishments: Place a small candy-coated chocolate at the front of the band, right where the icing circle and the wafer cookie meet, to act as the hat’s buckle.
- Let Them Set: Allow the cookies to sit for about 15 minutes, so the icing and decorating gel can set and hold everything in place.
Extra Tips:
- For a more personalized touch, you can use different colored icing or candy-coated chocolates to match your Halloween theme.
- If you want to make these cookies ahead of time, store them in an airtight container to keep them fresh.
- Be sure to have extra icing and decorating gel on hand, just in case you need to fix any mishaps or if you want to add more details to your witch hats.
Creepy Crawly Spider Pretzels
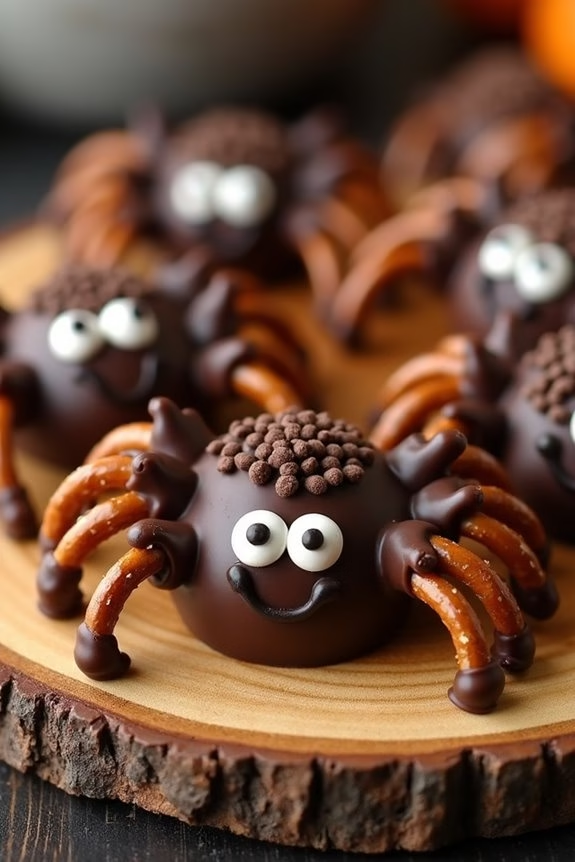
Looking to add a touch of spooky delight to your Halloween celebrations? Creepy Crawly Spider Pretzels are the perfect treat to thrill both kids and adults alike. These deliciously eerie snacks combine the salty crunch of pretzels with the sweet allure of chocolate, creating an irresistible combination.
Not only are they fun to make, but they also serve as a fantastic centerpiece for your Halloween party table, delighting guests with their ghoulish charm. Crafting these Creepy Crawly Spider Pretzels is a breeze, making them an ideal project for involving little ones in the kitchen.
With just a few ingredients and a tad of creativity, you can whip up a batch of these edible arachnids in no time. This recipe serves 4-6 people, providing enough to share or to have a hauntingly good time all to yourself. Whether as a party snack or a festive dessert, these spiders will surely scuttle their way into your Halloween traditions.
Ingredients:
- 24 large pretzel rods
- 1 cup semi-sweet chocolate chips
- 24 small pretzel sticks
- 48 candy eyes
- 1/2 cup mini chocolate chips
- Wax paper
Instructions:
- Prepare the Workstation: Line a baking sheet with wax paper to guarantee the pretzels don’t stick once dipped in chocolate. This will also make clean-up much easier.
- Melt the Chocolate: In a microwave-safe bowl, melt the semi-sweet chocolate chips by microwaving them in 30-second intervals, stirring in between, until smooth and fully melted.
- Dip the Pretzel Rods: Take each large pretzel rod and dip it into the melted chocolate, guaranteeing about half of the rod is coated. Use a spoon if needed to cover it evenly.
- Create Spider Legs: While the chocolate is still wet, break the small pretzel sticks in half and attach four halves on each side of the chocolate-coated pretzel rod to form the spider legs.
- Add Eyes: Gently press two candy eyes onto the chocolate near the end of the rod to give your spider its spooky gaze.
- Add Extra Details: Before the chocolate sets, sprinkle a few mini chocolate chips over the body of each spider for added texture and detail.
- Set the Spiders: Place the finished pretzels on the prepared baking sheet and allow the chocolate to set completely. You can speed up the process by placing them in the refrigerator for about 10 minutes.
- Serve and Enjoy: Once the chocolate has hardened, your Creepy Crawly Spider Pretzels are ready to serve. Arrange them on a platter for a terrifyingly tasty display.
Extra Tips:
To guarantee the chocolate adheres well to the pretzels, make sure the pretzels are dry and at room temperature before dipping. If you find the chocolate thickening while working, simply reheat it in the microwave for a few seconds to maintain a smooth consistency.
For a more colorful version, consider using white chocolate and adding food coloring to match your Halloween theme. Enjoy personalizing your spiders with different candies and edible decorations to make each one uniquely creepy!
Mummy Jalapeño Poppers
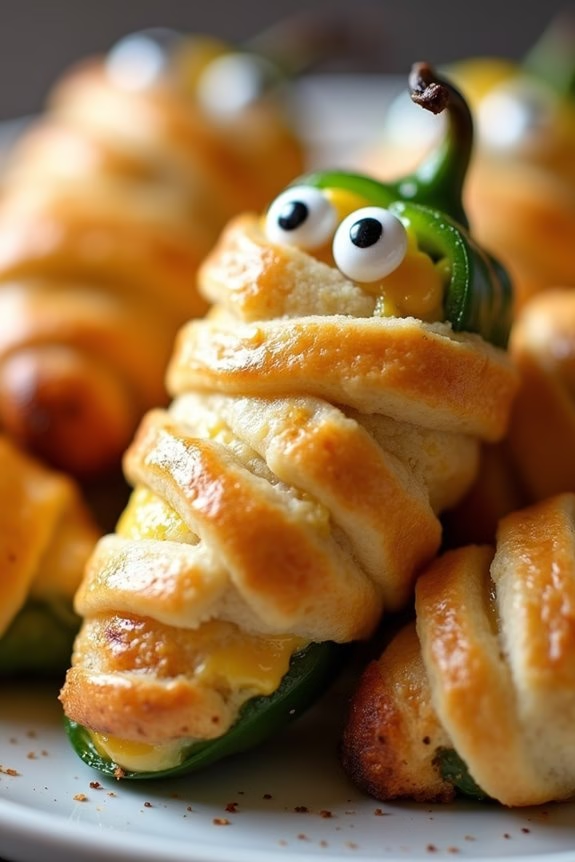
Halloween is a time for fun, frights, and festive treats, and these Mummy Jalapeño Poppers fit the bill perfectly. Infused with a spicy kick from fresh jalapeños and wrapped in a flaky, buttery crescent roll dough, these poppers are sure to be a hit at any Halloween gathering. Their mummy-like appearance isn’t only adorable but also adds a playful twist to the classic jalapeño popper.
Whether you’re hosting a party or just looking to add some spooky flair to your table, these poppers are easy to make and delicious to eat. The creamy cheese filling inside the jalapeños adds a rich contrast to their heat, making each bite a delightful surprise. Plus, they’re baked instead of fried, so they’re a slightly healthier option without sacrificing taste.
Serve these Mummy Jalapeño Poppers warm from the oven, and watch them disappear as guests devour them with delight. Perfect for a serving size of 4-6 people, these poppers are sure to become a favorite Halloween tradition.
Ingredients:
- 12 fresh jalapeños
- 8 oz cream cheese, softened
- 1 cup shredded cheddar cheese
- 1/2 teaspoon garlic powder
- 1/2 teaspoon onion powder
- 1/4 teaspoon salt
- 1/4 teaspoon black pepper
- 1 tube refrigerated crescent roll dough
- 24 small candy eyes (available in the baking aisle)
Cooking Instructions:
- Prepare the Jalapeños: Preheat your oven to 375°F (190°C). Slice each jalapeño in half lengthwise and remove the seeds and membranes using a small spoon or paring knife. Be sure to wear gloves or wash your hands thoroughly afterward to avoid irritation.
- Make the Cheese Filling: In a mixing bowl, combine the softened cream cheese, shredded cheddar cheese, garlic powder, onion powder, salt, and black pepper. Mix until well combined and smooth.
- Stuff the Jalapeños: Spoon the cheese mixture into each jalapeño half, filling them generously. Use the back of the spoon to press the filling into the jalapeño cavity evenly.
- Wrap with Dough: Unroll the crescent roll dough and separate it into triangles. Cut each triangle into thin strips. Wrap the dough strips around each stuffed jalapeño, leaving gaps for the “mummy” appearance. Leave a small space at the top for the eyes.
- Bake the Poppers: Place the wrapped jalapeños on a baking sheet lined with parchment paper. Bake in the preheated oven for 12-15 minutes, or until the dough is golden brown and cooked through.
- Add the Eyes: Remove the poppers from the oven and let them cool slightly. Place two candy eyes on each popper to complete the mummy look.
Extra Tips: For those who prefer a milder version, you can blanch the jalapeños in boiling water for a minute before stuffing them to reduce their heat. If you’re short on time, you can also use pre-made jalapeño poppers and just wrap them in dough for a quick shortcut.
To add variety, consider adding cooked bacon bits or diced chives to the cheese filling for an extra burst of flavor. Enjoy these Mummy Jalapeño Poppers as a fun and festive appetizer that’s sure to be a crowd-pleaser at your Halloween celebration!
Pumpkin Patch Brownie Bites
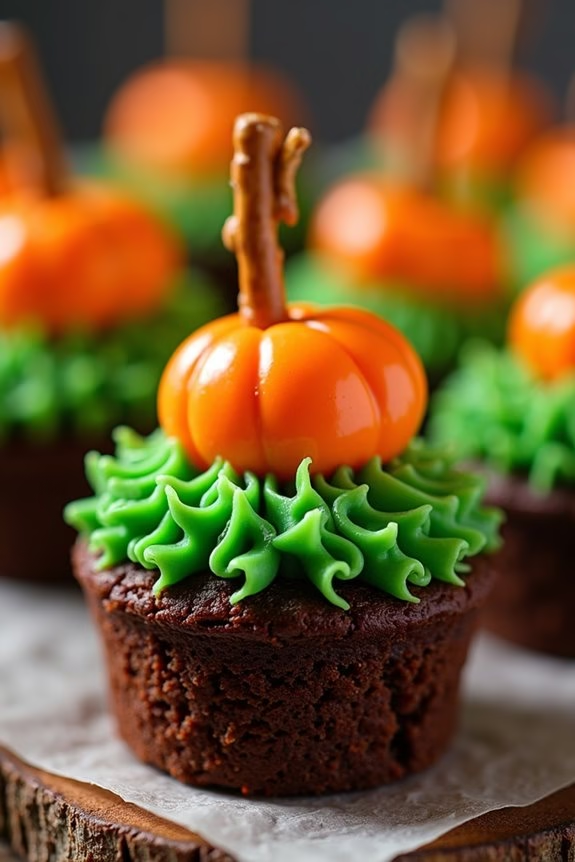
Pumpkin Patch Brownie Bites are delightful and festive treats perfect for any Halloween gathering. These bite-sized delights combine rich, chocolatey brownies with a creative pumpkin patch theme, making them visually appealing and irresistibly delicious.
They’re easy to make and fun to decorate, making them a great activity to involve kids in holiday preparations. With a combination of brownies, frosting, and a touch of creativity, these treats will surely be the highlight of your Halloween spread.
Making Pumpkin Patch Brownie Bites is a straightforward process that requires basic baking skills and a bit of imagination. The base of the treat is a classic brownie, which can be homemade or store-bought, depending on your preference and time constraints.
The fun part comes when you transform these brownies into a charming pumpkin patch scene using green frosting for grass, orange candies for pumpkins, and pretzel sticks as pumpkin stems. The result is a tray of tiny, edible pumpkin patches that will bring a smile to everyone’s face.
Ingredients (Serving Size: 4-6 people):
- 1 box of brownie mix (or homemade brownie batter)
- 2 cups green frosting (store-bought or homemade)
- 1 cup orange candy-coated chocolates (e.g., M&M’s)
- 12 pretzel sticks
- 1 teaspoon vanilla extract (for homemade frosting)
- 1/4 cup butter (for homemade frosting)
- 2 cups powdered sugar (for homemade frosting)
- 2-3 tablespoons milk (for homemade frosting)
Instructions:
1. Prepare the Brownies: Preheat your oven according to the brownie mix instructions or your homemade recipe. Prepare the brownie batter as directed. Pour the batter into a greased mini muffin tin to create bite-sized brownie bites.
Bake according to the time specified on the mix or until a toothpick inserted in the center comes out clean. Allow them to cool completely before decorating.
2. Make the Frosting (if homemade): In a mixing bowl, beat the butter until smooth. Gradually add the powdered sugar, vanilla extract, and milk. Mix until the frosting is creamy and smooth.
Add a few drops of green food coloring until the desired shade is achieved.
3. Frost the Brownies: Using a piping bag or a knife, spread a small amount of green frosting on the top of each cooled brownie bite. This will serve as the grass for your pumpkin patch.
4. Decorate with Pumpkins: Place a few orange candy-coated chocolates on top of each frosted brownie, pressing them gently into the frosting. Break the pretzel sticks into small pieces and insert one into each candy to mimic the pumpkin stem.
5. Final Touches: Arrange the Pumpkin Patch Brownie Bites on a serving tray. Feel free to add additional decorative touches such as candy corn or edible leaves to enhance the Halloween theme.
Extra Tips:
For a more vibrant patch, consider using different shades of green frosting to create depth and dimension. If you’re short on time, using store-bought brownie bites can speed up the process.
Additionally, keep a damp cloth handy to clean your hands while decorating, as the chocolates may melt slightly with handling. Remember to refrigerate the brownie bites if you’re making them ahead of time to keep the frosting and decorations intact, but allow them to reach room temperature before serving for the best taste and texture.
Vampire Bite Cupcakes

Whether you’re hosting a Halloween party or simply want to indulge in a festive treat, Vampire Bite Cupcakes are a fantastic choice. The recipe is designed to serve 4-6 people, making it perfect for a small gathering.
These cupcakes aren’t only fun to make but also allow for some creative decoration, letting you channel your inner Dracula as you prepare them. Follow this recipe to create these hauntingly delightful cupcakes that are guaranteed to be a hit at any Halloween festivity.
Ingredients (Serves 4-6):
- 1 cup all-purpose flour
- 1/2 cup unsweetened cocoa powder
- 1 teaspoon baking powder
- 1/2 teaspoon baking soda
- 1/4 teaspoon salt
- 1/2 cup unsalted butter, softened
- 1 cup granulated sugar
- 2 large eggs
- 1 teaspoon vanilla extract
- 1/2 cup buttermilk
- 3/4 cup raspberry jam
- Red food coloring (optional)
- 1 cup heavy cream
- 1/4 cup powdered sugar
- 1 teaspoon vanilla extract
Instructions:
- Preheat and Prepare: Preheat your oven to 350°F (175°C) and line a cupcake tin with 12 cupcake liners.
- Mix Dry Ingredients: In a medium-sized bowl, whisk together the flour, cocoa powder, baking powder, baking soda, and salt until well combined.
- Cream Butter and Sugar: In a large mixing bowl, beat the softened butter and granulated sugar with an electric mixer on medium speed until light and fluffy, about 2-3 minutes.
- Add Eggs and Vanilla: Add the eggs one at a time, beating well after each addition. Mix in the vanilla extract.
- Combine Wet and Dry Ingredients: Gradually add the dry ingredients to the butter mixture, alternating with the buttermilk, starting and ending with the dry ingredients. Mix until just combined.
- Fill Cupcake Liners: Divide the batter evenly among the cupcake liners, filling each about 2/3 full.
- Bake: Bake in the preheated oven for 18-20 minutes, or until a toothpick inserted into the center of a cupcake comes out clean. Remove from the oven and let cool in the tin for 5 minutes before transferring to a wire rack to cool completely.
- Prepare Raspberry Filling: In a small bowl, mix the raspberry jam with a few drops of red food coloring to enhance the blood-like appearance.
- Fill Cupcakes: Once the cupcakes are completely cool, use a small knife to cut out a small cone-shaped piece from the center of each cupcake. Fill each hole with about a teaspoon of the raspberry mixture.
- Make Vanilla Frosting: In a mixing bowl, whip the heavy cream with the powdered sugar and vanilla extract until stiff peaks form.
- Frost the Cupcakes: Pipe or spread the vanilla frosting over the top of each cupcake, covering the filled hole.
- Decorate: Drizzle a little of the remaining raspberry mixture over the frosted cupcakes to create the effect of dripping blood.
Extra Tips: For an extra spooky touch, consider adding edible vampire fangs or plastic spider decorations on top of the cupcakes.
If you don’t have buttermilk on hand, you can make a substitute by mixing 1/2 cup of milk with 1/2 tablespoon of lemon juice or vinegar and letting it sit for 5 minutes before use.
It’s important to let the cupcakes cool completely before filling and frosting to prevent the frosting from melting. Enjoy crafting these eerie delights, and don’t be afraid to let your creativity run wild with decoration ideas!
Candy Corn Bark
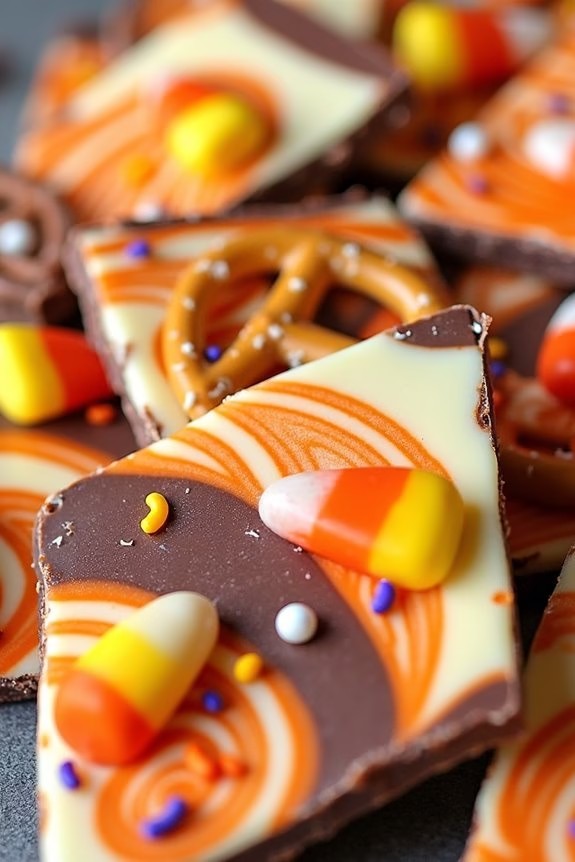
Candy Corn Bark is a festive and delightful treat that perfectly captures the spirit of Halloween. This easy-to-make dessert combines the rich flavors of chocolate with the sweet, colorful allure of candy corn. Not only is it visually appealing, but it also offers a deliciously satisfying crunch.
Whether you’re hosting a Halloween party or simply want to enjoy a spooky night in, Candy Corn Bark is certain to be a hit with both kids and adults alike.
The beauty of Candy Corn Bark lies in its simplicity and adaptability. With just a few ingredients and minimal preparation time, you can create a batch of this delightful treat to share with family and friends. It’s a fantastic option for those who want to impress their guests without spending hours in the kitchen.
The recipe can also be easily customized by adding other toppings or using different types of chocolate, making it a versatile addition to your Halloween menu.
Ingredients for Candy Corn Bark (serves 4-6 people):
- 12 ounces of semisweet chocolate chips
- 12 ounces of white chocolate chips
- 1 cup of candy corn
- 1/2 cup of pretzels, broken into small pieces
- 1/4 cup of festive Halloween sprinkles
Cooking Instructions:
- Prepare the Baking Sheet: Line a baking sheet with parchment paper to prevent the chocolate from sticking and to make it easier to remove once set.
- Melt the Semisweet Chocolate: In a microwave-safe bowl, heat the semisweet chocolate chips in 30-second intervals, stirring after each interval, until completely melted and smooth.
- Spread the Semisweet Chocolate: Pour the melted semisweet chocolate onto the prepared baking sheet and spread it evenly using a spatula, forming a thin layer.
- Melt the White Chocolate: Similarly, melt the white chocolate chips in a separate microwave-safe bowl using the same method as the semisweet chocolate.
- Spread the White Chocolate: Pour the melted white chocolate over the semisweet chocolate layer. Use a spatula or a butter knife to gently swirl the two chocolates together to create a marbled effect.
- Add Toppings: Immediately sprinkle the candy corn, pretzel pieces, and Halloween sprinkles evenly over the swirled chocolate mixture before it begins to set.
- Cool and Set: Allow the bark to cool at room temperature until it’s completely set. For a quicker setting time, you can place the baking sheet in the refrigerator for about 30 minutes.
- Break into Pieces: Once the chocolate is firm, break the bark into irregular pieces and serve.
Extra Tips:
For best results, verify your chocolate is thoroughly melted and smooth before spreading on the baking sheet to avoid clumping. If you prefer a less sweet version, consider using dark chocolate instead of semisweet chocolate.
Additionally, you can incorporate other toppings such as chopped nuts, dried fruits, or other types of candy to personalize your Candy Corn Bark. Store any leftovers in an airtight container at room temperature to maintain freshness and crispness.
Frankenstein Pudding Cups

Frankenstein Pudding Cups are a fun and easy Halloween treat that will thrill both kids and adults alike. These spooky desserts combine creamy pudding with a bit of creativity to create a treat that resembles the iconic monster. They’re perfect for Halloween parties, classroom celebrations, or just a special treat at home.
With just a few ingredients and a little bit of imagination, you can create a delicious and festive dessert that everyone will love.
To make Frankenstein Pudding Cups, you start by preparing instant pudding and tinting it with green food coloring to match Frankenstein’s iconic skin tone. The pudding is then layered into clear cups and decorated with chocolate sandwich cookies and edible eyes to bring the monster to life. This recipe is simple enough for kids to help with, making it a fun family activity.
The serving size for this recipe is 4-6 people, but it can be easily adjusted for larger groups.
Ingredients:
- 1 package (3.4 oz) instant vanilla pudding mix
- 2 cups cold milk
- Green food coloring
- 1 cup whipped topping
- 6 chocolate sandwich cookies
- 12 edible candy eyes
- Black icing or gel
- 4-6 clear plastic cups
Instructions:
- Prepare the Pudding: In a medium bowl, combine the instant vanilla pudding mix with the cold milk. Whisk for about 2 minutes until the mixture starts to thicken.
- Add Color: Add a few drops of green food coloring to the pudding and stir until the color is evenly distributed. Adjust the amount of food coloring until you achieve the desired shade of green.
- Fold in Whipped Topping: Gently fold in the whipped topping until fully incorporated, creating a light and fluffy texture.
- Crush the Cookies: Place the chocolate sandwich cookies in a resealable plastic bag and crush them using a rolling pin or bottom of a cup. These will serve as Frankenstein’s “hair.”
- Assemble the Cups: Divide the green pudding mixture evenly among the clear cups. Top each cup with a layer of crushed cookies to create the hair.
- Decorate: Use the black icing or gel to draw a mouth on each cup. Place two candy eyes just below the cookie hairline to complete the Frankenstein face.
- Chill: Refrigerate the assembled pudding cups for at least 30 minutes before serving to allow the flavors to meld and the pudding to firm up.
Extra Tips:
For an extra spooky touch, you can add small bolts to the sides of each cup using chocolate-covered pretzel sticks or mini marshmallows.
If you want to make the pudding cups even more interactive, provide kids with additional decorations like gummy worms or licorice strings to create scars or stitches on their Frankenstein creations.
Remember to adjust the amount of green food coloring gradually to avoid an overly intense hue, and always opt for clear cups to guarantee the monstrous design is fully visible.
Eyeball Chocolate Truffles
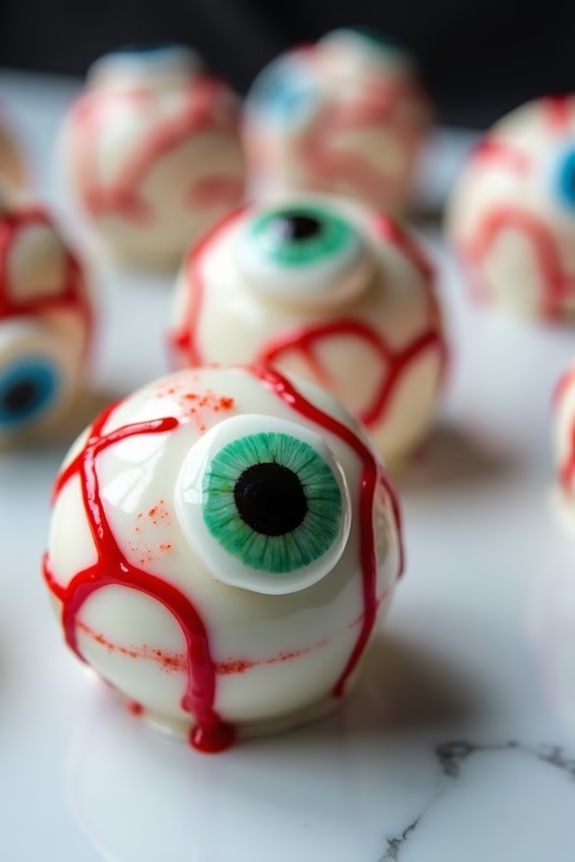
The process of making these truffles is simple and enjoyable, suitable even for those who may not consider themselves expert bakers. With just a few ingredients and some artistic flair, you can whip up a batch of these creepy confections in no time.
The smooth, rich chocolate centers are paired with vibrant decorations that mimic the look of eyeballs, creating a treat that’s sure to delight both children and adults alike.
Ingredients (Serves 4-6 people):
- 8 oz semi-sweet chocolate chips
- 1/2 cup heavy cream
- 1/4 cup unsalted butter
- 1 teaspoon vanilla extract
- 1 cup white candy melts
- Red food coloring
- Blue or green food coloring
- Black icing gel
- Red icing gel
- Candy eyeballs
Instructions:
- Prepare the Chocolate Mixture: In a heatproof bowl, combine the semi-sweet chocolate chips and butter. Heat the heavy cream in a small saucepan over medium heat until it just begins to simmer. Pour the hot cream over the chocolate and butter, then let it sit for about 2 minutes. Stir until the mixture is smooth and glossy. Add the vanilla extract and mix well.
- Chill the Mixture: Cover the bowl with plastic wrap and refrigerate for about 1-2 hours, or until the chocolate mixture is firm enough to scoop.
- Shape the Truffles: Once chilled, use a small spoon or melon baller to scoop out portions of the chocolate mixture. Roll each portion between your palms to form a smooth ball. Place the balls onto a baking sheet lined with parchment paper.
- Melt Candy Coating: In a microwave-safe bowl, melt the white candy melts according to the package instructions. Divide the melted candy into three small bowls. Tint one bowl with a few drops of red food coloring, another with blue or green, and leave the third bowl white.
- Decorate the Truffles: Dip each chocolate ball into the white candy melt to coat completely, allowing excess to drip off. Place back on the parchment paper. Once the coating has set slightly, use a small brush or toothpick to draw red “veins” with the red icing gel. Use the blue or green candy melt to create a colored iris on each truffle. Add a black dot with icing gel for the pupil and place a candy eyeball in the center for added effect.
- Final Touches: Allow the decorated truffles to set completely at room temperature or refrigerate briefly to speed up the process.
Extra Tips:
For an extra spooky effect, consider using glow-in-the-dark or glow under blacklight icing gels available at specialty stores.
When shaping the truffles, keep your hands cool to prevent the chocolate from melting too quickly. If you find the chocolate difficult to work with, dust your hands with a bit of cocoa powder to help prevent sticking.
Ultimately, feel free to experiment with different colors and designs for the iris of the eyeball to create a variety of creepy looks. Enjoy your deliciously eerie creations!
Skeleton Cheese Balls
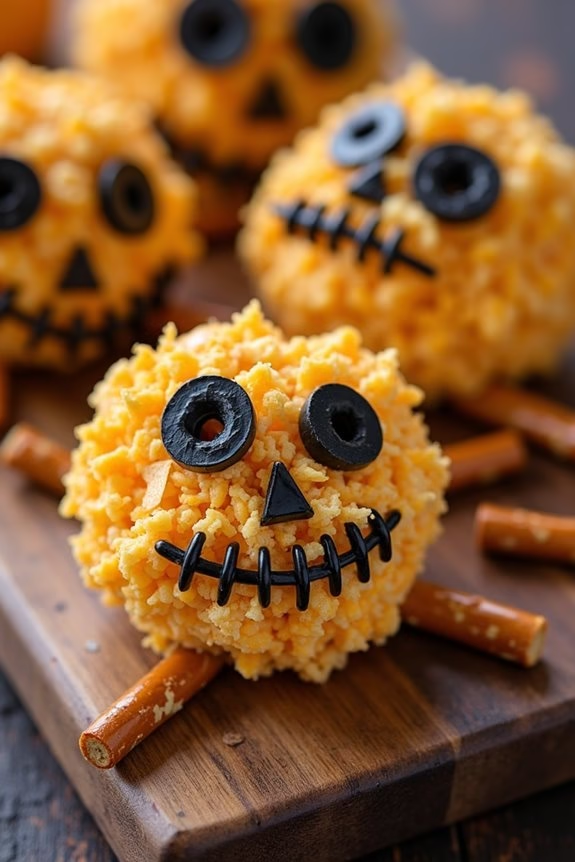
Skeleton Cheese Balls are a fun and spooky addition to any Halloween party spread. These bite-sized treats combine creamy cheese and savory flavors with a playful presentation to impress both kids and adults. The cheese balls are shaped to resemble small skeleton heads, complete with facial features that can be customized to add a personal touch.
Not only are they easy to make, but they’re also a delicious and visually appealing appetizer that sets the perfect mood for a Halloween gathering. Perfect for serving a party of 4-6, these Skeleton Cheese Balls can be prepared ahead of time and chilled until guests arrive.
The recipe uses simple ingredients that can be found at most grocery stores, making it both convenient and cost-effective. Whether you’re hosting a casual get-together or a more elaborate Halloween bash, these cheese balls will surely become a crowd favorite.
Ingredients (for 4-6 servings):
- 16 oz cream cheese, softened
- 2 cups shredded cheddar cheese
- 1 teaspoon garlic powder
- 1 teaspoon onion powder
- 1/2 teaspoon smoked paprika
- 1/4 teaspoon salt
- 1/2 cup crushed tortilla chips
- Black olives (for decoration)
- Pretzel sticks (for decoration)
Cooking Instructions:
- Prepare the Cheese Mixture: In a large bowl, combine the softened cream cheese and shredded cheddar cheese. Add garlic powder, onion powder, smoked paprika, and salt. Mix thoroughly until all ingredients are well combined and form a smooth mixture.
- Shape the Cheese Balls: Using your hands, take a small amount of the cheese mixture and roll it into a ball, about the size of a golf ball. Repeat the process until all the mixture is used up. You should have approximately 12-15 cheese balls.
- Coat the Cheese Balls: Roll each cheese ball in the crushed tortilla chips, ensuring they’re evenly coated. This will give the cheese balls a crunchy exterior and enhance the skeleton look.
- Decorate the Skeleton Faces: Slice black olives into small pieces to create eyes, noses, and mouths for each skeleton head. Use the olive pieces to create facial features on each cheese ball. To mimic skeleton bones, break pretzel sticks in half and insert them into the sides of the cheese balls.
- Chill the Cheese Balls: Place the decorated cheese balls on a platter and refrigerate them for at least 1 hour before serving. This will help the cheese balls firm up and hold their shape.
Extra Tips: For a more intense flavor, you can add a pinch of cayenne pepper to the cheese mixture. If you prefer a smoother texture, consider using a food processor to blend the cheese mixture. Make sure the cheese balls are well-chilled before serving to maintain their shape.
You can also experiment with different coatings, such as crushed nuts or breadcrumbs, for added variety.
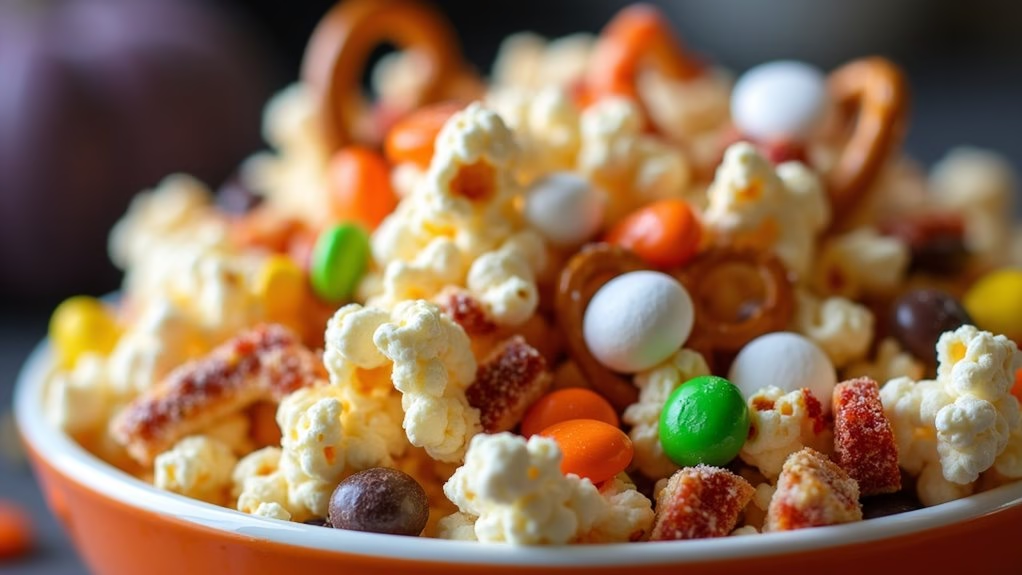
Haunted House Popcorn Mix
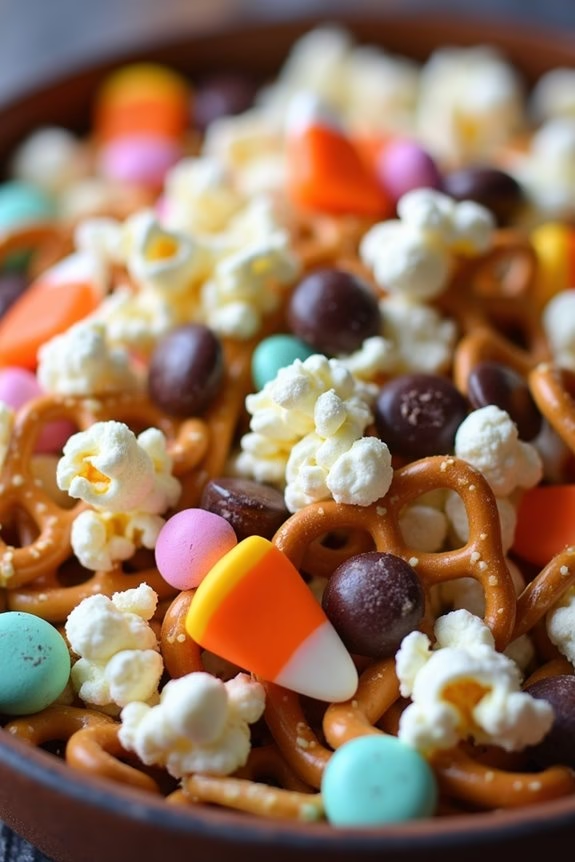
Haunted House Popcorn Mix is an easy and delightful Halloween treat that combines both sweet and savory flavors. This colorful mix is perfect for parties or as a festive snack while watching your favorite spooky movies. The combination of popcorn, candies, and pretzels creates a wonderfully crunchy and flavorful experience, and the addition of Halloween-themed treats makes it perfectly suited for the season.
This recipe is designed to serve 4-6 people, making it an ideal choice for small gatherings or family celebrations. Prepare this Haunted House Popcorn Mix in advance to save time on the day of your event. It’s a simple recipe that requires minimal ingredients and effort but is certain to be a hit with both kids and adults alike.
Ingredients:
- 8 cups of popped popcorn
- 1 cup of candy corn
- 1 cup of mini marshmallows
- 1 cup of pretzel sticks
- 1/2 cup of chocolate chips
- 1/2 cup of Halloween-themed candies (e.g., M&Ms, Reese’s Pieces)
- 1/4 cup of melted butter
- 1/2 teaspoon of salt
Cooking Instructions:
- Prepare the Popcorn: Start by popping the popcorn using your preferred method, whether it’s on the stovetop, in an air popper, or microwave. Once popped, place the popcorn in a large mixing bowl.
- Add Ingredients: To the bowl of popcorn, add the candy corn, mini marshmallows, pretzel sticks, chocolate chips, and Halloween-themed candies. Mix everything together gently with your hands or a large spoon to distribute the ingredients evenly.
- Melt the Butter: In a small saucepan over low heat, melt the butter. Once melted, remove it from the heat and stir in the salt until fully dissolved.
- Combine and Coat: Pour the melted butter mixture over the popcorn mix. Toss the mixture gently to guarantee that the popcorn and other ingredients are lightly coated with the butter. This helps the seasonings adhere and enhances the overall flavor.
- Serve: Transfer the Haunted House Popcorn Mix to a serving bowl or individual cups. It’s ready to serve immediately, or you can store it in an airtight container for up to two days if making ahead.
Extra Tips:
For an extra festive touch, consider adding a few drops of orange or black food coloring to the melted butter before mixing it with the popcorn.
You can also customize your mix by adding other treats such as gummy worms or nuts, depending on your preferences and dietary needs.
Remember to keep the mix sealed until serving to maintain its freshness and crunch. Enjoy your spooky and delicious Halloween treat!