
When Halloween rolls around, there’s nothing quite as delightful as decorating sugar cookies. Picture yourself creating a whimsical ghost or a cheerful jack-o’-lantern, each cookie a canvas for your imagination. From spooky eyeballs to enchanting black cats, the creative possibilities are endless. It’s all about vibrant icing, playful candy decorations, and embracing your artistic flair. Are you ready to charm your guests with these enchanting treats? Let’s uncover the magic in each cookie!
Spooky Ghost Cookies
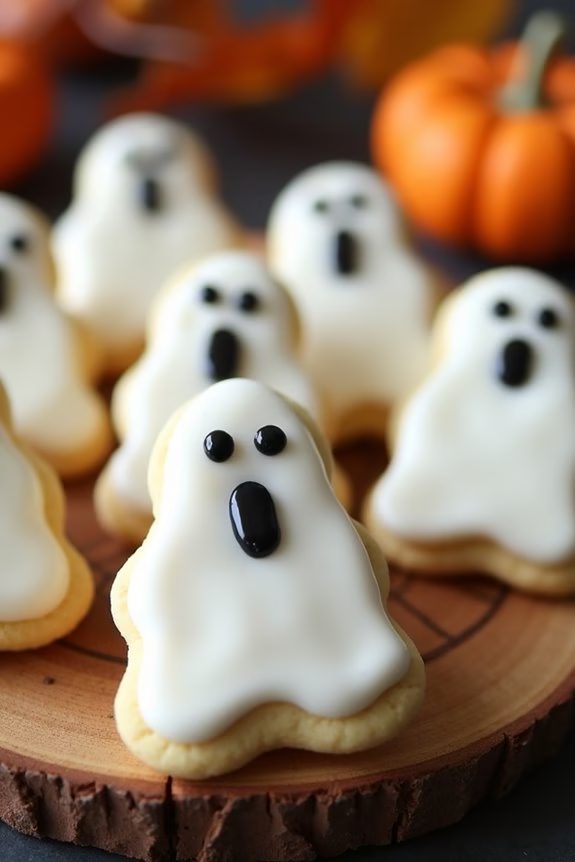
Halloween is the perfect time to get creative in the kitchen with some hauntingly delicious treats. Spooky Ghost Cookies are a delightful addition to any Halloween celebration, offering a sweet and festive way to indulge in the holiday spirit.
These sugar cookies aren’t only charming to look at, with their ghostly shapes and whimsical decorations, but they’re also incredibly tasty, with a buttery, melt-in-your-mouth texture complemented by a hint of vanilla. Whether you’re hosting a Halloween party or looking for a fun activity to do with the kids, these cookies are sure to become a Halloween favorite.
The process of making Spooky Ghost Cookies is both enjoyable and straightforward, making it ideal for bakers of all skill levels. The key to achieving the perfect ghostly silhouette lies in the cookie dough, which is rolled out and cut into ghost shapes using a cookie cutter.
Once baked to a golden perfection, these cookies are decorated with a simple icing that brings the ghosts to life. With just a few ingredients and a little bit of creativity, you can create a batch of cookies that are as delightful to look at as they’re to eat.
Ingredients (Serves 4-6):
- 2 3/4 cups all-purpose flour
- 1 teaspoon baking soda
- 1/2 teaspoon baking powder
- 1 cup unsalted butter, softened
- 1 1/2 cups white sugar
- 1 egg
- 1 teaspoon vanilla extract
- 1/2 teaspoon almond extract
- 3-4 tablespoons milk
- Black decorating gel or icing
- White icing or royal icing
Instructions:
- Preheat the Oven: Preheat your oven to 375°F (190°C). Line two baking sheets with parchment paper or silicone baking mats to prevent the cookies from sticking.
- Prepare the Dry Ingredients: In a medium bowl, whisk together the flour, baking soda, and baking powder. This guarantees even distribution of the leavening agents in the dough.
- Cream the Butter and Sugar: In a large bowl, use an electric mixer to cream the butter and sugar together until the mixture is light and fluffy. This process should take about 3 minutes.
- Add the Wet Ingredients: Beat in the egg, vanilla extract, and almond extract until well combined. These ingredients add flavor and moisture to the dough.
- Combine the Mixture: Gradually add the dry ingredients to the butter mixture, mixing just until the dough comes together. If the dough seems too stiff, add milk one tablespoon at a time until it reaches the desired consistency.
- Roll Out the Dough: Divide the dough in half and roll out each half on a floured surface to about 1/4-inch thickness. Use a ghost-shaped cookie cutter to cut out your cookies.
- Bake the Cookies: Place the cookies onto the prepared baking sheets, leaving about 2 inches between each cookie. Bake for 8-10 minutes, or until the edges are lightly golden. Allow them to cool on the baking sheet for 5 minutes before transferring to a wire rack to cool completely.
- Decorate the Cookies: Once the cookies are completely cool, use white icing to cover the surface of each ghost. Use black decorating gel or icing to add eyes and a mouth, giving your ghosts a spooky expression.
Extra Tips:
To ascertain your Spooky Ghost Cookies hold their shape during baking, it’s important to chill the dough for at least 30 minutes before rolling it out. This step helps prevent the cookies from spreading too much.
When decorating, you can use a piping bag for more precise details, or simply use a small spoon or toothpick for a more rustic look. Feel free to get creative with the faces of your ghost cookies; each one can have its own unique personality!
Store any leftover cookies in an airtight container to keep them fresh for up to a week.
Grinning Jack-O’-Lantern Cookies
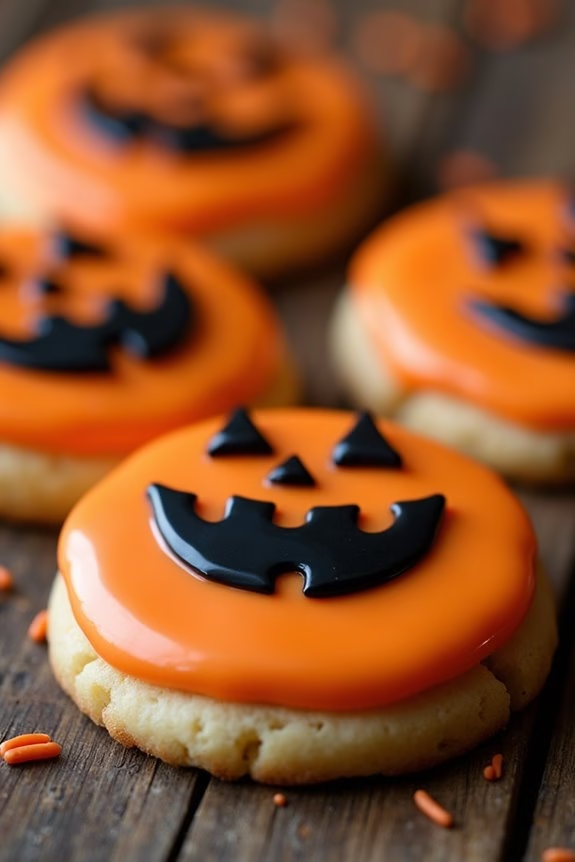
Grinning Jack-O’-Lantern Cookies are a delightful treat perfect for Halloween celebrations. These sugar cookies aren’t only delicious but also fun to decorate, making them an excellent activity for families and friends. The cookies are shaped like classic jack-o’-lanterns, complete with grinning faces that can be personalized to suit your spooky or silly preferences.
With a buttery, sweet base and festive orange icing, they’re sure to be a hit at any Halloween gathering. Creating these cookies involves making a simple sugar cookie dough, which is then rolled out and cut into pumpkin shapes. Once baked, the cookies are cooled and decorated with vibrant royal icing to bring the jack-o’-lantern faces to life.
The icing can be piped or spread on, allowing for creativity in your designs. Whether you’re a seasoned baker or a beginner, these Grinning Jack-O’-Lantern Cookies are a fun and rewarding project that results in a delicious treat.
Ingredients (serving size: 4-6 people):
- 2 3/4 cups all-purpose flour
- 1 teaspoon baking powder
- 1/2 teaspoon salt
- 1 cup unsalted butter, softened
- 1 1/2 cups granulated sugar
- 1 large egg
- 2 teaspoons vanilla extract
- Orange food coloring
- Black food coloring
- 2 cups powdered sugar
- 2 tablespoons meringue powder
- 4 tablespoons water
Cooking Instructions:
- Prepare the Dough: Begin by whisking together the flour, baking powder, and salt in a medium bowl. In a separate large bowl, cream the softened butter and granulated sugar together until light and fluffy. Beat in the egg and vanilla extract until well combined. Gradually add the dry ingredients to the wet mixture, mixing until a smooth dough forms.
- Chill the Dough: Divide the dough into two portions, flatten them into disks, wrap in plastic wrap, and refrigerate for at least 1 hour. This assists the dough to firm up, making it easier to roll out and cut.
- Preheat the Oven: While the dough chills, preheat your oven to 350°F (175°C) and line two baking sheets with parchment paper.
- Roll and Cut: On a lightly floured surface, roll out one disk of dough to about 1/4 inch thickness. Use a pumpkin-shaped cookie cutter to cut out as many shapes as possible. Transfer the cut-outs to the prepared baking sheets, leaving a little space between each cookie.
- Bake the Cookies: Bake in the preheated oven for 10-12 minutes or until the edges start to turn golden. Remove from the oven and let them cool on the baking sheets for a few minutes before transferring to a wire rack to cool completely.
- Prepare the Icing: In a clean bowl, whisk together the powdered sugar, meringue powder, and water until smooth. Divide the icing into two bowls; tint one with orange food coloring for the pumpkin and the other with black for the facial features.
- Decorate the Cookies: Once the cookies are completely cooled, use the orange icing to flood the surface of each cookie. Allow the icing to set slightly before using the black icing to draw on the jack-o’-lantern faces. You can use a piping bag or a small spoon for this step. Let the icing set completely before serving.
Extra Tips:
For a more vibrant orange, add a few drops of red food coloring along with the orange to achieve a deeper hue. When decorating, if you don’t have piping bags, you can use a zip-top bag with a small corner snipped off as an alternative.
To guarantee your cookies maintain their shape, make sure the dough is well chilled before rolling and cutting. For added flavor, consider adding a pinch of cinnamon or nutmeg to the dough for a subtle spiced taste that complements the Halloween theme.
Bewitching Black Cat Cookies
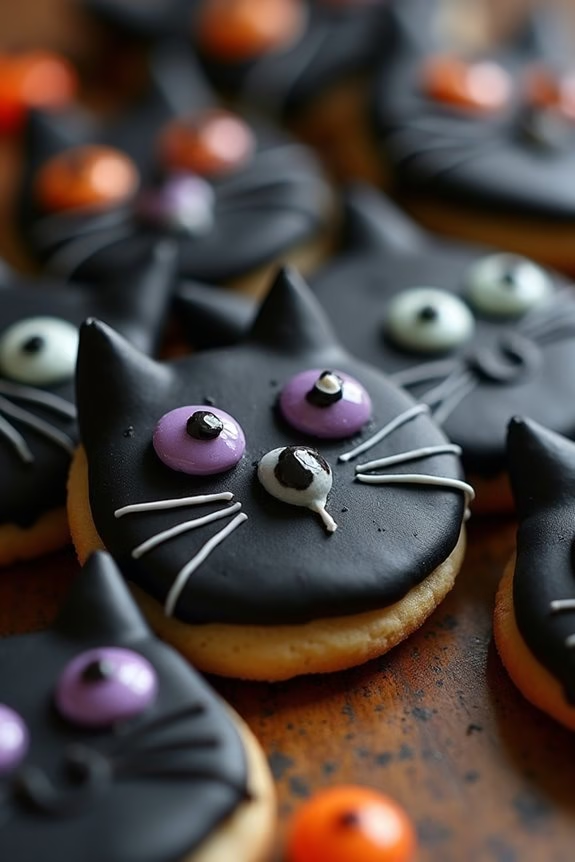
Halloween is the perfect time to indulge in some festive baking, and what better way to celebrate than with Bewitching Black Cat Cookies? These spooky, yet adorable, sugar cookies are sure to be a hit at any Halloween gathering. Shaped like curious black cats with bright eyes, they bring a playful touch to your dessert table.
Perfect for kids and adults alike, these cookies aren’t only delicious but also a fun project to get everyone in the Halloween spirit. The base of these cookies is a classic sugar cookie dough, flavored with a hint of vanilla for that perfect balance of sweetness. They’re then decorated with black royal icing and candy eyes for a striking look.
You can use a cat-shaped cookie cutter to achieve the perfect feline silhouette. Whether you’re hosting a Halloween party or just looking to add some spooky fun to your baking repertoire, these Bewitching Black Cat Cookies are bound to enchant everyone who tries them.
Ingredients for 4-6 servings:
- 2 3/4 cups all-purpose flour
- 1 teaspoon baking soda
- 1/2 teaspoon baking powder
- 1 cup unsalted butter, softened
- 1 1/2 cups white sugar
- 1 egg
- 1 teaspoon vanilla extract
- Black food coloring
- 3 cups powdered sugar
- 2 tablespoons meringue powder
- 6 tablespoons water
- Candy eyes for decoration
Instructions:
- Preheat and Prepare: Preheat your oven to 375°F (190°C). Line two baking sheets with parchment paper and set aside.
- Mix Dry Ingredients: In a medium-sized bowl, whisk together the flour, baking soda, and baking powder. This guarantees even distribution of the leavening agents.
- Cream Butter and Sugar: In a large bowl, using an electric mixer, cream together the softened butter and white sugar until light and fluffy. This should take about 3 minutes.
- Add Egg and Vanilla: Beat in the egg and vanilla extract to the creamed mixture until well combined.
- Combine Wet and Dry Ingredients: Gradually add the dry ingredients to the wet mixture, mixing just until combined. Don’t overmix.
- Add Food Coloring: Add black food coloring to the dough and knead until the color is uniform throughout.
- Roll Out Dough: On a lightly floured surface, roll out the dough to about 1/4 inch thickness.
- Cut Out Cookies: Use a cat-shaped cookie cutter to cut out shapes. Place them on the prepared baking sheets, spacing them about 2 inches apart.
- Bake Cookies: Bake in the preheated oven for 8-10 minutes, or until the edges are just starting to turn golden. Cool on the baking sheets for 5 minutes then transfer to wire racks to cool completely.
- Prepare Royal Icing: In a medium bowl, combine powdered sugar, meringue powder, and water. Beat until the mixture is smooth. Add black food coloring until desired shade is achieved.
- Decorate Cookies: Using a piping bag fitted with a small round tip, outline and flood the cookies with the black royal icing. Immediately place candy eyes on each cat cookie before the icing sets.
- Dry Cookies: Allow decorated cookies to dry completely at room temperature before serving or storing.
Extra Tips:
When making Bewitching Black Cat Cookies, verify your butter is softened but not melted, as this affects the texture of the cookies. If you’re new to royal icing, practice on a piece of parchment before decorating the cookies to get the hang of it.
If you don’t have candy eyes, you can create eyes with white and black royal icing or small candy pieces. Store cookies in an airtight container to keep them fresh, and enjoy the sweet and spooky goodness!
Eerie Eyeball Cookies
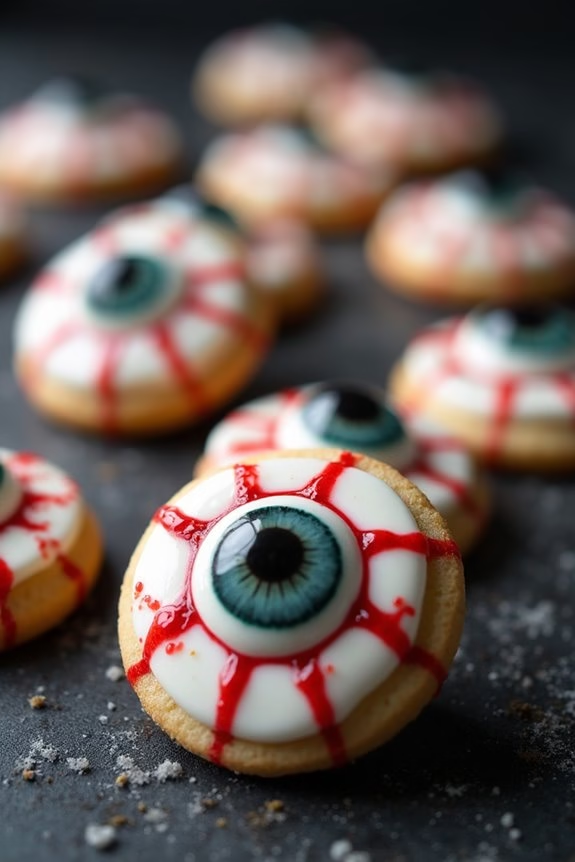
Eerie Eyeball Cookies are a spooktacular treat perfect for adding a touch of frightful fun to your Halloween spread. These cookies aren’t only deliciously sweet but also come with an eerie twist that will delight both kids and adults. They make for a great themed dessert that sets the mood for your Halloween festivities with their ghoulish appearance.
To make these Eerie Eyeball Cookies, you’ll start with a classic sugar cookie base that’s soft and chewy. The magic happens when you transform these simple cookies into creepy eyeballs using a few additional decorations. With this recipe, you can whip up a batch to serve 4-6 people, making it ideal for a small gathering or family treat.
Ingredients:
- 2 1/2 cups all-purpose flour
- 1 teaspoon baking powder
- 1/2 teaspoon salt
- 1 cup unsalted butter, softened
- 1 cup granulated sugar
- 1 large egg
- 1 teaspoon vanilla extract
- Red gel food coloring
- White icing
- Black icing or melted chocolate
- Round candy eyes
Instructions:
- Prepare the Dough:
- In a medium bowl, whisk together the all-purpose flour, baking powder, and salt. Set aside.
- In a large mixing bowl, cream the softened butter and granulated sugar together until light and fluffy. This should take about 2-3 minutes using an electric mixer on medium speed.
- Add the egg and vanilla extract to the butter mixture and mix until fully incorporated.
- Gradually add the dry ingredients to the wet ingredients, mixing until a soft dough forms.
- Chill the Dough:
- Divide the dough into two equal halves. Wrap each portion in plastic wrap and refrigerate for at least 1 hour. This helps to firm up the dough, making it easier to roll out and cut.
- Shape the Cookies:
- Preheat your oven to 350°F (175°C) and line a baking sheet with parchment paper.
- Roll out the dough on a lightly floured surface to about 1/4-inch thickness. Use a round cookie cutter to cut out circles for the eyeballs.
- Place the cookies on the prepared baking sheet, leaving about 2 inches between each cookie.
- Bake the Cookies:
- Bake the cookies in the preheated oven for 10-12 minutes, or until the edges are lightly golden. Be careful not to over-bake them, as you want them to remain soft.
- Remove from the oven and allow the cookies to cool completely on a wire rack.
- Decorate the Eyeballs:
- Once the cookies have cooled, use white icing to spread a thin layer over each cookie.
- Apply a small amount of red gel food coloring onto a toothpick, then draw squiggly lines from the center to the edges of the cookie to resemble bloodshot veins.
- Place a round candy eye in the center of each cookie. Use black icing or melted chocolate to add details to the eyes if desired.
Extra Tips:
For a more dramatic effect, experiment with different candy eye sizes or use colored icing to create different eye colors. Confirm your butter is well softened to make blending easier, but avoid melting it completely.
If you find the dough too sticky to work with, sprinkle a bit more flour when rolling it out. Finally, store the decorated cookies in an airtight container to keep them fresh and maintain their spooky look until serving time.
Creepy Crawly Spider Cookies
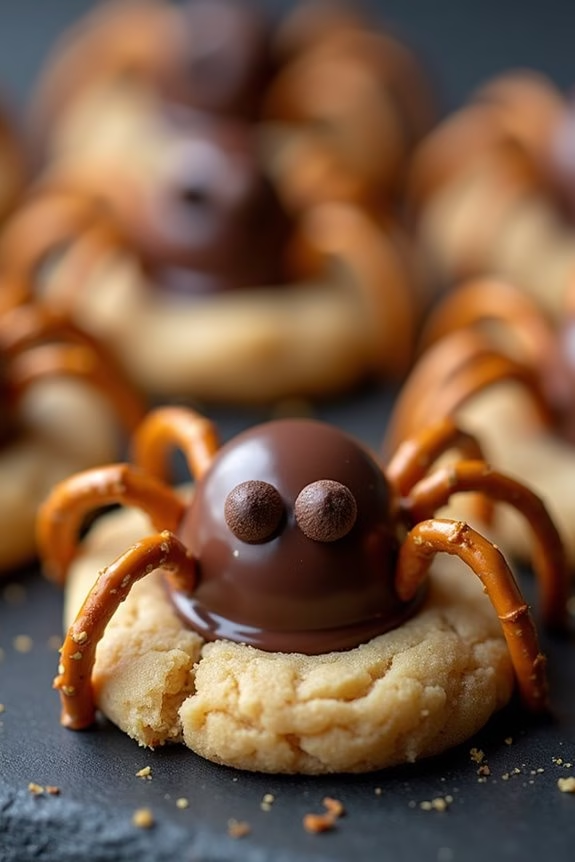
Creepy Crawly Spider Cookies are a fun and spooky treat perfect for Halloween festivities. These delicious sugar cookies are transformed into creepy spiders with the help of a few creative decorations, making them a hit with both kids and adults. The cookies are sweet, buttery, and just the right amount of soft, with a delightful crunch from the spider’s legs and body. They’re sure to be the highlight of any Halloween party or gathering.
The process of making these Creepy Crawly Spider Cookies is simple, and it’s an excellent activity to involve the whole family. These cookies are made with a basic sugar cookie dough, and after baking, they’re adorned with chocolate truffle bodies and pretzel legs to create the spider effect. This recipe is designed to serve 4-6 people, so it’s perfect for a small party or family gathering.
Let’s plunge into the ingredients and the step-by-step instructions to create these spooky treats.
Ingredients (Serves 4-6):
- 2 1/2 cups all-purpose flour
- 1/2 teaspoon baking powder
- 1/4 teaspoon salt
- 1 cup unsalted butter, softened
- 1 cup granulated sugar
- 1 large egg
- 1 teaspoon vanilla extract
- 12 chocolate truffles (e.g., Lindt or similar)
- 24 small pretzel sticks, broken into thirds
- 1/4 cup mini chocolate chips
- 1/4 cup chocolate frosting or melted chocolate for decorating
Cooking Instructions:
- Prepare the Dough: In a medium bowl, whisk together flour, baking powder, and salt. In a large bowl, beat the softened butter and granulated sugar with an electric mixer on medium speed until light and fluffy. Add the egg and vanilla extract, and mix until well combined. Gradually add the dry ingredients to the wet ingredients, mixing until just combined.
- Chill the Dough: Wrap the dough in plastic wrap and refrigerate for at least 1 hour. This helps the dough firm up, making it easier to roll out and cut.
- Preheat the Oven: Preheat your oven to 350°F (175°C) and line two baking sheets with parchment paper.
- Roll and Cut the Cookies: On a lightly floured surface, roll out the dough to about 1/4-inch thickness. Use a round cookie cutter to cut out circles (about 2 inches in diameter) and place them on the prepared baking sheets.
- Bake the Cookies: Bake the cookies in the preheated oven for 10-12 minutes, or until the edges are lightly golden. Remove from the oven and allow them to cool completely on the baking sheets.
- Decorate the Cookies: Once the cookies are completely cooled, place a small dollop of chocolate frosting or melted chocolate in the center of each cookie. Place a chocolate truffle on top of the frosting to form the spider’s body.
- Add the Legs: Insert pretzel stick pieces into the frosting around the truffle to form the spider’s legs, three on each side.
- Create the Eyes: Use a small amount of frosting or melted chocolate to attach mini chocolate chips to the truffles, creating the spider’s eyes.
Extra Tips:
For even more spooky fun, you can use colored icing to add details to the spiders, such as fangs or additional eyes. If you don’t have chocolate truffles, you can substitute them with malted milk balls or any round chocolate candy.
Be sure to handle the cookies gently when decorating to prevent breakage. Finally, you can make the cookie dough and bake the cookies in advance, then decorate them closer to your event to guarantee freshness.
Enjoy your Creepy Crawly Spider Cookies, and have a spooktacular Halloween!
Wicked Witch Hat Cookies

Halloween is the perfect time to indulge in some festive baking, and Wicked Witch Hat Cookies are a delightful treat that will undoubtedly cast a spell on your taste buds. These whimsical cookies not only look enchanting but also offer a deliciously sweet flavor that’s perfect for the spooky season. The combination of a classic sugar cookie base, vibrant icing, and a rich chocolate hat creates a magical dessert that will be adored by children and adults alike.
Creating these cookies involves crafting a simple sugar cookie dough, which will serve as the base for the witch hats. Once baked, the cookies are decorated with colorful frosting and topped with a chocolate cone to mimic the iconic witch’s hat shape. This recipe is designed to yield enough cookies to serve 4-6 people, making it an excellent choice for small gatherings or as a fun family baking project.
Ingredients (serves 4-6):
- 2 3/4 cups all-purpose flour
- 1 teaspoon baking soda
- 1/2 teaspoon baking powder
- 1 cup unsalted butter, softened
- 1 1/2 cups granulated sugar
- 1 egg
- 1 teaspoon vanilla extract
- 1/2 teaspoon almond extract (optional)
- Black food coloring
- Green icing (store-bought or homemade)
- 6 chocolate ice cream cones
- 1/2 cup chocolate chips, melted
- Sprinkles for decoration
Cooking Instructions:
- Prepare the Dough: In a medium bowl, whisk together the flour, baking soda, and baking powder. In a separate large bowl, cream the softened butter and granulated sugar together until the mixture is light and fluffy. Beat in the egg, vanilla extract, and almond extract (if using) until well combined.
- Combine Ingredients: Gradually add the dry ingredients to the wet mixture, mixing until a soft dough forms. Add black food coloring to the dough and knead it until the color is evenly distributed and you achieve your desired shade.
- Chill the Dough: Wrap the dough in plastic wrap and refrigerate it for at least 1 hour. This step helps to firm up the dough, making it easier to roll out and cut.
- Preheat the Oven: Preheat your oven to 375°F (190°C). Line two baking sheets with parchment paper.
- Shape the Cookies: Roll out the dough on a lightly floured surface to about 1/4-inch thickness. Use a round cookie cutter to cut out circles. Place the rounds onto the prepared baking sheets.
- Bake the Cookies: Bake the cookies in the preheated oven for 8-10 minutes or until they’re lightly golden around the edges. Allow them to cool completely on a wire rack.
- Decorate the Cookies: Once cooled, spread green icing over the surface of each cookie. Attach a chocolate cone (open end down) to the center of each cookie using a dab of melted chocolate to secure it. Decorate the base of each cone with sprinkles to resemble a witch’s hat band.
Extra Tips: For an extra touch of flavor, consider adding a pinch of cinnamon or nutmeg to the cookie dough. If you find it difficult to achieve a deep black color with food coloring, try starting with a base of cocoa powder to darken the dough naturally before adding the coloring.
When decorating, make certain the melted chocolate has cooled slightly but is still fluid enough to act as a glue for attaching the chocolate cones securely. Store the finished cookies in an airtight container to keep them fresh for several days.
Friendly Frankenstein Cookies

Get into the spooky spirit of Halloween with these delightful and playful Friendly Frankenstein Cookies. Perfect for a Halloween party or a fun family baking session, these cookies aren’t only delicious but also a blast to decorate. Made from a classic sugar cookie base, they’re wonderfully buttery and hold their shape, making them perfect for icing and embellishing with your favorite Frankenstein features.
Whether you’re an experienced baker or a beginner, this recipe is easy to follow with charming results. These cookies are sure to be a hit with both kids and adults alike, bringing a little bit of monster fun to your Halloween celebrations. Gather your ingredients and prepare to create these adorable, ghoulish treats!
Ingredients (Serves 4-6 people):
- 2 3/4 cups all-purpose flour
- 1 teaspoon baking powder
- 1/2 teaspoon salt
- 1 cup unsalted butter, softened
- 1 1/2 cups granulated sugar
- 1 egg
- 1 teaspoon vanilla extract
- 1/2 teaspoon almond extract
- Green food coloring
- Black and white royal icing (for decorating)
- Candy eyes
- Black licorice or chocolate sprinkles (for hair)
Cooking Instructions:
- Preheat Oven: Start by preheating your oven to 350°F (175°C). Line a baking sheet with parchment paper to prevent the cookies from sticking.
- Mix Dry Ingredients: In a medium bowl, whisk together the flour, baking powder, and salt. This will be the dry mixture for your cookies.
- Cream Butter and Sugar: In a large bowl, use an electric mixer to cream the softened butter and sugar until light and fluffy, about 2-3 minutes.
- Add Egg and Extracts: Beat in the egg, vanilla extract, and almond extract until well combined.
- Combine Mixtures: Gradually add the dry ingredients to the wet ingredients, mixing until just combined. Add green food coloring a few drops at a time until the desired Frankenstein green is achieved.
- Roll Out Dough: On a floured surface, roll out the dough to about 1/4 inch thickness. Use a rectangular cookie cutter or a knife to cut out rectangles for Frankenstein’s face.
- Bake Cookies: Place the cut-out cookies on the prepared baking sheet, and bake in the preheated oven for 8-10 minutes, or until the edges are lightly golden. Allow them to cool on the baking sheet for a few minutes before transferring them to a wire rack to cool completely.
- Decorate Cookies: Once the cookies are cool, use black royal icing to create Frankenstein’s hair and mouth. Use white royal icing to attach candy eyes and create bolts on the sides of the face. Use black licorice or chocolate sprinkles to add texture to the hair.
Extra Tips:
When decorating your Friendly Frankenstein Cookies, let your creativity shine! If you don’t have black licorice or chocolate sprinkles, you can use black icing to draw hair strands.
To guarantee the royal icing sets well, allow the decorated cookies to sit at room temperature for a few hours before serving. If you’re planning to store the cookies, place them in an airtight container to keep them fresh and delicious for up to a week. Enjoy your spooky, sweet creations!
Haunted House Cookies
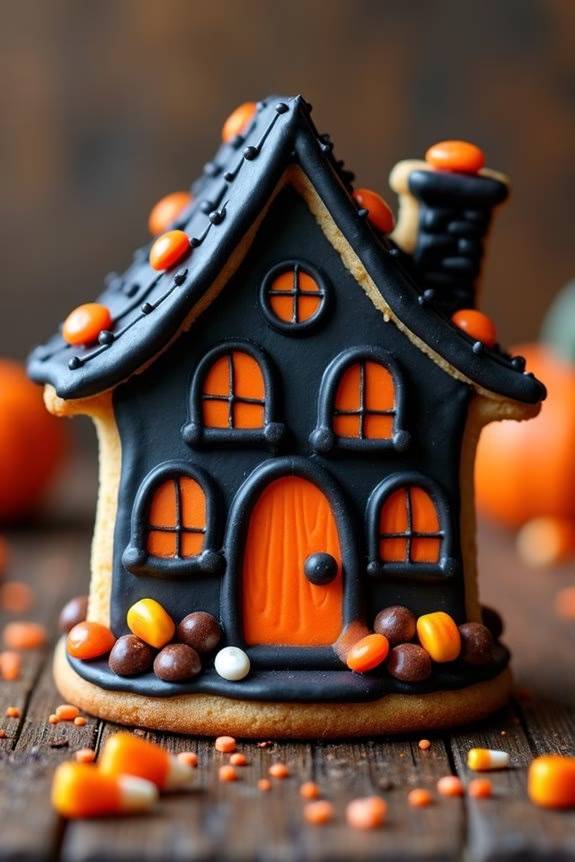
Celebrate Halloween with these festive and spooky Haunted House Sugar Cookies. Perfect for a party or as a fun family activity, these cookies not only taste delicious but also allow for creativity in decorating. Using a simple sugar cookie dough, you’ll transform these treats into mini haunted houses with the help of royal icing and a variety of candies. The end result is a batch of eerie, edible masterpieces that are sure to impress your guests.
This recipe yields enough cookies for 4-6 people, making it ideal for a small gathering or family event. The dough is easy to work with and can be made ahead of time, allowing you more time to focus on the fun part: decorating! So gather your ingredients, roll up your sleeves, and get ready to conjure up some spooky kitchen magic.
Ingredients (Serves 4-6 people):
- 2 3/4 cups all-purpose flour
- 1 teaspoon baking soda
- 1/2 teaspoon baking powder
- 1 cup unsalted butter, softened
- 1 1/2 cups white sugar
- 1 egg
- 1 teaspoon vanilla extract
- 1/2 teaspoon almond extract
- Black and orange food coloring
- Assorted candies for decorating (e.g., candy corn, chocolate chips, licorice)
- Royal icing (prepared or homemade)
- Sprinkles (optional)
Cooking Instructions:
- Prepare the Dough: In a medium bowl, whisk together the flour, baking soda, and baking powder. In a large bowl, cream the softened butter and sugar until light and fluffy. Beat in the egg, vanilla extract, and almond extract. Gradually blend in the dry ingredients until fully combined. Divide the dough in half.
- Color the Dough: Add black food coloring to one half of the dough, kneading until the color is evenly distributed. Repeat with the other half of the dough using orange food coloring. Wrap each dough in plastic wrap and chill for at least 1 hour.
- Preheat and Roll: Preheat your oven to 375°F (190°C). On a lightly floured surface, roll out the chilled dough to about 1/4 inch thickness. Use house-shaped cookie cutters to cut out shapes, and transfer to a parchment-lined baking sheet.
- Bake: Bake in the preheated oven for 8-10 minutes, or until the edges are lightly golden. Remove from oven and allow cookies to cool on the baking sheet for 5 minutes before transferring to a wire rack to cool completely.
- Decorate: Once the cookies are completely cooled, use royal icing to create windows, doors, and other haunted house features. Add candies and sprinkles as desired to complete the look. Allow the icing to set before serving.
Extra Tips:
For the best results, make sure your butter is truly at room temperature before creaming with the sugar; this helps achieve a smooth dough.
When rolling out the dough, sprinkle a little flour on your rolling pin to prevent sticking.
If you prefer a more detailed haunted house, use a toothpick or fine-tipped icing bag for intricate designs.
Remember to have fun and be creative with your decorations; there’s no right or wrong way to make a haunted house cookie!
Bewitched Broomstick Cookies

Bewitched Broomstick Cookies are a whimsical and fun addition to any Halloween treat lineup. These delightful cookies not only look charmingly festive but also offer a delicious buttery flavor that will have your guests reaching for seconds. Perfect for a spooky party or a cozy night in with family, these cookies are shaped like tiny broomsticks, making them an adorable and tasty nod to Halloween’s witchy traditions.
Crafting these Bewitched Broomstick Cookies is a breeze, requiring only a few simple ingredients and a bit of creativity. The key is to achieve the perfect balance of sweetness and texture, guaranteeing the cookies keep their shape while baking. The dough is shaped into broomsticks and decorated to enhance their playful appearance. Whether you’re a seasoned baker or a kitchen newbie, these cookies are sure to cast a spell on everyone who tries them.
Ingredients for 4-6 servings:
- 2 cups all-purpose flour
- 1/2 teaspoon baking powder
- 1/4 teaspoon salt
- 1/2 cup unsalted butter, softened
- 3/4 cup granulated sugar
- 1 large egg
- 1 teaspoon vanilla extract
- 1/2 teaspoon almond extract
- 1/2 cup chocolate chips (for decoration)
- 1/4 cup butterscotch chips (for decoration)
- Black licorice strings (for decoration)
Cooking Instructions:
- Preheat and Prepare: Preheat your oven to 350°F (175°C) and line two baking sheets with parchment paper to prevent sticking.
- Mix Dry Ingredients: In a medium-sized bowl, whisk together the flour, baking powder, and salt. This will guarantee even distribution of the leavening agent throughout the cookies.
- Cream Butter and Sugar: In a large mixing bowl, beat the softened butter and granulated sugar together until light and fluffy, about 2-3 minutes. This helps to incorporate air into the mixture, giving the cookies a tender texture.
- Add Wet Ingredients: Add the egg, vanilla extract, and almond extract to the butter and sugar mixture, beating until fully combined. The extracts will infuse the dough with flavor.
- Combine Ingredients: Gradually add the dry ingredients to the wet ingredients, mixing until just combined. Be careful not to overmix, as this can make the cookies tough.
- Shape the Cookies: Take small portions of dough and roll them into 3-inch long cylinders. Pinch one end to form a broomstick handle and flatten the other end slightly to mimic the bristles of a broom.
- Decorate: Press chocolate chips and butterscotch chips into the flattened end of each cookie to create the appearance of broom bristles. Use small pieces of black licorice to wrap around the base of the bristles for added effect.
- Bake: Place the shaped cookies on the prepared baking sheets and bake in the preheated oven for 10-12 minutes, or until the edges are just starting to turn golden. Be sure not to overbake them to keep them soft and chewy.
- Cool: Allow the cookies to cool on the baking sheets for a few minutes before transferring them to a wire rack to cool completely.
Extra Tips: For an extra festive touch, you can add a few drops of food coloring to the dough to give the broomsticks a spooky hue. Alternatively, you can drizzle melted chocolate over the cooled cookies for a decorative finish. If you find the dough too sticky to work with, refrigerate it for 20-30 minutes before shaping. Enjoy these Bewitched Broomstick Cookies with a glass of milk or a cup of hot cider for the ultimate Halloween treat!
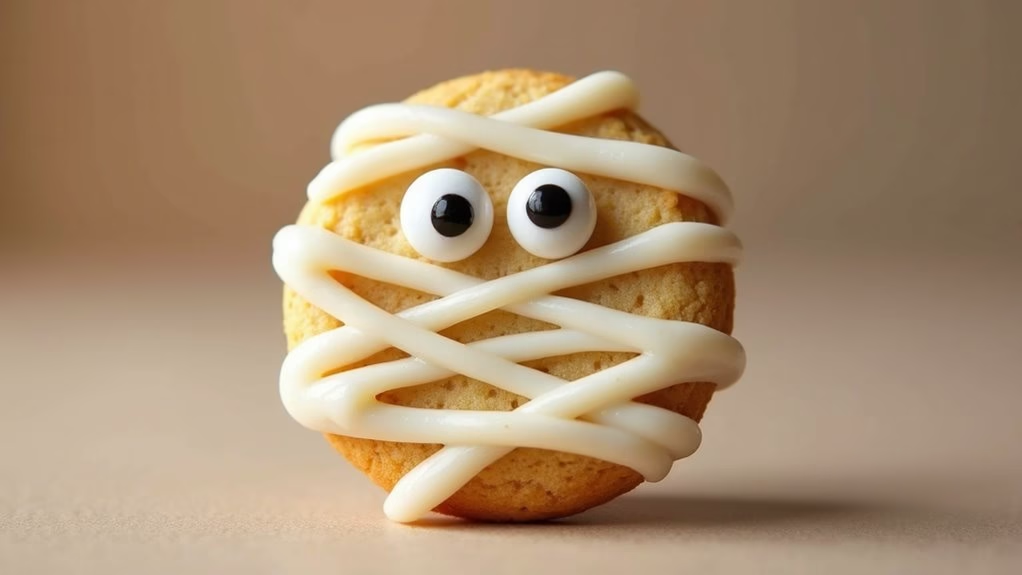
Mummified Mummy Cookies
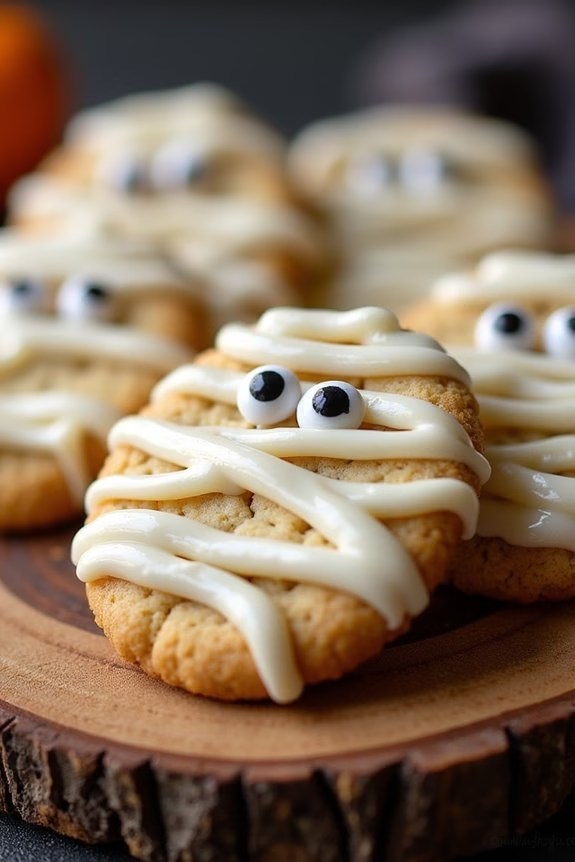
Mummified Mummy Cookies are a delightful treat perfect for your Halloween festivities. These sugar cookies aren’t only delicious but also fun to make and decorate. With their spooky mummy design, they’ll be a hit at any Halloween party. The base of the cookie is a classic sugar cookie, providing a sweet, buttery canvas that’s perfect for a variety of decorations. The addition of white icing and candy eyes transforms these simple cookies into festive mummies.
To create these Mummified Mummy Cookies, you’ll start with a basic sugar cookie dough, which is then rolled out and cut into mummy shapes. After baking, the cookies are cooled and decorated with white icing to mimic mummy bandages, and candy eyes are added for a playful touch. The preparation is straightforward, making this a great project to involve kids or friends in for some Halloween fun.
Ingredients for Mummified Mummy Cookies (serves 4-6):
- 2 3/4 cups all-purpose flour
- 1 teaspoon baking soda
- 1/2 teaspoon baking powder
- 1 cup unsalted butter, softened
- 1 1/2 cups white sugar
- 1 egg
- 1 teaspoon vanilla extract
- 1/2 teaspoon almond extract (optional)
- 2 tablespoons milk
- White icing (store-bought or homemade)
- Candy eyes
Cooking Instructions:
- Prepare the Dough: In a medium bowl, whisk together the flour, baking soda, and baking powder. Set this mixture aside.
- Mix the Wet Ingredients: In a large bowl, cream together the butter and sugar until smooth. Beat in the egg, vanilla extract, and almond extract (if using). Gradually blend in the dry ingredients, then add the milk and mix until the dough comes together.
- Chill the Dough: Divide the dough in half, wrap each half in plastic wrap, and refrigerate for at least 1 hour. This will make the dough easier to handle and roll out.
- Preheat the Oven: Preheat your oven to 375°F (190°C) and line baking sheets with parchment paper.
- Roll and Cut the Dough: On a lightly floured surface, roll out one portion of the dough to about 1/4 inch thickness. Use a gingerbread man cookie cutter or similar shape to cut out the mummy cookies. Place the cut-out cookies on the prepared baking sheets.
- Bake the Cookies: Bake in the preheated oven for 8 to 10 minutes, or until the edges are lightly golden. Remove from the oven and let the cookies cool on the baking sheets for 5 minutes before transferring them to a wire rack to cool completely.
- Decorate the Cookies: Once the cookies are completely cooled, use white icing to create mummy bandages across the cookies. Add candy eyes to complete the mummy look.
Extra Tips:
For the best results, make certain that your butter is softened before creaming with the sugar. This will help achieve a smooth and well-mixed dough.
If you don’t have a gingerbread man cutter, you can use any similar shape and adjust the mummy bandage decoration accordingly.
When applying the icing, a piping bag or a small plastic bag with a corner snipped off can be used for more precision.
If you prefer, homemade royal icing can be used instead of store-bought, offering a more customized consistency for your decorating needs.
Have fun with the process and encourage creativity while decorating your mummy cookies!