
Oh, I can hardly wait to share some spine-chilling fun with you as Halloween creeps closer!
Crafting a dessert table centerpiece that’s both spooky and scrumptious is such an exciting challenge, don’t you think?
From eerie eyeball towers to ghostly ghouls, the creative possibilities for Halloween cakes are endless.
If you’re as intrigued as I am about turning a simple cake into a frightful masterpiece, let’s explore ten spooky creations that promise to captivate and chill all your guests.
Get ready for some deliciously haunting inspiration!
Eerie Eyeball Tower
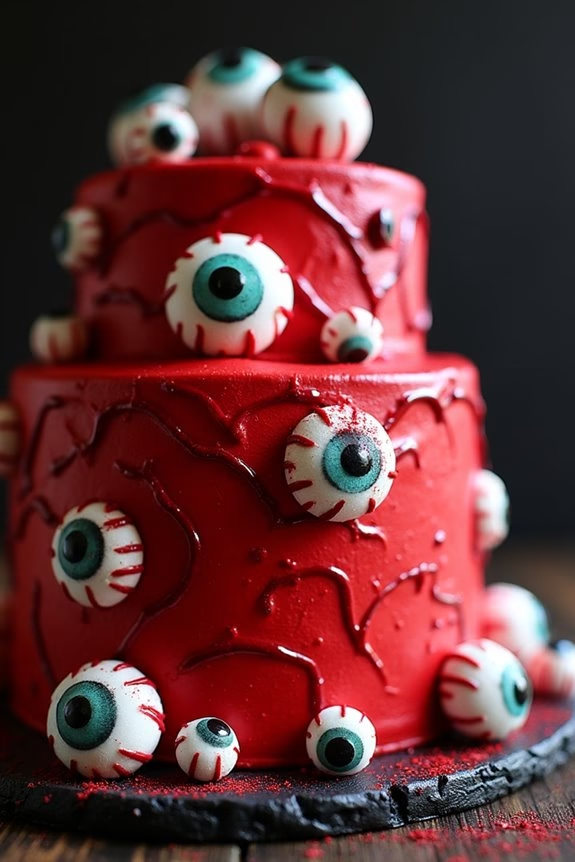
Create a spine-chilling centerpiece for your Halloween party with this Eerie Eyeball Tower cake. This whimsical and slightly spooky dessert is sure to make your guests’ eyes pop with delight. Using both creativity and baking skills, you’ll craft a delicious tower that not only tantalizes taste buds but also serves as a Halloween-themed showstopper. The juxtaposition of a sweet cake with the eerie appearance of bloodshot eyeballs will leave everyone both impressed and deliciously satisfied.
To achieve the perfect Eerie Eyeball Tower, you’ll need a combination of cake, frosting, fondant, and some edible decorations to mimic bloodshot eyes. The layers of cake form the tower, while the decorations add the thematic flair. This recipe includes instructions for baking and assembling a multi-layered tower and crafting realistic candy eyeballs, making it perfect for serving a small crowd of 4-6 people.
Ingredients (Serving Size: 4-6 people):
- 2 cups all-purpose flour
- 1 ½ cups granulated sugar
- 1 cup unsalted butter, softened
- 4 large eggs
- 1 cup whole milk
- 2 teaspoons vanilla extract
- 2 teaspoons baking powder
- ½ teaspoon salt
- 2 cups powdered sugar
- 3 tablespoons heavy cream
- 1 teaspoon red food coloring
- 1 package white fondant
- 1 package black fondant
- 1 package edible candy eyes
- ½ cup raspberry jam
Cooking Instructions:
- Prepare the Cake Batter: Preheat your oven to 350°F (175°C). In a large bowl, cream together the softened butter and granulated sugar until light and fluffy. Add the eggs one at a time, beating well after each addition. Mix in the vanilla extract. In a separate bowl, combine the flour, baking powder, and salt. Gradually add the dry mixture to the wet ingredients, alternating with the milk, until the batter is smooth.
- Bake the Cakes: Divide the batter evenly into two 8-inch round cake pans, greased and lined with parchment paper. Bake for 25-30 minutes or until a toothpick inserted into the center comes out clean. Allow the cakes to cool in the pans for 10 minutes before transferring them to a wire rack to cool completely.
- Prepare the Frosting: While the cakes cool, make the frosting by combining the powdered sugar, heavy cream, and red food coloring in a bowl. Beat until smooth and spreadable. Adjust the consistency with more cream if necessary.
- Assemble the Tower: Once the cakes are cool, cut each cake horizontally to create four layers. Place one layer on a serving plate and spread a thin layer of raspberry jam over it. Top with another cake layer and repeat until all layers are used.
- Frost the Cake: Cover the entire cake with a thin layer of red frosting to create a “crumb coat.” Chill the cake in the refrigerator for 15 minutes, then apply a final, thicker coat of frosting.
- Decorate with Eyeballs: Roll out the white fondant and cut out various sizes of circles to resemble eyeballs. Roll smaller pieces of black fondant for pupils and attach them to the white circles. Using edible candy eyes and fondant pieces, decorate the cake, creating a tower of eerie eyeballs.
- Add Bloodshot Effect: Using a toothpick, dip it into red food coloring and draw bloodshot lines radiating from the pupils on the fondant eyeballs for a realistic effect.
Extra Tips:
For a more stable tower, insert a few wooden dowels through the cake layers. This will prevent the tower from toppling over as you slice and serve. Make sure your fondant is rolled evenly to avoid cracking, and use a small amount of cornstarch to prevent sticking. Customize the fondant colors for different eye effects or add edible glitter for a magical touch. Store any leftovers in an airtight container to keep the cake fresh.
Gruesome Graveyard Cake
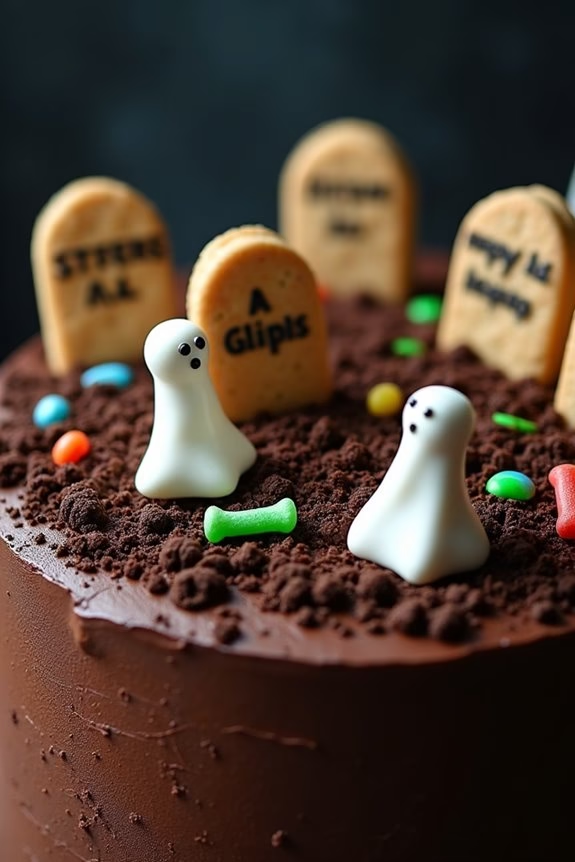
Halloween is the perfect time to let your culinary creativity run wild, and what better way to do so than by crafting a Gruesome Graveyard Cake? This spine-chilling dessert is designed to both delight and dread with its eerie aesthetic, making it a show-stopping centerpiece for any Halloween gathering. Perfect for those who love a combination of fun and fright, this cake combines rich chocolate flavors with spooky decorations to leave your guests both satisfied and spooked.
Creating a Gruesome Graveyard Cake involves layering moist chocolate cake with a decadent frosting, and then adorning it with edible graveyard decorations such as tombstones, bones, and ghosts. With a serving size for 4-6 people, this recipe is perfect for a small party or family gathering. Not only is this cake visually appealing, but it also offers a delicious treat that will have everyone reaching for a second slice. Ready to get started on this macabre masterpiece? Gather your ingredients and follow the steps below.
Ingredients for Gruesome Graveyard Cake (serving size: 4-6 people)
- 1 cup all-purpose flour
- 1 cup granulated sugar
- 1/2 cup unsweetened cocoa powder
- 1 teaspoon baking powder
- 1/2 teaspoon baking soda
- 1/4 teaspoon salt
- 1/2 cup milk
- 1/4 cup vegetable oil
- 1 egg
- 1 teaspoon vanilla extract
- 1/2 cup boiling water
- 1 cup chocolate frosting
- 6-8 chocolate sandwich cookies
- 8-10 oval-shaped cookies or biscuits
- Black food coloring
- White fondant or marshmallow ghosts
- Candy bones or gummy worms
- Edible green gel or icing
Cooking Instructions
- Preheat Oven: Start by preheating your oven to 350°F (175°C). Grease and flour an 8-inch round cake pan to prevent sticking.
- Mix Dry Ingredients: In a large mixing bowl, combine the flour, sugar, cocoa powder, baking powder, baking soda, and salt. Whisk until well blended.
- Combine Wet Ingredients: In a separate bowl, mix together the milk, vegetable oil, egg, and vanilla extract. Pour this mixture into the bowl of dry ingredients and stir until just combined.
- Add Boiling Water: Slowly add the boiling water to the batter, stirring continuously. The batter will be quite thin, which is normal.
- Bake the Cake: Pour the batter into the prepared cake pan. Bake in the preheated oven for 30-35 minutes, or until a toothpick inserted into the center comes out clean. Allow the cake to cool completely on a wire rack.
- Prepare the Graveyard Toppings: Crush the chocolate sandwich cookies in a zip-lock bag to create “dirt” for the graveyard. Set aside.
- Frost the Cake: Once the cake is completely cool, spread the chocolate frosting evenly over the top and sides.
- Assemble the Graveyard: Sprinkle the crushed cookies on top of the frosted cake to mimic dirt. Insert the oval-shaped cookies vertically into the cake to resemble gravestones. Use black food coloring to write spooky messages on the gravestones.
- Decorate with Edible Elements: Place the fondant or marshmallow ghosts on the cake. Add candy bones or gummy worms around the graveyard for an extra creepy touch. Use edible green gel or icing to create grass patches.
Extra Tips
For an even spookier effect, consider adding a few drops of green food coloring to some of the frosting, and use it to create a mossy effect around the gravestones.
If you don’t have fondant, marshmallows can be easily shaped into ghost figures with a bit of creativity.
Also, to save time, you can use a store-bought chocolate cake mix instead of making it from scratch.
Haunted House Cake
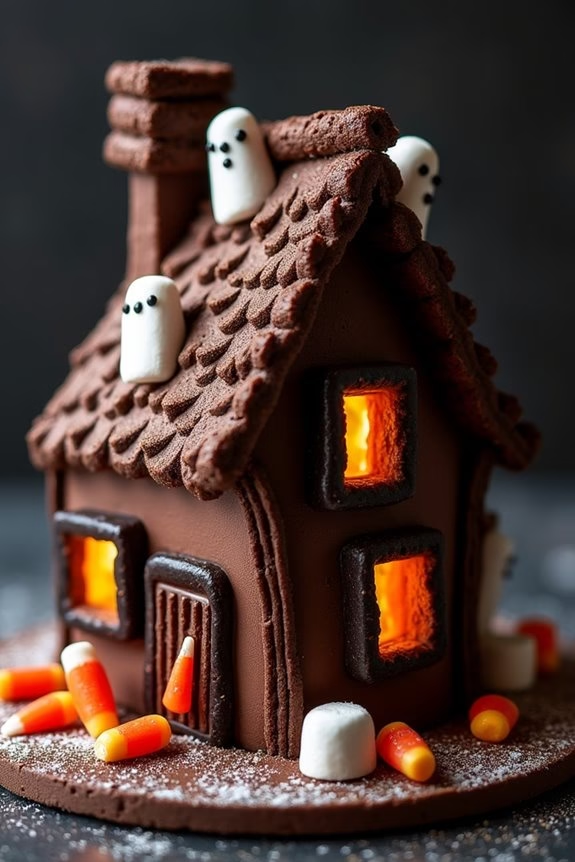
Get ready to amaze your Halloween party guests with a spooktacular Haunted House Cake! This deliciously eerie dessert isn’t only a treat for the taste buds but also a feast for the eyes. A fun project for both kids and adults, this cake combines a rich chocolate base with a hauntingly good selection of decorations.
Whether you’re an experienced baker or just getting started, this recipe is sure to be a hit at your next Halloween celebration.
The Haunted House Cake features a moist and flavorful chocolate cake, layered with a creamy frosting and adorned with a variety of spooky decorations like candy corn, chocolate cookies, and gummy ghosts. Perfect for a serving size of 4-6 people, this recipe allows you to release your creativity to build your haunted house with edible elements that capture the essence of Halloween in every bite.
Let’s plunge into the ingredients and steps needed to create this spooktacular cake!
Ingredients for 4-6 people:
- 1 1/2 cups all-purpose flour
- 1 cup granulated sugar
- 1/2 cup unsweetened cocoa powder
- 1 teaspoon baking soda
- 1/2 teaspoon baking powder
- 1/2 teaspoon salt
- 1 cup buttermilk
- 1/2 cup vegetable oil
- 2 large eggs
- 1 teaspoon vanilla extract
- 1 cup boiling water
- 1 1/2 cups chocolate frosting
- Chocolate wafer cookies (for the roof and accents)
- Candy corn
- Gummy ghosts or other Halloween-themed gummies
- Edible black and orange gel icing
- Mini marshmallows
- Chocolate chips
Cooking Instructions:
- Preheat the Oven: Start by preheating your oven to 350°F (175°C) and prepare a 9×13 inch baking pan by greasing it lightly or lining it with parchment paper.
- Mix the Dry Ingredients: In a large bowl, sift together the flour, sugar, cocoa powder, baking soda, baking powder, and salt. Confirm there are no lumps for a smooth batter.
- Combine Wet Ingredients: In another bowl, whisk together the buttermilk, vegetable oil, eggs, and vanilla extract until well combined.
- Create the Batter: Gradually add the wet ingredients into the dry ingredients, mixing until just combined. Then, carefully stir in the boiling water until the batter is smooth and well mixed.
- Bake the Cake: Pour the batter into the prepared pan and bake for 30-35 minutes, or until a toothpick inserted into the center comes out clean. Allow the cake to cool completely on a wire rack.
- Frost the Cake: Once the cake is cooled, spread a generous layer of chocolate frosting over the top and sides of the cake.
- Construct the Haunted House: Use chocolate wafer cookies to create the roof and other structural elements of the haunted house. Secure them with frosting.
- Decorate: Add candy corn, gummy ghosts, and mini marshmallows around the cake to create a spooky landscape. Use edible gel icing to draw windows, doors, and other haunted house features. Scatter chocolate chips for added texture and decoration.
Extra Tips:
For a truly haunting effect, consider adding a few drops of black food coloring to the frosting to create a darker, more mysterious finish.
If you find the cake structure challenging, use toothpicks or skewers to help stabilize the cookies until the frosting sets.
Feel free to get creative with the decoration; melted white chocolate can be used to add ghostly drips, while edible glitter can enhance the magical, eerie atmosphere of your cake.
Enjoy crafting your Haunted House Cake, and have a monstrously delightful Halloween!
Creepy Cauldron Cake

Halloween is a time for eerie decorations, spooky costumes, and delightfully frightening treats. This Creepy Cauldron Cake is the perfect addition to your Halloween festivities, combining the fun of a witch’s brew with the sweetness of a delicious cake.
With its bubbling green frosting and candy “eyeballs,” this cake is sure to be a hit at your Halloween party. Whether you’re hosting a gathering for kids or adults, this cake will be a showstopper that captivates both eyes and taste buds.
The Creepy Cauldron Cake is a visual and culinary masterpiece that looks like a bubbling pot of potion. The chocolate cake base provides a rich, decadent flavor, while the green frosting gives the appearance of a mystical brew.
Topped with candy eyes, gummy worms, and other spooky embellishments, this cake is as fun to make as it’s to eat. The recipe below serves 4-6 people, perfect for a small group of ghoulish guests.
Ingredients:
- 2 cups all-purpose flour
- 1 ¾ cups granulated sugar
- ¾ cup unsweetened cocoa powder
- 1 ½ teaspoons baking powder
- 1 ½ teaspoons baking soda
- 1 teaspoon salt
- 2 eggs
- 1 cup whole milk
- ½ cup vegetable oil
- 2 teaspoons vanilla extract
- 1 cup boiling water
- 3 cups green frosting
- Assorted edible eyes
- Gummy worms
- Black licorice strips
Instructions:
- Preheat and Prepare Pans: Preheat your oven to 350°F (175°C). Grease and flour two 9-inch round cake pans to prevent the cake from sticking.
- Mix Dry Ingredients: In a large mixing bowl, whisk together the flour, sugar, cocoa powder, baking powder, baking soda, and salt until thoroughly combined.
- Combine Wet Ingredients: Add the eggs, milk, vegetable oil, and vanilla extract to the dry ingredients. Beat on medium speed for 2 minutes until the batter is smooth and well blended.
- Add Boiling Water: Carefully stir in the boiling water until fully incorporated. The batter will be thin, but this is normal and will result in a moist cake.
- Bake the Cakes: Divide the batter evenly between the prepared cake pans. Bake for 30-35 minutes, or until a toothpick inserted into the center comes out clean. Allow the cakes to cool in the pans for 10 minutes, then remove from pans and transfer to a wire rack to cool completely.
- Frost the Cake: Once the cakes are completely cooled, spread a layer of green frosting on top of one cake layer. Place the second cake layer on top, and frost the entire cake with the remaining green frosting.
- Decorate: Arrange the edible eyes, gummy worms, and black licorice strips on the cake to resemble a bubbling cauldron. Be creative with your decorations to enhance the eerie effect.
Extra Tips:
When preparing the cake, make sure all ingredients are at room temperature for easier mixing. If you want the cake to be even more stable for stacking and decorating, consider chilling the cake layers in the refrigerator for about 30 minutes before frosting.
For an extra touch of realism, you could add a few drops of green food coloring to the frosting to achieve the perfect shade of cauldron green. Remember, the fun is in the decoration, so feel free to experiment with different candies and designs to make your Creepy Cauldron Cake truly unique!
Spine-Chilling Spider Cake
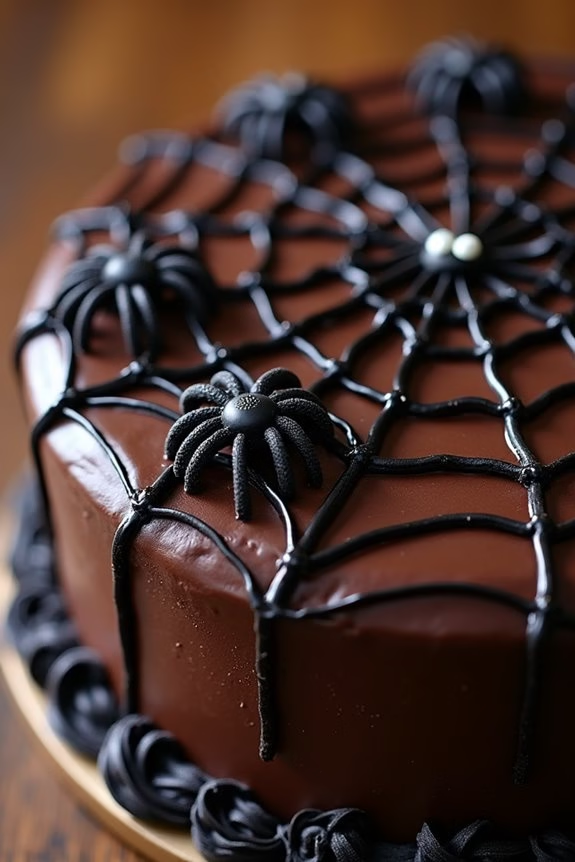
The Spine-Chilling Spider Cake is the perfect treat to add a touch of spooky delight to your Halloween festivities. This cake combines a rich, chocolatey base with a terrifyingly fun spider web design that will leave your guests both impressed and slightly spooked. The combination of decadent flavors and creative decoration makes this cake a standout centerpiece for any Halloween party, guaranteeing it’s not just a feast for the taste buds but also for the eyes.
This recipe is designed to serve 4-6 people, making it ideal for a small gathering or family celebration. The cake itself is moist and flavorful, with a smooth frosting that sets the stage for the intricate spider web design. Using simple ingredients and easy-to-follow steps, this cake isn’t only delicious but also a fun project to involve kids or friends in the baking process. With a few basic tools and a bit of creativity, you’ll have a marvelous Halloween treat ready in no time.
Ingredients
- 1 ½ cups all-purpose flour
- 1 cup granulated sugar
- ½ cup unsweetened cocoa powder
- 1 teaspoon baking soda
- ½ teaspoon baking powder
- ½ teaspoon salt
- 1 cup buttermilk
- ½ cup vegetable oil
- 2 large eggs
- 1 teaspoon vanilla extract
- 1 cup boiling water
- 1 cup heavy cream
- 8 oz semi-sweet chocolate chips
- Black food coloring gel
- 4-5 black licorice sticks
- Candy eyes or small white candies for decoration
Instructions
- Prepare the Oven and Cake Pans: Preheat your oven to 350°F (175°C). Grease and flour two 9-inch round cake pans to guarantee the cake doesn’t stick.
- Mix the Dry Ingredients: In a large mixing bowl, whisk together the flour, sugar, cocoa powder, baking soda, baking powder, and salt until well combined.
- Combine Wet Ingredients: In another bowl, mix the buttermilk, vegetable oil, eggs, and vanilla extract. Gradually add the boiling water, stirring continuously until the mixture is smooth.
- Create the Batter: Slowly add the wet ingredients to the dry ingredients, mixing until just combined. Be careful not to overmix to keep the cake tender.
- Bake the Cakes: Divide the batter evenly between the prepared cake pans. Bake in the preheated oven for 30-35 minutes or until a toothpick inserted into the center comes out clean. Allow the cakes to cool completely on a wire rack.
- Prepare the Ganache Frosting: Heat the heavy cream in a small saucepan until it begins to simmer. Remove from heat and pour over the chocolate chips. Let sit for a minute before stirring until smooth. Allow the ganache to cool slightly before use.
- Assemble the Cake: Place one cake layer on a serving plate. Spread a layer of ganache over it and then place the second cake layer on top. Cover the entire cake with the remaining ganache.
- Decorate with a Spider Web: For the web design, use a small amount of ganache mixed with black food coloring gel. Use a piping bag with a small round tip to draw concentric circles on the cake’s surface. Use a toothpick to drag lines from the center to the edge to create a web effect.
- Add the Spiders: Cut the black licorice into small pieces to create spider legs and use candy eyes or small white candies to complete the spiders. Arrange them on the cake for a spine-chilling effect.
Extra Tips
When making the ganache, make certain the cream is just simmering and not boiling to prevent the chocolate from seizing. If your ganache becomes too thick as it cools, gently reheat it over a double boiler until it reaches a spreadable consistency.
For an added spooky touch, you can tint some of the ganache with dark purple or green food coloring to add more depth to your design. Remember to allow the cake to cool completely before frosting to avoid melting the ganache. Enjoy your deliciously eerie Spine-Chilling Spider Cake!
Wicked Witch’s Hat Cake

The Wicked Witch’s Hat Cake is a delightful and spooky treat perfect for any Halloween celebration. This cake combines the whimsy of Halloween with the rich flavors of chocolate and vanilla. Shaped like a witch’s hat, it adds a magical touch to your dessert table. The cake not only looks impressive but also tastes divine, with layers of moist cake and creamy frosting. It’s a showstopper that will surely captivate all your guests, young and old alike.
To create this enchanting cake, you’ll start by baking a chocolate cake for the base of the hat and a cone-shaped cake for the tip. The cakes are then stacked and covered in a rich, dark chocolate frosting to mimic the texture and color of a witch’s hat. You can add decorative touches such as edible glitter, colored icing, or candy to make it even more spellbinding.
Here’s how you can make a Wicked Witch’s Hat Cake for 4-6 people:
Ingredients:
- 2 ½ cups all-purpose flour
- 1 ¾ cups granulated sugar
- ¾ cup unsweetened cocoa powder
- 1 ½ teaspoons baking soda
- 1 teaspoon baking powder
- 1 teaspoon salt
- 2 large eggs
- 1 cup whole milk
- ½ cup vegetable oil
- 2 teaspoons vanilla extract
- 1 cup boiling water
- 1 batch of chocolate frosting (store-bought or homemade)
- Black food coloring (optional)
- Edible glitter or colored icing (for decoration)
Instructions:
- Prepare the Cake Batter: Preheat your oven to 350°F (175°C). In a large mixing bowl, combine the flour, sugar, cocoa powder, baking soda, baking powder, and salt. Mix well. Add the eggs, milk, vegetable oil, and vanilla extract. Beat on medium speed until the batter is smooth. Gradually stir in the boiling water until fully combined. The batter will be thin.
- Bake the Cakes: Grease and flour one round cake pan (10-inch) and one oven-safe cone-shaped bowl or pan (metal or glass). Pour the batter into the prepared pans, filling them about halfway. Bake in the preheated oven for 30-35 minutes or until a toothpick inserted in the centers comes out clean. Cool the cakes in the pans for about 10 minutes, then transfer them to a wire rack to cool completely.
- Assemble the Hat: Once the cakes have cooled, place the round cake on a serving platter or cake board to form the brim of the hat. Carefully trim the top of the cone-shaped cake to make it level. Place it on top of the round cake to form the point of the hat.
- Frost the Cake: In a large bowl, prepare your chocolate frosting. If desired, add black food coloring to achieve the desired shade. Spread a thin layer of frosting over the entire cake to create a crumb coat. Chill the cake for 15-20 minutes to set the frosting. Apply a second, thicker layer of frosting, smoothing it with an offset spatula to create a sleek, hat-like finish.
- Decorate the Hat: Add the finishing touches by sprinkling edible glitter over the hat or piping colored icing around the base for extra flair. You can also add chocolate candies or other embellishments to enhance the witch theme.
Extra Tips:
When creating the Wicked Witch’s Hat Cake, verify your frosting is at room temperature for easier spreading. If you’re using black food coloring, remember that a little goes a long way; start with a small amount and gradually add more until you achieve the desired color.
If you don’t have a cone-shaped pan, craft a cone from sturdy cardboard, cover it with foil, and bake the cake batter in it. This cake can be made a day in advance; just store it in the refrigerator and let it sit at room temperature for about 30 minutes before serving to allow the frosting to soften slightly.
Enjoy your magical Halloween creation!
Terrifying Tombstone Cake
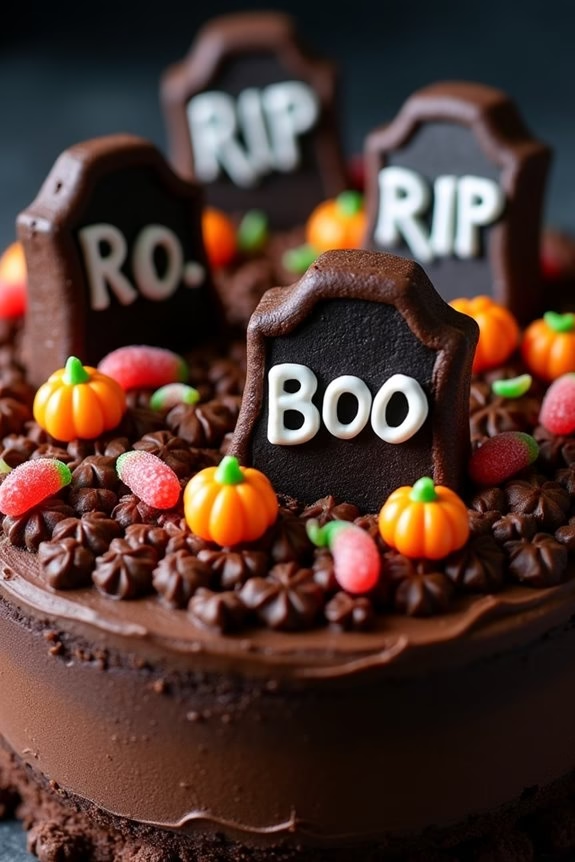
Terrifying Tombstone Cake is a spine-chillingly delightful dessert perfect for Halloween festivities. This cake is designed to look like a graveyard scene, complete with tombstones and eerie embellishments. The cake itself is rich and chocolatey, offering a delicious contrast to its spooky exterior.
It’s an ideal centerpiece for any Halloween party, sure to impress and thrill your guests with its creative and haunting presentation.
This recipe provides a detailed guide on crafting a Terrifying Tombstone Cake for 4-6 people. You’ll create a luscious chocolate cake base, covered in dark frosting to resemble the soil. Then, you’ll use cookies and candies to fashion the tombstones and other ghoulish decorations.
Whether you’re an experienced baker or a novice, this recipe will walk you through each step to guarantee your cake is both delicious and visually striking.
Ingredients:
- 1 1/2 cups all-purpose flour
- 1 cup granulated sugar
- 1/2 cup unsweetened cocoa powder
- 1 teaspoon baking soda
- 1/2 teaspoon salt
- 1 cup buttermilk
- 1/2 cup vegetable oil
- 2 large eggs
- 1 teaspoon vanilla extract
- 1 cup boiling water
- 1/2 cup chocolate chips (optional)
- 1 can (16 ounces) chocolate frosting
- 6 rectangular chocolate cookies (e.g., Milano or similar)
- White icing pen or tube
- Assorted Halloween candies (e.g., gummy worms, candy pumpkins)
Instructions:
- Preheat and Prepare: Preheat your oven to 350°F (175°C). Grease and flour a 9×13 inch baking pan.
- Mix Dry Ingredients: In a large bowl, combine the flour, sugar, cocoa powder, baking soda, and salt. Whisk together until well mixed.
- Add Wet Ingredients: Add the buttermilk, vegetable oil, eggs, and vanilla extract to the dry ingredients. Beat with an electric mixer on medium speed until smooth and well combined.
- Incorporate Boiling Water: Gradually stir in the boiling water until the batter is smooth. The batter will be thin, but this is normal. If desired, fold in the chocolate chips at this stage.
- Bake the Cake: Pour the batter into the prepared baking pan. Bake in the preheated oven for 30-35 minutes, or until a toothpick inserted into the center comes out clean. Allow the cake to cool completely in the pan on a wire rack.
- Frost the Cake: Once the cake is cool, spread the chocolate frosting evenly over the top and sides of the cake, smoothing it out to resemble the surface of a graveyard.
- Create Tombstones: Using the white icing pen, write spooky inscriptions such as “RIP” or “BOO” on the chocolate cookies to resemble tombstones. Allow the icing to set for a few minutes.
- Assemble the Graveyard: Insert the decorated cookies vertically into the cake to form tombstones. Scatter Halloween candies around the tombstones to add to the eerie effect.
- Final Touches: Add any additional decorations as desired, such as edible glitter for a magical touch or plastic spiders for extra creepiness.
Extra Tips:
For a more textured soil effect, you can crumble additional chocolate cookies or chocolate graham crackers and sprinkle them over the frosted cake.
If you don’t have buttermilk, you can substitute it with a mixture of regular milk and a tablespoon of vinegar or lemon juice.
When writing on the cookies, practice on a piece of parchment paper first to guarantee your lettering is neat.
Finally, verify the cake is fully cooled before decorating to prevent the frosting from melting.
Bloodcurdling Brain Cake
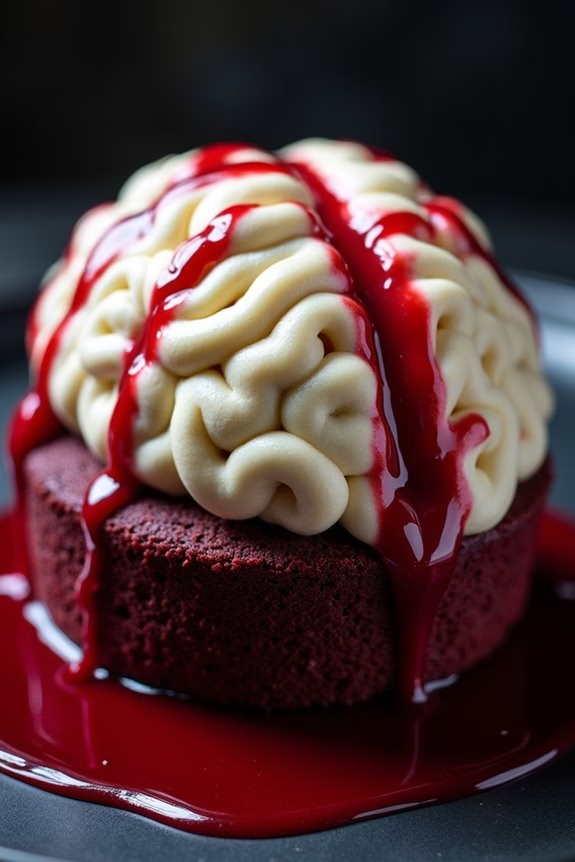
Creating a Bloodcurdling Brain Cake is a perfect way to add an eerie yet delightful centerpiece to your Halloween celebration. This cake features a realistic brain shape with a gooey raspberry sauce that resembles blood, making it both delicious and visually striking.
While it may look complex, this recipe is straightforward, allowing you to create a spooktacular dessert that will impress your guests.
With a combination of red velvet cake, buttercream frosting, and raspberry sauce, this cake not only looks gory but tastes heavenly as well. The red velvet cake provides the perfect base with its rich cocoa flavor and vibrant color, while the buttercream frosting helps to sculpt the brain shape.
The raspberry sauce adds a tangy sweetness and an extra level of horror. Let’s plunge into this creepy culinary adventure!
Ingredients (serving size: 4-6 people):
- 2 cups all-purpose flour
- 1 ½ cups granulated sugar
- 1 teaspoon baking soda
- 1 teaspoon salt
- 1 teaspoon cocoa powder
- 1 ½ cups vegetable oil
- 1 cup buttermilk, room temperature
- 2 large eggs, room temperature
- 2 tablespoons red food coloring
- 1 teaspoon white distilled vinegar
- 1 teaspoon vanilla extract
Mummified Monster Cake
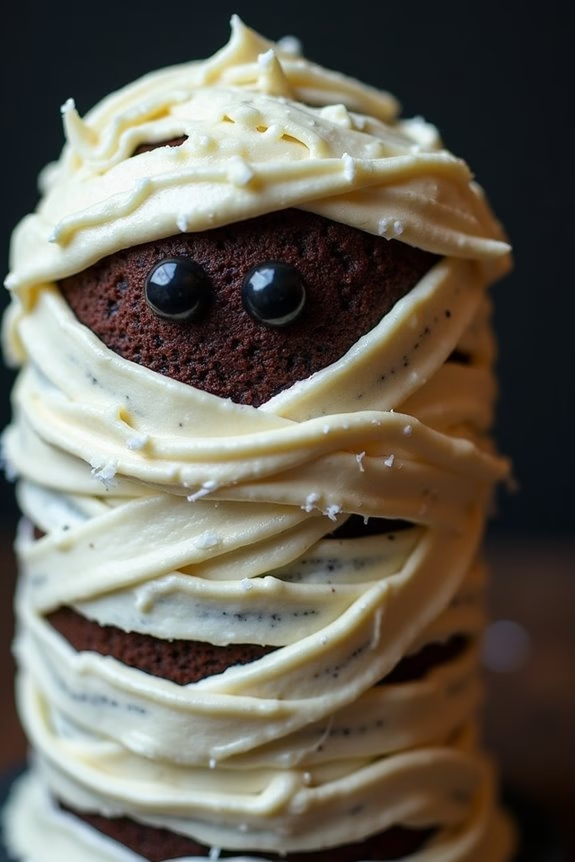
Release your inner pastry artist this Halloween with a spook-tacular Mummified Monster Cake that will leave your guests in awe! This cake isn’t only a sweet treat but also a delightful centerpiece, perfect for any Halloween party. The Mummified Monster Cake combines layers of moist chocolate cake with a rich buttercream frosting, all wrapped up in eerie fondant bandages to create a deliciously spooky effect.
It’s a fun and creative way to celebrate the holiday, and best of all, it’s designed to serve 4-6 people, making it perfect for small gatherings or family events.
This Mummified Monster Cake is made with simple ingredients, yet it looks impressively intricate. The chocolate cake layers provide a deep, rich flavor, while the buttercream adds creaminess and sweetness. The fondant bandages not only give the cake its mummified look but also offer a chewy texture contrast. It’s a multi-sensory experience that’s sure to please every monster at your table.
Whether you’re a seasoned baker or a beginner, this recipe will guide you through creating a frightfully fantastic cake that’s both fun to make and delicious to eat.
Ingredients (serves 4-6):
- 1 cup all-purpose flour
- 1 cup granulated sugar
- 1/2 cup unsweetened cocoa powder
- 1 teaspoon baking powder
- 1/2 teaspoon baking soda
- 1/4 teaspoon salt
- 1/2 cup vegetable oil
- 1/2 cup buttermilk
- 2 large eggs
- 1 teaspoon vanilla extract
- 1 cup boiling water
- 1 cup unsalted butter, softened (for frosting)
- 4 cups powdered sugar (for frosting)
- 2 teaspoons vanilla extract (for frosting)
- 2-4 tablespoons milk (for frosting)
- White fondant
- Edible black gel or candy eyes
Cooking Instructions:
- Preheat and Prepare Cake Pans: Preheat your oven to 350°F (175°C). Grease and line two 8-inch round cake pans with parchment paper.
- Mix Dry Ingredients: In a large bowl, whisk together the flour, sugar, cocoa powder, baking powder, baking soda, and salt until well combined.
- Combine Wet Ingredients: In another bowl, mix the vegetable oil, buttermilk, eggs, and vanilla extract until smooth. Gradually add the boiling water while continuing to stir.
- Combine Mixtures: Slowly add the wet ingredients to the dry ingredients, mixing until just combined and smooth. Be careful not to overmix.
- Bake the Cakes: Divide the batter evenly between the prepared cake pans. Bake for 30-35 minutes or until a toothpick inserted into the center comes out clean. Allow the cakes to cool in the pans for 10 minutes, then transfer them to a wire rack to cool completely.
- Prepare Buttercream Frosting: In a mixing bowl, beat the softened butter until creamy. Gradually add the powdered sugar, vanilla extract, and milk, beating until the frosting is smooth and fluffy.
- Assemble the Cake: Place one cake layer on a serving plate and spread a generous amount of frosting on top. Place the second cake layer on top and cover the entire cake with a thin layer of frosting to create a crumb coat. Refrigerate for 15 minutes to set.
- Decorate with Fondant: Roll out the white fondant and cut it into thin strips to create bandages. Wrap the strips around the cake, leaving some spaces in between to reveal the frosting beneath. Place edible eyes or candy eyes on the cake to give it a mummified monster appearance.
- Final Touches: Once decorated, refrigerate the cake for at least 30 minutes before serving to allow the fondant to set.
Extra Tips:
When working with fondant, it’s important to keep it covered with plastic wrap or a damp cloth to prevent it from drying out while you work.
If you’re new to fondant, practice rolling and cutting on a small piece first to get the hang of it. To make the cake extra spooky, consider using a bit of food coloring gel to add shading to the fondant bandages for a more realistic mummified look.
Finally, if you want to add more flavors, consider incorporating a layer of jam or a flavored filling between the cake layers for an unexpected twist!
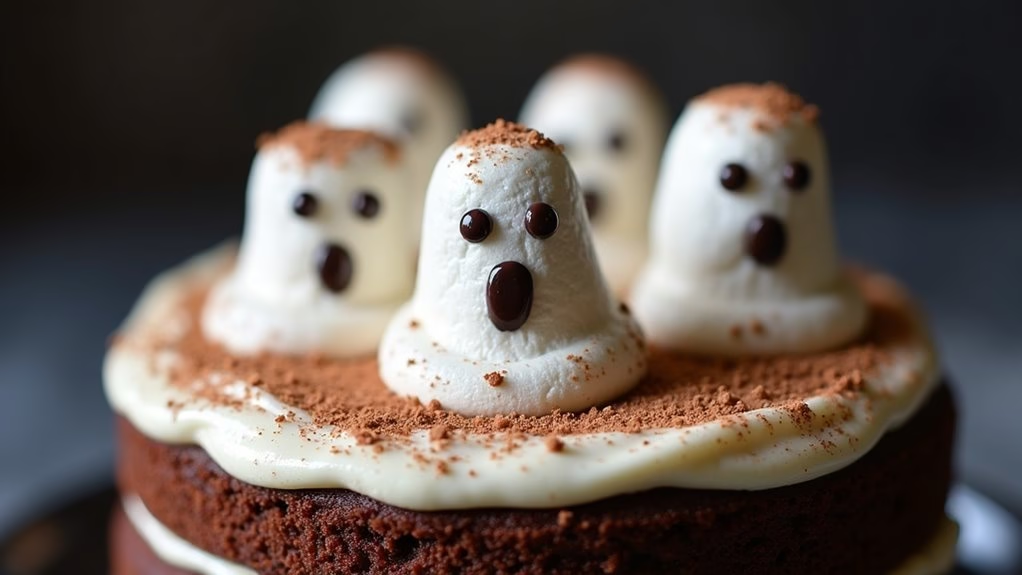
Ghostly Ghoul Cake

Halloween is the perfect time to get creative in the kitchen, and what better way to celebrate than with a delightfully spooky Ghostly Ghoul Cake? This cake isn’t only visually enchanting with its eerie decorations but also deliciously satisfying with rich flavors that will please any crowd.
The Ghostly Ghoul Cake combines a moist chocolate base with a hauntingly delicious vanilla frosting, and it’s topped with ghostly figures made from marshmallows and chocolate chips. It’s an ideal centerpiece for any Halloween gathering, sure to charm both kids and adults alike.
The Ghostly Ghoul Cake is designed to serve 4-6 people, making it perfect for a small get-together or family celebration. Whether you’re a baking novice or an experienced chef, this recipe is accessible and allows for creative freedom with the decorations. You can personalize your ghoul figures to be as terrifying or as cute as you like, making certain your cake is the talk of the party.
Let’s plunge into the ingredients and steps needed to craft this bewitching dessert.
Ingredients:
- 1 1/2 cups all-purpose flour
- 1 cup granulated sugar
- 1/2 cup unsweetened cocoa powder
- 1 teaspoon baking soda
- 1/2 teaspoon salt
- 1 cup buttermilk
- 1/2 cup vegetable oil
- 2 large eggs
- 1 teaspoon vanilla extract
- 1 cup boiling water
- 1 cup unsalted butter, softened
- 4 cups powdered sugar
- 1 tablespoon vanilla extract
- 2-3 tablespoons milk
- 12 large marshmallows
- 24 mini chocolate chips
Instructions:
- Preheat the Oven: Start by preheating your oven to 350°F (175°C). Grease and flour two 8-inch round cake pans to guarantee easy removal after baking.
- Prepare the Cake Batter: In a large mixing bowl, combine the flour, sugar, cocoa powder, baking soda, and salt. Mix well to confirm there are no lumps. Add the buttermilk, vegetable oil, eggs, and vanilla extract to the dry ingredients. Beat on medium speed until fully combined. Gradually stir in the boiling water until the batter is smooth and thin.
- Bake the Cake: Divide the batter evenly between the prepared cake pans. Place in the preheated oven and bake for 30-35 minutes or until a toothpick inserted into the center comes out clean. Allow the cakes to cool in the pans for 10 minutes before transferring them to a wire rack to cool completely.
- Make the Frosting: In a large bowl, beat the softened butter until creamy. Gradually add the powdered sugar, one cup at a time, blending well after each addition. Stir in the vanilla extract and enough milk to achieve a smooth, spreadable consistency.
- Assemble the Cake: Place one cake layer on a serving plate. Spread a generous layer of frosting on top, then place the second cake layer on top of the frosted one. Frost the top and sides of the cake with the remaining frosting.
- Create the Ghostly Figures: For the ghost decorations, take the marshmallows and use mini chocolate chips to create eyes and a mouth on each. Place the marshmallow ghosts around the cake, pressing them gently into the frosting to secure them.
- Finishing Touches: You can sprinkle some cocoa powder or edible glitter on top to add an extra spooky effect. Your Ghostly Ghoul Cake is now ready to delight your guests!
Extra Tips:
When making the Ghostly Ghoul Cake, make sure that your cake layers are completely cooled before applying the frosting to prevent it from melting. If you’re short on time, you can prepare the cake layers a day in advance and store them in the refrigerator.
For an added spooky touch, consider using black or orange food coloring in the frosting to enhance the Halloween theme. Additionally, if you don’t have buttermilk, you can make a quick substitute by adding a tablespoon of white vinegar or lemon juice to a cup of milk and letting it sit for 5 minutes.
Adjust the ghost decorations to your liking, adding more or fewer marshmallows depending on your taste and the size of your cake. Enjoy crafting your delicious Halloween masterpiece!