

As Halloween approaches, I’m always on the lookout for ways to add a festive touch to our dinners. Think of transforming your kitchen into a hub of culinary creativity with Mummy Hot Dogs or Spooky Spider Tacos. These playful meals are about more than just eating. They’re about creating an experience that delights kids and brings the family together. Curious about turning dinner time into a Halloween adventure? Let’s explore some bewitchingly fun ideas!
Mummy Hot Dogs

Mummy Hot Dogs aren’t only easy to prepare, but they also offer a great opportunity for kids to get involved in the kitchen. The process of wrapping the hot dogs in dough is perfect for little hands, making it a fun family activity.
Whether served as an appetizer or a main course, these mummified munchies are sure to be a hit. Let’s get started on creating this spooky dish for a serving size of 4-6 people.
Ingredients for Mummy Hot Dogs****:
- 8 hot dogs
- 1 can of refrigerated crescent roll dough (or puff pastry)
- 1 egg, beaten
- Mustard or ketchup for decoration
Cooking Instructions:
1. Preheat the Oven: Set your oven to 375°F (190°C). This will guarantee that it reaches the perfect temperature by the time you’re ready to bake your Mummy Hot Dogs.
2. Prepare the Dough: Open the can of crescent roll dough and unroll it onto a clean surface. If using puff pastry, roll it out to a thin sheet. Use a pizza cutter or sharp knife to slice the dough into thin strips, about 1/4 inch wide.
3. Wrap the Hot Dogs: Take one hot dog and begin wrapping it with the dough strips, leaving a small gap at the top for the “face.” Overlap and crisscross the strips to create a mummy-like appearance.
Repeat this process with all the hot dogs.
4. Add the Beaten Egg****: Place the wrapped hot dogs on a baking sheet lined with parchment paper. Brush each mummy with the beaten egg to give them a golden, crispy finish.
5. Bake the Mummies: Put the baking sheet in the preheated oven and bake for 15-20 minutes, or until the dough is golden brown and cooked through.
6. Decorate the Mummies: Once baked, remove from the oven and let cool for a few minutes. Use mustard or ketchup to dot small eyes on each mummy for a fun, spooky look.
Extra Tips: For a cheesy twist, you can add a slice of cheese around each hot dog before wrapping it in dough.
If you’re looking to make these a bit healthier, consider using turkey or chicken hot dogs. For a gluten-free version, substitute crescent roll dough with gluten-free pastry dough.
Witch’s Fingers Breadsticks

Transform your Halloween dinner table into a spooky spectacle with these Witch’s Fingers Breadsticks. Perfectly eerie yet delicious, these breadsticks are shaped into creepy witch fingers, complete with almond fingernails and a hint of green food coloring to give them an extra ghastly look. Kids will love the fun, hands-on experience of shaping the dough and decorating their own witch fingers, making it an ideal Halloween activity to enjoy together as a family.
These Witch’s Fingers Breadsticks aren’t only visually striking but also delightfully tasty. The recipe uses store-bought pizza dough for convenience, guaranteeing that you spend less time prepping and more time enjoying the festivities. A touch of garlic powder and grated Parmesan cheese adds a savory depth of flavor that perfectly complements the spooky theme. Serve these breadsticks with marinara sauce for dipping, and watch your little ghouls and goblins devour them with glee.
Ingredients (Serves 4-6):
- 1 pound store-bought pizza dough
- 1 tablespoon olive oil
- 1 teaspoon garlic powder
- 1/4 cup grated Parmesan cheese
- 1/2 teaspoon salt
- 1/4 teaspoon green food coloring
- 24 whole blanched almonds
- 1 cup marinara sauce (for dipping)
Cooking Instructions:
- Preheat the Oven: Start by preheating your oven to 375°F (190°C). Line a baking sheet with parchment paper to prevent the breadsticks from sticking.
- Prepare the Dough: Lightly flour a clean surface and roll out the pizza dough into a large rectangle, approximately 1/4-inch thick. Use a knife or a pizza cutter to slice the dough into thin strips, about 4 inches long and 1/2 inch wide.
- Shape the Fingers: Take each strip and gently roll it between your hands to form a finger-like shape. Pinch one end slightly to form the tip of the finger and flatten the other end just a bit. Press an almond into the pinched end to resemble a fingernail.
- Add Color and Flavor: In a small bowl, mix the olive oil with a few drops of green food coloring. Use a pastry brush to lightly brush the colored oil over each breadstick. Sprinkle the garlic powder, grated Parmesan cheese, and salt evenly over the breadsticks for added flavor.
- Bake the Breadsticks: Carefully transfer the breadsticks to the prepared baking sheet. Bake in the preheated oven for 15-20 minutes or until they turn a light golden brown. Keep an eye on them to ascertain they don’t over-bake.
- Serve: Remove the breadsticks from the oven and let them cool slightly on a wire rack. Serve warm with a side of marinara sauce for dipping.
Extra Tips: For an extra creepy look, use a small knife to make knuckle lines on each breadstick before baking. If you want to make the breadsticks ahead of time, you can shape and assemble them, then refrigerate until you’re ready to bake. Just add a few extra minutes to the baking time if they go into the oven cold. Also, feel free to experiment with different dipping sauces like ranch or cheese dip to suit your family’s preferences.
Monster Mac and Cheese
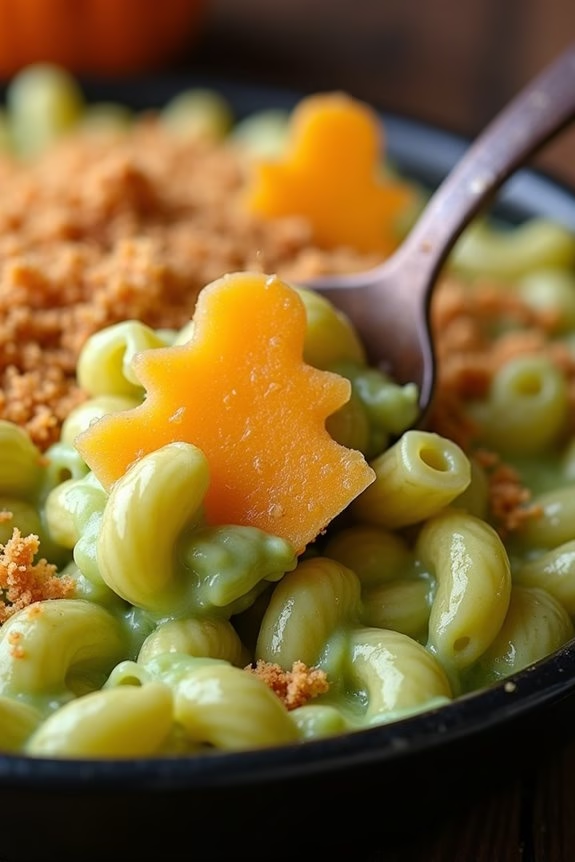
Transform a classic comfort dish into a spooktacular Halloween treat with Monster Mac and Cheese. This dish isn’t only delicious but also visually striking, making it a perfect addition to your Halloween dinner menu for kids. With its vibrant color and cheesy goodness, it promises to be a hit at any Halloween gathering, leaving the little ones both entertained and satisfied.
The secret to this Monster Mac and Cheese lies in its rich and creamy texture combined with a ghoulish green hue that can be achieved using spinach or food coloring. This dish retains all the comforting qualities of traditional mac and cheese while adding a playful twist to delight kids and adults alike. Serve it as a main course or a side dish to complement your Halloween feast.
Ingredients for 4-6 servings:
- 1 pound elbow macaroni
- 4 cups shredded cheddar cheese
- 2 cups milk
- 1/4 cup unsalted butter
- 1/4 cup all-purpose flour
- 1 teaspoon garlic powder
- 1/2 teaspoon onion powder
- Salt and pepper to taste
- 1 cup fresh spinach or a few drops of green food coloring
- 1/2 cup breadcrumbs (optional)
- Cooking spray
Cooking Instructions:
- Cook the Pasta: Bring a large pot of salted water to a boil. Add the elbow macaroni and cook for about 7-8 minutes or until al dente. Drain the pasta and set it aside.
- Prepare the Cheese Sauce: In a large saucepan over medium heat, melt the butter. Once melted, whisk in the flour to create a roux. Continue whisking for about 1-2 minutes until the mixture is golden brown.
- Add Milk and Spinach: Gradually add the milk to the roux, whisking constantly to prevent lumps. If using spinach, add it at this stage to cook until wilted, about 2-3 minutes. For a smooth texture, blend the mixture until the spinach is fully incorporated and the sauce is green. If you’re using food coloring, add a few drops instead and stir.
- Incorporate Cheese and Seasonings: Reduce the heat to low and add the shredded cheddar cheese, garlic powder, onion powder, salt, and pepper. Stir continuously until the cheese is melted and the sauce is smooth.
- Combine with Pasta: Add the cooked macaroni to the cheese sauce, stirring until all the pasta is well coated and the mixture is evenly colored.
- Optional Topping: Preheat your oven to 350°F (175°C). Transfer the mac and cheese to a greased baking dish. Sprinkle breadcrumbs over the top for a crunchy texture. Lightly coat the breadcrumbs with cooking spray.
- Bake: Place the baking dish in the oven and bake for about 15-20 minutes, or until the top is golden brown and bubbly.
Extra Tips:
For a healthier twist and to enhance the green color naturally, use fresh spinach instead of food coloring. Blending the spinach into the sauce not only adds vitamins but also gives the dish a vibrant green hue.
If presenting this dish as part of a Halloween theme, consider using fun-shaped pasta like spirals or shells to add an extra element of fun. To further enhance the Halloween theme, use cookie cutters to shape ghost or monster faces from slices of cheese to lay on top before serving.
Ghostly Pizza Faces

Making Ghostly Pizza Faces is a breeze and can be an exciting kitchen adventure for kids. The pizzas start with a simple base of English muffins, which provide the perfect size for individual pizzas that are easy for little hands to manage. The ghostly theme is achieved with mozzarella cheese cut into ghost shapes, and the faces are made using a variety of toppings such as olives, peppers, and pepperoni. Involving your kids in the preparation process makes this meal not only a treat for their taste buds but also a memorable Halloween tradition.
Ingredients (Serves 4-6)
- 6 English muffins, split in half
- 1 cup pizza sauce
- 12 slices of mozzarella cheese, cut into ghost shapes
- 1/2 cup sliced black olives
- 1/2 cup mini pepperoni slices
- 1/4 cup diced green bell pepper
- 1/4 cup diced red bell pepper
- 1 tablespoon olive oil
- Pinch of dried oregano (optional)
Cooking Instructions
- Preheat the Oven: Start by preheating your oven to 375°F (190°C). This will guarantee the pizzas cook evenly and the cheese melts perfectly.
- Prepare the Muffin Base: Place the split English muffins on a baking sheet lined with parchment paper or lightly greased with olive oil. This will prevent sticking and make cleanup easier.
- Add the Sauce: Spread a generous tablespoon of pizza sauce over each muffin half. Be sure to cover the muffins evenly, but leave a small border around the edges to prevent the sauce from spilling over during baking.
- Create the Ghosts: Using a small ghost-shaped cookie cutter, cut the mozzarella cheese slices into ghost shapes. Place a cheese ghost on top of each muffin half.
- Decorate the Faces: Let the kids use the olives, mini pepperoni, and diced peppers to create spooky faces on the cheese ghosts. Encouraging creativity will make the process fun and engaging for them.
- Season and Bake: Lightly drizzle olive oil over the pizzas and sprinkle a pinch of dried oregano if desired. This will add extra flavor. Bake in the preheated oven for about 10-12 minutes, or until the cheese is melted and bubbly, and the edges of the muffins are golden brown.
- Serve and Enjoy: Remove the pizzas from the oven and let them cool slightly before serving. Enjoy the ghostly creations while they’re warm and cheesy.
Extra Tips
For a more interactive experience, set up a “topping station” where kids can choose their ingredients and create their own designs.
If you don’t have a ghost-shaped cookie cutter, you can use a small knife to carefully cut the cheese into ghost-like shapes. Be sure to supervise younger children while they use sharp tools.
Additionally, feel free to substitute or add other toppings such as mushrooms or ham to suit your family’s preferences.
Spooky Spider Tacos
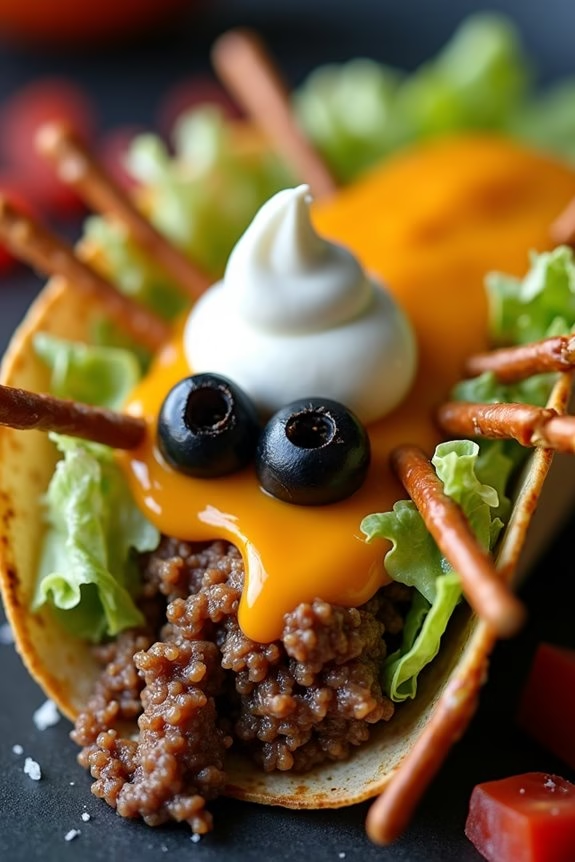
Spooky Spider Tacos are a fun and festive way to celebrate Halloween with your kids. These tacos aren’t only delicious but also provide a creative twist with their spider-like appearance, making your Halloween dinner both spooky and memorable. Made with seasoned ground beef, black olives, and soft taco shells, these Spooky Spider Tacos are sure to be a hit with the whole family. As they enjoy their meal, the kids will be delighted by the taco’s resemblance to a creepy crawly spider.
The preparation of Spooky Spider Tacos is straightforward, requiring only a few simple ingredients that you might already have at home. In less than 30 minutes, you can have a plate full of these edible arachnids ready for your little ones to devour. Not only is this recipe quick and easy, but it also allows for some fun participation from the kids, who can help assemble the tacos and create their own spooky designs.
Perfect for a Halloween dinner party or a special family meal, these tacos are bound to bring smiles and maybe even a few playful screams to your dinner table.
Ingredients (Serves 4-6):
- 1 pound ground beef
- 1 packet taco seasoning mix
- 1 cup water
- 12 small soft taco shells
- 1 cup shredded lettuce
- 1 cup shredded cheddar cheese
- 1/2 cup sour cream
- 1/2 cup diced tomatoes
- 1/4 cup sliced black olives (for spider eyes)
- 24 pretzel sticks (for spider legs)
Instructions:
- Prepare the Ground Beef: In a large skillet over medium heat, cook the ground beef until browned, breaking it apart with a spatula as it cooks. Drain any excess grease from the skillet.
- Season the Beef: Add the taco seasoning mix and water to the browned beef. Stir well to combine. Let it simmer on low heat for about 5 minutes, or until the mixture thickens and is well incorporated.
- Prepare the Tacos: Warm the taco shells according to the package instructions. This can typically be done by wrapping them in foil and heating them in the oven for 5-7 minutes at 350°F.
- Assemble the Tacos: Lay out the taco shells and fill each one with a generous spoonful of the seasoned ground beef. Add a layer of shredded lettuce, followed by shredded cheddar cheese, diced tomatoes, and a dollop of sour cream.
- Create the Spider Design: Place two slices of black olives on top of each taco to resemble spider eyes. Insert four pretzel sticks into each side of the tacos to mimic spider legs.
- Serve and Enjoy: Arrange the Spooky Spider Tacos on a platter and serve immediately, encouraging guests to admire and enjoy their spooky creations.
Extra Tips:
For a healthier option, you can substitute ground beef with ground turkey or chicken. Feel free to add more toppings like avocado slices, jalapeños, or chopped onions to cater to your family’s preferences.
To make the experience more interactive, set up a taco bar and let the kids assemble their own spiders. This not only makes the meal more engaging but also allows them to customize their tacos with their favorite toppings.
Creepy Crawly Pasta
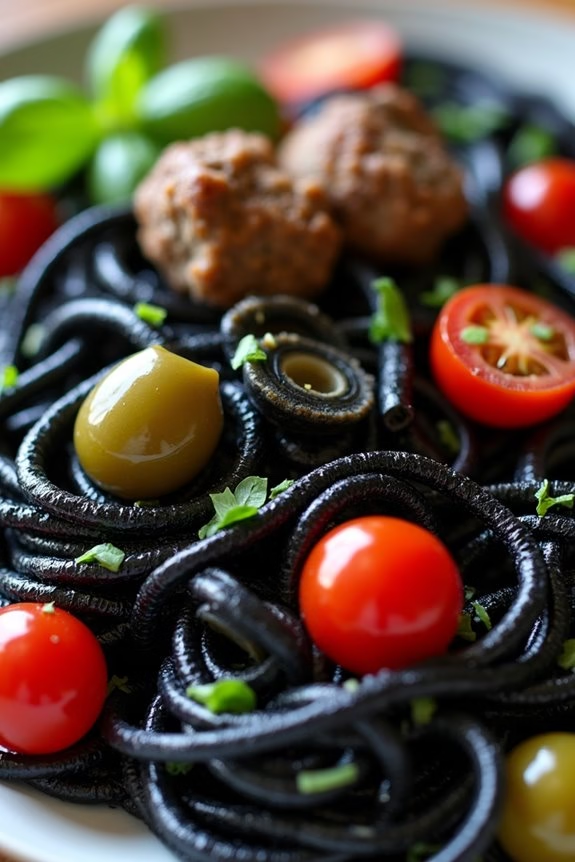
Get ready to serve up a delightfully spooky dish with our Creepy Crawly Pasta, perfect for a Halloween dinner that will both thrill and chill your little ones! This recipe combines colorful pasta, creepy ingredients, and a bit of culinary magic to create a meal that’s just as fun to make as it’s to eat.
Ideal for a Halloween-themed gathering or a family dinner before trick-or-treating, this meal is sure to capture the imagination and taste buds of kids and adults alike. The Creepy Crawly Pasta not only looks eerie but is also packed with flavors and nutrients, making it a great option for a festive yet balanced meal.
Using simple ingredients that you likely already have on hand, this dish is easy to prepare and customize according to your family’s preferences. The star of the show is the edible “crawlers” that slither through the pasta, giving it a wonderfully spooky appearance. Follow our step-by-step instructions to create this ghoulish delight that comfortably serves 4-6 people.
Ingredients:
- 1 pound of spaghetti or linguine
- 2 tablespoons of olive oil
- 1 medium onion, finely chopped
- 3 cloves of garlic, minced
- 1 can (14 oz) of crushed tomatoes
- 1 tablespoon of tomato paste
- 1 tablespoon of balsamic vinegar
- 1 teaspoon of sugar
- Salt and pepper to taste
- 1/2 teaspoon of red pepper flakes (optional)
- 1/2 cup of black olives, sliced
- 1/2 cup of green olives, sliced
- 1/2 cup of cherry tomatoes, halved
- 12 meatballs (store-bought or homemade)
- 2 tablespoons of fresh basil, chopped
- Black food coloring (optional, for pasta water)
Instructions:
- Cook the Pasta: Bring a large pot of salted water to a boil. If desired, add a few drops of black food coloring for an eerie effect. Add the pasta and cook according to package instructions until al dente. Drain and set aside.
- Prepare the Sauce: In a large skillet, heat the olive oil over medium heat. Add the chopped onion and sauté until translucent, about 5 minutes. Add the minced garlic and cook for an additional 1-2 minutes until fragrant.
- Create the Tomato Base: Stir in the crushed tomatoes, tomato paste, balsamic vinegar, and sugar. Season with salt, pepper, and red pepper flakes if using. Let the sauce simmer for about 10 minutes, stirring occasionally, until it thickens slightly.
- Add the Creepy Ingredients: Mix in the black and green olives, cherry tomatoes, and meatballs. Allow everything to heat through, which should take about 5 minutes. The olives and tomatoes represent the “creepy crawlers” in the pasta, adding both flavor and a spooky touch.
- Combine and Serve: Add the cooked pasta to the sauce and gently toss to coat all the strands evenly. Serve hot, garnished with fresh basil to add a pop of green color.
Extra Tips:
For an extra spooky twist, consider shaping the meatballs into small, irregular forms to mimic creepy crawlies even more. You can also use different pasta shapes like fusilli or rotini to create a more tangled appearance, which adds to the effect.
If you have picky eaters, you can finely chop the olives and mix them into the sauce, providing the flavor without the visual. Ultimately, be cautious with the amount of black food coloring, as a little goes a long way to achieve the desired effect without overpowering the dish with artificial coloring. Enjoy your Halloween feast!
Jack-O’-Lantern Stuffed Peppers

Transform your Halloween dinner table into a festive feast with these Jack-O’-Lantern Stuffed Peppers. They’re not only fun and visually appealing but also a healthy and delicious option that’s perfect for kids. Each pepper is carved like a mini pumpkin and filled with a savory mixture that will delight both young and old alike. This spooky dish is sure to be a hit at any Halloween gathering.
These stuffed peppers are a creative way to incorporate vegetables into your Halloween menu without sacrificing flavor. The filling is made up of seasoned ground beef, rice, and vegetables, all wrapped in a tender bell pepper “jack-o’-lantern.” The combination of flavors and textures makes this dish both nutritious and satisfying.
With a little bit of carving and creativity, you can turn a simple dinner into a Halloween masterpiece that kids will love to devour.
Ingredients (Serves 4-6):
- 6 large orange bell peppers
- 1 pound ground beef
- 1 cup cooked rice
- 1 onion, finely chopped
- 2 cloves garlic, minced
- 1 cup tomato sauce
- 1 cup shredded mozzarella cheese
- 1 teaspoon dried Italian seasoning
- Salt and pepper to taste
- Olive oil for frying
Cooking Instructions:
- Prepare the Peppers: Preheat your oven to 350°F (175°C). Wash the orange bell peppers thoroughly. Cut the tops off the peppers and remove the seeds and membranes. Using a small knife, carefully carve jack-o’-lantern faces into one side of each pepper, being cautious not to cut too deeply.
- Cook the Filling: In a large skillet, heat a bit of olive oil over medium heat. Add the chopped onion and minced garlic, sautéing until the onion becomes translucent. Add the ground beef, breaking it apart with a spoon, and cook until it’s browned and cooked through.
- Mix the Stuffing: Once the beef is cooked, drain any excess fat. Stir in the cooked rice, tomato sauce, and Italian seasoning. Season with salt and pepper to taste. Cook for another 5 minutes, allowing the flavors to meld together.
- Stuff the Peppers: Spoon the beef and rice mixture into each prepared pepper, filling them generously. Place the peppers upright in a baking dish. If any filling is left over, you can spread it around the peppers in the dish.
- Bake: Cover the baking dish with foil and bake for 25-30 minutes, until the peppers are tender. Remove the foil, sprinkle the top of each pepper with shredded mozzarella cheese, and bake for an additional 5-10 minutes, or until the cheese is melted and bubbly.
- Serve: Once cooked, allow the peppers to cool slightly before serving. Enjoy your Halloween-themed meal!
Extra Tips:
To make the carving process safer and easier, use a small paring knife and work slowly. You can also involve the kids in the carving process (with supervision) to make it a fun family activity.
For a vegetarian option, consider substituting the ground beef with a mix of beans or quinoa. Additionally, if your peppers are tipping over in the baking dish, try slicing a small amount off the bottom to create a flat surface.
Enjoy the creative process and have a spooky, delicious Halloween dinner!
Frankenstein Burgers

Frankenstein Burgers are a fun and spooky twist on the classic hamburger, perfect for a Halloween dinner with kids. These ghoulishly delicious burgers feature a creative presentation that resembles the iconic monster, complete with green-tinted buns, cheesy eyes, and a scary yet playful demeanor.
Whether you’re hosting a Halloween party or simply want to bring some festive fun to the family dinner table, Frankenstein Burgers are sure to be a hit with kids and adults alike.
Crafting these burgers involves a bit of creativity and attention to detail, but the end result is a delightful dish that combines flavor with fun. The key is to use a variety of toppings and ingredients to create the monster’s face, allowing kids to get involved in the assembly process.
This interactive aspect not only makes dinnertime more exciting but also encourages little ones to enjoy their meal. Let’s plunge into the ingredients and steps needed to bring these monstrous creations to life.
Ingredients (serving size: 4-6 people):
- 4-6 hamburger buns
- Green food coloring
- 1 1/2 pounds ground beef
- Salt and pepper to taste
- 4-6 slices of cheese (preferably cheddar)
- 8-12 black olives
- 1 small red bell pepper
- 1/2 cup mayonnaise
- 2 tablespoons ketchup
- 1 tablespoon mustard
- 4-6 lettuce leaves
- 4-6 tomato slices
- 1 small cucumber
- Toothpicks
Cooking Instructions:
- Prepare the Buns: Begin by tinting the hamburger buns green. Mix a few drops of green food coloring with a small amount of water, then use a pastry brush to lightly coat the top of each bun. Allow them to dry while you prepare the patties.
- Make the Patties: In a large bowl, combine the ground beef with salt and pepper. Form the mixture into 4-6 evenly sized patties. Use your thumb to make a slight indentation in the center of each patty to guarantee even cooking.
- Cook the Patties: Heat a grill or skillet over medium-high heat. Cook the patties for about 4-6 minutes on each side, or until they reach your desired level of doneness. During the last minute of cooking, place a slice of cheese on each patty and allow it to melt.
- Prepare the Frankenstein Faces: While the patties are cooking, slice the black olives to create “eyes,” cut the bell pepper into jagged pieces for “scars,” and slice the cucumber into thin rounds for “bolts.”
- Assemble the Burgers: Spread a mix of mayonnaise, ketchup, and mustard on the bottom half of each bun. Place a lettuce leaf and a tomato slice on each bun, followed by the cheesy beef patty.
- Decorate the Faces: Place two olive slices on the cheese to form eyes. Use cucumber slices secured with toothpicks at the sides of the bun to resemble Frankenstein’s neck bolts. Arrange bell pepper pieces on top for added features and character.
- Finish and Serve: Top each burger with the green-tinted bun. Serve immediately, and let the kids enjoy their spooky creations!
Extra Tips:
For an extra spooky effect, consider using different types of cheese, such as mozzarella, to vary the look of the eyes. You can also add more toppings like pickles or bacon for added flavor and texture.
If you prefer a healthier option, try using turkey or chicken for the patties. To make the process more engaging, encourage kids to create their own Frankenstein faces, allowing them to express their creativity while enjoying their meal.
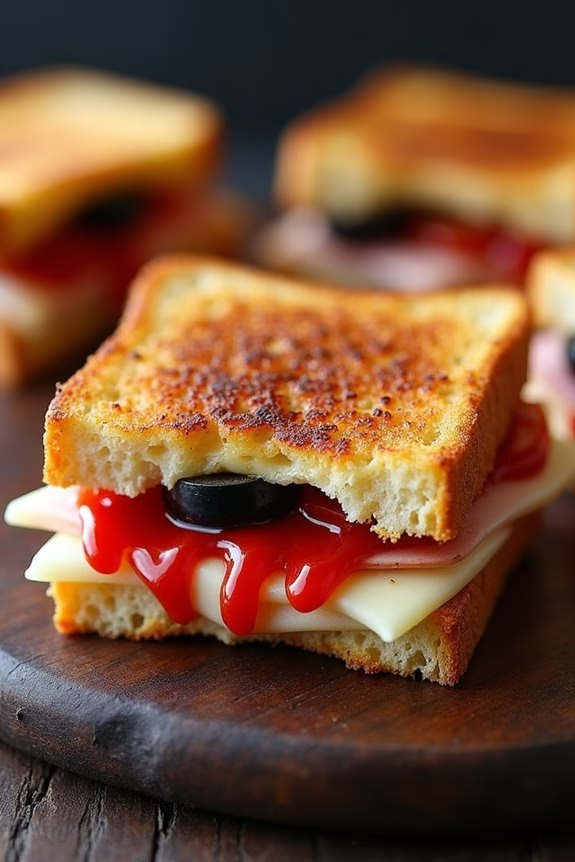
Vampire Bite Sandwiches
The simplicity of the Vampire Bite Sandwiches makes them an ideal choice for busy parents during the Halloween season. They require minimal ingredients and can be assembled quickly. You can get creative with the fillings, using your child’s favorite sandwich ingredients, ensuring even the pickiest eater will be tempted to take a bite.
Now, let’s gather the ingredients and get started on creating these frightfully fun sandwiches.
Ingredients (serves 4-6 people):
- 8-12 slices of white or wheat sandwich bread
- 8-12 slices of ham or turkey
- 8-12 slices of cheese (cheddar or American work well)
- 1/2 cup of mayonnaise
- 1/4 cup of ketchup
- 1 tablespoon of mustard (optional)
- 1 small jar of sliced black olives
- 1 large tomato, sliced
- Butter (optional, for toasting)
Instructions:
- Prepare the Bread: Begin by laying out the slices of bread on a clean surface or cutting board. If desired, lightly butter one side of each slice for a toasted effect.
- Assemble the Sandwiches: Spread a thin layer of mayonnaise on the unbuttered side of each slice. On half of the bread slices, layer a slice of cheese followed by a slice of ham or turkey. Add a slice of tomato and a few slices of black olives on top.
- Create Bite Marks: Place the remaining bread slices on top to form a sandwich. Using a small circular cookie cutter or the rim of a small glass, gently press into the top slice of bread to create two circular holes, mimicking vampire bite marks.
- Add the “Blood”: Mix the ketchup and mustard (if using) in a small bowl. Carefully drizzle or spread this mixture around the bite marks, allowing it to ooze slightly for a dramatic effect.
- Toast the Sandwiches (Optional): If you prefer toasted sandwiches, heat a skillet over medium heat and place the sandwiches buttered side down. Toast each side until golden brown and the cheese begins to melt.
- Serve: Cut each sandwich in half diagonally and arrange on a platter. Serve immediately for the freshest taste and the most fun presentation.
Extra Tips:
For an extra spooky touch, consider using a small amount of red food coloring mixed with the ketchup to intensify the “bloody” effect.
If your children are adventurous eaters, you can add more fillings like pickles or lettuce for added crunch and flavor. To make the sandwiches more nutritious, opt for whole grain bread and lean meats.
Skeleton Quesadillas

Halloween is the perfect time to combine fun and food, and Skeleton Quesadillas are a spooky yet delicious treat that kids will love. These quesadillas aren’t only delightful to look at with their skeleton design, but they’re also packed with flavors that will satisfy hungry little ghosts and goblins.
Using simple ingredients and a bit of creativity, you can transform a regular quesadilla into a festive Halloween meal that will be the star of your dinner table. Skeleton Quesadillas are a fantastic way to get kids involved in the kitchen. They can help with assembling ingredients, arranging the skeleton shapes, and even adding their favorite toppings.
This recipe is designed to serve 4-6 people, making it perfect for a small Halloween gathering or family dinner. With a crispy exterior and gooey cheese interior, these quesadillas are sure to be a hit with both kids and adults.
Ingredients for 4-6 servings:
- 8 large flour tortillas
- 2 cups shredded cheddar cheese
- 1 cup cooked chicken, shredded (optional)
- 1 can (15 oz) black beans, drained and rinsed
- 1/2 cup salsa
- 1/4 cup chopped green onions
- 1/4 cup sliced black olives
- 1/4 cup sour cream
- Olive oil or cooking spray
Cooking Instructions:
- Prepare the Ingredients: Start by gathering all the ingredients. Shred the cooked chicken if you’re using it, and drain and rinse the black beans. Chop the green onions and slice the black olives.
- Assemble the Quesadillas: Lay out four tortillas on a clean surface. Begin by spreading an even layer of shredded cheddar cheese over each tortilla. Add a layer of shredded chicken, black beans, and a dollop of salsa. Sprinkle green onions on top, adding a touch of color and flavor.
- Create the Skeleton Design: Place a second tortilla on top of each assembled quesadilla. Use a knife to carefully cut out skeleton shapes on the top tortilla, such as a skull or bones, for a festive Halloween touch.
- Cook the Quesadillas: Heat a non-stick skillet over medium heat and lightly grease it with olive oil or cooking spray. Place one quesadilla into the skillet, skeleton side up. Cook for about 3-4 minutes on each side until the tortilla is golden and the cheese has melted. Repeat for the remaining quesadillas.
- Serve: Once cooked, carefully remove the quesadillas from the skillet and allow them to cool slightly. Cut into wedges and serve with a side of sour cream, sliced black olives, and any additional salsa if desired.
Extra Tips:
For a more pronounced skeleton design, use cookie cutters to create precise shapes on the top tortilla before placing it on the assembled quesadilla. This adds an extra layer of fun and detail to your dish.
If you prefer a vegetarian option, simply omit the chicken and add extra beans or vegetables like bell peppers or corn. Make sure to monitor the heat while cooking to prevent the tortillas from burning; medium heat usually works best for achieving a crispy exterior without overcooking the ingredients inside.
Eyeball Meatballs

Transform your Halloween dinner into a spooky feast with Eyeball Meatballs! These creepy but delicious meatballs are sure to be a hit with kids, combining the fun of Halloween with the savory satisfaction of a classic dish. Perfect for a family gathering or a Halloween party, these meatballs add a touch of whimsy and fright to your meal.
The combination of flavorful ground meat and eerie edible “eyeballs” will delight your young ghouls and goblins, making it a memorable experience for everyone involved. Eyeball Meatballs aren’t just fun to look at; they’re also scrumptious and easy to prepare.
This recipe uses ingredients that are likely already in your pantry or easily available at your local grocery store. The key to nailing the eyeball effect is in the creative use of mozzarella balls and olives, which give these meatballs their distinctive and spooky appearance. Follow the recipe below to create a dish that will have everyone talking!
Ingredients (Serves 4-6):
- 1 pound ground beef
- 1/2 cup breadcrumbs
- 1/4 cup grated Parmesan cheese
- 1 egg
- 1 teaspoon garlic powder
- 1 teaspoon onion powder
- 1 teaspoon Italian seasoning
- Salt and pepper to taste
- 1 cup marinara sauce
- 12 small mozzarella balls (bocconcini)
- 6 pitted black olives
- Fresh basil leaves (optional, for garnish)
Instructions:
- Preheat the Oven: Start by preheating your oven to 375°F (190°C). This guarantees that the oven is hot enough to cook the meatballs evenly.
- Prepare the Meatball Mixture: In a large mixing bowl, combine the ground beef, breadcrumbs, Parmesan cheese, egg, garlic powder, onion powder, Italian seasoning, salt, and pepper. Mix well until all the ingredients are fully incorporated. This creates the base for your meatballs.
- Shape the Meatballs: Using your hands, roll the mixture into 12 evenly sized meatballs. Place them on a baking sheet lined with parchment paper, spacing them evenly to cook properly.
- Bake the Meatballs: Place the baking sheet in the preheated oven and bake the meatballs for about 20 minutes or until they’re cooked through and browned on the outside.
- Prepare the Eyeballs: While the meatballs are baking, slice the mozzarella balls in half and cut the black olives into small circular pieces. These will form the “iris” and “pupil” of the eyeballs.
- Assemble the Eyeballs: Once the meatballs are cooked, remove them from the oven and let them cool slightly. Place a half mozzarella ball on top of each meatball, pressing gently so it adheres. Top with a slice of olive to create the pupil.
- Simmer in Sauce: In a large saucepan, heat the marinara sauce over medium heat. Carefully add the assembled eyeball meatballs to the sauce and simmer for about 5 minutes, allowing the flavors to meld and the mozzarella to slightly melt.
- Serve: Transfer the meatballs to a serving dish, spooning some sauce over them. Garnish with fresh basil leaves if desired.
Extra Tips:
To guarantee your Eyeball Meatballs are a hit, consider using a toothpick to secure the mozzarella and olive pieces if they aren’t sticking well. This can help maintain their creepy appearance until they’re eaten.
If you want to make this dish ahead of time, the meatballs can be prepared a day in advance and stored in the refrigerator. Just reheat them in the marinara sauce before serving.
For a fun twist, you can use different colored olives or even add a drop of red food coloring to the mozzarella for a more gory effect! Enjoy the frightful fun with these delicious eyeball meatballs!
Bat Wing Chicken Drumsticks

Prepare to delight and spook your little trick-or-treaters with Bat Wing Chicken Drumsticks! This Halloween-inspired dish is sure to be a hit with both kids and adults alike. Featuring juicy chicken drumsticks marinated in a dark, flavorful sauce, these “bat wings” aren’t only a visual treat but also a tasty addition to your Halloween dinner table. The deep color and savory flavors make these drumsticks a fun and festive way to celebrate the holiday.
The secret to achieving the perfect dark hue lies in the marinade, which combines soy sauce, balsamic vinegar, and a hint of food coloring to give the chicken an eerie appearance. Roasted to perfection, the drumsticks become tender and deliciously crispy on the outside. Serve these up with a side of spooky mashed potatoes or a ghostly salad to complete your Halloween meal. This recipe is designed to serve 4-6 people, ensuring there’s enough for everyone to enjoy.
Ingredients:
- 12 chicken drumsticks
- 1 cup soy sauce
- 1/2 cup balsamic vinegar
- 1/4 cup honey
- 3 cloves garlic, minced
- 1 tablespoon fresh ginger, grated
- 1 teaspoon black food coloring (optional, for a darker finish)
- 1/2 teaspoon black pepper
- 1/4 teaspoon cayenne pepper
- 1 tablespoon olive oil
- Green onion and sesame seeds for garnish (optional)
Cooking Instructions:
- Prepare the Marinade: In a large mixing bowl, combine the soy sauce, balsamic vinegar, honey, minced garlic, grated ginger, black food coloring, black pepper, and cayenne pepper. Mix well until all ingredients are thoroughly combined.
- Marinate the Chicken: Place the chicken drumsticks into the marinade, ensuring each piece is fully coated. Cover the bowl with plastic wrap and let the drumsticks marinate in the refrigerator for at least 2 hours, or overnight for best results.
- Preheat the Oven: Preheat your oven to 400°F (200°C). Line a baking sheet with aluminum foil and lightly grease it with olive oil to prevent sticking.
- Bake the Drumsticks: Arrange the marinated drumsticks on the prepared baking sheet, ensuring they’re spaced apart for even cooking. Pour any remaining marinade over the drumsticks. Bake in the preheated oven for 35-40 minutes, or until the chicken is cooked through and the skin is crispy.
- Serve and Garnish: Once cooked, remove the drumsticks from the oven and let them rest for a few minutes. Garnish with chopped green onions and sesame seeds before serving for an added touch of flavor and color.
Extra Tips:
For an authentic bat wing look, consider using black food coloring in moderation to achieve a deep, dark color. If you prefer a more natural approach, you can skip the food coloring and rely on the soy sauce and balsamic vinegar for a rich brown hue.
It’s important to monitor the baking time and check for doneness by ensuring the internal temperature of the chicken reaches 165°F (75°C). For an added smoky flavor, you can grill the drumsticks instead of baking them. Enjoy these spooky treats with your favorite Halloween-themed sides to create an unforgettable festive meal!
Zombie Brain Jello Salad

Zombie Brain Jello Salad is the perfect Halloween treat that combines spookiness with deliciousness, delighting kids of all ages. This eerie dessert isn’t only fun to look at, but it’s also easy to make. The green-tinted jello, combined with a few choice ingredients, creates an appetizingly creepy “brain” that adds a festive flair to your Halloween dinner table. Kids will love the brainy texture, and you’ll love how simple it’s to put together.
As you prepare this Zombie Brain Jello Salad, you can get creative with the presentation, making it as gory or as tame as you like. The key is to have fun with the process and create a dish that will make a memorable impression on your little ghouls and goblins. Perfect for a group of 4-6 children, this recipe is sure to be a hit at your Halloween gathering.
Ingredients (for 4-6 servings):
- 2 packages of lime-flavored jello (3 oz each)
- 2 cups boiling water
- 1 cup cold water
- 1 cup whipped topping
- 1/2 cup mini marshmallows
- 1/2 cup canned fruit cocktail, drained
- 1/4 cup chopped walnuts (optional)
- Red food coloring
- Brain-shaped mold or bowl
Instructions:
- Prepare the Jello Base: In a large mixing bowl, dissolve the lime jello in 2 cups of boiling water. Stir until the jello is completely dissolved, about 2 minutes.
- Add Cold Water: Stir in 1 cup of cold water to the dissolved jello mixture. Allow it to cool slightly for about 10 minutes.
- Mix in Ingredients: Gently fold in the whipped topping, mini marshmallows, fruit cocktail, and walnuts (if using) into the cooled jello mixture. Make sure everything is evenly distributed throughout the mixture.
- Add Color: Add a few drops of red food coloring to achieve a slightly gory, brain-like appearance. Mix thoroughly until you reach the desired color. Be careful not to overdo it; you still want the green to show through.
- Mold the Brain: Pour the jello mixture into the brain-shaped mold. If you don’t have a brain mold, a regular bowl can work, though it may not have the same dramatic effect.
- Chill: Refrigerate the jello for at least 4 hours, or until fully set. For best results, let it chill overnight to guarantee it holds its shape when unmolded.
- Unmold and Serve: To serve, gently loosen the edges of the jello from the mold with a knife. Carefully invert onto a serving plate and remove the mold. Serve immediately for the best texture.
Extra Tips:
When preparing the Zombie Brain Jello Salad, make sure the jello mixture is cooled adequately before adding the whipped topping and other ingredients to prevent melting.
If you want an even creepier effect, you can add edible decorations like candy eyeballs or gummy worms around the base of the “brain.”
For a firmer jello, consider reducing the cold water by 1/4 cup. Remember, the key is to have fun with this dish and let your creativity shine through!
Scarecrow Cornbread Muffins

Scarecrow Cornbread Muffins are a delightful treat that brings a touch of Halloween whimsy to your kids’ dinner table. These muffins aren’t only fun to make but also deliciously satisfying, combining the sweet and savory flavors of cornbread with a festive presentation. Perfect for a Halloween-themed dinner, these muffins are easy to prepare and can be a great way to involve your kids in the kitchen.
With a few simple ingredients, you can transform ordinary cornbread into a Spooktacular dish that will delight both the taste buds and the imagination.
These muffins are designed to resemble charming little scarecrows, making them an ideal addition to your Halloween menu. By adding some creative toppings like olives, bell peppers, and cheese, you can give your muffins personality and flair.
Whether served as a side dish or a main attraction, Scarecrow Cornbread Muffins are sure to become a favorite in your household. This recipe serves 4-6 people, making it perfect for a family dinner or a small gathering.
Ingredients
- 1 cup yellow cornmeal
- 1 cup all-purpose flour
- 1/4 cup granulated sugar
- 1 tablespoon baking powder
- 1/2 teaspoon salt
- 1 cup milk
- 2 large eggs
- 1/4 cup vegetable oil
- 1/2 cup shredded cheddar cheese
- 8-10 slices of black olives (for eyes)
- 1 small red bell pepper, cut into small triangles (for noses)
- 1/2 cup shredded mozzarella cheese (for hair)
Cooking Instructions
- Preheat the Oven: Begin by preheating your oven to 375°F (190°C). This guarantees that the oven reaches the right temperature by the time your batter is ready, ensuring even baking.
- Prepare the Muffin Batter: In a large mixing bowl, combine the cornmeal, flour, sugar, baking powder, and salt. In a separate bowl, whisk together the milk, eggs, and vegetable oil. Gradually add the wet ingredients to the dry ingredients, stirring until just combined. Be careful not to overmix; a few lumps are fine.
- Add Cheese to the Batter: Fold in the shredded cheddar cheese gently. This will add a delicious cheesy flavor to your muffins and make sure that each bite has a gooey, cheesy surprise.
- Fill Muffin Tin: Grease a muffin tin or line it with paper liners. Pour the batter evenly into the muffin cups, filling each about 3/4 full to allow room for rising.
- Decorate Your Scarecrows: Add two olive slices to each muffin as eyes. Place a small triangle of red bell pepper below the olives to serve as the nose. Finally, sprinkle the shredded mozzarella cheese on top to create the effect of hair.
- Bake the Muffins: Place the muffin tin into the preheated oven and bake for 15-18 minutes, or until a toothpick inserted into the center of a muffin comes out clean. The tops should be golden brown.
- Cool and Serve: Allow the muffins to cool in the tin for about 5 minutes before transferring them to a wire rack. Serve warm for the best texture and flavor.
Extra Tips
For an extra spooky touch, consider using different colored bell peppers to make each muffin unique. You can also add a dash of paprika or chili powder to the batter for a hint of spice.
If you want to make the muffins more nutritious, consider adding some finely grated zucchini or carrots into the batter. Additionally, if you’re serving these at a party, you can create a little scarecrow scene by arranging the muffins on a platter with some corn husks or straw for a complete Halloween-themed presentation.
Enjoy creating and eating these fun Scarecrow Cornbread Muffins!
Haunted Forest Broccoli Trees

- 2 large broccoli heads
- 2 tablespoons olive oil
- 1 teaspoon garlic powder
- Salt and pepper to taste
- 1 cup cherry tomatoes, halved
- 1/2 cup shredded cheddar cheese
- 1/4 cup Parmesan cheese
- 1 tablespoon lemon juice
- Optional: black olives, sliced for decoration
Cooking Instructions:
- Prepare the Broccoli: Wash the broccoli heads thoroughly and pat them dry with a paper towel. Cut them into florets, keeping the stalks somewhat long to resemble tree trunks.
- Preheat the Oven: Preheat your oven to 400°F (200°C) to guarantee it’s hot enough to roast the broccoli to perfection.
- Season the Broccoli: In a large bowl, toss the broccoli florets with olive oil, garlic powder, salt, and pepper, making certain each piece is well-coated with the seasoning.
- Arrange on Baking Sheet: Spread the broccoli evenly on a baking sheet lined with parchment paper. Make sure the florets aren’t overcrowded to allow even roasting.
- Roast the Broccoli: Place the baking sheet in the preheated oven and roast for 15-20 minutes, or until the broccoli is tender and slightly crispy around the edges.
- Add Cherry Tomatoes and Cheese: After the initial roasting, remove the baking sheet from the oven. Sprinkle the cherry tomatoes and both cheeses over the broccoli.
- Final Roast: Return the baking sheet to the oven for an additional 5 minutes, allowing the cheese to melt and the cherry tomatoes to soften slightly.
- Finishing Touches: Once done, remove the broccoli from the oven. Drizzle with lemon juice and, if desired, decorate with sliced black olives to enhance the eerie forest look.
Extra Tips:
To add a more haunted look, consider arranging the broccoli trees on a black or dark-colored platter, which can make the green pop and enhance the spooky theme.
You can also use cookie cutters to cut cheese slices into ghost or bat shapes and place them among the trees for added fun.
Encourage your kids to help arrange the “forest” on the platter, making it a fun family activity.
Adjust the seasoning to your children’s taste preferences, and don’t hesitate to get creative with additional decorations like edible eyes or pumpkin seeds.