
As Halloween approaches, I’m so excited to share some spooktacular food ideas that will enchant your little ghouls and goblins. Picture Monster Eyeball Pizza Bites staring back at you. Witch’s Broomstick Pretzels are ready to sweep you off your feet. These treats have a magically eerie charm that will delight every young partygoer. And that’s just the beginning of our cauldron of creativity.
Monster Eyeball Pizza Bites

Monster Eyeball Pizza Bites are a fun and spooky treat perfect for Halloween celebrations with kids. These creepy yet delicious bites are made to resemble eyes, adding a playful and eerie touch to your Halloween party spread. With their savory flavors and fun appearance, they’re bound to be a hit with children and adults alike.
Easy to make and ready in a pinch, Monster Eyeball Pizza Bites combine the classic flavors of pizza with a unique presentation that will captivate and delight. This recipe is great for involving little hands in the kitchen, making it an engaging activity for family time. Kids will love assembling these bites and watching them come to life as they bake.
The combination of gooey cheese, tangy tomato sauce, and a hint of spooky olive “pupils” creates a flavorful snack that can be enjoyed fresh out of the oven. Whether you’re hosting a Halloween party or just want to add some festive fun to snack time, these Monster Eyeball Pizza Bites are sure to satisfy.
Ingredients (serving size: 4-6 people):
- 1 can of refrigerated pizza dough
- 1 cup of pizza sauce
- 1 1/2 cups of shredded mozzarella cheese
- 12-18 large green olives, pitted
- 12-18 slices of pepperoni
- 12-18 small black olives, pitted
Cooking Instructions:
- Preheat the Oven: Begin by preheating your oven to 400°F (200°C) so that it’s ready for baking once you’ve assembled your pizza bites.
- Prepare the Dough: Roll out the pizza dough on a lightly floured surface to guarantee it doesn’t stick. Use a cookie cutter or a glass to cut out 2-inch circles from the dough, forming the base for your bites.
- Assemble the Pizza Bites: Place the dough circles onto a baking sheet lined with parchment paper. Spoon a small amount of pizza sauce onto each circle, spreading it evenly.
- Add Cheese: Sprinkle a generous amount of mozzarella cheese on top of the sauce on each dough circle. This will serve as the “white” of the eyeball.
- Create the Eyeballs: Place a slice of pepperoni on top of the cheese. Then, place a green olive in the center of the pepperoni, and finish by placing a piece of black olive in the center of the green olive to form the “pupil.”
- Bake: Put the baking sheet in the preheated oven and bake for about 10-12 minutes, or until the dough is golden brown and the cheese is melted and bubbly.
- Cool and Serve: Allow the pizza bites to cool slightly before serving. This makes them easier for little hands to handle and enjoy.
Extra Tips:
To make these pizza bites more nutritious, consider adding finely chopped vegetables like bell peppers or mushrooms under the cheese layer. You can also use whole wheat pizza dough for a healthier twist.
If you want to make these ahead of time, assemble the bites and store them in the refrigerator; bake them just before serving to keep them fresh and tasty. Additionally, make sure to keep an eye on the baking time, as ovens can vary, and you don’t want to overcook the dough.
Witch’s Broomstick Pretzels
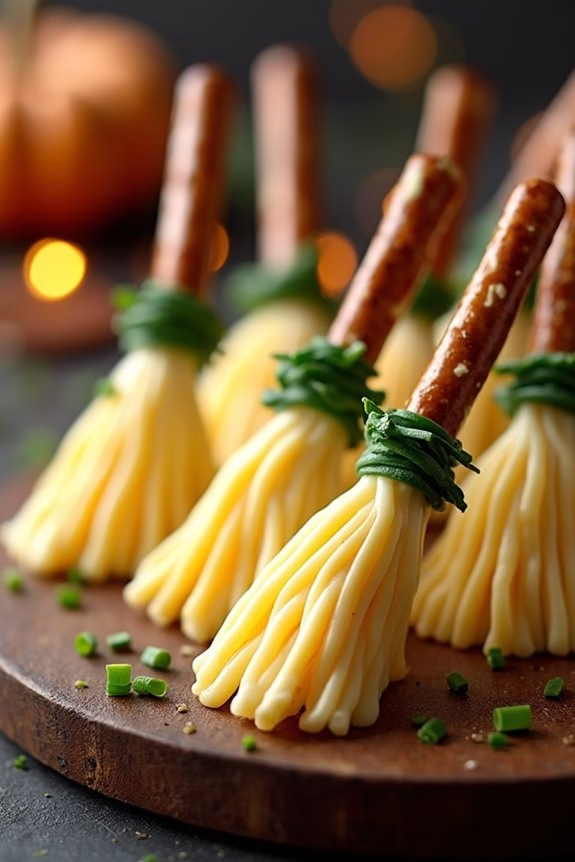
Witch’s Broomstick Pretzels are a fun and spooky treat perfect for any Halloween celebration. These delicious snacks are easy to make and require only a few simple ingredients. They’re perfect for serving at a Halloween party or as a fun after-school snack for kids. The combination of salty pretzels and savory cheese creates a delightful taste that will surely be a hit with children and adults alike.
The idea behind Witch’s Broomstick Pretzels is to create a snack that looks like miniature broomsticks, adding a playful and thematic element to your Halloween festivities. The process involves assembling pretzel sticks, string cheese, and a few other items to create these whimsical treats. This recipe serves 4-6 people, making it ideal for small gatherings or family get-togethers.
Ingredients:
- 12 pretzel sticks
- 6 string cheese sticks
- 12 chives or thin green onion strips
- 1 tablespoon honey or mustard (optional for dipping)
Instructions:
- Prepare the Cheese: Begin by unwrapping the string cheese sticks. Use a sharp knife to cut each string cheese stick in half, giving you a total of 12 pieces.
- Create the Broom Bristles: Take each half of the string cheese and make multiple vertical cuts about halfway up the cheese, creating the appearance of broom bristles. Be careful not to cut all the way through.
- Attach the Pretzel Sticks: Insert one end of a pretzel stick into the uncut end of the string cheese. Gently press the cheese to secure it onto the pretzel stick, forming the handle of the broomstick.
- Wrap the Chives: Take a strip of chive or green onion and carefully wrap it around the top of the cheese where it meets the pretzel stick. This will hold the “bristles” in place and enhance the broomstick appearance. Tie a small knot if possible.
- Optional Dipping Sauce: If desired, prepare a small dish of honey or mustard for dipping. This adds a sweet or tangy flavor complementing the salty pretzels and creamy cheese.
- Serve: Arrange the Witch’s Broomstick Pretzels on a serving platter or tray. They’re now ready to be enjoyed by your little ghouls and goblins!
Extra Tips: When making Witch’s Broomstick Pretzels, guarantee the string cheese is cold and firm for easier cutting and handling. If the cheese becomes too soft, refrigerate it for a few minutes before proceeding.
Additionally, if you’re serving these at a party, consider making them fresh right before guests arrive to maintain the best texture and appearance. Feel free to get creative with the presentation, using a Halloween-themed platter or arranging them in a pattern for added visual appeal.
Spooky Spider Deviled Eggs

Halloween is the perfect time to get creative with your culinary skills, especially when it comes to making fun and spooky treats for kids. One such delightful dish is Spooky Spider Deviled Eggs, which not only look creepy but also taste delicious.
These deviled eggs are decorated with black olive spiders, making them the perfect addition to your Halloween-themed party. Not only are they visually appealing, but they also offer a creamy, savory bite that both children and adults will enjoy.
The beauty of this recipe lies in its simplicity and ease of preparation. With just a few ingredients, you can whip up a batch of these deviled eggs in no time. The classic deviled egg mixture is enhanced with a touch of paprika for extra flavor, and finished off with olives to create an eerie spider on each egg half.
This dish is sure to be a hit at any gathering, providing a fun and festive way to celebrate Halloween. Serve these up to 4-6 people and watch them disappear faster than a ghost on All Hallows’ Eve!
Ingredients (serves 4-6):
- 6 large eggs
- 1/4 cup mayonnaise
- 1 teaspoon Dijon mustard
- 1 teaspoon white vinegar
- Salt and pepper to taste
- Paprika for garnish
- 18-24 black olives
Cooking Instructions:
1. Boil the Eggs:
Place the eggs in a single layer in a saucepan and cover them with water. Bring the water to a boil over medium-high heat. Once boiling, remove the saucepan from the heat, cover it, and let the eggs sit for 10 minutes.
2. Prepare the Eggs:
After 10 minutes, drain the hot water and transfer the eggs to an ice bath to cool for about 5 minutes. Once cooled, gently tap each egg on a hard surface to crack the shell, then peel under running water.
3. Make the Filling:
Slice the peeled eggs in half lengthwise and scoop out the yolks into a small mixing bowl. Set the egg whites aside on a serving platter. Mash the yolks with a fork until smooth, then mix in the mayonnaise, Dijon mustard, white vinegar, salt, and pepper until well combined.
4. Assemble the Deviled Eggs:
Spoon or pipe the yolk mixture back into the egg white halves, mounding slightly. Lightly dust the tops with paprika for added color and flavor.
5. Create the Spiders:
Slice the black olives in half. Use one half as the spider’s body, placing it in the center of each filled egg. Cut the remaining olive halves into thin strips to create legs, arranging eight legs around each body.
6. Serve:
Chill the deviled eggs in the refrigerator for at least 30 minutes before serving, allowing the flavors to meld.
Extra Tips:
When boiling eggs, adding a teaspoon of baking soda to the water can make peeling easier. For an extra spooky effect, you can use a small paring knife to score the egg whites and create a web-like pattern.
If you want to add a bit more zest to the filling, consider incorporating a dash of hot sauce or a sprinkle of cayenne pepper. Be sure to keep these deviled eggs refrigerated until serving to maintain their freshness and flavor.
Mummy Hot Dogs
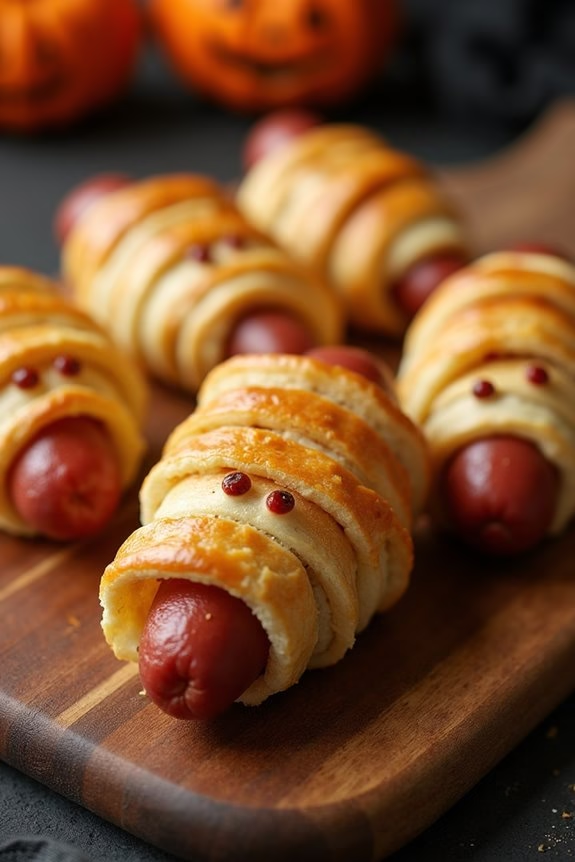
Mummy Hot Dogs are a spooky and delightful treat perfect for a Halloween gathering or a fun dinner with the kids. These tasty snacks are fun to make and can be a great way to get children involved in the kitchen. The combination of a hot dog wrapped in crescent roll dough to resemble a mummy makes them both delicious and visually appealing. They aren’t only easy to prepare but also customizable with various fillings and toppings to suit different tastes.
These Halloween-themed Mummy Hot Dogs are sure to be a hit at any party. You can enjoy them as a main dish or a savory snack, and they can be served with a variety of dipping sauces. The simplicity of the recipe allows you to create these mummies quickly, leaving you with more time to enjoy the festivities. Whether you’re hosting a Halloween party or simply looking for a fun dinner idea, these Mummy Hot Dogs are sure to delight both kids and adults alike.
Ingredients (serving size of 4-6 people):
- 8 hot dogs
- 1 can (8 oz) refrigerated crescent roll dough
- 1 large egg
- 1 tablespoon water
- Yellow mustard or ketchup for decoration
- Optional: cheese slices
Cooking Instructions:
- Preheat the Oven: Start by preheating your oven to 375°F (190°C) to guarantee it’s hot enough to bake the mummies evenly.
- Prepare the Dough: Open the can of crescent roll dough and unroll it onto a clean surface. If it’s pre-cut, press the seams together to form a single sheet. Use a pizza cutter or sharp knife to cut the dough into thin strips, about ¼ inch wide.
- Wrap the Hot Dogs: Take each hot dog and wrap the dough strips around it, leaving a small gap near the top for the mummy’s face. You can wrap the dough in a random pattern to resemble a mummy’s bandages. If desired, place a small slice of cheese under the dough for added flavor.
- Prepare for Baking: Place the wrapped hot dogs on a baking sheet lined with parchment paper. Mix the egg with a tablespoon of water in a small bowl to create an egg wash. Brush this mixture lightly over the dough to give it a golden-brown finish when baked.
- Bake: Put the baking sheet in the preheated oven and bake for 12-15 minutes, or until the dough is golden brown and fully cooked.
- Decorate: Once baked, remove the hot dogs from the oven and let them cool slightly. Use a small amount of mustard or ketchup to create eyes on each mummy by dotting it where the face is exposed.
Extra Tips:
For a more creative touch, use edible googly eyes instead of mustard or ketchup to make the mummies even more fun and spooky. If you prefer a vegetarian version, substitute the hot dogs with veggie dogs.
Additionally, these Mummy Hot Dogs can be made ahead of time and reheated in the oven just before serving, making them a convenient option for a busy Halloween evening.
Ghostly Popcorn Balls
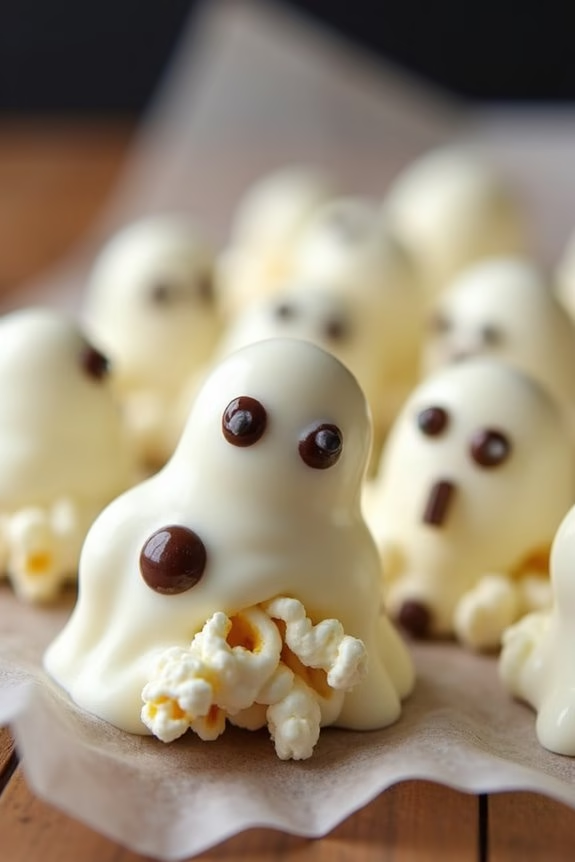
Ghostly Popcorn Balls are a spooktacular treat that’s perfect for Halloween festivities with kids. These delightful snacks aren’t only fun to eat but also a joy to make, as they combine the classic taste of buttery popcorn with the marshmallow sweetness that kids adore. Shaping them into ghostly figures and adding a touch of spooky decoration will make them the star of your Halloween party table.
Plus, they provide an interactive cooking experience for kids, allowing them to get involved in the kitchen and release their creativity.
Perfect for a serving size of 4-6 people, Ghostly Popcorn Balls can be crafted with minimal ingredients and effort. The gooey texture of the marshmallow binds the popcorn together, while a touch of white chocolate adds a ghostly hue. You can add edible eyes or use chocolate chips for eyes to give these treats a fun and spooky personality.
Whether you’re hosting a Halloween event or looking for a fun cooking activity with your kids, Ghostly Popcorn Balls are sure to delight both young and old.
Ingredients for 4-6 Servings:
- 10 cups popped popcorn
- 1/4 cup unsalted butter
- 1 package (10 oz) mini marshmallows
- 1/2 teaspoon vanilla extract
- 1/2 cup white chocolate chips
- Edible candy eyes or chocolate chips for decoration
Cooking Instructions:
- Prepare the Popcorn: Begin by popping about 10 cups of popcorn. You can use air-popped popcorn or microwave popcorn. Confirm that all unpopped kernels are removed to prevent any unpleasant surprises in your Ghostly Popcorn Balls.
- Melt the Butter and Marshmallows: In a large saucepan, melt 1/4 cup of unsalted butter over medium heat. Once melted, add the entire package of mini marshmallows. Stir continuously until the marshmallows are completely melted and smooth. Stir in the vanilla extract for added flavor.
- Combine with Popcorn: Remove the saucepan from the heat and immediately pour the melted marshmallow mixture over the prepared popcorn. Use a spatula to gently fold the popcorn into the mixture until every kernel is well-coated.
- Shape the Popcorn Balls: Allow the mixture to cool slightly, so it’s comfortable to handle. Lightly grease your hands with butter or non-stick spray to prevent sticking. Take handfuls of the mixture and shape them into balls. If desired, slightly elongate them to create a ghostly shape.
- Add Ghostly Features: Melt the white chocolate chips in a microwave-safe bowl, stirring every 30 seconds until smooth. Dip each popcorn ball into the melted chocolate, or drizzle it over the balls to give them a ghostly white appearance. Press edible candy eyes or chocolate chips into the balls to create faces.
- Set and Serve: Place the completed popcorn balls on a baking sheet lined with parchment paper. Allow them to set for about 30 minutes or until the chocolate hardens. Serve and enjoy the ghostly delight!
Extra Tips:
To make the shaping process easier, consider using disposable gloves lightly coated with butter or cooking spray. This will help prevent the sticky marshmallow mixture from sticking to your hands.
You can also experiment with different decorations to personalize your Ghostly Popcorn Balls. Adding a dash of food coloring to the marshmallow mixture can create different ghostly hues, or using a variety of edible decorations can make your ghosts look unique and fun.
Encourage children to participate in decorating to make the experience educational and enjoyable!
Frankenstein Rice Krispie Treats
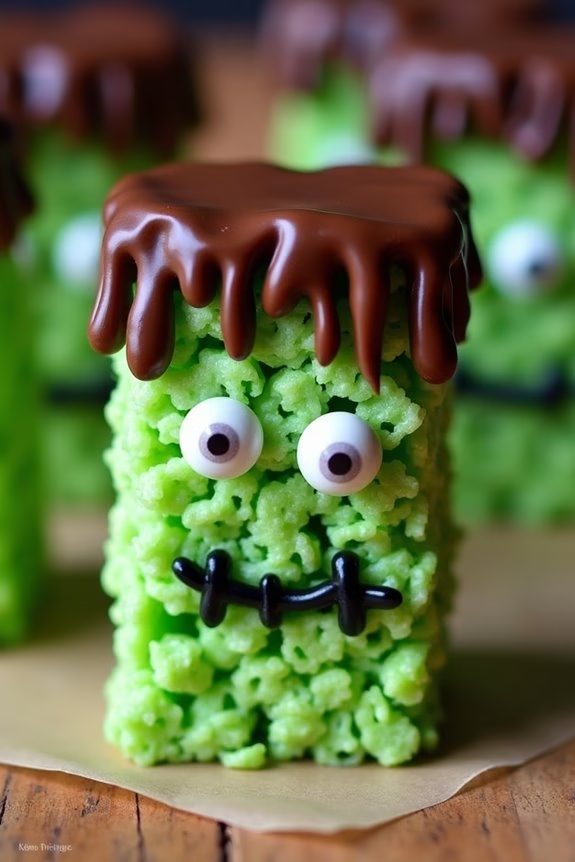
Frankenstein Rice Krispie Treats are a fun and spooky addition to your Halloween party table that kids will love. These green, monster-themed treats are easy to make and require only a few simple ingredients. Not only do they taste delicious, but their quirky appearance adds a playful element to your Halloween festivities.
The treats are made by adding green food coloring to traditional Rice Krispie treats and then decorating them with candy eyes and chocolate to create the iconic Frankenstein look.
Whether you’re hosting a Halloween party or just want to make a festive snack for your kids, these Frankenstein Rice Krispie Treats are guaranteed to be a hit. They’re perfect for getting the little ones involved in the kitchen, as they can help shape the treats and add the final decorative touches.
Be prepared for some sticky fun that results in monstrously adorable snacks that everyone will enjoy.
Ingredients for 4-6 servings:
- 6 cups Rice Krispies cereal
- 3 tablespoons butter
- 1 package (10 oz) mini marshmallows
- Green food coloring
- 1 cup semi-sweet chocolate chips
- Candy eyes
- Black or brown icing gel
Cooking Instructions:
- Prepare the Baking Pan: Start by lining a 9×13-inch baking pan with parchment paper or lightly grease it to prevent sticking.
- Melt the Butter and Marshmallows: In a large saucepan, melt 3 tablespoons of butter over low heat. Once melted, add the mini marshmallows and stir until completely melted and smooth.
- Add Food Coloring: Remove the pan from heat and add green food coloring to the melted marshmallow mixture. Add a few drops at a time, stirring until you achieve your desired shade of green.
- Mix in the Cereal: Gradually add the Rice Krispies cereal to the green marshmallow mixture. Stir until the cereal is evenly coated.
- Shape the Treats: Transfer the mixture into the prepared baking pan. Using a spatula or your hands (lightly greased with butter), press the mixture evenly into the pan. Allow it to cool and set for about 30 minutes.
- Melt the Chocolate: While the treats are setting, melt the chocolate chips in a microwave-safe bowl. Heat in 30-second increments, stirring in between, until smooth.
- Cut and Decorate: Once the treats are set, cut them into rectangular pieces. Dip the top of each piece into the melted chocolate to create Frankenstein’s hair. Place candy eyes below the chocolate, and use the icing gel to draw a mouth and stitches on the face.
- Let the Chocolate Set: Allow the chocolate to harden before serving. You can speed up the process by placing the treats in the refrigerator for a few minutes.
Extra Tips:
For a more personalized touch, you can use different types of candy or icing colors to create a variety of monster faces.
If you want to make these treats even more festive, consider adding Halloween-themed sprinkles before the chocolate sets.
To prevent sticking when cutting the treats, use a knife coated with cooking spray. Make sure the treats are completely cool before cutting to guarantee clean edges.
Enjoy these festive snacks with friends and family for a monstrously good time!
Pumpkin Patch Dirt Cups

Pumpkin Patch Dirt Cups are a delightful and spooky treat perfect for Halloween festivities. These cups aren’t only fun to make but also delicious to eat, featuring layers of creamy pudding, crumbled cookies, and festive decorations that resemble a mini pumpkin patch. Kids will love getting involved in assembling these treats, making it a great activity for the whole family.
This recipe is designed to serve 4-6 people, making it ideal for a small gathering or party. The cups are visually appealing and can be customized with various candies and decorations to fit the Halloween theme. Whether you’re hosting a Halloween party or just enjoying a festive dessert, Pumpkin Patch Dirt Cups are sure to be a hit.
Ingredients (serving size: 4-6 people):
- 1 package (3.9 ounces) instant chocolate pudding mix
- 2 cups cold milk
- 1 package (14.3 ounces) chocolate sandwich cookies
- 1 cup whipped topping
- 1 cup candy pumpkins
- 1/4 cup green decorating sugar or green sprinkles
- Clear plastic cups or small mason jars for serving
Instructions:
- Prepare the Pudding: In a medium-sized bowl, whisk together the instant chocolate pudding mix and cold milk until fully combined and smooth. Allow the pudding to set in the refrigerator for about 5 minutes, or until it thickens.
- Crush the Cookies: While the pudding is setting, place the chocolate sandwich cookies in a large resealable plastic bag. Use a rolling pin to crush the cookies into fine crumbs. Alternatively, you can use a food processor for this step.
- Layer the Dirt Cups: Start by adding a layer of cookie crumbs at the bottom of each cup or jar. Next, add a generous layer of chocolate pudding. Repeat the layering process until the cups are almost full, finishing with a top layer of cookie crumbs to resemble “dirt.”
- Decorate the Cups: Add a dollop of whipped topping on each cup. Sprinkle green decorating sugar or green sprinkles on top of the whipped topping to mimic grass. Place a few candy pumpkins on each cup to complete the pumpkin patch look.
- Chill and Serve: Refrigerate the completed Pumpkin Patch Dirt Cups for at least 30 minutes before serving to allow the layers to set together. Serve chilled.
Extra Tips: To make the Pumpkin Patch Dirt Cups even more engaging, consider using gummy worms or candy corn as additional decorations. You can also use different colors of decorating sugar to create varied grass effects. If making these cups with kids, encourage them to personalize their own cups with their favorite candy toppings. For a healthier twist, use reduced-fat cookies and low-fat milk to prepare the pudding.
Dracula’s Blood Punch

Dracula’s Blood Punch is a spooky and delightful drink that’s perfect for any Halloween gathering, particularly one that includes kids. This vibrant red punch isn’t only visually engaging but also bursting with fruity flavors that are sure to please young palates. By using a combination of fruit juices and soda, you can create a revitalizing beverage that has a hint of mystery and excitement, fitting right in with the Halloween spirit.
Whether you’re hosting a party or just having a fun family night, this punch will be a hit among children and adults alike. To enhance the eerie atmosphere, you can serve Dracula’s Blood Punch in a large glass bowl or cauldron. Add some plastic vampire fangs or gummy worms to the punch to give it an extra spooky touch. You might also consider using dry ice to create a fog effect that will delight and enchant your little guests.
This punch is simple to make, allowing you to focus on enjoying the festivities. Here’s how to create this Halloween treat that serves 4-6 people.
Ingredients:
- 2 cups cranberry juice
- 2 cups cherry juice
- 1 cup pomegranate juice
- 2 cups lemon-lime soda
- 1 cup club soda
- 1/4 cup grenadine syrup
- Ice cubes
- Optional: gummy worms, plastic vampire fangs, or dry ice
Instructions:
- Combine the Juices: In a large punch bowl, combine the cranberry juice, cherry juice, and pomegranate juice. Stir well to confirm that the juices are fully mixed together, creating the base of your punch.
- Add the Soda: Pour in the lemon-lime soda and club soda. These bubbly additions will give your punch a fizzy texture that kids love. Stir gently to maintain the carbonation as much as possible.
- Sweeten with Grenadine: Add the grenadine syrup to the punch. This won’t only enhance the sweetness but also deepen the red color, making it look even more like “blood.”
- Chill the Punch: Add ice cubes to the punch bowl to keep the drink nice and cold. If you’re using dry ice, handle it with care and place a small piece into the punch for a spooky fog effect. Confirm it’s fully dissolved before serving to ensure safety.
- Decorate and Serve: For an extra Halloween touch, float gummy worms on the surface of the punch or hang plastic vampire fangs on the rim of the glasses. Serve immediately to enjoy it at its fizziest and most invigorating state.
Extra Tips:
When using dry ice, make sure to handle it with care, using gloves or tongs, and never touch it directly with bare hands. It’s important to allow the dry ice to completely dissolve before serving the punch to kids to avoid any risk of frostbite.
If you prefer a less sweet version, you can adjust the amount of grenadine or substitute the lemon-lime soda with more club soda. For a fun twist, freeze some of the juice in ice cube trays and use those instead of regular ice to avoid diluting the punch as it sits.
Creepy Crawly Cupcakes

Creepy Crawly Cupcakes are a spook-tacular treat perfect for Halloween festivities. These adorable yet eerie cupcakes will delight kids with their ghoulish decorations that resemble crawling creatures.
Whether you’re hosting a Halloween party or simply indulging in some festive baking at home, these cupcakes are sure to be a hit. The combination of moist chocolate cupcakes and fun, creepy toppers makes these an irresistible treat for kids and adults alike.
To create these Creepy Crawly Cupcakes, you’ll start with a classic chocolate cupcake base, which provides the perfect backdrop for the spooky decorations. The cupcakes are then topped with a rich chocolate frosting to simulate the dark and mysterious nature of Halloween night.
The highlight of this recipe is the edible creepy crawlies made with gummy worms and chocolate sprinkles, which add a playful element to each bite. With a serving size suitable for 4-6 people, this recipe guarantees there’s enough creepy crawly fun to go around.
Ingredients (Serving Size: 4-6 people)
- 1 cup all-purpose flour
- 1 cup granulated sugar
- 1/3 cup unsweetened cocoa powder
- 1/2 teaspoon baking powder
- 1/2 teaspoon baking soda
- 1/4 teaspoon salt
- 1/2 cup milk
- 1/4 cup vegetable oil
- 1 teaspoon vanilla extract
- 1 egg
- 1/2 cup boiling water
- 1 can (16 oz) chocolate frosting
- 1 pack gummy worms
- Chocolate sprinkles
Cooking Instructions
- Preheat the Oven: Start by preheating your oven to 350°F (175°C). Line a muffin tin with cupcake liners to prepare for the batter.
- Mix Dry Ingredients: In a large mixing bowl, combine the flour, sugar, cocoa powder, baking powder, baking soda, and salt. Whisk the dry ingredients until they’re fully integrated and free of lumps.
- Prepare the Batter: Add the milk, vegetable oil, vanilla extract, and egg to the dry ingredients. Mix on medium speed using an electric mixer until the batter is smooth. Gradually stir in the boiling water until the batter is thin and glossy.
- Bake the Cupcakes: Pour the batter into the prepared cupcake liners, filling each one about two-thirds full. Bake in the preheated oven for 18-20 minutes, or until a toothpick inserted into the center of a cupcake comes out clean.
- Cool the Cupcakes: Once baked, remove the cupcakes from the oven and allow them to cool in the pan for about 5 minutes. Then transfer them to a wire rack to cool completely before frosting.
- Frost the Cupcakes: Use a spatula to spread a generous layer of chocolate frosting over each cooled cupcake, creating a smooth, even surface.
- Decorate with Creepy Crawlies: Cut gummy worms in half and place them on top of the frosting to resemble creepy crawlies emerging from the cupcakes. Sprinkle chocolate sprinkles over the frosting to add texture and simulate dirt.
Extra Tips
For an even spookier effect, consider adding a few drops of green or red food coloring to the chocolate frosting to create a more eerie appearance.
You can also use different types of gummy creatures, like spiders or centipedes, for added variety. If you prefer a homemade frosting, a simple buttercream with added cocoa powder works wonderfully.
When cutting the gummy worms, use a clean pair of kitchen shears for more precise cuts. Finally, verify the cupcakes are completely cooled before frosting to prevent the frosting from melting.
Haunted Veggie Skeletons
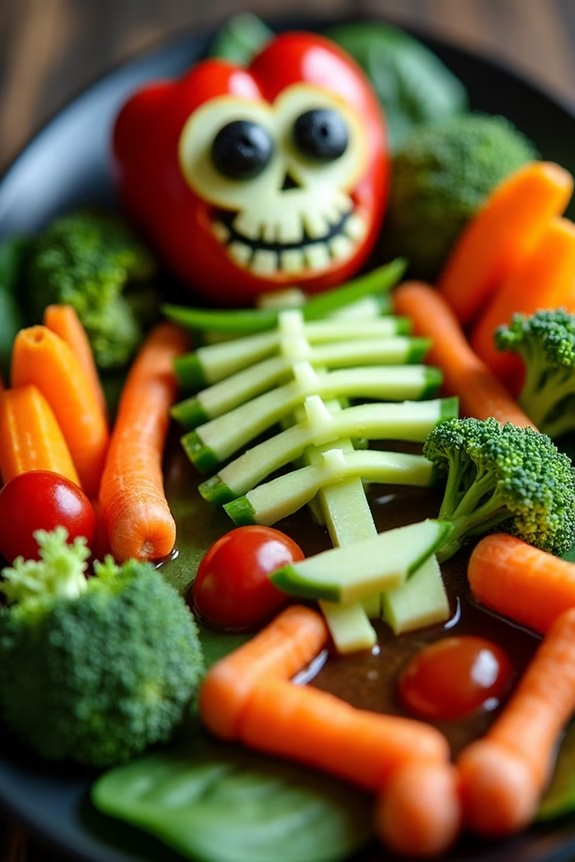
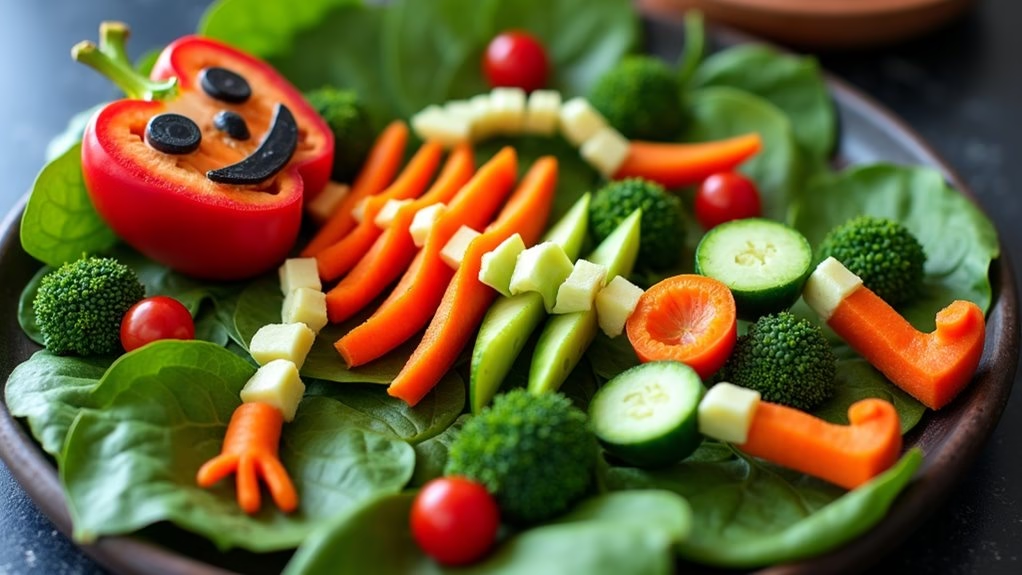
Halloween is the perfect time to get creative with food, making dishes that are both fun and healthy. One exciting dish for kids is Haunted Veggie Skeletons. This delightful platter encourages children to eat their veggies while enjoying the spooky Halloween theme. Using a variety of colorful vegetables, you can create a skeleton masterpiece that’s sure to delight little ones at any Halloween gathering.
The concept is simple: assemble an array of fresh vegetables into the shape of a skeleton on a large platter. The head can be fashioned from a halved red bell pepper, the body from cucumber slices or celery sticks, and the limbs from carrots, cherry tomatoes, and broccoli florets. Serve this with a delicious dip, such as ranch or hummus, and watch as kids are drawn to this healthy, spooky snack.
Ingredients (Serving Size: 4-6 people):
- 1 large red bell pepper
- 1 large cucumber
- 3-4 large carrots
- 1 small head of broccoli
- 1 cup cherry tomatoes
- 1 cup sugar snap peas
- 1 cup baby spinach leaves
- 1/2 cup black olives
- 1 cup ranch dressing or hummus (for dipping)
Cooking Instructions:
- Prepare the Vegetables: Wash all vegetables thoroughly. Slice the red bell pepper in half, removing the seeds and stem. Cut the cucumber into thin slices. Peel the carrots and cut them into sticks. Separate the broccoli into small florets. Halve the cherry tomatoes.
- Assemble the Skeleton: On a large serving platter, start by placing the halved red bell pepper at the top to form the skeleton’s head. You can use the black olives to create eyes and a mouth on the pepper.
- Form the Body: Lay out the cucumber slices in a vertical line beneath the head to form the spine. Use sugar snap peas to create ribs by placing them horizontally across the cucumber slices.
- Create the Limbs: Arrange carrot sticks as arms and legs extending from the body. Use broccoli florets for the skeleton’s hands and feet, and place cherry tomatoes at the joints for added color.
- Add Finishing Touches: Use baby spinach leaves to fill in any gaps around the skeleton to add a leafy background. Place the dipping sauce in a small bowl at the base of the skeleton for easy access.
- Serve and Enjoy: Present the platter to your party guests and encourage them to dip their favorite veggies into the ranch dressing or hummus.
Extra Tips:
To make the Haunted Veggie Skeletons even more appealing to kids, consider using small cookie cutters to shape some of the vegetables into fun forms like stars or moons. This adds an extra element of surprise and delight.
Additionally, feel free to substitute any vegetables based on personal preference or availability. The key is to use a variety of colors and shapes to make the skeleton visually striking and enticing to young eyes. Make sure to keep the vegetables crisp and fresh by assembling the platter shortly before serving.