
Halloween parties just aren’t the same without a lineup of treats that disappear faster than you can say “boo.” Picture Ghostly Cupcakes, Monster Eyeball Truffles, and Witch’s Brew Punch, each with a spooky twist that brings Halloween to life. These 15 tempting creations are sure to delight both kids and adults, blending fun flavors with eye-catching presentations. Get ready to uncover other eerie goodies that will make your celebration truly unforgettable. Let’s make this Halloween a sweetly spooky affair!
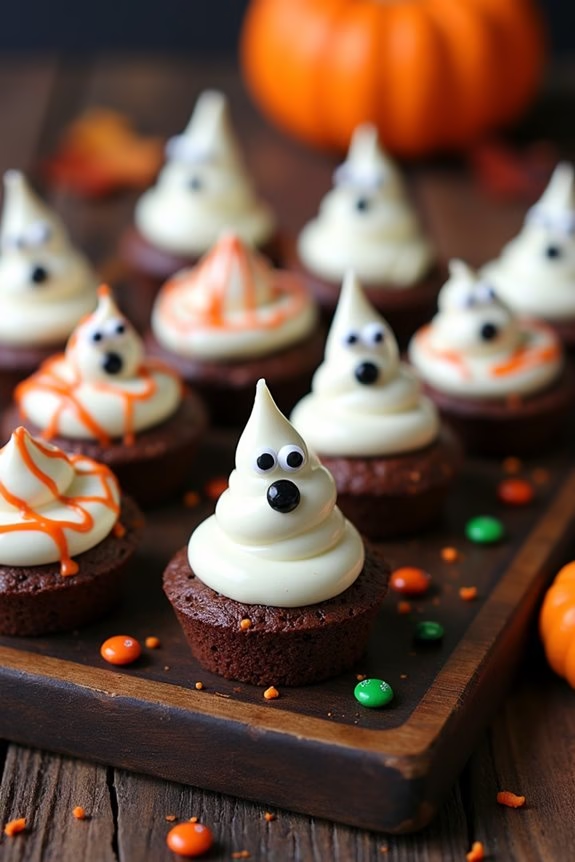
Ghostly Cupcakes
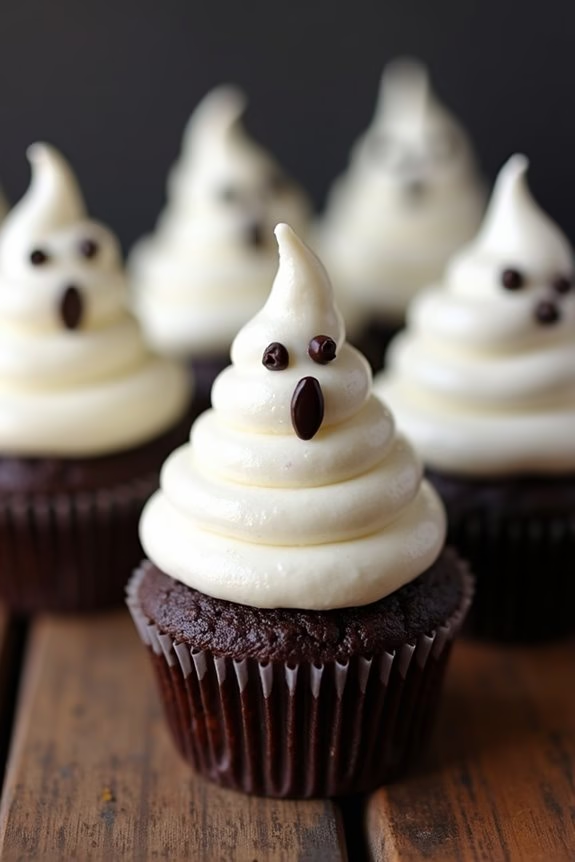
Ghostly Cupcakes are a spooktacular addition to any Halloween party, delighting both kids and adults with their eerie charm. These cupcakes aren’t only delicious but also fun to make, with their ghostly appearance adding a whimsical touch to your festive spread.
With a moist chocolate base and a creamy, marshmallow-like topping shaped like little ghosts, they’re sure to be a hit at your gathering. Perfectly sized and easy to serve, Ghostly Cupcakes bring a playful spirit to your Halloween celebrations.
Creating these hauntingly good cupcakes is simpler than you might think. You’ll start by making a rich chocolate cupcake base, guaranteeing each bite is filled with deep cocoa flavor. Then, you’ll whip up a fluffy marshmallow frosting, which will be piped into ghost shapes, complete with tiny chocolate chip eyes.
The result is an adorable and delicious treat that captures the essence of Halloween fun. Whether you’re hosting a party or just looking to indulge in some spooky baking, these Ghostly Cupcakes are a must-try.
Ingredients (Serves 4-6 people):
- 1 cup all-purpose flour
- 1/2 cup unsweetened cocoa powder
- 1 cup granulated sugar
- 1 teaspoon baking powder
- 1/2 teaspoon baking soda
- 1/4 teaspoon salt
- 1/2 cup unsalted butter, melted
- 2 large eggs
- 1 teaspoon vanilla extract
- 1/2 cup milk
- 1 cup mini marshmallows
- 1/4 cup heavy cream
- 1/2 cup mini chocolate chips
Cooking Instructions:
- Preheat and Prepare: Preheat your oven to 350°F (175°C) and line a cupcake pan with 12 paper liners. This will guarantee that your cupcakes bake evenly and are easy to remove from the pan.
- Mix Dry Ingredients: In a medium-sized bowl, whisk together the flour, cocoa powder, sugar, baking powder, baking soda, and salt. This will evenly distribute the baking agents and guarantee a uniform rise.
- Combine Wet Ingredients: In another bowl, beat together the melted butter, eggs, and vanilla extract until well combined. Slowly add the milk and continue to mix until smooth.
- Create Batter: Gradually add the dry ingredients to the wet ingredients, mixing until just combined. Be careful not to overmix, as this can result in dense cupcakes.
- Bake Cupcakes: Divide the batter evenly among the cupcake liners, filling each about two-thirds full. Bake for 18-20 minutes, or until a toothpick inserted into the center comes out clean. Allow the cupcakes to cool completely on a wire rack.
- Make Marshmallow Frosting: In a heatproof bowl, combine mini marshmallows and heavy cream. Melt them together using a double boiler, stirring until smooth. Let the mixture cool slightly.
- Pipe Ghosts: Transfer the marshmallow frosting to a piping bag fitted with a round nozzle. Pipe the frosting onto each cupcake in a spiral to create ghost shapes.
- Add Eyes: Gently press two mini chocolate chips onto each ghost to form the eyes. Let the frosting set for a few minutes before serving.
Extra Tips:
For the best results, make sure all your ingredients are at room temperature, which helps the batter and frosting combine smoothly. If you don’t have a piping bag, you can use a plastic zip-top bag and snip off a corner to pipe the frosting.
Customize your ghostly faces with different expressions by using a toothpick to adjust the chocolate chip eyes. Store any leftover cupcakes in an airtight container at room temperature for up to two days. Enjoy your spooky sweet treats!
Monster Eyeball Truffles
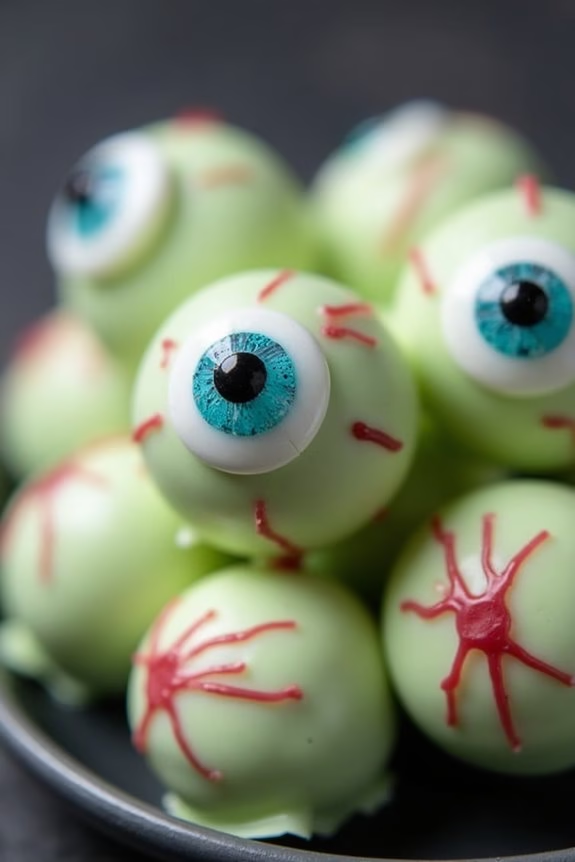
Monster Eyeball Truffles are a spooktacular treat perfect for any Halloween party. These eerie delights aren’t only fun and creepy to look at but also deliciously rich and sweet. Made with a luscious combination of chocolate and cream cheese, each truffle is rolled into a ball and then transformed into a gory eyeball with the help of candy decorations.
Whether you’re hosting a party for kids or adults, these Monster Eyeball Truffles are certain to be a hit. Ideal for serving 4-6 people, this recipe is both simple and satisfying. The key to creating these devilishly delightful truffles is in the details. By using small candy eyeballs and a bit of creativity, you can craft a treat that will both delight and frighten your guests.
These truffles are a fantastic way to add a touch of the macabre to your party spread without too much fuss.
Ingredients (serving size: 4-6 people):
- 8 oz cream cheese, softened
- 16 oz package chocolate sandwich cookies (like Oreos)
- 12 oz white chocolate chips or candy melts
- Small candy eyeballs
- Red and black gel icing or edible markers
- Optional: Green food coloring
Cooking Instructions:
- Prepare the Cookie Mixture: In a food processor, crush the chocolate sandwich cookies until they become fine crumbs. Transfer the crumbs to a large bowl.
- Mix with Cream Cheese: Add the softened cream cheese to the bowl with the cookie crumbs. Mix thoroughly until well combined and a dough-like consistency forms. You can use a spatula or your hands for this step.
- Form the Truffle Balls: Roll the cookie mixture into small balls, about 1 inch in diameter. Place the balls on a baking sheet lined with parchment paper.
- Chill the Truffles: Place the baking sheet in the refrigerator for at least 30 minutes to allow the truffles to firm up.
- Melt the White Chocolate: While the truffles are chilling, melt the white chocolate chips or candy melts in a microwave-safe bowl. Heat in 30-second intervals, stirring in between, until completely smooth. If desired, add a few drops of green food coloring to make the coating look more monstrous.
- Coat the Truffles: Remove the truffles from the refrigerator. Dip each truffle into the melted white chocolate, guaranteeing it’s fully coated. Use a fork to lift the truffle out, allowing excess chocolate to drip off before placing it back on the parchment paper.
- Decorate the Eyeballs: Immediately place a candy eyeball on top of each truffle while the chocolate is still wet. Use red and black gel icing or edible markers to draw veins and details on the eyeballs for a more realistic effect.
- Set the Coating: Allow the chocolate to set completely. You can speed up this process by placing the truffles back in the refrigerator for an additional 10-15 minutes.
Extra Tips:
When making Monster Eyeball Truffles, verify that the cream cheese is fully softened before mixing to achieve a smooth consistency. If you find the chocolate coating too thick, add a small amount of vegetable oil to thin it out.
For a more colorful display, experiment with different candy melt colors or use assorted candy eyeballs. These truffles can be made a day in advance and stored in the refrigerator, making them a convenient option for party planning. Enjoy your creepy creations!
Witch’s Brew Punch
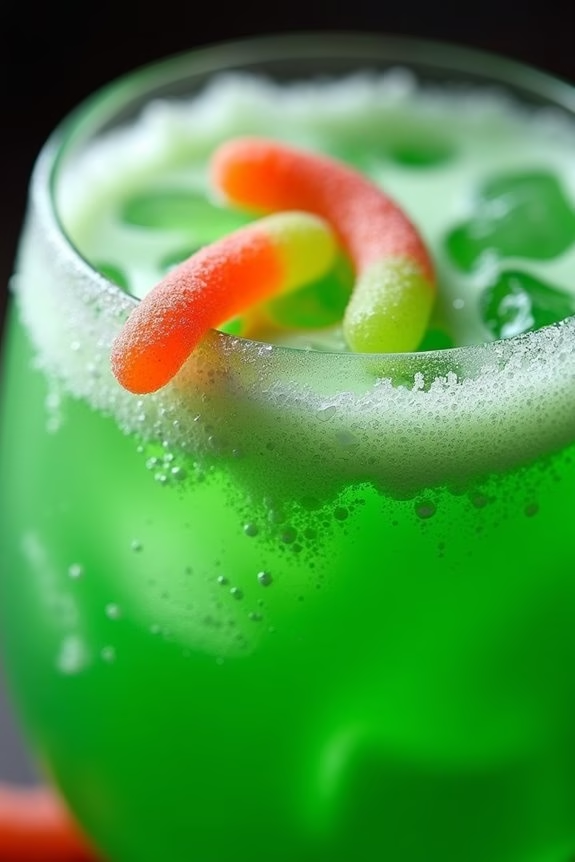
Witch’s Brew Punch is a delightful and visually enchanting beverage that’s perfect for any Halloween party. This eerie concoction isn’t only delicious but also adds a spooky touch to your Halloween festivities. With its vibrant green color and tantalizing flavors, Witch’s Brew Punch is sure to be a hit among both children and adults at your gathering.
Whether you’re hosting a small get-together or a larger bash, this punch is easy to scale up or down to meet your needs. The beauty of Witch’s Brew Punch lies in its simple preparation and the adaptability of its ingredients. You can make it as sweet or as tart as you prefer, and the addition of sherbet or gummy candy can provide a fun twist.
With its bubbling, frothy top, thanks to the addition of soda, this punch looks like it’s been concocted in a witch’s cauldron. Perfect for a group of 4-6 people, this recipe will guide you through creating a bewitching beverage that will enchant your guests.
Ingredients (serving size: 4-6 people):
- 1 liter lemon-lime soda
- 2 cups pineapple juice
- 4 cups green fruit punch
- 1/2 cup lime juice
- 1 pint lime sherbet
- 1 cup gummy worms (optional)
- Ice cubes
Instructions:
- Prepare the Base: In a large punch bowl, combine the pineapple juice, green fruit punch, and lime juice. Stir well to make sure that all the juices are thoroughly mixed.
- Add Fizz: Gently pour the lemon-lime soda into the punch bowl. Stir slowly to maintain the carbonation, which will give the punch its bubbly, frothy appearance.
- Incorporate Sherbet: Add the pint of lime sherbet to the punch. Allow it to float on top and slowly melt into the mixture. This will create a creamy, frothy layer that resembles a witch’s cauldron bubbling over.
- Chill with Ice: Add ice cubes to the punch bowl to keep the beverage cool throughout the duration of your party. This also helps in diluting the punch slightly, balancing the flavors.
- Garnish and Serve: If using, add gummy worms on top of the punch for an extra spooky touch. Serve immediately in clear cups to showcase the vibrant green color and frothy top.
Extra Tips:
For a more dramatic effect, you can serve Witch’s Brew Punch in a cauldron-style punch bowl. Consider adding dry ice to the setup (not directly in the drink) for a smoky, mysterious atmosphere, but make sure it’s handled safely and kept out of the reach of children.
If you want to experiment with flavors, try adding a splash of ginger ale for an extra kick or substitute the lime sherbet with orange for a different color and taste. Always taste the punch before serving to adjust sweetness or tartness to your liking, making sure it’s just right for your guests.
Candy Corn Popcorn Mix
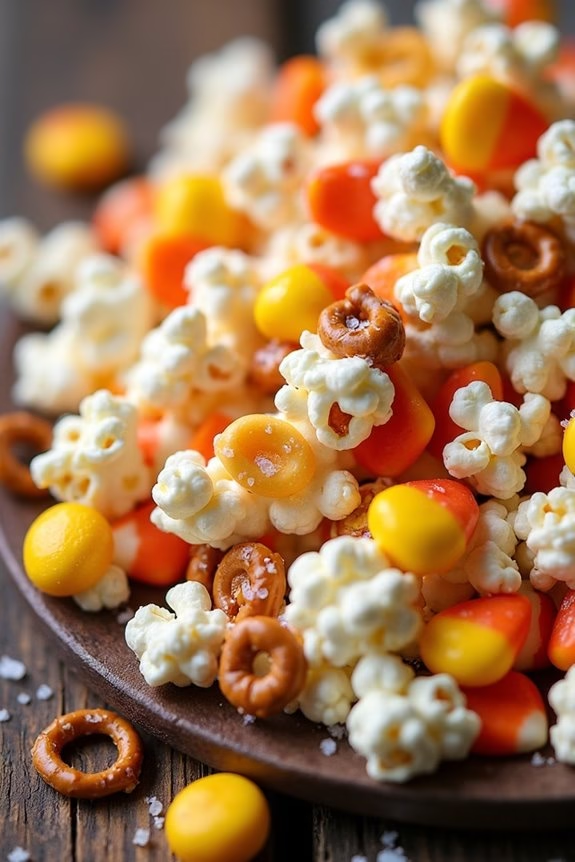
If you’re looking to add a festive touch to your Halloween party, the Candy Corn Popcorn Mix is a perfect treat that combines the sweetness of candy corn with the savory crunch of popcorn.
This delightful mix isn’t only easy to make but is also certain to be a hit among both kids and adults. With its vibrant colors and irresistible flavor, this snack is ideal for serving at any Halloween gathering.
Candy Corn Popcorn Mix is a versatile dish, allowing you to add or adjust ingredients based on your preferences. You can even get creative by incorporating other Halloween-themed candies or nuts for an extra crunch.
The following recipe is designed to serve 4-6 people, making it suitable for small get-togethers or as part of a larger snack spread.
Ingredients (Serving Size: 4-6 people)
- 8 cups of popped popcorn
- 2 cups of candy corn
- 1 cup of pretzel sticks
- 1 cup of peanuts (optional)
- 1 cup of melted white chocolate or candy melts
- ½ teaspoon of sea salt
Cooking Instructions
- Prepare the Popcorn: Begin by popping your popcorn. You can use store-bought popcorn or make your own using an air popper or stovetop. Once popped, confirm all unpopped kernels are removed.
- Mix the Ingredients: In a large mixing bowl, combine the popped popcorn, candy corn, pretzel sticks, and peanuts. Toss them together gently to confirm an even distribution of all components.
- Melt the Chocolate: In a microwave-safe bowl, melt the white chocolate or candy melts in the microwave. Heat in 30-second intervals, stirring in between, until fully melted and smooth.
- Coat the Mix: Drizzle the melted chocolate over the popcorn mixture. Use a spatula or spoon to gently fold the mixture, confirming that the chocolate coats the ingredients evenly.
- Add Salt: Sprinkle the sea salt over the chocolate-coated mixture and give it a final gentle toss to make sure the salt adheres to the melted chocolate.
- Set and Serve: Spread the mixture onto a baking sheet lined with parchment paper. Allow it to set at room temperature for about 30 minutes, or until the chocolate has hardened. Once set, break into clusters and serve.
Extra Tips
For an added flair, consider using colored candy melts to match your Halloween theme or add visual interest.
If you prefer a healthier option, you can substitute candy corn with dried fruit like cranberries or raisins. Additionally, keep in mind that the mix can be stored in an airtight container for up to a week, making it a great make-ahead option for your party.
Mummy Pretzel Rods
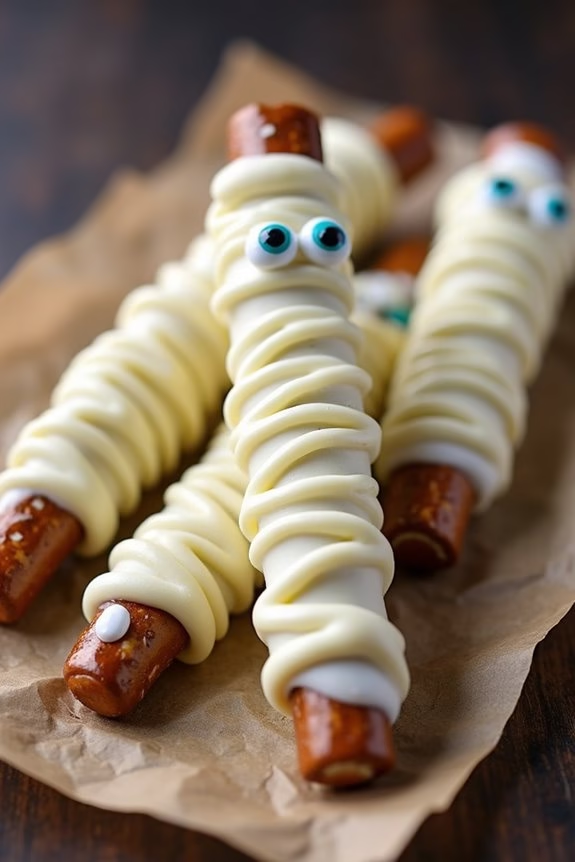
Mummy Pretzel Rods are a spook-tacular addition to any Halloween party spread. These fun and festive treats aren’t only delicious but also visually striking, making them perfect conversation starters.
With their eerie appearance resembling wrapped mummies, they’re sure to delight both kids and adults alike. Combining the salty crunch of pretzel rods with the sweet smoothness of white chocolate, these treats strike the perfect balance between sweet and savory, guaranteeing they’re a hit at any gathering.
Creating Mummy Pretzel Rods is a simple process that even the novice cook can master. The key is to meticulously wrap the white chocolate around the pretzel rods to achieve that authentic mummy look. This recipe makes approximately 4-6 servings, ideal for a small party or gathering.
Whether you’re hosting a Halloween bash or just want to surprise your family with a spooky snack, this recipe will guide you through creating these ghoulishly delightful treats.
Ingredients:
- 12 pretzel rods
- 1 cup white chocolate chips or white candy melts
- 1 tablespoon vegetable shortening (optional, for smoother chocolate)
- Small candy eyes
- Wax paper or parchment paper
Instructions:
- Prepare the Pretzel Rods: Lay out a sheet of wax paper or parchment paper on a large baking sheet or countertop. This will be used to place the coated pretzels on as they set.
- Melt the White Chocolate: In a microwave-safe bowl, combine the white chocolate chips (or candy melts) and vegetable shortening. Microwave in 20-second intervals, stirring in between, until the chocolate is completely melted and smooth. Be careful not to overheat the chocolate.
- Coat the Pretzel Rods: Dip each pretzel rod into the melted white chocolate, using a spoon to help cover about two-thirds of the pretzel. Allow any excess chocolate to drip off before placing the coated pretzel onto the prepared wax paper.
- Create the Mummy Wrap: Using a fork or a piping bag with a small round tip, drizzle additional melted white chocolate over the coated pretzel rods in a crisscross pattern to create the appearance of mummy bandages.
- Add the Eyes: While the chocolate is still soft, place two candy eyes near the top of each pretzel rod. Press gently to make sure they stick.
- Let Them Set: Allow the coated pretzel rods to cool and the chocolate to harden completely. You can speed up the process by placing them in the refrigerator for about 10-15 minutes.
Extra Tips:
To guarantee the white chocolate adheres smoothly to the pretzel rods, make sure the pretzels are completely dry and at room temperature before dipping.
If you prefer, you can substitute the candy eyes with small dots of dark chocolate or black gel icing to create eyes. For a fun twist, you can also use colored candy melts to give your mummies a unique look.
Store any leftover Mummy Pretzel Rods in an airtight container at room temperature for up to a week, keeping them fresh and crunchy.
Spooky Spider Cookies
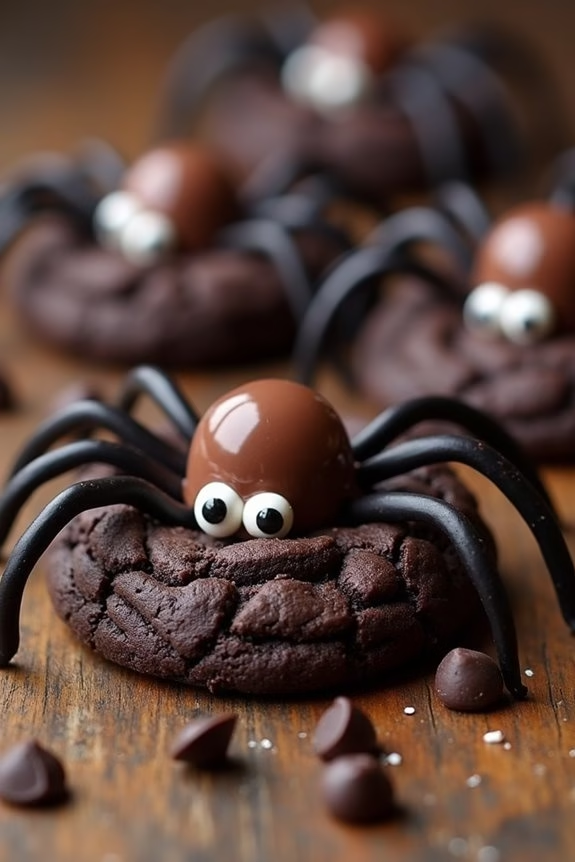
Spooky Spider Cookies are the perfect Halloween treat to spookify your party while delighting your guests’ taste buds. These festive cookies are a fun and creative way to add some eerie charm to your dessert table. They combine the classic taste of chocolate cookies with a playful spider design, making them a hit with both kids and adults. Not only do they taste delicious, but they also serve as a perfect conversation starter at any Halloween gathering.
Creating these Spooky Spider Cookies is an enjoyable activity that can involve the entire family. The recipe is simple enough for children to lend a hand with decorating, allowing them to express their creativity in forming the spider shapes. With just a few basic ingredients and some spooky decorations, you’ll have a batch of creepy crawly cookies ready to impress your guests. This recipe makes enough for a serving size of 4-6 people, ensuring there’s plenty to go around.
Ingredients:
- 1 cup unsalted butter, softened
- 1 cup granulated sugar
- 1 cup packed brown sugar
- 2 large eggs
- 1 teaspoon vanilla extract
- 2 cups all-purpose flour
- 2/3 cup cocoa powder
- 1 teaspoon baking soda
- 1/2 teaspoon salt
- 1 cup mini chocolate chips
- 12 chocolate truffles (e.g., Lindt Lindor)
- 24 candy eyes
- 1/2 cup black decorating gel
Instructions:
- Preheat and Prepare: Preheat your oven to 350°F (175°C). Line two baking sheets with parchment paper to prevent the cookies from sticking.
- Cream Butter and Sugars: In a large mixing bowl, beat together the softened butter, granulated sugar, and brown sugar until light and fluffy. This should take about 2-3 minutes.
- Add Eggs and Vanilla: Mix in the eggs one at a time, ensuring each is fully incorporated before adding the next. Stir in the vanilla extract.
- Combine Dry Ingredients: In another bowl, whisk together the flour, cocoa powder, baking soda, and salt. Gradually add the dry ingredients to the wet mixture, mixing until just combined.
- Stir in Chocolate Chips: Fold in the mini chocolate chips to distribute them evenly throughout the dough.
- Shape and Bake: Scoop tablespoon-sized amounts of dough onto the prepared baking sheets, spacing them about 2 inches apart. Bake in the preheated oven for 10-12 minutes, or until the cookies are set but still soft.
- Cool and Decorate: Remove the cookies from the oven and immediately press a chocolate truffle into the center of each cookie. Allow them to cool on the baking sheets for 5 minutes before transferring to a wire rack. Once cooled, use black decorating gel to draw eight spider legs extending from the truffle and attach candy eyes with a small dab of gel.
Extra Tips:
For an extra spooky touch, consider using a mix of different colored candy eyes or adding a touch of red decorating gel for a bloodshot effect. If the decorating gel is too runny, chill it in the refrigerator for a few minutes to firm it up before use.
Additionally, make sure not to overbake the cookies; they should remain soft and chewy, as they’ll firm up slightly as they cool. Finally, these cookies can be stored in an airtight container for up to a week, making them a convenient make-ahead treat for your Halloween party.
Haunted Brownie Bites
These Haunted Brownie Bites are the perfect spooky treat for your Halloween party. Not only are they deliciously chocolatey, but they also add a fun and eerie touch to your dessert table. With a rich, fudgy texture and a hauntingly delightful appearance, these brownie bites are guaranteed to be a hit with both kids and adults alike.
Decorate them with ghostly shapes, creepy crawlies, or any other Halloween-themed toppings to create a dessert that’s as festive as it’s tasty. Perfect for a crowd, this recipe yields enough for 4-6 people, making it ideal for small gatherings or as part of a larger Halloween spread.
The brownie bites are simple to make, using basic ingredients that you likely already have in your pantry. So, gather your ingredients and let’s get started on these spooky treats that are both a delight to the eye and the taste buds.
Ingredients (serving size: 4-6 people):
- 1/2 cup unsalted butter
- 3/4 cup granulated sugar
- 2 large eggs
- 1 teaspoon vanilla extract
- 1/3 cup unsweetened cocoa powder
- 1/2 cup all-purpose flour
- 1/4 teaspoon salt
- 1/4 teaspoon baking powder
- 1/2 cup mini chocolate chips
- 1/4 cup white chocolate chips (for decoration)
- Black and orange food coloring gel
- Halloween-themed sprinkles or candy eyes
Cooking Instructions:
- Preheat the Oven: Start by preheating your oven to 350°F (175°C) to make certain it’s ready for baking the brownie bites.
- Prepare the Baking Pan: Grease a mini muffin tin with non-stick cooking spray or line with mini paper liners for easy removal and cleanup.
- Melt the Butter: In a medium-sized saucepan, melt the butter over low heat. Once melted, remove from heat and stir in the sugar until well combined.
- Mix the Wet Ingredients: Allow the butter and sugar mixture to cool slightly, then whisk in the eggs one at a time, followed by the vanilla extract.
- Combine the Dry Ingredients: In a separate bowl, sift together the cocoa powder, flour, salt, and baking powder to make sure there are no lumps.
- Create the Brownie Batter: Gradually add the dry ingredients to the wet mixture, stirring until just combined. Be careful not to overmix, as this can result in dense brownies.
- Add Chocolate Chips: Gently fold in the mini chocolate chips to add an extra chocolatey bite to each brownie.
- Fill the Muffin Tin: Using a small cookie scoop or spoon, fill each cavity of the muffin tin about 3/4 full with the brownie batter.
- Bake the Brownie Bites: Place the tin in the preheated oven and bake for 12-15 minutes, or until a toothpick inserted into the center comes out with a few moist crumbs.
- Cool and Decorate: Allow the brownie bites to cool in the tin for a few minutes before transferring them to a wire rack to cool completely. Melt the white chocolate chips in the microwave, then divide and color with black and orange food coloring gel. Use the colored chocolate to create spooky designs on top of each brownie bite, and add sprinkles or candy eyes for extra flair.
Extra Tips:
For an extra spooky touch, consider using Halloween-themed molds to bake these brownie bites in fun shapes like ghosts or pumpkins.
If you want to make these treats ahead of time, the undecorated brownie bites can be baked and frozen for up to a month. Simply thaw them at room temperature before decorating.
For a gluten-free version, substitute the all-purpose flour with a gluten-free flour blend. Remember to adjust the baking time based on your oven and the size of your mini muffin tin. Enjoy these Haunted Brownie Bites as the perfect Halloween party dessert!
Vampire Bat Cheese Balls
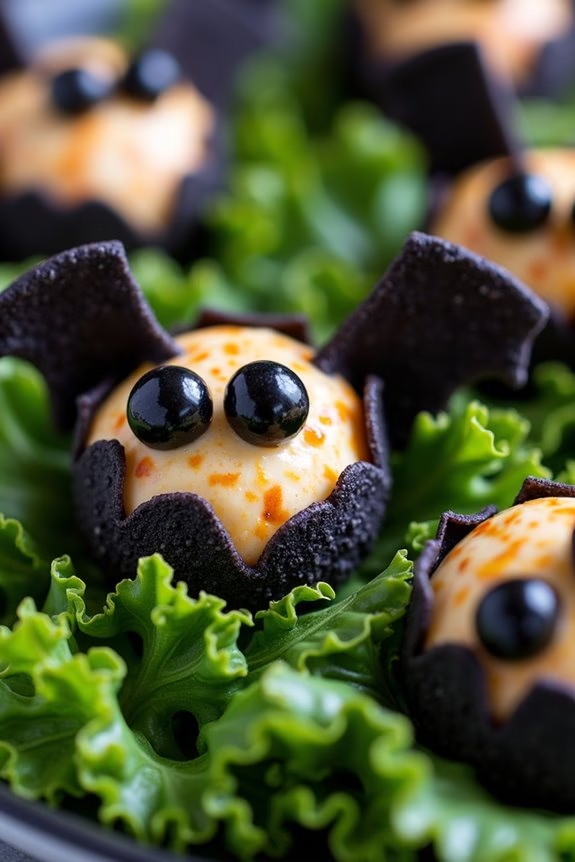
Vampire Bat Cheese Balls are a spooktacular addition to any Halloween party, offering a whimsical and delicious treat that’s certain to delight guests of all ages. These cheesy bites are shaped like little bats, complete with wings and eyes, making them a fun yet savory option among the sweet treats typically found at Halloween gatherings. The creamy cheese mixture inside contrasts perfectly with the crunchy coating, creating a delightful texture that will have everyone coming back for more.
Perfect for a gathering of 4-6 people, these Vampire Bat Cheese Balls are simple to prepare and can be made ahead of time, freeing you up to enjoy the festivities. Whether you’re hosting a full-fledged Halloween bash or a small get-together with friends and family, these cheese balls are a must-have on your menu. With a blend of flavorful cheeses, spices, and a crunchy coating, they make for an irresistible appetizer that captures the Halloween spirit.
Ingredients:
- 8 ounces cream cheese, softened
- 1 cup shredded sharp cheddar cheese
- 1/2 cup grated Parmesan cheese
- 1 teaspoon garlic powder
- 1 teaspoon onion powder
- 1/2 teaspoon smoked paprika
- Salt and pepper to taste
- 1 cup crushed black tortilla chips
- 12-16 black olives, sliced in half
- 24-36 almond slivers (for wings)
- Pretzel sticks (for serving)
Instructions:
- Prepare the Cheese Mixture: In a large bowl, combine the softened cream cheese, shredded cheddar cheese, and grated Parmesan cheese. Mix thoroughly until smooth and well combined. Add the garlic powder, onion powder, smoked paprika, and a pinch of salt and pepper. Mix until the spices are evenly distributed throughout the cheese mixture.
- Shape the Cheese Balls: Using a tablespoon or small ice cream scoop, portion out the cheese mixture and roll into 1-inch balls. Place the shaped balls on a baking sheet lined with parchment paper. Once all the balls are formed, place the baking sheet in the refrigerator for about 30 minutes to allow the cheese balls to firm up.
- Coat the Cheese Balls: While the cheese balls are chilling, crush the black tortilla chips in a zip-lock bag until they’re finely crumbled. Pour the crushed chips onto a shallow plate. Once the cheese balls have chilled, roll each one in the crushed tortilla chips until completely coated.
- Decorate the Cheese Balls: Press a sliced black olive onto each cheese ball to create the bat’s eyes. Insert two almond slivers on each side of the cheese balls to form the wings. Make sure the almonds are securely attached.
- Serve and Enjoy: Arrange the Vampire Bat Cheese Balls on a serving platter, and insert pretzel sticks into each cheese ball for easy handling. Serve immediately or refrigerate until ready to serve.
Extra Tips:
To guarantee the cheese balls hold their shape, make sure the cream cheese is softened to room temperature before mixing. This will help in creating a smooth and uniform mixture. When shaping the balls, wet your hands slightly to prevent the cheese from sticking.
If you want to add a bit of heat, consider adding a dash of cayenne pepper to the cheese mixture. For a fun presentation, consider placing the Vampire Bat Cheese Balls on a bed of lettuce or kale to mimic a spooky forest floor.
Pumpkin Patch Dirt Cups
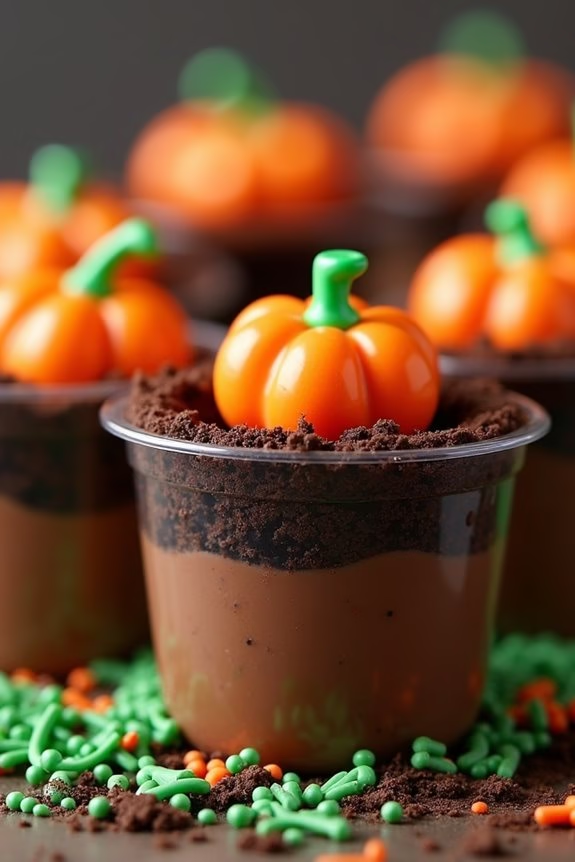
Pumpkin Patch Dirt Cups are a fun and festive treat perfect for Halloween parties. These delightful desserts combine layers of rich chocolate pudding, crumbled chocolate cookies, and a colorful pumpkin patch made from candy pumpkins and green sprinkles. Not only are they easy to make, but they also offer a visually appealing treat that captures the Halloween spirit.
Whether you’re hosting a party or simply looking to enjoy a themed dessert with family, these dirt cups are bound to impress both kids and adults alike.
The key to these Pumpkin Patch Dirt Cups lies in their playful presentation and delicious layers. By using pre-made chocolate pudding and store-bought chocolate sandwich cookies, you can quickly assemble these treats with minimal effort. Each cup is topped with candy pumpkins and green sprinkles to mimic a pumpkin patch, creating a delightful and edible Halloween scene.
This recipe serves 4-6 people, making it an ideal choice for small gatherings or an intimate Halloween celebration.
Ingredients
- 2 cups of chocolate pudding (store-bought or homemade)
- 20 chocolate sandwich cookies
- 12-18 candy pumpkins
- Green sprinkles
- 4-6 clear plastic cups
Cooking Instructions
- Prepare the Chocolate Pudding: If you’re using store-bought pudding, simply open the containers. If making homemade pudding, prepare according to your recipe and allow it to cool before assembling the cups.
- Crush the Cookies: Place the chocolate sandwich cookies in a zip-top bag and crush them using a rolling pin until they resemble fine crumbs. This will serve as the “dirt” layer in the cups.
- Assemble the Cups: Begin by adding a layer of chocolate pudding to the bottom of each clear plastic cup. Divide the pudding evenly among the cups.
- Add the Cookie Crumbs: Sprinkle a generous layer of crushed cookies over the pudding in each cup. Confirm the crumbs cover the pudding completely to create the appearance of soil.
- Decorate the Pumpkin Patch: Place 2-3 candy pumpkins on top of the cookie layer in each cup. Arrange them to look like a mini pumpkin patch.
- Add Green Sprinkles: Sprinkle a small amount of green sprinkles around the candy pumpkins to mimic grass or vines, enhancing the pumpkin patch effect.
- Chill the Cups: Place the assembled cups in the refrigerator for at least 30 minutes to allow the flavors to meld and the pudding to set further.
Extra Tips
For an added touch of whimsy, consider using a variety of candy decorations, such as gummy worms or candy corn, to enhance the Halloween theme.
Additionally, if making the pudding from scratch, verify it cools completely before assembling to prevent melting the toppings. These dirt cups can be made a day in advance, allowing for easy party preparation.
Serve them chilled for the best texture and flavor, and enjoy the spooky delight of Pumpkin Patch Dirt Cups at your Halloween gathering!
Zombie Finger Breadsticks

Halloween parties are a great opportunity to get creative with your treats, and Zombie Finger Breadsticks are sure to be a hit with kids and adults alike. These eerie breadsticks not only look the part but also taste delicious, with a perfect balance of crispy exterior and soft, chewy interior. They can be served alone or with a side of marinara sauce for dipping, adding a bloody twist to the presentation.
Making these breadsticks is a fun activity that you can even involve the kids in, letting them mold the dough into creepy finger shapes and add their own spooky touches.
Zombie Finger Breadsticks are made using simple ingredients you probably already have in your kitchen. With a preparation time of about 20 minutes and a cooking time of 15 minutes, you can whip these up in no time for a last-minute addition to any Halloween gathering. The following recipe will provide you with enough Zombie Finger Breadsticks to serve 4-6 people, ensuring everyone gets their fill of these frightful snacks.
Ingredients (serving size: 4-6 people):
- 1 lb pizza dough
- 24 whole almonds
- 1 egg
- 1 tablespoon water
- 1 tablespoon olive oil
- 1 teaspoon garlic powder
- 1 teaspoon dried oregano
- 1 teaspoon salt
- Red food coloring (optional)
Cooking Instructions:
- Preheat and Prepare: Preheat your oven to 375°F (190°C). Line a baking sheet with parchment paper to prevent the breadsticks from sticking.
- Divide the Dough: Roll out the pizza dough on a lightly floured surface to a thickness of about 1/2 inch. Cut the dough into 24 equal pieces.
- Shape the Fingers: Roll each piece into a thin log, about 5 inches in length, shaping them to resemble fingers. Pinch one end to form a pointed tip and slightly flatten the other end to mimic a knuckle.
- Add Almond Nails: Press an almond into the tip of each dough finger to create the appearance of a fingernail.
- Prepare Egg Wash: In a small bowl, whisk together the egg and water to create an egg wash. Brush each dough finger lightly with the egg wash to give them a golden color when baked.
- Season the Breadsticks: In another small bowl, combine the olive oil, garlic powder, dried oregano, and salt. Use a pastry brush to lightly coat each finger with the mixture, enhancing the flavor and appearance.
- Bake the Breadsticks: Place the prepared fingers on the lined baking sheet, leaving some space between each one. Bake in the preheated oven for 12-15 minutes or until they’re golden brown.
- Cool and Decorate: Allow the Zombie Finger Breadsticks to cool slightly. If desired, use red food coloring to add a bloody effect around the almond nails for an extra spooky touch.
Extra Tips:
When shaping the dough into fingers, don’t worry about making them perfect. The more irregular and twisted they look, the creepier and more authentic they’ll appear.
If you don’t have pizza dough, you can substitute with crescent roll dough or even breadstick dough. Additionally, you can experiment with different seasonings, such as adding a bit of Parmesan cheese or paprika, to customize the flavor to your liking.
Be sure to keep an eye on them while baking, as oven temperatures may vary and you don’t want them to over-bake. Serve these ghoulish treats with a side of marinara sauce for a bloody effect that’s sure to delight your guests.
Jack-o’-Lantern Quesadillas
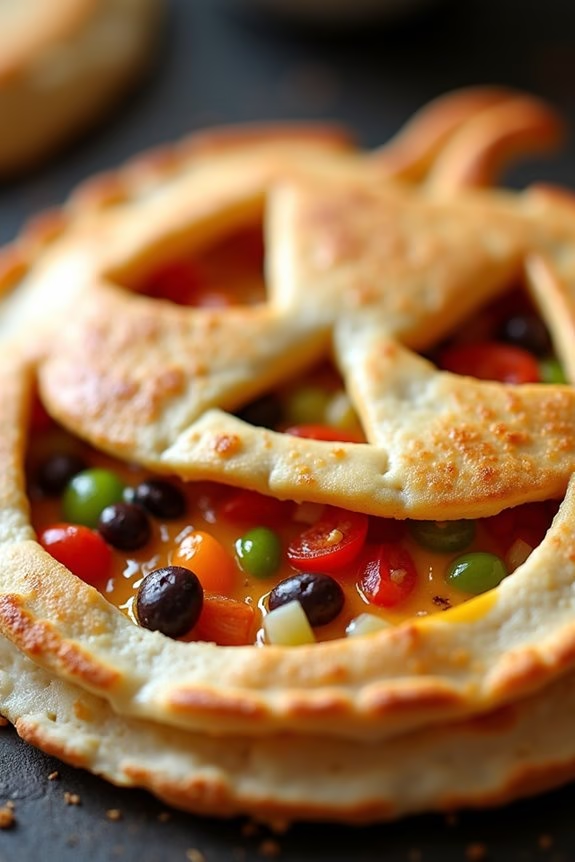
Jack-o’-Lantern Quesadillas are a festive and fun addition to any Halloween party. These cheesy, crispy delights not only serve as a delicious snack but also add a touch of spooky flair with their carved pumpkin faces. Perfect for both kids and adults, these quesadillas can be customized with your favorite fillings and are a great way to get into the Halloween spirit while indulging in a tasty treat.
To make these quesadillas, you’ll need to start by preparing tortillas that will act as the canvas for your Jack-o’-Lantern faces. The beauty of this dish lies in its simplicity and the ability to personalize each quesadilla to suit different tastes. Whether you prefer them spicy, cheesy, or filled with veggies, there’s a version of Jack-o’-Lantern Quesadillas for everyone. This recipe serves 4-6 people, making it an ideal choice for a small gathering or family dinner.
Ingredients:
- 6 large flour tortillas
- 2 cups shredded cheddar cheese
- 1 cup cooked and shredded chicken (optional)
- 1 cup black beans, drained and rinsed
- 1 cup bell peppers, finely chopped
- 1 cup onions, finely chopped
- 1 tablespoon taco seasoning
- Cooking spray or vegetable oil
- Sour cream and salsa for serving
Instructions:
1. Preheat and Prepare Ingredients:
Start by preheating your oven to 375°F (190°C). While the oven is heating, gather all your ingredients and have them ready for assembly. This includes shredding the cheese, chopping the bell peppers and onions, and preparing the chicken if using.
2. Create the Jack-o’-Lantern Faces:
Take three of the tortillas and use a sharp knife to carefully cut out Jack-o’-Lantern faces. Think of classic pumpkin faces with triangles for eyes and a jagged mouth. Be creative, but ascertain the cutouts are large enough to see the filling through them once cooked.
3. Assemble the Quesadillas:
Lay the remaining three tortillas flat and sprinkle a layer of cheese on each. Evenly distribute the chicken (if using), black beans, bell peppers, and onions over the cheese. Sprinkle taco seasoning over the filling for added flavor. Place the carved tortillas on top of the filled ones to create a sandwich.
4. Cook the Quesadillas:
Lightly coat a baking sheet with cooking spray or vegetable oil. Carefully place the assembled quesadillas on the baking sheet. Spray or lightly brush the tops of the tortillas with a little more oil to help them crisp up during baking.
5. Bake Until Crispy:
Place the baking sheet in the preheated oven and bake for about 10-12 minutes, or until the tortillas are golden brown and crispy, and the cheese has melted. Keep an eye on them to ascertain they don’t burn.
6. Serve Warm:
Once done, remove the quesadillas from the oven and let them cool slightly before slicing them into wedges. Serve with sour cream and salsa on the side for dipping.
Extra Tips:
For a more pronounced Jack-o’-Lantern effect, use a contrasting cheese like mozzarella or Monterey Jack for the filling so it stands out against the tortillas. You can also prepare the filling ingredients in advance to save time on the day of your party.
If you want to add a bit more heat, consider incorporating jalapeños or a spicy salsa into the mix. Remember, the key is to have fun with the designs and enjoy the process of creating these spooky treats!
Creepy Crawly Jello Shots
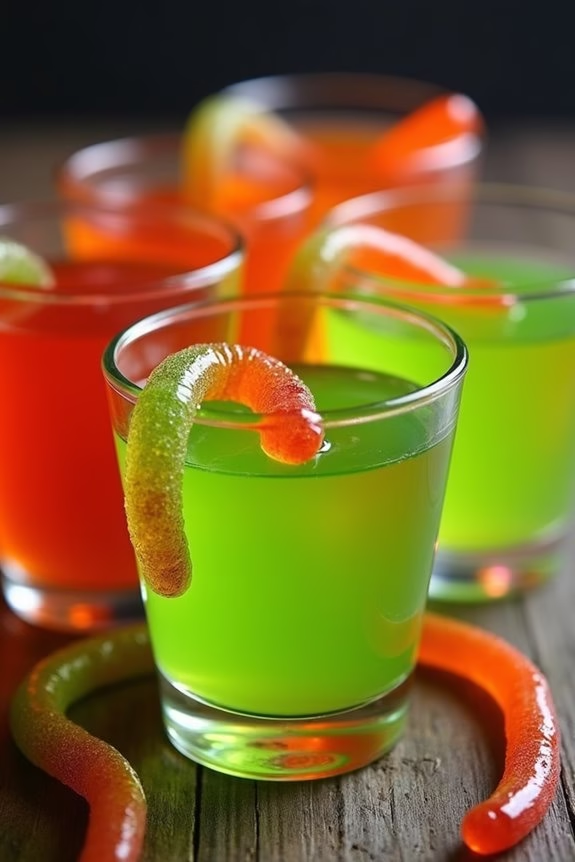
Creepy Crawly Jello Shots are the ultimate spooky treat to serve at your Halloween party. These ghoulishly delightful shots aren’t only fun to make but also a festive addition to any Halloween spread. They combine the sweet and tangy flavors of jello with the playful surprise of gummy worms, creating a treat that’s both creepy and delicious.
Perfect for adults and kids, these jello shots can be tailored to suit your party’s theme with different colors and flavors. This recipe is designed to serve 4-6 people, making it ideal for a small gathering or as part of a larger assortment of Halloween treats. The jello shots can be made in advance, allowing you to focus on other party preparations on the big day.
With just a few simple ingredients and some easy steps, you’ll have a batch of Creepy Crawly Jello Shots ready to impress your guests.
Ingredients:
- 1 package (3 oz) of flavored jello (preferably lime or orange for a spooky color)
- 1 cup boiling water
- 1/2 cup cold water
- 1/2 cup vodka (or replace with additional cold water for a non-alcoholic version)
- 1 package of gummy worms
- Plastic shot glasses or small cups
Instructions:
- Prepare the Jello Mixture: In a large mixing bowl, dissolve the jello powder in 1 cup of boiling water. Stir well until the jello is completely dissolved and the mixture is clear.
- Add Cold Ingredients: Once the jello is dissolved, add 1/2 cup of cold water and 1/2 cup of vodka to the bowl. Stir the mixture thoroughly to combine all the ingredients.
- Pour into Cups: Arrange the plastic shot glasses or small cups on a tray. Carefully pour the jello mixture into each cup, filling them about three-quarters full. This will leave room for the gummy worms.
- Insert Gummy Worms: Place 1-2 gummy worms into each cup, letting them dangle over the edge for a creepy effect. Push the worms slightly into the jello so they stay in place.
- Chill the Shots: Transfer the tray to the refrigerator. Allow the jello shots to set for at least 2-3 hours, or until firm to the touch.
- Serve and Enjoy: Once set, the Creepy Crawly Jello Shots are ready to serve. Arrange them on a platter and watch your guests delight in this spooky treat.
Extra Tips:
For a more dramatic effect, consider using an assortment of gummy insects or making the jello shots in different colors to mimic a variety of creepy crawlies.
If you prefer a non-alcoholic version, simply replace the vodka with an equal amount of cold water or juice. Confirm the jello is fully set before serving to maintain the best texture, and keep them chilled until they’re ready to be enjoyed.
Skeleton Bone Meringues
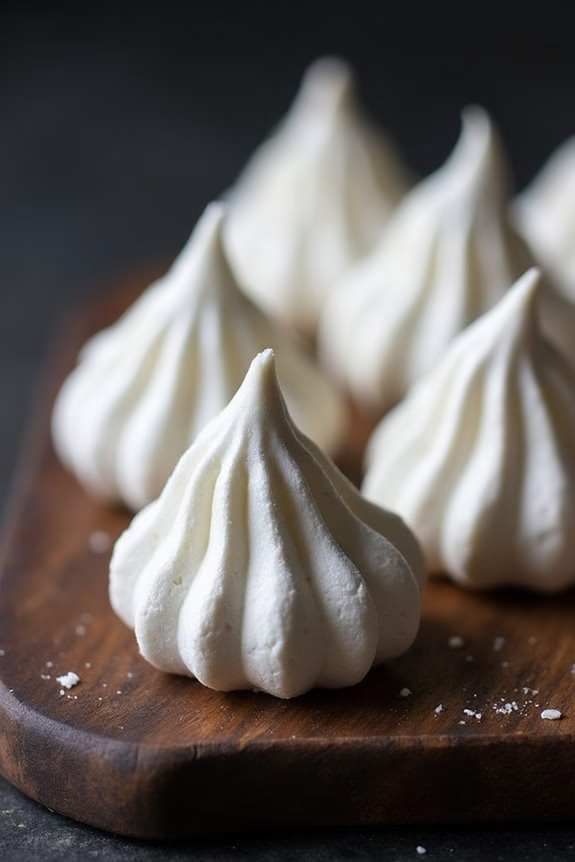
Skeleton Bone Meringues are the perfect spooky treat for your Halloween parties, offering a delightfully eerie appearance while satisfying your sweet tooth. These whimsical meringues are light, crisp, and shaped to resemble bones, making them an ideal addition to your Halloween spread. Not only do they look impressive, but they also melt in your mouth, providing a delightful contrast to the more decadent treats often found at such gatherings.
Whether you’re hosting a haunted house party or a small family get-together, these Skeleton Bone Meringues are sure to be a hit with guests of all ages.
Crafting these meringue bones is easier than you might think, requiring just a few simple ingredients and a bit of patience. The process involves whipping egg whites to stiff peaks and piping them into bone shapes before baking them to a crispy perfection. The result is a light, airy treat that’s both fun and festive.
With this recipe, you’ll have enough meringues to serve 4-6 people, making it perfect for intimate gatherings or as part of a larger dessert spread.
Ingredients (serving size: 4-6 people):
- 4 large egg whites
- 1 cup granulated sugar
- 1/4 teaspoon cream of tartar
- 1/2 teaspoon vanilla extract
- Pinch of salt
Cooking Instructions:
- Preheat the Oven: Start by preheating your oven to 225°F (110°C) and line two baking sheets with parchment paper to prevent the meringues from sticking.
- Prepare the Egg Whites: In a large, clean mixing bowl, beat the egg whites on medium speed with an electric mixer until they become frothy. Add the cream of tartar and a pinch of salt, and continue beating until soft peaks form.
- Add the Sugar: Gradually add the granulated sugar to the egg whites, about a tablespoon at a time, mixing well after each addition. Increase the mixer speed to high and beat until the meringue is glossy and stiff peaks form. This will take about 5-7 minutes.
- Incorporate the Vanilla: Gently fold in the vanilla extract, being careful not to deflate the meringue.
- Pipe the Meringues: Transfer the meringue mixture to a piping bag fitted with a large round tip. Pipe the meringue onto the prepared baking sheets in the shape of bones, making sure to leave space between each one.
- Bake the Meringues: Place the baking sheets in the preheated oven and bake for 1-1.5 hours, or until the meringues are dry and can easily be lifted off the parchment paper. Turn off the oven and let the meringues cool in the oven with the door slightly ajar for about an hour.
- Serve and Enjoy: Once cooled, carefully remove the meringues from the baking sheets and serve on a platter for your guests to enjoy.
Extra Tips:
For the best results, make sure your mixing bowl and beaters are completely free of any grease, as even a small amount can prevent the egg whites from whipping properly.
If you don’t have a piping bag, you can use a large zip-top bag with one corner snipped off. Additionally, if your meringues start to brown, reduce the oven temperature slightly and watch them closely to guarantee they maintain their ghostly white appearance.
Finally, store any leftover meringues in an airtight container to keep them crisp for a few days.
Black Cat Oreos

If you’re seeking a spooky yet delightful treat for your Halloween party, search no more than Black Cat Oreos. These whimsical and tasty treats are sure to be a hit with both kids and adults. The combination of crunchy Oreo cookies and sweet decorative elements will add a festive touch to your dessert table.
Plus, they’re easy to make, meaning you’ll have more time to enjoy the festivities with your guests.
The Black Cat Oreos aren’t only visually appealing but also deliciously satisfying. With just a few simple ingredients, you can transform ordinary Oreos into charming black cats, complete with candy eyes and licorice whiskers. This recipe yields about 12-18 Black Cat Oreos, making it perfect for a Halloween party serving size of 4-6 people.
Ingredients:
- 1 package of Oreo cookies (approx. 36 cookies)
- 1 cup of semi-sweet chocolate chips
- 24 candy eyes
- Black licorice laces
- 1 cup of mini chocolate chips
- 12-18 candy-coated chocolate pieces (like M&Ms) for noses
Cooking Instructions:
- Prepare Your Workspace: Begin by lining a baking sheet with parchment paper. This will be where you place your decorated Oreos to set.
- Melt the Chocolate: In a microwave-safe bowl, melt the semi-sweet chocolate chips in the microwave in 30-second intervals, stirring after each interval, until fully melted and smooth. Be cautious not to overheat, as chocolate can burn easily.
- Coat the Oreos: Using a fork, dip each Oreo cookie into the melted chocolate, making sure it’s fully coated. Allow any excess chocolate to drip back into the bowl before placing the cookie on the parchment-lined baking sheet.
- Decorate the Faces: While the chocolate is still wet, place two candy eyes on each Oreo. Position a candy-coated chocolate piece below the eyes to form the nose.
- Add the Whiskers: Cut the black licorice laces into small pieces, approximately 1 inch each. Arrange 3-4 whiskers on each side of the candy nose, pressing gently into the chocolate.
- Create the Ears: Take two mini chocolate chips and position them above the eyes to form the cat’s ears. Press gently into the chocolate.
- Set the Cookies: Allow the Black Cat Oreos to sit at room temperature or in the refrigerator until the chocolate has completely set and hardened, about 30 minutes to an hour.
Extra Tips:
When making the Black Cat Oreos, verify that your chocolate remains smooth and workable. If it begins to harden while you’re decorating, simply reheat it in the microwave for a few seconds.
Using a toothpick can help adjust the candy pieces precisely if needed. Additionally, consider using a variety of candy colors for the noses to add an extra pop of color to your Black Cat Oreos.
Finally, feel free to get creative with the whiskers and ears, adjusting lengths and placements to give each cat a unique personality.
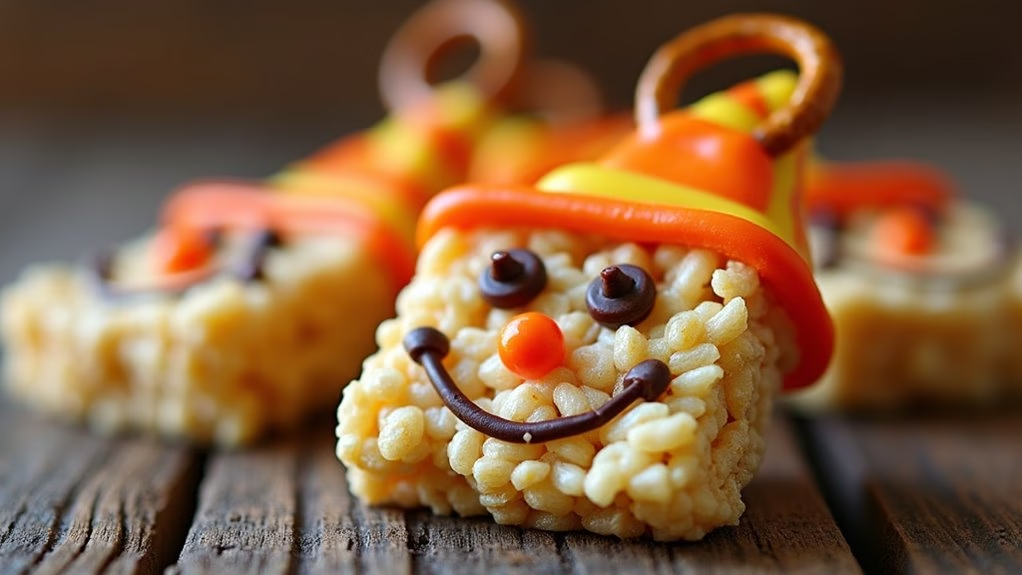
Scarecrow Krispie Treats
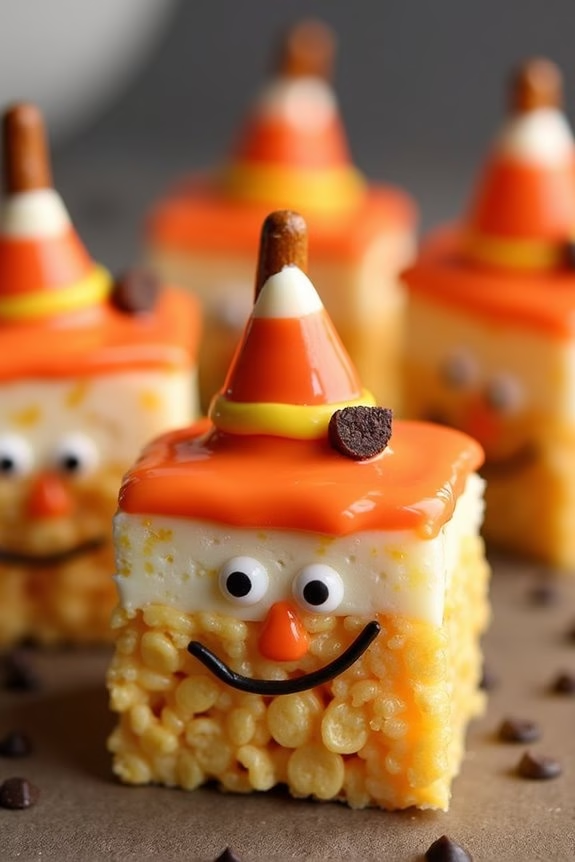
Scarecrow Krispie Treats are a delightful and festive addition to any Halloween party. These treats are a creative twist on classic rice krispie treats, designed to resemble cheerful scarecrows. With a combination of marshmallows, rice cereal, and a few decorative touches, these treats aren’t only delicious but also fun to make with family and friends. Ideal for serving 4-6 people, these treats can be easily made in a short amount of time, making them perfect for last-minute party preparations.
The key to creating these charming Scarecrow Krispie Treats is in the decoration. By using candy corn, chocolate chips, and pretzel sticks, you can transform a simple treat into a work of art. The recipe isn’t only straightforward but also allows for creativity, as you can adjust the decorations to suit your own scarecrow design preferences. Whether you’re hosting a Halloween party or just looking for a fun activity to do with kids, these treats are sure to be a hit.
Ingredients (Serving Size: 4-6 people):
- 3 tablespoons unsalted butter
- 1 package (10 ounces) mini marshmallows
- 6 cups rice cereal
- 20-24 candy corn pieces
- 12 mini chocolate chips
- 6 pretzel sticks
- 1/4 cup orange candy melts
- 1/4 cup yellow candy melts
- Cooking spray
Instructions:
- Prepare the Pan: Lightly grease a 9×13-inch baking dish with cooking spray to prevent sticking and set it aside.
- Melt the Butter and Marshmallows: In a large pot, melt the unsalted butter over low heat. Once melted, add the mini marshmallows and stir continuously until they’re completely melted and blended with the butter.
- Mix in the Rice Cereal: Remove the pot from the heat and add the rice cereal. Stir until the cereal is fully coated with the marshmallow mixture.
- Press into the Pan: Transfer the cereal mixture into the prepared baking dish. Use a spatula or waxed paper to press the mixture evenly into the pan. Allow it to cool for about 10 minutes.
- Cut into Squares: Once cooled, cut the treats into 12 squares.
- Melt Candy Melts: In separate microwave-safe bowls, melt the orange and yellow candy melts according to the package instructions. Stir until smooth.
- Decorate the Treats: Dip one end of each pretzel stick into the melted candy melts and attach it to the top of each square to create the scarecrow’s hat. Use the candy melts as “glue” to attach candy corn pieces for noses and mini chocolate chips for eyes.
- Final Touches: Allow the decorations to set by placing the treats in the refrigerator for about 10 minutes. Once set, your Scarecrow Krispie Treats are ready to serve!
For extra tips, make sure to work quickly when mixing the rice cereal with the melted marshmallows, as the mixture can harden if left sitting for too long. Additionally, when melting the candy melts, use short intervals in the microwave to prevent burning.
Feel free to experiment with different colors and types of candy to customize your scarecrows. If you plan to make these treats ahead of time, store them in an airtight container to keep them fresh. Enjoy your festive creations!