
Mornings can be a beautiful time to treat yourself to something special. There’s nothing quite like enjoying a delightful breakfast that’s both easy to make and a little indulgent. Picture creamy avocado toast topped with a perfectly poached egg, or a stack of fluffy banana pancakes with a drizzle of maple syrup. These are just a few of the satisfying recipes you can enjoy on your own. Ready to explore more breakfast ideas that make mornings feel special?
Avocado Toast With Poached Egg
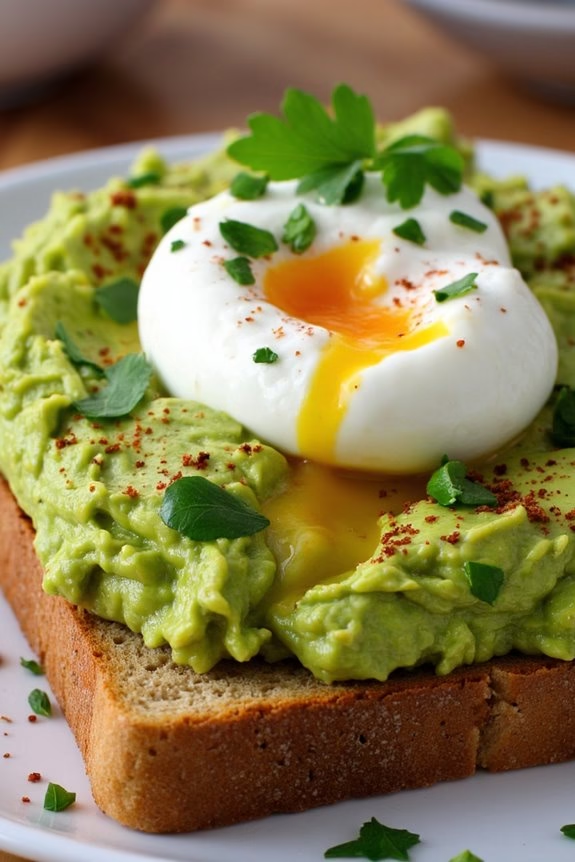
Avocado Toast With Poached Egg is a delightful and nutritious breakfast option, perfect for enjoying a quiet morning alone. This dish combines the creamy richness of ripe avocados with the soft, delectable texture of a poached egg, all atop a slice of crispy toast. Not only is it simple and quick to prepare, but it also offers a balanced meal packed with healthy fats, proteins, and carbohydrates, giving you the energy you need to start your day.
To make Avocado Toast With Poached Egg for a group of 4-6 people, you can easily scale up the ingredients. The key to this dish is in using fresh, high-quality ingredients, particularly ripe avocados and fresh eggs, to guarantee the best flavor and texture. This dish is versatile and can be customized with various toppings and seasonings to suit your taste preferences.
Ingredients (for 4-6 people):
- 4-6 slices of whole-grain bread
- 4-6 ripe avocados
- 4-6 large eggs
- 1 tablespoon white vinegar
- Salt and pepper, to taste
- Red pepper flakes, to taste (optional)
- Fresh lemon juice, to taste
- Fresh herbs (such as cilantro or parsley), for garnish (optional)
Cooking Instructions:
- Prepare the Ingredients: Start by slicing the avocados in half, removing the pits, and scooping the flesh into a bowl. Mash the avocados with a fork until smooth but still slightly chunky. Add a squeeze of fresh lemon juice, and season with salt and pepper to taste. Set aside.
- Toast the Bread: Lightly toast the slices of whole-grain bread until golden brown and crispy. You can use a toaster or a preheated oven set to 350°F (175°C).
- Poach the Eggs: Fill a medium-sized saucepan with water and bring it to a gentle simmer over medium heat. Add the white vinegar, which helps the egg whites coagulate more effectively. Crack each egg into a small bowl, then gently slide them one at a time into the simmering water. Poach the eggs for about 3-4 minutes, or until the whites are set but the yolks remain runny.
- Assemble the Toasts: Spread a generous amount of the mashed avocado mixture onto each slice of toasted bread. Use the back of a spoon to create a small well in the center of the avocado.
- Top with Poached Eggs: Using a slotted spoon, carefully remove the poached eggs from the water and gently place one on top of each avocado toast.
- Season and Serve: Sprinkle each toast with additional salt, pepper, and red pepper flakes, if desired. Garnish with fresh herbs for a pop of color and flavor. Serve immediately while the toast is still warm.
Extra Tips:
For the perfect poached egg, ascertain the water is at the right temperature—just simmering, not boiling. Boiling water can cause the eggs to break apart. If you’re new to poaching eggs, consider using a poaching ring or cup to help keep the eggs intact.
Additionally, you can add toppings like sliced tomatoes, radishes, or feta cheese for added flavor and texture. Adjust the seasoning to your liking, and experiment with different herbs and spices to create your personal version of this classic breakfast dish.
Berry and Yogurt Parfait
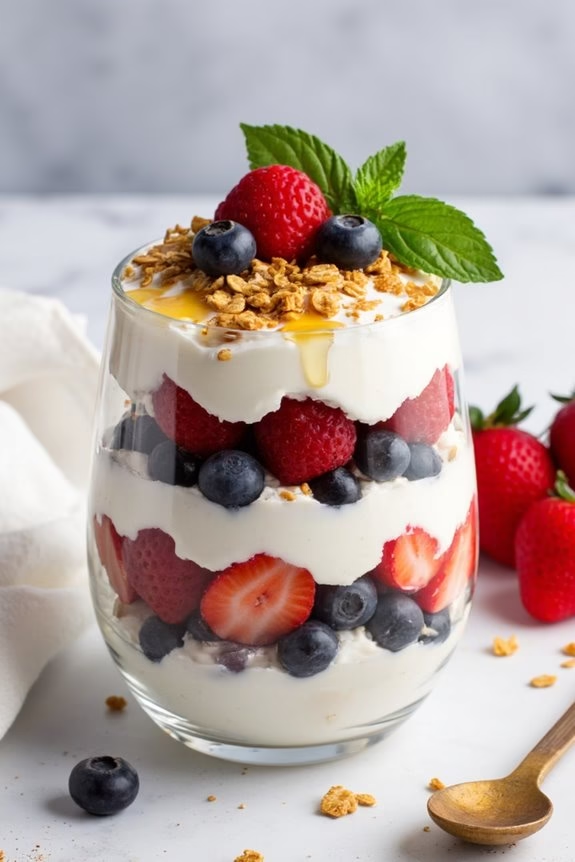
Start your morning with a revitalizing and nutritious Berry and Yogurt Parfait. This delightful dish is an excellent choice for a solo breakfast, offering a perfect balance of creamy yogurt, sweet berries, and crunchy granola. The combination not only satisfies your taste buds but also gives you a healthy boost to start your day.
Whether you’re rushing to work or enjoying a leisurely morning, this parfait can be prepared in just a few minutes.
The Berry and Yogurt Parfait is a versatile dish that allows you to customize your ingredients based on what’s in season or what you have on hand. You can mix and match different berries, add a drizzle of honey for extra sweetness, or even sprinkle some nuts for added texture. This recipe is designed for one serving, but the ingredients can easily be adjusted to serve a larger group if needed.
Ingredients for 4-6 servings:
- 3 cups plain Greek yogurt
- 1 cup granola
- 2 cups mixed berries (such as strawberries, blueberries, raspberries)
- 1/4 cup honey
- 1 teaspoon vanilla extract
- Fresh mint leaves (optional, for garnish)
Cooking Instructions:
- Prepare the Yogurt Base: In a medium-sized bowl, mix the Greek yogurt with the vanilla extract until well combined. This adds a subtle vanilla flavor to the yogurt, enhancing the overall taste of the parfait.
- Layer the Ingredients: In each serving glass or bowl, start by adding a spoonful of the yogurt mixture at the bottom. Follow this with a layer of mixed berries to create a colorful and appetizing look.
- Add Granola: Sprinkle a layer of granola over the berries, providing a crunchy texture that contrasts with the softness of the yogurt and berries.
- Repeat the Layers: Continue layering the yogurt, berries, and granola until the glass is filled. Aim for two to three layers depending on the size of your glass or bowl.
- Drizzle with Honey: Gently drizzle honey over the top layer. This will add a natural sweetness and bring all the flavors together.
- Garnish and Serve: If desired, garnish with fresh mint leaves for a pop of color and a hint of freshness. Serve immediately for the best taste and texture.
Extra Tips:
Choose berries that are at their peak ripeness for the best flavor. If fresh berries aren’t available, frozen berries can be a great alternative; just make sure to thaw them beforehand.
For a more indulgent twist, consider adding a dollop of whipped cream on the top layer. When preparing the parfait in advance, keep the granola separate until serving time to prevent it from becoming soggy.
Enjoy experimenting with different flavors and textures to create the parfait that suits your taste preferences.
Banana Pancakes With Maple Syrup

Banana pancakes with maple syrup are a delightful and comforting breakfast choice, perfect for those mornings when you want something a bit more special. These pancakes are fluffy, naturally sweetened by ripe bananas, and come together quickly, making them an ideal option for a leisurely breakfast or brunch.
The combination of the warm, soft pancakes with the rich, golden maple syrup creates a harmonious blend of flavors that will surely leave you satisfied.
Preparing banana pancakes with maple syrup is a simple process that requires a few basic ingredients that you likely already have in your kitchen. The key to achieving the perfect texture is using ripe bananas, which not only add sweetness but also help keep the pancakes moist.
Whether you’re cooking for a small group or planning to have leftovers for the next day, this recipe serves 4-6 people, guaranteeing everyone gets their fill of this delicious breakfast treat.
Ingredients (Serves 4-6)
- 2 cups all-purpose flour
- 2 tablespoons sugar
- 2 teaspoons baking powder
- 1/2 teaspoon baking soda
- 1/4 teaspoon salt
- 2 large eggs
- 1 1/2 cups milk
- 1 teaspoon vanilla extract
- 4 tablespoons unsalted butter, melted
- 3 ripe bananas, mashed
- Maple syrup, for serving
Cooking Instructions
- Prepare the dry ingredients: In a large mixing bowl, whisk together the flour, sugar, baking powder, baking soda, and salt. This guarantees the baking agents are evenly distributed for consistent rising.
- Mix the wet ingredients: In a separate bowl, beat the eggs lightly, then add the milk, vanilla extract, and melted butter. Stir in the mashed bananas until well combined.
- Combine wet and dry ingredients: Pour the wet ingredients into the dry ingredients. Gently stir the mixture with a spatula or wooden spoon until just combined. Be careful not to overmix; some lumps are okay as they help the pancakes stay fluffy.
- Preheat the cooking surface: Heat a non-stick skillet or griddle over medium heat. Lightly grease it with a small amount of butter or cooking spray to prevent sticking.
- Cook the pancakes: Pour about 1/4 cup of batter onto the preheated skillet for each pancake. Cook until bubbles form on the surface and the edges appear set, about 2-3 minutes. Flip the pancakes and cook for an additional 1-2 minutes until golden brown and cooked through.
- Serve: Transfer pancakes to a plate and keep warm while repeating the cooking process with the remaining batter. Serve the pancakes warm with a generous drizzle of maple syrup on top.
Extra Tips
For the best flavor, use very ripe bananas with plenty of brown spots. They’re easier to mash and bring a sweeter taste to the pancakes.
If you prefer thinner pancakes, you can add a bit more milk to the batter. To keep pancakes warm while cooking the rest, place them in a preheated oven at a low temperature (around 200°F/93°C).
For added texture and taste, consider adding a handful of chopped nuts or chocolate chips to the batter before cooking.
Smoked Salmon Bagel
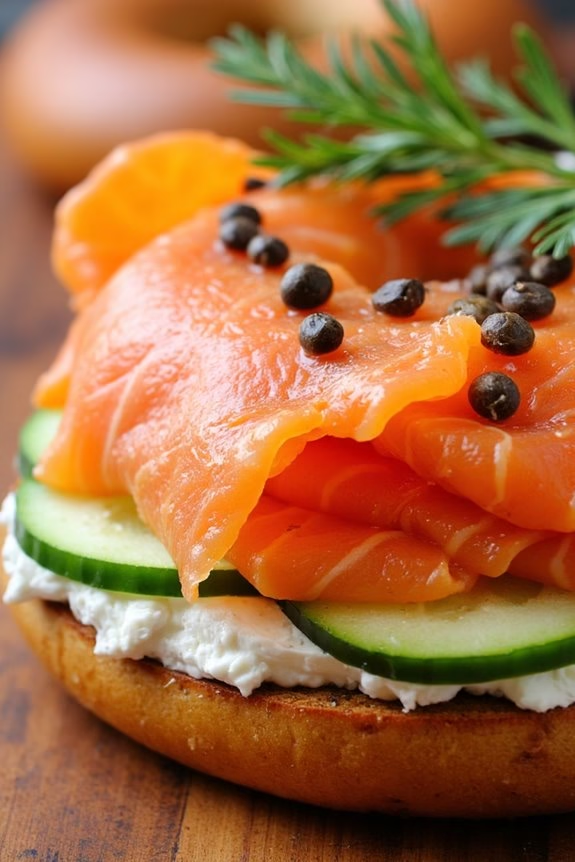
Smoked Salmon Bagel is a delightful, savory breakfast option that combines the rich flavors of smoked salmon with the tang of cream cheese, all nestled between a perfectly toasted bagel. This dish isn’t only delicious but also incredibly simple to prepare, making it an ideal choice for a solo breakfast that feels indulgent and satisfying.
The combination of the smoky, tender salmon with the creamy and smooth texture of the cream cheese, topped with crisp slices of cucumber and a sprinkle of fresh dill, creates a harmony of flavors that’s hard to resist.
To make a Smoked Salmon Bagel, you’ll want to start with a fresh bagel that complements the flavors of the smoked salmon. Plain, everything, or sesame seed bagels are all excellent choices. The bagel is sliced in half and toasted to a golden brown perfection, providing a satisfying crunch. A generous spread of cream cheese on each half serves as the base for the smoked salmon, which is then layered on top.
Add a few slices of cucumber for freshness, a sprinkle of capers for a salty kick, and a dash of dill for an herbal note. The result is a balanced, flavorful breakfast that’s sure to start your day off right.
Ingredients for 4-6 servings:
- 4-6 bagels (plain, everything, or sesame seed)
- 8-12 ounces of smoked salmon
- 8 ounces of cream cheese
- 1 cucumber, thinly sliced
- 1 small red onion, thinly sliced
- 1 tablespoon of capers
- Fresh dill, for garnish
- Lemon wedges, for serving
Cooking Instructions:
- Prepare the Bagels: Slice each bagel in half and place them in a toaster. Toast the bagels until they’re golden brown and crispy. This should take about 3-5 minutes depending on your toaster settings.
- Prepare the Spread: While the bagels are toasting, take the cream cheese out of the refrigerator to soften slightly. This will make it easier to spread. Once the bagels are toasted, evenly spread about 1-2 tablespoons of cream cheese on each half.
- Layer the Ingredients: On top of the cream cheese, lay a few slices of smoked salmon, guaranteeing it covers the cream cheese completely. Depending on the size of your bagel, use 1-2 ounces of salmon per half.
- Add Vegetables and Garnish: Place a few slices of cucumber and red onion over the salmon. Sprinkle a few capers atop for an extra burst of flavor.
- Finish with Herbs and Lemon: Garnish with fresh dill. Serve immediately with lemon wedges on the side, allowing each person to add a squeeze of lemon juice to their liking.
Extra Tips:
For the best results, use fresh bagels from a bakery or make your own if time allows, as the quality of the bagel can greatly impact the overall taste of the dish.
When selecting smoked salmon, opt for high-quality, thinly sliced options, as this will guarantee the best texture and flavor. If you enjoy a bit of spice, consider adding a dash of cracked black pepper or a sprinkle of red pepper flakes.
This dish is versatile, so feel free to add additional toppings like sliced avocado or tomato for extra flavor and nutrition.
Spinach and Feta Omelette

The spinach and feta omelette is a delightful breakfast option for one, offering a perfect blend of flavors and a burst of nutritional benefits. Packed with the goodness of fresh spinach and the tangy creaminess of feta cheese, this dish is a classic choice for those who enjoy a savory breakfast.
The omelette’s fluffy texture and flavor are complemented by a hint of garlic and onion, making it a wholesome and satisfying meal to kickstart your day. This recipe isn’t only quick to prepare but also versatile, allowing you to add your favorite herbs or spices to suit your taste.
Whether you’re looking for a protein-rich breakfast or a light lunch option, this spinach and feta omelette is a great choice. The following recipe is scaled for 4-6 servings to cater to family or friends, guaranteeing everyone can enjoy this nutritious dish.
Ingredients for 4-6 servings:
- 12 large eggs
- 2 cups fresh spinach leaves, chopped
- 1 cup feta cheese, crumbled
- 1 medium onion, finely chopped
- 2 cloves garlic, minced
- 1/4 cup milk
- Salt and pepper to taste
- 2 tablespoons olive oil or butter
- Fresh parsley for garnish (optional)
Cooking Instructions:
- Prepare the Ingredients: Begin by washing the spinach thoroughly and chopping it into small pieces. Finely chop the onion and mince the garlic cloves. Crumble the feta cheese and set aside.
- Whisk the Eggs: In a large mixing bowl, crack the eggs and add the milk. Whisk the mixture until the eggs are fully beaten and the milk is well incorporated. Season with salt and pepper to taste.
- Sauté the Vegetables: Heat olive oil or butter in a large non-stick skillet over medium heat. Add the chopped onion and sauté for 2-3 minutes until it becomes translucent. Add the minced garlic and cook for an additional minute until fragrant.
- Cook the Spinach: Add the chopped spinach to the skillet and cook for 2-3 minutes until wilted. Stir occasionally to guarantee even cooking.
- Combine Ingredients: Pour the egg mixture into the skillet over the cooked vegetables. Allow it to cook undisturbed for 2-3 minutes until the edges start to set.
- Add the Feta Cheese: Sprinkle the crumbled feta cheese evenly over the egg mixture. Using a spatula, gently lift the edges of the omelette to allow the uncooked eggs to flow to the bottom of the skillet.
- Finish Cooking: Reduce the heat to low, cover the skillet with a lid, and cook for an additional 2-3 minutes until the omelette is fully set and the cheese has slightly melted.
- Serve: Carefully slide the omelette onto a serving platter, garnish with fresh parsley if desired, and cut into portions. Serve hot.
Extra Tips:
For a fluffier omelette, make certain the eggs are well-whisked to incorporate air, which will help the omelette rise as it cooks. You can also add a splash of water instead of milk for a lighter texture.
If you prefer a creamier taste, substitute half of the feta cheese with cream cheese. Additionally, feel free to experiment with herbs like dill or basil for added flavor.
Remember to cook the omelette on a low flame towards the end to avoid overcooking and drying it out. Enjoy your delicious spinach and feta omelette with a side of toast or fresh fruit.
French Toast With Fresh Berries

The versatility of French toast allows you to customize it to your liking, whether you prefer it slightly sweetened or with a hint of spice. The addition of fresh berries not only adds vibrant color but also provides a healthy dose of vitamins and antioxidants.
This recipe serves 4-6 people, making it ideal for a small gathering or for meal prepping a few days’ worth of breakfast. Let’s explore the ingredients and steps needed to create this delicious dish.
Ingredients (Serves 4-6)
- 8 slices of thick-cut bread (such as brioche or challah)
- 4 large eggs
- 1 cup of whole milk
- 1 teaspoon vanilla extract
- 1 tablespoon granulated sugar
- 1/2 teaspoon ground cinnamon
- Butter or non-stick spray for cooking
- 2 cups of mixed fresh berries (such as strawberries, blueberries, and raspberries)
- Maple syrup or honey for serving
- Powdered sugar for dusting (optional)
Cooking Instructions
- Prepare the Egg Mixture: In a large mixing bowl, combine the eggs, milk, vanilla extract, sugar, and cinnamon. Whisk the ingredients together until they’re well blended and the sugar has dissolved.
- Soak the Bread: Place the slices of bread in a shallow dish or baking pan. Pour the egg mixture over the bread, making sure each slice is fully submerged. Let the bread soak for about 5 minutes, turning once to make certain both sides are evenly coated.
- Heat the Pan: Heat a large non-stick skillet or griddle over medium heat. Add a small amount of butter or spray with non-stick cooking spray to coat the surface.
- Cook the French Toast: Once the pan is hot, carefully place the soaked bread slices onto the skillet. Cook for about 3-4 minutes on each side, or until the bread is golden brown and cooked through. You may need to cook in batches, so keep the cooked slices warm in a low oven if necessary.
- Serve with Berries and Syrup: Arrange the cooked French toast slices on a serving platter or individual plates. Top generously with the fresh mixed berries. Drizzle with maple syrup or honey, and dust with powdered sugar if desired.
Extra Tips
For the best results, use slightly stale bread as it absorbs the egg mixture more effectively without becoming too soggy. If your bread is fresh, you can dry it out slightly by toasting it lightly before soaking it in the egg mixture.
Feel free to experiment with different types of bread for varied textures and flavors. If you prefer a richer flavor, substitute half of the milk with heavy cream. Finally, consider adding a hint of nutmeg or a splash of almond extract to the egg mixture for a unique twist on the classic recipe.
Chia Seed Pudding With Almonds
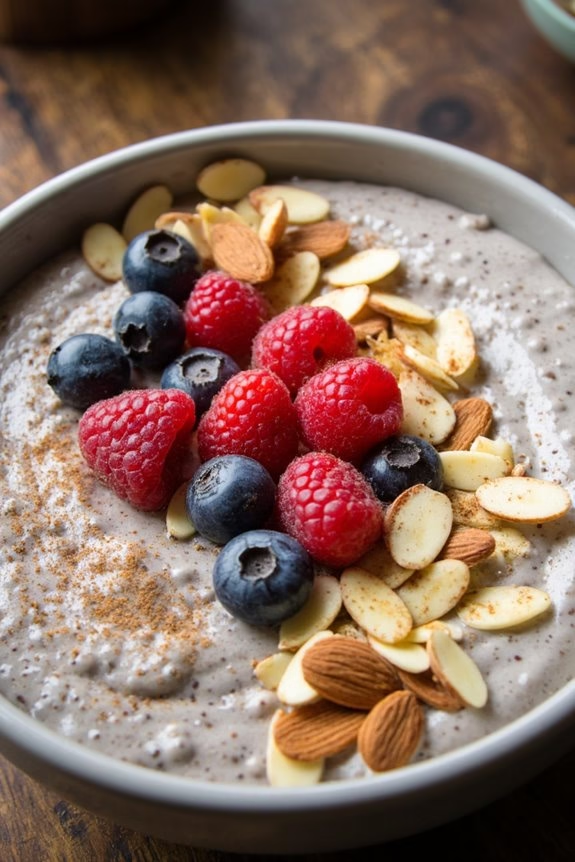
Chia Seed Pudding With Almonds is a nutritious and delightful breakfast option perfect for anyone looking to enjoy a healthy start to their day. This dish is rich in omega-3 fatty acids, fiber, and protein, making it an excellent choice for those who want to maintain a balanced diet.
The creamy texture of chia seeds soaked in almond milk, combined with the crunchy almonds, creates a satisfying and flavorful meal that can be prepared in advance for convenience.
The beauty of this pudding is its versatility; you can easily customize it with your favorite toppings such as fresh fruits, honey, or a sprinkle of cinnamon. It’s also an ideal breakfast for those on the go, as it can be prepared the night before and enjoyed in the morning without any hassle.
Plus, making a larger batch means you can have breakfast ready for several days or share it with family and friends.
Ingredients for 4-6 servings:
- 1 cup chia seeds
- 4 cups unsweetened almond milk
- 1/4 cup maple syrup or honey
- 1 teaspoon vanilla extract
- 1/2 cup sliced almonds
- Fresh fruits for topping (optional)
- Ground cinnamon for topping (optional)
Cooking Instructions:
- Mix Chia Seeds and Liquid: In a large bowl, combine the chia seeds and almond milk. Whisk them together thoroughly to guarantee all seeds are evenly coated and begin to absorb the liquid.
- Sweeten and Flavor: Add the maple syrup (or honey) and vanilla extract to the bowl. Stir well to incorporate the sweeteners and flavor evenly throughout the mixture.
- Refrigerate: Cover the mixture with a lid or plastic wrap and place it in the refrigerator for at least 4 hours, or preferably overnight. This allows the chia seeds to expand and thicken, creating a pudding-like consistency.
- Stir Again: After the chia pudding has set, give it a good stir to break up any clumps that may have formed. This will guarantee a smooth texture.
- Add Almonds and Serve: Divide the pudding into individual serving bowls. Sprinkle sliced almonds over each serving for added crunch. Add any additional toppings such as fresh fruits or a dash of cinnamon if desired.
- Store Leftovers: If you have any leftovers, cover them and store in the refrigerator for up to 5 days.
Extra Tips:
When making Chia Seed Pudding With Almonds, make sure to stir the mixture a couple of times during the initial hour of refrigeration. This helps to prevent clumping and guarantees a smoother texture.
If you prefer a thicker pudding, you can reduce the amount of almond milk or add more chia seeds to the mix. Experiment with different flavor extracts or natural sweeteners to suit your taste preferences, and don’t hesitate to get creative with toppings for an extra burst of flavor and nutrition.
Breakfast Burrito With Scrambled Eggs

Starting your day with a hearty and delicious breakfast can set the tone for the rest of your day. A Breakfast Burrito with Scrambled Eggs isn’t only a delightful way to enjoy your morning meal but also a versatile dish that can be tailored to your taste. Packed with protein and flavor, this dish combines the soft texture of scrambled eggs with the rich taste of cheese, and the added zest of salsa wrapped in a warm tortilla.
It’s perfect for those who love a quick, nutritious breakfast that doesn’t compromise on taste. Breakfast burritos make a great option for a solo breakfast but can easily be prepared for a crowd, making them ideal for a brunch gathering or family breakfast. With the option to customize the fillings, you can cater to different preferences by adding ingredients like spinach, mushrooms, or sausage.
The following recipe will serve 4-6 people, so you can enjoy it with friends or family, or have leftovers for the next day.
Ingredients (Serves 4-6):
- 8 large eggs
- 1/4 cup milk
- Salt and pepper to taste
- 2 tablespoons butter
- 1 cup shredded cheese (cheddar or your choice)
- 1 cup cooked and crumbled sausage or bacon
- 1/2 cup salsa
- 6 large flour tortillas
- 1/4 cup chopped green onions
- 1/4 cup chopped cilantro (optional)
Instructions:
- Prepare the Eggs: In a large bowl, crack the eggs and add the milk, salt, and pepper. Whisk the mixture until the eggs are fully combined and the mixture is smooth.
- Cook the Eggs: Heat a non-stick skillet over medium heat and add the butter. Once the butter has melted, pour in the egg mixture. Allow the eggs to set slightly, then gently stir with a spatula, pushing them from the edges to the center. Continue to cook until the eggs are softly scrambled and cooked to your preference. Remove from heat.
- Assemble the Burritos: Lay out the tortillas on a clean surface. Evenly distribute the scrambled eggs onto each tortilla. Sprinkle the cheese over the eggs, then add the cooked sausage or bacon. Top with a spoonful of salsa and sprinkle with green onions and cilantro.
- Wrap the Burritos: Fold in the sides of each tortilla, then roll them up from the bottom to the top, ensuring the fillings are secure within the wrap.
- Heat the Burritos: Optional step for a warmer burrito: Place the rolled burritos back onto the skillet, seam side down, and cook for 1-2 minutes on each side until the tortillas are golden brown and crisp.
- Serve: Slice each burrito in half if desired and serve immediately. Enjoy your meal with extra salsa or sour cream on the side if preferred.
Extra Tips:
For added flavor, try adding some diced avocado or a few slices of jalapeño for a spicy kick. If you’re preparing these in advance, wrap the burritos individually in foil and place them in a low oven to keep warm.
They can also be wrapped and stored in the refrigerator for up to two days; simply reheat them in the microwave or oven before serving. Remember, the key to perfect scrambled eggs is cooking them on low heat and stirring gently to maintain their soft texture.
Smashed Avocado on Sourdough
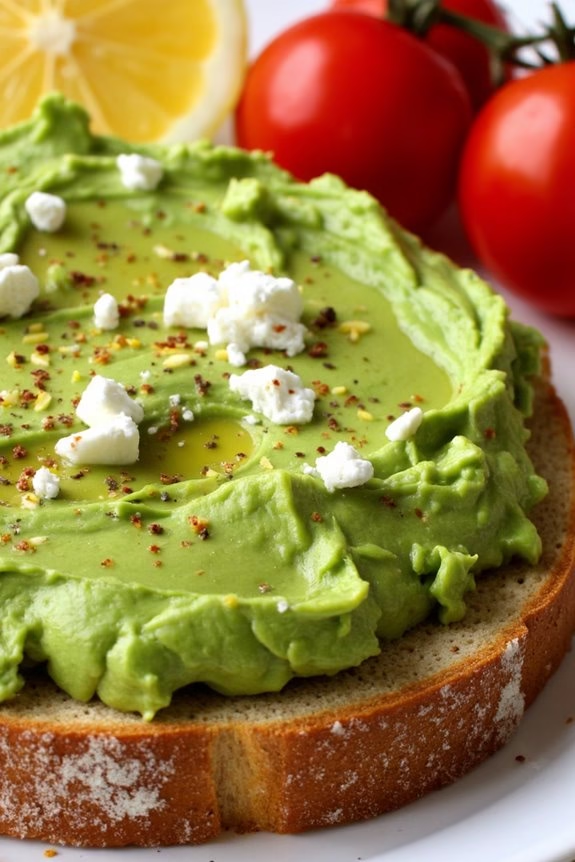
Smashed Avocado on Sourdough is a simple yet flavorful breakfast idea perfect for those mornings when you crave something delicious and satisfying. This dish combines the creamy texture of ripe avocados with the delightful crunch of toasted sourdough bread, finished with a hint of citrus and a sprinkle of spices. It’s not only quick to prepare but also packed with nutrients, making it an excellent choice for a nutritious start to your day.
Whether you’re enjoying breakfast alone or sharing with a few friends, this dish is sure to please. The beauty of Smashed Avocado on Sourdough lies in its versatility. You can easily customize it to suit your taste preferences by adding toppings like cherry tomatoes, poached eggs, or crumbled feta cheese.
Additionally, it’s a great way to utilize seasonal produce, guaranteeing you have a fresh and vibrant meal. For this recipe, we’ll prepare enough for 4-6 people, making it ideal for a family breakfast or a small brunch gathering. Gather your ingredients and get ready to enjoy this delicious breakfast treat!
Ingredients (Serves 4-6):
- 6 ripe avocados
- Juice of 2 lemons
- 1 teaspoon salt
- 1 teaspoon black pepper
- 1 teaspoon red pepper flakes
- 1 tablespoon olive oil
- 1 loaf of sourdough bread
- Optional toppings: cherry tomatoes, poached eggs, crumbled feta, fresh herbs
Cooking Instructions:
- Prepare the Avocados: Start by cutting the avocados in half, removing the pits, and scooping the flesh into a large mixing bowl. Use a fork to mash the avocados to your desired consistency—some prefer it chunkier, while others like it smoother.
- Season the Avocado: Add the lemon juice, salt, black pepper, and red pepper flakes to the mashed avocado. Mix well to combine all the flavors. The lemon juice won’t only add a rejuvenating zing but also prevent the avocado from browning.
- Toast the Sourdough: Slice the sourdough bread into thick pieces and toast them until golden brown. You can do this in a toaster or on a grill pan for added flavor. Drizzle each slice with a little olive oil after toasting.
- Assemble the Dish: Spread a generous portion of the smashed avocado mixture onto each slice of toasted sourdough. Confirm the avocado is evenly distributed for a balanced bite.
- Add Toppings: If desired, enhance your avocado toast by adding optional toppings such as halved cherry tomatoes, poached eggs, crumbled feta, or freshly chopped herbs like cilantro or parsley.
- Serve Immediately: Once assembled, serve the Smashed Avocado on Sourdough immediately to enjoy the ideal texture and flavor.
Extra Tips:
For the best results, choose avocados that are ripe but not overly soft. This will guarantee that the texture of the smashed avocado remains creamy and not mushy.
If you prefer a bit of heat, consider adding a dash more of red pepper flakes or even a hint of cayenne. Additionally, toasting the sourdough on a grill pan can impart a subtle smoky flavor, elevating the overall taste.
Don’t forget to experiment with toppings to keep the dish exciting and catered to your personal preferences!
Classic English Muffin Sandwich

Start your morning with a delightful Classic English Muffin Sandwich that’s perfect for breakfast. This beloved dish features a delicious combination of flavors and textures, from the crispy and warm English muffin to the savory layers of egg, cheese, and your choice of meat or vegetables.
It’s a quick and satisfying meal that you can easily prepare in your own kitchen, making it an ideal option for those who are cooking for themselves. This recipe offers a balance of protein, carbs, and fats to fuel your day, and you can customize it with your favorite ingredients.
Whether you’re a fan of bacon, sausage, or prefer a vegetarian version with avocado or spinach, this sandwich caters to a variety of tastes. Plus, the simplicity of preparation means you can enjoy a gourmet breakfast without spending hours in the kitchen. Below, you’ll find the ingredients you’ll need to make enough sandwiches for 4-6 people, as well as detailed instructions to guide you through the process.
Ingredients for 4-6 servings:
- 8 English muffins, split
- 8 large eggs
- 8 slices of cheddar cheese
- 8 slices of bacon or sausage patties (optional)
- Salt and pepper to taste
- Butter or cooking spray
- Optional: avocado slices, tomato slices, spinach, or other preferred toppings
Cooking Instructions:
- Prepare the Eggs: Start by heating a non-stick skillet over medium heat. Add a small amount of butter or cooking spray to prevent sticking. Crack the eggs into the skillet, keeping them separate, and season with salt and pepper. Cook until the whites are set and the yolks reach your desired level of doneness. Remove from the skillet and set aside.
- Cook the Meat: If you’re using bacon or sausage, cook it in the same skillet until crispy and fully cooked. Drain excess grease on paper towels.
- Toast the English Muffins: While the meat is cooking, split the English muffins and toast them in a toaster or under a broiler until golden brown.
- Assemble the Sandwiches: Place a slice of cheese on the bottom half of each toasted English muffin. Top with an egg, then add your cooked meat (if using). For a vegetarian option, add avocado slices or other desired toppings.
- Melt the Cheese: Return the assembled sandwich to the skillet or place them on a baking sheet in a preheated oven (350°F/175°C) for a few minutes until the cheese melts.
- Finish and Serve: Top each sandwich with the other half of the English muffin. Serve immediately while warm.
Extra Tips:
For an extra fluffy egg, consider whisking the eggs and cooking them scrambled instead of frying. You can also prepare the components ahead of time and quickly assemble them in the morning for a speedy breakfast.
Experiment with different cheeses, such as Swiss or mozzarella, to vary the flavor profile. If you’re watching your calorie intake, use whole grain English muffins and opt for turkey bacon or omit the meat entirely. This sandwich is incredibly versatile, so feel free to get creative with your favorite ingredients.
Quinoa Breakfast Bowl With Fruit
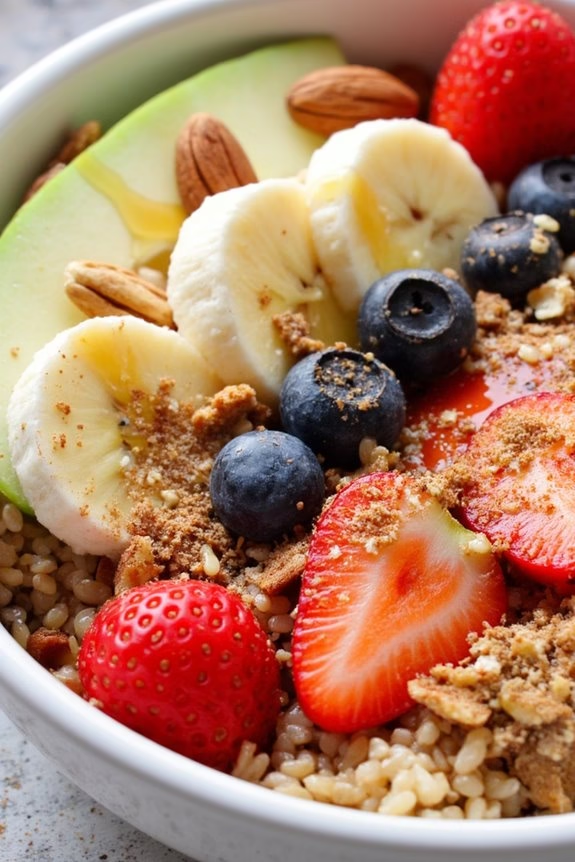
Quinoa Breakfast Bowl With Fruit is a delightful and nourishing way to start your morning. This dish combines the nutty flavor of quinoa with the natural sweetness of fresh fruits, creating a wholesome and colorful breakfast option. Packed with protein and fiber, quinoa serves as a perfect base that’s both filling and energizing, while the fruits add a burst of vitamins and antioxidants to your meal.
Whether you’re looking for a quick breakfast to fuel your busy day or a leisurely weekend treat, this quinoa bowl offers versatility and ease. Ideal for a serving size of 4-6 people, this breakfast bowl can be prepared in advance and customized to suit your taste. You can experiment with different fruits depending on the season or your preference, and even add toppings like nuts, seeds, or honey for extra flavor and texture.
The simplicity of the recipe allows for quick preparation, making it a practical choice for those who wish to maintain a healthy diet without spending too much time in the kitchen.
Ingredients:
- 2 cups quinoa
- 4 cups water
- 1/4 teaspoon salt
- 2 cups mixed fresh fruits (such as berries, bananas, and apples)
- 1/4 cup nuts (such as almonds or walnuts)
- 1/4 cup seeds (such as chia or flaxseeds)
- 1/4 cup honey or maple syrup
- 1 teaspoon vanilla extract
- 1/2 teaspoon ground cinnamon
Cooking Instructions:
1. Prepare the Quinoa:
Rinse the quinoa under cold water in a fine mesh strainer to remove any bitterness. In a medium-sized pot, combine the rinsed quinoa, water, and salt. Bring the mixture to a boil over medium-high heat. Once boiling, reduce the heat to low, cover, and let it simmer for about 15 minutes, or until the quinoa is tender and the water has been absorbed.
2. Fluff and Cool:
Once cooked, remove the pot from heat and let it sit covered for 5 minutes. Then, uncover and fluff the quinoa with a fork. Allow it to cool slightly to room temperature before assembling the breakfast bowls.
3. Prepare the Fruits and Toppings:
While the quinoa is cooling, wash and prepare your selection of fruits. Slice or dice them into bite-sized pieces. Roughly chop any nuts you plan to use.
4. Assemble the Bowls:
Divide the cooked quinoa evenly among 4-6 bowls. Top each portion with the prepared fruits, nuts, and seeds. Drizzle honey or maple syrup over each bowl for added sweetness, if desired. Sprinkle a pinch of cinnamon on top and add a dash of vanilla extract to enhance the flavor.
5. Serve:
Serve immediately or store in the refrigerator for later consumption. If storing, keep the toppings separate and add them just before serving to maintain freshness and texture.
Extra Tips:
When preparing your Quinoa Breakfast Bowl With Fruit, feel free to use whatever fruits are in season or readily available. For added creaminess, consider stirring in a spoonful of yogurt or a splash of almond milk before serving.
If you prefer a warm breakfast, you can lightly heat the quinoa before adding the toppings. This dish can also be made vegan by using maple syrup instead of honey. Finally, if you’re planning to make this recipe ahead of time, store the quinoa and toppings separately to keep everything fresh and vibrant until you’re ready to eat.
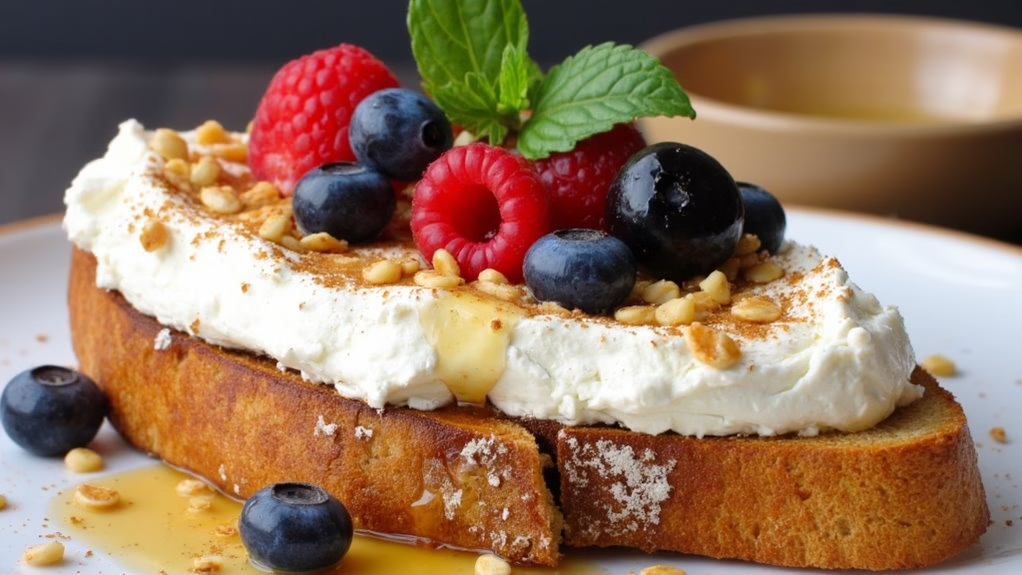
Ricotta and Honey Toast
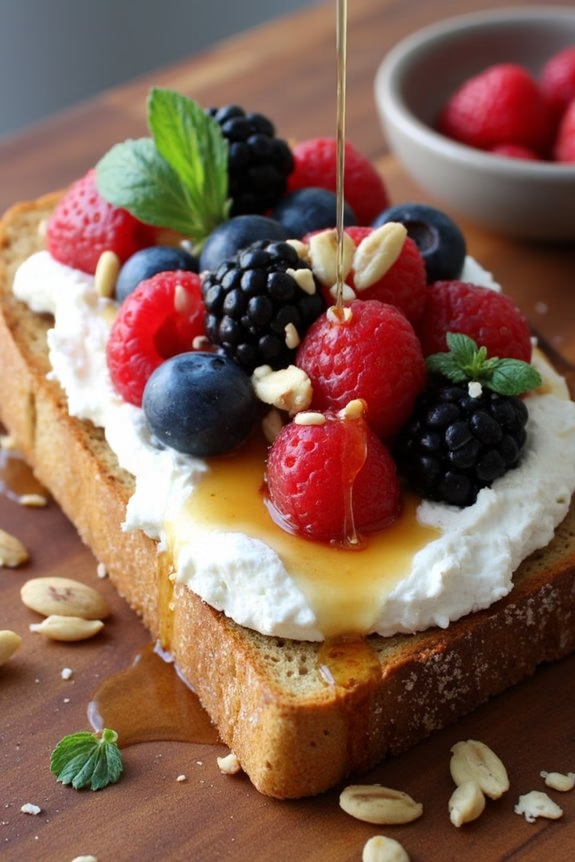
Ricotta and Honey Toast is a delightful breakfast option that combines the creamy texture of ricotta cheese with the natural sweetness of honey. This simple yet elegant dish is perfect for those mornings when you want something quick yet satisfying. The contrast between the creamy ricotta and the crunchy toast, along with the drizzle of honey, creates a harmonious blend of flavors and textures that’s certain to please your taste buds.
The beauty of Ricotta and Honey Toast lies in its simplicity. With just a few high-quality ingredients and minimal preparation time, you can create a breakfast that’s not only delicious but also visually appealing. Whether you’re enjoying a leisurely morning by yourself or hosting a small brunch gathering, this dish can easily be scaled up to serve multiple people.
Below are the ingredients you’ll need to prepare Ricotta and Honey Toast for a serving size of 4-6 people.
Ingredients (Serves 4-6):
- 1 loaf of rustic bread or sourdough, sliced
- 2 cups ricotta cheese
- 1/4 cup honey
- 1 teaspoon vanilla extract
- 1/2 teaspoon ground cinnamon
- Zest of 1 lemon
- Fresh berries (such as blueberries, raspberries, or strawberries)
- 1/4 cup chopped nuts (such as almonds or walnuts)
- Fresh mint leaves, for garnish (optional)
- Olive oil or butter, for toasting
Instructions:
- Prepare the Bread: Begin by slicing the loaf of bread into thick slices, about 1/2-inch thick. You can use rustic bread or sourdough for a hearty texture.
- Toast the Bread: Heat a grill pan or regular frying pan over medium heat. Lightly brush each side of the bread slices with olive oil or butter. Toast the bread on the pan until golden brown and crispy on both sides. This should take about 2-3 minutes per side. Remove from heat and set aside.
- Prepare the Ricotta Mixture: In a medium bowl, combine the ricotta cheese, vanilla extract, ground cinnamon, and lemon zest. Mix until well combined and smooth. This will add a lovely aroma and subtle flavor to the ricotta.
- Assemble the Toast: Spread a generous amount of the ricotta mixture over each slice of toasted bread. Drizzle each slice with honey, allowing it to cascade over the ricotta.
- Add Toppings: Top each slice with fresh berries of your choice and a sprinkle of chopped nuts for added texture and flavor. If desired, garnish with fresh mint leaves for a hint of freshness.
- Serve Immediately: Serve the Ricotta and Honey Toast immediately while the bread is still warm, and enjoy the delightful combination of flavors and textures.
Extra Tips:
When making Ricotta and Honey Toast, it’s important to choose fresh, high-quality ingredients to guarantee the best flavor. Opt for a good-quality ricotta cheese that has a creamy texture and mild flavor.
The bread should be fresh and sturdy enough to hold the toppings without getting soggy. Additionally, you can experiment with different types of honey and berries to suit your personal taste preferences. If you prefer a sweeter toast, feel free to add more honey.
This dish can also be customized with various toppings such as sliced bananas or a sprinkle of granola for added crunch.