

Are busy mornings making it hard to enjoy a satisfying breakfast?
I’ve discovered that prepping freezer meals can be a lifesaver.
From breakfast burritos to savory egg muffins, these make-ahead options are perfect for those hectic days.
Whether you crave a sweet potato hash or want a quick smoothie pack, these ideas promise to make your mornings easier.
Let’s explore some delicious and time-saving breakfast recipes that you can prepare in advance!
Hearty Breakfast Burritos

Start your day with a hearty breakfast that’s both satisfying and convenient. Hearty Breakfast Burritos are the perfect meal to prepare ahead of time and enjoy straight from the freezer. Packed with protein and flavor, these burritos feature a delicious combination of scrambled eggs, cheese, sausage, and vegetables, all wrapped in a soft tortilla.
They’re not only a great option for a busy morning but also an excellent way to guarantee you’re starting your day with a balanced meal. Freezing breakfast burritos allows you to have a delicious and nutritious breakfast ready in minutes, with minimal effort required in the morning.
Whether you’re looking to streamline your morning routine or simply crave a tasty and filling breakfast, these burritos fit the bill. Prepare them on the weekend, store them in the freezer, and enjoy a quick, hot breakfast throughout the week.
Ingredients (Serves 4-6 people):
- 6 large eggs
- 1/4 cup milk
- 1/2 teaspoon salt
- 1/4 teaspoon black pepper
- 1 tablespoon butter
- 1 cup cooked breakfast sausage, crumbled
- 1 cup shredded cheddar cheese
- 1/2 cup diced bell peppers
- 1/2 cup diced onions
- 6 large flour tortillas
- Salsa (optional)
Cooking Instructions:
- Prepare the eggs: In a mixing bowl, whisk together the eggs, milk, salt, and pepper until well combined. This will guarantee your eggs are fluffy and well-seasoned.
- Cook the eggs: Heat the butter in a large non-stick skillet over medium heat. Pour the egg mixture into the skillet and cook, stirring occasionally, until the eggs are scrambled and fully cooked. Remove from heat and set aside.
- Sauté the vegetables: In the same skillet, add the diced bell peppers and onions. Sauté over medium heat until they’re softened and slightly caramelized, about 5 minutes.
- Assemble the burritos: Lay out the tortillas on a clean surface. Evenly distribute the scrambled eggs, cooked sausage, sautéed vegetables, and shredded cheese onto each tortilla. For added flavor, you can also add a spoonful of salsa if desired.
- Wrap the burritos: Fold in the sides of each tortilla over the filling, then roll it up tightly from bottom to top to enclose the filling completely.
- Freeze the burritos: Wrap each burrito individually in aluminum foil or plastic wrap, then place them in a large resealable freezer bag. Label the bag with the date and contents, then store in the freezer.
- Reheat the burritos: To enjoy, remove a burrito from the freezer, unwrap it, and place it on a microwave-safe plate. Microwave on high for 2-3 minutes, or until heated through. Alternatively, you can reheat them in an oven at 350°F (175°C) for about 15-20 minutes.
Extra Tips:
When making these burritos, feel free to customize them by adding your favorite ingredients such as cooked bacon, ham, or different types of cheese. To prevent sogginess, guarantee the fillings aren’t too wet before assembling the burritos.
For the best texture, consider reheating the burritos in a toaster oven for a crispy exterior. Additionally, if you prefer a spicier kick, add some diced jalapeños or a dash of hot sauce to the filling before wrapping. Enjoy your Hearty Breakfast Burritos with a side of your favorite salsa or hot sauce for extra flavor!
Make-Ahead Smoothie Packs
Start your mornings effortlessly with Make-Ahead Smoothie Packs that guarantee you get a nutritious and delicious breakfast without the hassle.
These smoothie packs are perfect for those busy mornings when you don’t have time to chop fruits or measure ingredients. Simply prepare the packs in advance, store them in the freezer, and blend them with your choice of liquid whenever you’re ready to enjoy a quick and healthy breakfast. Not only do these packs save time, but they also allow you to control the ingredients and tailor the flavors to your liking.
This recipe makes enough smoothie packs for 4-6 servings, depending on portion size and hunger levels. Each pack is packed with vitamins, fiber, and energy-boosting nutrients to keep you fueled throughout the morning. The following ingredients and instructions will guide you on how to prepare these time-saving packs that will revolutionize your breakfast routine.
Ingredients (for 4-6 servings):
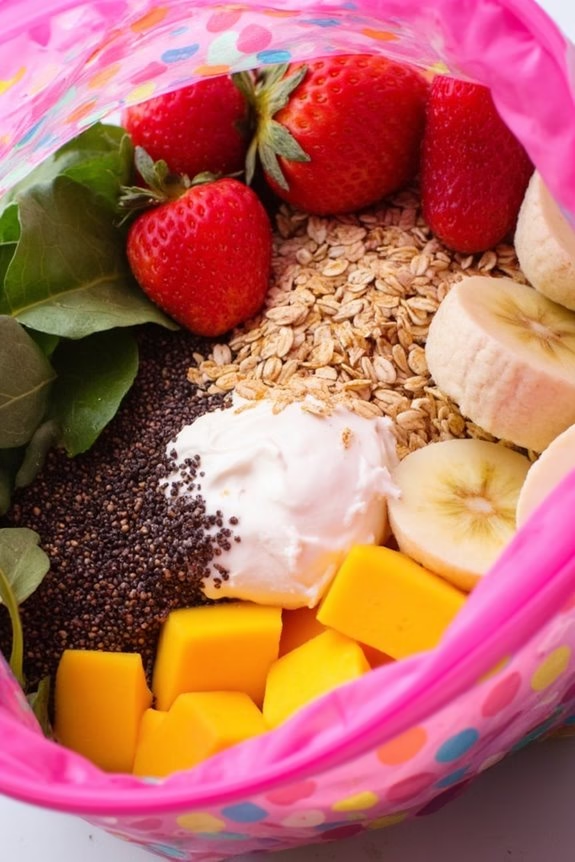
- 2 cups of frozen strawberries
- 2 cups of frozen mango chunks
- 2 bananas, sliced
- 1 cup of spinach leaves
- 1 cup of kale leaves
- 1/2 cup of rolled oats
- 1/4 cup of chia seeds
- 1/4 cup of flaxseeds
- 2 cups of Greek yogurt
- Optional: 1/4 cup of honey or maple syrup for added sweetness
Instructions:
- Prepare the Fruits and Greens:
- Begin by washing the spinach and kale leaves thoroughly to remove any dirt. Pat them dry with a clean towel or use a salad spinner.
- Slice the bananas into thin rounds. If using fresh strawberries and mangoes, wash and cut them into bite-sized pieces before freezing them.
- Assemble the Packs:
- Lay out six resealable freezer bags (or more depending on portion preferences). Divide the prepared fruits and greens evenly among the bags: add 1/3 cup of strawberries, 1/3 cup of mango chunks, a few banana slices, a handful of spinach, and kale leaves to each bag.
- Add Additional Ingredients:
- In each bag, add 2 tablespoons of rolled oats, 2 teaspoons of chia seeds, and 2 teaspoons of flaxseeds. These ingredients add fiber and omega-3 fatty acids to your smoothies for extra nutrition.
- Include the Greek Yogurt:
- Add approximately 1/3 cup of Greek yogurt to each bag. The yogurt not only provides creaminess but also adds a good amount of protein.
- Seal and Store:
- If using, drizzle a small amount of honey or maple syrup over the contents for sweetness. Carefully remove as much air as possible from each bag, seal them tightly, and label them with the date and type of smoothie mix.
- Store the packs in the freezer for up to one month.
- Blending the Smoothie:
- When ready to enjoy, remove a smoothie pack from the freezer. Empty the contents into a blender and add about 1 cup of your choice of liquid (such as almond milk, orange juice, or plain water). Blend until smooth and creamy. Adjust the liquid amount to achieve the desired consistency.
Extra Tips:
Customizing your Make-Ahead Smoothie Packs is easy and fun. Feel free to swap out the fruits or greens based on your preferences or seasonal availability.
Consider adding a scoop of protein powder for an extra boost or some nuts for added texture. Always verify your blender can handle frozen ingredients; if not, allow the ingredients to thaw for a few minutes before blending.
Keep a variety of smoothie flavors on hand to keep breakfast exciting and enjoyable every day.
Freezer-Friendly Breakfast Sandwiches

Start your day off right with these delicious and convenient freezer-friendly breakfast sandwiches. Perfect for busy mornings, these sandwiches can be prepared in advance and stored in the freezer for a quick and satisfying meal. Made with fluffy eggs, savory sausage, melty cheese, and a toasted English muffin, these breakfast sandwiches are sure to become a family favorite. Simply heat them up in the morning, and you’ll have a hearty breakfast ready in minutes.
These freezer-friendly breakfast sandwiches aren’t only easy to make, but they also provide a well-rounded meal that will keep you full and energized. Customize them with your favorite ingredients to suit your taste—add some veggies, swap out the sausage for bacon, or try different types of cheese.
Whether you’re feeding a family of four or preparing breakfast for the week, these sandwiches will make your mornings hassle-free and delicious.
Ingredients (Serves 4-6 people):
- 6 English muffins
- 6 large eggs
- 6 slices of cheddar cheese
- 6 sausage patties (or bacon slices)
- Salt and pepper, to taste
- 2 tablespoons butter
- Cooking spray or a small amount of oil
Cooking Instructions:
- Prepare the English Muffins: Split the English muffins in half and lightly toast them until golden brown. This can be done in a toaster or under a broiler. Set aside to cool.
- Cook the Sausage Patties: In a skillet over medium heat, cook the sausage patties until they’re fully cooked and browned on both sides, about 4-5 minutes per side. If using bacon, cook until crispy and drain on paper towels. Set aside.
- Scramble the Eggs: In a bowl, whisk the eggs with a pinch of salt and pepper. Heat a non-stick skillet over medium heat and add a small amount of butter or cooking spray. Pour in the eggs and cook, stirring occasionally, until they’re softly scrambled and just set. Remove from heat.
- Assemble the Sandwiches: Place a slice of cheese on the bottom half of each English muffin. Top with a sausage patty or bacon slice, a portion of scrambled eggs, and then place the other half of the English muffin on top.
- Wrap and Freeze: Individually wrap each sandwich in aluminum foil or parchment paper. Place the wrapped sandwiches in a freezer-safe bag or container, and store them in the freezer for up to 1 month.
- Reheat and Serve: To reheat a sandwich, remove the wrapping and place it on a microwave-safe plate. Microwave on high for 1-2 minutes, or until heated through. Alternatively, you can reheat in an oven at 350°F (175°C) for about 10-15 minutes. Enjoy warm.
Extra Tips:
For best results, allow the sandwiches to cool completely before wrapping and freezing to prevent excess moisture. When reheating, you may want to place a damp paper towel over the sandwich in the microwave to keep the bread from drying out.
If you prefer a crispier texture, consider reheating them in a toaster oven or skillet. Feel free to experiment with different types of bread, protein, or cheese to create your perfect breakfast sandwich combination.
Savory Egg Muffins

Savory Egg Muffins are a delicious and convenient option for a quick breakfast that can be prepared in advance and stored in the freezer. These muffins are packed with protein and vegetables, making them a wholesome choice to start your day. They’re perfect for busy mornings when you need something nutritious and filling to grab and go. The combination of eggs, cheese, and your favorite vegetables creates a delightful mix of flavors and textures.
These Savory Egg Muffins are incredibly versatile; you can customize them with your favorite ingredients or whatever you have on hand. Whether you prefer a vegetarian version or want to add some cooked bacon or sausage for an extra boost of protein, these muffins can be tailored to suit your taste. Once baked, they can be frozen and reheated easily, making them an ideal option for meal prep and ensuring you always have a healthy breakfast ready to enjoy.
Ingredients (Serving Size: 4-6 people):
- 12 large eggs
- 1 cup shredded cheese (cheddar, mozzarella, or your choice)
- 1 cup diced bell peppers
- 1 cup chopped spinach
- 1/2 cup diced onions
- 1/2 cup cooked and crumbled bacon or sausage (optional)
- Salt and pepper to taste
- Cooking spray or muffin liners
Cooking Instructions:
- Preheat and Prepare: Preheat your oven to 350°F (175°C). Lightly spray a muffin tin with cooking spray or line with muffin liners to prevent sticking.
- Mix the Eggs: In a large mixing bowl, crack the eggs and whisk them until they’re well beaten. Add salt and pepper to taste.
- Add Ingredients: Stir in the shredded cheese, diced bell peppers, chopped spinach, diced onions, and optional cooked bacon or sausage into the egg mixture. Mix until all ingredients are evenly distributed.
- Fill the Muffin Tin: Pour the egg mixture evenly into the prepared muffin tin, filling each cup about 3/4 full. This allows room for the muffins to rise while baking.
- Bake: Place the muffin tin in the preheated oven and bake for 20-25 minutes, or until the egg muffins are set and lightly golden on top.
- Cool and Store: Once baked, remove the egg muffins from the oven and allow them to cool in the tin for a few minutes. Then, transfer them to a wire rack to cool completely. For freezing, wrap each muffin individually in plastic wrap and place them in a freezer-safe bag or container.
Extra Tips:
When reheating frozen Savory Egg Muffins, you can either microwave them for about 1-2 minutes or bake them in the oven at 350°F (175°C) for 10-15 minutes until they’re heated through.
If you prefer a more uniform texture, you can blend the vegetables before adding them to the egg mixture. Feel free to experiment with different vegetables and proteins to suit your taste preferences.
Remember to label and date the muffins before freezing to keep track of their freshness.
Overnight Oats Freezer Cups
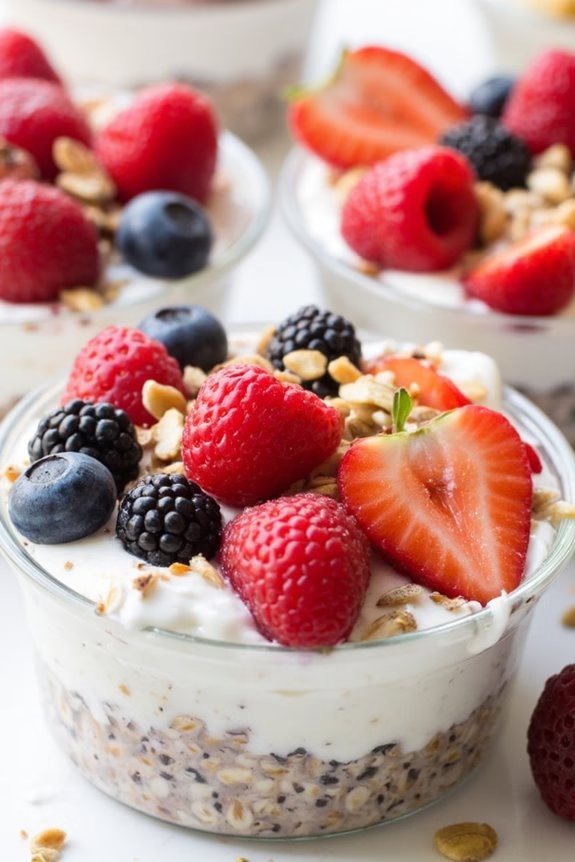
Start your mornings stress-free with these delicious Overnight Oats Freezer Cups. They’re the perfect make-ahead breakfast solution, providing you with a healthy and convenient option for busy mornings. By preparing these cups in advance and storing them in the freezer, you can enjoy a wholesome, hearty breakfast without having to spend time in the kitchen each day.
Customize them with your favorite fruits, nuts, and spices to make each batch uniquely yours. These freezer cups aren’t only easy to make but also incredibly versatile. Each cup is packed with nutritious ingredients like oats, yogurt, and chia seeds, guaranteeing you get a good mix of fiber and protein to keep you full and energized throughout the morning.
Whether you’re feeding a family of four or want to have a week’s worth of breakfasts ready to go, this recipe will help you get started on the right foot.
Ingredients for 4-6 Servings:
- 3 cups rolled oats
- 3 cups milk (dairy or non-dairy of choice)
- 1 cup Greek yogurt
- 1/4 cup chia seeds
- 2 tablespoons honey or maple syrup
- 1 teaspoon vanilla extract
- 1/2 teaspoon ground cinnamon
- 1 cup mixed berries (fresh or frozen)
- 1/2 cup chopped nuts (such as almonds or walnuts)
Cooking Instructions:
- Prepare the Base: In a large mixing bowl, combine the rolled oats, milk, Greek yogurt, chia seeds, honey or maple syrup, vanilla extract, and ground cinnamon. Stir the mixture well until all the ingredients are fully integrated.
- Add Fruits and Nuts: Gently fold in the mixed berries and chopped nuts into the oat mixture. Make sure the fruits and nuts are evenly distributed throughout the mixture to guarantee each cup has a balanced flavor.
- Portion the Mixture: Take silicone muffin cups or a muffin tin lined with paper liners, and spoon the mixture evenly into each cup. Fill each cup to about three-quarters full, leaving space for the oats to expand as they absorb the liquid.
- Freeze the Cups: Place the filled muffin cups on a baking sheet and transfer them to the freezer. Allow the cups to freeze for at least 4 hours, or until they’re completely solid.
- Store for Later Use: Once frozen, remove the cups from the muffin tin and transfer them to a freezer-safe bag or container. Label the container with the date and store them in the freezer for up to 3 months.
- Serve the Oats: When ready to eat, take out the desired number of cups and let them thaw in the refrigerator overnight or microwave them for 30-60 seconds until softened. Enjoy them as is or with additional toppings like extra berries, nuts, or a drizzle of honey.
Extra Tips:
For an added flavor boost, consider adding a tablespoon of nut butter to the oat mixture before freezing. If you prefer your oats a bit sweeter, adjust the amount of honey or maple syrup to taste.
You can also experiment with different fruit combinations or spices like nutmeg or cardamom for variety. Using silicone muffin cups will make it easier to pop out the frozen oats, but if you’re using a muffin tin, make sure to use paper liners for easy removal. Enjoy your hassle-free, nutritious breakfast!
Homemade Freezer Waffles

Homemade Freezer Waffles are a convenient and delicious option for busy mornings when you need a quick and satisfying breakfast. Making these waffles at home allows you to control the ingredients, ensuring a healthier start to your day.
This recipe yields fluffy and flavorful waffles that can be easily frozen and reheated, making them perfect for meal prep. These waffles aren’t only easy to make but also customizable. You can add your favorite mix-ins, such as blueberries, chocolate chips, or nuts, to cater to your taste preferences.
Once prepared and frozen, simply pop them in the toaster or oven for a warm, crispy breakfast in minutes. This recipe serves 4-6 people, making it ideal for families or for stocking up your freezer.
Ingredients:
- 2 cups all-purpose flour
- 2 tablespoons granulated sugar
- 1 tablespoon baking powder
- 1/2 teaspoon salt
- 2 large eggs
- 1 3/4 cups milk
- 1/2 cup melted butter
- 1 teaspoon vanilla extract
Instructions:
- Prepare the Batter: In a large mixing bowl, combine the all-purpose flour, granulated sugar, baking powder, and salt. Whisk these dry ingredients together until they’re well combined.
- Mix Wet Ingredients: In a separate bowl, beat the eggs and then add the milk, melted butter, and vanilla extract. Whisk these wet ingredients together until they’re thoroughly mixed.
- Combine Ingredients: Gradually pour the wet ingredients into the bowl with the dry ingredients. Stir the mixture gently until just combined, being careful not to overmix. It’s okay if the batter is slightly lumpy.
- Preheat Waffle Maker: Heat your waffle maker according to the manufacturer’s instructions. Lightly grease it with cooking spray or a brush of melted butter.
- Cook Waffles: Pour an appropriate amount of batter onto the preheated waffle maker, using a ladle or measuring cup. Close the lid and cook the waffles until they’re golden brown and crisp. This usually takes about 4-5 minutes, depending on your waffle maker.
- Cool and Freeze: Once cooked, transfer the waffles to a wire rack to cool completely. Once cooled, place them in a single layer on a baking sheet and freeze for about an hour. Then, transfer the frozen waffles to a resealable plastic bag or airtight container for longer storage.
- Reheat Waffles: When ready to eat, simply take the desired number of waffles from the freezer and reheat them in a toaster or oven until warmed through and crispy.
Extra Tips:
For an even fluffier texture, consider separating the eggs and beating the egg whites until stiff peaks form before gently folding them into the batter. This adds extra airiness to the waffles.
Additionally, be sure not to overfill the waffle maker, as this can cause the batter to spill over the edges. When freezing, make sure the waffles are completely cool to avoid ice crystals forming, which can affect the texture when reheated.
Enjoy your homemade freezer waffles with your favorite toppings such as syrup, fresh fruit, or whipped cream!
Breakfast Quesadillas

Breakfast quesadillas are a delicious and convenient option to start your day. These freezer-friendly delights are packed with scrambled eggs, cheese, and your choice of meats and veggies, all encased in a crispy tortilla. Perfect for busy mornings, you can prepare a batch ahead of time, freeze them, and simply heat them up when you’re ready to enjoy. Not only are they easy to make, but they also offer a balanced meal with plenty of protein and nutrients to keep you energized throughout the morning.
Making breakfast quesadillas is an excellent way to use up leftover ingredients, adding variety and flavor to your breakfast routine. By customizing the fillings according to your preference — whether it’s bacon, sausage, peppers, or spinach — you can create a meal that suits everyone’s taste. This recipe makes 4-6 servings, guaranteeing you have enough to feed the whole family or to store for future meals.
Ingredients (for 4-6 servings):
- 8 large flour tortillas
- 8 eggs
- 1 cup shredded cheese (cheddar, Monterey Jack, or your choice)
- 1 cup cooked bacon or sausage, crumbled
- 1 cup bell peppers, diced
- 1 cup spinach, chopped
- Salt and pepper, to taste
- 2 tablespoons butter or olive oil
Cooking Instructions:
- Prepare the Ingredients: Begin by prepping all your ingredients. Crack the eggs into a bowl, season with salt and pepper, and whisk them until smooth. Dice the bell peppers and chop the spinach. If you’re using bacon or sausage, confirm they’re pre-cooked and crumbled.
- Cook the Eggs: Heat a large skillet over medium heat and add a tablespoon of butter or olive oil. Pour in the eggs and scramble them until they’re just set. Remove the eggs from the skillet and set aside.
- Assemble the Quesadillas: Lay out the tortillas on a clean surface. On one half of each tortilla, evenly distribute the scrambled eggs, cooked bacon or sausage, diced bell peppers, chopped spinach, and a sprinkle of shredded cheese.
- Fold and Cook the Quesadillas: Fold the tortillas in half to cover the filling. Heat a non-stick skillet over medium heat and add a bit of butter or oil. Place the folded quesadillas in the skillet, cooking for about 3-4 minutes on each side, until the tortillas are golden brown and the cheese has melted.
- Cool and Freeze: Allow the quesadillas to cool completely if you plan to freeze them. Once cooled, wrap each quesadilla individually in aluminum foil or parchment paper and store them in a freezer-safe bag.
- Reheat and Serve: When ready to eat, remove a quesadilla from the freezer, unwrap it, and reheat in a skillet over medium heat, or microwave until heated through. Serve with salsa, sour cream, or your favorite toppings.
Extra Tips:
When making breakfast quesadillas, consider using whole wheat or gluten-free tortillas for a healthier option. You can also add or substitute other vegetables like mushrooms or onions to diversify the flavor.
When freezing, make sure the quesadillas are wrapped tightly to prevent freezer burn. For quicker reheating, slice the quesadillas into halves or quarters before freezing. This not only saves space but also guarantees even heating.
Enjoy these delicious and convenient breakfast quesadillas anytime you need a quick and satisfying meal.
Freezer-Ready Pancakes
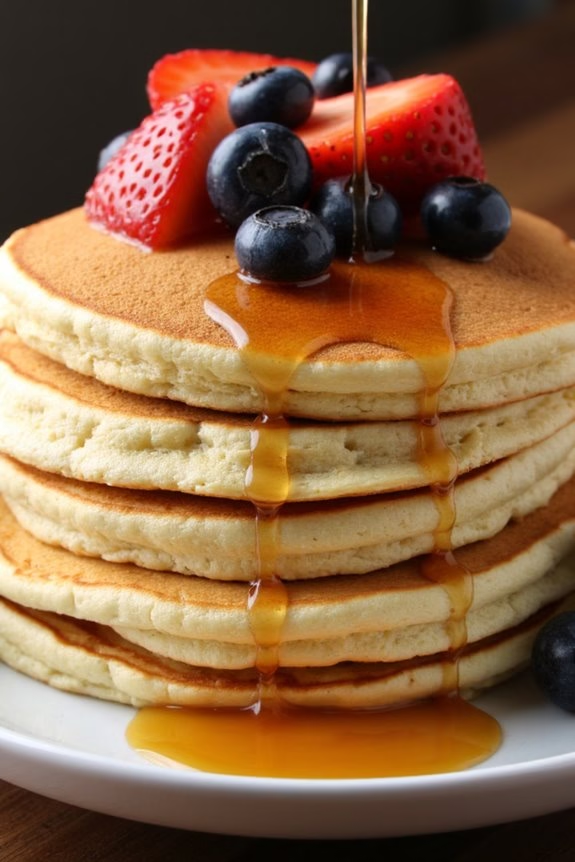
Freezer-Ready Pancakes are a lifesaver for busy mornings, offering a delicious and quick breakfast option without the hassle of making pancakes from scratch every day. By preparing a batch ahead of time, you can simply reheat them for a warm and satisfying meal in minutes.
These pancakes are fluffy, golden, and can be served with your favorite toppings such as syrup, fresh fruits, or a dollop of whipped cream.
Whether you’re meal prepping for the week or looking to stock up your freezer for those hectic mornings, these pancakes are a perfect choice. Made with simple ingredients, they freeze beautifully and maintain their texture and flavor once reheated.
Follow this recipe to enjoy homemade pancakes anytime you desire, without the morning rush.
Ingredients (Serves 4-6):
- 2 cups all-purpose flour
- 2 tablespoons sugar
- 1 tablespoon baking powder
- 1/2 teaspoon salt
- 2 large eggs
- 1 3/4 cups milk
- 1/4 cup melted butter
- 1 teaspoon vanilla extract
- Non-stick cooking spray or additional butter for cooking
Cooking Instructions:
1. Mix Dry Ingredients: In a large mixing bowl, whisk together the flour, sugar, baking powder, and salt until well combined. This will guarantee even distribution of the leavening agents for uniform pancakes.
2. Combine Wet Ingredients: In a separate bowl, beat the eggs and then mix in the milk, melted butter, and vanilla extract. Stir until the wet ingredients are fully integrated.
3. Make Batter: Pour the wet ingredients into the dry ingredients, gently stirring with a whisk or spatula until just combined. Be careful not to overmix; it’s okay if the batter is a little lumpy.
4. Heat Pan: Preheat a non-stick skillet or griddle over medium heat. Lightly grease the surface with non-stick cooking spray or a small amount of butter.
5. Cook Pancakes: Pour about 1/4 cup of batter onto the hot skillet for each pancake. Cook until bubbles form on the surface and the edges begin to look set, about 2-3 minutes. Flip the pancakes and cook for another 1-2 minutes until golden brown on both sides.
6. Cool and Freeze: Allow the pancakes to cool completely on a wire rack. Once cooled, lay them in a single layer on a baking sheet and freeze for about 1 hour. This prevents them from sticking together.
Then transfer the frozen pancakes to a resealable plastic bag or airtight container for long-term storage in the freezer.
7. Reheat and Serve: When ready to eat, reheat the pancakes in the microwave for about 30 seconds to 1 minute or in a toaster until heated through. Serve with your favorite toppings.
Extra Tips:
For best results, make sure not to overmix the batter, as this can result in tough pancakes.
When freezing, verify the pancakes are completely cool to prevent ice crystals from forming, which can affect texture. You can also place parchment paper between layers of pancakes when freezing to make them easier to separate.
If you prefer whole-grain pancakes, substitute half of the all-purpose flour with whole wheat flour for a healthier option.
Sweet Potato and Sausage Hash

Sweet Potato and Sausage Hash is a delightful and nutritious breakfast option, perfect for those busy mornings when you need a hearty meal to start your day. This dish combines the natural sweetness of sweet potatoes with the savory flavors of sausage, creating a balanced and satisfying meal.
It’s not only delicious but also easy to prepare and can be made in advance, making it an ideal candidate for a freezer breakfast option. By preparing a batch ahead of time, you can simply reheat and enjoy this breakfast on the go during your hectic weekdays.
This recipe serves 4-6 people and can be easily adjusted to suit different taste preferences. Whether you prefer your hash with a spicy kick or a mild flavor, you can modify the ingredients to fit your needs. Additionally, the Sweet Potato and Sausage Hash is packed with nutrients, providing a good source of protein, fiber, and vitamins, which are essential for maintaining energy levels throughout the morning.
Let’s explore the ingredients and steps required to make this delicious and convenient breakfast dish.
Ingredients:
- 3 medium sweet potatoes, peeled and diced
- 1 pound of sausage (your choice of pork, turkey, or chicken)
- 1 large onion, diced
- 1 red bell pepper, diced
- 1 green bell pepper, diced
- 3 cloves of garlic, minced
- 2 tablespoons olive oil
- 1 teaspoon paprika
- 1 teaspoon salt
- 1/2 teaspoon black pepper
- 1 teaspoon dried thyme
- 1/2 teaspoon red pepper flakes (optional)
- 1/4 cup chopped fresh parsley
Cooking Instructions:
- Prepare the Ingredients: Begin by peeling and dicing the sweet potatoes into small cubes. Dice the onion and bell peppers, and mince the garlic. This will guarantee that all your ingredients are ready to go and will help the cooking process run smoothly.
- Cook the Sausage: In a large skillet or frying pan over medium heat, add the sausage. Cook until it’s browned and cooked through, about 8-10 minutes. Remove the sausage from the pan and set it aside, leaving the fat in the pan for added flavor.
- Sauté the Vegetables: To the same pan, add the olive oil, onion, and garlic. Sauté for about 3 minutes until the onions become translucent. Then add the diced red and green bell peppers, and cook for an additional 5 minutes until they’re softened.
- Add Sweet Potatoes and Spices: Add the diced sweet potatoes to the pan along with paprika, salt, black pepper, dried thyme, and red pepper flakes (if using). Stir to combine all ingredients well, ensuring the sweet potatoes are coated with the spices.
- Cook Until Tender: Reduce the heat to medium-low, cover the pan with a lid, and allow the mixture to cook for about 15-20 minutes. Stir occasionally to prevent sticking, and cook until the sweet potatoes are tender and can be easily pierced with a fork.
- Combine and Finish: Once the sweet potatoes are done, return the sausage to the pan and mix everything together. Cook for another 2-3 minutes to heat the sausage through. Turn off the heat, sprinkle the chopped fresh parsley over the top, and give it a final stir.
- Serve and Enjoy: Adjust the seasoning if necessary, and serve the Sweet Potato and Sausage Hash warm. It’s perfect as is, or you can pair it with a fried or poached egg for an extra protein boost.
Extra Tips:
When cooking Sweet Potato and Sausage Hash, consider making a double batch to store some in the freezer for later use. Allow the hash to cool completely before dividing it into portion-sized containers and freezing.
For reheating, you can either microwave it or heat it in a skillet on the stove. Additionally, feel free to experiment with different types of sausage or add other vegetables such as spinach or mushrooms to diversify the flavors and nutrients.
Adjust the level of spices to match your preference, and enjoy a versatile breakfast that fits your lifestyle.
Nutritious Breakfast Cookies
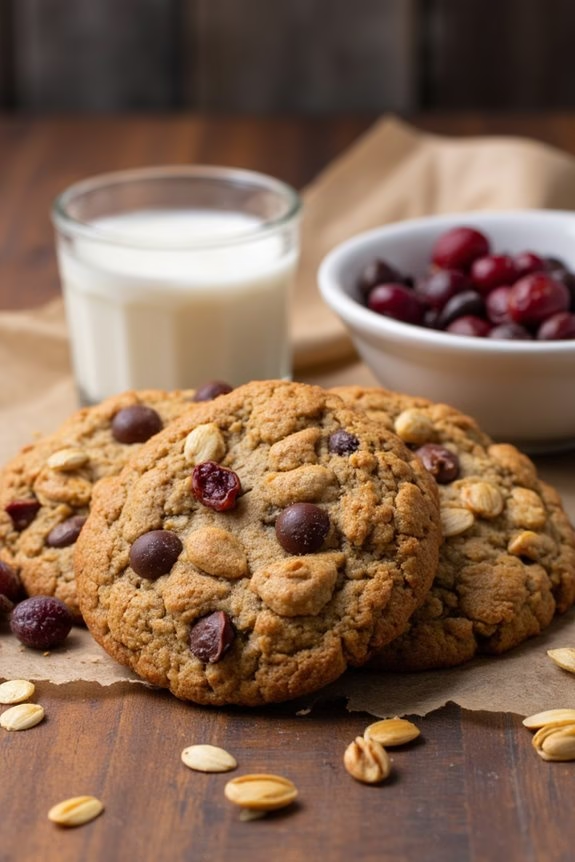
Start your day right with these delicious and nutritious breakfast cookies, perfect for a quick and healthy start to your morning.
These cookies are packed with wholesome ingredients like oats, nuts, dried fruits, and a touch of natural sweetness, making them a great option for those who are always on the go.
They’re freezer-friendly, so you can prepare a batch ahead of time and enjoy them throughout the week. Plus, they’re versatile, allowing you to customize them with your favorite add-ins.
Whether you’re serving a family or meal-prepping for yourself, these breakfast cookies are an excellent choice for those busy weekday mornings or leisurely weekend brunches.
They’re easy to make and require minimal preparation, making them an ideal recipe even for those who aren’t seasoned bakers.
Enjoy them with a cup of tea or coffee, or pack them as a snack for later in the day.
Ingredients for 4-6 people:
- 2 cups rolled oats
- 1 cup almond flour
- 1/2 cup almond butter
- 1/3 cup honey or maple syrup
- 1/4 cup unsweetened applesauce
- 2 large eggs
- 1 teaspoon vanilla extract
- 1/2 teaspoon baking soda
- 1/2 teaspoon cinnamon
- 1/4 teaspoon salt
- 1/2 cup chopped nuts (e.g., almonds, walnuts)
- 1/2 cup dried cranberries or raisins
- 1/4 cup dark chocolate chips (optional)
Cooking Instructions:
- Preheat the Oven: Start by preheating your oven to 350°F (175°C). Line a baking sheet with parchment paper or a silicone baking mat to prevent sticking.
- Mix Dry Ingredients: In a large bowl, combine the rolled oats, almond flour, baking soda, cinnamon, and salt. Stir well to ascertain the ingredients are evenly distributed.
- Combine Wet Ingredients: In a separate bowl, whisk together the almond butter, honey or maple syrup, applesauce, eggs, and vanilla extract until smooth and well combined.
- Mix Wet and Dry Ingredients: Pour the wet ingredients into the bowl with the dry ingredients. Stir until a dough forms. The mixture should be thick and slightly sticky.
- Add Mix-ins: Fold in the chopped nuts, dried cranberries or raisins, and chocolate chips (if using) to the dough, confirming they’re evenly distributed throughout.
- Shape the Cookies: Using a spoon or cookie scoop, drop rounded tablespoons of the dough onto the prepared baking sheet. Flatten each mound slightly with the back of the spoon to form cookie shapes.
- Bake: Place the baking sheet in the preheated oven and bake for 12-15 minutes, or until the cookies are golden brown around the edges and firm to touch.
- Cool: Remove the cookies from the oven and let them cool on the baking sheet for about 5 minutes before transferring them to a wire rack to cool completely.
Extra Tips:
For those looking to make these breakfast cookies gluten-free, verify that your oats are certified gluten-free.
You can substitute almond butter with any nut or seed butter of your choice if there are nut allergies to take into account.
Additionally, these cookies can be stored in the freezer for up to 3 months; just make sure they’re completely cooled before freezing.
When ready to eat, simply let them thaw at room temperature, or pop them in the microwave for a few seconds to warm them up.
Enjoy these cookies as a convenient, healthy breakfast or snack option any time of the day!