

With Halloween just around the corner, I’m absolutely giddy to share a lineup of 15 thrilling snacks that will make your party a scream. Picture the delight on your guests’ faces when they see Witch’s Finger Breadsticks and Mummy Hot Dogs on the table. These treats are all about putting a spooky twist on classic favorites. Perfect for enchanting both kids and adults alike. Let’s turn your gathering into an unforgettable Halloween bash with these eerie edibles!
Witch’s Finger Breadsticks

Witch’s Finger Breadsticks are a spooktacular addition to your Halloween party spread. These savory snacks not only look the part with their eerie, finger-like appearance but also offer a delicious, buttery taste that will have your guests coming back for more. Perfect for dipping into marinara or enjoying on their own, Witch’s Finger Breadsticks are bound to be a hit with kids and adults alike.
Whether you’re hosting a big bash or a small gathering, this recipe is designed to accommodate 4-6 party-goers. The secret to these creepy breadsticks is in the details. Almonds serve as the “fingernails,” while a few strategic cuts and a light sprinkle of seasoning give them a realistic, knobby look.
With just a bit of creativity, you can turn a simple bread dough into something that will have your guests doing a double take. So gather your ingredients and roll up your sleeves; it’s time to bring some frightful fun to the table with Witch’s Finger Breadsticks.
Ingredients (Serving Size: 4-6 people):
- 1 can (13.8 oz) refrigerated breadstick dough
- 24 whole blanched almonds
- 1/4 cup unsalted butter, melted
- 1 tablespoon garlic powder
- 1 teaspoon dried oregano
- Salt to taste
- Red food coloring (optional)
Cooking Instructions:
- Preheat the Oven: Start by preheating your oven to 375°F (190°C). This guarantees that the breadsticks cook evenly and achieve the perfect golden-brown color.
- Prepare the Baking Sheet: Line a baking sheet with parchment paper or lightly grease it to prevent the breadsticks from sticking during baking.
- Shape the Breadsticks: Open the can of breadstick dough and separate the dough into individual pieces. Roll each piece into a thin, finger-like shape, making sure to taper one end to resemble a fingertip.
- Add the Fingernails: Press a blanched almond into the tapered end of each breadstick to create the appearance of a fingernail. If using red food coloring, lightly dip the edge of the almond in the coloring before pressing it into the dough for a “bloody” effect.
- Create Knuckles and Wrinkles: Using a sharp knife, make small cuts across the dough to mimic knuckle lines and wrinkles, enhancing the realistic look of the fingers.
- Season the Breadsticks: In a small bowl, mix the melted butter with garlic powder, oregano, and a pinch of salt. Brush this mixture over each breadstick, providing an even coating for a rich, savory flavor.
- Bake the Breadsticks: Place the prepared breadsticks on the lined baking sheet and bake in the preheated oven for 10-12 minutes or until they’re golden brown and cooked through.
- Cool and Serve: Allow the breadsticks to cool slightly before serving. This will help set the shape and make them easier to handle.
Extra Tips: For an extra spooky touch, consider serving these Witch’s Finger Breadsticks with a side of marinara sauce or a blood-red pepper dip to mimic a gory accompaniment.
If you’re short on time, you can also use pre-made pizza dough instead of breadstick dough to achieve a similar result. For those looking to add a bit of heat, sprinkle some crushed red pepper flakes into the butter mixture.
Spooky Spider Deviled Eggs

If you’re looking to add a creepy yet delicious element to your Halloween party spread, Spooky Spider Deviled Eggs are the perfect choice. These eerie appetizers aren’t only visually engrossing but also pack a punch of flavor. The creamy yolk mixture, infused with tangy mustard and mayonnaise, provides a delightful contrast to the slightly chewy texture of the black olive “spiders” perched atop each egg. It’s a simple yet effective way to delight your guests with a dish that’s as fun to look at as it’s to eat.
Crafting these Spooky Spider Deviled Eggs is a breeze, making them an ideal choice for hosts who want to impress without spending hours in the kitchen. The key to this recipe is using fresh, high-quality eggs and ripe black olives to guarantee the best possible taste and presentation. With just a few ingredients, you can create a memorable centerpiece for your Halloween snack table that will have everyone talking. This recipe serves 4-6 people, making it a perfect addition to a variety of party menus.
Ingredients:
- 6 large eggs
- 3 tablespoons mayonnaise
- 1 teaspoon Dijon mustard
- Salt and pepper to taste
- Paprika for garnish (optional)
- 12 black olives
Instructions:
- Boil the Eggs: Place the eggs in a saucepan and cover them with cold water. Bring the water to a boil over medium-high heat. Once boiling, remove the saucepan from heat, cover it, and let the eggs sit for about 10-12 minutes. Drain the hot water and place the eggs in a bowl of ice water to cool for easier peeling.
- Prepare the Egg Halves: Peel the cooled eggs and slice them in half lengthwise. Carefully remove the yolks and place them in a separate bowl. Arrange the egg white halves on a serving platter.
- Make the Filling: Mash the egg yolks with a fork until crumbly. Add the mayonnaise, Dijon mustard, salt, and pepper. Mix until smooth and creamy. Adjust seasoning to taste.
- Fill the Eggs: Spoon or pipe the yolk mixture back into the egg white halves, dividing it evenly among them.
- Create the Olive Spiders: Cut the black olives in half. Use one half as the spider’s body and slice the other half into thin strips to create legs. Position an olive half on top of each filled egg as the body, and arrange 8 olive strips around it to form the legs.
- Garnish and Serve: If desired, sprinkle a pinch of paprika over the eggs for added color. Serve immediately or refrigerate until ready to serve.
Extra Tips:
For the best results, use eggs that aren’t too fresh, as older eggs tend to peel more easily after boiling. When making the filling, you can experiment with additional flavors by adding a dash of hot sauce or a teaspoon of pickle relish for an extra kick.
If you’re short on time, you can prepare the eggs and filling in advance and assemble the spiders just before serving to keep the olives fresh and appealing.
Monster Eyeball Cake Pops

Monster Eyeball Cake Pops are a spooktacular treat perfect for any Halloween gathering. These eerie yet delightful cake pops bring a fun twist to traditional cake offerings, delighting both kids and adults alike. Their eyeball design, complete with creepy details, makes them the highlight of any party spread. Made with moist cake, creamy frosting, and decadent chocolate coating, these treats are as delicious as they’re eye-catching.
Preparing these cake pops might seem intimidating at first, but with a little patience and creativity, you’ll be able to craft a batch of these ghoulish goodies with ease. This recipe yields approximately 12-18 Monster Eyeball Cake Pops, making it ideal for a small party of 4-6 people. Let’s jump into the ingredients and steps required to conjure these tasty monsters.
Ingredients:
- 1 box of cake mix (any flavor you prefer)
- Ingredients required for cake mix (usually eggs, oil, and water)
- 1 cup of frosting (store-bought or homemade)
- 12-18 cake pop sticks
- 1 pound of white chocolate or candy melts
- Assorted food coloring (green, red, blue, etc.)
- Candy eyeballs or similar edible decorations
- Red gel icing for details
Instructions:
- Bake the Cake: Prepare the cake according to the instructions on the box and allow it to cool completely. It’s best to bake it a day ahead to make sure it’s fully cooled.
- Crumble and Mix: Once the cake is cooled, crumble it into a large bowl until it resembles fine crumbs. Add in the frosting and mix until you achieve a dough-like consistency.
- Form the Balls: Roll the mixture into small balls, approximately the size of a ping-pong ball. Place them on a baking sheet lined with parchment paper and chill in the refrigerator for at least 2 hours, or until firm.
- Melt the Chocolate: Melt the white chocolate or candy melts in a heatproof bowl set over a pot of simmering water or in the microwave, stirring frequently until smooth.
- Dip the Sticks: Dip one end of each cake pop stick into the melted chocolate and insert it halfway into each cake ball. This helps the stick adhere to the cake ball.
- Coat the Cake Pops: Dip each cake pop into the melted chocolate, ensuring it’s fully coated. Gently tap off any excess chocolate and place the pops back on the parchment paper to set.
- Decorate with Eyeballs: Before the coating sets completely, press a candy eyeball onto each cake pop. Use the red gel icing to draw veins or other spooky details on the eyeballs.
- Let Them Set: Allow the chocolate coating to harden completely before serving. You can speed up the process by placing the cake pops in the refrigerator.
Extra Tips:
To make sure your Monster Eyeball Cake Pops turn out perfectly, make sure the cake balls are chilled properly before dipping them in chocolate; this prevents them from falling apart.
If the chocolate is too thick, add a teaspoon of vegetable shortening to thin it out. When decorating, have fun with the details—using different colored icing or candies can personalize each ‘eyeball’ and add an extra layer of spookiness.
Enjoy your delicious and creepy creations!
Ghostly Cheese Ball Bites
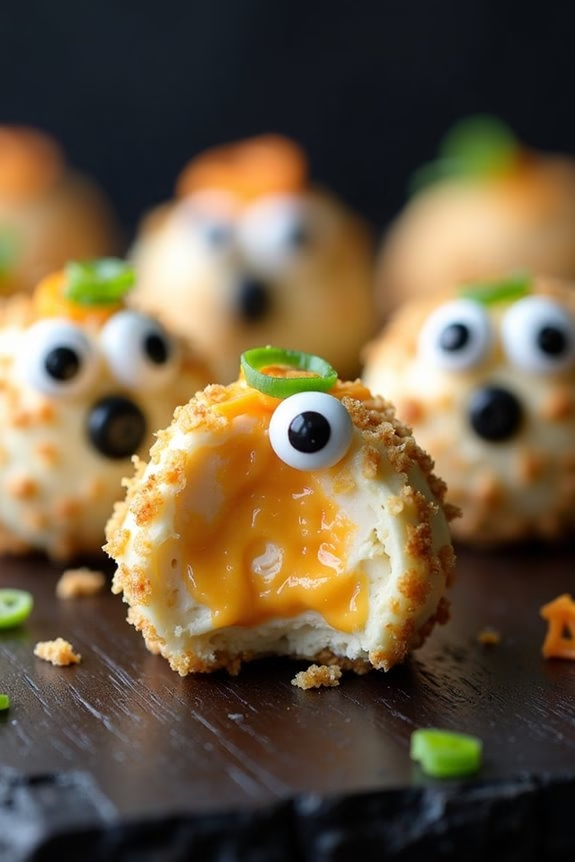
Ghostly Cheese Ball Bites are a delightful addition to any Halloween party, offering a spooky twist on a classic appetizer. These bite-sized treats aren’t only fun to look at but are also incredibly tasty. Made with a creamy cheese mixture and shaped into ghostly figures, they’re sure to be a hit among both children and adults.
Whether you’re hosting a large gathering or a small get-together, these Ghostly Cheese Ball Bites are the perfect snack to serve. The best part about these cheese balls is their versatility and ease of preparation. With just a few simple ingredients, you can create a delicious and festive snack that complements any Halloween spread.
The recipe can be adjusted to suit different tastes by varying the type of cheese or adding in extra spices. Additionally, these cheese balls can be prepared in advance, allowing you to focus on other party preparations. Each bite offers a burst of flavor, making them an irresistible treat for your guests.
Ingredients for Ghostly Cheese Ball Bites (Serves 4-6):
- 8 ounces cream cheese, softened
- 1 cup shredded cheddar cheese
- 1/4 cup finely chopped green onions
- 1/4 cup finely chopped bell peppers
- 1 teaspoon garlic powder
- 1/2 teaspoon paprika
- Salt and pepper to taste
- 1/2 cup finely crushed pretzels
- Edible candy eyes or small olives for decoration
Cooking Instructions:
- Prepare the Cheese Mixture: In a medium-sized mixing bowl, combine the softened cream cheese, shredded cheddar cheese, finely chopped green onions, chopped bell peppers, garlic powder, paprika, salt, and pepper. Mix thoroughly until all ingredients are well incorporated and the mixture is smooth.
- Form the Cheese Balls: Using your hands, scoop out about a tablespoon of the cheese mixture and roll it into a ball. Repeat this process until all the cheese mixture is used up. Aim to make each ball roughly the same size for even serving.
- Coat with Crushed Pretzels: Spread the finely crushed pretzels on a plate. Roll each cheese ball in the pretzels to coat them completely. The pretzel coating will give the cheese balls a crunchy texture and a delightful appearance.
- Add the Eyes: Once the cheese balls are coated, gently press two edible candy eyes or small olive pieces into each cheese ball to give them a ghostly appearance.
- Chill Before Serving: Place the finished cheese balls in the refrigerator for at least 30 minutes before serving. This allows the flavors to meld together and the cheese balls to firm up.
Extra Tips:
When making Ghostly Cheese Ball Bites, it’s important to guarantee the cream cheese is fully softened before mixing. This will make the combining process much easier and will result in a smoother mixture.
If you prefer a spicier flavor, consider adding a dash of cayenne pepper or hot sauce to the cheese mixture. Additionally, the cheese balls can be made a day in advance and stored in an airtight container in the refrigerator, saving you valuable time on the day of your party.
For a more festive touch, serve the cheese balls on a bed of leafy greens or alongside other Halloween-themed snacks.
Mummy Hot Dogs

Mummy Hot Dogs are a fun and spooky treat that will delight your Halloween party guests. These cleverly wrapped hot dogs look like little mummies, making them a perfect addition to your festive celebration. Not only are they visually appealing, but they’re also delicious and easy to prepare, making them a hit for both adults and kids alike.
With just a few simple ingredients, you can create a platter of these whimsical snacks that will be the talk of the party. The recipe involves wrapping hot dogs with strips of crescent roll dough to mimic the classic mummy appearance. Once baked, the dough turns into a golden, flaky crust that complements the savory taste of the hot dogs.
You can even personalize these mummies with mustard or ketchup eyes to give them a little personality. Whether served as a main dish or a finger food appetizer, Mummy Hot Dogs are certain to add a touch of fun and flavor to your Halloween festivities.
Ingredients for 4-6 servings:
- 1 package of hot dogs (8-10 hot dogs)
- 1 can of crescent roll dough
- Cooking spray
- Mustard or ketchup (for decoration)
Cooking Instructions:
- Preheat the Oven: Begin by preheating your oven to 375°F (190°C). This guarantees that the oven is at the right temperature by the time you’re ready to bake your mummies.
- Prepare the Dough: Open the can of crescent roll dough and unroll it onto a clean working surface. Using a knife or pizza cutter, slice the dough into thin strips, approximately 1/4 inch wide.
- Wrap the Hot Dogs: Take a hot dog and start wrapping the dough strips around it, leaving a small gap near the top for the mummy’s face. Continue wrapping until the hot dog is mostly covered, creating a mummy-like appearance. Repeat this process for all the hot dogs.
- Place on Baking Sheet: Lightly spray a baking sheet with cooking spray to prevent sticking. Arrange the wrapped hot dogs on the baking sheet, ensuring they’re spaced apart to allow even cooking.
- Bake the Mummies: Place the baking sheet in the preheated oven and bake for 12-15 minutes, or until the dough is golden brown and fully cooked.
- Add the Eyes: Remove the mummies from the oven and let them cool slightly. Use mustard or ketchup to dot on eyes near the exposed hot dog area to give your mummies a fun and spooky face.
Extra Tips:
For an extra touch of Halloween fun, you can use edible candy eyes instead of mustard or ketchup. If you want to add more flavor, consider using cheese-filled or spicy hot dogs for a twist.
Be sure to monitor the baking process closely, as the cooking time may vary depending on your oven and the thickness of the dough strips. If preparing for a larger crowd, simply double the ingredients and adjust the baking time as needed. Enjoy these Mummy Hot Dogs warm for the best taste and texture!
Vampire Bat Wings
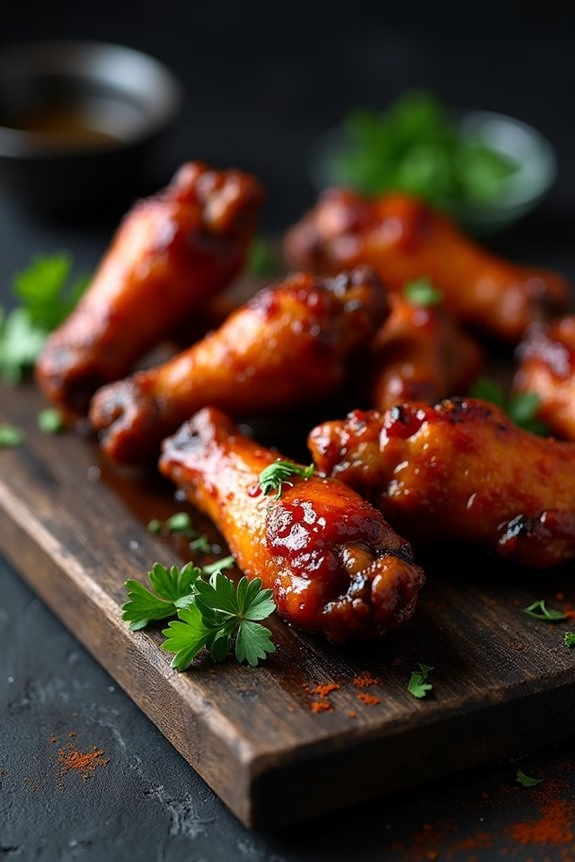
Looking for a spooky and delicious treat to serve at your Halloween party? Vampire Bat Wings are the perfect dish to enchant your guests. These wings aren’t only eerily themed but also bursting with flavor, making them an irresistible addition to your spread.
The wings are coated with a dark, sticky sauce that gives them a ghoulish appearance, perfect for the Halloween ambiance. Whether you’re hosting a large bash or a small gathering, these Vampire Bat Wings will surely be a hit.
The secret to these wings lies in their tantalizing combination of sweet, spicy, and savory flavors. The marinade infuses the chicken with a rich taste, while the sauce caramelizes beautifully during baking, creating a crispy, finger-licking good outer layer.
Serve these wings hot, and watch as your guests delight in their hauntingly good taste. With just the right balance of spices and a touch of sweetness, these wings will become a staple at every Halloween festivity.
Ingredients (Serves 4-6 People):
- 2 pounds chicken wings
- 1/2 cup soy sauce
- 1/4 cup balsamic vinegar
- 1/4 cup honey
- 2 tablespoons olive oil
- 4 cloves garlic, minced
- 1 teaspoon smoked paprika
- 1/2 teaspoon cayenne pepper
- 1/2 teaspoon black pepper
- 1/2 teaspoon salt
- 1 tablespoon fresh ginger, grated
- Black food coloring (optional)
Cooking Instructions:
- Prepare the Marinade: In a large bowl, combine the soy sauce, balsamic vinegar, honey, olive oil, minced garlic, smoked paprika, cayenne pepper, black pepper, salt, and grated ginger. If you prefer a darker, more dramatic appearance, add a few drops of black food coloring to the mixture.
- Marinate the Wings: Add the chicken wings to the marinade, ensuring they’re well-coated. Cover the bowl with plastic wrap and refrigerate for at least 2 hours, or overnight for best results. This allows the wings to absorb the flavors thoroughly.
- Preheat the Oven: Preheat your oven to 400°F (200°C). Line a baking sheet with aluminum foil and place a wire rack on top. This setup helps the wings cook evenly and stay crispy.
- Arrange the Wings: Remove the wings from the marinade and arrange them on the wire rack, ensuring they’re spread out evenly. Reserve the remaining marinade for basting.
- Bake the Wings: Place the wings in the preheated oven and bake for 20 minutes. After 20 minutes, baste the wings with the reserved marinade using a brush, then continue baking for another 20-25 minutes, or until the wings are cooked through and have a crispy exterior.
- Serve: Once done, remove the wings from the oven and let them cool slightly before serving. Arrange them on a platter and garnish with a sprinkle of fresh parsley or sesame seeds, if desired.
Extra Tips:
For extra crispy wings, make sure they’re as dry as possible before marinating. Pat them with paper towels to remove excess moisture.
If you want an even darker appearance, adding a few more drops of black food coloring will enhance the spooky effect. Keep an eye on the wings during the last few minutes of baking to avoid burning, as the sugar content in the marinade can caramelize quickly.
These Vampire Bat Wings are best enjoyed hot, so try to serve them straight from the oven for the best taste and texture.
Graveyard Dirt Cups
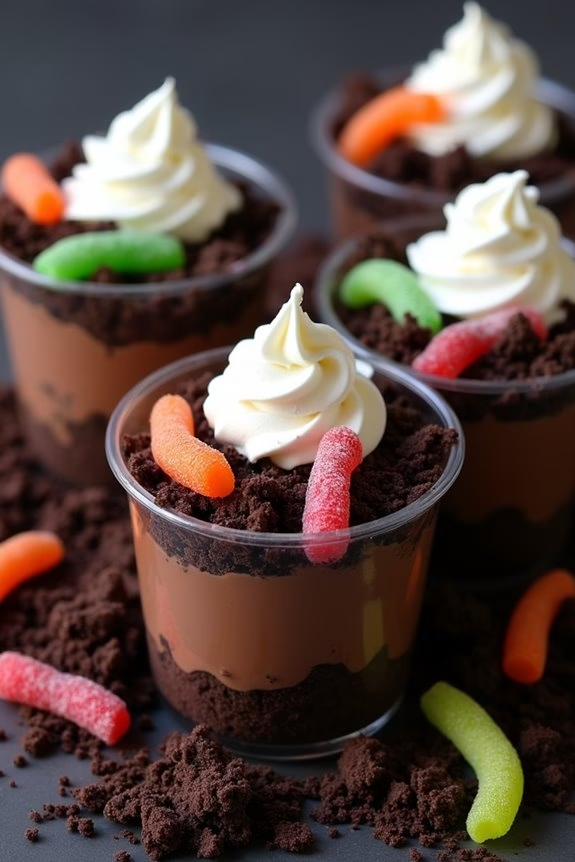
Graveyard Dirt Cups are a spooky and delicious treat that’s perfect for any Halloween celebration. These fun and festive desserts are both easy to make and a hit with guests of all ages. Layers of creamy chocolate pudding, crushed chocolate cookies, and gummy worms come together to create a dessert that looks just like a spooky graveyard. Not only are they tasty, but they also add a festive touch to your Halloween party spread.
These Graveyard Dirt Cups are perfect for serving 4-6 people, making them ideal for a small gathering or as part of a larger dessert table. The combination of rich chocolate, crunchy cookies, and chewy gummies is sure to satisfy any sweet tooth. Plus, they’re a great activity for kids to help with, as they can have fun decorating the tops of the cups with their own creative designs.
Ingredients (serves 4-6):
- 2 cups of milk
- 1 package (3.9 oz) instant chocolate pudding mix
- 1 package (14 oz) chocolate sandwich cookies
- 1 package (8 oz) gummy worms
- 1 cup whipped topping
- Small plastic or paper cups
Instructions:
- Prepare the Pudding: In a large mixing bowl, whisk together the instant chocolate pudding mix and milk. Continue to whisk for about 2 minutes until the mixture is smooth and begins to thicken. Set aside for about 5 minutes to allow the pudding to set completely.
- Crush the Cookies: Place the chocolate sandwich cookies in a large resealable plastic bag. Use a rolling pin or a heavy object to crush the cookies until they resemble coarse crumbs. You can also use a food processor for a finer texture if desired.
- Assemble the Cups: Begin by spooning a layer of chocolate pudding into each cup, filling it about a third of the way. Follow with a generous layer of crushed cookies to create the “dirt” layer. Repeat the layers, finishing with a top layer of cookie crumbs.
- Decorate with Gummy Worms: Push a few gummy worms into the top layer of cookie crumbs in each cup, so they appear to be crawling out of the “dirt.” You can use extra gummy worms to decorate the outside rim of the cups if desired.
- Add Whipped Topping: Just before serving, add a dollop of whipped topping on top of each cup. This can be shaped using a spoon or piping bag for a more decorative effect.
- Chill Before Serving: Place the assembled dirt cups in the refrigerator for at least 30 minutes before serving. This allows the flavors to meld and the pudding to firm up nicely.
Extra Tips:
For a more personalized touch, you can add small, edible tombstones made from cookie pieces or use candy pumpkins for extra decoration.
If you want to make the dirt cups ahead of time, prepare all components except the whipped topping and gummies, and assemble them closer to serving time to keep the toppings fresh.
Additionally, for a more intense chocolate flavor, consider adding a dash of cocoa powder to the pudding mix.
Enjoy your Graveyard Dirt Cups, and have a spooky Halloween!
Frankenstein Rice Krispie Treats
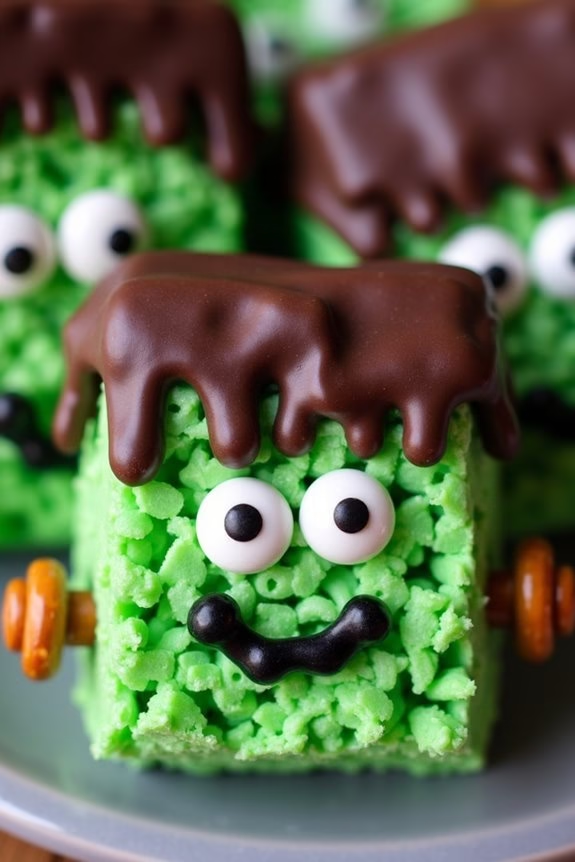
Frankenstein Rice Krispie Treats are the perfect Halloween snacks to delight and spook your party guests. These fun and festive treats are a twist on the classic Rice Krispie treats, featuring a ghoulish green color, a rich chocolate coating, and playful candy decorations that mimic Frankenstein’s iconic look.
Whether you’re hosting a Halloween party or simply looking for a creative treat to enjoy with friends and family, these treats are bound to be a hit with both kids and adults alike.
Creating these Frankenstein Rice Krispie Treats is a straightforward process that involves the classic method of making Rice Krispie treats, with a few added steps for decoration. The result is a batch of deliciously gooey and chewy treats, brought to life with a vibrant green hue and adorable candy features.
The combination of sweet marshmallows, crispy rice cereal, and rich chocolate makes for a delectable snack that’s perfect for any Halloween celebration.
Ingredients (serves 4-6 people):
- 3 tablespoons unsalted butter
- 1 package (10 oz) mini marshmallows
- 6 cups Rice Krispies cereal
- Green food coloring
- 1 cup semisweet chocolate chips
- Candy eyes
- Black decorating gel
- Pretzel sticks (for bolts)
Cooking Instructions:
- Prepare the Pan: Line a 9×13-inch pan with parchment paper or lightly grease it to prevent sticking. Set aside.
- Melt the Butter and Marshmallows: In a large saucepan, melt the butter over low heat. Once melted, add the mini marshmallows and stir continuously until completely melted and smooth. Remove from heat.
- Add Green Food Coloring: Stir in a few drops of green food coloring into the melted marshmallow mixture until you achieve the desired shade of green.
- Mix in the Rice Krispies: Gradually add the Rice Krispies cereal to the marshmallow mixture, stirring until the cereal is evenly coated with the green marshmallow mixture.
- Transfer to Pan and Cool: Pour the mixture into the prepared pan. Use a spatula to press the mixture evenly into the pan. Allow it to cool and set for about 30 minutes.
- Cut the Treats: Once set, remove the treats from the pan and cut them into rectangles, approximately 3×2 inches, to form the base of your Frankenstein heads.
- Melt the Chocolate: Place the chocolate chips in a microwave-safe bowl. Heat in the microwave in 20-second intervals, stirring between each, until completely melted and smooth.
- Decorate the Treats: Dip the top of each rectangle into the melted chocolate to create Frankenstein’s hair. Attach candy eyes to the face while the chocolate is still wet. Use black decorating gel to draw a mouth and scars.
- Add the Bolts: Break pretzel sticks in half and insert one piece into each side of the treats as bolts.
- Let Set: Allow the decorated treats to set at room temperature until the chocolate is firm.
Extra Tips:
To guarantee vibrant green treats, start with a few drops of food coloring and gradually add more until you reach the desired color.
Be cautious not to overheat the chocolate when melting, as it can become grainy if overheated. If you don’t have candy eyes, you can use white chocolate chips with a dot of black gel for the pupils.
For a nutty twist, consider adding a tablespoon of peanut butter to the marshmallow mixture before mixing in the cereal. Enjoy your spooky creations!
Bloody Mary Shrimp Shooters
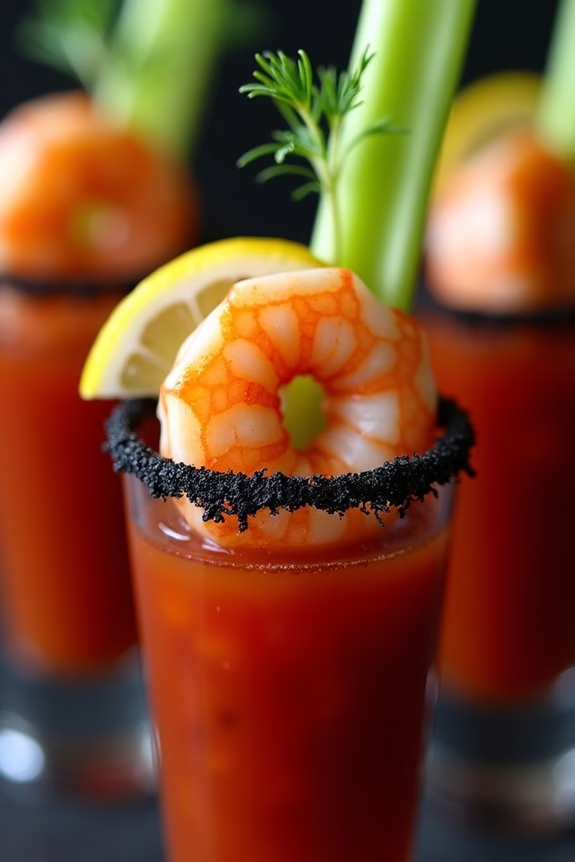
Bloody Mary Shrimp Shooters are an exciting and flavorful way to kick off your Halloween party! These delightful shooters combine the classic flavors of a Bloody Mary cocktail with succulent shrimp, creating a unique appetizer that your guests will love.
Served in shot glasses, they’re a visually striking and delicious treat that captures the spooky spirit of the holiday. The combination of spicy, tangy, and savory elements in this dish will surely leave a memorable impression.
Perfect for serving 4-6 people, Bloody Mary Shrimp Shooters aren’t only delicious but also simple to prepare. They offer a great opportunity to get creative with presentation, adding a touch of elegance or playfulness to your party table.
Whether you’re a seasoned cook or a novice in the kitchen, this recipe is accessible and fun to make. Let’s explore the ingredients and steps needed to create this ghoulishly delightful appetizer.
Ingredients (Serving Size: 4-6 people)
- 1 pound large shrimp, peeled and deveined
- 2 teaspoons olive oil
- 1 teaspoon Old Bay seasoning
- 1 cup tomato juice
- 1/4 cup vodka
- 2 tablespoons lemon juice
- 1 tablespoon Worcestershire sauce
- 1 teaspoon hot sauce (adjust to taste)
- 1/2 teaspoon celery salt
- 1/2 teaspoon ground black pepper
- 1 tablespoon horseradish
- Ice cubes
- Celery stalks for garnish
- Lemon wedges for garnish
- Fresh dill for garnish
Cooking Instructions
- Prepare the Shrimp: Preheat your oven to 400°F (200°C). Toss the shrimp with olive oil and Old Bay seasoning in a bowl until they’re well coated. Arrange them in a single layer on a baking sheet.
- Roast the Shrimp: Place the baking sheet in the preheated oven and roast the shrimp for about 8-10 minutes, or until they’re pink and cooked through. Remove from the oven and set aside to cool.
- Prepare the Bloody Mary Mix: In a large pitcher, combine the tomato juice, vodka, lemon juice, Worcestershire sauce, hot sauce, celery salt, black pepper, and horseradish. Stir well until all the ingredients are fully mixed.
- Chill the Mix: Add ice cubes to the Bloody Mary mix in the pitcher to chill it thoroughly. Alternatively, you can refrigerate the mixture for about 30 minutes before serving.
- Assemble the Shooters: Fill each shot glass halfway with the Bloody Mary mixture. Place a roasted shrimp on the rim of each glass and garnish with a small celery stalk, a lemon wedge, and a sprig of fresh dill.
- Serve and Enjoy: Arrange the Bloody Mary Shrimp Shooters on a serving tray and serve immediately to your guests. Encourage them to enjoy the shrimp as a tasty chaser to the spicy drink.
Extra Tips
For an added touch of Halloween flair, you can rim the shot glasses with black salt or a mixture of salt and activated charcoal to give them a spooky edge.
If you prefer a non-alcoholic version, simply omit the vodka and enhance the flavor with a bit more lemon juice or a dash of pickle juice. Additionally, feel free to adjust the spiciness of the Bloody Mary mix according to your guests’ preferences by varying the amount of hot sauce or horseradish.
Enjoy getting creative and have fun with this festive and flavorful appetizer!
Pumpkin Patch Brownie Bites
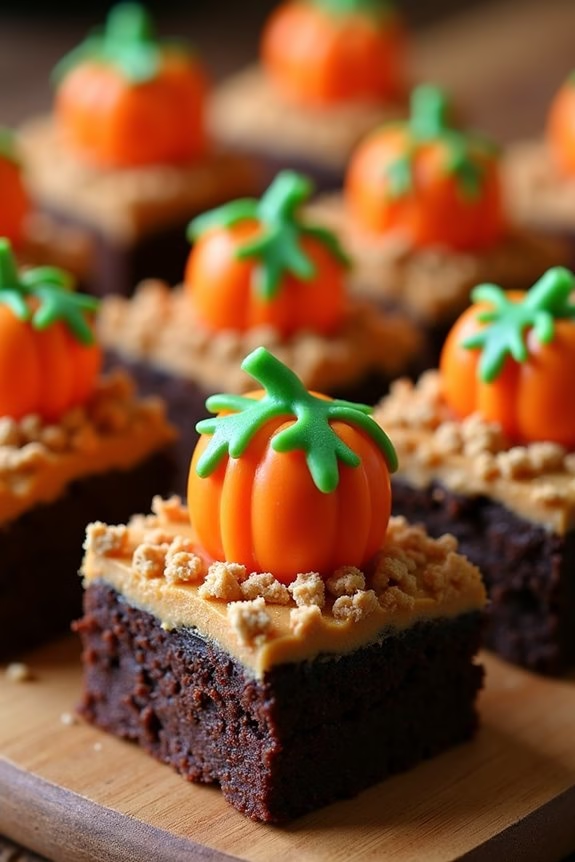
Creating festive treats for your Halloween party can be both fun and delicious, and Pumpkin Patch Brownie Bites are the perfect addition to your spooky spread. These adorable little bites not only capture the essence of autumn with their pumpkin-themed decorations but also delight guests with rich, chocolatey goodness.
Picture a platter of these dark, fudgy brownie bites, each topped with a vibrant orange pumpkin candy and a sprinkle of graham cracker crumbs to mimic the look of a pumpkin patch.
These brownie bites are easy to prepare and make an ideal dessert for serving 4-6 people. The combination of the moist chocolate brownie, creamy frosting, and crunchy toppings creates a delightful texture that will have your guests reaching for seconds. Whether you’re hosting a Halloween party or simply enjoying a cozy fall evening, these treats are sure to impress.
Ingredients for Pumpkin Patch Brownie Bites (serves 4-6):
- 1 box of brownie mix (for a 9×13 inch pan)
- Ingredients required for the brownie mix (usually eggs, oil, and water)
- 1 cup of chocolate frosting
- 1 cup of graham cracker crumbs
- 24 pumpkin-shaped candy (such as candy corn pumpkins or similar)
- Green icing or gel for decoration
Cooking Instructions:
- Preheat the Oven: Start by preheating your oven to the temperature specified on the brownie mix box. This is typically around 350°F (175°C).
- Prepare the Brownie Mix: In a large mixing bowl, combine the brownie mix with the required eggs, oil, and water as directed on the package. Stir until the ingredients are well incorporated and the batter is smooth.
- Bake the Brownies: Pour the brownie batter into a greased 9×13 inch baking pan, spreading it evenly. Bake the brownies in the preheated oven for the time specified on the package, usually 20-25 minutes, or until a toothpick inserted in the center comes out clean.
- Cool and Cut: Once baked, remove the pan from the oven and allow the brownies to cool completely. Once cooled, cut them into small bite-sized squares, approximately 1 to 1.5 inches in size.
- Decorate the Bites: Spread a thin layer of chocolate frosting on top of each brownie bite. Then, sprinkle a little graham cracker crumb over the frosting to create a “soil” effect.
- Add the Pumpkins: Place one pumpkin-shaped candy on top of each brownie bite, pressing gently to adhere it to the frosting. Use the green icing or gel to add small vines or leaves around the pumpkin candy to enhance the pumpkin patch appearance.
Extra Tips:
For best results, use a high-quality brownie mix or make your brownies from scratch if you prefer a homemade touch.
To make cutting easier and cleaner, chill the brownies in the refrigerator for about 15 minutes before slicing into bites. If you want to add a bit of flair, consider using different colored icings to create more intricate designs around your pumpkin candies.
These Pumpkin Patch Brownie Bites can be stored in an airtight container for up to three days, making them a great make-ahead option for your Halloween festivities.
Creepy Crawly Nachos
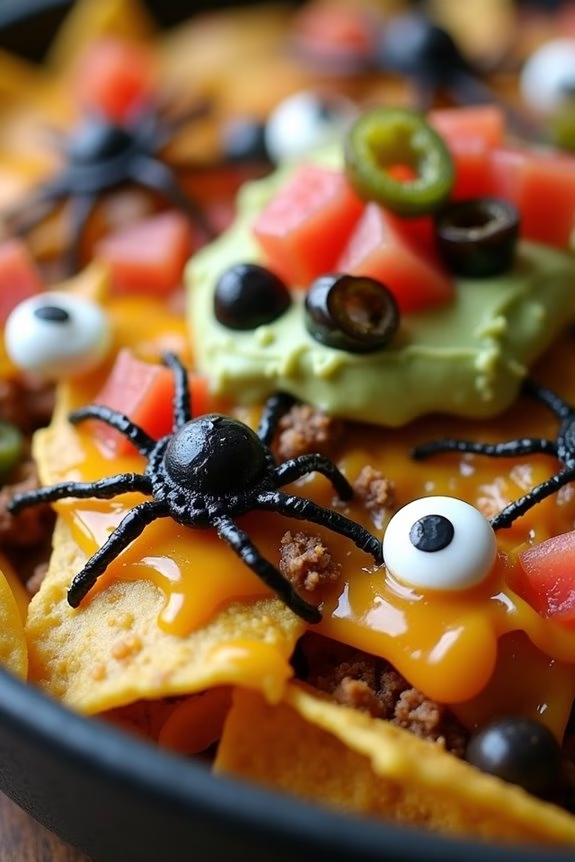
Are you ready to spook your guests with a fun and delicious Halloween treat? Creepy Crawly Nachos are the perfect addition to your Halloween party spread. This dish combines the classic comfort of nachos with a whimsical, eerie twist that will delight both kids and adults alike. The base of crispy tortilla chips is topped with a blend of melted cheese, seasoned beef, and a variety of toppings that represent the creepy crawlies we love to fear.
With a little creativity, these nachos will look like a plate straight out of a haunted kitchen, while still delivering the savory flavors everyone craves. The key to making these nachos particularly spooky is in the presentation and choice of toppings. Black olives and sliced jalapeños become beetle-like bugs, while sour cream and guacamole are piped into spider webs.
You can also add edible eyes to give your nachos an extra eerie appearance. Not only are these nachos delicious, but they also serve as a fantastic conversation starter and centerpiece for your Halloween festivities. This recipe serves 4-6 people, making it ideal for a small gathering or as part of a larger buffet.
Ingredients for Creepy Crawly Nachos:
- 1 bag of tortilla chips
- 1 pound ground beef
- 1 packet taco seasoning
- 2 cups shredded cheddar cheese
- 1/2 cup sliced black olives
- 1/4 cup pickled jalapeño slices
- 1/2 cup sour cream
- 1/2 cup guacamole
- 1 can (15 oz) black beans, drained and rinsed
- 1/2 cup diced tomatoes
- Edible candy eyes (optional)
Instructions:
- Preheat the Oven: Start by preheating your oven to 350°F (175°C). This guarantees that the chips will be warm and the cheese will melt evenly.
- Cook the Ground Beef: In a large skillet over medium heat, cook the ground beef until browned and fully cooked. Drain any excess fat. Add the taco seasoning and a little water as per the packet instructions. Stir well to combine, then remove from heat.
- Prepare the Nachos: On a large baking sheet or oven-safe platter, spread out a layer of tortilla chips. Evenly distribute the cooked beef over the chips.
- Add Toppings: Sprinkle the shredded cheddar cheese over the beef and chips. Add the black beans, sliced black olives, and pickled jalapeños, ensuring even coverage across the top.
- Bake the Nachos: Place the prepared nachos in the oven for about 10 minutes, or until the cheese is fully melted and bubbly.
- Decorate the Nachos: Once baked, remove from the oven and let them cool slightly. Use a piping bag or a plastic sandwich bag with a corner cut off to pipe the sour cream and guacamole in the shape of spider webs over the nachos. Decorate with edible candy eyes, placing them on the olives or jalapeños to represent creepy crawlies.
- Finish with Fresh Ingredients: Sprinkle the diced tomatoes over the top for added color and freshness.
Extra Tips:
For an even spookier presentation, use blue corn tortilla chips as the base to mimic a dark, moonlit night. If you’re short on time, you can prepare the beef mixture a day ahead and simply reheat it before assembling the nachos.
If serving to children, consider using mild taco seasoning and jalapeños to adjust the spice level. Finally, get creative with your toppings, and encourage your guests to add their own touch to the spooky scene with additional garnishes like chopped green onions or cilantro.
Witch’s Brew Punch

Looking for a perfect Halloween drink to serve at your spooky gathering? Witch’s Brew Punch is a crowd-pleaser that’s as enchanting to look at as it’s delicious to drink. This vibrant punch combines fruity flavors with a hint of fizz, making it a delightful addition to your Halloween party spread.
Serve it in a large, clear punch bowl to showcase its eerie green hue, and add some creepy garnishes to enhance the spooky vibe. Whether you’re hosting a party for kids or adults, this punch is sure to be a hit with all your guests.
This Witch’s Brew Punch isn’t only simple to make but also allows for some creative flair in presentation. You can easily scale up the recipe for larger gatherings or adjust the flavors based on personal preference.
The recipe below serves 4-6 people, making it ideal for small to medium-sized Halloween parties. With just a few ingredients and minimal prep time, you’ll have a tantalizing punch ready to enchant your guests.
Ingredients (Serves 4-6):
- 4 cups of lime sherbet
- 2 liters of lemon-lime soda
- 1 cup of pineapple juice
- 1 cup of orange juice
- 1 cup of green apple soda
- Lime slices for garnish
- Gummy worms or candy eyeballs for decoration
Instructions:
- Prepare the Punch Bowl: Start by placing your lime sherbet in a large punch bowl. This will be the base that gives your punch its creamy texture and vibrant color.
- Add the Liquids: Pour the lemon-lime soda, pineapple juice, and orange juice over the lime sherbet. Stir gently to combine the ingredients, ensuring that the sherbet starts to melt and mix with the liquids. This will create a frothy, bubbly effect.
- Incorporate the Green Apple Soda: Add the green apple soda to the punch mixture. This will enhance the color and add a tangy twist to the flavor profile.
- Garnish the Punch: Slice a lime and add the slices to the punch for a revitalizing garnish. For a spooky touch, drop in some gummy worms or candy eyeballs. These edible decorations will float on top, adding a fun, creepy element to the punch.
- Serve: Once everything is mixed and garnished, serve the punch immediately in clear glasses or cups to showcase its enchanting color. Enjoy the reactions as your guests sip on this magical concoction!
Extra Tips:
For an added spooky effect, consider using dry ice to create a foggy, mystical atmosphere around your punch bowl. Be sure to handle dry ice with care, using tongs and not touching it directly with bare hands.
Additionally, you can adjust the sweetness of the punch by altering the amount of lemon-lime soda or green apple soda to suit your taste. If you prefer a less sweet punch, opt for unsweetened pineapple and orange juices.
Finally, feel free to get creative with the garnishes – adding plastic spiders or other Halloween-themed decorations can enhance the eerie appeal of your Witch’s Brew Punch.
Brainy Jello Shots
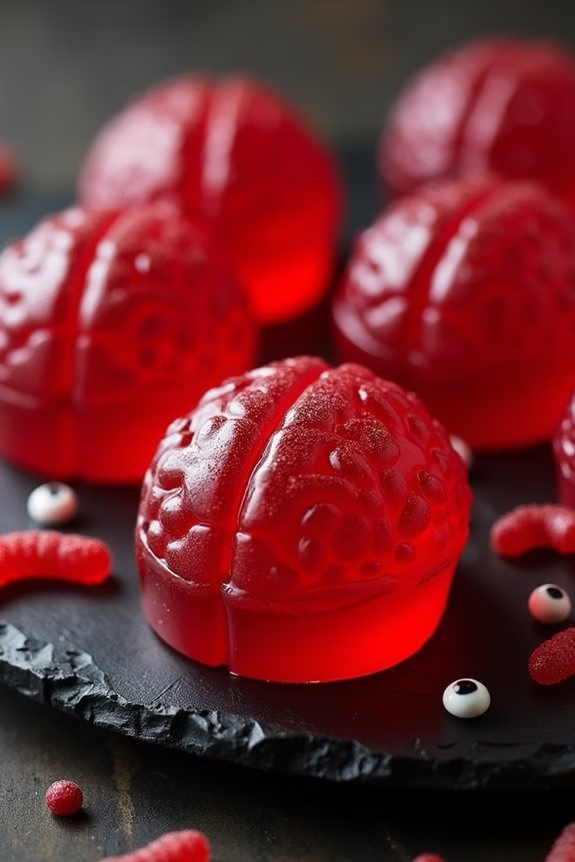
Add a touch of eerie elegance to your Halloween party with these Brainy Jello Shots. Perfectly designed to both thrill and chill your guests, these shots are a delightful combination of fun and flavor. The gelatinous texture mimics the look of a brain, making them a spooky yet delectable treat for party-goers. Not only will they add a festive flair to your table, but they’ll also provide a jiggly surprise with every sip.
These Brainy Jello Shots are easy to prepare and require minimal ingredients, making them a go-to recipe for any Halloween event. The shots combine the classic jello shot concept with a spooky twist, using a brain-shaped mold to create the perfect Halloween-themed snack. Serve them on a platter and watch your guests be amazed by both the creativity and the taste.
Ingredients (serving size: 4-6 people):
- 2 cups boiling water
- 2 packages (3 oz each) of strawberry or raspberry flavored gelatin
- 1 cup vodka
- 1 cup cold water
- Brain-shaped silicone mold
- Red food coloring (optional)
Cooking Instructions:
- Prepare the Gelatin: In a medium-sized bowl, pour 2 cups of boiling water over the gelatin powder. Stir constantly until the gelatin is completely dissolved, guaranteeing there are no lumps left.
- Add the Vodka: Once the gelatin has dissolved, add 1 cup of vodka and 1 cup of cold water to the mixture. Stir well to combine all the ingredients evenly.
- Enhance the Color: For an extra brainy effect, add a few drops of red food coloring to deepen the color of the jello. Stir gently until the desired hue is achieved.
- Fill the Mold: Carefully pour the jello mixture into the brain-shaped silicone molds. Fill each mold to the top for a complete brain shape.
- Chill and Set: Place the filled molds into the refrigerator. Allow the jello shots to set for at least 4 hours, or until they’re firm to the touch.
- Serve: Once set, gently remove the jello brains from the molds. Arrange them on a serving plate or platter for a striking presentation.
Extra Tips: For a non-alcoholic version, simply replace the vodka with an equal amount of cold water or fruit juice. If you’re using a more detailed mold, lightly spray it with a non-stick cooking spray before filling to guarantee the jello brains come out cleanly. Additionally, for a more realistic effect, consider adding gummy worms or candy eyeballs around the platters to enhance the spooky theme.
Skeleton Bone Pretzels

Skeleton Bone Pretzels are a fun and spooky treat perfect for any Halloween party! These eerie snacks aren’t only simple to make but also delicious, combining the satisfying crunch of pretzels with the creamy sweetness of white chocolate.
Whether you’re hosting a gathering for kids or throwing an adults-only bash, these skeleton bones will surely be a hit among your guests. With a little creativity and just a few simple ingredients, you can whip up a batch of these hauntingly good snacks that are as easy on the eyes as they’re on the palate.
The key to making these Skeleton Bone Pretzels look authentic is in the preparation, and with a few easy steps, you can achieve a bone-chilling effect that will enhance your Halloween spread.
First, it’s important to gather all your ingredients and tools in advance, ensuring a smooth cooking process. Once you’re ready, the steps involved are straightforward and can be completed in under an hour. This recipe is designed to serve 4-6 people, making it ideal for a small gathering or as part of a larger selection of Halloween-themed treats.
Ingredients for Skeleton Bone Pretzels (Serving Size: 4-6):
- 24 pretzel rods
- 2 cups white chocolate chips or white candy melts
- 48 mini marshmallows
- 1 tablespoon vegetable shortening (optional, for thinning chocolate)
- Black food coloring gel (optional, for decoration)
Cooking Instructions:
- Prepare Your Workspace: Begin by lining a baking sheet with parchment paper or a silicone baking mat. This will prevent the pretzels from sticking and make cleanup easier.
- Create the Bone Shape: Take each pretzel rod and attach a mini marshmallow to each end, pressing gently to secure them. These will form the rounded ends of the bones.
- Melt the White Chocolate: In a microwave-safe bowl, combine the white chocolate chips or candy melts with the vegetable shortening (if using). Microwave in 30-second intervals, stirring in between, until smooth and fully melted. Be careful not to overheat, as chocolate can burn easily.
- Coat the Pretzels: Using either a fork or your hands, dip each pretzel rod into the melted white chocolate, ensuring it’s fully coated, including the marshmallow ends. Allow any excess chocolate to drip off before placing the coated pretzel onto the prepared baking sheet.
- Set and Decorate: If desired, use black food coloring gel to add decorative patterns or faces onto the chocolate-coated pretzels for a spooky effect. Allow the pretzels to set at room temperature for at least 30 minutes, or place them in the refrigerator for faster setting.
- Serve and Enjoy: Once the chocolate is fully set, arrange the Skeleton Bone Pretzels on a platter and serve them to your delighted guests.
Extra Tips:
For an extra smooth finish, you can add a bit of vegetable shortening to the white chocolate when melting it. This will help thin the chocolate, making it easier to coat the pretzels evenly.
If you want to add a little more creativity, consider using colored candy melts or different food coloring gels to create a variety of spooky designs. Keep the pretzels stored in an airtight container if you’re preparing them in advance to maintain their freshness and crunch.
Eerie Eyeball Fruit Skewers

The concept of the Eerie Eyeball Fruit Skewers is simple yet effective: crafting eyeball-like shapes using a variety of fruits. The key is in the careful assembly and a few creative touches. You’ll need to select fruits that can be easily transformed into spherical shapes, such as grapes and blueberries, to create the “pupils” of the eyes. The contrasting colors of the fruits enhance the eerie look, making these fruit skewers a showstopper at your Halloween bash. Perfect for a serving size of 4-6 people, this recipe is as tasty as it’s terrifyingly fun!
Ingredients (Serving size: 4-6 people):
- 12 large seedless green grapes
- 12 small blueberries
- 12 medium-sized strawberries
- 1 banana
- 6 wooden skewers
- 1 tablespoon of lemon juice
Cooking Instructions:
- Prepare the Fruits: Wash all fruits thoroughly under running water. Pat them dry with a clean towel to remove any excess moisture.
- Make the Eyeballs: Cut a small slit in each grape and gently press a blueberry into the slit to create an “eyeball” effect. Repeat this process for all the grapes and blueberries.
- Prepare the Strawberries: Hull the strawberries by removing the green stems. Slice them in half to make them easier to thread onto the skewers.
- Slice the Banana: Peel the banana and slice it into thick, coin-like rounds. Sprinkle a little lemon juice over the banana slices to prevent them from browning.
- Assemble the Skewers: Take a wooden skewer and thread a strawberry half, followed by a banana slice, and then an “eyeball” grape. Continue this pattern until the skewer is full, ensuring an even distribution of colors and fruits.
- Repeat: Follow the same steps for the remaining skewers until all the ingredients have been used.
- Chill Before Serving: Place the completed skewers on a serving plate and refrigerate them for at least 30 minutes before serving. This helps the fruits stay fresh and firm.
Extra Tips: For an added spooky touch, you can drizzle a bit of red fruit syrup or raspberry coulis over the skewers to mimic “bloodshot” eyes. If you’re preparing the skewers in advance, keep them covered in the fridge to maintain freshness. Additionally, consider using a melon baller to create perfect round shapes from other fruits like cantaloupe or honeydew for additional variety.