

When it comes to hosting a Halloween potluck for kids, creating a spooky yet fun vibe is essential. I’ve gathered 12 enchanting recipe ideas that will surely charm every little witch and wizard. From savory Mummy Hot Dogs to sweet Bat Wing Cupcakes, there’s a treat to delight every palate. These goodies not only look eerily delightful but are also a breeze to whip up. Ready to sprinkle your table with a touch of culinary magic?
Monster Mash Popcorn
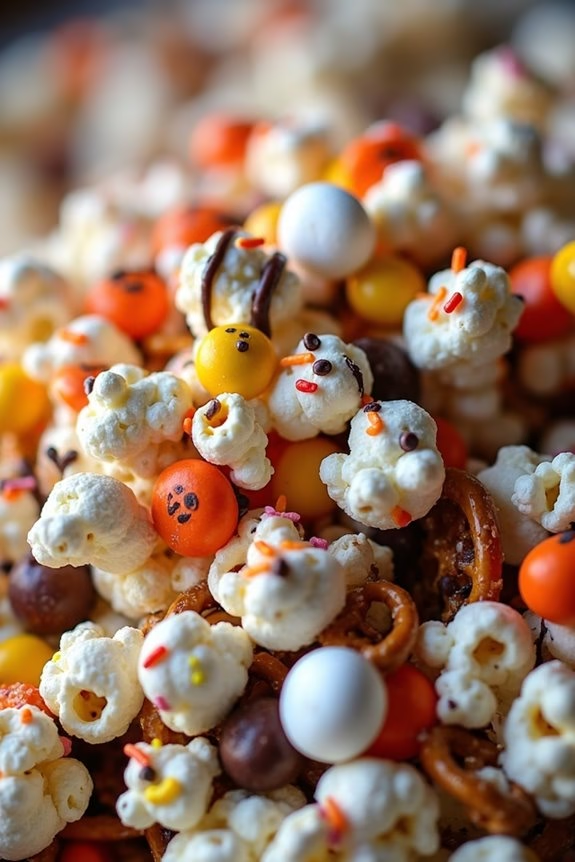
Looking to add a spooky twist to your Halloween potluck? Monster Mash Popcorn is the perfect treat to delight both kids and adults alike. This colorful and fun snack combines the deliciousness of popcorn with a medley of sweet and salty toppings, creating a monster-themed masterpiece that’s sure to be the star of your Halloween gathering.
Whether you’re hosting a party or attending one, this easy-to-make popcorn dish will bring out the festive spirit and satisfy every monster-sized appetite.
The beauty of Monster Mash Popcorn lies in its versatility and simplicity. You can customize it with your favorite candies and colors to match any Halloween theme. The combination of vibrant hues and various textures makes this snack not only visually appealing but also incredibly tasty.
It’s a delightful way to get creative in the kitchen and involve the little ones in the preparation. Get ready to impress your guests with a bowl of this monstrously delicious popcorn!
Ingredients (serving size: 4-6 people):
- 10 cups popped popcorn
- 1 cup candy corn
- 1 cup mini pretzels
- 1 cup chocolate candies (like M&M’s)
- 1/2 cup mini marshmallows
- 1/2 cup Halloween-themed sprinkles
- 1/4 cup melted white chocolate or candy melts
- 1/4 cup melted dark chocolate or candy melts
- 1/2 cup mixed nuts (optional)
Instructions:
- Prepare the Popcorn Base: Start by popping your popcorn. You can use either microwave popcorn, stovetop popcorn, or an air popper. Confirm that you have 10 cups of popped popcorn, and once ready, spread it out evenly on a large baking sheet or in a big mixing bowl.
- Add Sweet and Salty Elements: Sprinkle the candy corn, mini pretzels, chocolate candies, mini marshmallows, and mixed nuts (if using) evenly over the popcorn. These ingredients add both flavor and texture, creating the perfect balance of sweet and salty.
- Drizzle with Chocolate: Melt the white chocolate or candy melts in a microwave-safe bowl, stirring every 30 seconds until smooth. Repeat with the dark chocolate or candy melts in a separate bowl. Drizzle both melted chocolates over the popcorn mixture, aiming for a zigzag pattern to guarantee even coverage.
- Add Sprinkles: While the chocolate is still warm, quickly scatter the Halloween-themed sprinkles over the popcorn. This will help the sprinkles adhere to the chocolate, adding a festive touch to your Monster Mash Popcorn.
- Let It Set: Allow the chocolate to cool and harden. This may take about 20 minutes at room temperature. If you’re in a hurry, you can place the baking sheet in the refrigerator for about 10 minutes to speed up the process.
- Serve and Enjoy: Once the chocolate has set, gently break apart any large clusters of popcorn. Transfer your Monster Mash Popcorn into a large bowl or divide it into individual serving bags or cups for easy distribution at your Halloween potluck.
Extra Tips:
For an extra spooky effect, consider using colored candy melts to match your Halloween theme, such as green or purple. You can also add gummy worms or eyeball candies for a more monster-like appearance.
If you’re preparing this dish in advance, store it in an airtight container to maintain freshness. Finally, involving kids in the process of adding toppings and drizzling chocolate can make the preparation of Monster Mash Popcorn a fun and engaging Halloween activity!
Mummy Hot Dogs

Mummy Hot Dogs are a fun and spooky treat perfect for any Halloween potluck, especially for children! These adorable and delicious snacks are made by wrapping hot dogs in strips of crescent roll dough to resemble a mummy. Not only do they taste great, but they also add a festive touch to your Halloween spread.
The simplicity of the recipe makes it a great activity for kids to join in on, adding their own unique twists to their mummy designs. Perfect for serving 4-6 people, Mummy Hot Dogs can be served as a main dish or a delightful appetizer. They’re a surefire hit with both children and adults, and they’re quite easy to prepare.
Whether you’re hosting a Halloween party or attending a potluck, these Mummy Hot Dogs are certain to be a memorable addition to your spooky celebration.
Ingredients:
- 8 hot dogs
- 1 can (8 oz) refrigerated crescent roll dough
- 1 tablespoon mustard or ketchup (for decoration)
- Cooking spray
Cooking Instructions:
- Preheat the Oven: Begin by preheating your oven to 375°F (190°C). This will guarantee that your mummy hot dogs bake evenly and come out perfectly golden.
- Prepare the Dough: Unroll the crescent roll dough on a clean surface. Use a knife or pizza cutter to slice the dough into thin strips, approximately 1/4 inch wide. These strips will be used to wrap the hot dogs.
- Wrap the Hot Dogs: Take each hot dog and wrap it with the dough strips, leaving a small space for the “mummy’s face” to peek through. Feel free to get creative with your wrapping style to give each mummy a unique look.
- Place on Baking Sheet: Lightly coat a baking sheet with cooking spray to prevent sticking. Arrange the wrapped hot dogs on the sheet, ensuring they’re evenly spaced for even baking.
- Bake: Place the baking sheet in the preheated oven and bake for 12-15 minutes, or until the dough is golden brown and cooked through.
- Add the Face: Once out of the oven, let the mummy hot dogs cool for a few minutes. Use a small amount of mustard or ketchup to dot eyes onto the exposed part of the hot dogs, giving them their “mummy face.”
Extra Tips:
For an added crunch, try brushing the dough with a little melted butter before baking. You can also sprinkle on some sesame seeds or poppy seeds for extra texture.
If you prefer a spicier taste, consider using jalapeño or cheese-stuffed hot dogs. Remember, the key to fun mummy hot dogs is creativity, so feel free to experiment with different types of hot dogs and dough!
Enjoy these spooky treats with a side of your favorite dipping sauces like ketchup, mustard, or even a spicy sriracha mayo for an extra kick.
Witch’s Broomstick Snacks
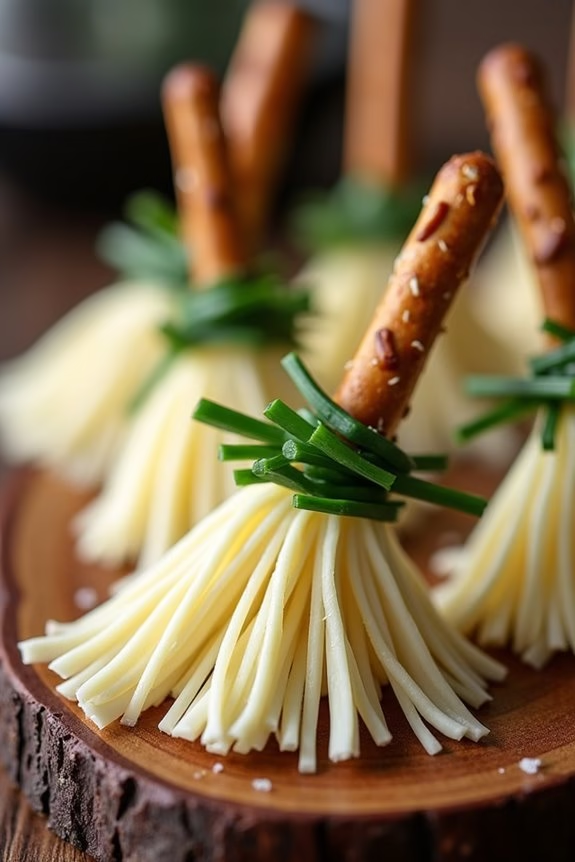
Get ready to enchant your little ones with these delightful and spooky Witch’s Broomstick Snacks, perfect for a Halloween potluck! These whimsical treats aren’t only fun to make but also a healthy alternative to the usual sugary Halloween snacks.
Made with just a few simple ingredients, these broomsticks will sweep your kids off their feet with their charming appearance and delicious taste. Ideal for serving at parties or just as a fun after-school snack, they’re certain to be a hit with children and adults alike.
The Witch’s Broomstick Snacks bring together the crunchiness of pretzel sticks with the smooth, fresh taste of mozzarella cheese sticks, creating a delightful combination of flavors and textures. The best part is that you don’t need to be a culinary wizard to whip up these snacks in no time.
Whether you’re hosting a Halloween gathering or just looking to add a touch of magic to your snack spread, these broomsticks are the perfect choice. Let’s get started on creating these magical munchies!
Ingredients (Serves 4-6 people):
- 12 pretzel sticks
- 6 mozzarella string cheese sticks
- 12 fresh chive stems
Cooking Instructions:
- Prepare the Cheese: Begin by unwrapping each mozzarella string cheese stick. Using a knife, cut each cheese stick in half to create a total of 12 shorter sticks.
- Slice the Cheese: Carefully make lengthwise cuts on one end of each cheese piece to create the appearance of broom bristles. Verify the cuts are deep enough to give a fringed effect but not so deep that the cheese falls apart.
- Insert the Pretzel Stick: Gently push a pretzel stick into the uncut end of each cheese piece. Make sure the pretzel is inserted far enough to hold the cheese securely but be cautious not to crack the cheese.
- Secure with Chives: Wrap a chive stem around the base of the cheese, just above the pretzel stick, to create the look of a broom handle. Tie the chive securely but gently to avoid breaking it.
- Final Touches: Arrange the completed broomsticks on a serving platter. Optionally, you can refrigerate them briefly to allow the cheese to firm up before serving.
Extra Tips:
To make the Witch’s Broomstick Snacks even more appealing, consider adding a small bowl of marinara or ranch dressing for dipping.
If chives are unavailable, thin strips of green onion can be used as an alternative. Additionally, for a gluten-free version, verify the pretzel sticks are gluten-free.
For an added spooky touch, you can use food-safe markers to draw faces on the cheese sticks. Enjoy making these snacks with your kids, and let their creativity shine as they help assemble the broomsticks!
Ghostly Fruit Cups
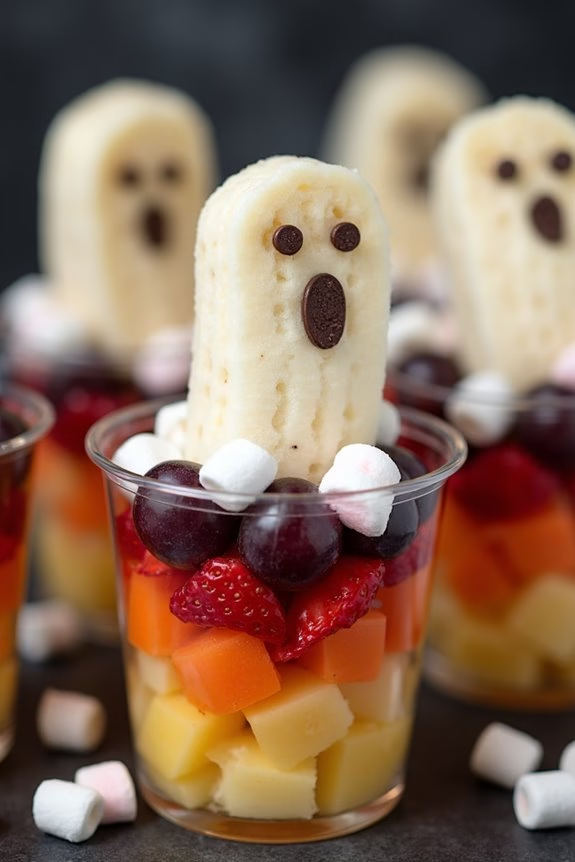
Halloween is a time for spooky fun and delicious treats, and Ghostly Fruit Cups are the perfect addition to any kid-friendly Halloween potluck. These delightful and healthy snacks aren’t only easy to make but also entertaining for children to eat. With a mix of fresh fruits and a touch of creativity, you can create these ghostly treats that are certain to be a hit among the little ones.
The combination of vibrant fruit colors and the spooky ghost design will make these fruit cups a memorable part of your Halloween celebration. Ghostly Fruit Cups aren’t only a fun treat but also a nutritious option for kids. Packed with vitamins and fiber, these fruit cups are a great way to guarantee that children get a serving of healthy food amidst all the Halloween candies and sweets.
The ghostly design is achieved using a simple, kid-friendly technique that allows for creativity and personalization. Whether you’re hosting a Halloween party or contributing to a potluck, these fruit cups will stand out as a festive and wholesome choice.
Ingredients for 4-6 servings:
- 2 bananas
- 1 cup of seedless grapes
- 1 cup of diced pineapple
- 1 cup of diced melon (cantaloupe or honeydew)
- 1 cup of diced strawberries
- 1/2 cup of mini marshmallows
- 1/4 cup of chocolate chips
Instructions:
- Prepare the Fruit: Begin by washing all the fruits thoroughly. Peel and slice the bananas into 1/2-inch thick rounds. Dice the pineapple, melon, and strawberries into small, bite-sized pieces. Keep them aside in separate bowls to maintain their freshness.
- Assemble the Fruit Cups: In each serving cup, start by layering the diced pineapple, followed by grapes, melon, and strawberries. Add a few banana slices on top of each cup. This layering technique not only looks appealing but also guarantees a variety of flavors in every bite.
- Create the Ghosts: Place two banana slices side by side on the top of each fruit cup to form the base of the ghost faces. Press two mini chocolate chips into each banana slice to create eyes.
- Add the Final Touches: Scatter a few mini marshmallows on top of each fruit cup for added sweetness and texture. These will resemble tiny ghostly apparitions floating amidst the fruit.
- Refrigerate and Serve: Chill the Ghostly Fruit Cups in the refrigerator for at least 30 minutes before serving. This helps to enhance the flavors and keeps the fruit fresh.
Extra Tips:
To make the Ghostly Fruit Cups even more fun, consider using clear plastic cups to showcase the colorful fruit layers. If you’re making these ahead of time, place a piece of cling wrap over each cup to keep the bananas from browning and to maintain freshness.
Additionally, you can substitute any of the fruits with your child’s favorites or those that are in season for the best taste. Encourage kids to help with the assembly process; they’ll love creating their own ghostly designs!
Spider Web Pizza
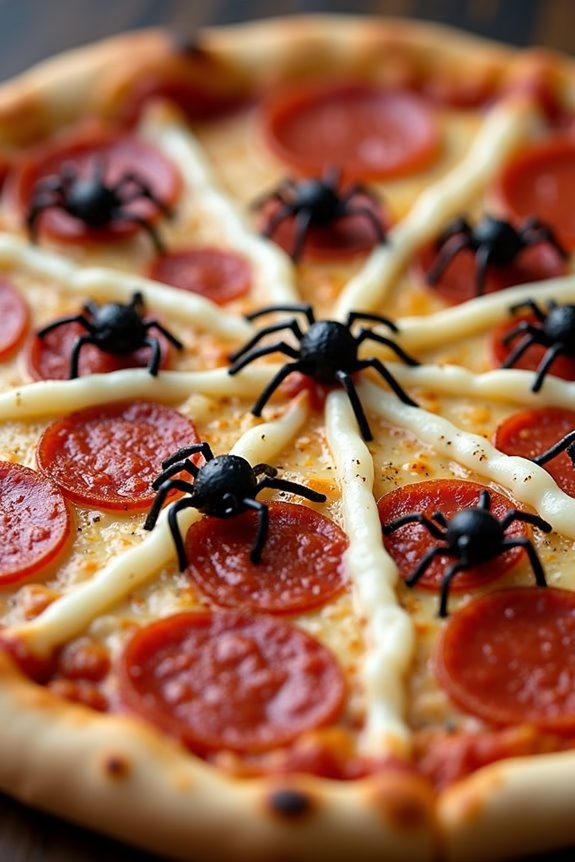
Spider Web Pizza is a fun and spooky twist on traditional pizza, perfect for a Halloween potluck. This creative dish will delight kids and adults alike with its clever design and delicious taste. By using simple ingredients and a little bit of imagination, you can transform an ordinary pizza into a webbed masterpiece that fits perfectly with the Halloween theme.
Not only is Spider Web Pizza visually appealing, but it’s also easy to make and customize based on your family’s favorite toppings. The secret to Spider Web Pizza lies in its clever use of mozzarella cheese to create a web-like pattern. This recipe is designed to serve 4-6 people, making it ideal for a small gathering.
With a few basic ingredients and some kitchen creativity, you can whip up this spooky treat in no time. Gather your ingredients, preheat your oven, and get ready to impress your little ghosts and goblins with this frightfully delicious pizza.
Ingredients (Serves 4-6)
- 1 pre-made pizza crust or dough
- 1 cup pizza sauce
- 2 cups shredded mozzarella cheese
- 12-15 slices of pepperoni
- 1 small black olive, sliced
- 1 tablespoon olive oil
- 1 teaspoon dried oregano
- 1 teaspoon garlic powder
Cooking Instructions
1. Preheat the Oven: Begin by preheating your oven to 425°F (220°C). This temperature guarantees a crispy crust and evenly melted cheese.
2. Prepare the Crust: Roll out your pre-made pizza dough on a lightly floured surface until it reaches your desired thickness. If using a pre-made crust, simply place it on a baking sheet or pizza stone.
3. Add Sauce and Seasoning: Using a spoon or ladle, spread the pizza sauce evenly over the crust, leaving a small border around the edges for the crust. Sprinkle the oregano and garlic powder over the sauce for added flavor.
4. Create the Web: Sprinkle the shredded mozzarella cheese over the sauce. To create the spider web effect, use a piping bag or a plastic sandwich bag with the corner snipped off to pipe additional mozzarella in concentric circles from the center of the pizza outward.
Use a toothpick or knife to drag lines from the center circle to the edge, resembling a spider web.
5. Add Toppings: Place the pepperoni slices evenly over the pizza. To make olive spiders, place an olive slice on top of a few pepperoni slices and use small olive pieces as legs.
6. Bake: Place the pizza in the preheated oven and Bake for 12-15 minutes, or until the cheese is bubbly and the crust is golden brown.
7. Cool and Serve: Remove the pizza from the oven and let it cool for a few minutes. Slice and serve to your enthusiastic trick-or-treaters.
Extra Tips
For an extra spooky effect, consider using a mix of white and string cheese to create a more defined spider web. You can also experiment with different toppings to cater to your audience’s tastes, such as adding veggies like bell peppers or mushrooms for added texture and flavor.
If you’re short on time, opt for a store-bought pizza crust to speed up the preparation process. Remember, the key to this dish is creativity, so feel free to customize and have fun with it!
Eyeball Deviled Eggs
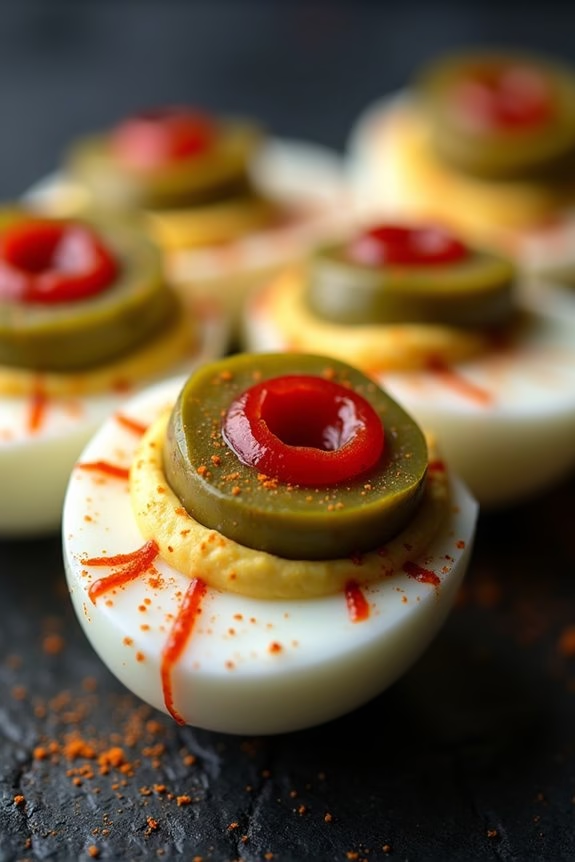
Halloween is the perfect time to bring out your creative culinary skills and whip up some spooky treats for the kids. One dish that stands out in both its eerie appearance and delightful taste is Eyeball Deviled Eggs. These ghoulish snacks aren’t just fun to look at, but they also pack a punch of flavor that kids and adults alike will enjoy.
With a few simple ingredients and some creativity, you can transform ordinary deviled eggs into creepy eyeballs that will be the talk of your Halloween potluck. Eyeball Deviled Eggs are an easy-to-make dish that only requires a little time and effort, making them ideal for busy parents or anyone looking to make a quick Halloween treat.
The usual deviled egg filling is given a spooky twist by adding a few drops of food coloring and some strategic garnishes. This recipe serves 4-6 people, making it perfect for a small gathering or as part of a larger spread of Halloween-themed foods. Let’s explore the ingredients you’ll need to create these hauntingly delicious snacks.
Ingredients:
- 6 large eggs
- 1/4 cup mayonnaise
- 1 teaspoon yellow mustard
- Salt and pepper to taste
- Red food coloring
- 6 small pimento-stuffed green olives
- 1 teaspoon paprika
Cooking Instructions:
- Boil the Eggs: Place the eggs in a pot and cover them with cold water. Bring the water to a boil over medium-high heat. Once boiling, turn off the heat and cover the pot. Allow the eggs to sit in the hot water for 10-12 minutes. This will guarantee the yolks are fully cooked.
- Prepare the Eggs: Drain the eggs and transfer them to a bowl of ice water. Let them cool for at least 5 minutes. Once cooled, gently peel the eggs and slice them in half lengthwise.
- Make the Filling: Carefully remove the yolks and place them in a small bowl. Add mayonnaise, mustard, salt, and pepper to the yolks. Mash the mixture with a fork until smooth.
- Color the Filling: Add a few drops of red food coloring to the yolk mixture to achieve a spooky, bloodshot look. Mix until the color is evenly distributed.
- Assemble the Eyeballs: Spoon or pipe the yolk mixture back into the egg whites. Place one olive slice on top of the filling in each egg half, with the pimento facing up to resemble an iris.
- Add the Details: Use a toothpick dipped in red food coloring to draw “veins” from the olive outward to the edges of the egg white, creating a realistic eyeball effect. Sprinkle a pinch of paprika for additional detail and flavor.
Extra Tips:
When preparing Eyeball Deviled Eggs, it’s important to guarantee that the eggs are thoroughly cooled before peeling to prevent them from sticking to the shell.
Using a piping bag or a sandwich bag with the corner snipped off can help achieve a cleaner and more precise filling presentation. If red food coloring isn’t available, beet juice can serve as a natural alternative.
Additionally, for a more intense flavor, consider adding a dash of hot sauce or a pinch of garlic powder to the yolk mixture. These tips will help you create the perfect creepy yet delicious eyeball deviled eggs for your Halloween potluck.
Frankenstein Rice Krispie Treats

Frankenstein Rice Krispie Treats are a fun and spooky addition to any Halloween potluck for kids. These delightful treats aren’t only easy to make but also allow for creativity in decorating, making them an engaging activity for children. The combination of crispy rice cereal and gooey marshmallows forms the perfect base for these monstrous snacks. With a hint of green food coloring and a few decorations, you can transform a simple snack into something frightfully festive.
These treats are also versatile, as you can modify the decorations to suit different tastes or allergies. Whether you serve them at a Halloween party or as a special treat at home, Frankenstein Rice Krispie Treats are sure to be a hit with kids and adults alike. The recipe provided below serves 4-6 people, making it perfect for small gatherings or family celebrations.
Ingredients:
- 3 tablespoons unsalted butter
- 4 cups mini marshmallows
- 6 cups rice cereal
- Green food coloring
- 1 cup chocolate chips, melted
- Candy eyes
- Black or brown gel icing
- Sprinkles or other decorations (optional)
Instructions:
- Prepare the Pan: Begin by lining a 9×13-inch baking pan with parchment paper. This will make it easier to remove the treats once they’re set.
- Melt the Butter and Marshmallows: In a large saucepan over low heat, melt the butter. Once melted, add the mini marshmallows and stir constantly until they’re completely melted and smooth.
- Add Food Coloring: Remove the saucepan from heat and add a few drops of green food coloring to the melted marshmallow mixture. Stir well until the color is evenly distributed.
- Mix in the Rice Cereal: Quickly add the rice cereal to the green marshmallow mixture. Stir until all the cereal is evenly coated.
- Transfer to the Pan: Pour the mixture into the prepared baking pan and press it down evenly with a spatula or clean hands. Allow it to cool and set for at least 30 minutes.
- Cut and Decorate: Once set, cut the rice krispie mixture into rectangles to form the Frankenstein heads. Using the melted chocolate, attach the candy eyes and draw a mouth. Use gel icing to add stitches or hair, and decorate with sprinkles as desired.
- Serve: Allow the chocolate and icing to set before serving the treats on a festive platter.
Extra Tips:
To make the Frankenstein Rice Krispie Treats even more special, consider using different types of candy for decoration, such as jelly beans for bolts on the sides of the head or licorice for hair.
If you find that the mixture is sticking to your hands while shaping, lightly grease your hands with butter or cooking spray. These treats can be made a day in advance and stored in an airtight container to keep them fresh for the party.
Pumpkin Veggie Tray
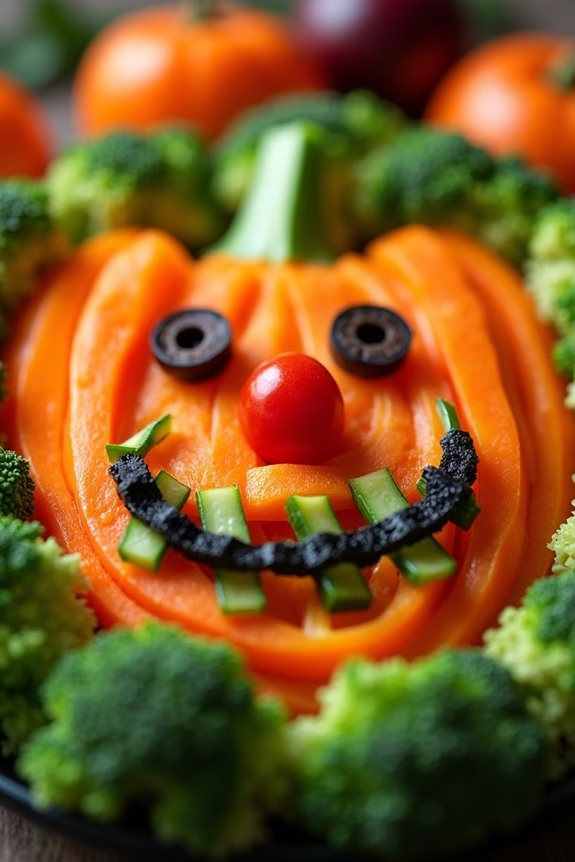
A Pumpkin Veggie Tray is a delightful and healthy treat that will add a festive touch to any Halloween potluck. This dish isn’t only visually appealing but also a nutritious option for kids to enjoy during the spooky season. The tray is designed to resemble a carved pumpkin, using a variety of colorful and fresh vegetables to create a fun and edible artwork. It’s an excellent way to promote kids to eat their veggies while getting into the Halloween spirit.
Creating a Pumpkin Veggie Tray is simple and requires minimal cooking, making it an easy dish to prepare for any gathering. The key is to choose a variety of vibrant vegetables that can be arranged to mimic the shape and features of a jack-o’-lantern. This recipe is perfect for serving 4-6 people and can be easily scaled up or down depending on the size of your Halloween celebration.
Ingredients:
- 1 large head of broccoli
- 1 large orange bell pepper
- 2 cups baby carrots
- 1 cup cherry tomatoes
- 1 cucumber
- 1 small bunch of celery
- 1 cup black olives
- 1 small pumpkin for decoration (optional)
- 1 cup ranch dressing or hummus
Instructions:
- Prepare Vegetables: Start by washing all your vegetables thoroughly under cold running water. Pat them dry with a clean kitchen towel to guarantee there’s no excess moisture.
- Cut and Slice: Break the broccoli into bite-sized florets. Slice the orange bell pepper in half, remove the seeds, and then cut it into thin strips. Slice the cucumber into rounds. Cut the celery into sticks of about 3-4 inches in length.
- Create the Pumpkin Face: On a large platter, arrange the broccoli florets in a circular shape to form the outline of a pumpkin. Place the orange bell pepper strips inside the broccoli circle to create the pumpkin’s body.
- Add Features: Use the cucumber rounds to create eyes. Position two cherry tomatoes on top of the cucumber rounds for a more detailed look. Use the black olives to form the mouth of the pumpkin. You can also use carrot sticks to form the pumpkin’s nose and add any additional facial features to your liking.
- Final Touches: Place the remaining cherry tomatoes and baby carrots around the platter as decorative accents. If using, position the small pumpkin in the center or to the side for an extra festive touch.
- Serve with Dip: Place a small bowl of ranch dressing or hummus on the side of the tray for dipping.
Extra Tips:
To make your Pumpkin Veggie Tray even more appealing, consider using a variety of colorful vegetables like red or yellow bell peppers, purple cauliflower, or radishes. You can also add small pieces of cheese shaped like Halloween-themed items such as bats or ghosts for added fun.
If you want to prepare the tray ahead of time, cover it tightly with plastic wrap and store it in the refrigerator until ready to serve. This will help keep the vegetables fresh and crisp.
Bat Wing Cupcakes

Bat Wing Cupcakes are a spooktacular treat perfect for Halloween potlucks, especially when kids are involved. These cupcakes aren’t only delicious but also visually exciting, with their bat wing decorations providing a fun and festive touch.
Whether you’re hosting a Halloween party or contributing to a class event, these cupcakes will certainly be a hit with their chocolatey goodness and creative flair.
The cupcakes are made with a rich chocolate base that pairs perfectly with the dark chocolate ganache and bat wing decorations. The wings are crafted from chocolate cookies, adding a crunchy texture that contrasts beautifully with the soft, moist cupcake. This recipe yields enough cupcakes to serve 4-6 people, making it an ideal choice for small gatherings or as part of a larger dessert spread.
Ingredients (Serves 4-6):
- 1 cup all-purpose flour
- 1/2 cup unsweetened cocoa powder
- 1 teaspoon baking powder
- 1/2 teaspoon baking soda
- 1/4 teaspoon salt
- 1/2 cup unsalted butter, softened
- 1 cup granulated sugar
- 2 large eggs
- 1 teaspoon vanilla extract
- 1/2 cup milk
- 1/2 cup dark chocolate chips
- 1/2 cup heavy cream
- 12 chocolate wafer cookies (for bat wings)
- Black food coloring (optional)
- Edible candy eyes (optional)
Cooking Instructions:
- Preheat the Oven: Preheat your oven to 350°F (175°C) and line a 12-cup muffin pan with cupcake liners.
- Prepare Dry Ingredients: In a medium bowl, sift together the flour, cocoa powder, baking powder, baking soda, and salt. Set aside.
- Cream Butter and Sugar: In a large mixing bowl, beat the softened butter and sugar with an electric mixer until light and fluffy, about 3 minutes.
- Add Eggs and Vanilla: Add the eggs one at a time, beating well after each addition. Stir in the vanilla extract.
- Combine Wet and Dry Mixtures: Gradually add the dry ingredients to the wet ingredients, alternating with the milk. Begin and end with the dry ingredients. Mix until just combined.
- Fill the Cupcake Liners: Divide the batter evenly among the prepared cupcake liners, filling each about 2/3 full.
- Bake the Cupcakes: Bake in the preheated oven for 18-20 minutes, or until a toothpick inserted into the center of a cupcake comes out clean. Let them cool completely on a wire rack.
- Make the Ganache: In a small saucepan, heat the heavy cream over medium heat until it just begins to simmer. Remove from heat and pour over the dark chocolate chips. Let it sit for a minute, then stir until smooth. Allow it to cool slightly, then add black food coloring if desired for an even darker appearance.
- Assemble the Cupcakes: Once the cupcakes are cool, spread the ganache over the top of each one using a spoon or spatula. Break each chocolate wafer cookie in half to create bat wings and insert them into the ganache on either side of each cupcake. Add candy eyes for a fun finishing touch.
Extra Tips: For an even more dramatic effect, consider using black cupcake liners to enhance the spooky theme.
If you can’t find chocolate wafer cookies, any thin chocolate cookie will do, just as long as you can break them in half to mimic bat wings. To guarantee the ganache doesn’t run, let it cool to a spreadable consistency before applying it to the cupcakes.
Finally, involving kids in decorating the cupcakes can be a fun activity that adds a personal touch to your Halloween potluck dish.
Creepy Crawly Pasta Salad
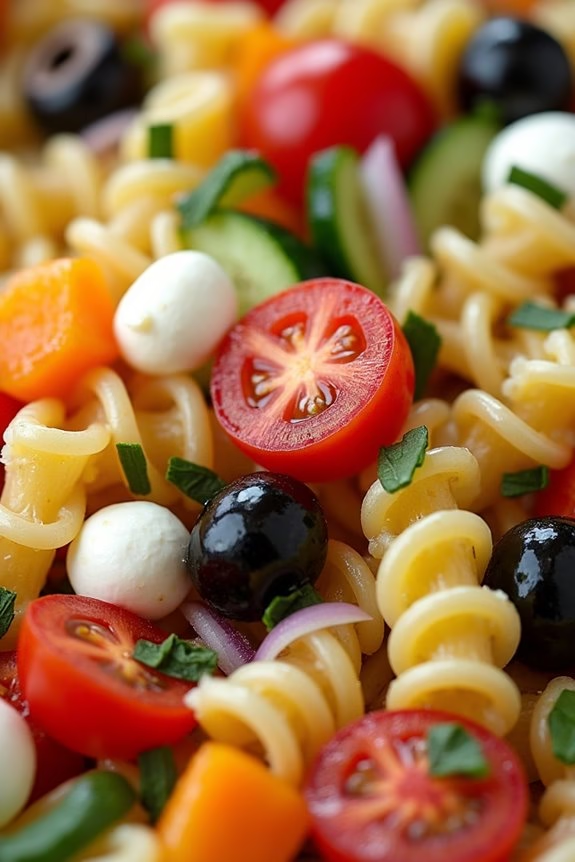
Creepy Crawly Pasta Salad is a perfect dish to add a touch of spookiness to your Halloween potluck for kids. This pasta salad isn’t only fun to make but also a nutritious option that will delight both kids and adults. The salad features pasta shaped like creepy crawlies, combined with colorful vegetables and a tangy dressing that will have everyone coming back for more.
It’s a great way to sneak in some veggies while keeping the kids entertained with the spooky theme. The Creepy Crawly Pasta Salad is easy to prepare and can be made ahead of time, making it a convenient choice for busy parents. The combination of textures and flavors is sure to please, with the pasta providing a satisfying chew and the vegetables adding a fresh crunch.
You can even let the kids help with the preparation, allowing them to get creative with the arrangement of the salad. With just a few simple ingredients and steps, you’ll have a delightful dish that’s both nutritious and fun for your Halloween gathering.
Ingredients (serving size: 4-6 people):
- 8 oz (about 3 cups) of pasta (preferably fun shapes like rotini or bow ties)
- 1 cup cherry tomatoes, halved
- 1 cup cucumber, diced
- 1/2 cup black olives, sliced
- 1/2 cup orange bell pepper, diced
- 1/4 cup red onion, finely chopped
- 1/2 cup mozzarella cheese balls or cubes
- 1/4 cup fresh basil leaves, chopped
- 1/2 cup Italian dressing
- Salt and pepper to taste
Cooking Instructions:
- Cook the Pasta: Bring a large pot of salted water to a boil. Add the pasta and cook according to package instructions until al dente. Drain the pasta and rinse under cold water to stop the cooking process. Allow it to cool completely.
- Prepare the Vegetables: While the pasta is cooling, wash and prepare the vegetables. Halve the cherry tomatoes, dice the cucumber and orange bell pepper, slice the black olives, and finely chop the red onion. Set aside.
- Combine Ingredients: In a large mixing bowl, combine the cooled pasta, prepared vegetables, mozzarella cheese, and chopped basil. Toss gently to mix the ingredients evenly.
- Add Dressing: Pour the Italian dressing over the pasta mixture. Use a spatula or large spoon to toss everything together until the dressing coats all the ingredients evenly. Season with salt and pepper to taste.
- Chill and Serve: Cover the bowl with plastic wrap or a lid and refrigerate for at least 30 minutes to allow the flavors to meld together. Before serving, give the salad a good stir. Transfer to a serving dish and enjoy your Creepy Crawly Pasta Salad!
Extra Tips:
For a more colorful and festive presentation, consider using tri-color pasta to enhance the Halloween theme. You can also add other vegetables like carrots or corn for added texture and nutrition.
If you want to make the salad more engaging for kids, let them arrange the pasta into fun shapes or patterns on their plates. Additionally, you can prepare the salad a day in advance and store it in the refrigerator, which can enhance the flavors even more. Just remember to toss it again before serving to redistribute the dressing.
Vampire Punch
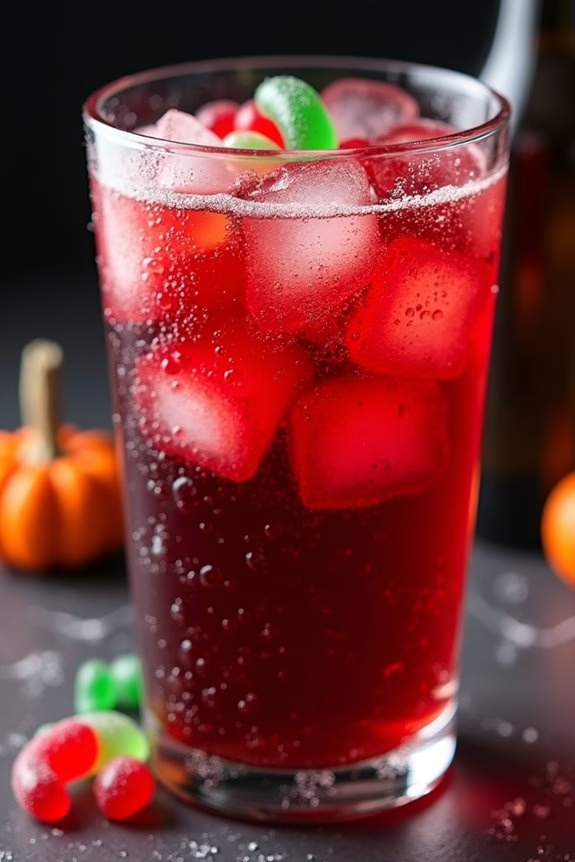
Halloween is the perfect time to get creative in the kitchen, especially when it comes to making festive treats and beverages for kids. One such spooky and delightful concoction is Vampire Punch. This crimson-colored drink won’t only quench the thirst of little goblins and ghosts but also add a bit of eerie fun to your Halloween potluck.
With a mix of fruity flavors and a touch of fizz, this punch is both delicious and visually appealing, making it a must-have for your Halloween celebration. The Vampire Punch isn’t just a treat for the taste buds but also a feast for the eyes. Its blood-red hue is sure to capture the imagination of young party-goers, and with a few simple ingredients, it’s easy to whip up a batch that will serve 4-6 people.
Whether you’re hosting a party or attending one, this punch will surely be a hit with the kids, leaving them enthusiastically asking for a refill.
Ingredients:
- 4 cups cranberry juice
- 2 cups ginger ale
- 1 cup pineapple juice
- 1/2 cup grenadine syrup
- 1/2 cup fresh lime juice
- Ice cubes
- Gummy vampire fangs or gummy worms (optional for garnish)
Instructions:
- Prepare the Base: In a large pitcher or punch bowl, pour in 4 cups of cranberry juice. This will serve as the primary base of your Vampire Punch, giving it its signature blood-red color.
- Add Fizz and Sweetness: Slowly add in 2 cups of ginger ale. The ginger ale not only provides a revitalizing fizz but also balances the tartness of the cranberry juice with a subtle sweetness.
- Incorporate Tropical Flavors: Pour in 1 cup of pineapple juice. This will introduce a hint of tropical flavor, making the punch more complex and enjoyable for kids.
- Sweeten with Grenadine: Add 1/2 cup of grenadine syrup to the mix. This ingredient will enhance the color and add sweetness, making the punch more appealing to young taste buds.
- Add a Zesty Twist: Squeeze in 1/2 cup of fresh lime juice. The lime juice will add a zesty kick to the punch, balancing the sweetness with a touch of acidity.
- Mix Well: Stir all the ingredients thoroughly until well combined. This guarantees that all the flavors are evenly distributed throughout the punch.
- Chill and Serve: Add a generous amount of ice cubes to the punch to keep it chilled. For an extra spooky touch, consider adding gummy vampire fangs or gummy worms as a garnish when serving.
Extra Tips:
When making Vampire Punch, it’s important to adjust the sweetness according to your preference. If you find the punch too tart, you can add a bit more grenadine or pineapple juice. Conversely, if it’s too sweet, a splash of extra lime juice can help balance the flavors.
For an added Halloween effect, you can freeze some of the punch in a mold to create a floating ice hand or skull in the punch bowl. This not only keeps the punch cool but also adds an extra element of surprise for the kids.
Skeleton Bone Breadsticks

Are you looking for a fun and spooky addition to your Halloween potluck spread? Search no more than Skeleton Bone Breadsticks. These eerie breadsticks not only fit the Halloween theme perfectly with their bone-like appearance but are also deliciously soft and chewy. Perfect for little hands to grab and enjoy, these breadsticks make a great snack or appetizer for kids.
The simple preparation and minimal ingredients make them an ideal choice for busy parents who want to whip up a festive treat without spending too much time in the kitchen. The dough is easy to work with, allowing you to shape the breadsticks into bone-like structures that will delight and intrigue young party-goers.
The breadsticks can be served plain or paired with a spooky marinara “blood” dipping sauce for added effect. This recipe yields enough for 4-6 people, making it a convenient option for a small gathering or to contribute to a larger potluck event.
Ingredients (Serving Size: 4-6 people):
- 1 package (13.8 oz) refrigerated pizza dough
- 2 tablespoons melted butter
- 1 teaspoon garlic powder
- 1 tablespoon grated Parmesan cheese
- 1 teaspoon dried oregano
- Marinara sauce for dipping (optional)
Cooking Instructions:
- Preheat the Oven: Start by preheating your oven to 375°F (190°C). Line a baking sheet with parchment paper or lightly grease it to prevent the breadsticks from sticking.
- Prepare the Dough: Roll out the refrigerated pizza dough on a lightly floured surface to prevent sticking. Aim for a rectangular shape about 12×8 inches in size.
- Cut and Shape: Using a pizza cutter or sharp knife, cut the dough into strips approximately 1 inch wide. For each strip, make a small slit at both ends and gently pull and twist the ends to form the shape of a bone.
- Arrange on Baking Sheet: Place the shaped dough onto the prepared baking sheet, leaving a small amount of space between each breadstick to allow for expansion during baking.
- Season the Breadsticks: In a small bowl, mix the melted butter and garlic powder. Brush this mixture over each breadstick, ensuring they’re well coated. Sprinkle Parmesan cheese and dried oregano evenly across the breadsticks for added flavor.
- Bake: Place the baking sheet in the preheated oven and bake for 12-15 minutes, or until the breadsticks are golden brown and cooked through.
- Serve: Remove from the oven and let cool slightly on a wire rack. Serve warm, with marinara sauce on the side for dipping if desired.
Extra Tips:
For an extra festive touch, consider using black sesame seeds or poppy seeds to give the bones a more realistic appearance. You can also experiment with different herbs and spices for seasoning according to your child’s taste preferences.
If you prefer a softer breadstick, cover them with a clean kitchen towel immediately after baking to retain moisture. These breadsticks can be prepared a few hours in advance and reheated just before serving to maintain their fresh, chewy texture.