
As the leaves turn and the air gets crisp, the excitement of Halloween begins to brew. I’m always on the lookout for the most spook-tacular treats to make my table the talk of the neighborhood. This year, I’ve concocted a delicious lineup that is sure to enchant your guests, featuring everything from Mummy Hot Dogs to a vibrant Witch’s Brew Soup. Think Spooky Spider Deviled Eggs that will send shivers down your spine and Ghoulishly Glazed Donuts that are frightfully fun. Get ready to stir up some magic in the kitchen with these bewitching recipes!
Mummy Hot Dogs

Mummy Hot Dogs are a fun and festive treat, perfect for any Halloween gathering. These spooky snacks aren’t only easy to make but also a delight for both kids and adults. Combining the classic flavors of hot dogs wrapped in crescent roll dough, these mummy-inspired appetizers are bound to be a hit at your Halloween party.
With just a few simple ingredients and a little creativity, you can whip up a batch of these tasty treats in no time. The charm of Mummy Hot Dogs lies in their adorable appearance, resembling little mummies ready to liven up your spooky celebrations.
This recipe is designed to serve 4-6 people, making it an ideal choice for small get-togethers. The soft, buttery crescent roll dough becomes crispy and golden when baked, providing the perfect contrast to the juicy hot dogs inside. Add a little mustard or ketchup for eyes, and you have a ghoulishly good snack that’s as much fun to make as it’s to eat.
Ingredients (Serves 4-6):
- 8 hot dogs
- 1 package (8 oz) of refrigerated crescent roll dough
- 1 tablespoon mustard or ketchup for decorating (optional)
- Cooking spray or parchment paper
Instructions:
1. Preheat the Oven: Start by preheating your oven to 375°F (190°C). This will guarantee that the mummy hot dogs cook evenly and achieve a nice golden color.
2. Prepare the Dough: Open the package of crescent roll dough and unroll it on a clean surface. Use a knife or pizza cutter to slice the dough into thin strips, about 1/4 inch wide.
3. Wrap the Hot Dogs: Take one hot dog and begin wrapping it with the dough strips. Leave a small gap near the top for the mummy’s face. Continue to wrap the dough around the hot dog in a random pattern to mimic the look of a mummy.
Repeat this process for all the hot dogs.
4. Arrange on Baking Sheet: Place the wrapped hot dogs on a baking sheet lined with parchment paper or lightly sprayed with cooking spray. Make certain they’re spaced evenly to allow even baking.
5. Bake the Mummies: Put the baking sheet in the preheated oven and bake for 12-15 minutes or until the dough is golden brown and cooked through.
6. Add the Eyes: Once baked, remove the mummy hot dogs from the oven and let them cool for a few minutes. Use a small amount of mustard or ketchup to dot eyes on each mummy, giving them a spooky yet cute appearance.
Extra Tips:
For a crispier texture, consider brushing the dough with a little melted butter before baking. If you want to add more flavor, consider sprinkling some garlic powder or sesame seeds on the dough before baking.
To guarantee that your mummy hot dogs aren’t too salty, choose hot dogs that are low in sodium. If serving these at a party, consider providing small bowls of dipping sauces such as cheese dip, mustard, or ketchup for added flavor.
Witch’s Brew Soup
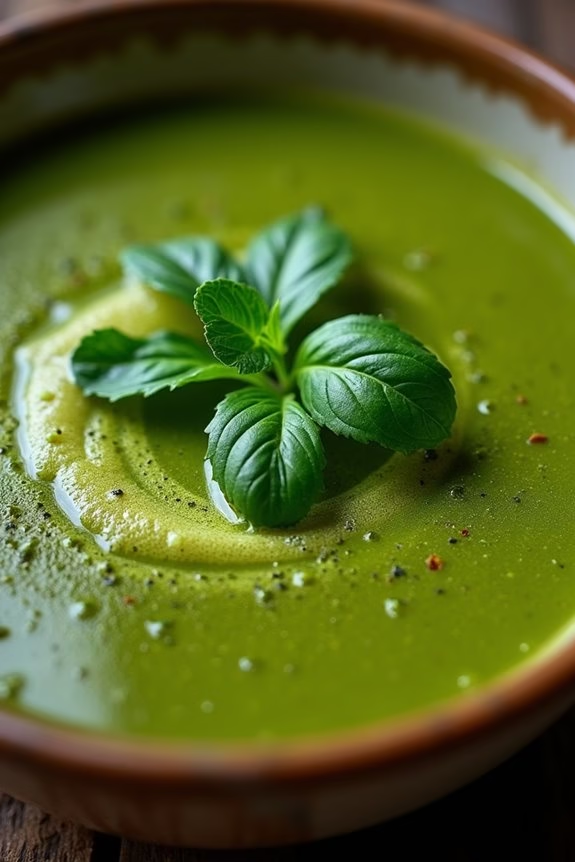
Transform your Halloween festivities with a bubbling cauldron of Witch’s Brew Soup. This bewitching dish is perfect for warming up after a night of trick-or-treating or setting the mood for a spooky gathering. The vibrant green hue and rich, earthy flavors make it a fitting centerpiece for your Halloween menu.
This recipe combines a variety of fresh vegetables and herbs to create a savory, nutritious soup that’s both delicious and visually enchanting. As you prepare Witch’s Brew Soup, you’ll find that it’s as simple to make as it’s delightful to serve. The key to this recipe is blending the right mix of vegetables and using fresh herbs to enhance the natural flavors.
With a little bit of magic and some careful stirring, you’ll have a cauldron full of soup that will delight witches, wizards, and guests of all ages. This recipe serves 4-6 people, ensuring there’s plenty to go around.
Ingredients:
- 2 tablespoons olive oil
- 1 large onion, chopped
- 2 cloves garlic, minced
- 4 cups vegetable broth
- 2 cups water
- 3 cups fresh spinach leaves
- 1 cup kale, chopped
- 2 cups broccoli florets
- 1 zucchini, sliced
- 1 cup peas
- 1 teaspoon dried thyme
- 1 teaspoon dried rosemary
- Salt and pepper to taste
- 1/4 cup fresh parsley, chopped
- 1/4 cup fresh basil, chopped
- 1 lemon, juiced
Instructions:
- Prepare the Cauldron: In a large pot over medium heat, add the olive oil. Once heated, sauté the chopped onion and minced garlic until the onion becomes translucent and fragrant, about 5 minutes.
- Add the Broth: Pour in the vegetable broth and water, bringing the mixture to a gentle simmer.
- Add the Greens: Stir in the spinach, kale, broccoli, and zucchini. Allow these vegetables to simmer for about 10 minutes, or until they’re tender.
- Season the Brew: Add the peas, thyme, rosemary, salt, and pepper. Stir well to combine all the flavors. Let the soup continue to simmer for another 5 minutes.
- Blend for Consistency: Using an immersion blender, carefully blend the soup in the pot until it reaches a smooth, consistent texture. If you prefer a chunkier soup, blend only partially.
- Finish with Fresh Herbs: Stir in the fresh parsley, basil, and lemon juice. Allow the soup to simmer for an additional 2 minutes, letting the fresh herbs infuse their flavors.
- Serve: Ladle the Witch’s Brew Soup into bowls and serve hot. Garnish with additional fresh herbs if desired.
Extra Tips:
For an even spookier presentation, serve the Witch’s Brew Soup in mini cauldrons or black bowls. Adding a swirl of cream or a drizzle of olive oil on top can add a ghostly effect to the surface of the soup.
If you want to make the soup more filling, consider adding cooked quinoa or lentils for added texture and protein. Adjust the seasoning according to your preference, and remember that the flavors will deepen even more if the soup is allowed to sit and meld for a few hours or overnight.
Ghostly Cheese Pizza

Get ready to spook up your kitchen this Halloween with a Ghostly Cheese Pizza that’s sure to delight both kids and adults alike. This whimsical twist on traditional pizza combines the gooey goodness of cheese with the playful addition of ghostly shapes, making it a perfect treat for your eerie celebrations. Not only is it visually appealing, but it also delivers on flavor, guaranteeing your Halloween gathering is a hit.
Ideal for a party or a family dinner, this Ghostly Cheese Pizza is both easy to make and fun to eat. The key to this pizza lies in its presentation, as ghost-shaped mozzarella slices sit atop a flavorful tomato base, creating a hauntingly delicious experience. With a few simple ingredients and steps, you can bring this spooky creation to life and serve a dish that both looks and tastes exceptional.
Ingredients for 4-6 servings:
- 1 pre-made pizza crust (12-inch)
- 1 cup pizza sauce
- 2 cups shredded mozzarella cheese
- 8 oz mozzarella cheese slices
- 1 tablespoon olive oil
- 1 teaspoon dried oregano
- Black olives (for ghost eyes)
- Fresh basil leaves (optional)
Cooking Instructions:
- Preheat the Oven and Prepare the Crust: Preheat your oven to 475°F (245°C). Place the pre-made pizza crust on a baking sheet or pizza stone. Brush the crust lightly with olive oil to give it a golden, crispy finish.
- Add the Sauce and Cheese: Spread the pizza sauce evenly over the crust, leaving about 1/2 inch around the edges for the crust. Sprinkle the shredded mozzarella cheese over the sauce, ensuring it’s evenly distributed.
- Cut Ghost Shapes: Using a small ghost-shaped cookie cutter, cut ghost shapes out of the mozzarella cheese slices. Place these cheese ghosts on top of the shredded mozzarella layer, arranging them evenly around the pizza.
- Create the Ghost Faces: Cut small circles from the black olives to create eyes for the cheese ghosts. Place two olive pieces on each ghost shape to form eyes.
- Bake the Pizza: Transfer the pizza to the preheated oven and bake for about 10-12 minutes, or until the cheese is melted and bubbly, and the crust is golden brown.
- Garnish and Serve: Once baked, remove the pizza from the oven and sprinkle with dried oregano. Add fresh basil leaves for extra flavor, if desired. Slice and serve hot.
Extra Tips: For an even more festive touch, consider using other Halloween-themed cookie cutters to create additional shapes from the mozzarella slices. If you have trouble finding mozzarella slices, you can use any mild white cheese that can be easily shaped.
Confirm the oven is fully preheated to achieve the perfect crispy crust. Adjust the toppings to your preference, adding vegetables or meats if desired. Enjoy your Ghostly Cheese Pizza as part of a fun and spooky Halloween meal!
Spooky Spider Deviled Eggs
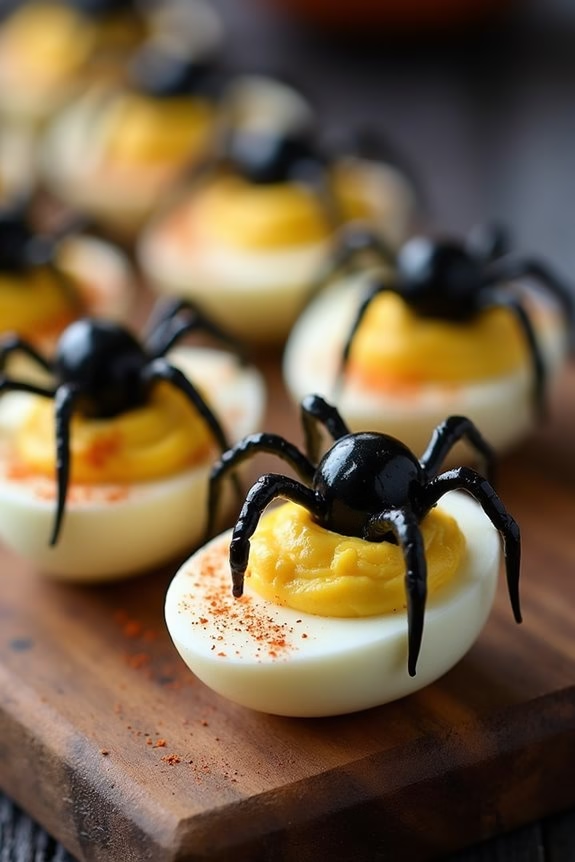
Transform your classic deviled eggs into a hauntingly delightful treat with our Spooky Spider Deviled Eggs. Perfect for Halloween gatherings, these appetizers feature a creepy-crawly twist that’s sure to impress guests both young and old. The combination of smooth, creamy yolk filling and olive spiders provides a deliciously eerie presentation that’s both fun and flavorful.
Whether you’re hosting a haunted house party or simply want to add some ghoulish charm to your dinner table, these deviled eggs are an easy way to celebrate the spooky season. Get ready to release your culinary creativity as you craft these charmingly creepy bites.
With just a handful of ingredients and a little bit of patience, you’ll create an appetizer that’s as delightful to look at as it’s to eat. Follow along with our straightforward instructions to guarantee your eggs turn out perfectly every time. Serve them up with a side of Halloween-themed décor and watch them disappear as fast as you can make them!
Ingredients (serving size: 4-6 people):
- 6 large eggs
- 1/4 cup mayonnaise
- 1 teaspoon Dijon mustard
- 1/2 teaspoon white vinegar
- Salt and pepper to taste
- Black olives (about 12-15 whole olives)
- Paprika (optional, for garnish)
Cooking Instructions:
- Boil the Eggs: Place the eggs in a saucepan and cover them with cold water. Bring the water to a boil over medium-high heat. Once boiling, remove the pan from heat, cover, and let the eggs sit for 12 minutes.
- Prepare the Eggs: After 12 minutes, transfer the eggs to a bowl of ice water to cool for about 5 minutes. Once cooled, peel the eggs carefully to avoid damaging the whites.
- Make the Filling: Slice each egg in half lengthwise and gently remove the yolks, placing them in a mixing bowl. Add mayonnaise, Dijon mustard, white vinegar, salt, and pepper to the yolks. Mash the mixture with a fork until smooth and creamy.
- Fill the Egg Whites: Spoon or pipe the yolk mixture back into the hollow egg whites, creating a heaping mound in each half.
- Create the Spiders: Cut the black olives in half. Use one half for the spider body and slice the other half into thin strips for the legs. Position the body on top of the yolk mixture, and arrange the legs around it to resemble a spider.
- Garnish and Serve: Optionally sprinkle paprika over the filled eggs for added color and flavor. Arrange the completed spider deviled eggs on a serving platter and enjoy your spooky creation!
Extra Tips:
For perfectly cooked eggs, make sure not to overboil them, as this can lead to a green ring around the yolk. If you want to save time on Halloween night, prepare the eggs a day in advance and store them in the refrigerator. Just add the olive spiders right before serving to maintain the freshest presentation.
Feel free to customize the filling to your taste by adding additional spices or ingredients like garlic powder or chopped herbs.
Monster Guacamole Cups

Monster Guacamole Cups are a fun and spooky addition to your Halloween festivities, perfect for adding a ghoulish twist to your party spread. These individual servings of guacamole aren’t only eye-catching but also deliciously creamy and packed with flavor. The use of creative garnishes transforms a classic guacamole recipe into a monstrous treat that both kids and adults will enjoy.
Whether you’re hosting a Halloween bash or just want to surprise your family with a themed snack, these Monster Guacamole Cups are bound to be a hit. The versatility of this dish allows you to customize it according to your taste preferences and dietary needs. You can make the guacamole as spicy or as mild as you like, and the monstrous decorations can be adjusted to suit your Halloween theme.
The recipe below yields enough for 4-6 people, making it perfect for a small gathering or as part of a larger spread. By using simple ingredients and a touch of creativity, you can whip up this festive treat in no time.
Ingredients:
- 4 ripe avocados
- 2 limes (juiced)
- 1 teaspoon salt
- 1/2 teaspoon ground black pepper
- 1/2 teaspoon garlic powder
- 1 small red onion (finely chopped)
- 1-2 jalapeños (seeded and minced)
- 2 Roma tomatoes (diced)
- 1/4 cup fresh cilantro (chopped)
- Tortilla chips (for serving)
- Black olives (sliced, for decoration)
- Cherry tomatoes (halved, for decoration)
- Pretzel sticks (for decoration)
- Mini plastic cups (for serving)
Cooking Instructions:
- Prepare the Avocados: Begin by cutting the avocados in half, removing the pits, and scooping the flesh into a mixing bowl. Use a fork or potato masher to mash the avocados until you achieve your desired level of smoothness.
- Mix the Guacamole: Add the lime juice, salt, black pepper, and garlic powder to the mashed avocados. Stir well to combine all the ingredients.
- Add the Vegetables: Incorporate the finely chopped red onion, minced jalapeños, diced Roma tomatoes, and chopped cilantro into the avocado mixture. Mix thoroughly to guarantee even distribution of flavors.
- Assemble the Cups: Divide the guacamole evenly among the mini plastic cups. Fill each cup to about three-quarters full, leaving room for the decorations.
- Decorate the Cups: To create the ‘monster’ appearance, use sliced black olives for eyes, cherry tomato halves for noses, and pretzel sticks for mouths or horns. Get creative with the arrangement to give each cup its own unique, spooky face.
- Serve: Place the Monster Guacamole Cups on a serving tray alongside a bowl of tortilla chips. They can be served immediately or covered and refrigerated for up to two hours before serving.
Extra Tips:
For an extra festive touch, consider using different colored cups or adding small Halloween-themed picks to each cup. If you’re making these in advance, keep them covered with plastic wrap to prevent the guacamole from browning.
Additionally, you can customize the level of spice by adjusting the amount of jalapeños or adding a dash of hot sauce. Encourage kids to help with the decoration—their creativity can lead to some truly unique monster designs!
Pumpkin Patch Brownies

Pumpkin Patch Brownies are a delightful and festive treat perfect for Halloween celebrations. These brownies combine the rich, chewy texture of chocolate brownies with the festive charm of a pumpkin patch. Topped with tiny candy pumpkins and a luscious chocolate ganache, these brownies aren’t only visually appealing but also irresistibly delicious.
Whether you’re hosting a Halloween party or simply want to enjoy a spooky treat with your family, Pumpkin Patch Brownies are bound to impress.
The concept of Pumpkin Patch Brownies revolves around creating a miniature pumpkin patch on each brownie square. This is achieved by incorporating orange candy melts and green icing to mimic the appearance of pumpkins and vines. The base of this dessert is a classic brownie, which is both easy to make and universally loved.
By adding these whimsical decorations, you elevate a simple dessert into a show-stopping centerpiece that captures the essence of the Halloween season.
Ingredients for Pumpkin Patch Brownies (Serves 4-6):
- 1 cup unsalted butter
- 2 cups granulated sugar
- 4 large eggs
- 1 cup all-purpose flour
- 1 cup unsweetened cocoa powder
- 1 teaspoon vanilla extract
- 1/2 teaspoon salt
- 1 cup semi-sweet chocolate chips
- 1 cup heavy cream
- 1 cup candy melts (orange)
- 1/2 cup mini candy pumpkins
- Green icing (store-bought or homemade)
Instructions:
- Preheat the Oven: Start by preheating your oven to 350°F (175°C). Grease and line a 9×13-inch baking pan with parchment paper to facilitate easy removal of the brownies.
- Prepare the Brownie Batter: In a large saucepan, melt the unsalted butter over low heat. Once melted, remove from heat and stir in granulated sugar until well combined. Add the eggs one at a time, mixing well after each addition. Stir in the vanilla extract.
- Mix Dry Ingredients: In a separate bowl, whisk together the all-purpose flour, unsweetened cocoa powder, and salt. Gradually add this dry mixture to the wet ingredients, stirring until just combined. Be careful not to overmix.
- Add Chocolate Chips: Fold in the semi-sweet chocolate chips into the brownie batter. This will add extra chocolatey goodness and texture to your brownies.
- Bake the Brownies: Pour the batter into the prepared baking pan and spread evenly. Bake in the preheated oven for 25-30 minutes or until a toothpick inserted into the center comes out with a few moist crumbs. Allow the brownies to cool completely in the pan.
- Prepare the Ganache: In a small saucepan, heat the heavy cream over low heat until it begins to simmer. Remove from heat and add the candy melts. Stir until completely melted and smooth. Pour this ganache over the cooled brownies, spreading it evenly with a spatula.
- Decorate the Brownies: Once the ganache has slightly set, arrange the mini candy pumpkins on top, pressing them gently into the ganache. Use the green icing to create vines and leaves around the pumpkins, enhancing the pumpkin patch effect.
- Serve and Enjoy: Allow the ganache to set completely before cutting the brownies into squares. Serve and delight your guests with the whimsical Halloween-themed treat.
Extra Tips:
For best results, verify your brownies are completely cooled before applying the ganache to prevent it from melting. If you prefer a richer pumpkin flavor, consider adding a teaspoon of pumpkin pie spice to the brownie batter.
For a more personalized touch, you can use different types of candy to decorate your pumpkin patch, such as candy corn or chocolate sprinkles. These brownies can be made a day in advance, allowing the flavors to meld beautifully, making them an ideal make-ahead dessert for your Halloween festivities.
Bloody Finger Cookies
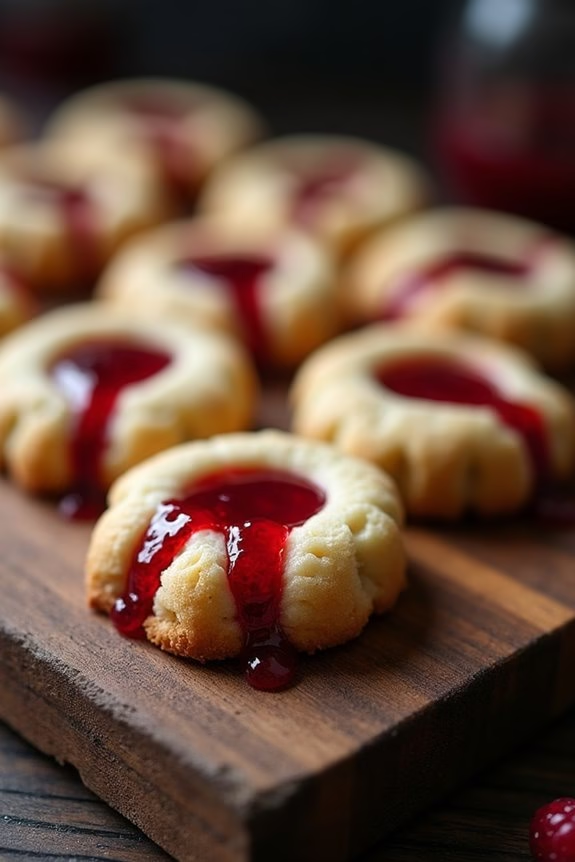
Bloody Finger Cookies are the perfect spooky treat to serve at your Halloween party. These eerie cookies not only look creepy but are also deliciously sweet, making them a fun addition to your festive table. Shaped like fingers with almond nails and a bloody appearance, they’re sure to get a reaction from your guests. The combination of buttery shortbread and the tang of the raspberry jam creates a tasty contrast that’s hard to resist.
Creating these cookies isn’t only fun but also a great activity to involve the whole family in. Kids will love shaping the dough into fingers and adding the finishing details to make them look realistic. They’re easy to prepare and don’t require any special equipment, so you can whip them up in no time. This recipe serves 4–6 people, making it ideal for a small gathering or as a part of a larger dessert spread.
Ingredients:
- 1 cup unsalted butter, softened
- 1 cup powdered sugar
- 1 egg
- 1 teaspoon vanilla extract
- 2 2/3 cups all-purpose flour
- 1 teaspoon baking powder
- 1/2 teaspoon salt
- 3/4 cup whole almonds, blanched
- 1/2 cup raspberry jam
- Red food coloring (optional)
Cooking Instructions:
- Prepare the Dough: In a large mixing bowl, cream together the softened butter and powdered sugar until light and fluffy. Add the egg and vanilla extract, mixing well until fully incorporated.
- Mix Dry Ingredients: In a separate bowl, whisk together the all-purpose flour, baking powder, and salt. Gradually add the dry mixture to the wet ingredients, stirring until a dough forms.
- Shape the Fingers: Divide the dough into small portions. Roll each portion into a finger-like shape, about 3 inches long. Press an almond firmly into one end to create the nail. Use a knife to make knuckle marks and indentations to give the cookies a realistic finger appearance.
- Chill the Dough: Place the shaped fingers on a baking sheet lined with parchment paper. Chill in the refrigerator for 20-30 minutes to firm up the dough.
- Bake the Cookies: Preheat your oven to 325°F (160°C). Bake the cookies for 15-20 minutes or until they’re lightly golden. Be careful not to overbake as they’ll harden as they cool.
- Add the Bloody Effect: Once the cookies have cooled, remove the almond nails. Add a drop of raspberry jam into the nail bed and replace the almond, allowing the jam to ooze out slightly. For extra bloodiness, mix a small amount of red food coloring with the raspberry jam and apply it to the finger ends or knuckles.
Extra Tips:
To make the cookies even scarier, you can add a touch of cocoa powder to some parts of the dough to create a dirty finger effect.
If you have time, try adding some texture to the dough using a fork or skewer for added realism.
Be sure to use a non-stick baking sheet or parchment paper to prevent the cookies from sticking.
If you want your cookies to have a more dramatic look, consider adding a small amount of black food coloring to the dough to give them a ghastly appearance.
Enjoy making these Bloody Finger Cookies and have a spooky Halloween!
Eyeball Punch
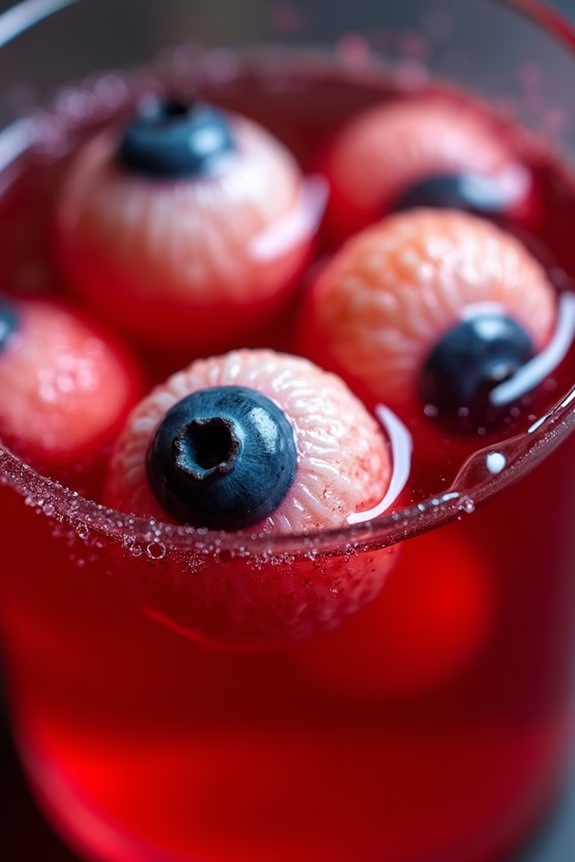
Eyeball Punch is a spooky and fun drink that will be the highlight of your Halloween party. With floating eyeballs peering up from the depths of a blood-red concoction, this punch not only looks eerie but also tastes delicious. The punch is a mix of fruity flavors that will delight both kids and adults alike, while the floating eyeballs are made from lychees and blueberries for an added touch of creepiness.
Serve this punch in a large bowl with a ladle so guests can scoop up the eyeballs into their glasses for an extra scare. This recipe is perfect for a gathering of 4-6 people, guaranteeing everyone gets their share of this ghoulish drink. The preparation is simple and can be done in advance, allowing you to focus on other party details.
The combination of fizzy soda, cranberry juice, and the unique texture of the lychee eyeballs will make this drink a memorable addition to your Halloween festivities.
Ingredients:
- 1 can of lychees in syrup
- 1 pint of fresh blueberries
- 2 cups cranberry juice
- 1 cup grape juice
- 1 liter lemon-lime soda
- 1 cup pineapple juice
- Ice cubes
Instructions:
- Prepare the Eyeballs: Drain the can of lychees, reserving the syrup for another use if desired. Gently insert a blueberry into the hollow center of each lychee to create the appearance of an eyeball. Set these aside in the refrigerator until ready to use.
- Mix the Punch Base: In a large punch bowl, combine the cranberry juice, grape juice, and pineapple juice. Stir the mixture well to make certain the flavors are thoroughly blended.
- Add the Soda: Just before serving, slowly pour the lemon-lime soda into the punch bowl. This will add a fizzy element to your punch and enhance the overall taste.
- Add the Eyeballs: Carefully place the prepared lychee eyeballs into the punch. The blueberries should face upwards to maintain the spooky appearance.
- Chill the Punch: Add ice cubes to the punch bowl to keep the drink cold. Alternatively, you can chill all the ingredients beforehand and omit the ice to prevent diluting the punch.
Extra Tips:
For an extra spooky effect, consider freezing some of the grape juice in a mold to create ice shapes that will float in the punch. You can also add a few drops of food coloring to intensify the blood-red color of the punch.
If you prefer a non-fizzy version, you can substitute the lemon-lime soda with sparkling water or leave it out entirely. Remember to taste and adjust the sweetness to your liking, as different brands of juices can vary in their sweetness levels.
Ghoulishly Glazed Donuts
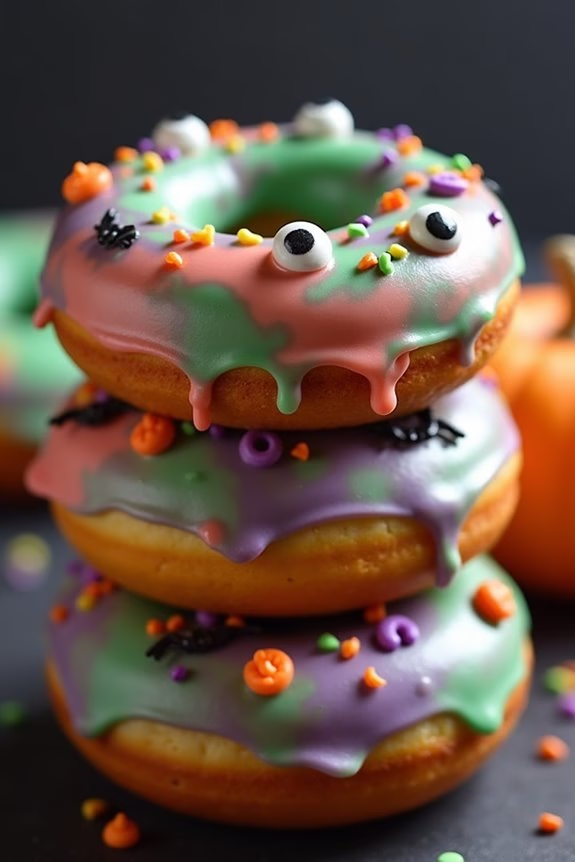
Halloween is the perfect time to indulge in some spooky and sweet treats, and what better way to celebrate than with Ghoulishly Glazed Donuts? These donuts aren’t only delicious but also visually enthralling, making them a fantastic addition to any Halloween party or gathering.
With a soft, fluffy interior and a wickedly colorful glaze that can be customized to any ghoulish theme, these donuts are sure to be a hit among both kids and adults alike. The beauty of Ghoulishly Glazed Donuts lies in their versatility. You can play around with different food colorings to achieve the desired eerie effect, and add spooky decorations like candy eyes, sprinkles, or even spider webs made from icing.
Whether served as breakfast treats or as a dessert, these donuts are bound to impress your guests and leave them wanting more. This recipe serves 4-6 people, making it ideal for a small gathering or family celebration.
Ingredients:
- 2 cups all-purpose flour
- 1/2 cup granulated sugar
- 1 tablespoon baking powder
- 1/2 teaspoon salt
- 1/2 teaspoon ground nutmeg
- 3/4 cup whole milk
- 2 large eggs
- 1 teaspoon vanilla extract
- 1/4 cup unsalted butter, melted
- Vegetable oil, for frying
- 2 cups powdered sugar
- 2-3 tablespoons whole milk
- Food coloring (various colors)
- Halloween-themed sprinkles and candy decorations
Instructions:
1. Prepare the Dough: In a large mixing bowl, whisk together the flour, granulated sugar, baking powder, salt, and nutmeg. In another bowl, combine the milk, eggs, and vanilla extract, then add the melted butter.
Pour the wet ingredients into the dry ingredients and mix until a dough forms.
2. Knead the Dough: Lightly flour a surface and knead the dough for about 5 minutes until it becomes smooth and elastic. Roll the dough to about 1/2 inch thickness.
3. Cut Out Donuts: Use a donut cutter or a round cutter to cut out donut shapes. If you don’t have a donut cutter, you can use two different sizes of round cutters to create the inner hole.
4. Heat the Oil: In a large pot, heat about 2 inches of vegetable oil to 350°F (175°C). Carefully drop the donuts into the hot oil, a few at a time, and fry until golden brown on each side, about 1-2 minutes per side.
5. Drain and Cool: Remove the donuts with a slotted spoon and place them on a wire rack lined with paper towels to drain excess oil. Let them cool completely before glazing.
6. Prepare the Glaze: In a medium bowl, whisk together the powdered sugar and 2-3 tablespoons of milk until smooth. Divide the glaze into separate bowls and add a few drops of food coloring to each, stirring to combine.
7. Glaze the Donuts: Dip the cooled donuts into the colored glaze, allowing excess to drip off. Place back on the wire rack and immediately sprinkle with Halloween-themed decorations before the glaze sets.
Extra Tips:
For the best texture, verify the oil is at the correct temperature before frying to avoid greasy donuts. If you don’t have a thermometer, test with a small piece of dough; it should sizzle and rise to the surface.
Feel free to experiment with the glaze by mixing different colors for a marbled effect, or use white glaze and add food coloring in a swirling pattern to achieve a ghostly look. For added flavor, consider incorporating a teaspoon of cinnamon or pumpkin spice into the dough for a seasonal twist.
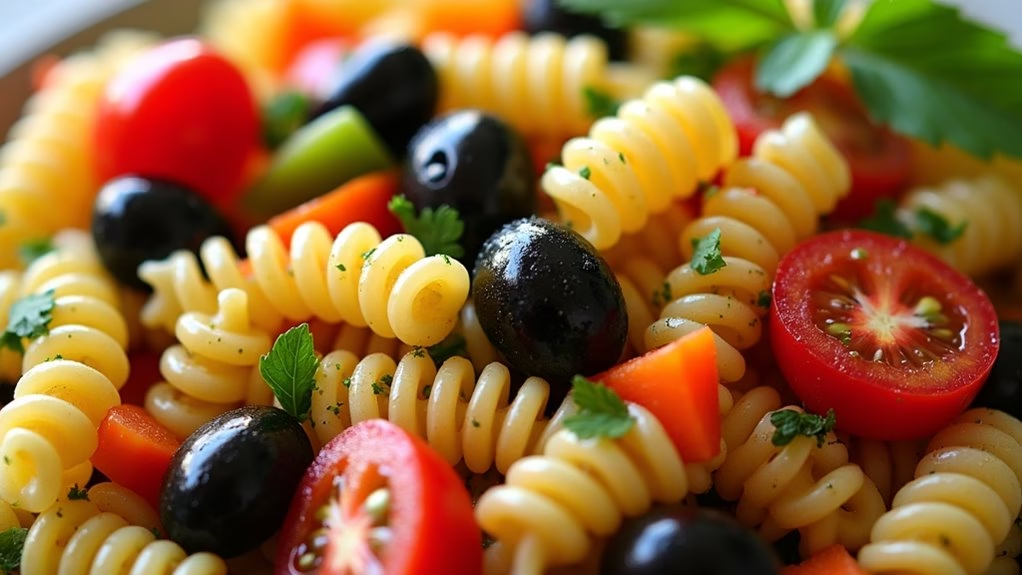
Creepy Crawly Pasta Salad
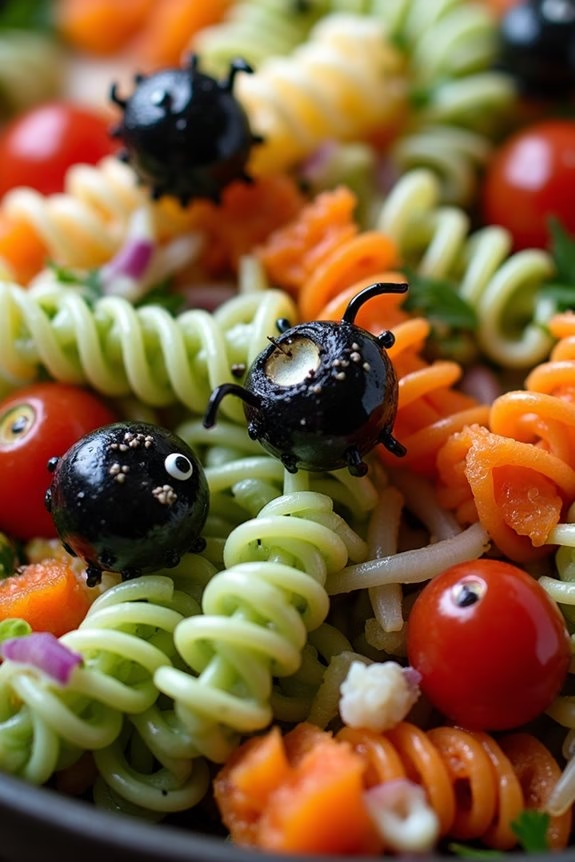
Creepy Crawly Pasta Salad is the perfect dish to add a touch of spooky fun to your Halloween spread. This eerie dish combines the deliciousness of a classic pasta salad with the unsettling appearance of creepy crawlies, making it a hit for both kids and adults.
With the right blend of ingredients and a dash of creativity, you can transform an ordinary pasta salad into a Halloween masterpiece that will have your guests both intrigued and delighted.
The key to this dish lies in its presentation. By using pasta shapes that mimic the appearance of bugs and incorporating vibrant, contrasting colors, you can create an appetizing and visually striking salad. The addition of olives, cherry tomatoes, and bell peppers not only enhances the flavor but also contributes to the creepy aesthetic.
The salad is then tossed in a tangy vinaigrette dressing that complements the ingredients and ties the flavors together seamlessly.
Ingredients (Serves 4-6):
- 12 ounces rotini pasta (preferably tri-color)
- 1 cup black olives, sliced
- 1 cup cherry tomatoes, halved
- 1/2 cup green bell pepper, diced
- 1/2 cup red bell pepper, diced
- 1/4 cup red onion, finely chopped
- 1/2 cup shredded carrots
- 1/4 cup fresh parsley, chopped
- 1/2 cup Italian vinaigrette dressing
- Salt and pepper to taste
Cooking Instructions:
- Cook the Pasta: Begin by cooking the rotini pasta according to the package instructions. Once cooked, drain the pasta and rinse it under cold water to stop the cooking process and cool it down. This will guarantee the pasta maintains a firm texture.
- Prepare Vegetables: While the pasta is cooling, slice the black olives, halve the cherry tomatoes, and dice the green and red bell peppers. Finely chop the red onion and shred the carrots. These ingredients will add color and crunch to your salad.
- Mix the Salad: In a large mixing bowl, combine the cooled pasta with the prepared vegetables—black olives, cherry tomatoes, bell peppers, red onion, and carrots. Add the chopped parsley for a fresh, herbal note.
- Dress the Salad: Pour the Italian vinaigrette dressing over the pasta and vegetables. Toss everything together gently to make sure the dressing coats all the ingredients evenly. Season the salad with salt and pepper to taste.
- Chill and Serve: Allow the salad to chill in the refrigerator for at least 30 minutes before serving to let the flavors meld together. Serve the Creepy Crawly Pasta Salad cold for the best taste and texture.
Extra Tips:
To enhance the creepy factor, you can use pasta shapes like farfalle (bow-tie) or fusilli, which resemble insects.
For an extra touch of Halloween flair, consider adding edible eyes to the olives using small bits of cheese and black sesame seeds. If you want to make the dish more substantial, you can add protein like grilled chicken or sliced salami.