
Halloween is almost here, and I’m so excited to share some spooky finger food ideas that will make your party unforgettable. Think eerie eyeball deviled eggs and mummified meatballs that are as delicious as they are creepy. These treats are not only a visual delight, but they also taste incredible. Get ready to enchant your guests with a table full of frightful fun. Let’s whip up some ghoulish culinary magic!
Eerie Eyeball Deviled Eggs
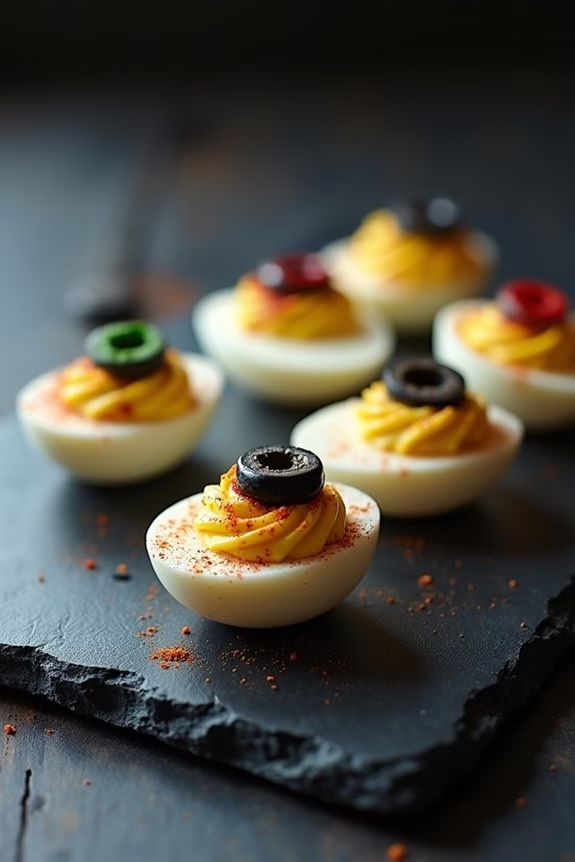
Eerie Eyeball Deviled Eggs are a spooky twist on the classic deviled eggs, perfect for your Halloween party spread. These chilling treats won’t only evoke a sense of eerie delight but will also tantalize the taste buds of your guests. By transforming simple ingredients into something both fun and frightening, you’ll have a delightful dish that’s certain to be the talk of the party.
The creamy yolk mixture, dyed in a ghastly hue, paired with a creepy olive pupil, creates a convincingly creepy eyeball effect that makes this dish a must-have for Halloween.
These Eerie Eyeball Deviled Eggs are as delicious as they’re visually enchanting, with a perfect balance of flavors that will make them a hit at any gathering. The dish serves 4-6 people and is easy to prepare, allowing you to focus on other party preparations.
With just a few simple ingredients and a bit of creativity, you can whip up a batch of these spooky treats that will add a hauntingly good element to your Halloween festivities.
Ingredients (serving size: 4-6 people):
- 6 large eggs
- 1/4 cup mayonnaise
- 1 teaspoon Dijon mustard
- 1/2 teaspoon white vinegar
- Salt and pepper to taste
- Red and green food coloring
- Black olives, sliced
- Paprika (optional)
Cooking Instructions:
- Boil the Eggs: Place the eggs in a medium saucepan and cover them with water. Bring the water to a rolling boil over medium-high heat. Once boiling, turn off the heat and cover the pan. Let the eggs sit in the hot water for about 9-12 minutes.
- Cool and Peel: Transfer the eggs to a bowl of ice water to cool for about 5 minutes. Once cooled, carefully peel the eggs under running water to guarantee all shells are removed smoothly.
- Halve the Eggs: Slice the eggs in half lengthwise. Gently remove the yolks and place them in a separate bowl.
- Prepare the Filling: Mash the yolks with a fork, then add mayonnaise, Dijon mustard, white vinegar, salt, and pepper. Mix until smooth and creamy.
- Color the Filling: Divide the yolk mixture into two separate bowls. Add a few drops of red food coloring to one bowl and green to the other. Mix until the desired color is achieved.
- Assemble the Eyeballs: Fill each egg white half with the colored yolk mixture, alternating colors for variety. Place a slice of black olive on top of each filled egg to create the pupil of the eyeball.
- Final Touches: For an added eerie effect, use a toothpick to draw red lines from the olive to the edge of the yolk using a bit of red food coloring, mimicking veins. Optionally, sprinkle a little paprika on top for added flavor and color.
Extra Tips:
For a more vibrant color effect, use gel food coloring instead of liquid, as it tends to produce more vivid results without altering the consistency of the yolk mixture.
If you find the yolk mixture too thick, you can adjust the consistency by adding a tiny bit more mayonnaise until the desired creaminess is achieved. Additionally, feel free to experiment with other spices in the yolk filling, such as garlic powder or a dash of hot sauce, to customize the flavor to your preference.
Mummified Meatballs

Mummified Meatballs are a spooky and delicious addition to any Halloween party. These creepy appetizers are sure to be a hit with both kids and adults, offering a fun twist on traditional meatballs. Wrapped in strips of dough to resemble little mummies, they aren’t only visually appealing but also packed with flavor. Serve them with a side of marinara sauce for a bloody good dip and watch them disappear faster than a ghost in the night.
The secret to great Mummified Meatballs is using a combination of savory meat and a flavorful dough that crisps up just right in the oven. Begin with your favorite meatball recipe or use pre-made meatballs to save time. The dough, typically crescent roll dough or puff pastry, is cut into thin strips and wrapped around each meatball to create the mummy effect.
Whether you’re hosting a Halloween bash or just looking for a fun way to get into the spooky spirit, these Mummified Meatballs are bound to be a crowd-pleaser.
Ingredients for 4-6 people:
- 1 pound ground beef or turkey
- 1/4 cup breadcrumbs
- 1/4 cup grated Parmesan cheese
- 1 egg
- 2 cloves garlic, minced
- 1 teaspoon Italian seasoning
- Salt and pepper to taste
- 1 package crescent roll dough or puff pastry
- 1/2 cup marinara sauce (for dipping)
- Candy eyes or small pieces of olives for decoration
Cooking Instructions:
- Preheat the Oven: Start by preheating your oven to 375°F (190°C). This will guarantee it’s hot enough to bake the meatballs evenly.
- Prepare the Meatballs: In a large bowl, mix together the ground meat, breadcrumbs, Parmesan cheese, egg, minced garlic, Italian seasoning, salt, and pepper. Use your hands to combine the ingredients thoroughly.
- Shape the Meatballs: Roll the meat mixture into small balls, about 1 to 1.5 inches in diameter. Place them on a baking sheet lined with parchment paper.
- Cook the Meatballs: Bake the meatballs in the preheated oven for about 15 minutes, or until they’re cooked through and slightly browned.
- Prepare the Dough Strips: While the meatballs are baking, unroll the crescent roll dough or puff pastry. Use a knife or pizza cutter to slice the dough into thin strips, about 1/4 inch wide.
- Wrap the Meatballs: Once the meatballs are done baking, let them cool slightly. Wrap each meatball with the dough strips, leaving small gaps to mimic mummy bandages. Make sure to leave space for the eyes.
- Bake the Mummified Meatballs: Return the wrapped meatballs to the oven and bake for an additional 10-12 minutes, or until the dough is golden brown and crispy.
- Decorate: Remove the meatballs from the oven and let them cool slightly. Add candy eyes or small pieces of olives to give your mummies a spooky face.
- Serve: Serve the Mummified Meatballs warm with marinara sauce on the side for dipping.
Extra Tips: For added flavor, you can experiment with different types of cheese or herbs in the meatball mixture. If using puff pastry, be sure to thaw it properly before use to make slicing and wrapping easier. Store any leftovers in an airtight container in the refrigerator and reheat them in the oven to maintain their crispy texture.
Witch’s Broomstick Snacks
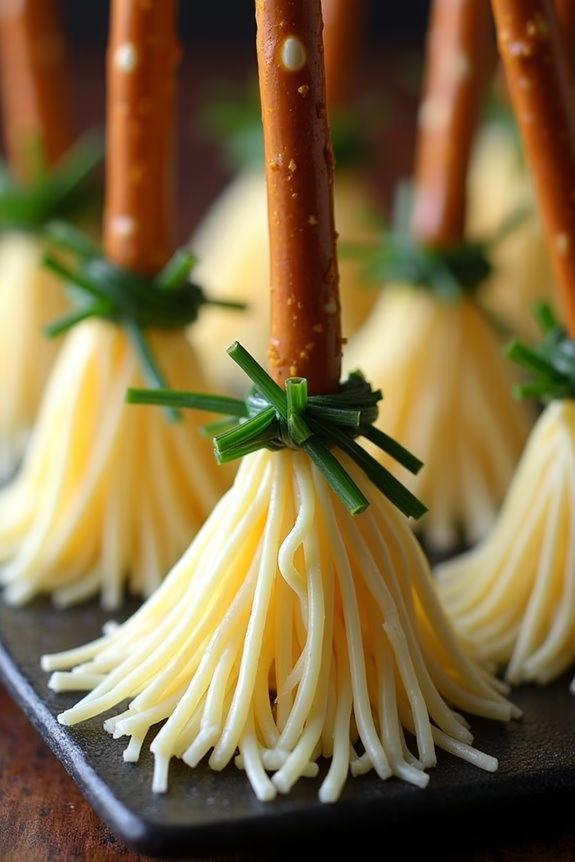
Witch’s Broomstick Snacks are a fun and spooky addition to any Halloween gathering. These delightful treats aren’t only simple to make but also add a whimsical touch to your party spread. Made with just a few ingredients, they capture the essence of the Halloween spirit and are certain to impress both kids and adults alike.
Perfect for serving as finger food, these snacks are designed to resemble miniature broomsticks, adding a magical flair to your festive table. The key to creating these charming Witch’s Broomstick Snacks lies in the combination of salty and savory flavors paired with a crunchy texture.
By using pretzel sticks as the broom handles and creatively crafting the broom bristles from cheese, these snacks become not just a tasty treat but also a visual delight. Ideal for a serving size of 4-6 people, this recipe guarantees that everyone at your Halloween bash gets a taste of the fun.
Ingredients:
- Pretzel sticks (1 package)
- String cheese (5 sticks)
- Fresh chives (1 bunch)
Instructions:
- Prepare the String Cheese:
- Begin by unwrapping the string cheese sticks. Using a sharp knife, cut each stick into thirds. This will form the base of the broom bristles.
- Create the Broom Bristles:
- Take each piece of string cheese and carefully slice the bottom half into thin strips, about 3/4 of the way up, to resemble broom bristles. Be gentle to avoid breaking the cheese.
- Assemble the Broomsticks:
- Insert a pretzel stick into the uncut end of the string cheese, pressing gently but firmly so that it holds in place. This will act as the broom handle.
- Secure with Chives:
- Take a fresh chive and wrap it around the top of the cheese where it meets the pretzel, tying it into a small knot to secure it. Trim any excess chive with scissors.
- Repeat and Serve:
- Repeat the process with the remaining cheese and pretzel sticks. Arrange the completed broomsticks on a platter for serving.
Extra Tips:
To guarantee the string cheese doesn’t break while cutting, make sure it’s cold and firm. If the cheese becomes too soft, place it in the refrigerator for a few minutes before resuming.
For added flavor, you can use flavored string cheese or sprinkle the finished brooms with paprika or your favorite seasoning. If fresh chives are unavailable, you can use thin strips of green onion as an alternative. Enjoy your spooky snack creation!
Creepy Crawly Spider Crackers
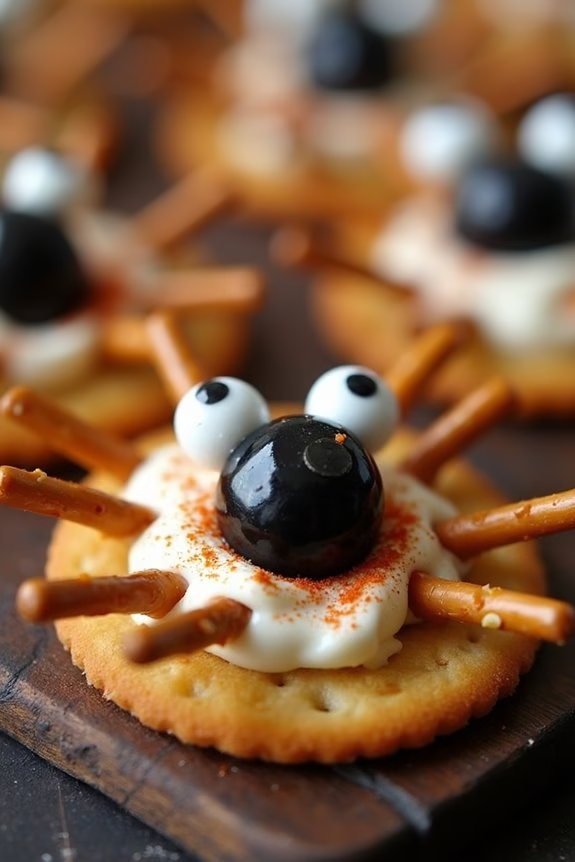
Halloween is the perfect time to get creative with your appetizers, and these Creepy Crawly Spider Crackers are sure to be a hit at any spooky gathering. These delightful treats aren’t only fun to look at but also delicious to eat. With a combination of crunchy crackers, creamy cheese, and edible decorations, they make for an engaging and interactive snack that both kids and adults will love.
The best part is, they’re incredibly easy to assemble, making them a great way to involve the whole family in the Halloween spirit.
These Creepy Crawly Spider Crackers are designed to serve 4-6 people, making them an ideal choice for a small party or family gathering. The ingredients are simple and can be found easily in your pantry or local grocery store. With just a few steps, you can transform ordinary crackers into a spooky spectacle that will surely impress your guests.
So, gather your ingredients and get ready to create these creepy crawly delights!
Ingredients (Serves 4-6):
- 24 round crackers
- 1 cup cream cheese, softened
- 48 pretzel sticks
- 24 small black olives, pitted
- 24 small candy eyes
- 1 teaspoon paprika (optional, for garnish)
Cooking Instructions:
- Prepare the Base: Begin by laying out your round crackers on a flat surface like a baking sheet or large platter. This will serve as the base for your spider crackers.
- Spread the Cheese: Using a butter knife or small spatula, spread approximately a teaspoon of softened cream cheese onto each cracker. This layer of cheese acts as the “body” of the spider and helps to hold the other components in place.
- Add the Legs: Carefully insert four pretzel sticks into the cream cheese on each side of the cracker, pressing gently to confirm they stay in place. These will serve as the spider’s legs. Repeat this process for each cracker.
- Create the Eyes: Place two small candy eyes on top of the cream cheese at one end of the cracker. Gently press them into the cheese so they adhere properly. If you prefer a more natural look, you can also use small pieces of olive instead of candy eyes.
- Finish with the Head: Cut each black olive in half and place one half on top of the cream cheese at the opposite end of the eyes. This will act as the spider’s head.
- Garnish (Optional): If desired, sprinkle a small amount of paprika over the cream cheese for added color and a slight kick of flavor.
Extra Tips:
When preparing the Creepy Crawly Spider Crackers, make sure that the cream cheese is well softened to make spreading easier and to help secure the pretzel legs and other toppings.
Feel free to get creative with the decorations; for example, you can use different types of crackers or flavored cream cheese for variety. If you’re hosting a larger party, simply double the ingredients to accommodate more guests.
Make these ahead of time and store them in the refrigerator to keep them fresh until your Halloween event begins.
Monster Mouth Apple Bites
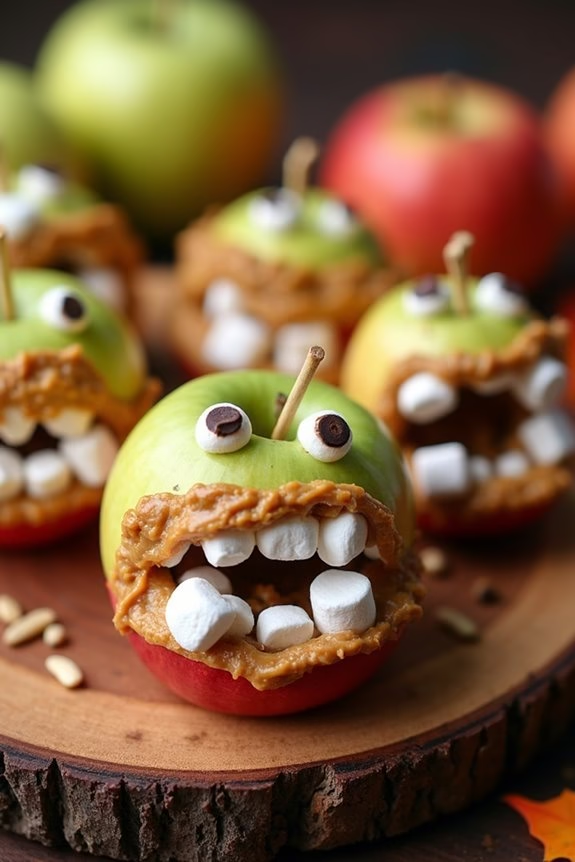
Monster Mouth Apple Bites are a fun and spooky treat perfect for Halloween gatherings. These delightful snacks not only look creepy but are also healthy and easy to prepare. The combination of fresh apples, peanut butter, and marshmallows creates a delicious balance of flavors and textures that will be a hit with both kids and adults.
Whether you’re hosting a Halloween party or simply want to surprise your family with a themed snack, Monster Mouth Apple Bites are sure to impress.
These apple bites resemble little monster mouths with protruding teeth, making them a conversation starter at any event. The recipe is straightforward and requires minimal ingredients, making it an ideal choice for busy hosts. This dish is also versatile, allowing you to customize the fillings and toppings based on your preferences or dietary needs.
With just a few simple steps, you can create a platter of creepy yet appetizing Monster Mouth Apple Bites that everyone will enjoy.
Ingredients (Serves 4-6):
- 3 medium apples (Granny Smith or Red Delicious)
- 1/4 cup creamy peanut butter
- 1/4 cup mini marshmallows
- 1 tablespoon lemon juice
- Optional: slivered almonds or sunflower seeds for extra “teeth”
Cooking Instructions:
- Prepare the Apples: Start by washing the apples thoroughly under running water. Dry them with a paper towel. Cut each apple into quarters and remove the core and seeds. Slice each quarter into two or three wedges, depending on the size of your apples.
- Prevent Browning: To keep the apple slices from browning, brush each slice with a little lemon juice. This will help maintain their fresh appearance without affecting the taste.
- Assemble the Mouths: Spread a thin layer of creamy peanut butter onto one side of each apple slice. This will act as the adhesive to hold the marshmallows in place.
- Add the Teeth: Press mini marshmallows into the peanut butter along the curved edge of one apple slice to create teeth. Align another apple slice on top, peanut butter side down, to form the top of the mouth. For added effect, you can insert slivered almonds or sunflower seeds between the marshmallows to create more teeth or fangs.
- Serve and Enjoy: Arrange the completed Monster Mouth Apple Bites on a platter and serve immediately. If you need to prepare them in advance, cover the platter with plastic wrap and store it in the refrigerator to keep the apples fresh.
Extra Tips: For a nut-free version, you can substitute the peanut butter with sunflower seed butter or cream cheese. Additionally, if you want to add more color to your Monster Mouth Apple Bites, consider using different varieties of apples for a mix of red, green, and yellow hues.
Make sure to have all your ingredients prepped and ready before assembling the bites, as this will make the process faster and more efficient. These bites are best served fresh, so avoid making them too far in advance.
Ghostly Cheese Puffs
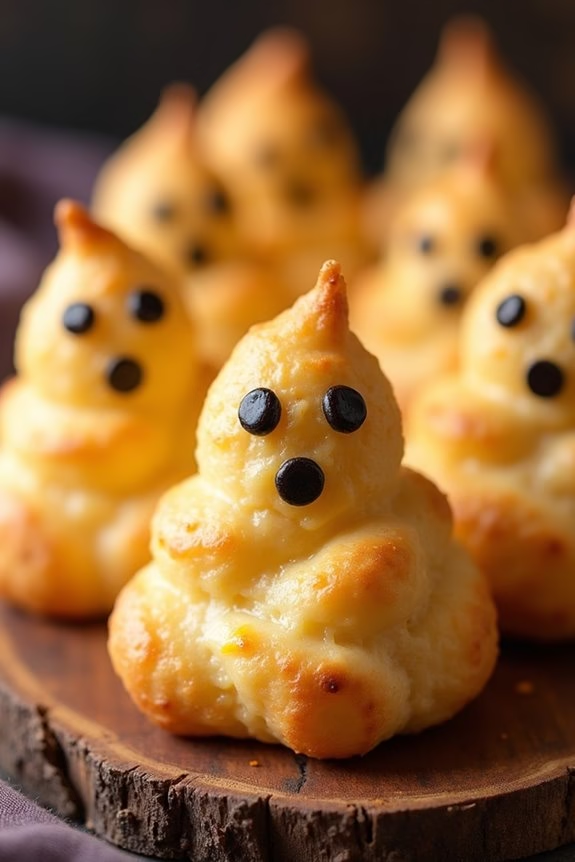
Transform your Halloween party spread with these delightfully spooky Ghostly Cheese Puffs. These crispy, cheesy treats aren’t only delicious but also add a whimsical touch to your festive table. Perfect for both kids and adults, these puffs are shaped like little ghosts, bringing a playful and thematic element to your Halloween festivities.
Made with simple ingredients, they’re easy to prepare and certain to be a hit at your gathering. These Ghostly Cheese Puffs are best served warm, straight from the oven, allowing the cheese to melt in your mouth with each bite. With a light and airy texture, they make for an irresistible savory snack.
Whether you’re hosting a large party or a small family gathering, this recipe is designed to serve 4-6 people, making it ideal for sharing with friends and family.
Ingredients for 4-6 Servings:
- 1 cup all-purpose flour
- 1/2 cup unsalted butter
- 1 cup water
- 1/2 teaspoon salt
- 4 large eggs
- 1 cup shredded cheddar cheese
- 1/4 cup grated Parmesan cheese
- Black peppercorns or edible black food gel for ghost eyes
Cooking Instructions:
- Preheat the oven to 400°F (200°C) and line a baking sheet with parchment paper to prevent sticking and guarantee even baking.
- Prepare the dough by combining the water, butter, and salt in a medium saucepan over medium heat. Stir until the butter is melted and the mixture comes to a boil.
- Incorporate the flour by removing the saucepan from heat and quickly stirring in the flour all at once. Return to low heat and stir continuously until the mixture forms a ball and pulls away from the sides of the pan, which should take about 1-2 minutes.
- Cool and add eggs: Allow the mixture to cool for 5 minutes. Add the eggs one at a time, mixing well after each addition until the dough is smooth and glossy.
- Mix in cheeses: Stir in the shredded cheddar and grated Parmesan until evenly distributed in the dough.
- Shape the ghost puffs: Transfer the dough to a piping bag fitted with a large round tip. Pipe ghost shapes onto the prepared baking sheet, leaving enough space between each for them to expand.
- Add ghost eyes: Place black peppercorns or dots of edible black food gel on each ghost to create eyes.
- Bake the cheese puffs in the preheated oven for 20-25 minutes, or until they’re puffed up and golden brown.
- Cool slightly before serving. Enjoy them warm for the best texture and flavor.
Extra Tips:
For an added kick, consider mixing a pinch of cayenne pepper into the dough for a subtle spicy flavor. If you don’t have a piping bag, you can use a zip-top bag with the corner snipped off to shape your ghosts.
Ascertain that your cheese is finely shredded to melt evenly into the dough. If you’re using black peppercorns for eyes and serving to young children, be sure to remove them before eating to avoid a spicy surprise.
Bloody Finger Hot Dogs

Bloody Finger Hot Dogs are a delightfully spooky treat perfect for any Halloween gathering. These creepy yet delicious snacks are sure to be the talk of the party, enchanting your guests with their eerily lifelike appearance. Perfect for serving at a Halloween bash or a themed dinner, these hot dogs are designed to resemble bloody fingers, complete with gruesome details like “fingernails” and “knuckles.”
The presentation may be unsettling, but the taste is undeniably satisfying, making them a hit with both kids and adults.
Creating Bloody Finger Hot Dogs is a fun and straightforward process that doesn’t require much culinary expertise. The secret to this dish is in the details, as subtle cuts and strategic placement of condiments transform ordinary hot dogs into gruesome finger replicas. With just a few simple ingredients and a bit of creativity, you can whip up a batch of these frightful finger foods in no time, guaranteeing your Halloween celebration is both tasty and memorable.
Ingredients for 4-6 servings:
- 8 hot dogs
- 8 hot dog buns
- 1/2 cup ketchup
- 1 tablespoon mustard (optional)
- 1/4 cup mayonnaise (optional)
- 1 small white onion
- 1 tablespoon vegetable oil (for frying)
- 8 blanched almond slices (for fingernails)
Cooking Instructions:
- Prepare the Hot Dogs: Begin by making shallow cuts on each hot dog to resemble finger joints. Make two or three slits on each hot dog to mimic knuckles. Be careful not to cut too deep.
- Shape the Fingernails: At one end of each hot dog, slice off a small, thin section to create a flat surface for the “fingernail.” This will help the almond slices adhere better.
- Cook the Hot Dogs: Heat a skillet over medium heat and add the vegetable oil. Once hot, add the prepared hot dogs. Cook them for about 5-7 minutes, turning occasionally, until they’re browned and heated through.
- Prepare the Onions: While the hot dogs are cooking, peel and slice the onion into thin rings. Fry the onion rings in a separate skillet over medium heat until they’re crispy and golden brown. This will take about 8-10 minutes.
- Assemble the Fingers: Place a hot dog into each bun. Use ketchup to simulate blood by spreading it generously around the “severed” end of the hot dog. Dab a bit of mayonnaise or mustard near the “fingernail” area as desired.
- Attach the Fingernails: Place a blanched almond slice on the flat end of each hot dog to serve as a fingernail. Press gently to ensure it adheres.
- Serve: Arrange the Bloody Finger Hot Dogs on a platter, garnishing with crispy onion rings for added flavor and texture.
Extra Tips:
For an extra eerie touch, consider adding some food coloring to the ketchup to make the “blood” more vibrant. You can also experiment with different types of buns, such as pretzel buns, to give the fingers a more realistic, flesh-like appearance.
If you want to add more flavor, consider marinating the hot dogs in a mixture of soy sauce, garlic, and a pinch of black pepper before cooking. This will give them a slightly smoky taste that complements the overall theme.
Remember to have fun with the process and let your creativity run wild to make these Bloody Finger Hot Dogs the highlight of your Halloween event!
Spooky Stuffed Bell Peppers

As Halloween approaches, transform your dinner table into a haunted feast with these Spooky Stuffed Bell Peppers. This dish isn’t only delicious but also adds a festive touch to your Halloween gathering. By carving scary faces into the bell peppers and filling them with a savory mixture of rice, ground meat, and vegetables, you’ll create a meal that’s both visually striking and satisfyingly hearty. Perfect for a spooky-themed dinner or a Halloween party, these stuffed peppers are sure to delight both kids and adults alike.
These Spooky Stuffed Bell Peppers are as fun to make as they’re to eat. The peppers aren’t only a canvas for your creative carvings but also serve as a nutritious vessel for a delightful filling. This recipe is designed to serve 4-6 people, making it an ideal choice for a small gathering or family meal.
Whether you’re a seasoned cook or a kitchen novice, this recipe is straightforward and allows room for creativity, making it a delightful addition to your Halloween festivities.
Ingredients:
- 4-6 large bell peppers (preferably orange or yellow for a Halloween look)
- 1 pound ground beef or turkey
- 1 cup cooked rice
- 1 medium onion, chopped
- 2 cloves garlic, minced
- 1 can (15 ounces) diced tomatoes
- 1 cup shredded cheese (cheddar or mozzarella)
- 1 teaspoon Italian seasoning
- Salt and pepper to taste
- Olive oil
Cooking Instructions:
- Prepare the Bell Peppers: Preheat your oven to 375°F (190°C). Carefully cut the tops off the bell peppers and remove the seeds and membranes. Use a small knife to carve jack-o’-lantern faces into the sides of the peppers. Lightly brush the exterior with olive oil and set aside on a baking tray.
- Cook the Filling: In a large skillet over medium heat, add a tablespoon of olive oil and sauté the chopped onion and minced garlic until they become translucent. Add the ground beef or turkey, breaking it apart with a spatula. Cook until it’s browned and cooked through.
- Mix Ingredients: Drain any excess fat from the skillet. Stir in the cooked rice, diced tomatoes, Italian seasoning, salt, and pepper. Cook for another 5-7 minutes, allowing the flavors to meld together. Remove from heat and stir in half of the shredded cheese.
- Stuff the Peppers: Carefully fill each carved pepper with the cooked mixture, pressing down gently to confirm they’re filled to the top. Place the filled peppers upright on the baking tray.
- Bake: Sprinkle the remaining cheese over the tops of the stuffed peppers. Cover the tray loosely with foil and bake in the preheated oven for 25 minutes. Remove the foil and bake for another 10-15 minutes, or until the peppers are tender and the cheese is melted and bubbly.
- Serve: Allow the peppers to cool slightly before serving, as they’ll be hot. Enjoy your spooky creation!
Extra Tips:
When carving the faces into the bell peppers, be gentle to avoid puncturing the sides too deeply, which could cause the filling to spill out during cooking.
You can prepare the filling a day in advance and store it in the refrigerator to save time on the day of your event. For a vegetarian version, substitute the ground meat with a mix of mushrooms and black beans.
Adjust the seasoning according to your taste; adding a pinch of cayenne pepper can give your filling a nice kick. Enjoy the process and have fun creating different facial expressions on the peppers!
Gory Guacamole Dip
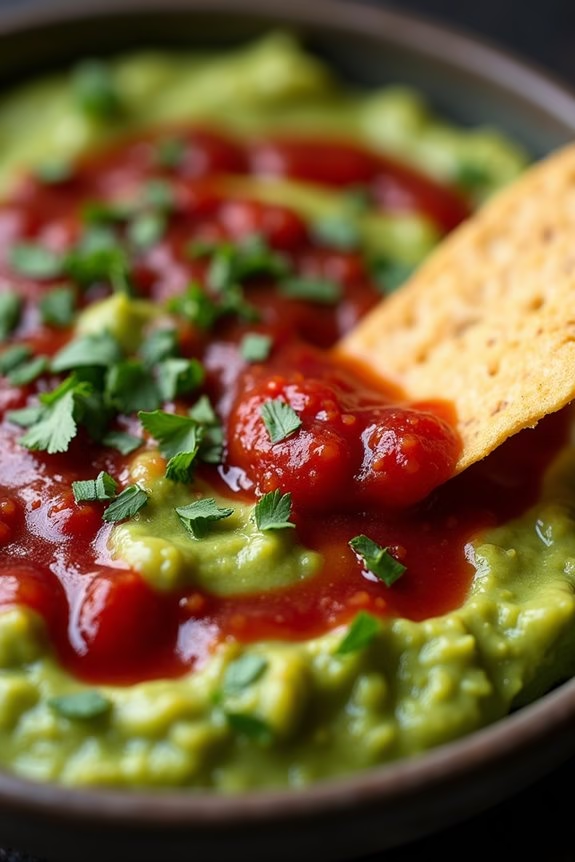
Transform your Halloween party into a spook-tacular feast with a dish that’s as visually terrifying as it’s delicious: Gory Guacamole Dip. This eerie appetizer is sure to be a hit among your guests, combining the creamy, rich flavors of traditional guacamole with a sinister, bloody twist. Ideal for any Halloween gathering, this dip pairs perfectly with tortilla chips, vegetable sticks, or even as a topping for your favorite tacos or nachos.
The vibrant colors and gruesome design will set the perfect mood for a night of frightful fun. Creating this Gory Guacamole Dip isn’t just about the taste, but also about the presentation. By incorporating a few simple techniques, you can make your guacamole appear bloodied and gory, adding an element of shock and awe to your Halloween spread.
This dish serves 4-6 people, making it an excellent choice for small gatherings or as part of a larger buffet. With a few key ingredients and some creative flair, your guacamole will be the talk of the party.
Ingredients:
- 4 ripe avocados
- 1 lime, juiced
- 1 teaspoon salt
- ½ teaspoon ground cumin
- ¼ teaspoon cayenne pepper
- ½ cup diced onion
- 3 tablespoons chopped fresh cilantro
- 2 roma tomatoes, diced
- 1 teaspoon minced garlic
- 1 jalapeño pepper, seeded and minced
- 4 tablespoons of red salsa
- ¼ cup sour cream (optional for decoration)
- Tortilla chips for serving
Cooking Instructions:
- Prepare the Avocados: Begin by cutting the avocados in half, removing the pits, and scooping the flesh into a large mixing bowl. Use a fork or potato masher to mash until you achieve your desired consistency — smooth or chunky.
- Mix the Base: Add lime juice, salt, ground cumin, and cayenne pepper to the mashed avocados. Stir well to combine, ensuring the lime juice is evenly distributed to prevent the avocados from browning.
- Incorporate Vegetables: Fold in the diced onion, chopped cilantro, diced tomatoes, minced garlic, and minced jalapeño pepper. Mix until all ingredients are well distributed throughout the guacamole, ensuring each bite is packed with flavor.
- Create the Gory Effect: Transfer the guacamole to a serving dish, spreading it evenly. Spoon the red salsa over the top, dripping it in random patterns to resemble blood. For an extra creepy touch, use a toothpick to swirl the salsa into the guacamole, creating a marbled, bloody effect.
- Finishing Touches: If desired, use a small piping bag to add dollops of sour cream on top, resembling skulls or ghostly faces. Serve immediately with tortilla chips on the side for dipping.
Extra Tips:
To keep your guacamole from turning brown, make sure to cover it tightly with plastic wrap, pressing the wrap directly onto the surface of the guacamole to minimize air exposure.
If you’re preparing this dish in advance, consider adding an extra squeeze of lime juice right before serving to enhance the flavor and freshness. For a spicier kick, retain some of the jalapeño seeds or add a few drops of hot sauce.
Bat Wings Chicken Drummettes

Bat Wings Chicken Drummettes are a spooky and delicious addition to your Halloween spread. These chicken drummettes are marinated in a dark and flavorful sauce that gives them a bat-like appearance, perfect for setting a Halloween mood. The combination of soy sauce, honey, and spices creates a savory and slightly sweet glaze that will have your guests coming back for more.
These drummettes aren’t only visually striking but also finger-licking good. Preparing Bat Wings Chicken Drummettes is straightforward and fun, making it an ideal recipe for a Halloween party. With just a few ingredients and simple steps, you can whip up a batch of these delectable wings in no time. Serve them hot, and watch as your guests plunge into these eerie-looking yet tasty treats. Here’s how you can make Bat Wings Chicken Drummettes for 4-6 people.
Ingredients:
- 2 pounds chicken drummettes
- 1/2 cup soy sauce
- 1/4 cup honey
- 2 tablespoons balsamic vinegar
- 1 tablespoon dark molasses
- 1 teaspoon smoked paprika
- 1 teaspoon garlic powder
- 1/2 teaspoon onion powder
- 1/2 teaspoon black pepper
- 1/4 teaspoon cayenne pepper
- Sesame seeds for garnish (optional)
- Chopped green onions for garnish (optional)
Instructions:
- Prepare the Marinade: In a large mixing bowl, combine the soy sauce, honey, balsamic vinegar, molasses, smoked paprika, garlic powder, onion powder, black pepper, and cayenne pepper. Whisk the ingredients together until well blended.
- Marinate the Chicken: Add the chicken drummettes to the marinade, making certain each piece is well coated. Cover the bowl with plastic wrap and refrigerate for at least 2 hours, preferably overnight, to let the flavors infuse the chicken.
- Preheat the Oven: Preheat your oven to 400°F (200°C). Line a baking sheet with aluminum foil and place a wire rack on top. This setup helps the chicken cook evenly and allows the excess marinade to drip away.
- Arrange the Drummettes: Remove the chicken drummettes from the marinade and arrange them on the wire rack, making sure they’re spaced apart. Discard the leftover marinade.
- Bake the Drummettes: Place the baking sheet in the preheated oven and bake for 35-40 minutes. Turn the drummettes halfway through cooking to guarantee they cook evenly and develop a nice, dark color.
- Garnish and Serve: Once cooked, remove the drummettes from the oven and let them rest for a few minutes. Optionally, sprinkle sesame seeds and chopped green onions over the top for added flavor and presentation. Serve them hot to your guests.
Extra Tips: For an even darker appearance, you can add a few drops of black food coloring to the marinade, giving the drummettes a more bat-like look. If you prefer a spicier kick, increase the amount of cayenne pepper or add a dash of hot sauce to the marinade.
Make certain to use a wire rack to achieve crispy skin on the drummettes, which adds to the overall texture and flavor of the dish.
Skeleton Bone Breadsticks

Skeleton Bone Breadsticks are a spooky and delicious addition to your Halloween spread. Perfect for entertaining guests or adding a touch of the macabre to your dinner table, these breadsticks are shaped like bones, making them a fun and interactive snack. They’re easy to make with pre-made pizza dough, and with a sprinkle of Parmesan cheese and a dash of garlic, they’re sure to be a hit with both kids and adults alike.
These breadsticks aren’t only visually appealing but also incredibly tasty. The crispy exterior and soft interior create the perfect balance of texture, while the garlic and Parmesan add a savory depth of flavor. Served with a side of marinara sauce for dipping, these Skeleton Bone Breadsticks will have your guests coming back for more. Whether you’re hosting a Halloween party or simply looking to make a festive meal, this recipe is a must-try.
Ingredients (Serves 4-6)
- 1 pound pizza dough
- 1/4 cup all-purpose flour (for dusting)
- 1/4 cup unsalted butter, melted
- 3 cloves garlic, minced
- 1/2 cup grated Parmesan cheese
- 1 teaspoon dried Italian herbs
- Salt, to taste
- Marinara sauce, for serving
Cooking Instructions
- Prepare the Dough: Preheat your oven to 400°F (200°C). Lightly dust a clean surface with flour and roll out the pizza dough into a rectangle approximately 12×18 inches in size.
- Shape the Breadsticks: Using a pizza cutter or sharp knife, slice the dough into strips about 1 inch wide. To create the bone shape, tie a knot at each end of the dough strips, leaving a straight section in the middle.
- Season the Breadsticks: In a small bowl, combine the melted butter and minced garlic. Brush this mixture generously over the shaped dough strips. Sprinkle the Parmesan cheese, dried Italian herbs, and a pinch of salt evenly over the top.
- Bake the Breadsticks: Place the breadsticks on a baking sheet lined with parchment paper, ensuring they’re evenly spaced. Bake in the preheated oven for 12-15 minutes, or until golden brown and cooked through.
- Serve: Remove from the oven and allow to cool slightly before serving. Arrange on a platter with a side of marinara sauce for dipping.
Extra Tips
When shaping the dough into bone shapes, make sure the knots aren’t too tight as they may restrict the dough from rising properly during baking.
If you prefer a spicier flavor, consider adding a pinch of red pepper flakes to the garlic butter mixture. For added flavor, you can also sprinkle a little extra Parmesan cheese on top of the breadsticks immediately after they come out of the oven.
Enjoy these breadsticks warm for the best taste and texture.
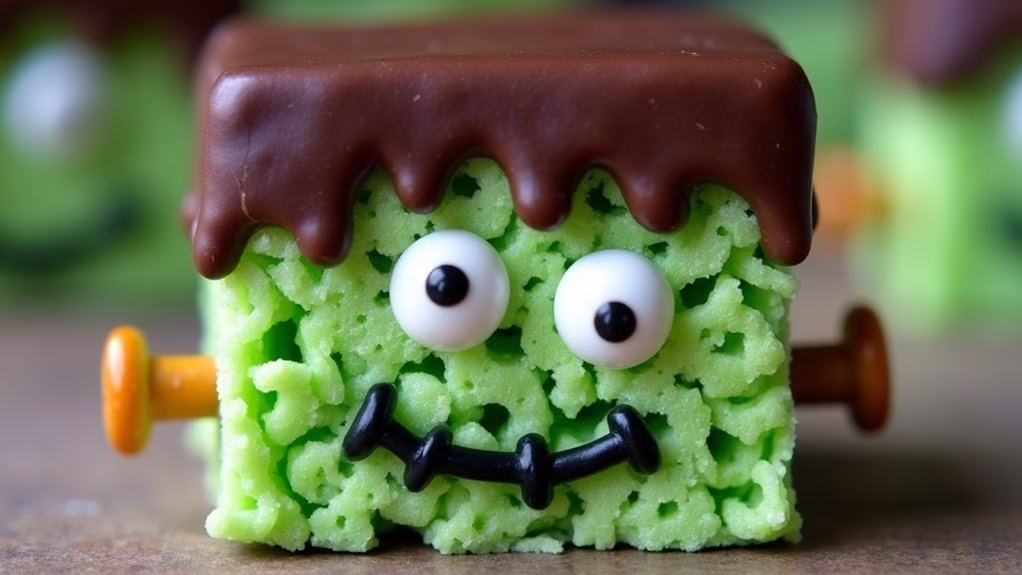
Frankenstein’s Monster Rice Krispie Treats
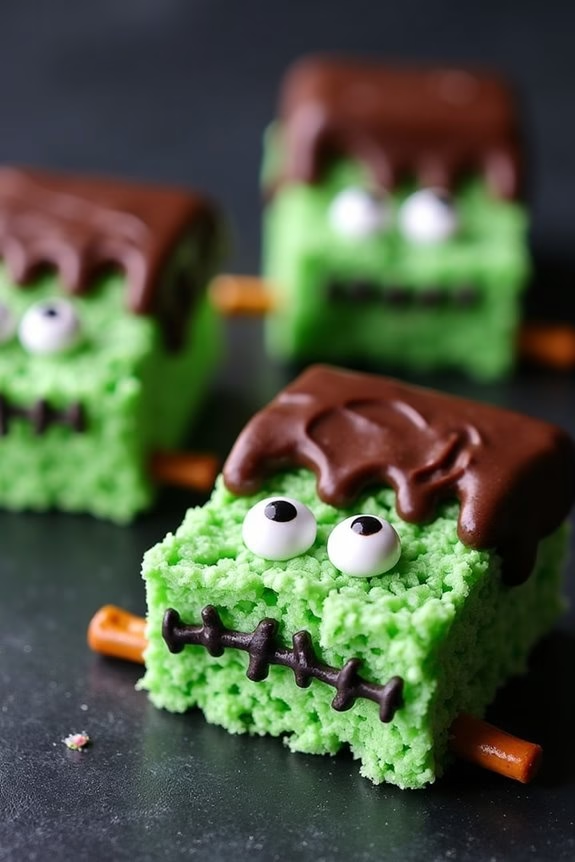
Frankenstein’s Monster Rice Krispie Treats are a fun and festive way to celebrate Halloween. These spooky snacks are a creative twist on the classic Rice Krispie treat, designed to resemble everyone’s favorite green monster from literature and film.
Perfect for Halloween parties, these treats are easy to make and will surely impress your guests with their playful appearance and delicious taste. Not only will children love them, but they also make a great conversation starter for adults.
These treats are colored and shaped to mimic Frankenstein’s monster, complete with green-tinted marshmallow cereal squares, chocolate hair, and candy eyes. The process involves making traditional Rice Krispie treats with a few added steps to achieve the perfect monstrous look.
These Frankenstein’s Monster Rice Krispie Treats are suitable for a serving size of 4-6 people, making them a perfect addition to your Halloween gathering.
Ingredients:
- 6 cups of Rice Krispies cereal
- 4 cups of mini marshmallows
- 3 tablespoons of unsalted butter
- Green food coloring
- 1 cup of semi-sweet chocolate chips
- Candy eyes
- Black decorating gel
- Mini pretzel sticks
Instructions:
- Prepare the Base: In a large saucepan, melt the butter over low heat. Add the mini marshmallows and stir until completely melted and smooth. Once melted, add a few drops of green food coloring and stir until the color is evenly distributed to achieve a Frankenstein-like hue.
- Combine with Cereal: Remove the saucepan from the heat and add the Rice Krispies cereal. Stir the mixture until the cereal is evenly coated with the green marshmallow mixture.
- Shape the Treats: Pour the mixture into a greased 9×13 inch baking dish. Press it down evenly with a spatula or lightly greased hands. Let it cool slightly, then cut into rectangular shapes resembling Frankenstein’s head.
- Add the Hair: In a microwave-safe bowl, melt the chocolate chips in 30-second intervals, stirring in between until smooth. Dip one end of each rectangle into the melted chocolate to create the appearance of hair.
- Place the Eyes and Bolts: Place two candy eyes on each rectangle below the chocolate hair. Stick mini pretzel sticks into the sides of the rectangles to resemble Frankenstein’s bolts.
- Finalize with Details: Use black decorating gel to draw a mouth and stitches on each Frankenstein’s face for additional character. Allow the chocolate to set before serving.
Extra Tips:
When making Frankenstein’s Monster Rice Krispie Treats, it’s important to work quickly while the marshmallow mixture is warm and pliable for easy shaping. If the mixture hardens too quickly, microwave it for a few seconds to soften again.
Additionally, for a smoother finish, slightly dampen your hands with water when pressing the cereal mixture into the pan, as this prevents sticking. For an extra fun touch, consider using different candy or decorations to personalize each monster treat!