
Halloween is just around the corner, and I couldn’t be more thrilled to share some adorable and fun dessert ideas for the little ones. Picture ghostly cupcakes with silly eyes and monster eyeball cookies that are sure to bring giggles all around. These tasty treats are not only scrumptious but also delightful creations that add a sprinkle of joy to any gathering. Whether you’re hosting a school event or a cozy party at home, there’s a magical dessert to make your celebration truly special. Ready to add a sweet touch to your Halloween festivities?
Ghostly Cupcakes
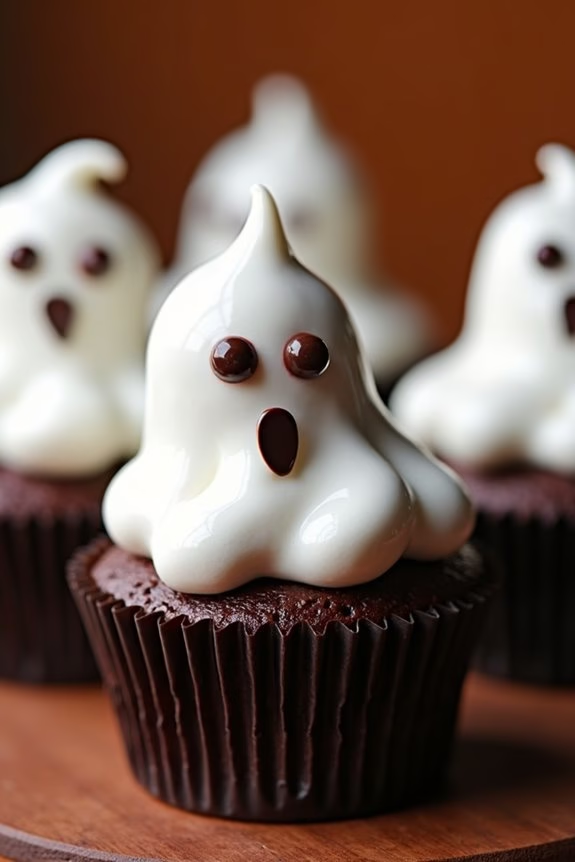
Halloween is a time for creativity and fun, and what better way to celebrate than with a batch of spook-tacular Ghostly Cupcakes? These delightful treats will add a whimsical touch to your Halloween party, delighting both kids and parents alike. With a light and fluffy chocolate cupcake base and a sweet, marshmallowy ghost on top, these cupcakes are as delicious as they’re adorable. Perfect for a small gathering or as treats for trick-or-treaters, Ghostly Cupcakes will surely be a hit this Halloween season.
These cupcakes aren’t only fun to make but also a great opportunity for kids to get involved in the kitchen. They can help with mixing the batter, piping the frosting, and, most importantly, decorating the ghostly figures. The recipe is designed to yield about 12 Ghostly Cupcakes, enough to serve 4-6 people. So gather your ingredients, put on some spooky tunes, and let’s get started on these hauntingly tasty cupcakes!
Ingredients (Serves 4-6):
- 1 cup all-purpose flour
- 1 cup granulated sugar
- 1/3 cup unsweetened cocoa powder
- 1/2 teaspoon baking soda
- 1/4 teaspoon baking powder
- 1/4 teaspoon salt
- 1/2 cup unsalted butter, melted
- 2 large eggs
- 1 teaspoon vanilla extract
- 1/2 cup buttermilk
- 12 large marshmallows
- 1 cup mini marshmallows
- 1/2 cup semi-sweet chocolate chips
- Black edible gel pen or icing for eyes and mouth
Cooking Instructions:
- Preheat the Oven: Preheat your oven to 350°F (175°C). Line a 12-cup muffin tin with cupcake liners.
- Mix Dry Ingredients: In a large bowl, whisk together the flour, sugar, cocoa powder, baking soda, baking powder, and salt until well combined.
- Prepare Wet Ingredients: In another bowl, mix the melted butter, eggs, vanilla extract, and buttermilk. Stir until the mixture is smooth and uniform.
- Combine Mixtures: Gradually add the wet ingredients to the dry ingredients, stirring until just combined. Be careful not to overmix, as this can lead to dense cupcakes.
- Fill Cupcake Liners: Divide the batter evenly among the cupcake liners, filling each about two-thirds full.
- Bake the Cupcakes: Place the muffin tin in the preheated oven and bake for 18-20 minutes, or until a toothpick inserted into the center of a cupcake comes out clean. Allow the cupcakes to cool in the pan for about 5 minutes before transferring them to a wire rack to cool completely.
- Create Ghosts: Once the cupcakes are completely cool, place a large marshmallow on top of each cupcake. In a microwave-safe bowl, melt the mini marshmallows for about 20-30 seconds until gooey. Stir until smooth.
- Attach Ghosts: Spoon a small amount of the melted mini marshmallow mixture on top of each large marshmallow, letting it drip down to create a ghostly appearance.
- Decorate: Melt the chocolate chips in a small microwave-safe bowl, stirring every 15 seconds until completely melted. Use the melted chocolate or black edible gel pen to draw eyes and a spooky mouth on each marshmallow ghost.
Extra Tips:
When making Ghostly Cupcakes, it’s important to guarantee that the cupcakes are completely cool before adding the marshmallow ghosts. This prevents the marshmallows from melting or sliding off due to heat.
If you don’t have buttermilk on hand, you can make a substitute by adding a tablespoon of lemon juice or vinegar to a half cup of milk and letting it sit for a few minutes.
Finally, when decorating the ghosts, encourage kids to get creative with their designs—each ghost can have its unique expression, adding to the fun and personalization of your Halloween treats!
Monster Eyeball Cookies
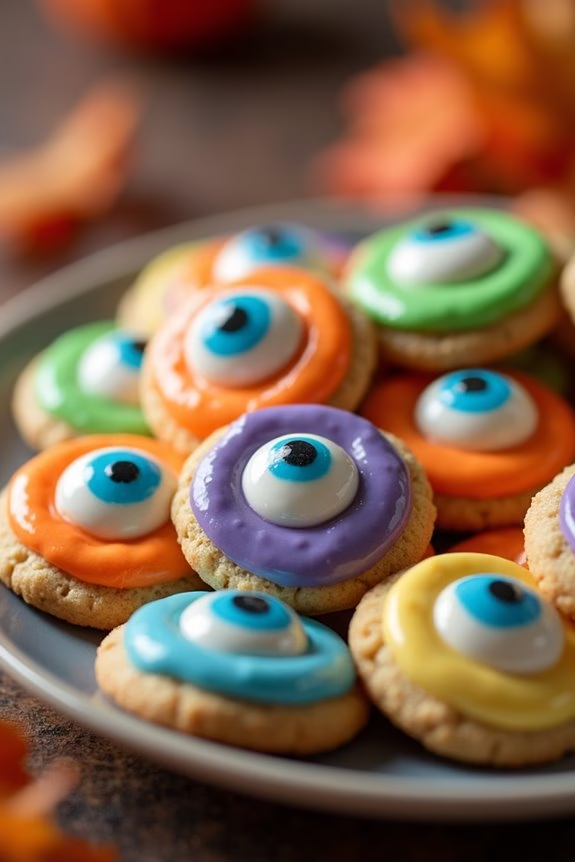
Monster Eyeball Cookies are a frightfully fun treat perfect for your kids to enjoy this Halloween. These cookies aren’t only delicious but also a great way to engage your little ones in baking. With their creepy yet cute appearance, these cookies are sure to be a hit at any Halloween party. The combination of a rich cookie base with the spooky decoration of candy eyeballs will make them a favorite among children and adults alike.
Best of all, they’re simple to make and can be a fun family activity. The cookies are made with a classic sugar cookie dough, which provides a buttery and sweet foundation. The true magic happens in the decoration phase, where each cookie is transformed into a monster’s eyeball using colorful icing and candy eyes. The recipe is designed to yield 4-6 servings, making it perfect for a small Halloween gathering or a family night in. Read on to discover how you can bring these Monster Eyeball Cookies to life in your kitchen.
Ingredients (Serves 4-6):
- 1 cup unsalted butter, softened
- 1 cup granulated sugar
- 1 large egg
- 1 teaspoon vanilla extract
- 2 1/4 cups all-purpose flour
- 1/2 teaspoon baking powder
- 1/4 teaspoon salt
- Assorted food coloring
- Candy eyeballs
- Optional: Colorful sprinkles
Cooking Instructions:
- Preheat & Prep: Preheat your oven to 350°F (175°C). Line two baking sheets with parchment paper for easy cleanup.
- Cream the Butter and Sugar: In a large mixing bowl, cream together the softened butter and granulated sugar until the mixture is light and fluffy. This should take about 2-3 minutes using an electric mixer.
- Add Wet Ingredients: Add the egg and vanilla extract to the butter-sugar mixture. Mix until well combined.
- Mix Dry Ingredients: In a separate bowl, whisk together the all-purpose flour, baking powder, and salt. Gradually add the dry ingredients to the wet ingredients, mixing until just combined.
- Divide and Color the Dough: Divide the dough into different portions, depending on how many colors you want. Add a few drops of food coloring to each portion and knead until the color is evenly distributed.
- Shape the Cookies: Roll tablespoon-sized amounts of dough into balls and place them on the prepared baking sheets, spacing them about 2 inches apart.
- Bake: Bake the cookies in the preheated oven for 10-12 minutes, or until the edges are just starting to turn golden. Allow them to cool on the baking sheet for a few minutes before transferring them to a wire rack.
- Decorate: Once the cookies are completely cool, use a small dab of icing or frosting to attach candy eyeballs to each cookie. Add colorful sprinkles if desired to enhance the monster effect.
Extra Tips:
To make the Monster Eyeball Cookies even more exciting, you can experiment with different shapes and sizes. Try using different sized candy eyeballs for a more varied look.
If you want to add a bit of texture, consider adding a few drops of almond or lemon extract to the dough. This will give the cookies an extra layer of flavor that complements the sweetness.
Finally, verify that the cookies are fully cooled before decorating to prevent the icing from melting, which will help the eyeballs stay in place.
Witch Hat Cones
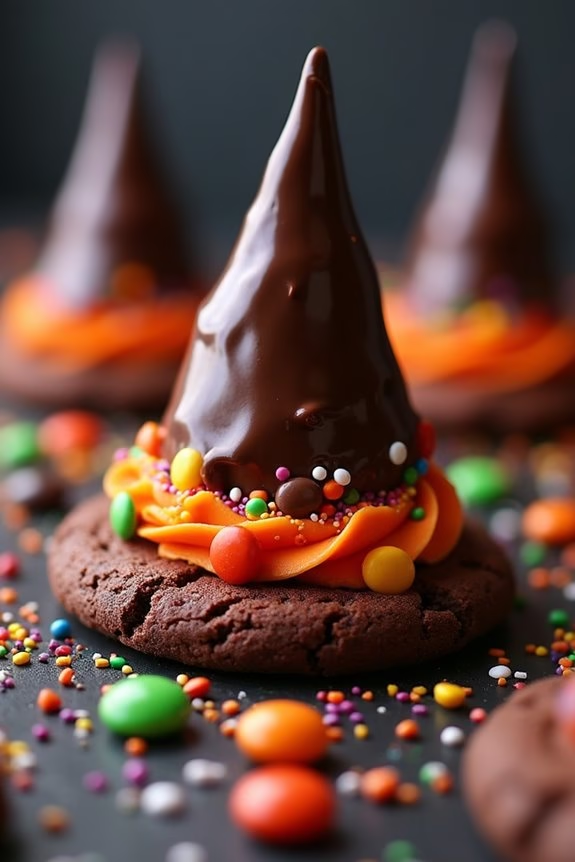
Looking for a fun, spooky treat to delight your little monsters this Halloween? These Witch Hat Cones are sure to cast a spell over any gathering! This whimsical dessert is perfect for kids’ parties and can be customized with their favorite candies and flavors. With just a few ingredients and a little creativity, you can whip up these magical hats that not only look fantastic but taste delicious too.
The Witch Hat Cones are as simple to make as they’re enchanting. Using basic ingredients like ice cream cones, chocolate, and various candies, you can create a dessert that’s both festive and fun. This recipe makes enough for 4-6 people, making it ideal for small gatherings or family fun nights. Kids will enjoy decorating their own cones, adding a personal touch to their sweet creations. Let’s get started on crafting these charming edible hats!
Ingredients (Serves 4-6):
- 6 sugar cones
- 1 cup semi-sweet chocolate chips
- 6 round chocolate cookies (e.g., Oreos)
- Assorted small candies (e.g., M&Ms, sprinkles, candy corn)
- 1/4 cup frosting (any color)
- Food coloring (optional, for frosting)
Instructions:
- Prepare the Chocolate Coating: In a microwave-safe bowl, melt the semi-sweet chocolate chips in 30-second intervals, stirring between each, until smooth and fully melted.
- Coat the Cones: Dip the open end of each sugar cone into the melted chocolate, ensuring it’s fully coated. Let any excess chocolate drip off before placing each cone on a piece of parchment paper to set.
- Attach the Hats to the Brims: Once the chocolate on the cones has set slightly but is still tacky, place each cone onto the center of a chocolate cookie. The chocolate will act as glue, securing the cone to the cookie. Allow them to harden completely.
- Decorate the Hats: Using the frosting, pipe a band around the base of each cone where it meets the cookie to simulate a hatband. You can add food coloring to the frosting for a more vibrant look. Decorate with assorted candies and sprinkles as desired.
- Set the Cones: Allow the assembled hats to sit until the chocolate and frosting have fully set. This typically takes about 15-20 minutes. For faster setting, you can place them in the refrigerator for a few minutes.
Extra Tips:
When crafting your Witch Hat Cones, make sure the chocolate isn’t too hot when applying it to the cones to avoid melting them. You can experiment with different frosting colors to match your Halloween theme.
If you prefer a more textured look, consider rolling the chocolate-coated cones in crushed cookies or colored sugar before they set. This recipe is a great opportunity for kids to get involved, so let them take the lead on decorating with their favorite candies!
Mummy Brownies
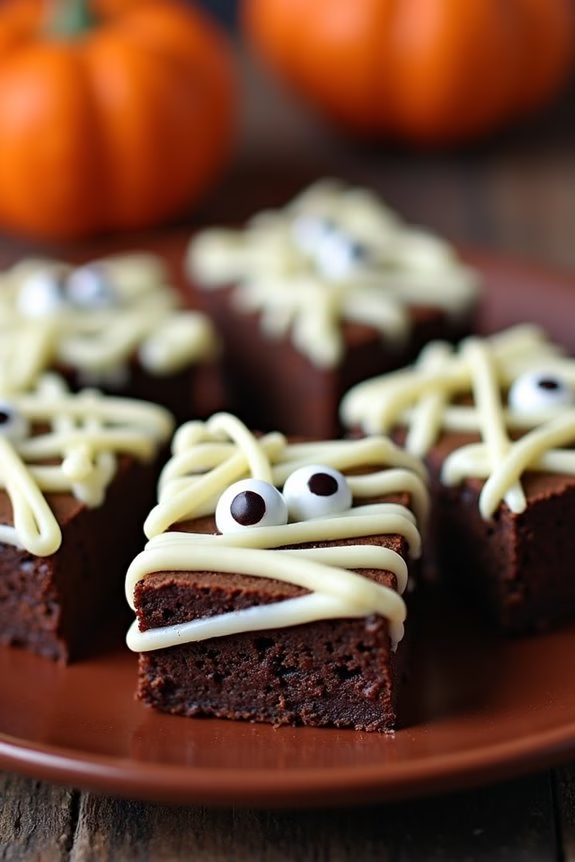
Mummy Brownies are a spooktacular treat perfect for Halloween parties or a fun baking activity with kids. These deliciously fudgy brownies are transformed into creepy mummies with a combination of creamy white chocolate and googly candy eyes. Not only do they look adorable, but they’re also incredibly easy to make, making them a great choice for little hands enthusiastic to help in the kitchen.
Whether you’re hosting a Halloween bash or simply want to enjoy a ghoulishly good dessert with your family, these Mummy Brownies are sure to be a hit.
Perfect for serving 4-6 people, these brownies are made from a rich chocolate base, covered with white chocolate “bandages” and finished with playful candy eyes. The result is a sweet and festive treat that combines the classic chocolatey goodness of brownies with a fun Halloween twist.
Follow the simple steps below to whip up your very own batch of Mummy Brownies and get ready to delight your little goblins!
Ingredients:
- 1 cup unsalted butter
- 2 cups granulated sugar
- 4 large eggs
- 1 cup all-purpose flour
- 1 cup unsweetened cocoa powder
- 1 teaspoon vanilla extract
- 1/2 teaspoon salt
- 1 cup white chocolate chips
- Candy eyes
Instructions:
- Preheat and Prepare: Preheat your oven to 350°F (175°C). Grease or line a 9×13 inch baking pan with parchment paper to guarantee easy removal of the brownies later.
- Melt Butter and Mix: In a large saucepan, melt the butter over low heat. Remove from heat and stir in the sugar until well combined. Add in the eggs one at a time, whisking until smooth. Stir in the vanilla extract.
- Combine Dry Ingredients: In a separate bowl, sift together the flour, cocoa powder, and salt. Gradually add the dry mixture to the wet ingredients, stirring just until combined and no streaks remain.
- Bake the Brownies: Pour the brownie batter into the prepared baking pan, spreading it evenly. Bake in the preheated oven for 25-30 minutes, or until a toothpick inserted into the center comes out with a few moist crumbs. Let cool completely in the pan on a wire rack.
- Melt White Chocolate: Once the brownies are cool, melt the white chocolate chips in a microwave-safe bowl, heating in 20-second intervals and stirring in between until smooth.
- Decorate as Mummies: Transfer the melted white chocolate into a piping bag or a resealable plastic bag with a small corner snipped off. Drizzle the white chocolate over the brownies in a zigzag pattern to create the mummy bandages. Place candy eyes on top while the chocolate is still soft to guarantee they stick.
- Serve and Enjoy: Allow the chocolate to set before cutting the brownies into squares. Serve and enjoy your spooky Mummy Brownies!
Extra Tips:
For an added touch of Halloween fun, consider using a mix of different-sized candy eyes to give your mummies unique and quirky expressions. If you don’t have white chocolate chips on hand, you can substitute with white candy melts.
To guarantee clean cuts, use a sharp knife and wipe it clean between slices. These Mummy Brownies can be made a day in advance and stored in an airtight container at room temperature, which makes them a convenient option for busy Halloween preparations.
Spider Web Donuts
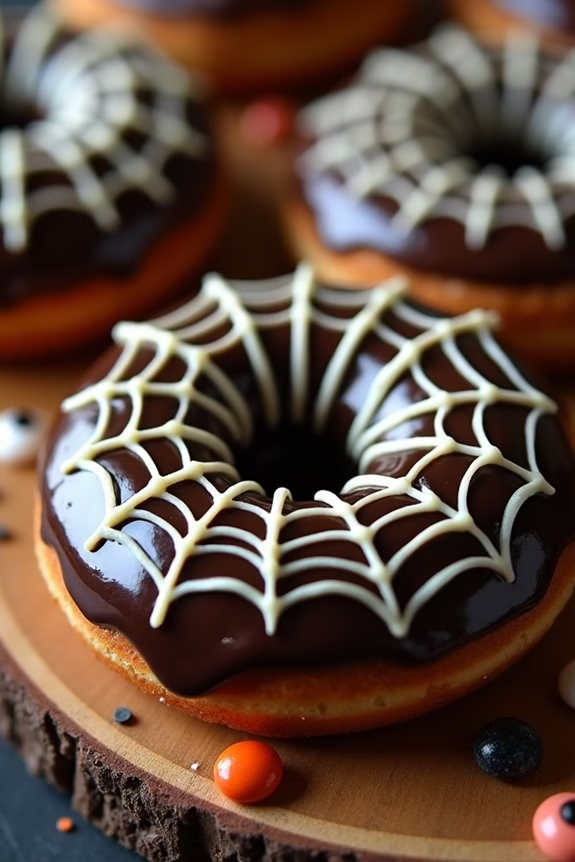
Spider Web Donuts are a fun and spooky treat perfect for Halloween celebrations with kids! These delightful donuts not only taste delicious but also visually captivate with their intricate spider web design.
Whether you’re hosting a Halloween party or just looking to add a touch of festive fun to your family’s dessert menu, these donuts are sure to be a hit with both children and adults alike. Easy to make and customize with various toppings, these spider-themed sweets bring creativity and flavor together in a delightful way.
To achieve the desired spider web effect, a simple technique is used to create a striking contrast between the dark chocolate glaze and the white spider web lines. This recipe serves 4-6 people, making it ideal for a small gathering or family treat.
Keep in mind that while the recipe is straightforward, it does require a little finesse with the decoration, but it’s absolutely worth the effort for the stunning results. Now, let’s explore the ingredients and steps to create these spooky Spider Web Donuts.
Ingredients:
- 2 cups all-purpose flour
- 1/2 cup granulated sugar
- 1 tbsp baking powder
- 1/2 tsp salt
- 3/4 cup milk
- 2 large eggs
- 1/4 cup unsalted butter, melted
- 1 tsp vanilla extract
- 1 cup semi-sweet chocolate chips
- 1/2 cup heavy cream
- 1/4 cup white chocolate chips
Cooking Instructions:
- Preheat the Oven: Start by preheating your oven to 350°F (175°C). This will guarantee that your donuts bake evenly.
- Prepare the Donut Batter: In a large mixing bowl, whisk together the flour, sugar, baking powder, and salt. In another bowl, combine milk, eggs, melted butter, and vanilla extract. Gradually add the wet ingredients to the dry ingredients, stirring until just combined.
- Fill the Donut Pan: Grease a donut pan with cooking spray. Pour the batter into a piping bag or a plastic bag with a corner snipped off. Pipe the batter into the donut molds, filling each about 2/3 full.
- Bake the Donuts: Place the pan in the preheated oven and bake for 10-12 minutes, or until the donuts are lightly golden and a toothpick inserted into the center comes out clean. Allow the donuts to cool in the pan for about 5 minutes before transferring them to a wire rack to cool completely.
- Make the Chocolate Glaze: In a microwave-safe bowl, combine the semi-sweet chocolate chips and heavy cream. Microwave in 30-second intervals, stirring in between, until the mixture is smooth and fully melted.
- Glaze the Donuts: Dip the top of each cooled donut into the chocolate glaze, letting any excess drip off. Place the donuts back on the wire rack.
- Create the Spider Web Design: Melt the white chocolate chips in a microwave-safe bowl. Transfer the melted chocolate to a small piping bag or a plastic bag with a tiny corner snipped off. Starting from the center of each donut, pipe a spiral pattern with the white chocolate. Using a toothpick, gently drag lines from the center to the outer edge of the donut to create a spider web effect.
Extra Tips:
When making Spider Web Donuts, patience and precision are key, especially during the decoration stage.
If you don’t have a donut pan, you can try using a muffin pan and shaping the batter into rings. For a more vibrant spider web design, consider adding food coloring to the white chocolate.
If you’re making these with kids, allow them to get creative with adding sprinkles or candy eyes to make their donuts even more festive!
Pumpkin Patch Rice Krispie Treats
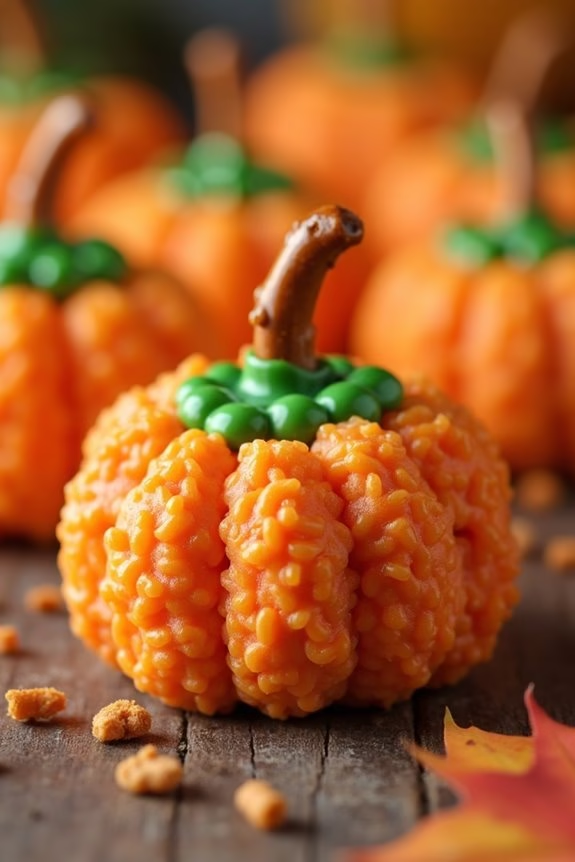
Pumpkin Patch Rice Krispie Treats are a delightful Halloween dessert that combines the classic crunch of Rice Krispies with the festive charm of a pumpkin patch. Perfect for kids, these treats are both fun to make and delicious to eat. Shaped to resemble mini pumpkins, they bring a playful and seasonal twist to your Halloween festivities.
They’re easy to prepare, requiring only a handful of ingredients and simple steps, making them an ideal kitchen activity for families to enjoy together. This recipe yields a serving size of 4-6 people, ensuring there’s plenty to go around at your Halloween gathering.
With the addition of orange food coloring and green candy melts, these treats perfectly capture the colors of autumn. Whether it’s for a classroom party or a spooky night at home, Pumpkin Patch Rice Krispie Treats are sure to be a hit with kids and adults alike.
Ingredients (serving size: 4-6 people):
- 6 cups Rice Krispies cereal
- 3 tablespoons butter
- 4 cups mini marshmallows
- Orange food coloring
- 1 cup green candy melts
- Pretzel sticks
- Green gummy candies (optional for additional decoration)
Instructions:
- Prepare the Pan: Line a baking sheet with parchment paper or lightly grease it with cooking spray to prevent sticking.
- Melt the Butter and Marshmallows: In a large pot, melt the butter over low heat. Once melted, add the mini marshmallows and stir continuously until they’re completely melted and smooth.
- Add Food Coloring: Once the marshmallows are melted, remove the pot from the heat. Stir in a few drops of orange food coloring until the mixture reaches your desired shade of pumpkin orange.
- Mix in Rice Krispies: Quickly pour the Rice Krispies cereal into the marshmallow mixture. Stir until all the cereal is evenly coated with the orange marshmallow mixture.
- Shape the Pumpkins: Allow the mixture to cool slightly, but not completely harden. Grease your hands with a little butter or cooking spray to prevent sticking, and shape small handfuls of the mixture into pumpkin shapes, placing them on the prepared baking sheet.
- Insert the Stems: Break the pretzel sticks into halves or thirds and gently press one into the top center of each pumpkin shape to act as the stem.
- Melt Green Candy Melts: Melt the green candy melts according to the package instructions. Use a spoon or piping bag to apply the melted candy around the base of the pretzel sticks, creating the look of leaves.
- Add Decorative Touches: For extra fun, you can add green gummy candies or additional melted candy details to resemble vines or leaves around the pumpkins.
- Cool and Serve: Allow the treats to cool completely at room temperature or in the refrigerator until they’re firm enough to handle. Once set, serve and enjoy!
Extra Tips:
To make shaping the pumpkins easier, be sure to work quickly while the marshmallow mixture is still moldable. If the mixture starts to harden before you’re done, you can gently warm it over low heat to soften it again.
Using a small amount of butter or cooking spray on your hands will prevent the sticky mixture from adhering to your skin. For a more vibrant color, feel free to adjust the amount of food coloring to your liking. Additionally, store any leftovers in an airtight container to keep them fresh for several days.
Candy Corn Parfaits
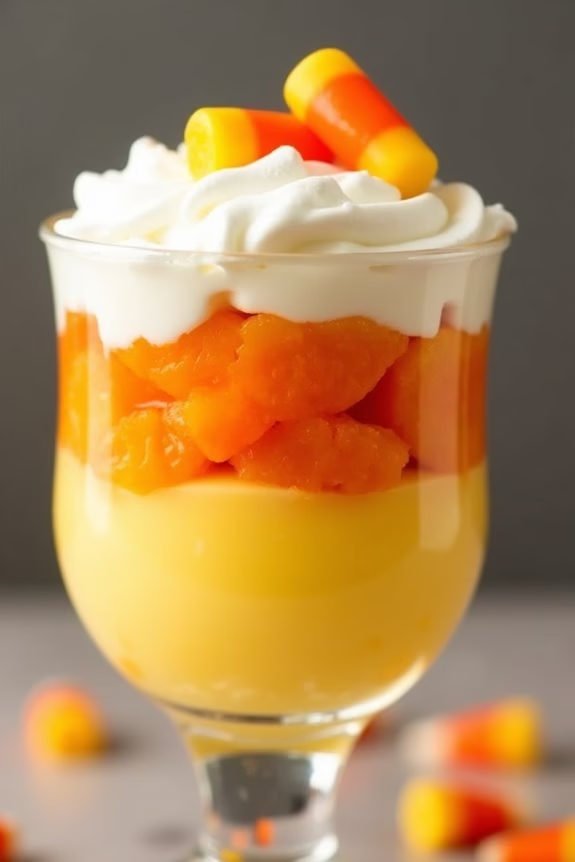
Candy Corn Parfaits are a fun and festive Halloween dessert that kids will absolutely love. This delightful treat layers colorful, creamy ingredients to mimic the iconic candy corn design, making it a visually appealing addition to any Halloween gathering.
Not only are these parfaits adorable to look at, but they’re also incredibly simple to prepare, requiring just a few basic ingredients and no baking at all. Ideal for 4-6 servings, these parfaits are perfect for little hands and big smiles.
This recipe is all about layering vibrant colors and creamy textures into a clear cup to create a striking effect. The bottom layer represents the yellow stripe of candy corn, followed by a sweet orange layer, and topped off with a fluffy white cream.
Whether served as a treat at a Halloween party or as a special dessert for a family night, Candy Corn Parfaits are sure to be a hit. Let’s plunge into the ingredients you’ll need to create this eye-catching dessert.
Ingredients for 4-6 Servings:
- 1 package (3.4 ounces) instant vanilla pudding mix
- 2 cups cold milk
- Yellow food coloring
- 1 can (15 ounces) mandarin oranges, drained
- 1 cup whipped cream or whipped topping
- Candy corn pieces for garnish
- Clear plastic cups or glass cups
Cooking Instructions:
- Prepare the Pudding: In a mixing bowl, combine the instant vanilla pudding mix with 2 cups of cold milk. Whisk together for about 2 minutes until the pudding thickens. If desired, add a few drops of yellow food coloring to the pudding and stir until the color is evenly distributed. This will serve as the yellow base layer of your parfait.
- Create the Layers: Take your clear plastic or glass cups and fill the bottom third of each with the prepared yellow pudding. Gently tap the cups on the counter to even out the layer.
- Add the Orange Layer: Next, add a layer of mandarin oranges on top of the yellow pudding. Confirm these are well-drained to prevent excess moisture from affecting your parfait layers.
- Top with Whipped Cream: For the final layer, generously spoon whipped cream or whipped topping over the mandarin oranges, filling the cup to the top. This white layer represents the tip of the candy corn.
- Garnish and Serve: Finish by garnishing each parfait with a few candy corn pieces on top. Serve immediately, or refrigerate until ready to serve.
Extra Tips:
When making Candy Corn Parfaits, using clear cups enhances the visual appeal, allowing the colorful layers to shine through. Confirm each layer is neatly applied to maintain a distinct separation between colors.
If you’re preparing these parfaits in advance, add the whipped cream layer and candy corn garnish just before serving to keep the toppings fresh and fluffy. Additionally, feel free to experiment with different flavors of pudding or add a layer of crumbled cookies for extra texture and flavor.
Batty Cake Pops
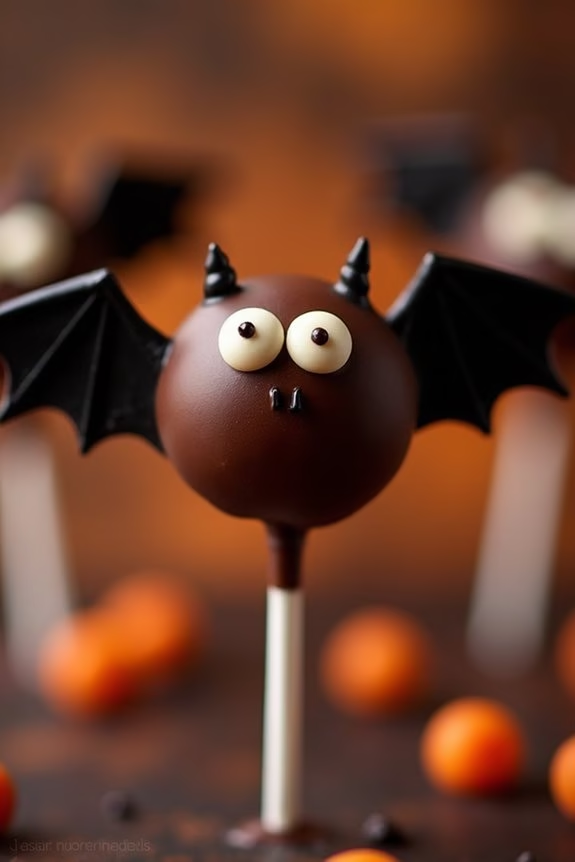
Batty Cake Pops are the perfect spooky treats to delight kids during Halloween. These charming little bites are fun to make and even more fun to eat. Imagine a cake pop, but with a whimsical twist — shaped like bats, complete with wings and eyes that seem to glow in the dark!
With a moist cake center coated in chocolate and adorned with edible decorations, these Batty Cake Pops are sure to be the highlight of your Halloween dessert spread.
Making these Batty Cake Pops is an engaging activity that kids can join in on, allowing their creativity to shine. Start by preparing a simple cake, then crumble it and mix it with frosting to create the cake pop base. Once you’ve formed the bat shapes, dip them in melted chocolate and add finishing touches like wings and eyes.
These treats aren’t only delectable but also a delightful way to get into the Halloween spirit.
Ingredients for Batty Cake Pops (Serves 4-6):
- 1 box of chocolate cake mix (plus ingredients required for the cake mix)
- 1 cup chocolate frosting
- 2 cups semi-sweet chocolate chips
- 12 cake pop sticks
- 12 black construction paper bat wings
- Edible candy eyes
- 1 tablespoon vegetable oil
- Styrofoam block or cake pop stand
Instructions:
- Prepare the Cake: Begin by baking the chocolate cake according to the instructions on the box. Let the cake cool completely before moving to the next step.
- Create Cake Pop Mixture: Once the cake is cooled, crumble it into a large bowl. Add the chocolate frosting and mix thoroughly until you have a dough-like consistency.
- Shape the Cake Pops: Roll the cake mixture into 12 equal-sized balls. Insert a cake pop stick into each ball and place them on a baking sheet lined with parchment paper. Freeze for about 30 minutes to firm them up.
- Melt the Chocolate: In a microwave-safe bowl, combine the semi-sweet chocolate chips and vegetable oil. Microwave in 30-second intervals, stirring in between until smooth and fully melted.
- Coat the Cake Pops: Dip each cake pop into the melted chocolate, ensuring it’s completely covered. Let excess chocolate drip off before placing them back on the parchment paper.
- Decorate the Cake Pops: Before the chocolate sets, attach the black construction paper bat wings to each pop. Stick on the edible candy eyes to create the bat faces. Allow the chocolate to harden by placing the cake pops into the Styrofoam block or cake pop stand.
Extra Tips:
For an extra spooky effect, consider using glow-in-the-dark edible gel to outline the bat wings or add additional facial features.
If you’re worried about the pops not sticking to the sticks, dip the end of each stick in melted chocolate before inserting it into the cake balls; this will act like glue once the chocolate hardens.
To make the process seamless, have all your decorations ready and within reach before you start dipping the cake pops. Enjoy your eerie and delicious Batty Cake Pops!
Frankenstein Marshmallow Pops

Frankenstein Marshmallow Pops are a delightful and spooky treat that will surely thrill kids and adults alike at any Halloween party. These pops are a fun and creative way to bring the classic monster to life, using marshmallows, candy melts, and some decorative candies. Not only are they easy to make, but they also allow kids to get involved in the kitchen, fostering creativity and providing an exciting hands-on experience.
With their vibrant green faces and quirky candy features, these marshmallow pops will be a standout addition to any dessert table. Perfect for a Halloween gathering, this recipe serves 4-6 people, making it ideal for a small party or family event. The marshmallow pops are designed to be both delicious and visually appealing, providing a sweet and whimsical treat that captures the playful spirit of Halloween.
Gather your ingredients and get ready to start on a monstrous culinary adventure with these Frankenstein Marshmallow Pops.
Ingredients for 4-6 People:
- 12 large marshmallows
- 1 cup green candy melts
- 1/4 cup black candy melts
- 12 lollipop sticks
- 24 candy eyes
- 1 tube of black decorating gel
- 1/4 cup chocolate sprinkles
- 24 mini chocolate chips
Instructions:
- Prepare the Marshmallows: Begin by inserting a lollipop stick into each marshmallow, ensuring they’re secure but not pushed all the way through. Set them aside.
- Melt the Candy Melts: In a microwave-safe bowl, melt the green candy melts according to the package instructions. Stir until smooth and fully melted. Repeat the same process in a separate bowl for the black candy melts.
- Coat the Marshmallows: Dip each marshmallow into the green candy melt, using a spoon to help coat them evenly. Allow any excess to drip off before placing them on a piece of parchment paper to set.
- Create Hair and Features: Once the green coating has slightly set but isn’t fully hardened, dip the top of each marshmallow into the black candy melts to form Frankenstein’s “hair.” Sprinkle chocolate sprinkles on the black area to add texture.
- Add Eyes and Mouth: While the candy coating is still slightly tacky, press two candy eyes onto each marshmallow pop. Use the black decorating gel to draw a mouth and any other facial features like stitches.
- Attach Bolts: For the final touch, press a mini chocolate chip on each side of the marshmallow to resemble the bolts on Frankenstein’s neck.
- Allow to Set: Let the completed pops sit until the candy coatings are fully hardened. This may take about 20-30 minutes at room temperature.
Extra Tips:
To make the process even smoother, consider using a styrofoam block to stand the marshmallow pops upright while the candy coating sets. This will help maintain their shape and prevent any smudging.
If you find that the candy melts are too thick, add a teaspoon of vegetable oil to thin them out for an easier coating process. Additionally, if you’re working with kids, encourage them to get creative with the facial expressions and features to give each Frankenstein pop its unique character.
Enjoy the process, and have a monstrously good time creating these Halloween treats!
Creepy Crawly Jello Cups
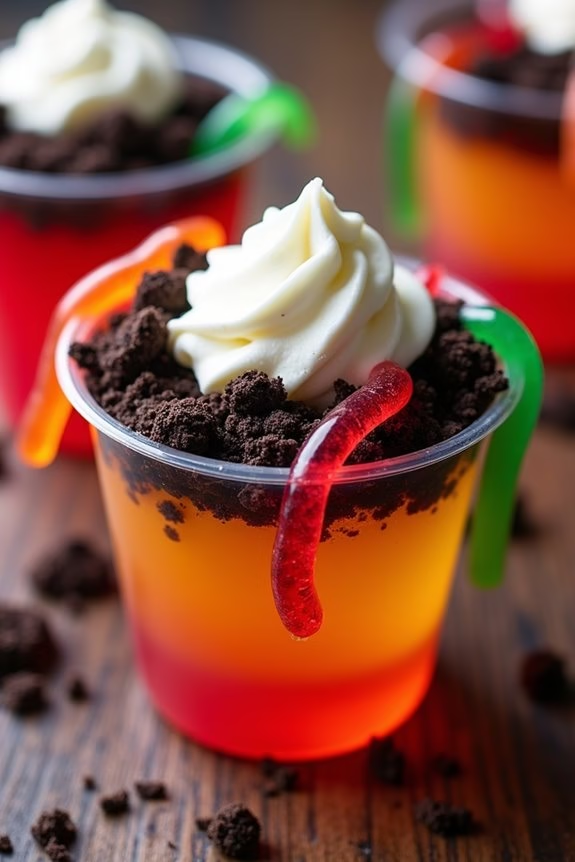
Creepy Crawly Jello Cups are the perfect Halloween treat to delight and spook kids at the same time. These wiggly, jiggly desserts are easy to make and offer a fun way to incorporate creepy crawlies into your Halloween festivities without any real fright. The combination of fruity gelatin and gummy worms creates a visually appealing and delicious treat that kids will love to dig into.
With a little creativity, you can transform ordinary jello into a festive Halloween dessert that will be the hit of any party. These Creepy Crawly Jello Cups aren’t only fun to eat but also simple to prepare, making them a great activity to involve kids in the kitchen.
The recipe is versatile, allowing you to use your favorite gelatin flavors and colors to match your Halloween theme. The gummy worms add a playful touch, and you can even use edible dirt made from crushed cookies to enhance the effect. Whether you’re hosting a Halloween party or just looking for a festive dessert to enjoy at home, these jello cups will certainly add a spooky twist to your celebrations.
Ingredients (Serves 4-6):
- 2 packages of flavored gelatin (6 oz each, any color/flavor)
- 4 cups boiling water
- 2 cups cold water
- 1 pack of gummy worms
- 1 cup crushed chocolate cookies (optional, for edible dirt)
- Whipped cream (optional, for topping)
Cooking Instructions:
- Prepare the Gelatin: Start by boiling 4 cups of water. Once the water is boiling, carefully pour it into a large mixing bowl. Add the gelatin powder to the boiling water and stir continuously until the powder is completely dissolved.
- Add Cold Water: After the gelatin has dissolved, add 2 cups of cold water to the mixture. Stir well to guarantee everything is combined and the mixture is smooth.
- Pour into Cups: Divide the gelatin mixture evenly among clear plastic or glass cups. This recipe should make about 4-6 servings, depending on the size of your cups.
- Add Gummy Worms: Before the gelatin sets, drop a few gummy worms into each cup. Let some hang over the edge for a more dramatic effect. If you’re using edible dirt, save some gummy worms to place on top later.
- Chill the Gelatin: Place the cups in the refrigerator and allow them to chill for at least 2-3 hours, or until the gelatin is fully set.
- Decorate: Once the gelatin is set, you can sprinkle crushed chocolate cookies on top to resemble dirt. Add extra gummy worms on top. If desired, add a dollop of whipped cream to each cup for an added treat.
Extra Tips:
For an even spookier effect, consider using different colors of gelatin to create layers. Simply prepare one color, let it set partially, then add another color on top. Be sure to insert gummy worms in between the layers for extra creepy crawly fun.
You can also use molds to make different Halloween-themed shapes if you prefer not to use cups. Remember, patience is key when waiting for the gelatin to set, so plan accordingly to guarantee your Creepy Crawly Jello Cups are ready in time for your Halloween celebration.
Skeleton Pretzel Rods
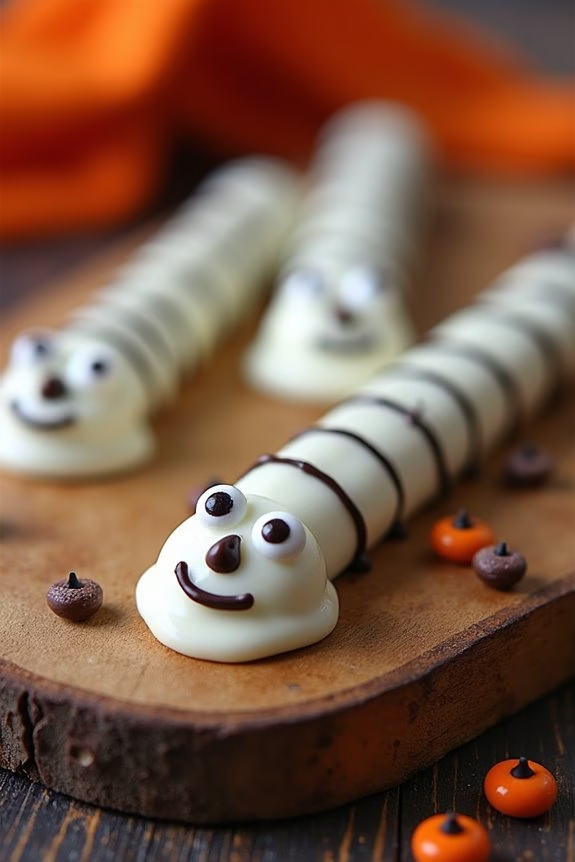
Halloween is a time for spooky fun and delicious treats, and what better way to celebrate than with Skeleton Pretzel Rods? This delightful dessert combines the crunch of pretzel rods with the creamy sweetness of white chocolate, creating a treat that’s as fun to make as it’s to eat. Perfect for kids’ parties or a festive snack, these Skeleton Pretzel Rods are sure to be a hit with little ghouls and goblins.
Skeleton Pretzel Rods not only look spooktacular but are also incredibly easy to make, requiring just a handful of ingredients. Kids will love helping to create these edible skeletons, which can be decorated with candy eyes and chocolate for a creepy-cute finish. Whether you’re hosting a Halloween bash or just want to make something special with your little ones, this recipe is guaranteed to add a touch of ghostly charm to your holiday festivities.
Ingredients for 4-6 servings:
- 12 pretzel rods
- 12 oz white chocolate chips or candy melts
- 24 candy eyes
- 1/4 cup mini chocolate chips
- 1/4 cup mini marshmallows
- Black edible gel or writing icing
Cooking Instructions:
- Prepare the Workstation: Line a baking sheet with parchment paper. This will be where you place your pretzel rods to cool and harden after dipping.
- Melt the White Chocolate: In a microwave-safe bowl, melt the white chocolate chips or candy melts in 30-second intervals, stirring in between, until smooth and fully melted. Alternatively, you can use a double boiler for this step.
- Dip the Pretzel Rods: Hold each pretzel rod by one end and dip it into the melted white chocolate, covering about two-thirds of the rod. Allow any excess chocolate to drip off before placing it on the prepared baking sheet.
- Decorate the Skeletons: While the chocolate is still wet, press two candy eyes near the top of each dipped rod to create the skeleton’s face. Below the eyes, use mini chocolate chips to form a mouth.
- Add Skeleton Ribs: Place mini marshmallows along the sides of the pretzel rod, pressing them gently into the melted chocolate to resemble ribs.
- Draw the Details: Use black edible gel or writing icing to draw additional details, such as cracks or stitches, on the skeleton face if desired.
- Set the Chocolate: Allow the decorated pretzel rods to sit at room temperature or place them in the refrigerator for about 15-20 minutes until the chocolate is completely set.
Extra Tips:
For a neater finish, you can use a spoon to help coat the pretzel rods with chocolate evenly. If you’re finding it difficult to attach the candy eyes or chocolate chips, a small dab of extra melted chocolate will act as a glue.
Be creative with the decorations—kids might enjoy adding their unique touches, such as different colored icing or sprinkles. If you want to make the activity even more fun, set up a decorating station where kids can personalize their skeletons with various edible accessories.
Vampire Bite Cupcakes
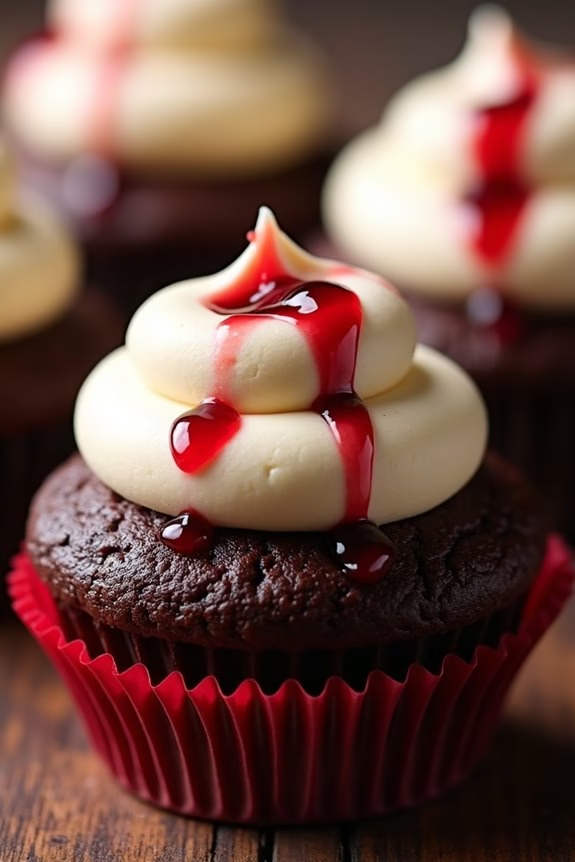
Vampire Bite Cupcakes are a spooktacular addition to any Halloween celebration, delighting both kids and adults alike. These cupcakes aren’t only delicious but also visually appealing, with a fun and eerie twist that perfectly fits the Halloween theme. The “bite marks” filled with raspberry or cherry sauce give the illusion of a vampire’s infamous taste, making these treats irresistibly playful and a guaranteed hit at any party.
Ideal for a serving size of 4-6 people, these cupcakes are easy to make and require only a few simple ingredients. The rich chocolate cupcakes are topped with a creamy and smooth vanilla frosting, while the tangy fruit sauce inside mimics the look of blood. These Vampire Bite Cupcakes aren’t only a treat for the taste buds but also a creative way to bring the Halloween spirit to life through food.
Ingredients:
- 1 1/2 cups all-purpose flour
- 1 cup granulated sugar
- 1/3 cup unsweetened cocoa powder
- 1 teaspoon baking powder
- 1/2 teaspoon baking soda
- 1/4 teaspoon salt
- 1/2 cup unsalted butter, melted
- 2 large eggs
- 1 teaspoon vanilla extract
- 3/4 cup milk
- 1 cup heavy cream
- 2 tablespoons powdered sugar
- 1 teaspoon vanilla extract (for frosting)
- 1/2 cup raspberry or cherry sauce
- Red food coloring (optional)
Cooking Instructions:
- Preheat the Oven: Start by preheating your oven to 350°F (175°C) and lining a muffin tin with cupcake liners.
- Mix Dry Ingredients: In a large bowl, whisk together the flour, sugar, cocoa powder, baking powder, baking soda, and salt until well combined.
- Combine Wet Ingredients: In a separate bowl, mix the melted butter, eggs, vanilla extract, and milk. Stir until the mixture is smooth and homogeneous.
- Create the Batter: Gradually add the wet mixture to the dry ingredients, stirring gently until just combined. Avoid overmixing to ascertain the cupcakes remain fluffy.
- Fill the Cupcake Liners: Spoon the batter into the prepared cupcake liners, filling each about 2/3 full to allow room for rising.
- Bake: Place the cupcakes in the preheated oven and bake for 18-20 minutes, or until a toothpick inserted into the center comes out clean. Once baked, remove from the oven and let cool completely on a wire rack.
- Prepare the Frosting: While the cupcakes are cooling, whip the heavy cream, powdered sugar, and vanilla extract until stiff peaks form. This will be your vanilla frosting.
- Create Vampire Bites: Once the cupcakes are cooled, use a small spoon or a melon baller to scoop out a small hole in the center of each cupcake. Fill each hole with raspberry or cherry sauce—add a drop or two of red food coloring to enhance the “bloody” effect if desired.
- Frost the Cupcakes: Pipe or spread the vanilla frosting over the top of each cupcake, covering the filled holes.
- Add the Finishing Touches: To complete the vampire bite look, use a toothpick to create two small holes on the frosting and fill them with a tiny drop of the fruit sauce to mimic fang marks.
Extra Tips:
To make your Vampire Bite Cupcakes extra special, consider using dark chocolate cocoa powder for a richer flavor. If you prefer a less sweet cupcake, you can reduce the sugar in the cupcake batter or adjust the sweetness of the fruit sauce.
For a more dramatic effect, add a drop of black food coloring to the chocolate batter to make the cupcakes even darker. Remember to let the cupcakes cool completely before adding the frosting to prevent it from melting. Enjoy your creepy and delicious Halloween treat!
Haunted House Gingerbread Cookies
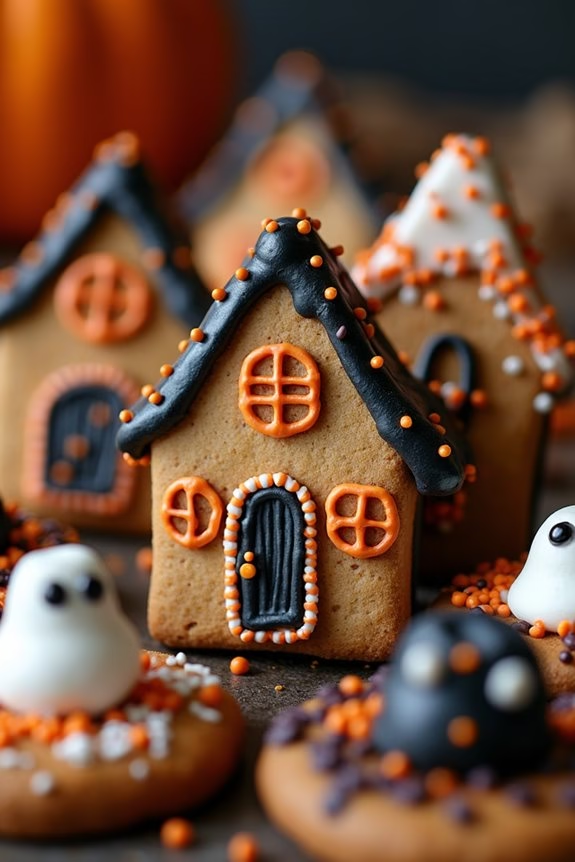
Haunted House Gingerbread Cookies are the perfect treat to make this Halloween extra special for kids. These spooktacular cookies aren’t only delicious but also serve as a fun and creative activity for children. With a combination of gingerbread’s warm spices and festive decorations, these cookies are sure to delight both little ones and adults alike.
Gather around the kitchen and enjoy an afternoon of baking and decorating, setting the stage for a memorable Halloween experience.
Creating Haunted House Gingerbread Cookies involves baking the gingerbread cookie base and then decorating them to resemble eerie haunted houses. The decorating process allows for a lot of creativity, with options ranging from simple and cute to elaborate and spooky. This recipe yields enough cookies for 4-6 people, making it perfect for a small Halloween gathering or family fun night.
Ingredients:
- 3 cups all-purpose flour
- 3/4 cup brown sugar
- 3/4 cup unsalted butter, softened
- 2/3 cup molasses
- 1 large egg
- 1 tablespoon ground ginger
- 1 tablespoon ground cinnamon
- 1 teaspoon baking soda
- 1/2 teaspoon ground cloves
- 1/4 teaspoon salt
- Assorted Halloween-themed cookie cutters
- Assorted icing colors (black, orange, white)
- Edible decorations (candy eyes, sprinkles, mini marshmallows)
Instructions:
1. Prepare the Dough: In a large bowl, cream together the softened butter and brown sugar until light and fluffy. Add the molasses and egg, mixing until well combined.
In a separate bowl, whisk together the flour, ginger, cinnamon, baking soda, cloves, and salt. Gradually add the dry ingredients to the wet mixture, stirring until a dough forms.
2. Chill the Dough: Wrap the dough in plastic wrap and refrigerate for at least 1 hour. This will make the dough easier to roll out and cut into shapes.
3. Preheat and Prepare: Preheat your oven to 350°F (175°C). Line baking sheets with parchment paper to prevent the cookies from sticking.
4. Roll and Cut: Roll out the dough on a lightly floured surface to about 1/4-inch thickness. Use Halloween-themed cookie cutters to cut out haunted house shapes. Place the cookies on the prepared baking sheets, leaving some space between them.
5. Bake the Cookies: Bake in the preheated oven for 10-12 minutes, or until the edges are firm and the cookies are lightly browned. Remove from the oven and allow them to cool on the baking sheets for a few minutes before transferring them to a wire rack to cool completely.
6. Decorate the Cookies: Once the cookies are completely cooled, use the assorted icing colors to decorate them as haunted houses. Add edible decorations like candy eyes and sprinkles to enhance the spooky effect. Get creative with your designs!
7. Let the Icing Set: Allow the icing to set for at least 30 minutes before serving or packaging the cookies.
Extra Tips:
When making Haunted House Gingerbread Cookies, make certain that your dough is thoroughly chilled before rolling it out, as this helps maintain the shape of the cookies during baking.
If the dough becomes too sticky while rolling, dust it lightly with flour. For an extra fun twist, you can prepare a few different icing colors and let the kids go wild with their decorating ideas.
These cookies can be stored in an airtight container for up to a week, making them a great make-ahead treat for your Halloween festivities.
Zombie Brain Pudding
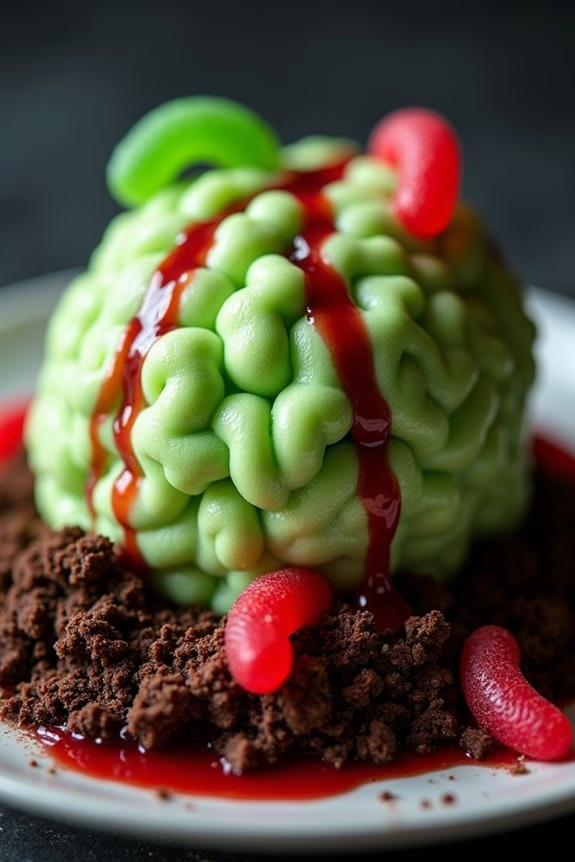
Halloween is the perfect time to release your creativity in the kitchen, especially when it comes to preparing spooky treats for kids. One such delight is the Zombie Brain Pudding, a creeptastic dessert that combines fun and fright with delicious flavors. This dessert is designed to look like a zombie’s brain, making it a hit at any Halloween party.
With its vibrant colors and surprisingly yummy taste, it’s sure to impress and intrigue the little ones and adults alike. The Zombie Brain Pudding isn’t only visually engaging but also easy to make, requiring simple ingredients that come together to create a ghoulish masterpiece.
Perfect for a serving size of 4-6 people, this recipe is a delightful blend of creativity and culinary skills. It allows kids to enjoy the spirit of Halloween with a touch of sweetness and a dash of fright. Let’s explore the ingredients and steps needed to create this spooky dessert.
Ingredients for 4-6 people:
- 2 packs (3.4 oz each) of instant vanilla pudding mix
- 4 cups of cold milk
- Green food coloring
- Red food coloring
- 12 oz whipped cream
- 1 pack (5 oz) gummy worms
- 1 cup crushed chocolate cookies
- 1/4 cup of strawberry jam
Cooking Instructions:
- Prepare the Pudding: In a large mixing bowl, combine the instant vanilla pudding mix with cold milk. Use a whisk to blend the mixture until it thickens and achieves a smooth consistency. This should take about 2 minutes.
- Add the Color: Once the pudding has thickened, add a few drops of green food coloring and stir well until the color is evenly distributed. Adjust the amount of food coloring until you achieve the desired shade of “zombie brain” green.
- Incorporate the Whipped Cream: Gently fold in the whipped cream with the green pudding. This gives the “brains” a light, fluffy texture, making it more appealing and fun to eat.
- Create the Brain Effect: Divide the pudding mixture into small, brain-shaped mounds on a large platter or individual cups. Use a spoon to create grooves and creases to resemble the surface of a brain.
- Add the Gory Details: Mix a few drops of red food coloring with the strawberry jam to create a “bloody” effect. Drizzle the red mixture over the pudding to give it a creepy, realistic appearance.
- Add the Extras: Sprinkle crushed chocolate cookies around the base of the pudding brains to resemble dirt. Finally, add gummy worms crawling out of the brains for an extra spooky touch.
Extra Tips:
To make the Zombie Brain Pudding even more fun, consider using brain-shaped molds for a more defined look. You can also experiment with different flavors of pudding to suit your tastes, such as chocolate or strawberry.
If you’re planning to make this dessert ahead of time, store it in the refrigerator and add the gummy worms just before serving to keep them fresh and chewy. For a healthier twist, you can use low-fat milk and whipped cream substitutes. Enjoy crafting this eerie yet delightful Halloween treat!
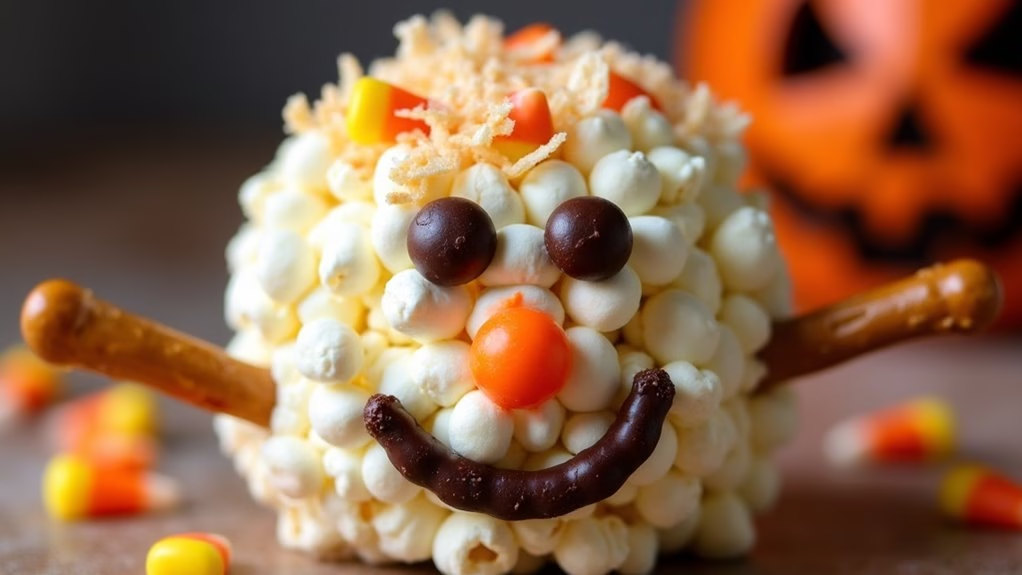
Scarecrow Popcorn Balls
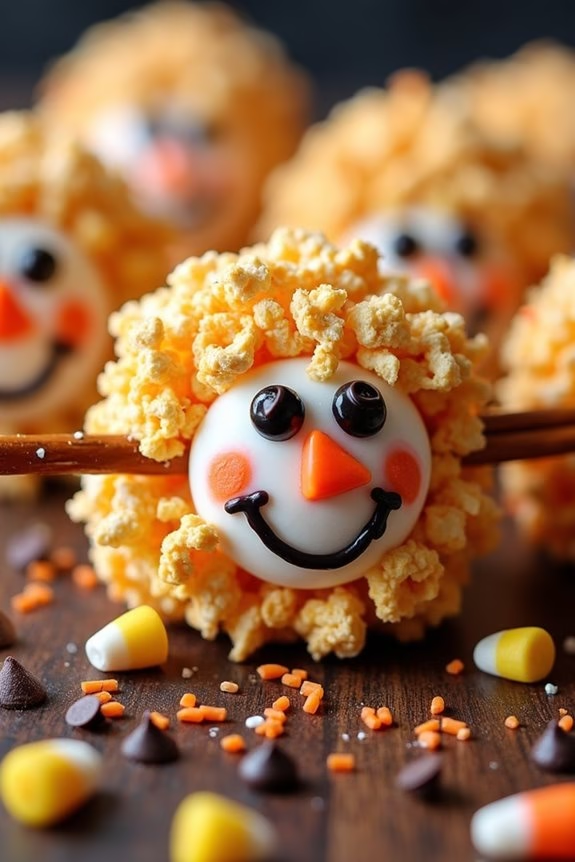
Scarecrow Popcorn Balls are a delightful Halloween treat that will enchant kids with their fun appearance and sweet flavor. These popcorn balls aren’t only a joy to make but also a perfect addition to any Halloween party. The combination of popcorn, marshmallows, and candy creates a sweet and chewy treat that’s as fun to eat as it’s to look at. The scarecrow theme makes them perfect for the fall season, adding a whimsical touch to your Halloween festivities.
Ideal for serving 4-6 people, this recipe is easy to follow and allows for plenty of creative freedom. Kids will enjoy helping in the kitchen, especially when it comes to shaping the popcorn balls and decorating them to look like adorable scarecrows. With a few simple ingredients and a bit of imagination, these Scarecrow Popcorn Balls will become a Halloween staple in your household.
Ingredients:
- 10 cups popped popcorn
- 1/2 cup unsalted butter
- 4 cups mini marshmallows
- 1 teaspoon vanilla extract
- 1/4 teaspoon salt
- 1 cup candy corn
- 1 cup mini chocolate chips (for eyes and buttons)
- 1/2 cup shredded coconut (optional, for hair)
- Pretzel sticks (for arms)
- Assorted Halloween sprinkles (for decoration)
Instructions:
- Prepare the Popcorn: Start by popping your popcorn and ensuring it’s free of any unpopped kernels. Place the popcorn in a large mixing bowl to have enough room for mixing.
- Melt the Butter and Marshmallows: In a large saucepan over medium heat, melt the butter. Once melted, add the mini marshmallows and stir continuously until fully melted and smooth. This will be the sticky base that holds your popcorn balls together.
- Add Flavorings: Remove the saucepan from the heat and quickly stir in the vanilla extract and salt. This will add a hint of flavor to your popcorn balls.
- Combine Popcorn and Marshmallow Mixture: Pour the marshmallow mixture over the popcorn. Use a spatula or wooden spoon to gently mix until all the popcorn is evenly coated. The mixture will be hot, so be careful not to burn yourself.
- Shape the Popcorn Balls: Allow the mixture to cool slightly, so it’s easier to handle. Grease your hands with a bit of butter or oil, and form the popcorn into balls about the size of a tennis ball.
- Decorate: While the popcorn balls are still slightly sticky, press candy corn, mini chocolate chips, and sprinkles onto each ball to create the scarecrow’s face and buttons. Use shredded coconut for hair and pretzel sticks for arms.
- Set the Popcorn Balls: Place the decorated popcorn balls on a baking sheet lined with parchment paper. Allow them to cool completely so they hold their shape.
Extra Tips:
For a more personalized touch, encourage kids to get creative with the decorations. Use different types of candy or edible markers to draw faces on the scarecrows.
If the marshmallow mixture starts to harden before you’ve finished forming all the balls, you can gently reheat it over low heat to make it more pliable.
Storing the popcorn balls in an airtight container will keep them fresh for several days, making them a perfect make-ahead treat for Halloween celebrations.