
As the spooky season approaches, let’s embark on a delightful journey filled with sweet and spooky creations.
Picture your kitchen as a hub of creativity, where tiny hands turn simple ingredients into magical Halloween cookies.
From spider cookies to monster meringues and ghostly sugar treats, each recipe promises not only delicious flavors but also unforgettable memories.
These treats are perfect for sparking creativity and bringing a festive spirit to your home.
Are you ready to explore these enchanting Halloween cookies with your little ones?
Spooky Spider Cookies
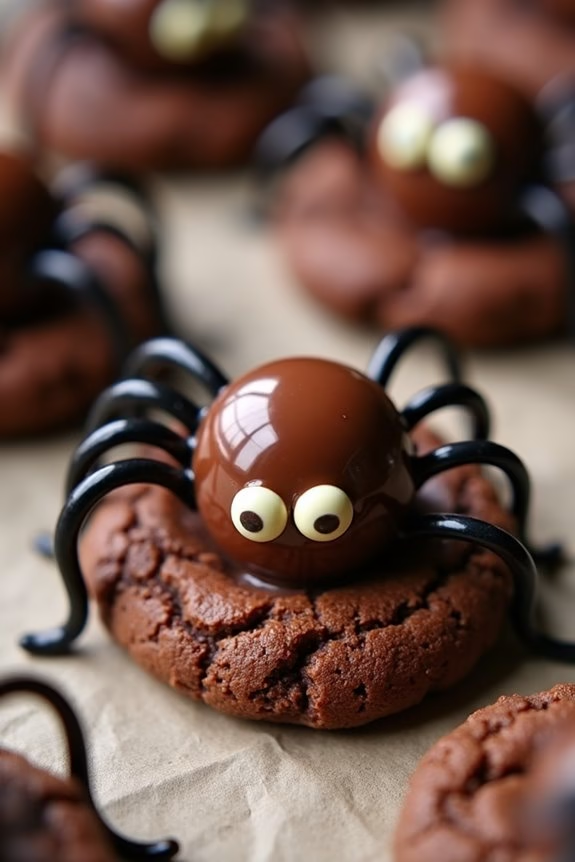
Spooky Spider Cookies are a fun and festive treat that kids will love making and eating. These cookies are perfect for Halloween parties or as a spooky snack during the Halloween season. With a chocolatey base and a creepy-crawly design, these cookies not only taste delicious but also add a touch of frightful fun to your festivities. Kids will especially enjoy decorating their own spiders with chocolate and candy.
The recipe for Spooky Spider Cookies is simple enough for children to assist with, making it a great family activity. The process involves creating a basic chocolate cookie, adding a chocolate spider body, and using candy to form the legs and eyes. This hands-on recipe encourages creativity, allowing each cookie to have its own unique personality and design. Let your imagination run wild as you create your own spooky, edible spiders!
Ingredients for 4-6 servings:
- 1 cup unsalted butter, softened
- 1 cup granulated sugar
- 1 cup packed brown sugar
- 2 large eggs
- 1 teaspoon vanilla extract
- 2 3/4 cups all-purpose flour
- 1/2 cup cocoa powder
- 1 teaspoon baking soda
- 1/2 teaspoon salt
- 24 milk chocolate balls (e.g., Maltesers, Whoppers)
- 48 candy eyes
- Black licorice laces, cut into small pieces
Cooking Instructions:
- Preheat Oven: Preheat your oven to 350°F (175°C) and line two baking sheets with parchment paper.
- Mix Wet Ingredients: In a large bowl, cream together the softened butter, granulated sugar, and brown sugar until light and fluffy. Beat in the eggs one at a time, then add the vanilla extract.
- Combine Dry Ingredients: In another bowl, sift together the all-purpose flour, cocoa powder, baking soda, and salt.
- Form the Dough: Gradually add the dry ingredients to the wet ingredients, mixing until a soft dough forms.
- Shape the Cookies: Roll the dough into 1-inch balls and place them on the prepared baking sheets. Make sure to space them about 2 inches apart.
- Bake: Bake in the preheated oven for 10-12 minutes, or until the cookies are set. Remove from the oven and let them cool slightly.
- Add Spider Bodies: While the cookies are still warm, gently press a milk chocolate ball into the center of each cookie to form the spider’s body. Allow the cookies to cool completely.
- Decorate: Once cooled, use a small amount of melted chocolate to attach candy eyes to each spider body. Cut the black licorice laces into small pieces and press them into the cookies to form the spider legs.
Extra Tips:
To guarantee your Spooky Spider Cookies maintain their shape, chill the dough in the refrigerator for about 30 minutes before baking. This will help prevent the cookies from spreading too much in the oven.
Also, if you don’t have black licorice, you can substitute with thin strips of fruit leather or pretzel sticks for the spider legs. For an extra touch of fun, consider using different colored candy eyes to give your spiders varied and quirky expressions.
Monster Mash Meringues
Monster Mash Meringues are a delightful and spooky treat that’s perfect for Halloween festivities with kids. These crunchy and chewy sweets are shaped like little monsters, complete with googly eyes and vibrant colors that will surely bring a smile to any child’s face.
Meringues are made from simple ingredients but require a bit of patience and precision to achieve the perfect texture. Their light and airy nature makes them a delightful addition to any Halloween party spread, and they can be customized with different colors and decorations to match your spooky theme.
Creating Monster Mash Meringues is a fun activity to involve children in, as they can help with piping the meringues onto the baking sheet or placing the edible eyes. The key to meringues is confirming the egg whites are whipped to the right consistency and that the baking temperature is low enough to gently dry them out without browning.
These meringues can be made ahead of time and stored in an airtight container, making them a convenient option for party planning.
Ingredients (Serves 4-6):
- 4 large egg whites
- 1 cup granulated sugar
- 1/4 teaspoon cream of tartar
- 1/4 teaspoon vanilla extract
- Gel food coloring (various colors)
- Edible candy eyes
- Piping bags with round tips
Cooking Instructions:
- Preheat and Prepare: Preheat your oven to 225°F (110°C). Line two baking sheets with parchment paper to prevent the meringues from sticking.
- Whip the Egg Whites: In a clean, dry mixing bowl, combine the egg whites and cream of tartar. Using an electric mixer, beat the egg whites on medium speed until soft peaks form.
- Add Sugar: Gradually add the granulated sugar, a tablespoon at a time, while continuing to beat the mixture. Increase the mixer speed to high, and beat until the meringue is glossy and forms stiff peaks. This should take about 5-7 minutes.
- Mix in Vanilla: Gently fold in the vanilla extract with a spatula, being careful not to deflate the meringue.
- Color the Meringue: Divide the meringue into separate bowls if you want multiple colors. Add a few drops of gel food coloring to each bowl and gently fold until the color is evenly distributed.
- Pipe the Meringues: Transfer the colored meringue to a piping bag fitted with a round tip. Pipe small mounds onto the prepared baking sheets, leaving some space between each mound.
- Add Eyes: Immediately press edible eyes onto each mound before the meringue dries.
- Bake: Bake in the preheated oven for 1 hour and 30 minutes, or until the meringues are dry to the touch and can be easily lifted from the parchment.
- Cool: Turn off the oven and let the meringues cool completely in the oven with the door slightly ajar. This prevents them from cracking due to a sudden temperature change.
Extra Tips:
When making Monster Mash Meringues, it’s essential to confirm your mixing bowl and utensils are free of any grease or moisture, as these can prevent the egg whites from whipping properly.
If you prefer a chewier center, reduce the baking time slightly and test a meringue for your desired texture. To create different monster styles, experiment with varying the size and shape of your meringue mounds and use different colors for a more diverse monster family.
Enjoy getting creative with the kids, and remember that imperfections only add to the monster charm!
Ghostly Sugar Cookies
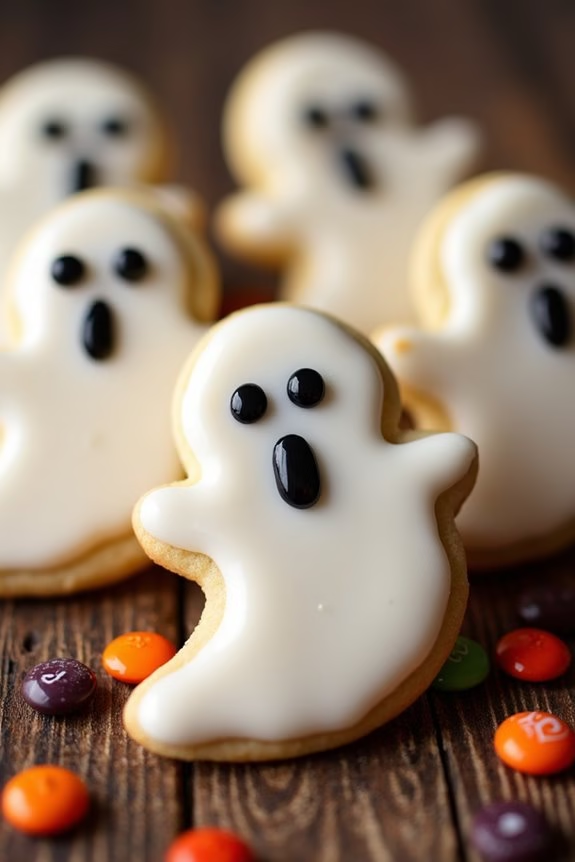
Ghostly Sugar Cookies are a delightful treat that are perfect for celebrating Halloween with kids. These spooky cookies aren’t only fun to make but also delicious to eat. The ghostly shapes and sweet flavors make them a favorite among children and adults alike.
Whether you’re hosting a Halloween party or simply looking to enjoy some festive baking, these cookies are bound to be a hit.
Making Ghostly Sugar Cookies is an excellent way to involve children in the kitchen. Kids will love cutting out ghost shapes from the dough and decorating them with icing and candies. This recipe is designed for a serving size of 4-6 people, guaranteeing that there’s plenty to share with friends and family.
The cookies are soft, buttery, and can be customized with different decorations to suit your Halloween theme.
Ingredients for Ghostly Sugar Cookies (serving size: 4-6 people):
- 2 3/4 cups all-purpose flour
- 1 teaspoon baking powder
- 1/2 teaspoon salt
- 1 cup unsalted butter, softened
- 1 1/2 cups granulated sugar
- 1 large egg
- 1 teaspoon vanilla extract
- 1/2 teaspoon almond extract (optional)
- White icing for decorating
- Black icing or edible marker for detailing
- Assorted Halloween candies for decoration
Cooking Instructions:
- Preheat the Oven: Begin by preheating your oven to 350°F (175°C). Line two baking sheets with parchment paper to prevent the cookies from sticking.
- Prepare the Dough: In a medium bowl, whisk together the flour, baking powder, and salt. Set this mixture aside. In a large bowl, using an electric mixer, beat the butter and sugar together until light and fluffy, about 2-3 minutes. Add in the egg, vanilla extract, and almond extract (if using) and mix until well combined.
- Combine Ingredients: Gradually add the dry ingredients to the wet ingredients, mixing on low speed until a dough forms. Assure the dough is well incorporated but avoid overmixing.
- Roll Out the Dough: Lightly flour your work surface and roll out the dough to about 1/4 inch thickness. Use a ghost-shaped cookie cutter to cut out shapes from the dough. Gather any scraps, re-roll, and cut additional cookies until all dough is used.
- Bake the Cookies: Place the ghost shapes onto the prepared baking sheets, leaving some space between each cookie. Bake in the preheated oven for 8-10 minutes, or until the edges just begin to turn golden. Remove from the oven and let cool on the baking sheet for a few minutes before transferring to a wire rack to cool completely.
- Decorate the Cookies: Once the cookies are completely cool, use white icing to cover the surface of each ghost. Use black icing or an edible marker to add eyes and mouth details. Add any additional Halloween candy decorations as desired.
Extra Tips:
For the best results, make sure that your butter is properly softened before starting, as this will help in achieving a smooth dough.
If you’re baking with kids, let them get creative with the decorations; they can use small candies or sprinkles to give each ghost its own personality.
If you want to prepare the dough in advance, it can be refrigerated for up to 2 days before rolling out and baking.
Finally, store any leftover cookies in an airtight container to keep them fresh and delicious.
Witch Hat Treats
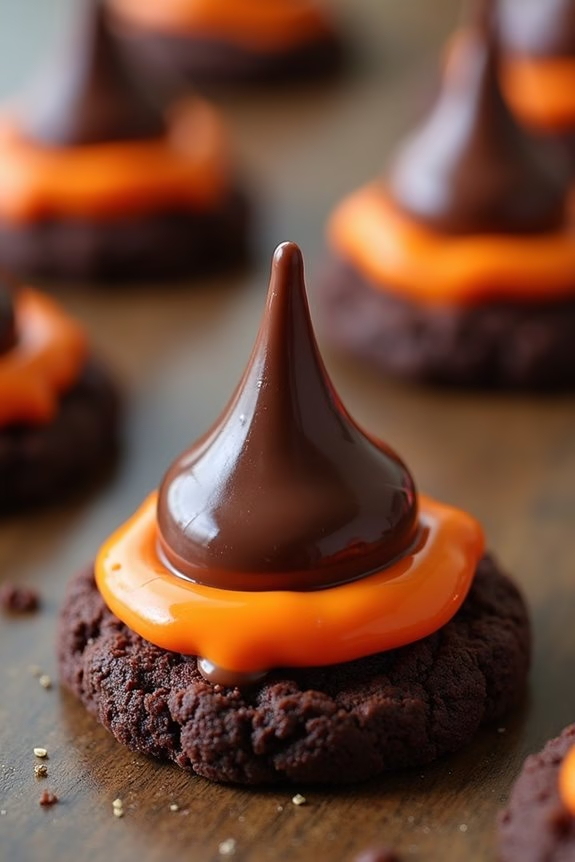
Halloween is the perfect time to get creative in the kitchen with your kids, and these Witch Hat Treats are a fun and simple way to do just that. Not only are they visually delightful, but they’re also delicious and easy to make, using ingredients you likely already have at home.
This recipe is perfect for a fun family activity or for serving at a Halloween party, bringing a bit of spooky magic to your table. These Witch Hat Treats combine the sweet flavors of chocolate and cookies, topped with a colorful candy accent to make them extra festive.
Not only do they look like charming little witch hats, but they’re also the perfect size for little hands. This recipe is designed to serve 4-6 people, making it ideal for a small gathering or a family night in. Gather your ingredients and get ready to conjure up some Halloween magic in your kitchen!
Ingredients (serving size: 4-6 people):
- 12 chocolate sugar cookies
- 1 cup semi-sweet chocolate chips
- 12 chocolate kisses
- 12 candy-coated chocolates (such as M&M’s)
- 1/4 cup orange icing or frosting
Cooking Instructions:
1. Prepare the Work Area: Begin by setting up a clean and spacious work area. Line a baking sheet with parchment paper to prevent sticking and make clean-up easy.
2. Melt the Chocolate: In a microwave-safe bowl, melt the semi-sweet chocolate chips. Heat in 30-second intervals, stirring in between, until the chocolate is smooth and completely melted.
3. Assemble the Witch Hats: Take one chocolate sugar cookie and place it flat on the parchment-lined baking sheet. Dip the base of a chocolate kiss into the melted chocolate and position it in the center of the cookie. This forms the peak of the witch hat.
Repeat with the remaining cookies and kisses.
4. Add the Candy Accent: While the chocolate is still soft, press a candy-coated chocolate (M&M) onto the front of each chocolate kiss. This will be the “buckle” of the hat.
5. Decorate with Icing: Using a small piping bag or a plastic sandwich bag with the corner snipped off, pipe a ring of orange icing around the base of each chocolate kiss where it meets the cookie. This adds a pop of color and secures the kiss to the cookie.
6. Set the Treats: Allow the Witch Hat Treats to set at room temperature until the chocolate has hardened and the icing is firm. This should take about 30 minutes.
Extra Tips:
For best results, verify that the cookies and candies are at room temperature before assembly, as this will help the melted chocolate adhere better.
If you want to add a bit more flair, consider using different colors of icing to match your Halloween theme or sprinkle with edible glitter for an extra touch of magic.
To make the process even more fun for kids, let them choose their favorite colored candies for the hat’s “buckle.” Remember to store any leftover treats in an airtight container to keep them fresh and delicious. Enjoy your spooky creations!
Pumpkin Patch Cookies

Pumpkin Patch Cookies are a delightful treat that combines the festive spirit of Halloween with the comforting flavors of autumn. These cookies aren’t only fun to make with kids but also perfect for sharing with friends and family during Halloween gatherings. Shaped like little pumpkins and decorated to resemble a vibrant pumpkin patch, these cookies will surely be a hit with children and adults alike.
Creating Pumpkin Patch Cookies involves a simple sugar cookie dough that’s flavored with a hint of pumpkin spice and colored with orange food coloring to achieve that classic pumpkin hue. Once baked, the cookies are decorated with green frosting vines and pumpkin seeds or candy for stems, turning each cookie into a mini pumpkin patch. This recipe is designed to make 24-30 cookies, which is a great serving size for 4-6 people, guaranteeing everyone gets to enjoy these festive treats.
Ingredients (Serving size: 4-6 people, makes 24-30 cookies):
- 2 3/4 cups all-purpose flour
- 1 teaspoon baking soda
- 1/2 teaspoon baking powder
- 1 teaspoon pumpkin pie spice
- 1 cup unsalted butter, softened
- 1 1/2 cups white sugar
- 1 egg
- 1 teaspoon vanilla extract
- Orange food coloring
- Green frosting (store-bought or homemade)
- Pumpkin seeds or small candy pieces for stems
Instructions:
- Preheat the Oven and Prepare Baking Sheets: Preheat your oven to 350°F (175°C). Line two baking sheets with parchment paper to prevent sticking and promote even baking.
- Combine Dry Ingredients: In a medium bowl, whisk together the flour, baking soda, baking powder, and pumpkin pie spice. This will guarantee that the spices are evenly distributed throughout the dough.
- Cream Butter and Sugar: In a large bowl, cream together the softened butter and sugar until light and fluffy. This should take about 2-3 minutes using an electric mixer on medium speed.
- Add Wet Ingredients: Beat in the egg and vanilla extract to the butter mixture. Mix until fully incorporated. Add a few drops of orange food coloring to achieve the desired pumpkin color and mix well.
- Mix in Dry Ingredients: Gradually add the dry ingredients to the wet ingredients, mixing on low speed until just combined. Be careful not to overmix, as this can make the cookies tough.
- Shape the Cookies: Using a tablespoon, scoop the dough and roll it into small balls. Place them onto the prepared baking sheets, leaving some space between each for spreading.
- Bake the Cookies: Bake in the preheated oven for 8-10 minutes, or until the edges are lightly golden. The centers should remain slightly soft. Remove from the oven and let cool on the baking sheet for a few minutes before transferring to a wire rack to cool completely.
- Decorate the Cookies: Once cooled, use the green frosting to pipe vines on each cookie. Add a pumpkin seed or candy piece at the top of each cookie to serve as the pumpkin stem.
Extra Tips:
When making Pumpkin Patch Cookies, it’s important to verify that the butter is at room temperature for best creaming with the sugar. This helps create a smooth and light cookie dough.
If desired, you can adjust the amount of pumpkin pie spice to suit your taste preferences. For a more festive touch, consider adding a pinch of cinnamon or nutmeg to the frosting.
When decorating, let your creativity shine—kids will enjoy adding their personal touches to each cookie, making the activity fun and engaging for the whole family.
Mummy Wrapped Pretzel Rods
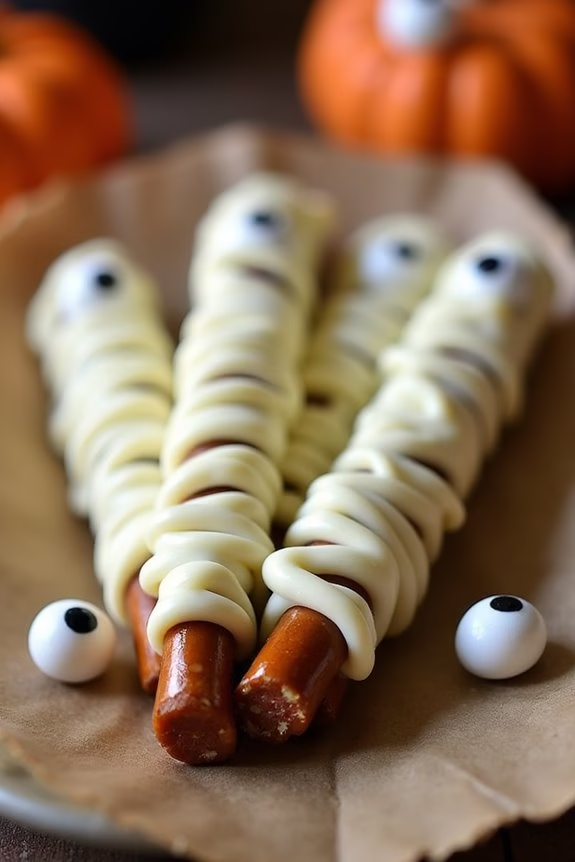
Mummy Wrapped Pretzel Rods are a spooktacular treat that will delight kids and adults alike during the Halloween season. These fun and easy-to-make snacks are perfect for a Halloween party or just as a festive treat to enjoy at home. The combination of salty pretzels and sweet white chocolate creates a deliciously addictive snack that’s both visually appealing and tasty.
With only a few ingredients and minimal preparation, you can whip up a batch of these mummified delights in no time. This recipe is designed to serve 4-6 people, making it perfect for a small gathering or a family treat. The simplicity of the ingredients and preparation makes it an ideal recipe to involve kids in the cooking process. They’ll love wrapping the pretzels and adding candy eyes to bring their mummies to life.
All you need is a little creativity and patience to create these adorable Halloween-themed snacks.
Ingredients:
- 12 pretzel rods
- 1 cup white chocolate chips or white candy melts
- 24-36 candy eyeballs
- 1 tablespoon vegetable oil (optional, for thinning chocolate)
Instructions:
- Prepare the Pretzels: Lay a sheet of parchment paper on a baking tray or countertop to place the dipped pretzels on for drying.
- Melt the Chocolate: Place the white chocolate chips or candy melts into a microwave-safe bowl. Microwave in 30-second intervals, stirring after each interval, until completely melted and smooth. Stir in vegetable oil if the chocolate is too thick, to achieve a thinner consistency for easier drizzling.
- Dip the Pretzels: Dip each pretzel rod into the melted white chocolate, covering about 2/3 of the rod. Tap gently to remove excess chocolate.
- Create the Mummy Wrap: Use a spoon or a small piping bag with a tiny hole to drizzle additional white chocolate over the coated pretzel rods in zigzag patterns to mimic mummy bandages.
- Add the Eyes: While the chocolate is still wet, place two candy eyeballs onto each pretzel rod to give your mummies their spooky faces.
- Set the Chocolate: Allow the pretzels to rest on the parchment paper until the chocolate sets completely. You can speed up this process by placing them in the refrigerator for about 15 minutes.
- Serve and Enjoy: Once the chocolate is set, your Mummy Wrapped Pretzel Rods are ready to be enjoyed! Serve them on a festive platter for a Halloween-themed presentation.
Extra Tips:
To prevent the chocolate from seizing or becoming too thick, make sure that your bowl and any utensils used are completely dry before starting. If you’re working with multiple batches, keep the chocolate warm and smooth by placing the bowl over a pot of gently simmering water.
For added flavor, consider using flavored candy melts, such as vanilla or mint, to give your mummies a unique twist. Remember to let the kids get creative with their designs—no two mummies need to look alike!
Frankenstein’s Monster Bites
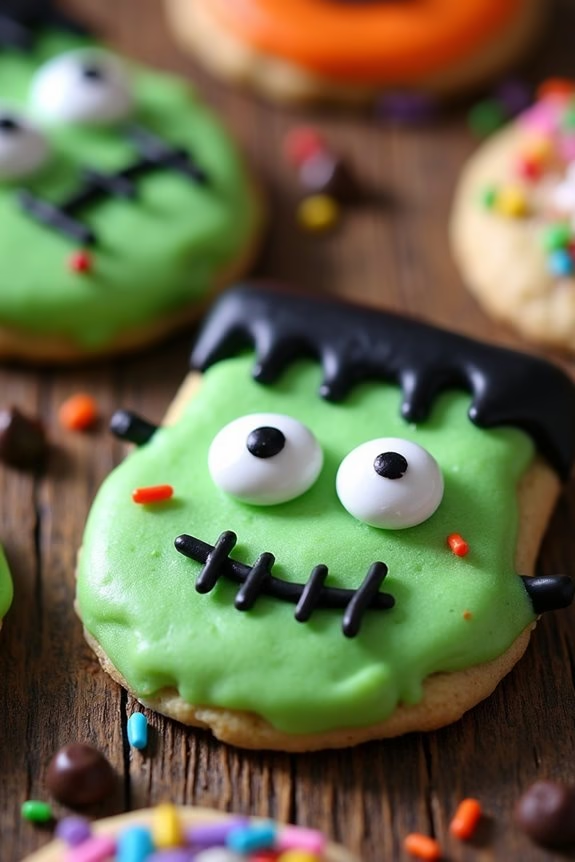
Frankenstein’s Monster Bites are a spooky and delightful treat perfect for any Halloween celebration, especially when kids are involved. These cookies aren’t only fun to make with their vibrant green color and unique design, but they’re also delicious with a sweet, chewy texture.
Perfect for a party or a festive family baking session, these cookies will surely be a hit with the little ones, as they get to create their own mini Frankenstein’s Monsters using simple ingredients and decorations.
The process of making Frankenstein’s Monster Bites is kid-friendly and encourages creativity. With a little guidance, children can take part in crafting their own monster faces using candy eyes, chocolate chips, and colorful sprinkles.
This interactive recipe is designed for 4-6 servings, guaranteeing there are plenty of cookies to share with friends or keep for yourself. The use of vibrant food coloring and playful decorations makes this not just a baking session but an imaginative adventure in the kitchen.
Ingredients (Serves 4-6)
- 1 cup unsalted butter, softened
- 1 cup granulated sugar
- 1 large egg
- 1 teaspoon vanilla extract
- 2 cups all-purpose flour
- 1/2 teaspoon baking powder
- 1/4 teaspoon salt
- Green food coloring
- Candy eyes
- Chocolate chips
- Black decorating gel
- Colored sprinkles
Cooking Instructions
- Preheat the Oven: Begin by preheating your oven to 350°F (175°C). Line a baking sheet with parchment paper to prevent sticking.
- Cream Butter and Sugar: In a large mixing bowl, cream together the softened butter and granulated sugar until the mixture is light and fluffy. This should take about 2-3 minutes using an electric mixer.
- Add Egg and Vanilla: Add in the egg and vanilla extract, and mix until well combined. Confirm the egg is fully incorporated into the butter mixture.
- Mix Dry Ingredients: In a separate bowl, whisk together the all-purpose flour, baking powder, and salt. Gradually add the dry ingredients to the wet mixture, mixing until a dough forms.
- Color the Dough: Add a few drops of green food coloring to the dough. Mix until you achieve the desired shade of green, reminiscent of Frankenstein’s Monster.
- Shape the Cookies: Scoop tablespoons of dough and roll them into balls. Slightly flatten each ball onto the prepared baking sheet to create a cookie shape.
- Decorate: While the dough is still soft, press candy eyes and chocolate chips into each cookie to form a monster face. Use black decorating gel to draw a mouth and add any other details you like.
- Bake: Place the baking sheet in the preheated oven and bake for 10-12 minutes, or until the edges of the cookies are set. Avoid over-baking to maintain a soft texture.
- Cool and Serve: Allow the cookies to cool on the baking sheet for a few minutes before transferring them to a wire rack. Once cooled, serve and enjoy your Frankenstein’s Monster Bites!
Extra Tips
When making Frankenstein’s Monster Bites, it’s important to use food coloring sparingly at first. You can always add more to achieve the right shade, but too much may alter the dough’s consistency.
For added fun, encourage kids to get creative with their monster designs, experimenting with different candy and gel combinations. If you want your cookies to have a bit more texture, consider adding crushed Oreos or pretzel pieces to the dough before baking.
Enjoy the process and have a monstrously good time!
Batty Chocolate Chip Cookies
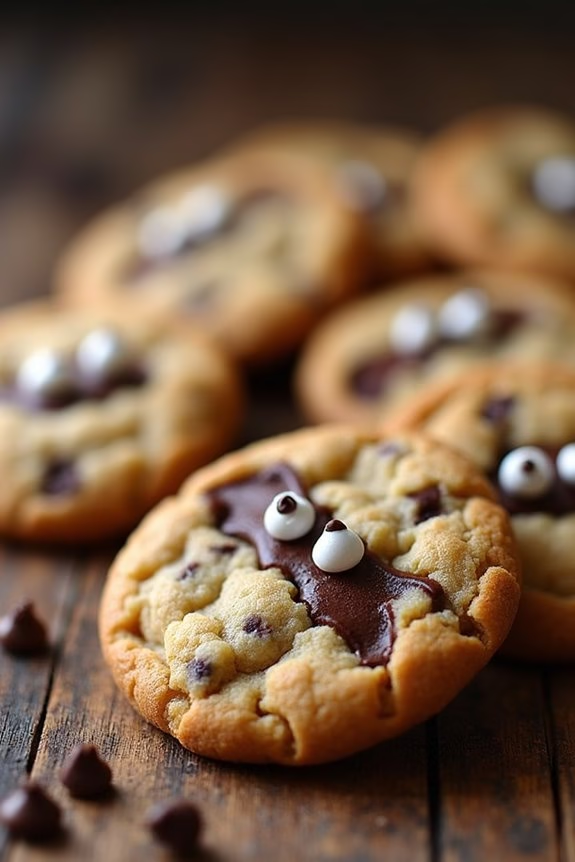
Halloween is a time of spooky fun and delicious treats, and what better way to celebrate than with a batch of Batty Chocolate Chip Cookies? These cookies are perfect for kids who love both the thrill of the season and the classic taste of chocolate chip cookies. The whimsical bat shape adds a playful touch, making them an exciting addition to any Halloween party or a delightful surprise in a lunchbox.
With their crispy edges, soft centers, and rich chocolate flavor, these cookies are certain to be a hit among children and adults alike.
Creating these Batty Chocolate Chip Cookies is a fantastic way to involve kids in the kitchen. The process of mixing, shaping, and decorating offers a fun, hands-on activity that they can enjoy. Plus, customizing each bat with eyes and wings allows for creativity and personal expression.
Whether you’re a seasoned baker or a beginner, this recipe is straightforward and easy to follow, guaranteeing that everyone can experience the joy of baking and eating these delightful Halloween treats.
Ingredients (Serves 4-6)
- 2 1/4 cups all-purpose flour
- 1 teaspoon baking soda
- 1/2 teaspoon salt
- 1 cup unsalted butter, softened
- 3/4 cup granulated sugar
- 3/4 cup packed brown sugar
- 1 teaspoon vanilla extract
- 2 large eggs
- 2 cups semi-sweet chocolate chips
- Black food coloring (optional)
- Candy eyes or mini chocolate chips for decoration
Instructions
- Preheat the Oven: Begin by preheating your oven to 350°F (175°C). Line two baking sheets with parchment paper to guarantee the cookies bake evenly and don’t stick.
- Mix Dry Ingredients: In a medium-sized bowl, whisk together the flour, baking soda, and salt. This combination will guarantee that the dry ingredients are evenly distributed throughout the dough.
- Cream Butter and Sugars: In a large bowl, beat the softened butter, granulated sugar, brown sugar, and vanilla extract together until the mixture is creamy and smooth. This should take about 2 minutes with an electric mixer on medium speed.
- Add Eggs: Add the eggs one at a time, beating well after each addition until fully incorporated. This will help to emulsify the mixture and create a smooth dough.
- Combine Wet and Dry Ingredients: Gradually add the flour mixture to the butter mixture, beating slowly until just combined. Be careful not to overmix, as this can make the cookies tough.
- Fold in Chocolate Chips: Stir in the chocolate chips using a spatula or wooden spoon. If desired, add a few drops of black food coloring to give the dough a spooky tint.
- Shape the Cookies: Use a cookie cutter or your hands to form bat shapes from the dough. Place the shaped dough onto the prepared baking sheets, leaving about 2 inches between each cookie.
- Bake: Bake in the preheated oven for 10-12 minutes or until the edges are golden brown. The centers should still be soft, as they’ll continue to cook slightly on the baking sheet.
- Cool and Decorate: Allow the cookies to cool on the baking sheets for 5 minutes before transferring them to a wire rack to cool completely. Once cooled, decorate with candy eyes or mini chocolate chips to create the bat faces.
Extra Tips
When making Batty Chocolate Chip Cookies, confirm the butter is at room temperature for easier creaming with the sugars. If the dough is too sticky to shape, refrigerate it for 20-30 minutes to firm up.
For a more intense chocolate flavor, consider using dark chocolate chips. Finally, if you want your bats to look even more festive, add a touch of edible glitter or sprinkles for added sparkle.
Enjoy baking these spook-tacular treats with your little ones, and watch them disappear faster than a bat in the night!
Haunted House Gingerbread
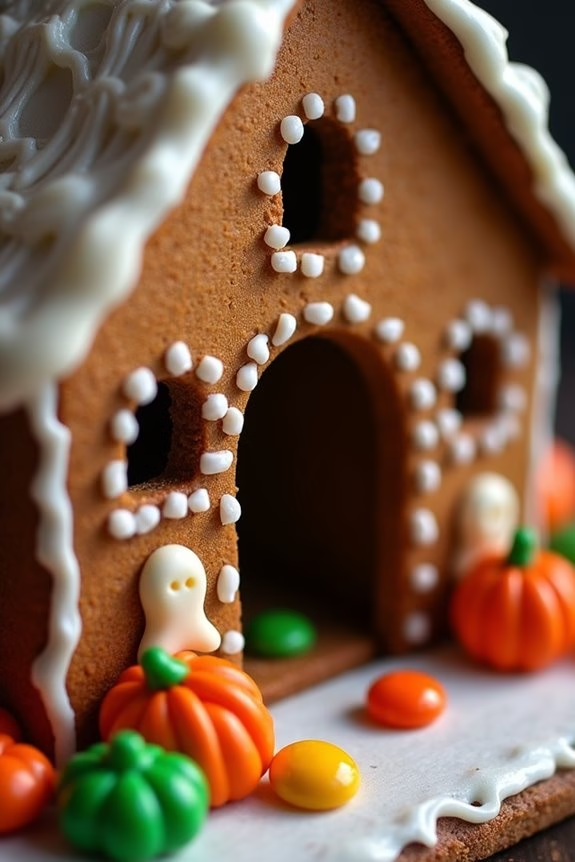
The process of making a Haunted House Gingerbread involves preparing both the gingerbread and the icing that will hold your structure together. Using a combination of spices like ginger, cinnamon, and cloves, the gingerbread dough is flavorful and aromatic, setting the scene for a Halloween-themed masterpiece.
Once baked, the gingerbread pieces are assembled into a spooky house and decorated with icing and candies to bring your haunted creation to life.
Ingredients for 4-6 servings:
- 3 cups all-purpose flour
- 1 teaspoon baking soda
- 1/2 teaspoon salt
- 1 tablespoon ground ginger
- 1 tablespoon ground cinnamon
- 1/2 teaspoon ground cloves
- 1/2 cup (1 stick) unsalted butter, softened
- 3/4 cup packed brown sugar
- 1 large egg
- 1/2 cup molasses
- 2 teaspoons vanilla extract
- Royal icing (store-bought or homemade)
- Assorted candies for decoration
Instructions:
- Preheat and Prepare: Start by preheating your oven to 350°F (175°C). Line two baking sheets with parchment paper to prevent sticking and set them aside for later use.
- Mix Dry Ingredients: In a medium bowl, whisk together the flour, baking soda, salt, ground ginger, cinnamon, and cloves. This will form the dry base of your gingerbread dough.
- Cream Butter and Sugar: In a large mixing bowl, cream together the softened butter and brown sugar until the mixture is light and fluffy. This process should take about 2-3 minutes.
- Add Wet Ingredients: Beat in the egg, molasses, and vanilla extract until well combined. The mixture should be smooth and creamy.
- Combine Wet and Dry Ingredients: Gradually add the dry ingredients to the wet ingredients, mixing until a thick dough forms. You may need to use your hands to fully incorporate all the flour.
- Chill the Dough: Divide the dough in half and flatten each portion into a disk. Wrap in plastic wrap and refrigerate for at least 1 hour. This step is essential to make the dough easier to roll out.
- Roll Out the Dough: Once chilled, take one disk of dough and roll it out on a lightly floured surface to about 1/4 inch thickness. Use haunted house cookie cutters or a template to cut out the shapes needed for your house.
- Bake the Gingerbread: Transfer the cut-outs to the prepared baking sheets and bake for 10-12 minutes, or until the edges are firm. Let them cool completely on a wire rack before assembling.
- Assemble the House: Use royal icing as the “glue” to assemble your gingerbread house. Start by attaching the walls and then the roof. Allow the structure to set for at least 1 hour before decorating.
- Decorate: Once the house is stable, use additional royal icing and assorted candies to decorate your haunted house as desired. Let your creativity run wild with spooky designs!
Extra Tips:
When constructing your Haunted House Gingerbread, patience is key. Allowing the structure to set properly before decorating will prevent any collapses or mishaps.
If you’re crafting with kids, encourage them to be imaginative with their decorations, using a variety of candies to create ghosts, cobwebs, or even pumpkins on the house.
Be sure to keep any leftover dough chilled until you’re ready to roll it out, as warmer dough can become sticky and difficult to manage. Enjoy the process and have a hauntingly good time!
Candy Corn Cookie Pops
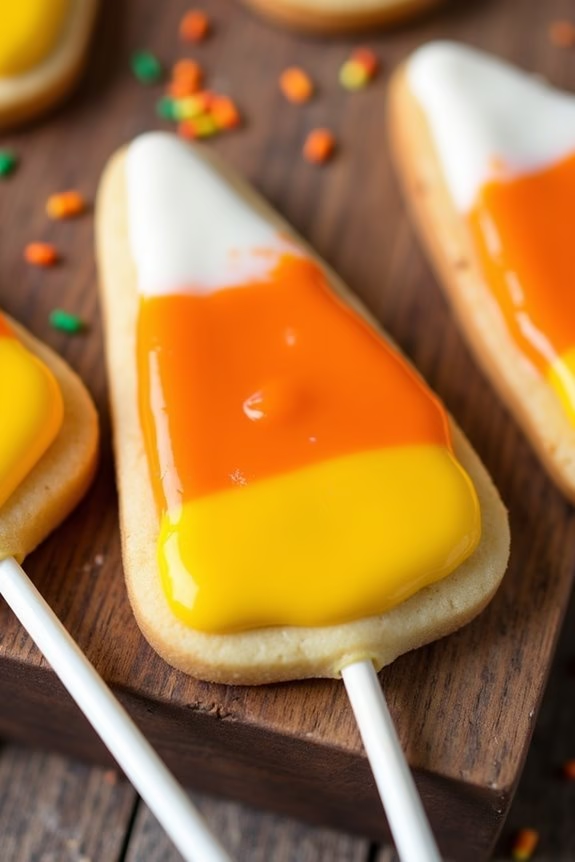
Candy Corn Cookie Pops are a delightful treat perfect for celebrating Halloween with kids. These colorful and fun treats combine the classic flavors of sugar cookies with the iconic look of candy corn, making them both visually appealing and delicious. Not only are they a hit with children, but they also provide a creative opportunity for little hands to help out in the kitchen.
Whether you’re hosting a Halloween party or just looking for a festive snack, these cookie pops are bound to bring smiles to everyone’s faces.
The process of making Candy Corn Cookie Pops is simple and enjoyable, making it a great activity for families. The recipe involves preparing a sugar cookie dough, coloring it in vibrant shades of yellow and orange, and then shaping it into fun candy corn designs on lollipop sticks.
Once baked and cooled, these treats can be further decorated with icing or sprinkles to add an extra layer of fun. With the following ingredients and instructions, you’ll be able to create a batch of Candy Corn Cookie Pops that serve 4-6 people.
Ingredients:
- 2 1/2 cups all-purpose flour
- 1/2 teaspoon baking powder
- 1/4 teaspoon salt
- 3/4 cup unsalted butter, softened
- 1 cup granulated sugar
- 1 large egg
- 1 teaspoon vanilla extract
- Orange and yellow food coloring
- 24 lollipop sticks
- Optional: white icing for decoration
- Optional: sprinkles for decoration
Instructions:
- Preheat the Oven: Begin by preheating your oven to 350°F (175°C). Line two baking sheets with parchment paper to prevent the cookies from sticking.
- Prepare the Dough: In a medium bowl, whisk together the flour, baking powder, and salt. In a large bowl, beat the softened butter and granulated sugar together until light and fluffy. Add in the egg and vanilla extract, mixing until well combined.
- Color the Dough: Divide the dough into three equal portions. Leave one portion plain, and color the other two portions with orange and yellow food coloring, respectively. Mix until the colors are evenly distributed.
- Shape the Cookies: Take small portions of each colored dough and press them together to form a triangle shape, resembling a piece of candy corn. Insert a lollipop stick into the base of each triangle, making sure it’s securely embedded.
- Bake the Cookies: Place the cookie pops on the prepared baking sheets, leaving enough space between them. Bake for 10-12 minutes, or until the edges are lightly golden. Allow the cookies to cool on the baking sheets for a few minutes before transferring them to a wire rack.
- Decorate the Pops: Once cooled, decorate the candy corn cookie pops with white icing and sprinkles if desired. This step can be a fun opportunity for kids to get involved and express their creativity.
Extra Tips:
When making Candy Corn Cookie Pops, verify that the lollipop sticks are firmly embedded in the dough to prevent them from falling out during baking. If you find the dough too sticky to work with, chilling it in the refrigerator for 15-20 minutes can make it easier to handle.
Additionally, when coloring the dough, start with a small amount of food coloring and gradually add more until the desired shade is achieved. This way, you can avoid overly intense colors.
Enjoy making these delightful treats, and have a spooktacular Halloween!
Eyeball Truffle Treats
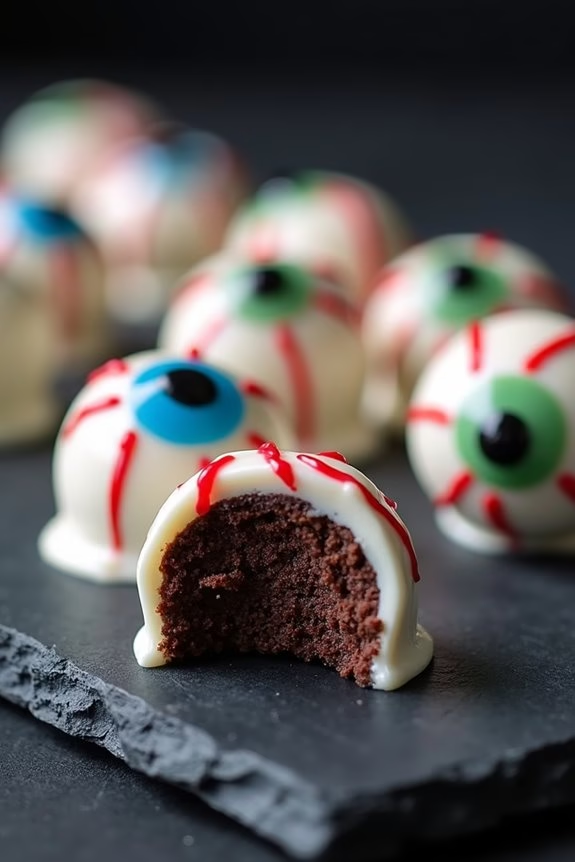
Get ready to spook and delight your little monsters with these Eyeball Truffle Treats, perfect for Halloween fun. These gory yet delicious snacks aren’t only creepy to look at but also a delight to taste, making them a fantastic addition to your Halloween party treats.
With a chocolatey center and an eerie exterior, these truffles are sure to be a hit among kids and adults alike. Plus, they’re simple enough for the little ones to help make, turning the kitchen into a fun and creative Halloween workshop.
The Eyeball Truffle Treats are a fusion of rich chocolate truffles and whimsical Halloween-themed decorations. The core of the treat is a luscious chocolate truffle, surrounded by a white candy coating that resembles the white of an eye.
To complete the spooky look, colored candy melts and edible gel are used to create bloodshot veins and pupils, giving these treats an eerily realistic appearance. Perfect for a serving size of 4-6 people, this recipe is ideal for a small gathering or an intimate family Halloween celebration.
Ingredients:
- 1 cup of semi-sweet chocolate chips
- 1/2 cup of heavy cream
- 1 teaspoon of vanilla extract
- 1 tablespoon of butter
- 1 cup of white candy melts
- Red food coloring gel
- Blue or green candy melts (for irises)
- Black edible gel or black icing (for pupils)
- Red edible gel (for veins)
Instructions:
- Prepare the Truffle Mixture: In a medium saucepan, heat the heavy cream over medium heat until it begins to simmer. Remove from heat and add the chocolate chips and butter, stirring until the mixture is smooth and fully combined. Stir in the vanilla extract. Chill the mixture in the refrigerator for about 1-2 hours or until firm.
- Shape the Truffles: Once the truffle mixture is firm, use a small scoop or your hands to shape tablespoon-sized portions into balls. Place the truffles on a baking sheet lined with parchment paper and return to the refrigerator to set for about 15 minutes.
- Melt the Candy Coating: Melt the white candy melts according to the package instructions, either in the microwave or using a double boiler.
- Coat the Truffles: Dip each truffle into the melted white candy coating, making sure it’s completely covered. Use a fork to lift the truffle out, allowing excess coating to drip off before placing it back on the parchment-lined sheet.
- Decorate the Eyeballs: Before the candy coating sets completely, press a small blue or green candy melt onto each truffle to form the iris. Once set, use black edible gel to dot the center of the iris, creating the pupil. Finally, use red edible gel to draw thin, bloodshot veins radiating from the iris to the edge of the eyeball.
- Set and Serve: Allow the truffles to set completely at room temperature or in the refrigerator before serving.
Extra Tips:
When crafting these eerie delights, make certain that the chocolate truffle mixture is thoroughly chilled before shaping to avoid sticky hands and misshapen treats.
If you’re short on time, you can speed up the setting process by briefly placing the truffles in the freezer. For an extra touch of fun, consider using a variety of candy melt colors for the irises to create a diverse set of eyeballs.
Finally, store any leftovers in an airtight container in the refrigerator to maintain their freshness and prevent the decorations from smudging.
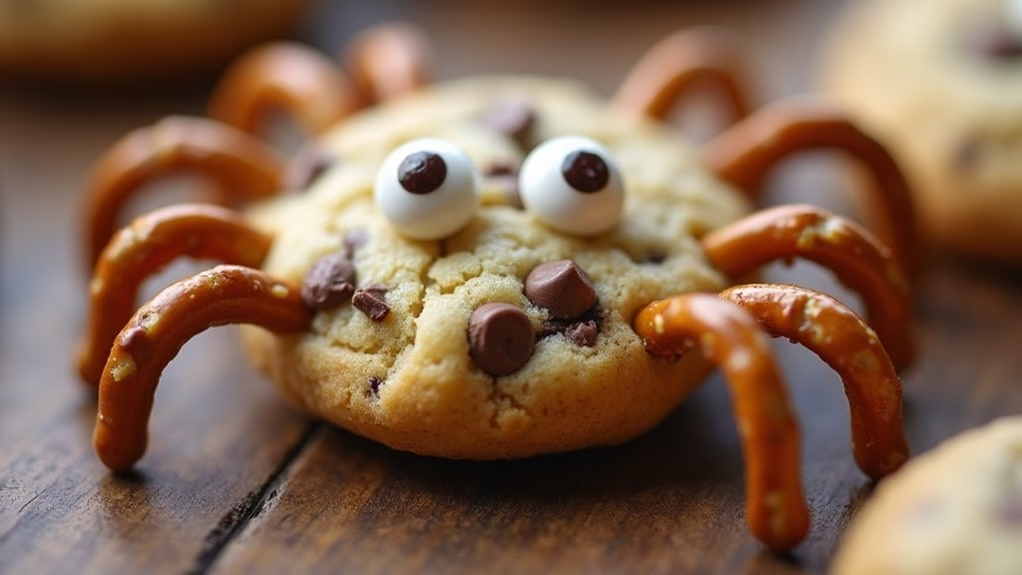
Creepy Crawly Critter Cookies
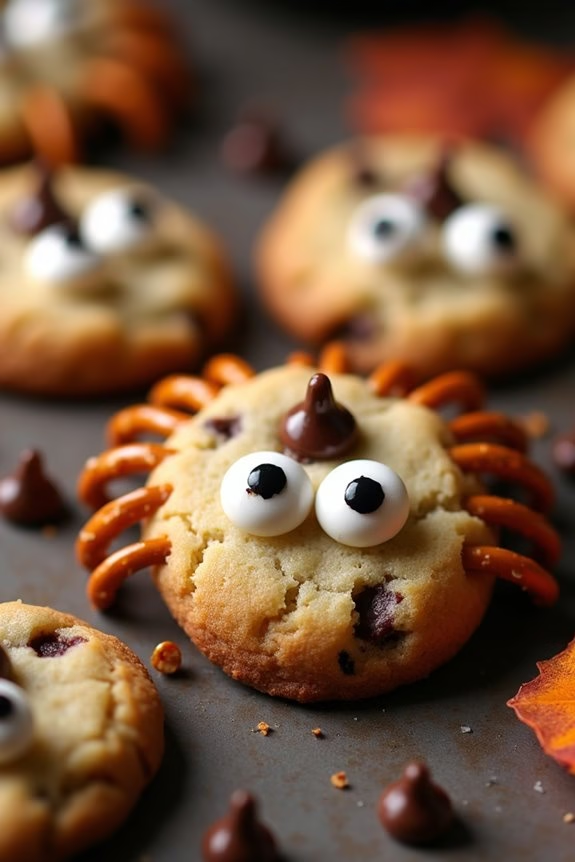
Creepy Crawly Critter Cookies are the perfect Halloween treat that combines a delightful crunch with a spooky twist that kids will adore. These cookies transform the classic chocolate chip cookie into an imaginative creation that features edible creepy crawlies like pretzel legs and candy eyes. The result isn’t only a delicious dessert but also a fun and engaging baking project that brings the Halloween spirit alive in your kitchen.
Whether you’re hosting a Halloween party or just looking for a fun activity to do with your kids, these cookies are sure to be a hit. Designed to serve 4-6 people, this recipe guarantees everyone gets to enjoy their own critter creation. The process is simple enough for children to join in, making it a great opportunity to spend quality time together.
Not only will you create delicious cookies, but you’ll also spark creativity and laughter as you decorate these treats. With just a few basic ingredients and some decorative items, you’ll have a batch of creepy crawly critters ready to delight your little ghouls and goblins.
Ingredients:
- 1 cup unsalted butter, softened
- 1 cup granulated sugar
- 1 cup brown sugar, packed
- 2 large eggs
- 1 teaspoon vanilla extract
- 3 cups all-purpose flour
- 1 teaspoon baking soda
- 1/2 teaspoon baking powder
- 1/2 teaspoon salt
- 2 cups semi-sweet chocolate chips
- 48 candy eyes
- 48 mini pretzel sticks
- Assorted mini candies for decoration (optional)
Instructions:
- Preheat and Prepare: Preheat your oven to 350°F (175°C). Line two baking sheets with parchment paper or silicone baking mats to prevent the cookies from sticking.
- Mix the Wet Ingredients: In a large mixing bowl, combine the softened butter, granulated sugar, and brown sugar. Cream them together using an electric mixer on medium speed until the mixture is light and fluffy. This should take about 2-3 minutes.
- Add Eggs and Vanilla: Beat in the eggs one at a time, making sure each egg is fully incorporated before adding the next. Then mix in the vanilla extract.
- Combine Dry Ingredients: In a separate bowl, whisk together the flour, baking soda, baking powder, and salt. Gradually add this dry mixture to the wet mixture, blending on low speed until just combined.
- Stir in Chocolate Chips: Fold in the chocolate chips using a spatula or wooden spoon, ensuring they’re evenly distributed throughout the dough.
- Shape and Decorate: Scoop tablespoon-sized portions of dough onto the prepared baking sheets, leaving enough space for spreading. Gently press down on each ball to flatten slightly. Insert 4 mini pretzel sticks on each side of the cookie to resemble legs, then place two candy eyes on each cookie.
- Bake: Place the cookies in the preheated oven and bake for 10-12 minutes, or until the edges are golden brown. The centers may appear slightly undercooked but will set as they cool.
- Cool and Serve: Allow the cookies to cool on the baking sheets for 5 minutes before transferring them to a wire rack to cool completely. Once cooled, add any additional decorative candies if desired.
For the best results, make sure your butter is at room temperature before you start, as this will make it easier to cream with the sugars. If you want to add an extra layer of fun, consider using different colored candy eyes or sprinkles to give each critter its own unique personality.
Remember to let the cookies cool completely before serving, as the pretzel legs will be more stable and less likely to break. Enjoy your spooky sweet creations!