

Hey there, fellow Halloween enthusiasts! 🎃 As you plan your ultimate dinner party, let’s transform that charcuterie board into a bewitching centerpiece. Think eerie yet delicious cheese selections, meats arranged in delightfully spine-chilling designs, and breads shaped like witches’ fingers. Add a haunting mix of fruits, nuts, and sinister sweets to excite your taste buds. Ready to enchant your guests with these creative ideas? Stick around for some spook-tacular inspiration!
Ghoulish Gourmet Cheese Selection
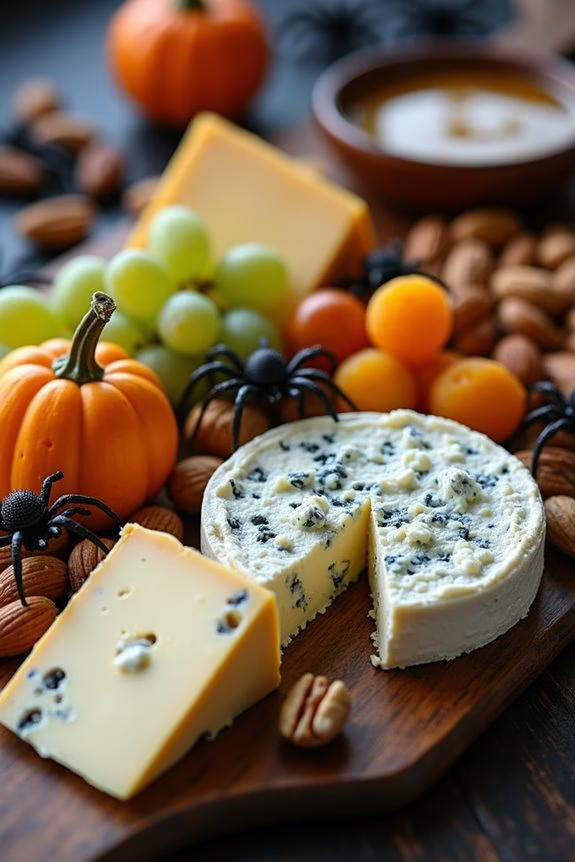
For a spooktacular Halloween party, there’s nothing quite like a Ghoulish Gourmet Cheese Selection to wow your guests. This charcuterie board combines a variety of cheeses that are both visually intriguing and deliciously satisfying, perfect for a frightful night of festivities.
The key to a successful Halloween-themed cheese board is a balance of flavors, textures, and a bit of theatrical flair. From creamy Brie that oozes like a ghostly apparition to aged cheddar that crumbles like ancient bones, your guests will have a hauntingly good time sampling each one.
Creating a Ghoulish Gourmet Cheese Selection involves selecting cheeses that not only taste incredible but also contribute to the eerie ambiance of your Halloween celebration. Complement these cheeses with a selection of crackers, fresh fruit, nuts, and a few strategically placed spooky decorations.
This board is designed to serve 4-6 people, making it perfect for an intimate gathering or as part of a larger spread. So grab your favorite serving board, and let’s get started on crafting a cheese selection that’s both ghoulish and gourmet.
Ingredients for Ghoulish Gourmet Cheese Selection (Serves 4-6):
- 200g creamy Brie cheese
- 200g aged cheddar cheese
- 150g blue cheese
- 150g smoked Gouda
- 100g goat cheese
- A variety of crackers or breadsticks
- 1 cup green and black grapes
- 1/2 cup dried apricots
- 1/2 cup mixed nuts (almonds, walnuts, pecans)
- 1/4 cup honey or fig jam
- Decorative items: Small pumpkins, fake spiders, or Halloween-themed toothpicks
Cooking Instructions:
- Prepare the Cheeses: Begin by allowing all cheeses to come to room temperature. This usually takes about an hour. Room temperature cheese has a more pronounced flavor and a softer texture, which is ideal for tasting.
- Arrange the Board: On a large cutting board or platter, place the Brie and goat cheese. Slice the aged cheddar and smoked Gouda into thin, easy-to-grab pieces. Crumble the blue cheese into small chunks. Arrange these cheeses with some space between them to make room for other items.
- Add the Accompaniments: Surround the cheeses with a generous selection of crackers and breadsticks. Scatter grapes and dried apricots around the board for a pop of color and a touch of sweetness.
- Incorporate the Nuts and Sweet Elements: Place small piles of mixed nuts in open spaces on the board. Add a small dish of honey or fig jam to the board as a sweet complement to the cheeses.
- Decorate: To give your board a Halloween twist, add small decorative elements like mini pumpkins, fake spiders, or use Halloween-themed toothpicks to skewer some of the cheese or fruit.
Extra Tips:
When assembling your Ghoulish Gourmet Cheese Selection, think about color and contrast. Choose cheeses with different hues and textures to create a visually striking presentation.
Don’t forget to label the cheeses; this can be done with simple tags or spooky labels for an added Halloween touch. Consider adding a knife for each cheese to prevent flavors from mingling, and remember to replenish the board as the night goes on.
Most importantly, have fun with it and let your creativity shine through in your cheese selections and decorations.
Spooky Meat and Salami Arrangements

Halloween is a time for fun, fright, and festive food! One of the best ways to impress your guests is with a Spooky Salami and Meat Charcuterie Board. This dish combines the artistry of food presentation with the savory delights of various meats, creating an eerie yet appetizing display. Perfect for a Halloween gathering, this charcuterie board offers an exciting blend of flavors and textures that will captivate both the eyes and taste buds of your guests.
Creating a spooky charcuterie board involves more than just selecting meats; it’s about creating an experience. To make it truly eerie, you can use imaginative arrangements like shaping salami into roses or creating a “meat mummy.” Add some Halloween-themed decorations or garnishes such as olives, berries, and cheese cut into spooky shapes. Accompany these with crackers, breadsticks, and dips, which not only enhance the taste but also contribute to the visual appeal. This recipe serves 4-6 people and is sure to be a hit at your Halloween party.
Ingredients:
- 200g of salami
- 200g of prosciutto
- 200g of chorizo
- 150g of soppressata
- 100g of black olives
- 100g of green olives
- 150g of assorted cheeses (e.g., cheddar, brie, gouda)
- 100g of dried apricots
- 100g of mixed nuts
- A handful of fresh rosemary sprigs
- Crackers and breadsticks for serving
Instructions:
- Prepare the Meats: Begin by rolling the prosciutto into small rolls. For the salami, create a rose shape by folding each slice in half and then rolling it into a cone. Arrange these on the board, leaving space between each type of meat.
- Add the Cheese: Cut the assorted cheeses into various spooky shapes using cookie cutters. Arrange them around the meats, making sure of a balanced distribution across the board.
- Garnish with Olives and Nuts: Scatter the black and green olives around the board. Place mixed nuts in small clusters to add different textures and flavors.
- Incorporate Fruits: Add dried apricots to the board for a touch of sweetness. These not only provide contrast in flavor but also add a vibrant color to the display.
- Finish with Decor: Place sprigs of rosemary around the board to enhance the presentation with a touch of green. Add crackers and breadsticks on the sides or in small bowls for easy access.
- Final Touches: Check that all items are easily accessible and adjust as needed to guarantee an attractive and functional presentation.
Extra Tips:
When creating your Spooky Salami and Meat Charcuterie Board, remember that the key is in the details. Use small bowls or ramekins for dips and spreads if you wish to include them.
Try to balance the colors and textures across the board to make it visually appealing. If fresh rosemary isn’t available, you can use other herbs like thyme or sage for a similar effect.
Finally, prepare the board just before your event to guarantee everything remains fresh and inviting.
Bewitching Bread and Cracker Choices
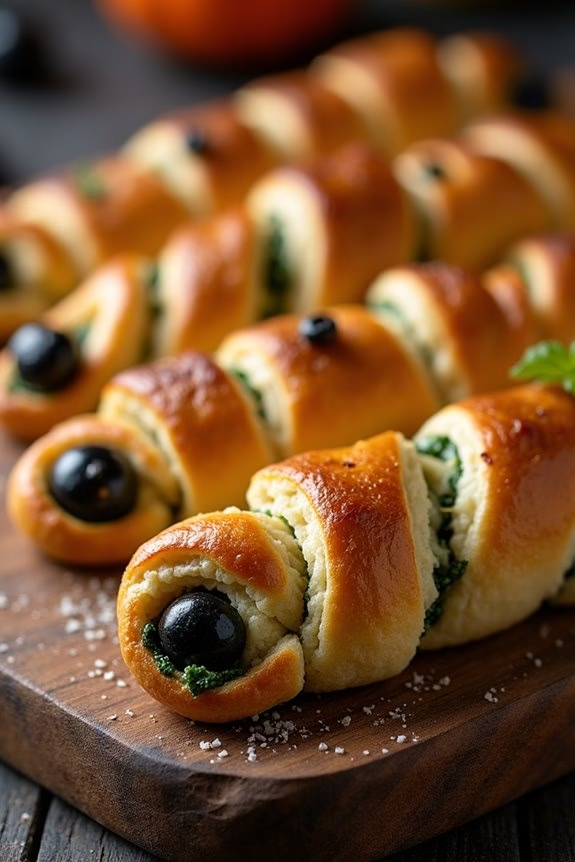
Create a hauntingly delicious addition to your Halloween charcuterie board with these Spooky Spinach and Cheese Stuffed Breadsticks. They aren’t only visually appealing but also offer a tasty twist with their savory filling and crispy exterior.
These breadsticks can be shaped into fun, eerie designs like witches’ fingers or twisted mummies to add an extra element of fun to your Halloween spread. Perfect for serving 4-6 people, these breadsticks are filled with a delightful mixture of spinach and cheese, which oozes out slightly to create a ghoulish appearance.
They’re simple to prepare and cook, making them an ideal choice for a Halloween gathering, whether you’re planning a party or a cozy get-together with family. Here’s how to make these spooky treats:
Ingredients:
- 1 pack of refrigerated pizza dough (enough for 8 breadsticks)
- 1 cup fresh spinach, chopped
- 1 cup shredded mozzarella cheese
- 1/2 cup ricotta cheese
- 2 cloves garlic, minced
- 1 teaspoon Italian seasoning
- Salt and pepper to taste
- 1 egg, beaten (for egg wash)
- Black olives (for decoration)
Cooking Instructions:
- Preheat the Oven: Set your oven to 375°F (190°C) to guarantee it’s ready for baking once your breadsticks are prepared.
- Prepare the Filling: In a medium-sized bowl, combine the chopped spinach, mozzarella cheese, ricotta cheese, minced garlic, Italian seasoning, salt, and pepper. Mix until all ingredients are well-incorporated.
- Roll Out the Dough: Unroll the pizza dough on a lightly floured surface. Use a rolling pin if necessary to smooth it out to about a 1/4-inch thickness.
- Cut and Fill: Cut the dough into strips, approximately 2 inches wide and 6 inches long. Place a tablespoon of the spinach mixture onto one half of each strip.
- Seal and Shape: Fold the dough over the filling and press the edges to seal. Shape the breadsticks into spooky designs like fingers or twists. If making fingers, use a knife to score knuckle lines and press an olive slice onto the tip for a fingernail.
- Egg Wash: Brush the tops of the breadsticks with the beaten egg to give them a golden finish when baked.
- Bake: Place the breadsticks on a baking sheet lined with parchment paper. Bake in the preheated oven for 15-18 minutes until they turn golden brown.
- Cool and Serve: Allow the breadsticks to cool slightly before serving them on your charcuterie board.
Extra Tips:
For an extra eerie effect, use food coloring to tint the dough before baking. Green or black can add to the Halloween theme.
Consider doubling the recipe if you anticipate a larger crowd, as these tend to disappear quickly! You can also prepare the filling a day in advance to save time on the day of your event. Adjust the seasoning to your taste, and remember, these breadsticks are best enjoyed warm for the full ‘cheese pull’ effect!
Hauntingly Good Fruit and Nut Pairings
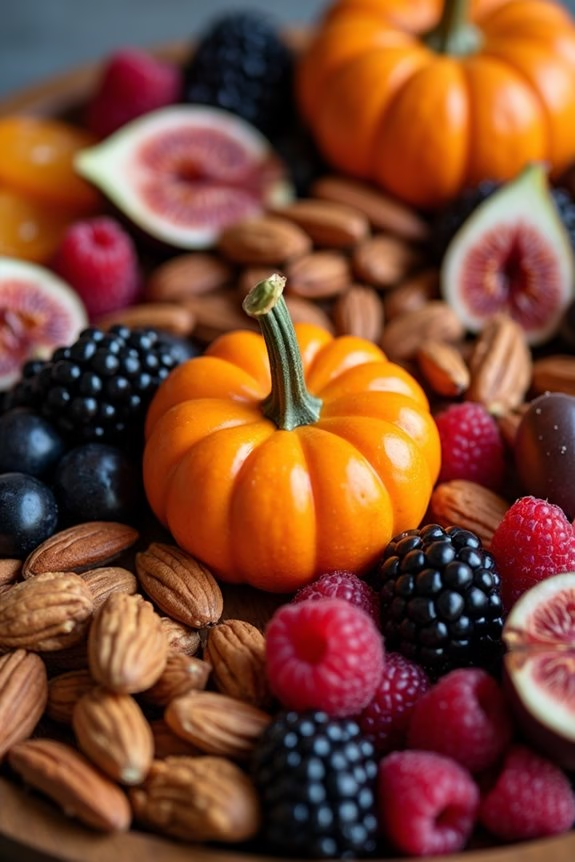
Halloween is the perfect occasion to get creative with your food presentations, and a Hauntingly Good Fruit and Nut Charcuterie Board is a delightful way to serve up some spooky and scrumptious treats. This board is a colorful and nutritious mix of fruits and nuts, arranged in a way that captures the essence of Halloween. It’s perfect for serving 4-6 people, making it an ideal addition to your Halloween party spread or a fun family gathering. The natural sweetness of the fruits pairs wonderfully with the rich flavors of nuts, creating a balanced and satisfying snack.
This charcuterie board can be customized to suit your preferences, but the key is to mix textures and flavors to keep it interesting and visually appealing. The aim is to create a board that isn’t only delicious but also a feast for the eyes, with an array of colors and shapes that evoke the Halloween spirit. With the right selection of fruits and nuts, you can create a board that’s both healthy and indulgent, providing your guests with a delightful treat that’s sure to impress.
Ingredients (serving size: 4-6 people):
- 1 cup of dried apricots
- 1 cup of dried figs
- 1 cup of fresh blackberries
- 1 cup of fresh raspberries
- 1 cup of fresh grapes (red or black)
- 1 cup of roasted almonds
- 1 cup of walnuts
- 1 cup of pecans
- 1 cup of dark chocolate-covered nuts
- 4 pieces of fresh figs, halved
- 1 small pumpkin for decoration
- 1 cup of assorted cheese cubes (optional)
Instructions:
- Preparation: Start by washing all the fresh fruits thoroughly. Dry them with a clean towel to remove any excess water, which will help keep them fresh and prevent the other ingredients from getting soggy.
- Arranging the Board: Choose a large wooden or slate board to create your charcuterie display. Begin by placing the small pumpkin in the center for a festive Halloween touch. This will serve as the focal point of the board.
- Placing the Fruits: Arrange the fresh fruit around the pumpkin. Place the grapes in small bunches to add volume and texture to the board. Position the blackberries and raspberries in small clusters, alternating them to create a colorful pattern. Place the halved fresh figs strategically to add visual interest.
- Adding Nuts: Distribute the roasted almonds, walnuts, and pecans evenly around the fruits. This will add a nice crunch and contrast to the soft textures of the fruits. Be sure to leave some space between different types of nuts to make them easily accessible.
- Incorporating Dried Fruits and Chocolate: Fill in the remaining spaces with dried apricots, dried figs, and dark chocolate-covered nuts. These will add sweetness and depth of flavor to the board. If using cheese, scatter the cubes in small clusters, ensuring they aren’t overwhelming the other elements.
- Final Touches: Step back and look at the board. Adjust any elements as needed to guarantee a balanced and visually appealing display. You can add small utensils or tongs for easy serving.
Extra Tips:
To enhance the Halloween theme, consider using cookie cutters to shape some of the cheese slices into spooky shapes like bats or pumpkins. You can also add small decorative elements like fake spiders or cobwebs around the board for an added eerie effect.
If you have dietary restrictions, feel free to substitute with gluten-free or vegan options as required. Remember to keep the board at a cool temperature until serving to maintain the freshness of the fruits and integrity of the chocolate. Enjoy your Hauntingly Good Fruit and Nut Charcuterie Board with a side of your favorite spooky drink for a complete Halloween experience!
Phantom Pickles and Olives
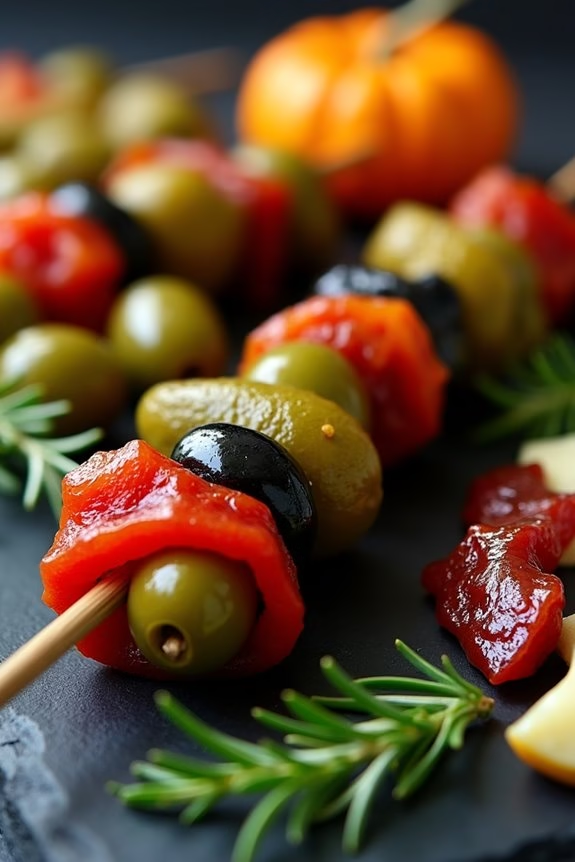
Transform your Halloween spread into a spooky delight with Phantom Pickles and Olives. This dish combines the tangy and briny flavors of pickles and olives with a mysterious, eerie presentation that will captivate your guests. Perfect for a Halloween charcuterie board, these ghoulish snacks are both visually appealing and deliciously satisfying.
By using a variety of pickles and olives, you can create a hauntingly beautiful arrangement that’s sure to be the highlight of your Halloween party. The key to making Phantom Pickles and Olives lies in selecting a diverse range of colors, shapes, and textures to evoke a sense of eerie elegance.
By creatively arranging these ingredients and incorporating a few additional spooky elements, you can achieve a visually stunning centerpiece. Whether you’re hosting a large gathering or an intimate get-together, this dish is designed to serve 4-6 people, making it a versatile addition to your festive feast.
Ingredients for 4-6 People:
- 1 cup of assorted olives (green, black, and Kalamata)
- 1 cup of assorted pickles (gherkin, dill, and sweet)
- 1/2 cup of pickled onions
- 1/2 cup of pickled jalapeños
- 1/2 cup of roasted red peppers
- 1/4 cup of caperberries
- 1/4 cup of marinated artichoke hearts
- 6-8 sprigs of fresh rosemary
- 1 small pumpkin or decorative gourd (for presentation)
- 6-8 skewers or cocktail picks
Cooking Instructions:
- Prepare the Ingredients: Begin by draining and rinsing the olives, pickles, and other pickled elements to remove any excess brine. Pat them dry with a paper towel to prevent them from making the board soggy.
- Arrange the Ingredients: On a large serving platter or charcuterie board, start by placing the small pumpkin or decorative gourd in the center as a focal point. This will serve as the centerpiece of your Phantom Pickles and Olives display.
- Create Skewers: Thread a variety of olives, pickles, pickled onions, jalapeños, roasted red peppers, caperberries, and artichoke hearts onto skewers or cocktail picks. Mix and match to create intriguing combinations and a variety of colors and textures.
- Add Fresh Elements: Surround the pumpkin with the skewers, arranging them in a fan-like pattern. Add sprigs of fresh rosemary around the base of the pumpkin to give the display a touch of natural greenery and an aromatic element.
- Final Touches: For an extra spooky effect, you can carve a simple face into the pumpkin or gourd to enhance the Halloween theme. Lightly mist the entire board with water to keep the ingredients fresh and glistening.
Extra Tips:
When creating your Phantom Pickles and Olives display, consider using a dark, dramatic serving board to enhance the eerie theme. A slate or dark wooden board can provide a striking contrast to the vivid colors of the pickles and olives.
Additionally, you can incorporate small decorative Halloween elements like plastic spiders or cobwebs to add an extra layer of spookiness. Finally, remember that variations in the types of pickles and olives you choose can cater to different taste preferences, ensuring that everyone finds something they enjoy on your charcuterie board.
Devilish Dips and Spreads

Celebrate Halloween with a Spooky Black Bean and Avocado Dip that will add a devilish twist to your charcuterie board. This dip isn’t only deliciously creamy and flavorful but also visually striking with its eerie black hue, perfect for a Halloween-themed gathering.
The combination of black beans and avocados offers a rich and smooth texture, while lime juice and spices add a zesty kick, making it a crowd favorite for your spooky festivities.
This recipe yields a dip that serves 4-6 people, making it ideal for a small gathering. The contrasting colors and creamy texture of this dip will have your guests coming back for more. It pairs wonderfully with assorted crackers, fresh vegetables, or crispy tortilla chips. Get ready to enchant your guests with a dip that’s as delightful to the palate as it’s to the eyes.
Ingredients:
- 2 ripe avocados
- 1 can (15 ounces) black beans, rinsed and drained
- 1 clove garlic, minced
- 1 small red onion, finely chopped
- 2 tablespoons fresh lime juice
- 1/2 teaspoon ground cumin
- 1/2 teaspoon smoked paprika
- Salt and pepper to taste
- 2 tablespoons fresh cilantro, chopped
- 1/4 cup crumbled feta cheese (optional)
- Tortilla chips or vegetable sticks for serving
Cooking Instructions:
- Prepare the Avocados: Slice the avocados in half, remove the pits, and scoop the flesh into a large mixing bowl. Use a fork or potato masher to mash the avocados until they’re smooth with a slightly chunky texture.
- Blend the Beans: In a food processor, combine the black beans, minced garlic, and lime juice. Pulse the mixture until it becomes smooth and creamy. If necessary, add a tablespoon of water to achieve your desired consistency.
- Mix Ingredients: Add the black bean mixture to the mashed avocados in the mixing bowl. Stir well to combine, ensuring the ingredients are evenly distributed.
- Add Flavor: Stir in the finely chopped red onion, ground cumin, smoked paprika, salt, and pepper. Mix until all spices are well incorporated into the dip.
- Garnish and Serve: Transfer the dip to a serving bowl and sprinkle chopped cilantro and crumbled feta cheese (if using) on top. Serve with a side of tortilla chips or vegetable sticks for dipping.
- Chill (Optional): For enhanced flavors, consider covering and refrigerating the dip for 30 minutes before serving.
Extra Tips:
For a spookier presentation, consider serving the dip in a hollowed-out pumpkin or a cauldron-style bowl.
You can also add a dash of cayenne pepper or hot sauce for an extra kick to suit your guests’ spice preferences. If you want to keep the dip vibrant and fresh for longer, press a piece of plastic wrap directly onto the surface before sealing the container to minimize browning.
Enjoy your Halloween-themed charcuterie board with this eerily delicious dip!
Sinister Sweet Treat Additions

When it comes to Halloween charcuterie boards, adding a dash of sweetness is vital to balance out the savory elements. One delightful addition that’s sure to captivate both the young and the young-at-heart is Spooky Candy-Corn Popcorn Balls. These treats not only add a pop of color to your board but are also a perfect blend of crunchy, sweet, and slightly salty flavors. The candy corn provides a nostalgic touch, while the sticky marshmallow coating makes the popcorn balls irresistibly chewy and fun to eat.
Preparing Spooky Candy-Corn Popcorn Balls is a straightforward process, and they make an ideal project for involving little helpers in the kitchen. The combination of popcorn, marshmallows, and candy corn creates a delightful texture contrast, and the vibrant colors fit perfectly with the Halloween theme. These popcorn balls can be made ahead of time and stored, making them a convenient option for your holiday festivities.
Ingredients for 4-6 servings:
- 10 cups of popped popcorn
- 3 cups mini marshmallows
- 1/2 cup unsalted butter
- 1 teaspoon vanilla extract
- 1/4 teaspoon salt
- 1 cup candy corn
- Cooking spray
Cooking Instructions:
- Prepare the Popcorn: Start by popping 10 cups of popcorn. You can use store-bought popcorn or pop your own at home. Make sure you remove any unpopped kernels, as they can be a nuisance when forming the popcorn balls.
- Melt the Marshmallow Mixture: In a large saucepan, melt 1/2 cup of unsalted butter over medium heat. Once melted, add 3 cups of mini marshmallows and stir continuously until the marshmallows are completely melted and the mixture is smooth. Stir in 1 teaspoon of vanilla extract and 1/4 teaspoon of salt for added flavor.
- Combine Popcorn and Candy Corn: In a large mixing bowl, combine the popped popcorn and 1 cup of candy corn. Pour the melted marshmallow mixture over the popcorn and candy corn. Quickly, but gently, stir to coat all the popcorn and candy corn evenly with the marshmallow mixture.
- Form the Popcorn Balls: Spray your hands with cooking spray to prevent sticking. While the mixture is still warm, take a handful of the popcorn mixture and gently press it into a ball shape. Continue this process until all the mixture is used, making sure each ball is tightly packed.
- Set the Popcorn Balls: Place the formed popcorn balls onto a baking sheet lined with parchment paper. Allow them to cool and set for about 30 minutes before serving or storing.
Extra Tips:
For a more festive touch, consider adding a few drops of orange or green food coloring to the melted marshmallow mixture before combining it with the popcorn. This will give the popcorn balls an even more vibrant Halloween appearance.
If you want to make these popcorn balls ahead of time, store them in an airtight container at room temperature for up to three days. Avoid refrigerating them, as this could make them lose their chewy texture. Adjust the size of the popcorn balls according to your preference, and make sure to keep them tightly packed so they hold their shape.
Creepy Condiments and Sauces
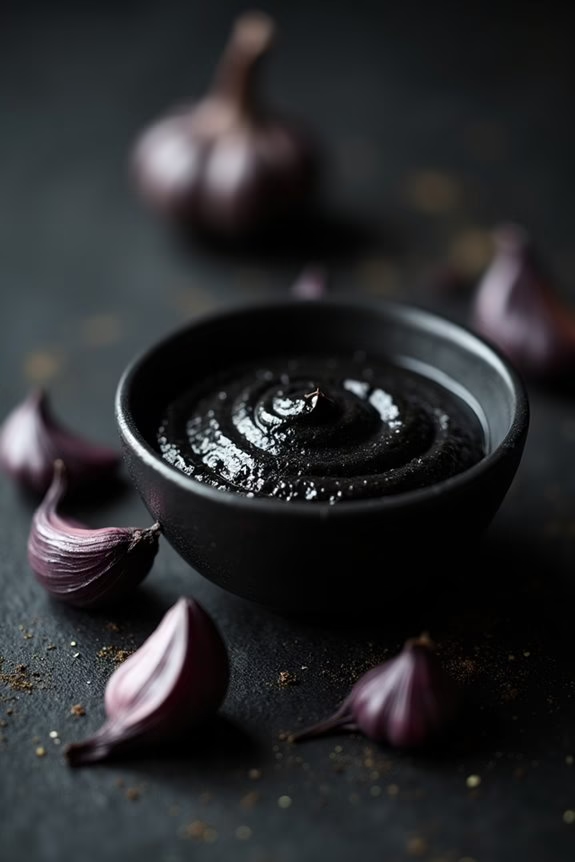
Transform your Halloween charcuterie board into a ghoulish delight with our Spooky Black Garlic Aioli. This eerie condiment adds a mysterious touch to your platter, with its rich, dark hue and tantalizing umami flavor. Black garlic, the star ingredient, is aged and fermented, giving it a sweet, mellow, and slightly tangy taste that’s both intriguing and delicious. This aioli pairs perfectly with a variety of meats, cheeses, and veggies, making it a versatile addition to your board.
The beauty of this recipe lies in its simplicity and ability to elevate the flavors of your Halloween spread. Whether you’re hosting a small gathering or a larger party, this Spooky Black Garlic Aioli will certainly captivate your guests. With just a few ingredients, you can whip up this hauntingly delicious sauce in no time, guaranteeing that your charcuterie board is as flavorful as it’s festive.
Ingredients (Serves 4-6):
- 4 cloves black garlic
- 1 cup mayonnaise
- 1 tablespoon lemon juice
- 1 teaspoon Dijon mustard
- 1 teaspoon Worcestershire sauce
- Salt and black pepper to taste
Instructions:
- Prepare the Black Garlic: Begin by peeling the black garlic cloves. Since black garlic is softer than regular garlic, you can easily squeeze it out of its skin using your fingers. Confirm that there are no skins left attached to the cloves.
- Mix the Ingredients: In a medium-sized bowl, combine the peeled black garlic, mayonnaise, lemon juice, Dijon mustard, and Worcestershire sauce. Use a fork to mash the black garlic thoroughly, integrating it with the other ingredients.
- Blend Until Smooth: Transfer the mixture to a blender or use an immersion blender directly in the bowl. Blend the ingredients until they form a smooth, creamy aioli. The black garlic should be completely incorporated, giving the aioli a uniform dark color.
- Season to Taste: Once blended, taste the aioli and add salt and black pepper according to your preference. Blend again briefly to confirm the seasoning is evenly distributed.
- Chill and Serve: Transfer the aioli to a serving bowl and cover it. Chill in the refrigerator for at least 30 minutes before serving to allow the flavors to meld. Serve it as a dip or spread alongside your Halloween charcuterie board.
Extra Tips:
For the most striking appearance, use a dark dish to serve the aioli, enhancing its spooky aesthetic. If you want to add more complexity to the flavor, consider roasting your black garlic cloves lightly before incorporating them into the aioli. This will bring out even more sweetness and depth.
Additionally, you can experiment with adding a pinch of smoked paprika or cayenne pepper for a hint of spice and color. Remember, the key to a great aioli is balance, so adjust your seasoning slowly and taste as you go.
Enchanting Edible Decorations

Transform your Halloween gathering with an enchanting and spooky charcuterie board that combines both savory and sweet elements. This eye-catching spread is perfect for entertaining a group of 4-6 people and will surely be the centerpiece of your festive table.
With a mix of meats, cheeses, fruits, and creative touches, you can capture the essence of Halloween while delighting your guests’ taste buds. From eerie edible decorations to ghostly garnishes, this charcuterie board is as fun to assemble as it’s to devour.
The key to a memorable Halloween charcuterie board is in the details. Begin by selecting a variety of cheeses and cured meats, then add seasonal fruits, nuts, and candies. To enhance the Halloween theme, incorporate edible decorations like plastic spiders or candy eyes.
By creatively arranging the components and using themed accessories, you can create a board that isn’t only delicious but also visually appealing. Follow this recipe for a spooktacular spread that will have everyone coming back for more.
Ingredients (Serves 4-6):
- 200g of cheddar cheese
- 200g of brie cheese
- 150g of salami slices
- 150g of prosciutto
- 1 cup of black olives
- 1 cup of green grapes
- 1/2 cup of dried apricots
- 1/2 cup of almonds
- 1/4 cup of pumpkin seeds
- 1/2 cup of candy corn
- Edible candy eyes
- Decorative plastic spiders
- Crackers or breadsticks
- Fresh rosemary sprigs
Instructions:
- Prepare the Base: Start by selecting a large wooden board or platter as the base for your charcuterie. This will provide ample space for arranging all the ingredients.
- Arrange Cheeses: Cut the cheddar cheese into cubes and slice the brie into wedges. Place these on opposite ends of the board to create balance.
- Add Meats: Fold the salami slices into quarters and arrange them in a fan shape. Roll the prosciutto and place it next to the brie.
- Incorporate Fruits and Nuts: Scatter the black olives and green grapes around the cheeses and meats. Add clusters of dried apricots and almonds for texture and flavor.
- Seasonal Touches: Sprinkle pumpkin seeds and candy corn around the board. For a spooky effect, place candy eyes sporadically among the other ingredients.
- Add Decorative Elements: Strategically place plastic spiders on the board for a Halloween vibe. Use fresh rosemary sprigs to add a touch of greenery and aroma.
- Final Touches: Fill any remaining gaps with crackers or breadsticks to ascertain the board appears full and bountiful.
Extra Tips:
To make your charcuterie board even more festive, consider using small pumpkins or gourds as additional decor around the board.
Don’t hesitate to get creative with the arrangement, experimenting with different shapes and layers to enhance visual appeal. If you want to add more sweetness, chocolate-covered pretzels or caramel dip can be wonderful additions.
Remember that balance is key, so verify there’s a good mix of savory and sweet elements. Most importantly, have fun with it and let your imagination run wild to capture the spirit of Halloween!
Wickedly Themed Serving Platters
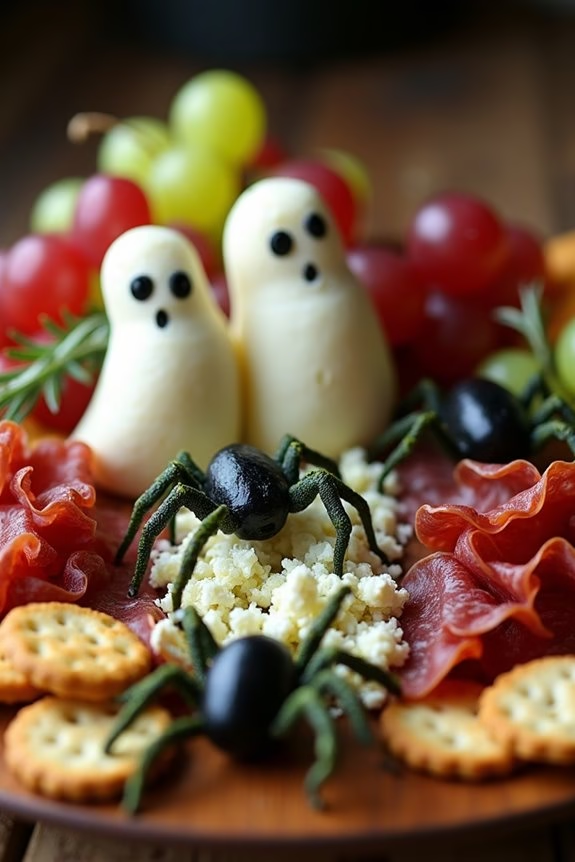
This Halloween, impress your guests with a Creepy Crawly Cheese and Meat Platter that’s both delicious and delightfully unsettling. Perfect for a gathering of 4-6 people, this wickedly themed charcuterie board combines a variety of cheeses, cured meats, and eerie garnishes that evoke the spirit of the season.
Think of it as a traditional charcuterie board with a spine-chilling twist, complete with ghoulish accents that will make your Halloween party the talk of the town.
To create this spooktacular platter, you’ll want to focus on presentation as much as flavor. Choose a large wooden board or a serving tray as your canvas. Arrange ingredients in a way that suggests the mysterious and macabre.
From ghostly goat cheese logs to olive spiders creeping across the board, every element should contribute to the eerie aesthetic while offering flavors that complement each other. This bewitching combination of tastes and textures will guarantee your guests are both entertained and satisfied.
Ingredients (Serving Size: 4-6 people):
- 100g of Brie cheese
- 100g of aged cheddar cheese
- 100g of blue cheese
- 100g of goat cheese
- 150g of prosciutto
- 150g of salami
- 100g of black olives
- 100g of green olives
- 1 small bunch of red grapes
- 1 small bunch of green grapes
- 1 cup of dried apricots
- 1 cup of mixed nuts (almonds, walnuts, etc.)
- 1 package of crackers
- 1 package of breadsticks
- Fresh rosemary sprigs for garnish
- Edible flowers for decoration (optional)
Instructions:
- Prepare the Board: Begin by placing the cheeses on the board. Cut the Brie into wedges, crumble the blue cheese, and shape the goat cheese into small logs. Arrange them in different sections of the board, leaving space for other ingredients.
- Add the Meats: Fold the prosciutto into small, loose bundles and fan out the salami to create a flower-like appearance. Place these near the cheeses, ensuring easy access for guests.
- Create the Olive Spiders: Slice some black olives in half for the body of the spiders. Use thin strips of green olives as legs, arranging them around the olive halves on the board to create a creepy crawly effect.
- Include Fruits and Nuts: Scatter the red and green grapes around the board, filling in gaps and adding color. Add clusters of dried apricots and mixed nuts for texture and additional flavor.
- Add Crackers and Breadsticks: Arrange crackers and breadsticks around the board’s perimeter, providing a crunchy complement to the cheeses and meats.
- Decorate with Garnishes: Tuck fresh rosemary sprigs between the ingredients for a touch of greenery. If desired, add edible flowers to enhance the board’s visual appeal.
- Final Touches: Make final adjustments to the arrangement, ensuring a balanced and visually appealing presentation. Serve immediately or cover with plastic wrap and refrigerate until guests arrive.
Extra Tips:
For an even more festive touch, consider using cookie cutters to shape the cheeses into Halloween-themed figures like bats or ghosts. Guarantee that the cheeses are chilled but not too cold when serving, as this brings out their flavors.
Don’t be afraid to get creative with your garnishes—consider adding fun elements like plastic spider rings or mini pumpkins for a truly haunting effect. Remember, the key to a successful Halloween charcuterie board is balancing the spooky theme with delicious flavors that will keep your guests coming back for more.