

Are you ready to add a touch of gourmet magic to your Halloween festivities?
I’ve rounded up 15 irresistible cake ideas that bring both flavor and style to your spooky celebrations.
Picture a Dark Chocolate and Black Cherry Layer Cake taking center stage at your party or savor the cozy warmth of a Spiced Pumpkin and Maple Cream Cake.
Each cake is a feast for the eyes and the taste buds.
Get ready to impress your guests with these delightful Halloween treats!
Dark Chocolate and Black Cherry Layer Cake
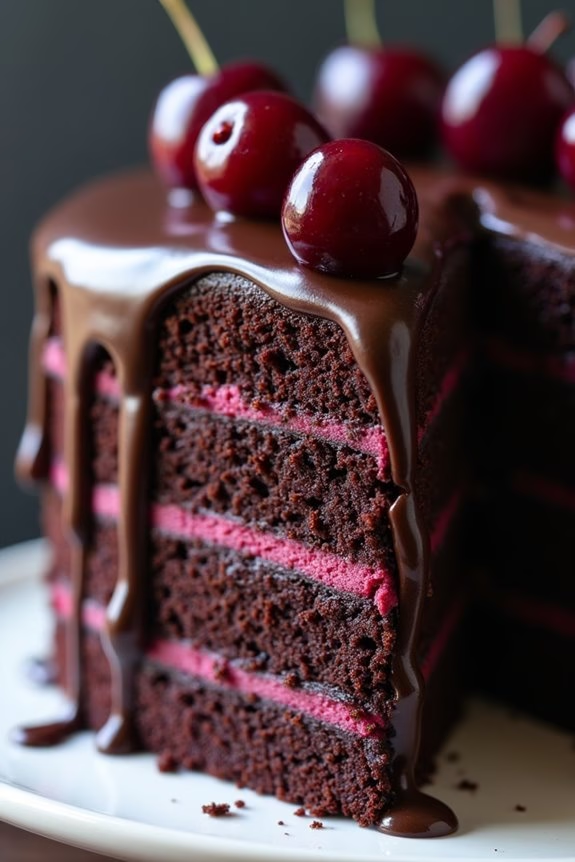
Indulge in the rich and decadent flavors of a Dark Chocolate and Black Cherry Layer Cake this Halloween. Perfect for adult gatherings, this cake combines the bittersweet taste of dark chocolate with the tartness of black cherries, creating a sophisticated dessert that seamlessly fits into the spooky theme of the holiday.
The layers of moist chocolate sponge cake are complemented by a luscious black cherry filling, and the entire creation is wrapped in a smooth, dark chocolate ganache. This cake not only looks impressive but also guarantees a delightful experience for anyone who takes a bite.
To achieve the perfect balance of flavors, the cake’s components are carefully crafted and assembled. The chocolate sponge layers provide a sturdy yet tender base, while the black cherry filling adds a burst of fruity freshness. The dark chocolate ganache serves as a velvety finishing touch, offering a glossy and elegant appearance that will captivate your guests.
With a serving size of 4-6 people, this cake is ideal for an intimate Halloween gathering, where each slice becomes a conversation starter and a sweet treat to savor.
Ingredients (for 4-6 servings):
For the Chocolate Cake:
- 1 1/2 cups all-purpose flour
- 1 cup granulated sugar
- 1/2 cup unsweetened cocoa powder
- 1 1/2 teaspoons baking powder
- 1/2 teaspoon baking soda
- 1/2 teaspoon salt
- 2 large eggs
- 1/2 cup whole milk
- 1/2 cup vegetable oil
- 2 teaspoons vanilla extract
- 1/2 cup boiling water
For the Black Cherry Filling:
- 1 cup fresh or frozen black cherries, pitted
- 1/4 cup granulated sugar
- 2 tablespoons cornstarch
- 1 tablespoon lemon juice
- 1/4 cup water
For the Dark Chocolate Ganache:
- 1 cup heavy cream
- 8 ounces dark chocolate, chopped
Cooking Instructions:
- Prepare the Cake Batter: Preheat the oven to 350°F (175°C). Grease and line two 8-inch round cake pans with parchment paper. In a large mixing bowl, sift together the flour, sugar, cocoa powder, baking powder, baking soda, and salt. Add the eggs, milk, vegetable oil, and vanilla extract. Mix on medium speed until well combined. Gradually add the boiling water, mixing until the batter is smooth and thin.
- Bake the Cakes: Divide the batter evenly between the prepared cake pans. Bake in the preheated oven for 25-30 minutes, or until a toothpick inserted into the center comes out clean. Allow the cakes to cool in the pans for 10 minutes before transferring them to a wire rack to cool completely.
- Make the Black Cherry Filling: In a small saucepan, combine the cherries, sugar, cornstarch, lemon juice, and water. Cook over medium heat, stirring frequently, until the mixture thickens and the cherries soften, about 5-7 minutes. Allow the filling to cool before using.
- Prepare the Dark Chocolate Ganache: In a small saucepan, bring the heavy cream to a simmer over medium heat. Remove from heat and add the chopped dark chocolate. Let it sit for 2 minutes, then stir until smooth and glossy. Allow the ganache to cool slightly until it thickens to a spreadable consistency.
- Assemble the Cake: Place one cake layer on a serving plate. Spread the black cherry filling evenly over the top. Place the second cake layer on top, pressing gently to adhere. Pour the dark chocolate ganache over the top of the cake, allowing it to drip down the sides for a dramatic effect. Use a spatula to smooth the top and sides of the cake.
- Chill and Serve: Refrigerate the cake for at least 30 minutes to set the ganache before serving. Slice and enjoy the decadent flavors of dark chocolate and black cherry.
Extra Tips:
When making the ganache, verify the chocolate is finely chopped for easy melting. If the ganache is too runny, let it cool longer until it reaches the desired consistency.
For a smoother cake texture, you may sift the dry ingredients twice before mixing. If you prefer a stronger cherry flavor, consider adding a tablespoon of cherry liqueur to the filling.
Finally, for added decoration, you can garnish the cake with whole cherries or edible gold leaf for a luxurious touch.
Spiced Pumpkin and Maple Cream Cake
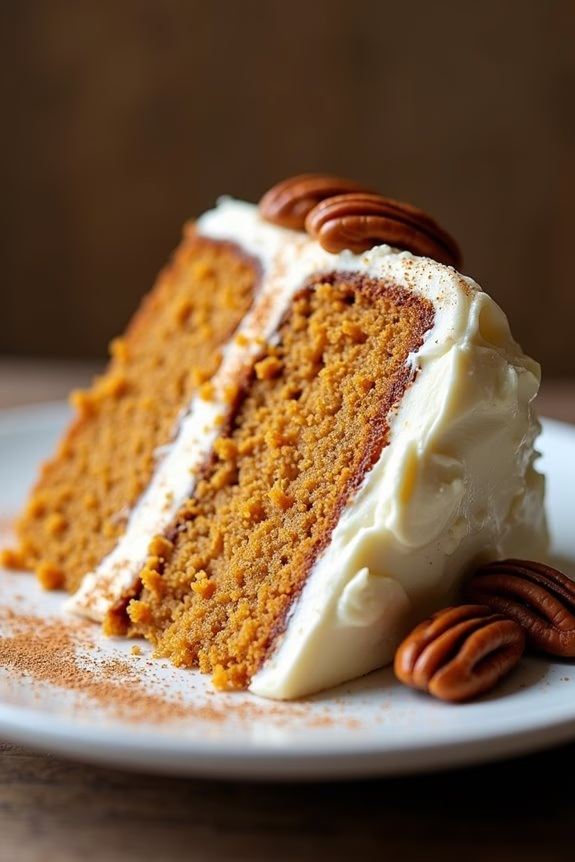
Spiced Pumpkin and Maple Cream Cake is a delightful dessert perfect for adult Halloween gatherings. This cake combines the rich, earthy flavors of pumpkin with the sweet, aromatic allure of maple cream, creating a sophisticated treat that evokes the essence of fall. The addition of warm spices such as cinnamon, nutmeg, and ginger elevates the cake, making it a comforting and festive choice for the season.
This cake isn’t only delicious but also visually appealing, featuring layers of moist, spiced pumpkin cake interspersed with smooth, creamy maple frosting. The cake can be garnished with caramelized pecans or a dusting of cinnamon to enhance its presentation. Ideal for serving a group of 4-6 people, this Spiced Pumpkin and Maple Cream Cake is sure to impress your guests and add a touch of elegance to your Halloween celebrations.
Ingredients (serving size: 4-6 people):
- 2 cups all-purpose flour
- 1 cup granulated sugar
- 1 cup canned pumpkin puree
- 1/2 cup vegetable oil
- 1/2 cup maple syrup
- 3 large eggs
- 1 teaspoon vanilla extract
- 1 teaspoon baking powder
- 1 teaspoon baking soda
- 1/2 teaspoon salt
- 1 teaspoon ground cinnamon
- 1/2 teaspoon ground nutmeg
- 1/4 teaspoon ground ginger
- 1/2 cup unsalted butter, softened
- 2 cups confectioners’ sugar
- 1 teaspoon maple extract
- 1/4 cup heavy cream
Cooking Instructions:
- Preheat and Prepare Pans: Preheat your oven to 350°F (175°C). Grease and flour two 8-inch round cake pans to prevent the cake from sticking.
- Mix Dry Ingredients: In a medium bowl, whisk together the flour, baking powder, baking soda, salt, cinnamon, nutmeg, and ginger. Set aside.
- Combine Wet Ingredients: In a large mixing bowl, beat together the sugar, eggs, and vanilla extract until well combined. Add in the pumpkin puree and vegetable oil, and mix until smooth.
- Incorporate Dry Ingredients: Gradually add the dry ingredients to the wet ingredients, mixing until just combined. Be careful not to overmix to guarantee a tender cake.
- Bake the Cakes: Divide the batter evenly between the prepared cake pans. Bake in the preheated oven for 25-30 minutes, or until a toothpick inserted into the center comes out clean. Allow the cakes to cool in the pans for 10 minutes before transferring them to a wire rack to cool completely.
- Prepare the Maple Cream: In a separate bowl, beat the softened butter until creamy. Gradually add the confectioners’ sugar and beat until well combined. Add the maple syrup, maple extract, and heavy cream, and beat until the frosting is smooth and fluffy.
- Assemble the Cake: Once the cakes are completely cool, place one cake layer on a serving plate and spread a generous layer of maple cream frosting over it. Top with the second cake layer and frost the top and sides of the cake.
- Garnish (Optional): For a festive touch, garnish the cake with caramelized pecans or a light dusting of cinnamon.
Extra Tips:
For an extra depth of flavor, consider adding a tablespoon of finely grated orange zest to the cake batter. This will provide a subtle citrus note that complements the spices beautifully.
When frosting the cake, make sure that both the cake and frosting are at room temperature to prevent the frosting from melting or becoming too stiff. If you prefer a more pronounced maple flavor, you can increase the amount of maple extract in the frosting slightly, but do so gradually to avoid overpowering the cake.
Black Velvet Cake With Blood Orange Glaze

Black Velvet Cake With Blood Orange Glaze is an elegant yet spooky dessert that’s perfect for any adult Halloween gathering. This cake combines the rich, dark flavor of a classic velvet cake with a tangy and vividly colored blood orange glaze, creating a striking visual and taste experience.
The deep black color of the cake contrasts beautifully with the bright red-orange glaze, making it a centerpiece-worthy addition to your Halloween table. Not only does it look impressive, but the blend of cocoa and citrus flavors also guarantees that it tastes as good as it looks.
The preparation of Black Velvet Cake With Blood Orange Glaze involves a few simple steps, making it accessible even for those who aren’t seasoned bakers. The cake itself is made with a combination of cocoa powder and black food coloring to achieve its dramatic hue.
Once baked, the cake is topped with a glaze made from fresh blood orange juice, which not only adds a citrusy kick but also enhances the cake’s visual appeal. This recipe serves 4-6 people, making it ideal for a small gathering or intimate dinner party.
Ingredients
For the Black Velvet Cake:
- 1 1/2 cups all-purpose flour
- 1 cup granulated sugar
- 1/2 cup unsweetened cocoa powder
- 1 teaspoon baking soda
- 1/2 teaspoon salt
- 1 cup buttermilk
- 1/2 cup vegetable oil
- 2 large eggs
- 1 teaspoon vanilla extract
- 1 teaspoon black food coloring
For the Blood Orange Glaze:
- 1 1/2 cups powdered sugar
- 1/4 cup fresh blood orange juice
- 1 tablespoon blood orange zest
Cooking Instructions
- Preheat and Prepare the Pan: Preheat your oven to 350°F (175°C). Grease and flour a 9-inch round cake pan and set aside.
- Mix Dry Ingredients: In a medium bowl, whisk together the flour, cocoa powder, baking soda, and salt until well combined.
- Combine Wet Ingredients: In a large bowl, combine the buttermilk, vegetable oil, eggs, vanilla extract, and black food coloring. Mix until smooth and the color is evenly distributed.
- Combine Mixtures: Gradually add the dry ingredients to the wet ingredients, mixing until just combined. Be careful not to overmix as this can lead to a dense cake.
- Bake the Cake: Pour the batter into the prepared cake pan, smoothing the top with a spatula. Bake for 30-35 minutes or until a toothpick inserted into the center comes out clean.
- Cool the Cake: Allow the cake to cool in the pan for about 10 minutes before transferring it to a wire rack to cool completely.
- Prepare the Glaze: In a small bowl, whisk together the powdered sugar, blood orange juice, and zest until smooth and pourable.
- Glaze the Cake: Once the cake has fully cooled, pour the blood orange glaze over the top, letting it drip down the sides for a dramatic effect.
Extra Tips
When making the Black Velvet Cake, make sure that all ingredients are at room temperature for a smoother batter and even baking. If you can’t find blood oranges, regular oranges can be substituted, though the color will be less intense.
For an extra touch of elegance, garnish the cake with thin slices of blood orange or edible flowers. Remember to let the cake cool completely before glazing, as a warm cake will cause the glaze to melt and become runny.
Enjoy this deliciously spooky treat with a dark cup of coffee or a Halloween-themed cocktail for the ultimate holiday indulgence.
Hazelnut and Dark Rum Bundt Cake
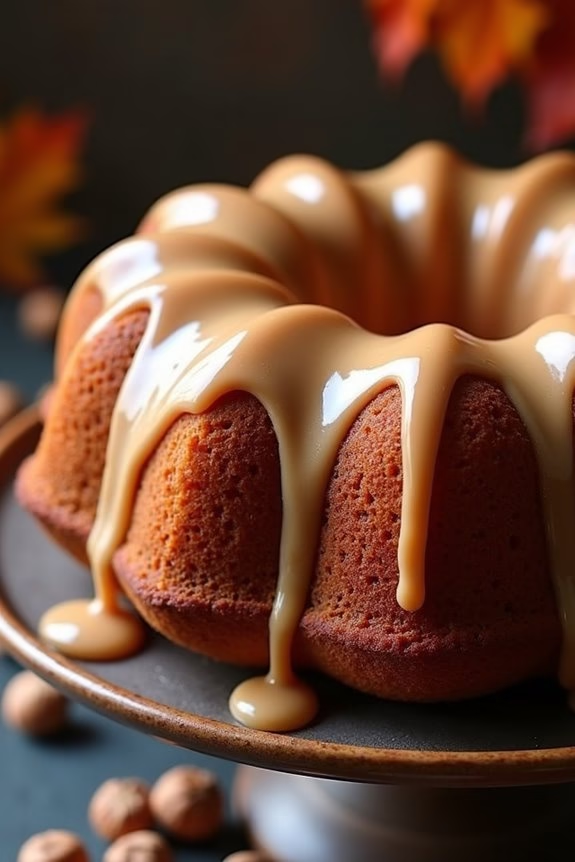
Indulge your guests in a sophisticated Halloween treat with a Hazelnut and Dark Rum Bundt Cake. This cake blends the rich flavors of hazelnut and the warm, aromatic notes of dark rum, creating a dessert that’s both festive and refined.
The bundt cake is perfect for adult gatherings, offering a delightful contrast to the usual sugary Halloween fare. It’s a showstopper dessert that will have your guests raving and asking for the recipe.
This cake isn’t only delicious but also visually striking, thanks to its elegant bundt shape and a drizzle of hazelnut glaze. The moist interior, with its nutty aroma and subtle kick from the rum, pairs beautifully with a cup of coffee or a glass of dessert wine.
With this recipe, you can create a memorable centerpiece for your Halloween celebration that’s both easy to prepare and certain to impress.
Ingredients (Serves 4-6)
- 1 1/2 cups all-purpose flour
- 1/2 cup ground hazelnuts
- 1 teaspoon baking powder
- 1/2 teaspoon baking soda
- 1/4 teaspoon salt
- 1 cup unsalted butter, softened
- 1 cup granulated sugar
- 3 large eggs
- 1 teaspoon vanilla extract
- 1/2 cup dark rum
- 1/4 cup whole milk
- 1 cup powdered sugar (for glaze)
- 2-3 tablespoons hazelnut liqueur (for glaze)
Cooking Instructions
1. Preheat and Prepare the Pan:
Preheat your oven to 350°F (175°C). Grease a bundt pan thoroughly with butter or non-stick cooking spray, making certain all crevices are well-coated to prevent sticking.
2. Mix Dry Ingredients:
In a medium bowl, whisk together the flour, ground hazelnuts, baking powder, baking soda, and salt. This will guarantee even distribution of the leavening agents.
3. Cream Butter and Sugar:
In a large mixing bowl, beat the softened butter and granulated sugar together with an electric mixer on medium speed until pale and fluffy, about 3 minutes.
4. Add Eggs and Flavorings:
Add the eggs one at a time, beating well after each addition. Mix in the vanilla extract until fully incorporated.
5. Incorporate Dry Ingredients and Liquids:
Gradually add the dry ingredients to the butter mixture, alternating with the dark rum and milk. Begin and end with the dry ingredients, mixing just until combined after each addition to avoid overmixing.
6. Pour Batter into Pan:
Pour the batter into the prepared bundt pan, smoothing the top with a spatula.
7. Bake the Cake:
Bake in the preheated oven for 40-45 minutes, or until a toothpick inserted into the center of the cake comes out clean. Allow the cake to cool in the pan for 10 minutes before turning it out onto a wire rack to cool completely.
8. Prepare the Glaze:
In a small bowl, whisk together the powdered sugar and hazelnut liqueur until smooth. Adjust the consistency with more liqueur if necessary; it should be thick but pourable.
9. Glaze and Serve:
Once the cake is completely cool, drizzle the glaze over the top, allowing it to cascade down the sides. Let the glaze set for a few minutes before serving.
Extra Tips
For an extra layer of flavor, consider toasting the ground hazelnuts before adding them to the cake batter. This will intensify the nutty flavor and add a delightful aroma.
If you don’t have a bundt pan, a standard loaf pan can be used, though the baking time may need to be adjusted. Remember to let the cake cool completely before glazing to guarantee the glaze sets nicely and doesn’t melt off.
Additionally, for a non-alcoholic version, you can substitute the dark rum with apple juice and the hazelnut liqueur in the glaze with a hazelnut-flavored syrup.
Ghostly White Chocolate and Raspberry Mousse Cake
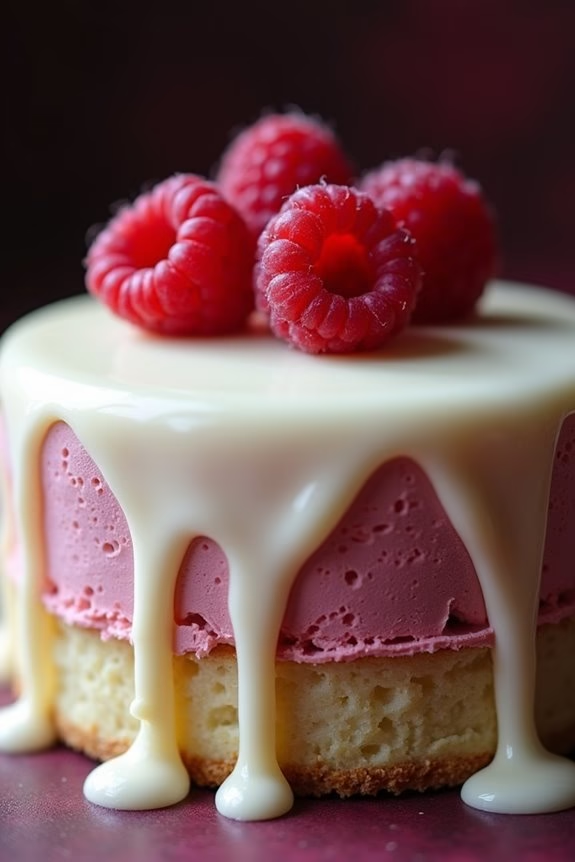
If you’re looking to elevate your Halloween party with a sophisticated dessert, the Ghostly White Chocolate and Raspberry Mousse Cake is the perfect choice. This cake combines the creamy richness of white chocolate with the tart freshness of raspberries, creating a beautifully balanced dessert that’s sure to impress your guests.
The ghostly appearance is achieved with a smooth, white chocolate glaze that drapes elegantly over the cake, making it both a centerpiece and a conversation starter at your adult Halloween gathering.
This cake isn’t only delicious but also visually stunning, with layers of light mousse and a hidden raspberry surprise. It serves 4-6 people, making it ideal for an intimate party or a special dinner. The preparation requires some patience and finesse, but the end result is well worth the effort.
Below, you’ll find a detailed list of ingredients and step-by-step instructions to help you create this hauntingly delightful dessert.
Ingredients (Serves 4-6):
- 200g white chocolate
- 250ml heavy cream
- 150g fresh raspberries
- 100g granulated sugar
- 3 large eggs, separated
- 1 teaspoon vanilla extract
- 2 tablespoons raspberry liqueur (optional)
- 1 packet (7g) gelatin
- 2 tablespoons water
- 150g digestive biscuits (or graham crackers)
- 75g unsalted butter, melted
- Additional raspberries for garnish
Instructions:
- Prepare the Base: Crush the digestive biscuits into fine crumbs and mix them with the melted butter until well combined. Press this mixture firmly into the base of a springform pan to form an even layer. Chill in the refrigerator while you prepare the mousse.
- Melt the White Chocolate: In a heatproof bowl, gently melt the white chocolate over a pot of simmering water, stirring until smooth. Remove from heat and allow it to cool slightly.
- Whip the Cream: In a separate bowl, whip the heavy cream until it forms soft peaks. Set aside in the refrigerator.
- Make the Raspberry Puree: Blend the raspberries with half of the sugar until smooth. Strain the puree to remove seeds if desired, then gently heat it over a low flame. Stir in the raspberry liqueur, if using, and set aside to cool.
- Prepare the Mousse Base: In a small bowl, sprinkle the gelatin over water and let it bloom for about 5 minutes. Once bloomed, gently heat until dissolved.
- Combine the Ingredients: In a large bowl, beat the egg yolks with the remaining sugar and vanilla extract until pale and thickened. Stir in the melted white chocolate, followed by the dissolved gelatin. Gently fold in the whipped cream, then divide the mixture. Fold the raspberry puree into half of this mixture to create the raspberry mousse layer.
- Assemble the Cake: Pour the raspberry mousse over the chilled biscuit base, followed by the white chocolate mousse. Smooth the top and refrigerate for at least 4 hours or until set.
- Decorate: Carefully remove the cake from the pan. For the ghostly effect, you can drizzle additional melted white chocolate over the top, allowing it to drip down the sides. Garnish with fresh raspberries.
Extra Tips:
When making the mousse, make certain that the chocolate is only slightly warm before mixing it with other ingredients to prevent the gelatin from setting too quickly.
It’s also important to handle the whipped cream gently; overmixing can cause it to deflate, affecting the texture of the mousse. If you’re looking to add more Halloween flair, consider using chocolate decorations in the shape of ghosts or bats on top of the cake.
Enjoy the process and the delicious result!
Caramel Apple Upside-Down Cake
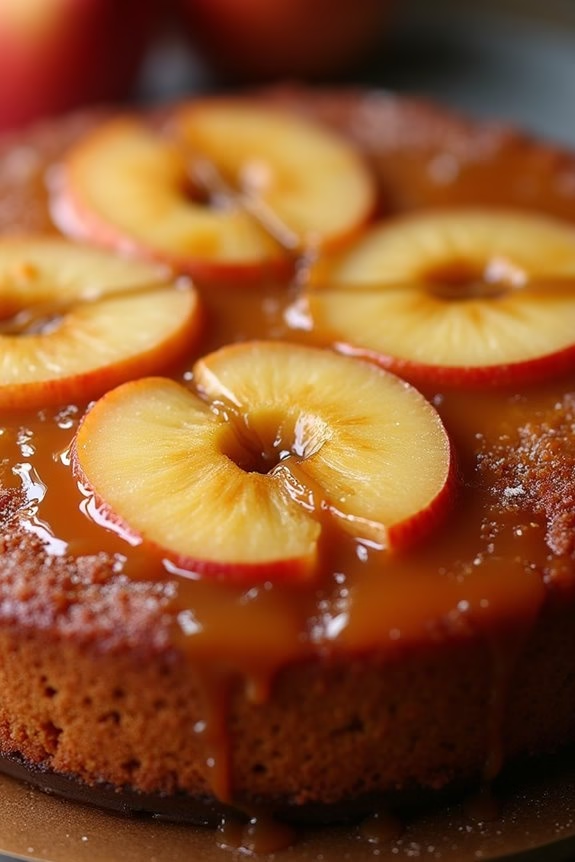
Caramel Apple Upside-Down Cake is a delightful twist on the traditional upside-down cake, perfect for a sophisticated Halloween gathering. This decadent dessert combines the comforting flavors of caramel and apples with a moist, buttery cake. The brown sugar and butter create a luscious caramel sauce that perfectly complements the tartness of the apples, making it a fall favorite.
Not only is it delicious, but its presentation is stunning, with the caramel-coated apple slices glistening on top of the golden cake. This cake is best enjoyed warm, perhaps with a scoop of vanilla ice cream or a dollop of whipped cream.
It’s a wonderful choice for adults who appreciate a classic dessert with a modern twist. Whether you’re hosting a Halloween party or simply enjoying a quiet evening with friends, this Caramel Apple Upside-Down Cake is sure to impress and satisfy your sweet tooth. With its rich flavors and beautiful appearance, it’s the perfect treat to celebrate the spooky season.
Ingredients (Serves 4-6):
- 2 large apples, peeled, cored, and sliced
- 1/2 cup unsalted butter
- 1 cup packed brown sugar
- 1 teaspoon ground cinnamon
- 1/4 teaspoon ground nutmeg
- 1/2 teaspoon salt
- 1 1/2 cups all-purpose flour
- 1 1/2 teaspoons baking powder
- 1/2 cup granulated sugar
- 2 large eggs
- 1 teaspoon vanilla extract
- 1/2 cup whole milk
Cooking Instructions:
- Prepare the Pan: Preheat your oven to 350°F (175°C). Grease a 9-inch round cake pan and line the bottom with parchment paper for easy removal.
- Make the Caramel Sauce: In a small saucepan, melt 1/4 cup of the unsalted butter over medium heat. Stir in the brown sugar, 1/2 teaspoon of cinnamon, and nutmeg. Cook until the mixture bubbles and the sugar dissolves completely. Pour the caramel sauce into the prepared cake pan, spreading it evenly.
- Arrange the Apples: Layer the apple slices on top of the caramel sauce in a circular pattern, starting from the outer edge and working your way in. Set the pan aside.
- Mix Dry Ingredients: In a medium bowl, whisk together the flour, baking powder, the remaining 1/2 teaspoon of cinnamon, and salt. Set aside.
- Cream Butter and Sugar: In a large mixing bowl, beat the remaining 1/4 cup of unsalted butter with the granulated sugar using an electric mixer until light and fluffy. Add the eggs one at a time, beating well after each addition. Mix in the vanilla extract.
- Combine Wet and Dry Ingredients: Gradually add the dry ingredients to the wet ingredients, alternating with the milk, beginning and ending with the flour mixture. Mix until just combined, being careful not to overmix.
- Assemble the Cake: Pour the batter over the apples in the cake pan, smoothing the top with a spatula.
- Bake: Place the cake pan in the preheated oven and bake for 35-40 minutes, or until a toothpick inserted in the center comes out clean.
- Cool and Invert: Allow the cake to cool in the pan for about 10 minutes. Run a knife around the edges to loosen, then carefully invert the cake onto a serving plate. Remove the parchment paper.
Extra Tips:
When selecting apples for this recipe, consider using a firm variety like Granny Smith or Honeycrisp, as they hold their shape well during baking. If you find your caramel sauce is too thick, you can stir in a tablespoon of heavy cream to reach your desired consistency.
Additionally, make sure the cake is fully cooled before inverting to prevent any hot caramel from spilling. This cake can be prepared a day in advance; simply reheat slightly before serving to enjoy the full flavors.
Espresso and Almond Praline Cake
Indulge in the sophisticated flavors of this Espresso and Almond Praline Cake, a perfect treat for adults looking to add a touch of elegance to their Halloween festivities.
This cake combines the rich, bold taste of espresso with the sweet, nutty crunch of almond praline, creating a dessert that’s both luxurious and unforgettable. The deep coffee notes pair beautifully with the caramelized almonds, making it an ideal centerpiece for any adult Halloween gathering.
Designed to serve 4-6 people, this cake is perfect for sharing among friends or loved ones. Each bite delivers a perfect balance of flavors and textures, with moist espresso-infused layers complemented by a decadent praline topping.
Whether you’re hosting a dinner party or simply enjoying a cozy evening at home, this cake is sure to impress your guests and leave them craving more.
Ingredients:
- 1 cup all-purpose flour
- 1/2 cup unsalted butter, softened
- 1 cup granulated sugar
- 2 large eggs
- 1/2 cup strong brewed espresso, cooled
- 1 tsp vanilla extract
- 1 tsp baking powder
- 1/4 tsp salt
- 1/2 cup finely chopped almonds
- 1/2 cup granulated sugar (for praline)
- 2 tbsp water
- 1 cup heavy cream
- 1/4 cup powdered sugar
- 1/2 tsp almond extract
Instructions:
1. Prepare the Cake Batter: Preheat your oven to 350°F (175°C). Grease and flour a 9-inch round cake pan. In a large bowl, cream together the softened butter and 1 cup of granulated sugar until light and fluffy. Add the eggs one at a time, beating well after each addition. Mix in the vanilla extract.
2. Incorporate Dry Ingredients: In a separate bowl, sift together the flour, baking powder, and salt. Gradually add the dry ingredients to the wet mixture, alternating with the brewed espresso, beginning and ending with the flour mixture. Mix until just combined.
3. Bake the Cake: Pour the batter into the prepared cake pan and smooth the top with a spatula. Bake in the preheated oven for 25-30 minutes, or until a toothpick inserted into the center of the cake comes out clean. Allow the cake to cool in the pan for 10 minutes before transferring it to a wire rack to cool completely.
4. Make the Almond Praline: While the cake is cooling, prepare the praline. In a small saucepan, combine 1/2 cup of sugar and 2 tablespoons of water. Cook over medium heat, stirring occasionally, until the sugar dissolves and the mixture turns a deep amber color. Remove from heat and quickly stir in the chopped almonds.
Pour the praline mixture onto a parchment-lined baking sheet and spread it out thinly. Allow it to cool completely, then break into small pieces.
5. Prepare the Whipped Cream: In a chilled mixing bowl, combine the heavy cream, powdered sugar, and almond extract. Whip until soft peaks form.
6. Assemble the Cake: Once the cake is completely cool, spread a generous layer of whipped cream over the top. Sprinkle the almond praline pieces over the whipped cream, pressing them gently to adhere.
Extra Tips:
For an even more intense espresso flavor, consider adding a teaspoon of instant espresso powder to the cake batter.
When making the praline, work quickly as the sugar can harden rapidly. If you prefer a smoother praline, you can finely chop the almonds before adding them to the caramel.
The cake can be stored in the refrigerator for up to three days, though it’s best enjoyed fresh for maximum texture and flavor.
Red Wine Chocolate Truffle Cake

Halloween is a time for adults to indulge in some sophisticated treats, and what better way to do that than with a decadent Red Wine Chocolate Truffle Cake? This dessert is perfect for those looking to elevate their Halloween celebration with a touch of elegance and an infusion of rich, adult flavors. The combination of velvety chocolate and robust red wine creates a luxurious dessert experience that’s both indulgent and satisfying.
Whether you’re hosting a Halloween party or simply want to enjoy a gourmet dessert, this cake will surely impress your guests with its deep, complex flavors and stunning presentation.
The Red Wine Chocolate Truffle Cake is a multi-layered masterpiece that features a moist chocolate cake infused with red wine, layered with a luscious chocolate ganache, and topped with a glossy chocolate glaze. This cake brings together the bold notes of red wine and the rich taste of chocolate to create a dessert that’s both sophisticated and decadent. Designed to serve 4-6 people, this cake is the perfect way to celebrate Halloween with a little bit of indulgence and a whole lot of style.
Ingredients:
- 1 cup all-purpose flour
- 1/2 cup unsweetened cocoa powder
- 1 teaspoon baking powder
- 1/2 teaspoon baking soda
- 1/4 teaspoon salt
- 1/2 cup unsalted butter, softened
- 1 cup granulated sugar
- 2 large eggs
- 1 teaspoon vanilla extract
- 3/4 cup red wine (preferably a dry red wine)
- 1 cup heavy cream
- 8 ounces semisweet chocolate, chopped
- 2 tablespoons butter
- 1/4 cup light corn syrup
Cooking Instructions:
- Prepare the Oven and Pan: Preheat your oven to 350°F (175°C). Grease and flour a 9-inch round cake pan to prevent sticking.
- Mix Dry Ingredients: In a medium bowl, sift together the flour, cocoa powder, baking powder, baking soda, and salt. Set aside.
- Cream Butter and Sugar: In a large mixing bowl, beat the softened butter and granulated sugar together using an electric mixer until light and fluffy. This should take about 2-3 minutes.
- Add Eggs and Vanilla: Add the eggs, one at a time, beating well after each addition. Mix in the vanilla extract until combined.
- Incorporate Wine and Dry Ingredients: Gradually add the dry ingredients to the butter mixture, alternating with the red wine. Begin and end with the dry ingredients, mixing just until incorporated.
- Bake the Cake: Pour the batter into the prepared cake pan and smooth the top. Bake for 30-35 minutes, or until a toothpick inserted in the center comes out clean. Allow the cake to cool in the pan for 10 minutes before transferring to a wire rack to cool completely.
- Prepare the Ganache: While the cake cools, heat the heavy cream in a small saucepan over medium heat until it begins to simmer. Remove from heat and add the chopped semisweet chocolate. Let it sit for a few minutes, then stir until smooth. Let the ganache cool to room temperature.
- Assemble the Cake: Once the cake is completely cool, slice it horizontally into two layers. Spread half of the ganache over the bottom layer, then place the top layer back on.
- Glaze the Cake: To make the glaze, melt the remaining butter and corn syrup in a small saucepan over low heat. Stir in the remaining chocolate until smooth. Pour the glaze over the top of the cake, allowing it to drip over the sides.
- Chill and Serve: Refrigerate the cake for at least 1 hour to set the ganache and glaze before serving.
Extra Tips:
For the best results, choose a full-bodied red wine, such as Cabernet Sauvignon or Merlot, to enhance the chocolate flavor. If you prefer a sweeter cake, consider using a dessert wine or a port.
Make sure the cake is completely cool before slicing and layering to prevent the ganache from melting. For a more festive touch, you can decorate the cake with edible gold dust or dark chocolate curls. Remember to store any leftovers in the refrigerator to keep the cake fresh and delicious.
Matcha and Black Sesame Opera Cake
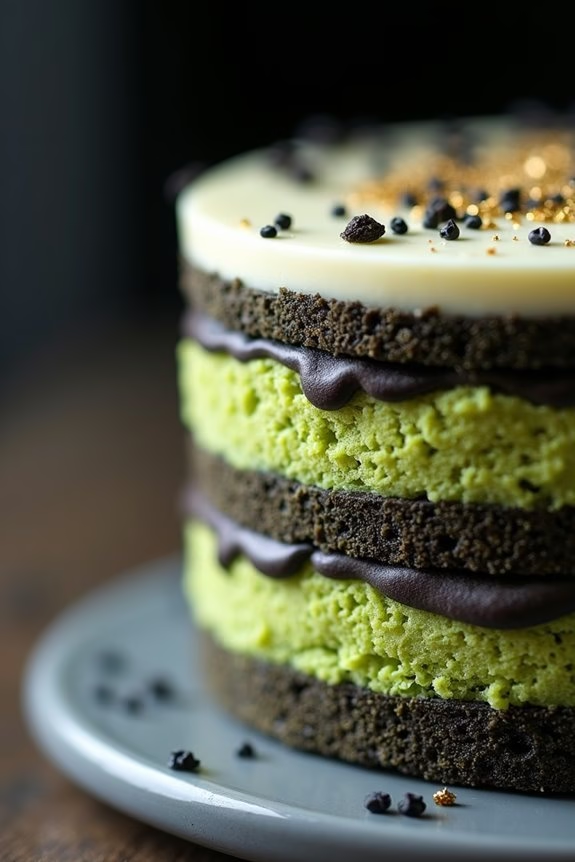
The Matcha and Black Sesame Opera Cake is an exquisite and sophisticated dessert that brings a twist to the traditional opera cake, making it perfect for an adult Halloween celebration. This stunning cake layers matcha-flavored joconde sponge with black sesame buttercream and a luscious white chocolate ganache. The subtle bitterness of matcha pairs beautifully with the nutty, earthy flavors of black sesame, while the white chocolate adds a touch of sweetness, creating a well-balanced dessert.
The elegant appearance and complex flavors make it a standout choice for a sophisticated Halloween gathering. This cake isn’t only a treat for the taste buds but also an impressive centerpiece for your Halloween table. With its rich layers and contrasting colors, it encapsulates the spirit of Halloween without the need for traditional spooky themes. The delicate balance of flavors will captivate your guests, making it a memorable addition to your adult Halloween festivities. The recipe provided will serve 4-6 people, guaranteeing there’s enough to go around while allowing you to showcase your culinary skills.
Ingredients:
- Joconde Sponge:
- 1 cup almond flour
- 1 cup confectioners’ sugar
- 6 large eggs
- 6 large egg whites
- 1/4 cup granulated sugar
- 1/2 cup all-purpose flour
- 2 tablespoons matcha powder
- 2 tablespoons melted butter
- Black Sesame Buttercream:
- 1/2 cup unsalted butter, softened
- 1 cup confectioners’ sugar
- 1/4 cup black sesame paste
- 1 teaspoon vanilla extract
- White Chocolate Ganache:
- 1 cup white chocolate chips
- 1/2 cup heavy cream
Cooking Instructions:
- Prepare the Joconde Sponge:
- Preheat your oven to 350°F (175°C). Line a baking sheet with parchment paper.
- In a mixing bowl, combine almond flour and confectioners’ sugar. Mix in the whole eggs, one at a time, until smooth.
- In a separate bowl, whisk egg whites and granulated sugar until stiff peaks form. Gently fold this meringue into the almond mixture.
- Sift the all-purpose flour and matcha powder together, then fold them into the batter along with the melted butter.
- Spread the batter evenly onto the prepared baking sheet and bake for about 10-12 minutes, or until lightly golden and springy to the touch. Allow it to cool completely.
- Make the Black Sesame Buttercream:
- Beat the softened butter in a bowl until creamy. Gradually add confectioners’ sugar, beating until the mixture is light and fluffy.
- Mix in the black sesame paste and vanilla extract until fully incorporated.
- Prepare the White Chocolate Ganache:
- Heat the heavy cream in a small saucepan until it just begins to simmer. Remove from heat and pour over the white chocolate chips in a heatproof bowl.
- Let it sit for a minute, then stir until smooth and shiny. Allow it to cool slightly before using.
- Assemble the Cake:
- Cut the joconde sponge into three equal rectangles. Place one layer on a serving plate.
- Spread half of the black sesame buttercream over the first layer, then place a second sponge layer on top.
- Spread a layer of white chocolate ganache over the second sponge, then add the final sponge layer.
- Cover the top and sides of the cake with the remaining black sesame buttercream.
- Drizzle any leftover ganache over the top for decoration, and refrigerate the cake for at least 1 hour before serving.
Extra Tips:
When making the joconde sponge, confirm that the egg whites are whipped to stiff peaks for the best texture. Folding the meringue gently into the almond mixture helps maintain the sponge’s lightness.
When assembling the cake, use a serrated knife to trim the edges for a neat finish. For a more intense black sesame flavor, consider toasting the sesame seeds before making the paste. If you want to add an extra Halloween touch, decorate the top with edible gold dust or black sprinkles for a dramatic effect.
Ginger and Pear Spice Cake
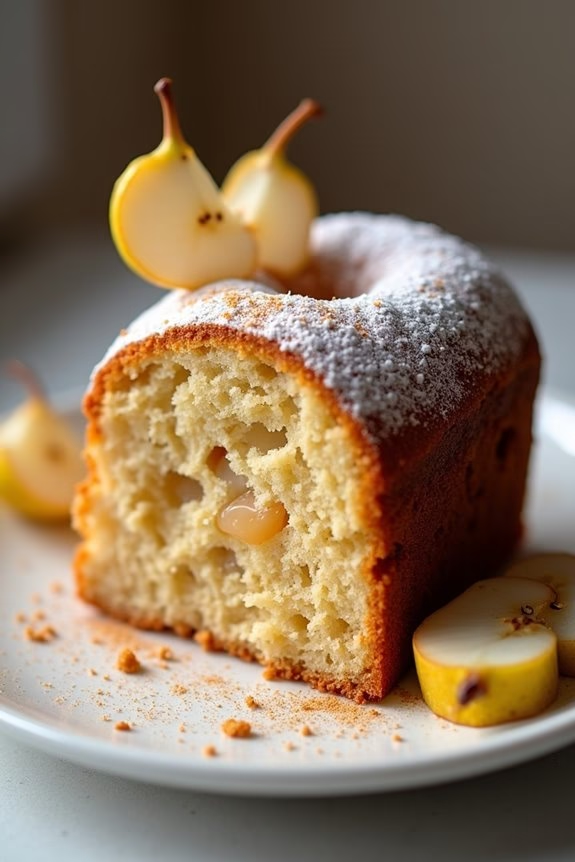
Halloween is a time for creativity and indulgence, and what better way to celebrate than with a sophisticated treat like a Ginger and Pear Spice Cake? This cake combines the warm, comforting flavors of ginger and spice with the delicate sweetness of ripe pears. It’s perfect for adult gatherings, offering a refined taste that complements the spooky yet elegant theme of a grown-up Halloween party.
The moist, flavorful cake is sure to be a hit, leaving your guests asking for seconds. This recipe serves 4-6 people, making it ideal for an intimate gathering or a small dinner party. The ginger and pear combination not only adds a unique twist to the traditional spice cake but also infuses it with a tantalizing aroma that fills your home as it bakes.
The cake pairs beautifully with a cup of spiced tea or a glass of mulled wine, making it an excellent choice for a cozy, autumn evening.
Ingredients:
- 1 1/2 cups all-purpose flour
- 1 teaspoon baking powder
- 1/2 teaspoon baking soda
- 1 teaspoon ground ginger
- 1/2 teaspoon ground cinnamon
- 1/4 teaspoon ground nutmeg
- 1/4 teaspoon ground cloves
- 1/4 teaspoon salt
- 1/2 cup unsalted butter, softened
- 3/4 cup brown sugar
- 2 large eggs
- 1 teaspoon vanilla extract
- 1/2 cup buttermilk
- 2 ripe pears, peeled, cored, and diced
- 1/4 cup crystallized ginger, finely chopped
Instructions:
- Preheat and Prepare: Preheat your oven to 350°F (175°C). Grease and flour a 9-inch round cake pan, or line it with parchment paper to facilitate easy removal of the cake.
- Mix Dry Ingredients: In a medium bowl, whisk together the flour, baking powder, baking soda, ground ginger, cinnamon, nutmeg, cloves, and salt. This guarantees the spices are evenly distributed throughout the cake.
- Cream Butter and Sugar: In a large mixing bowl, cream the softened butter and brown sugar together using an electric mixer on medium speed until light and fluffy. This should take about 3-4 minutes.
- Add Eggs and Vanilla: Beat in the eggs one at a time, confirming each is fully incorporated before adding the next. Stir in the vanilla extract to enhance the flavors.
- Incorporate Dry Ingredients and Buttermilk: Gradually add the dry ingredients to the butter mixture in three parts, alternating with the buttermilk. Begin and end with the dry ingredients, mixing just until combined.
- Fold in Pears and Ginger: Gently fold in the diced pears and crystallized ginger using a spatula. Be careful not to overmix, as this might crush the pears.
- Bake: Pour the batter into the prepared cake pan and smooth the top with a spatula. Bake in the preheated oven for 30-35 minutes, or until a toothpick inserted into the center comes out clean.
- Cool and Serve: Allow the cake to cool in the pan for about 10 minutes before transferring it to a wire rack to cool completely. Serve the cake warm or at room temperature.
Extra Tips:
For an added touch of indulgence, consider topping your Ginger and Pear Spice Cake with a simple glaze made from powdered sugar and a splash of milk. You can also garnish with thin slices of pear or a sprinkle of powdered ginger for a decorative finish.
If you want a bit more crunch, add a handful of chopped nuts, such as walnuts or pecans, to the batter. And remember, the key to a moist cake isn’t overbaking; so keep a close eye on the cake during the last few minutes of baking time.
Enjoy your Halloween with this delightful, adult-friendly treat!
Roasted Fig and Walnut Tart
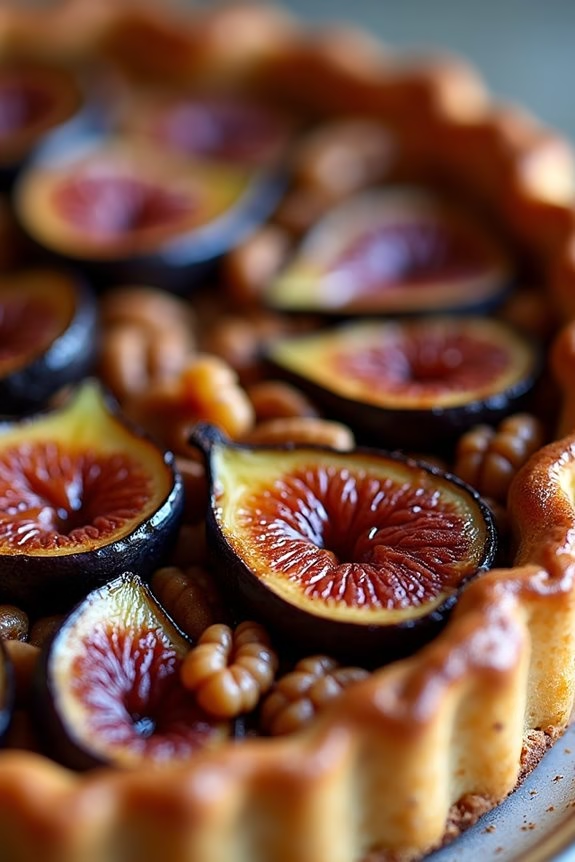
If you’re looking for an elegantly spooky treat to impress your adult Halloween party guests, the Roasted Fig and Walnut Tart is a sophisticated choice. This tart combines the rich, sweet flavors of roasted figs with the earthy, nutty taste of walnuts, all enveloped in a buttery, flaky pastry.
It’s a harmonious blend of textures and flavors that’s certain to please any palate. Not only is this tart visually stunning, but it also perfectly captures the essence of autumn with its warm, inviting aroma and deep, rich colors.
The Roasted Fig and Walnut Tart is an excellent dessert option that pairs beautifully with a glass of port or your favorite dessert wine. The complexity of the flavors, with the sweet fig filling and the crunchy walnut topping, creates a delightful contrast that’s both satisfying and indulgent.
Perfect for a sophisticated Halloween gathering, this tart can be made ahead of time, allowing you to focus on enjoying the festivities with your guests.
Ingredients (serves 4-6):
- 1 sheet of puff pastry (thawed if frozen)
- 12 ripe figs, halved
- 2 tablespoons honey
- 1 tablespoon balsamic vinegar
- 1/2 cup walnuts, roughly chopped
- 1/4 cup brown sugar
- 1 teaspoon cinnamon
- 1 tablespoon unsalted butter, melted
- 1 egg, beaten (for egg wash)
- Powdered sugar (optional, for dusting)
Cooking Instructions:
- Preheat the Oven: Start by preheating your oven to 400°F (200°C). This guarantees that it reaches the right temperature for baking the puff pastry to perfection.
- Prepare the Puff Pastry: Roll out the puff pastry on a lightly floured surface until it’s large enough to fit your tart pan. Press the pastry into the pan, trimming any excess. Prick the bottom with a fork to prevent it from puffing up during baking.
- Prepare the Figs: In a bowl, toss the halved figs with honey and balsamic vinegar. Arrange them cut side up on a baking sheet lined with parchment paper.
- Roast the Figs: Place the baking sheet in the preheated oven and roast the figs for about 10-15 minutes, or until they begin to caramelize and soften. Remove from the oven and let them cool slightly.
- Prepare the Walnut Mixture: In another bowl, combine the chopped walnuts, brown sugar, cinnamon, and melted butter. Mix well until the walnuts are coated evenly.
- Assemble the Tart: Arrange the roasted figs on the prepared puff pastry in the tart pan. Sprinkle the walnut mixture evenly over the top.
- Add the Finishing Touches: Brush the edges of the puff pastry with the beaten egg for a golden finish.
- Bake the Tart: Place the tart in the oven and bake for 20-25 minutes, or until the pastry is golden brown and crisp.
- Cool and Serve: Allow the tart to cool slightly before removing it from the pan. Dust with powdered sugar before serving, if desired.
Extra Tips: To guarantee the perfect tart, make sure the figs are ripe but firm to prevent the tart from becoming too soggy.
You can prepare the walnut mixture and roast the figs a day ahead to save time on the day of the event. If you’re looking for a gluten-free option, substitute the puff pastry with a gluten-free pastry dough of your choice.
Serve the tart warm or at room temperature for the best flavor, and consider pairing it with a dollop of whipped cream or a scoop of vanilla ice cream for added indulgence.
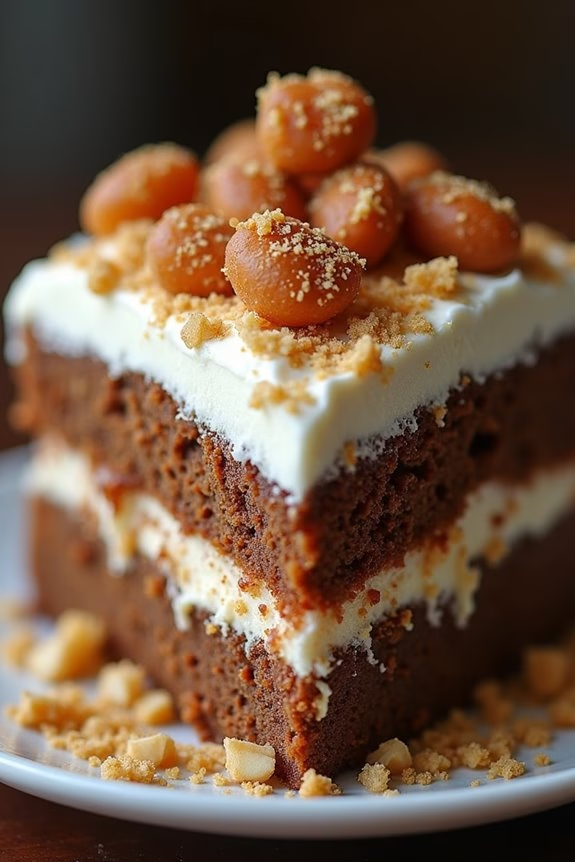
Bourbon Pecan Chocolate Sheet Cake
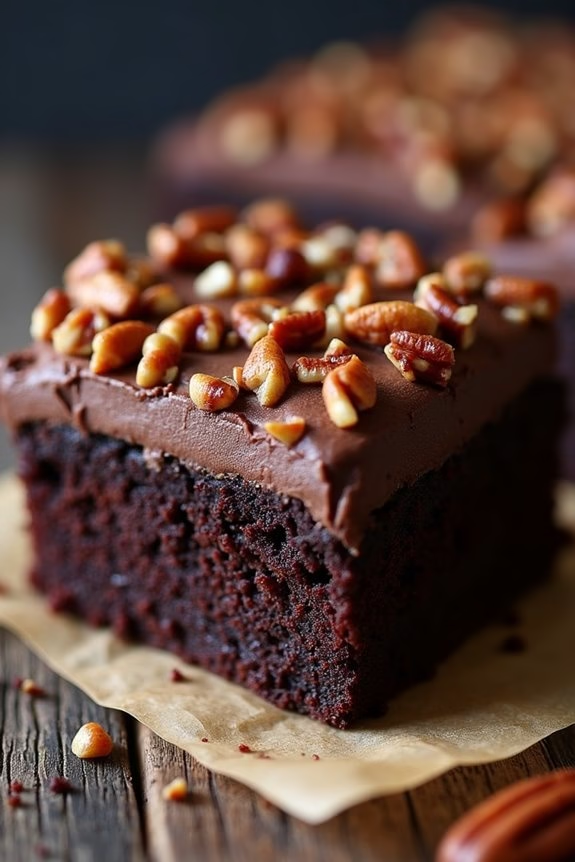
If you’re searching for a sophisticated Halloween treat that caters to an adult palate, seek no further than the Bourbon Pecan Chocolate Sheet Cake. This decadent dessert combines the rich flavors of dark chocolate with the warmth of bourbon and the nutty crunch of pecans, creating an indulgent cake perfect for Halloween gatherings.
Its luxurious flavor profile and moist texture are sure to impress guests, making it an ideal centerpiece for your spooky soiree. This cake isn’t just about its exquisite taste; it also boasts a beautiful presentation. The sheet cake format makes it easy to serve, while the bourbon-infused chocolate frosting and pecan garnish add an elegant touch.
Perfect for serving 4-6 people, this cake will become a favorite among those who appreciate the finer things in life. It’s time to put on your apron and get ready to bake this impressive Halloween treat.
Ingredients (serves 4-6):
- 1 cup all-purpose flour
- 1 cup granulated sugar
- 1/2 cup unsweetened cocoa powder
- 1 teaspoon baking powder
- 1/2 teaspoon baking soda
- 1/4 teaspoon salt
- 1/2 cup unsalted butter, melted
- 1/2 cup buttermilk
- 2 large eggs
- 1 teaspoon vanilla extract
- 1/4 cup bourbon
- 1/2 cup chopped pecans
For the Frosting:
- 1/2 cup unsalted butter
- 1/4 cup unsweetened cocoa powder
- 1/4 cup bourbon
- 3 cups powdered sugar
- 1/4 cup milk
- 1 teaspoon vanilla extract
- 1/2 cup chopped pecans (for topping)
Instructions:
- Preheat and Prepare: Preheat your oven to 350°F (175°C). Grease a 9×13-inch sheet pan with butter or non-stick cooking spray, and set it aside.
- Mix Dry Ingredients: In a large mixing bowl, whisk together the flour, sugar, cocoa powder, baking powder, baking soda, and salt until well combined.
- Combine Wet Ingredients: In another bowl, combine the melted butter, buttermilk, eggs, vanilla extract, and bourbon. Whisk until the mixture is smooth.
- Incorporate the Mixtures: Gradually add the wet ingredients to the dry ingredients, stirring gently until the batter is smooth and well combined. Fold in the chopped pecans.
- Bake the Cake: Pour the batter into the prepared sheet pan, spreading it evenly. Bake in the preheated oven for 25-30 minutes, or until a toothpick inserted into the center comes out clean. Let the cake cool completely in the pan on a wire rack.
- Prepare the Frosting: In a medium saucepan, melt the butter over medium heat. Stir in the cocoa powder and bourbon until smooth. Remove from heat and gradually whisk in the powdered sugar, milk, and vanilla extract until the frosting is smooth and spreadable.
- Frost and Garnish: Once the cake is completely cooled, spread the frosting evenly over the top. Sprinkle with additional chopped pecans for garnish.
Extra Tips:
When making the Bourbon Pecan Chocolate Sheet Cake, be sure to use high-quality cocoa powder and bourbon for the best flavor. If you prefer a milder bourbon taste, reduce the amount in the frosting to suit your preference.
Toasting the pecans before adding them to the batter and as a topping can enhance their flavor and add an extra layer of complexity to the cake. Finally, confirm the cake is completely cool before frosting to prevent the frosting from melting and becoming too runny. Enjoy this rich, adult-friendly dessert at your Halloween celebration!
Salted Caramel and Pretzel Cheesecake
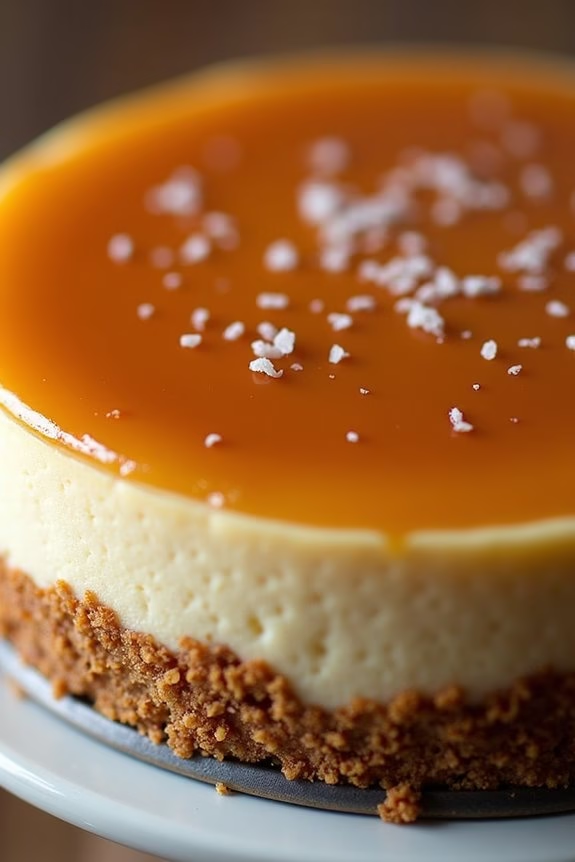
Indulge in a decadent dessert that perfectly balances sweet and salty flavors with this Salted Caramel and Pretzel Cheesecake. This recipe is perfect for an adult Halloween gathering, offering a sophisticated twist on traditional cheesecake with the unique addition of a salty pretzel crust. The creamy cheesecake filling is complemented by a luscious layer of homemade salted caramel, creating a dessert that’s both visually stunning and deliciously satisfying.
This cheesecake serves 4-6 people and is an ideal centerpiece for your Halloween celebration. With a bit of patience and precision, you’ll be able to create a dessert that impresses both in taste and presentation. The combination of textures and flavors will leave your guests craving more, making it an unforgettable addition to your Halloween festivities.
Ingredients:
For the Pretzel Crust:
- 1 1/2 cups crushed pretzels
- 1/2 cup unsalted butter, melted
- 1/4 cup granulated sugar
For the Cheesecake Filling:
- 24 oz cream cheese, softened
- 1 cup granulated sugar
- 1 tsp vanilla extract
- 3 large eggs
- 1/2 cup sour cream
For the Salted Caramel Sauce:
- 1 cup granulated sugar
- 6 tbsp unsalted butter, cubed
- 1/2 cup heavy cream
- 1 tsp sea salt
Cooking Instructions:
- Prepare the Pretzel Crust:
- Preheat your oven to 350°F (175°C).
- In a medium bowl, combine the crushed pretzels, melted butter, and granulated sugar. Mix until the pretzels are well-coated.
- Press the mixture into the bottom of a 9-inch springform pan, guaranteeing an even layer.
- Bake the crust for 10 minutes, then remove from the oven and let it cool completely.
- Make the Cheesecake Filling:
- In a large mixing bowl, beat the softened cream cheese and sugar until smooth and creamy.
- Add in the vanilla extract and mix until well combined.
- Incorporate the eggs one at a time, mixing on low speed to avoid over-beating.
- Stir in the sour cream until the mixture is smooth and uniform.
- Bake the Cheesecake:
- Pour the cheesecake filling over the cooled pretzel crust, using a spatula to smooth the top.
- Create a water bath by placing the springform pan inside a larger baking pan and filling the larger pan with hot water until it reaches halfway up the sides of the springform pan.
- Bake in the preheated oven for 45-50 minutes, or until the edges are set and the center is slightly jiggly.
- Turn off the oven and leave the cheesecake inside with the door slightly ajar for an additional hour to cool gradually.
- Remove from the oven and refrigerate for at least 4 hours or overnight.
- Prepare the Salted Caramel Sauce:
- In a medium saucepan over medium heat, melt the sugar until it turns a golden brown, stirring constantly to prevent burning.
- Carefully add the butter, whisking until it’s completely melted.
- Slowly pour in the heavy cream, continuing to whisk until the mixture is smooth.
- Allow the caramel to boil for about 1 minute, then remove from heat and stir in the sea salt.
- Let the caramel cool to room temperature before drizzling over the chilled cheesecake.
Extra Tips:
For a perfectly smooth cheesecake, confirm all ingredients, especially the cream cheese, are at room temperature before beginning. This helps achieve a lump-free filling.
When baking, avoid opening the oven door frequently to maintain a stable temperature and prevent cracks. If you notice your cheesecake cracking, a dollop of salted caramel sauce can artfully conceal any imperfections while adding extra flavor.
To achieve a clean slice, use a warm, wet knife, wiping it between cuts. Enjoy your Salted Caramel and Pretzel Cheesecake with a glass of wine or a cup of coffee for an exquisite Halloween treat.
Almond and Blood Plum Tart
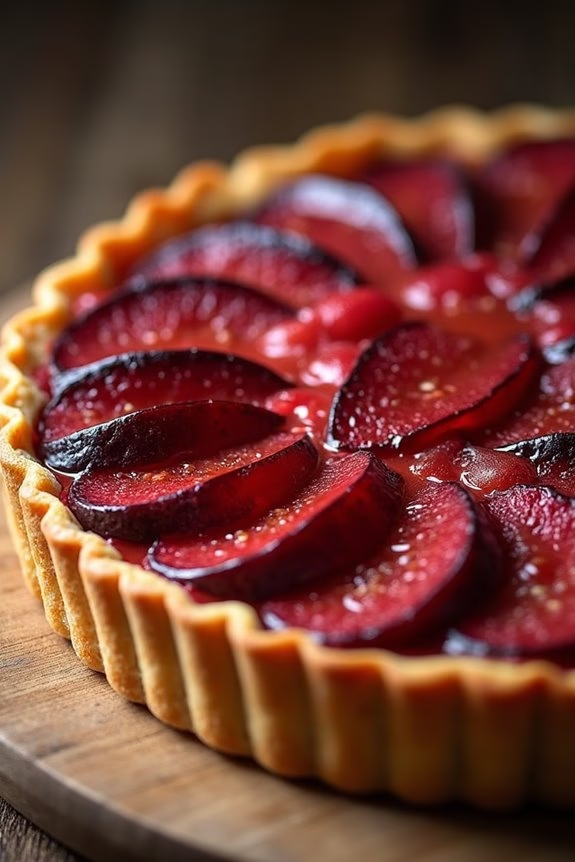
Serve up a spine-chilling treat this Halloween with an Almond and Blood Plum Tart that’s perfect for adults looking to indulge in a sophisticated dessert with a spooky twist. This tart combines the nutty richness of almonds with the hauntingly deep hues of blood plums, creating a visually stunning masterpiece that will impress and delight your guests.
The almond filling provides a creamy contrast to the tartness of the plums, while the buttery crust holds everything together in a perfectly balanced bite. This recipe serves 4-6 people and is ideal for a Halloween gathering or an intimate dinner party. The tart can be prepared ahead of time, allowing you to focus on other party preparations.
The combination of ingredients not only guarantees a delicious result but also makes for an eye-catching presentation that fits the Halloween theme perfectly. With a little bit of creativity, you can transform this tart into the centerpiece of your dessert table.
Ingredients:
- 1 1/2 cups all-purpose flour
- 1/2 cup powdered sugar
- 1/2 cup unsalted butter, chilled and diced
- 1 large egg yolk
- 2 tablespoons cold water
- 1 cup almond meal
- 1/2 cup granulated sugar
- 1/2 cup unsalted butter, softened
- 2 large eggs
- 1 teaspoon almond extract
- 6 blood plums, pitted and sliced
- 2 tablespoons apricot jam (optional, for glazing)
Instructions:
- Prepare the Tart Crust:
- Preheat your oven to 350°F (175°C). In a large mixing bowl, combine the all-purpose flour and powdered sugar. Add the chilled diced butter, and using your fingers or a pastry cutter, blend until the mixture resembles coarse breadcrumbs.
- Add the egg yolk and cold water, mixing until the dough begins to come together. Form the dough into a ball, wrap it in plastic wrap, and refrigerate for at least 30 minutes.
- Roll Out the Crust:
- On a lightly floured surface, roll out the chilled dough to fit a 9-inch tart pan. Carefully transfer the dough to the pan, pressing it into the edges and trimming any excess. Prick the base with a fork to prevent bubbling.
- Blind Bake the Crust:
- Line the crust with parchment paper and fill with pie weights or dried beans. Bake for 15 minutes, remove the weights and parchment, and bake for an additional 5 minutes until lightly golden. Let it cool.
- Prepare the Almond Filling:
- In a mixing bowl, beat together the almond meal, granulated sugar, and softened butter until creamy. Add the eggs one at a time, followed by the almond extract, blending until smooth.
- Assemble the Tart:
- Spread the almond filling evenly over the cooled crust. Arrange the blood plum slices on top in a circular pattern, pressing them gently into the filling.
- Bake the Tart:
- Bake the assembled tart in the oven for about 30-35 minutes or until the almond filling is set and the plums are tender. If desired, brush the warm tart with apricot jam to add a glossy finish.
- Cool and Serve:
- Allow the tart to cool completely before removing it from the tart pan. Slice and serve it at room temperature or slightly chilled.
Extra Tips:
For the best results, choose blood plums that are ripe but still firm, as they’ll hold their shape better during baking. If you can’t find blood plums, other varieties of plums can be substituted, though they may not provide the same dramatic color.
To prevent the crust from becoming soggy, make sure it’s fully cooled before adding the almond filling. If you wish to enhance the Halloween theme, consider adding a few drops of red food coloring to the almond filling for a more vibrant appearance.
Mocha and Hazelnut Tiramisu Cake
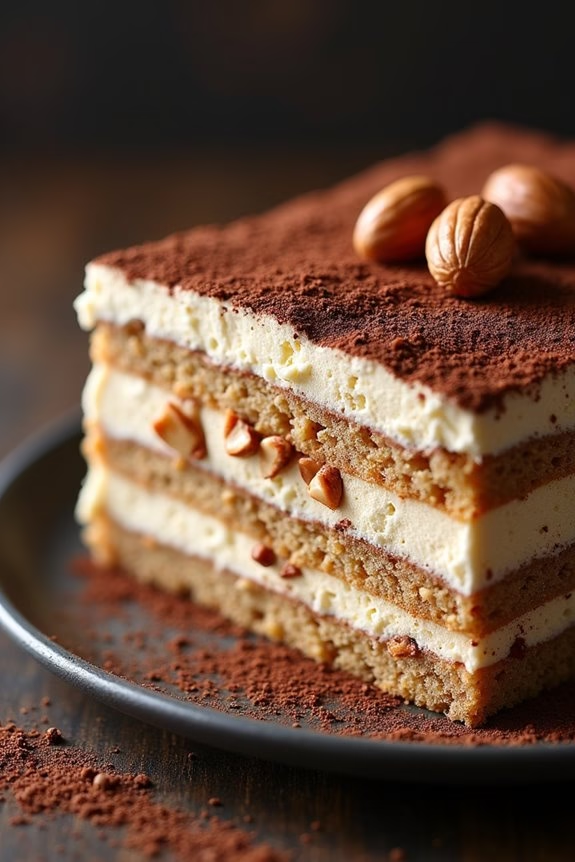
Indulge in the rich, decadent flavors of our Mocha and Hazelnut Tiramisu Cake, a sophisticated twist on the traditional Italian dessert. This cake combines the robust taste of espresso, the creamy texture of mascarpone, and the nutty crunch of hazelnuts to create an exquisite treat tailor-made for adults. Perfect for a Halloween gathering or any special occasion, this cake promises to be the star of your dessert table.
Each bite offers a harmonious blend of flavors and textures, leaving a lasting impression on your guests.
Our Mocha and Hazelnut Tiramisu Cake isn’t only delicious but also visually striking, with layers of coffee-soaked ladyfingers, mascarpone cream, and a generous dusting of cocoa powder. It’s topped with toasted hazelnuts for an extra layer of flavor and crunch.
This recipe serves 4-6 people, making it ideal for a small party. Whether you’re a seasoned baker or a beginner in the kitchen, this recipe is straightforward and rewarding, ensuring you can whip up this delightful cake with ease.
Ingredients (Serves 4-6):
- 1 cup (240ml) strong brewed espresso, cooled
- 2 tablespoons coffee liqueur (optional)
- 250g mascarpone cheese
- 1 cup (240ml) heavy cream
- 1/2 cup (100g) granulated sugar
- 1 teaspoon vanilla extract
- 24 ladyfingers (savoiardi)
- 1/4 cup (25g) unsweetened cocoa powder
- 1/2 cup (70g) toasted hazelnuts, roughly chopped
- 2 tablespoons instant espresso powder
Cooking Instructions:
- Prepare the Espresso Mixture: In a shallow bowl, combine the cooled espresso with the coffee liqueur. Stir well to combine, and set aside. This mixture will be used to soak the ladyfingers.
- Make the Mascarpone Cream: In a large mixing bowl, combine the mascarpone cheese, heavy cream, granulated sugar, and vanilla extract. Beat with an electric mixer on medium speed until the mixture is smooth and forms soft peaks. Be careful not to over-whip.
- Soak the Ladyfingers: Quickly dip each ladyfinger into the espresso mixture, ensuring they’re soaked but not soggy. Arrange a layer of the soaked ladyfingers at the bottom of a 9×9 inch baking dish or similar container.
- Layer the Cake: Spread half of the mascarpone cream over the layer of ladyfingers. Dust with a light layer of cocoa powder and sprinkle some chopped hazelnuts on top. Repeat the process with another layer of soaked ladyfingers and the remaining mascarpone cream.
- Finish and Chill: Dust the top layer generously with cocoa powder and sprinkle with the remaining hazelnuts. Cover the dish with plastic wrap and refrigerate for at least 4 hours, or overnight for best results. This allows the flavors to meld and the cake to set properly.
Extra Tips:
For an extra boost of flavor, consider adding a hint of hazelnut liqueur to the espresso mixture. When whipping the mascarpone cream, make sure all ingredients are cold to achieve the best texture.
If you prefer a stronger coffee flavor, increase the amount of espresso powder in the cream. Finally, for a more dramatic presentation, serve the cake with a sprinkle of shaved dark chocolate or chocolate curls on top.