

Halloween is just around the corner, and I’ve conjured up a list of 15 wickedly delightful brownie recipes that will enchant your taste buds. Think fudgy delights turned into ghostly marshmallows, intricate spiderweb designs, and even mummies that almost come alive. As a lifelong brownie enthusiast, these creations not only satisfy my chocolate cravings but also add a playful twist to the spooky season. Ever wondered what a witch hat brownie bite looks like? Let’s embark on a deliciously spooky journey together!
Ghostly Marshmallow Brownies
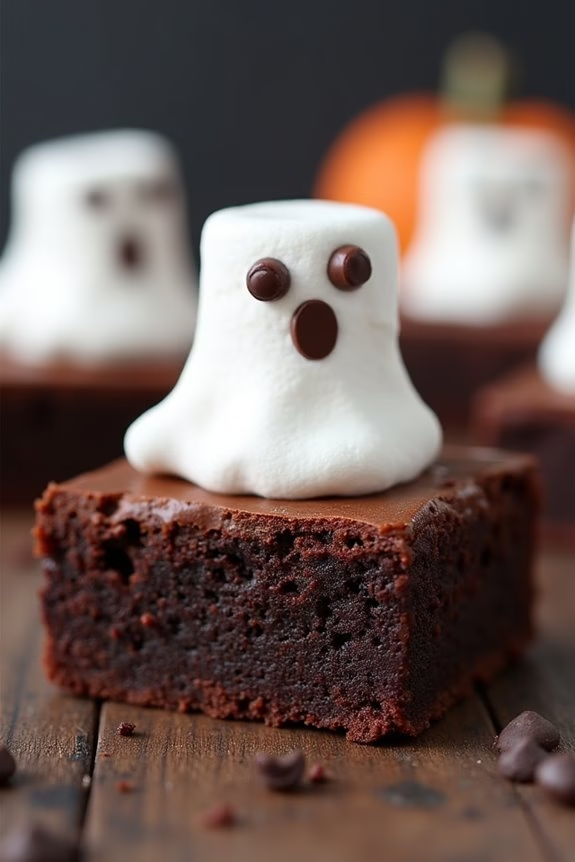
Ghostly Marshmallow Brownies are the perfect spooky treat to delight both kids and adults during the Halloween season. These rich and fudgy brownies are topped with ghostly marshmallows, adding a fun and festive touch to your dessert table.
Whether you’re hosting a Halloween party or simply want to enjoy a themed dessert, this recipe is certain to become a seasonal favorite. The combination of decadent chocolate brownie with gooey marshmallow creates an irresistible texture and flavor.
The marshmallows are carefully shaped into little ghost figures, complete with chocolate eyes, making these brownies not only delicious but also a playful addition to your Halloween celebrations. With a serving size of 4-6 people, these Ghostly Marshmallow Brownies are perfect for sharing with friends and family.
Ingredients (Serving Size: 4-6 people)
- 1 cup unsalted butter
- 2 cups granulated sugar
- 4 large eggs
- 1 teaspoon vanilla extract
- 1 cup all-purpose flour
- 1 cup unsweetened cocoa powder
- 1/2 teaspoon salt
- 1/2 teaspoon baking powder
- 12 large marshmallows
- 1/4 cup mini chocolate chips (for decorating)
Cooking Instructions
- Preheat the Oven: Start by preheating your oven to 350°F (175°C). Grease a 9×13 inch baking pan and set it aside.
- Prepare the Brownie Batter: In a medium saucepan over medium heat, melt the butter. Once melted, remove from heat and stir in the sugar, followed by the eggs and vanilla extract. Mix until smooth and well combined.
- Combine Dry Ingredients: In a separate bowl, sift together the flour, cocoa powder, salt, and baking powder. Gradually fold the dry ingredients into the wet mixture until just combined, taking care not to overmix.
- Bake the Brownies: Pour the brownie batter into the prepared baking pan and smooth the top with a spatula. Bake in the preheated oven for 25-30 minutes, or until a toothpick inserted into the center comes out with a few moist crumbs.
- Shape the Marshmallow Ghosts: While the brownies are baking, prepare the marshmallow ghosts. Use a pair of scissors to cut each marshmallow into a ghost-like shape. Optional: use your fingers to pinch and form little arms.
- Add Marshmallow Ghosts: Once the brownies are baked, remove them from the oven and immediately place the marshmallow ghosts on top, spaced evenly. Press gently to adhere.
- Decorate the Ghosts: While the brownies are still warm, place two mini chocolate chips on each marshmallow to create eyes for the ghosts.
- Cool and Serve: Allow the brownies to cool in the pan on a wire rack. Once completely cool, cut into squares and serve your Ghostly Marshmallow Brownies.
Extra Tips
To guarantee your brownies are perfectly fudgy, make sure not to overbake them. Keep an eye on the baking time as ovens can vary.
If you find the marshmallows aren’t sticking well, try placing the brownies back in the oven for a minute or two just to soften the marshmallows slightly. Enjoy these treats fresh, as the marshmallows stay soft and gooey shortly after baking.
If you prefer a more ghostly effect, you can also use a bit of powdered sugar to dust over the marshmallow tops, giving them an ethereal appearance.
Spiderweb Fudge Brownies
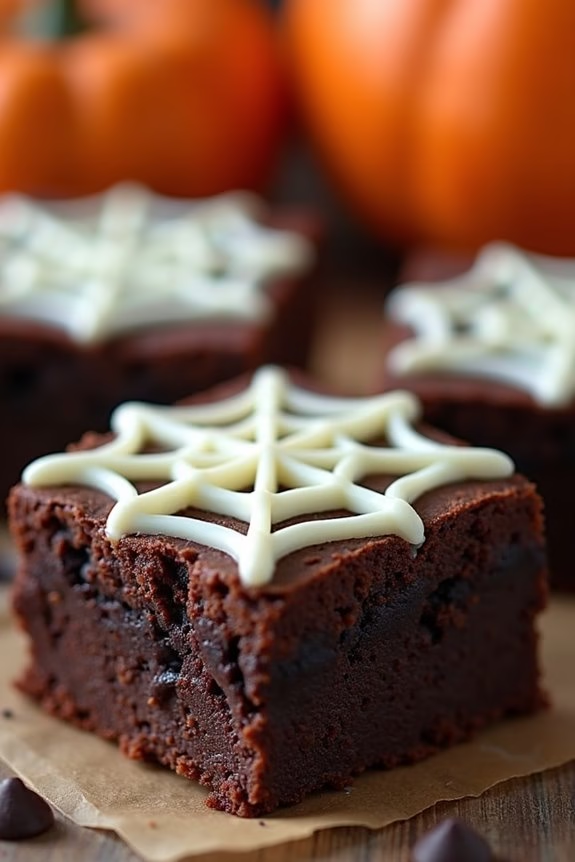
Get into the Halloween spirit with these delectable Spiderweb Fudge Brownies that are as fun to make as they’re to eat. Perfect for serving at your Halloween party or enjoying as a festive treat, these brownies combine rich chocolatey goodness with a spooky flair. The spiderweb design on top adds a touch of whimsy, making them a hit with both kids and adults alike.
These brownies serve 4-6 people and are made with a deliciously fudgy base, followed by a creamy white chocolate topping that’s transformed into an intricate spiderweb pattern. The process is simple enough for novice bakers, yet the end result is impressive enough to wow your guests. Gather your ingredients and prepare to create a Halloween treat that will have everyone asking for seconds.
Ingredients:
- 1 cup unsalted butter
- 2 cups granulated sugar
- 4 large eggs
- 1 teaspoon vanilla extract
- 1 cup all-purpose flour
- 1 cup unsweetened cocoa powder
- 1/2 teaspoon salt
- 1 cup semi-sweet chocolate chips
- 1/2 cup heavy cream
- 1/2 cup white chocolate chips
Cooking Instructions:
- Preheat and Prepare the Pan: Preheat your oven to 350°F (175°C). Grease and line a 9×13 inch baking pan with parchment paper, leaving some overhang on the sides to easily lift the brownies out later.
- Melt Butter and Chocolate: In a microwave-safe bowl, melt the unsalted butter. Stir in the semi-sweet chocolate chips until smooth and fully melted. Allow the mixture to cool slightly.
- Mix Wet Ingredients: In a large mixing bowl, combine the granulated sugar, eggs, and vanilla extract. Beat together until the mixture is thick and pale.
- Combine Dry Ingredients: In a separate bowl, sift together the all-purpose flour, cocoa powder, and salt. Gradually fold the dry ingredients into the wet mixture, stirring until just combined.
- Create the Batter: Slowly stir the melted butter and chocolate mixture into the brownie batter until smooth and well incorporated.
- Bake: Pour the brownie batter into the prepared baking pan and spread it evenly. Bake in the preheated oven for 25-30 minutes, or until a toothpick inserted into the center comes out with a few moist crumbs.
- Prepare the Topping: While the brownies are baking, heat the heavy cream in a small saucepan over medium heat until it begins to simmer. Remove from heat and pour over white chocolate chips. Stir until the white chocolate is completely melted and smooth.
- Create the Spiderweb Design: Once the brownies have cooled slightly, pour the white chocolate mixture over the top, spreading it out evenly. Using a toothpick or a skewer, gently drag lines from the center to the edges to create a spiderweb pattern.
- Cool and Serve: Allow the brownies to cool completely in the pan before lifting them out using the parchment paper overhang. Cut into squares and serve.
Extra Tips:
For the best results, make sure that the brownies are completely cool before attempting to cut them, as this will help maintain the integrity of the spiderweb design.
If you prefer a more pronounced spiderweb effect, you can drizzle additional melted dark chocolate over the white chocolate layer before dragging the lines.
Additionally, these brownies can be made a day in advance; simply store them in an airtight container at room temperature. Enjoy your spooky, delicious creation!
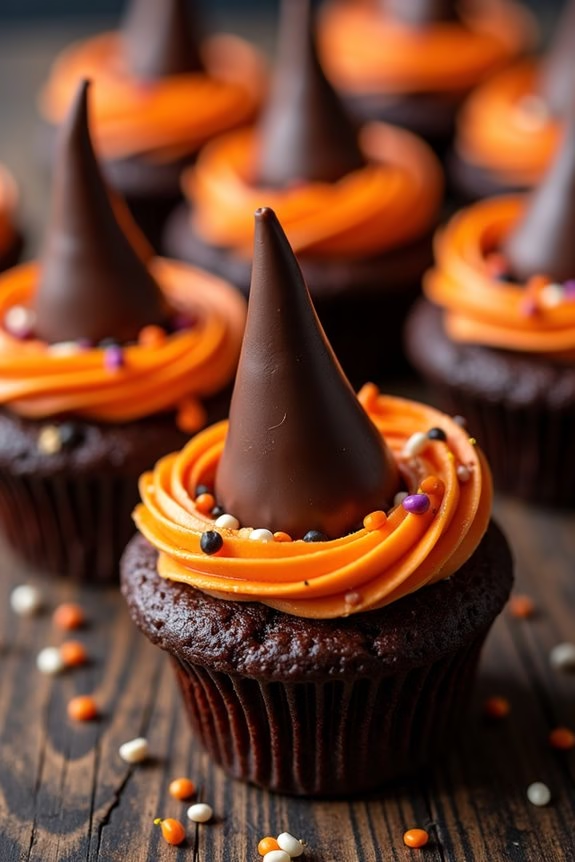
Witch Hat Brownie Bites
- 1 box of brownie mix (18-20 oz)
- 2 large eggs
- 1/2 cup vegetable oil
- 1/4 cup water
- 12 mini ice cream cones
- 12 chocolate kisses
- 1 cup chocolate chips
- 1/2 cup orange frosting
- Sprinkles for decoration (optional)
Instructions:
- Preheat and Prepare: Preheat your oven to 350°F (175°C). Line a 12-cup muffin tin with paper liners to prevent the brownies from sticking and to make them easier to serve.
- Mix the Brownie Batter: In a large mixing bowl, combine the brownie mix, eggs, vegetable oil, and water. Stir until the mixture is smooth and well combined. The batter should be thick and glossy.
- Fill the Muffin Tin: Evenly distribute the brownie batter into the prepared muffin tin, filling each cup about 2/3 full. This allows space for the brownie to rise without overflowing.
- Bake the Brownies: Place the muffin tin in the preheated oven and bake for 18-20 minutes, or until a toothpick inserted into the center of a brownie comes out mostly clean. Allow the brownies to cool in the pan for 5 minutes before transferring them to a wire rack to cool completely.
- Prepare the Witch Hats: Melt the chocolate chips in a microwave-safe bowl, heating in 30-second intervals and stirring in between until smooth. Dip the rim of each mini ice cream cone into the melted chocolate, making sure it’s well coated.
- Assemble the Witch Hats: Attach a chocolate kiss to the center of the chocolate-coated rim of each cone, using the melted chocolate as glue. Allow the hats to set until the chocolate hardens.
- Decorate the Brownie Bites: Once the brownies are completely cool, use the orange frosting to pipe a small circle in the center of each brownie. Gently press a witch hat onto each frosted brownie, allowing the frosting to secure the hat in place.
- Add Finishing Touches: If desired, sprinkle each brownie bite with decorative sprinkles for an extra festive touch.
Extra Tips:
For a more personalized touch, try using different types of sprinkles or colored frosting to match your Halloween party theme. You can also add a few drops of food coloring to the brownie batter for a fun twist.
If you find the chocolate hats difficult to attach, try refrigerating them for a few minutes to help the chocolate set faster.
Finally, verify that the brownies are completely cooled before decorating to prevent the frosting and chocolate from melting.
These Witch Hat Brownie Bites are best served fresh but can be stored in an airtight container for up to two days. Enjoy your spooky treats!
Mummy Brownie Bars
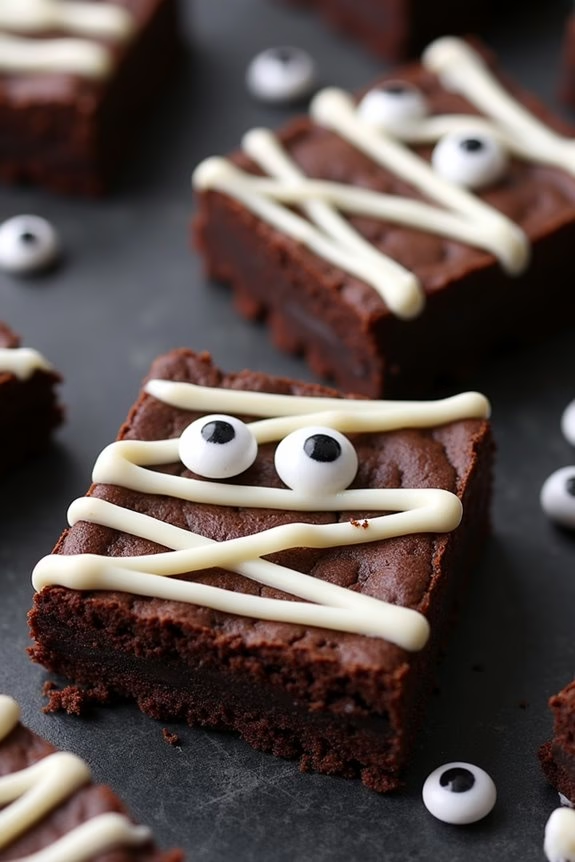
Mummy Brownie Bars are a spooky and delightful treat perfect for Halloween festivities. These fun and festive brownies aren’t only a visual delight but also a chocolatey indulgence that will satisfy your sweet tooth. With a rich, fudgy texture and a playful mummy design, these brownie bars are sure to be a hit with both kids and adults alike.
Whether you’re hosting a Halloween party or simply want to surprise your family with a themed dessert, these Mummy Brownie Bars are an outstanding choice. Creating these delicious and decorative treats is simple and requires just a few basic ingredients commonly found in your pantry.
The process involves baking a batch of classic brownies, cutting them into bars, and then decorating them to resemble mummies using white chocolate and candy eyes. This recipe makes enough for 4-6 people, guaranteeing there’s plenty to go around for everyone to enjoy. So, gather your ingredients and get ready to bake these spooktacular Mummy Brownie Bars!
Ingredients for 4-6 people:
- 1 cup unsalted butter
- 1 cup granulated sugar
- 1 cup brown sugar
- 4 large eggs
- 2 teaspoons vanilla extract
- 1 cup all-purpose flour
- 1 cup unsweetened cocoa powder
- 1/2 teaspoon salt
- 1 cup white chocolate chips
- Candy eyes
Cooking Instructions:
- Preheat the Oven: Start by preheating your oven to 350°F (175°C). Prepare a 9×13 inch baking pan by lining it with parchment paper or lightly greasing it.
- Mix the Wet Ingredients: In a large mixing bowl, melt the unsalted butter. Once melted, add the granulated sugar and brown sugar, and whisk until well combined. Add the eggs and vanilla extract, then continue to whisk until the mixture is smooth and creamy.
- Combine Dry Ingredients: In a separate bowl, sift together the all-purpose flour, unsweetened cocoa powder, and salt. Gradually add these dry ingredients to the wet mixture, stirring until just combined. Be careful not to overmix to warrant your brownies remain tender and fudgy.
- Bake the Brownies: Pour the brownie batter into the prepared baking pan, spreading it evenly. Place the pan in the preheated oven and bake for 25-30 minutes, or until a toothpick inserted into the center comes out with a few moist crumbs.
- Cool and Cut: Once baked, remove the brownies from the oven and allow them to cool completely in the pan. Once cooled, lift the brownies out using the parchment paper and cut them into bars of your desired size.
- Melt White Chocolate: In a microwave-safe bowl, melt the white chocolate chips in 30-second intervals, stirring after each interval until fully melted and smooth.
- Decorate the Brownies: Transfer the melted white chocolate to a piping bag or a resealable plastic bag with a small corner snipped off. Drizzle the white chocolate over the brownie bars in a zigzag pattern to create the look of mummy bandages. While the chocolate is still soft, place candy eyes on each brownie bar to complete the mummy look.
- Set the Chocolate: Allow the decorated brownies to sit at room temperature until the white chocolate has set. This usually takes about 15-20 minutes.
Extra Tips:
For the best texture, avoid overbaking the brownies; they should be slightly underdone in the center to achieve that desirable fudgy consistency.
If you’re short on time, you can use a boxed brownie mix as a base and focus your efforts on the mummy decoration. Additionally, feel free to get creative with the decorations by using different colored chocolate or adding other fun Halloween-themed candies.
These Mummy Brownie Bars can also be made a day in advance, which allows the flavors to meld together beautifully.
Pumpkin Patch Brownies
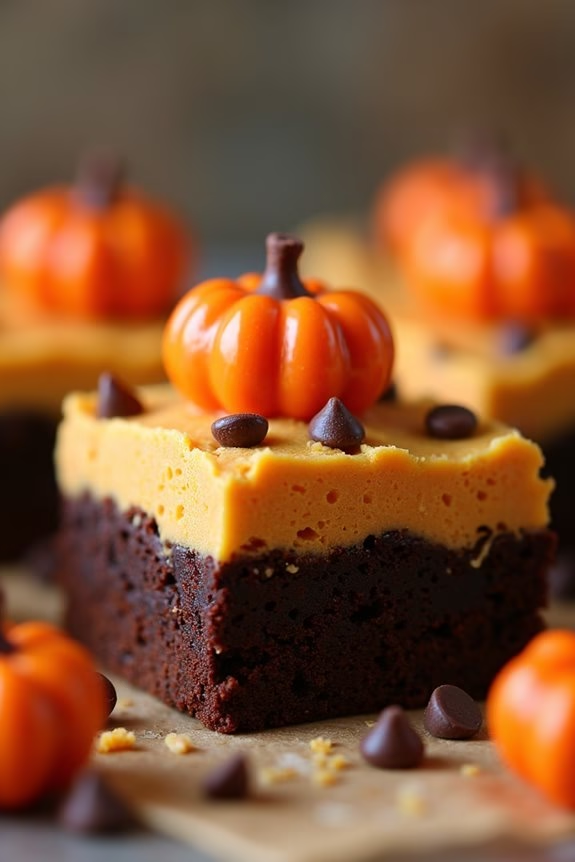
Pumpkin Patch Brownies are a delightful twist on traditional Halloween treats, combining the rich flavors of chocolate with the warmth and spice of pumpkin. Perfect for a spooky celebration or a cozy autumn evening, these brownies not only taste amazing but also look festive with their pumpkin patch decoration.
With a fudgy brownie base topped with a creamy pumpkin layer, these treats are sure to be a hit with both kids and adults alike. The key to making these brownies special is their layered approach, which gives each bite a perfect balance of chocolate and pumpkin.
The brownie base is dense and chocolatey, while the pumpkin layer is smooth, creamy, and just sweet enough. Topped with a handful of candy pumpkins or marzipan pumpkins to create the appearance of a pumpkin patch, these brownies are as visually appealing as they’re delicious. This recipe serves 4-6 people, making it ideal for a small gathering or a family treat.
Ingredients:
- 1 cup unsalted butter
- 1 cup granulated sugar
- 1 cup packed light brown sugar
- 4 large eggs
- 1 tablespoon vanilla extract
- 1 cup all-purpose flour
- 1 cup unsweetened cocoa powder
- 1 teaspoon salt
- 1 teaspoon baking powder
- 1 cup canned pumpkin puree
- 1 teaspoon pumpkin pie spice
- 1/2 cup cream cheese, softened
- 1/2 cup mini chocolate chips
- Candy pumpkins or marzipan pumpkins for decoration
Cooking Instructions:
- Preheat and Prepare: Preheat your oven to 350°F (175°C). Grease a 9×13-inch baking pan or line it with parchment paper for easy removal of the brownies once baked.
- Make the Brownie Batter: In a large saucepan, melt the butter over medium heat. Once melted, remove from heat and stir in the granulated sugar and light brown sugar until well combined. Allow the mixture to cool slightly, then add the eggs one at a time, beating well after each addition. Stir in the vanilla extract.
- Combine Dry Ingredients: In a separate bowl, whisk together the all-purpose flour, cocoa powder, salt, and baking powder. Gradually add the dry ingredients to the wet mixture, stirring until just combined. Be careful not to overmix, as this can make the brownies tough.
- Prepare the Pumpkin Layer: In another bowl, combine the canned pumpkin puree, pumpkin pie spice, and cream cheese. Mix until smooth and creamy.
- Layer the Brownies: Pour the brownie batter into the prepared baking pan and spread it evenly. Gently spread the pumpkin mixture over the brownie layer, using a spatula to create an even layer. Sprinkle the top with mini chocolate chips.
- Bake: Place the baking pan in the preheated oven and bake for 35-40 minutes, or until a toothpick inserted into the center comes out with a few moist crumbs. Allow the brownies to cool completely in the pan on a wire rack.
- Decorate: Once cooled, decorate the top of the brownies with candy pumpkins or marzipan pumpkins to resemble a pumpkin patch. Cut into squares and serve.
Extra Tips:
For the best results, make sure all your ingredients are at room temperature before you start, particularly the eggs and cream cheese, as this will help them blend more smoothly.
If you find the pumpkin layer is difficult to spread, you can drop it by spoonfuls over the brownie batter and use a knife to gently swirl the two layers together for a marbled effect.
Additionally, if you prefer a stronger pumpkin flavor, consider adding an extra half teaspoon of pumpkin pie spice. Enjoy your Halloween brownies with a scoop of vanilla ice cream for an extra indulgent treat!
Bloody Red Velvet Brownies
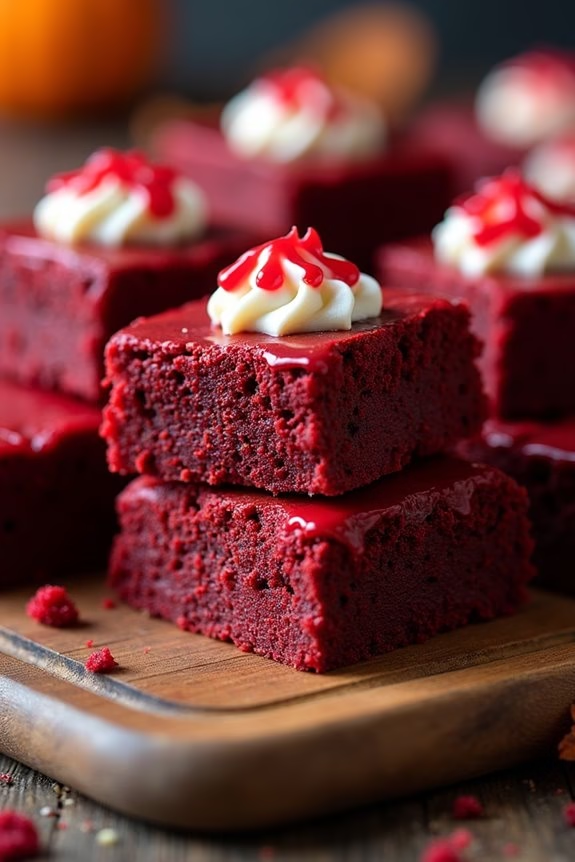
Halloween is the perfect time to indulge in spooky-themed treats, and Bloody Red Velvet Brownies are the ultimate dessert to add a touch of fright to your festivities. With their striking red color and rich, chocolatey flavor, these brownies are sure to be a hit at any Halloween gathering. The velvety texture combined with a hint of cocoa makes them a decadent treat that both adults and kids will love.
Plus, the “bloody” appearance adds a fun and eerie twist that perfectly complements the Halloween theme. These Bloody Red Velvet Brownies aren’t only visually appealing but also incredibly simple to make. The recipe involves just a few basic ingredients, which makes it accessible even to beginner bakers.
Whether you’re hosting a Halloween party or just want to surprise your family with a festive dessert, this recipe will guarantee you have a batch of delicious brownies ready in no time. Let’s plunge into the ingredients and instructions to create this spooktacular treat.
Ingredients (Serves 4-6):
- 1 cup all-purpose flour
- 1 cup granulated sugar
- 1/2 cup unsalted butter, melted
- 2 large eggs
- 2 tablespoons unsweetened cocoa powder
- 1 teaspoon vanilla extract
- 1 tablespoon red food coloring
- 1/4 teaspoon salt
- 1/2 teaspoon white vinegar
- 1/2 cup buttermilk
- 1/2 teaspoon baking powder
- Optional: Cream cheese frosting or red gel icing for decoration
Instructions:
- Preheat the Oven: Begin by preheating your oven to 350°F (175°C). This guarantees that your oven is at the right temperature when you’re ready to bake the brownies.
- Prepare the Baking Pan: Line a 9×9 inch baking pan with parchment paper or lightly grease it with butter. This will prevent the brownies from sticking and make it easier to remove them from the pan later.
- Mix Dry Ingredients: In a medium-sized bowl, whisk together the all-purpose flour, cocoa powder, salt, and baking powder. This will ensure that the dry ingredients are evenly distributed throughout the batter.
- Combine Wet Ingredients: In a separate large bowl, beat together the melted butter and sugar until well combined. Add in the eggs, vanilla extract, red food coloring, and white vinegar, and mix until smooth and the color is evenly distributed.
- Incorporate Buttermilk: Gradually add the buttermilk to the wet mixture, continuing to mix until all the ingredients are well combined.
- Blend Dry and Wet Mixtures: Slowly add the dry ingredients to the wet mixture, stirring until just combined. Be careful not to overmix, as this can result in denser brownies.
- Transfer to Baking Pan: Pour the brownie batter into the prepared baking pan, spreading it evenly with a spatula.
- Bake: Place the pan in the preheated oven and bake for 25-30 minutes, or until a toothpick inserted into the center of the brownies comes out clean or with just a few crumbs attached.
- Cool and Decorate: Allow the brownies to cool in the pan for about 10 minutes before transferring them to a wire rack to cool completely. Once cooled, you can optionally add cream cheese frosting or decorate with red gel icing for that extra “bloody” effect.
Extra Tips:
For the best results, make sure to use gel-based red food coloring for a more vibrant color. If you don’t have buttermilk on hand, you can make a substitute by mixing 1/2 cup of milk with 1/2 tablespoon of lemon juice or vinegar and letting it sit for a few minutes.
Also, feel free to get creative with the decorations! You can drizzle melted chocolate or use Halloween-themed sprinkles to add more festive flair to your brownies. Enjoy your delicious Bloody Red Velvet Brownies with a chilling glass of milk or your favorite beverage for a perfect Halloween treat!
Monster Eye Brownies
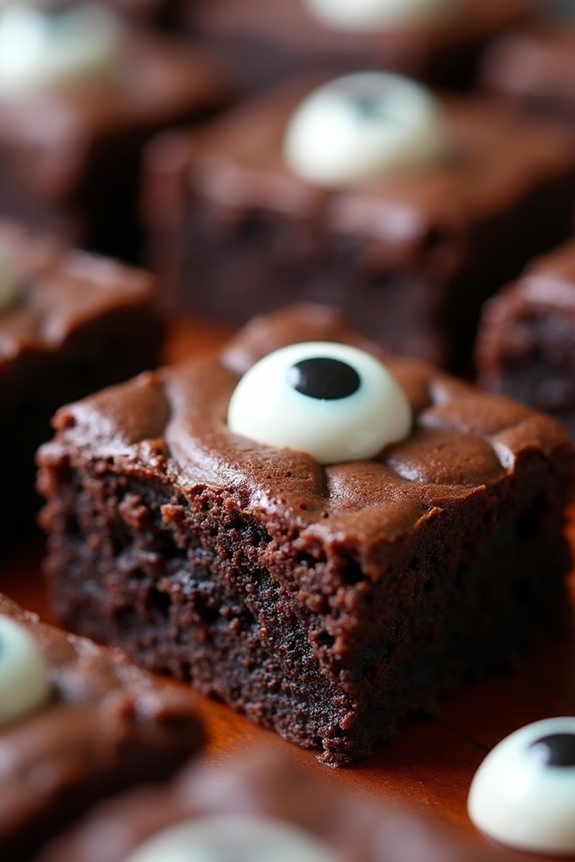
Monster Eye Brownies are a spooky and delicious treat perfect for Halloween festivities. These gooey, chocolatey brownies are adorned with eerie candy eyes, making them a hit at any Halloween party. Not only are they fun to look at, but they also pack a rich, decadent flavor that will satisfy any sweet tooth.
Whether you’re serving them to little monsters or adult ghouls, these brownies are certain to be a crowd-pleaser.
Creating Monster Eye Brownies is a fun and simple process that combines the classic brownie recipe with a spooky twist. The recipe requires basic brownie ingredients, and the addition of candy eyeballs gives them a playful, Halloween-themed look. This dish serves 4-6 people, making it perfect for a small gathering or as part of a larger dessert spread.
Follow these steps to create a batch of brownies that are as exciting to make as they’re to eat.
Ingredients (Serves 4-6 people):
- 1/2 cup unsalted butter
- 1 cup granulated sugar
- 2 large eggs
- 1 teaspoon vanilla extract
- 1/3 cup unsweetened cocoa powder
- 1/2 cup all-purpose flour
- 1/4 teaspoon salt
- 1/4 teaspoon baking powder
- 1/2 cup semi-sweet chocolate chips
- 1/4 cup candy eyeballs
Instructions:
- Preheat the Oven: Start by preheating your oven to 350°F (175°C). This will guarantee that your brownies bake evenly.
- Prepare the Baking Pan: Grease an 8×8-inch baking pan or line it with parchment paper to prevent sticking.
- Melt the Butter: In a medium saucepan over low heat, melt the butter. Once melted, remove the saucepan from the heat.
- Mix Wet Ingredients: Stir in the sugar, eggs, and vanilla extract into the melted butter until well combined.
- Add Dry Ingredients: Sift the cocoa powder, flour, salt, and baking powder together in a separate bowl. Gradually add this mixture to the wet ingredients, stirring until the batter is smooth and well combined.
- Incorporate Chocolate Chips: Gently fold the semi-sweet chocolate chips into the batter.
- Pour and Bake: Pour the brownie batter into the prepared baking pan, spreading it evenly. Bake in the preheated oven for 20-25 minutes or until a toothpick inserted in the center comes out with a few moist crumbs.
- Cool and Decorate: Allow the brownies to cool completely in the pan on a wire rack. Once cooled, press candy eyeballs into the top of the brownies, spacing them randomly for a monstrous effect.
Extra Tips:
For even more Halloween fun, consider adding a drop of green or red food coloring to the brownie batter for a more ghoulish appearance.
If you prefer a nuttier texture, try adding chopped nuts in step 6 along with the chocolate chips. Additionally, if you don’t have candy eyeballs, use small marshmallows with a dot of chocolate for the same eerie effect.
Vampire Bite Brownies

Vampire Bite Brownies are a spooky yet delicious treat perfect for Halloween celebrations. These brownies aren’t only rich and chocolatey, but they also feature a fang-tastic surprise with a gooey, blood-red filling that looks like a vampire bite. The combination of dark chocolate and sweet raspberry filling makes these brownies both visually striking and irresistibly tasty.
Perfect for a Halloween party or just a fun October baking project, Vampire Bite Brownies are certain to impress both kids and adults alike.
To create these brownies, you start with a classic brownie base, rich in cocoa and slightly fudgy. The addition of a raspberry filling gives them a unique twist, as it peeks through the top crust, creating an eerie, yet appetizing, effect. The process is simple enough for beginner bakers and can be a fun project for families to tackle together.
With this recipe, you’ll have a batch of 4-6 servings, ideal for sharing or indulging in yourself.
Ingredients:
- 1 cup all-purpose flour
- 1/2 cup unsweetened cocoa powder
- 1/2 teaspoon salt
- 1/2 teaspoon baking powder
- 1 cup granulated sugar
- 1/2 cup unsalted butter, melted
- 2 large eggs
- 1 teaspoon vanilla extract
- 1/2 cup semi-sweet chocolate chips
- 1/2 cup raspberry jam or raspberry preserves
- Red food coloring (optional)
Instructions:
- Preheat Your Oven: Start by preheating your oven to 350°F (175°C). Grease an 8×8-inch baking pan or line it with parchment paper to prevent the brownies from sticking.
- Mix Dry Ingredients: In a medium bowl, whisk together the flour, cocoa powder, salt, and baking powder. This will guarantee that all the dry ingredients are thoroughly combined and free of any lumps.
- Combine Wet Ingredients: In a separate bowl, mix the granulated sugar and melted butter until well-blended. Add the eggs one at a time, beating well after each addition. Stir in the vanilla extract.
- Combine and Add Chocolate Chips: Gradually add the dry ingredients to the wet ingredients, stirring until just combined. Be careful not to overmix. Fold in the chocolate chips to guarantee they’re evenly distributed throughout the batter.
- Prepare Raspberry Filling: In a small bowl, mix the raspberry jam with a few drops of red food coloring until you achieve a deep red, blood-like color. This step is optional but enhances the visual effect.
- Layer and Swirl: Pour half of the brownie batter into the prepared baking pan, spreading it evenly. Drop spoonfuls of the raspberry mixture over the batter, then cover with the remaining brownie batter. Use a knife or a skewer to swirl the batter and raspberry mixture together, creating a marbled effect.
- Bake: Place the pan in the preheated oven and bake for 25-30 minutes, or until a toothpick inserted into the center comes out with a few moist crumbs. Avoid overbaking to maintain a fudgy texture.
- Cool and Serve: Allow the brownies to cool in the pan on a wire rack before cutting them into squares. Serve and enjoy your Vampire Bite Brownies!
Extra Tips:
For an extra touch of spookiness, consider adding some edible candy eyes on top of the brownies before serving. You can also experiment with other berry jams if you prefer a different flavor.
If you’re looking for a gluten-free version, simply substitute the all-purpose flour with a gluten-free flour blend. Remember to store any leftover brownies in an airtight container to keep them fresh for longer.
Creepy Crawly Critter Brownies
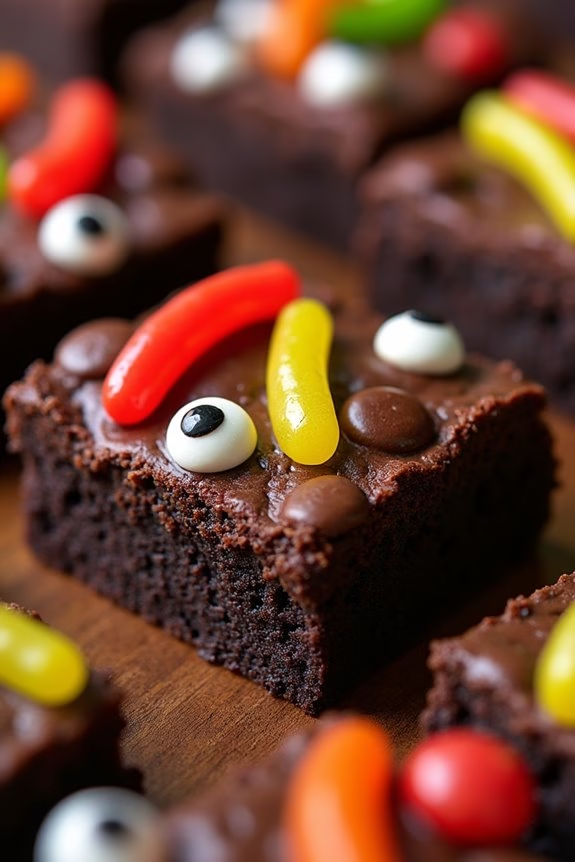
Creepy Crawly Critter Brownies are the perfect addition to your Halloween festivities, offering a fun and spooky twist on a classic dessert. These brownies aren’t only delicious but also visually intriguing, making them a hit among both kids and adults. By incorporating gummy worms and other creepy crawly candies, you can easily transform a simple brownie into a festive treat that captures the spirit of Halloween.
The rich, chocolatey base of the brownies provides the perfect backdrop for the vibrant colors and playful textures of the candy critters. Whether you’re hosting a Halloween party or simply want to surprise your family with a themed dessert, these Creepy Crawly Critter Brownies are bound to delight.
Plus, they’re easy to make and customize, allowing you to add your favorite Halloween candies to create a truly unique and delicious treat.
Ingredients (serves 4-6):
- 1 cup all-purpose flour
- 1/2 cup unsweetened cocoa powder
- 1 cup granulated sugar
- 1/2 cup unsalted butter, melted
- 2 large eggs
- 1 teaspoon vanilla extract
- 1/4 teaspoon salt
- 1/2 cup semi-sweet chocolate chips
- 1 cup assorted gummy worms and other creepy candy critters
- 1/4 cup chocolate frosting (optional)
- Edible eyes (optional)
Instructions:
- Preheat and Prepare: Preheat your oven to 350°F (175°C). Grease a 9×9-inch baking pan or line it with parchment paper for easy removal.
- Mix Dry Ingredients: In a medium bowl, sift together the flour, cocoa powder, and salt. This guarantees that the dry ingredients are well combined and any lumps are removed.
- Combine Wet Ingredients: In a separate large bowl, whisk together the melted butter and sugar until smooth. Add the eggs and vanilla extract, mixing until fully incorporated.
- Create Batter: Gradually add the dry ingredients to the wet ingredients, stirring gently until just combined. Be careful not to overmix, as this can make the brownies tough.
- Add Chocolate Chips: Fold in the semi-sweet chocolate chips, distributing them evenly throughout the batter.
- Pour and Bake: Pour the batter into the prepared baking pan, spreading it evenly. Bake in the preheated oven for 25-30 minutes, or until a toothpick inserted into the center comes out mostly clean.
- Cool and Decorate: Allow the brownies to cool in the pan on a wire rack. Once cooled, spread a thin layer of chocolate frosting over the top if desired. Arrange the gummy worms and other candy critters on top, pressing them gently into the frosting or brownie surface. For added fun, place edible eyes on some of the critters.
Extra Tips:
To guarantee your Creepy Crawly Critter Brownies are a hit, consider using a variety of colorful gummy worms and candies to make the brownies more visually appealing.
If you’re not using frosting, you can lightly press the candies into the brownies while they’re still warm so they stick better. For an even spookier effect, use a toothpick to create small trails in the frosting to mimic the look of worms crawling.
Haunted Graveyard Brownies
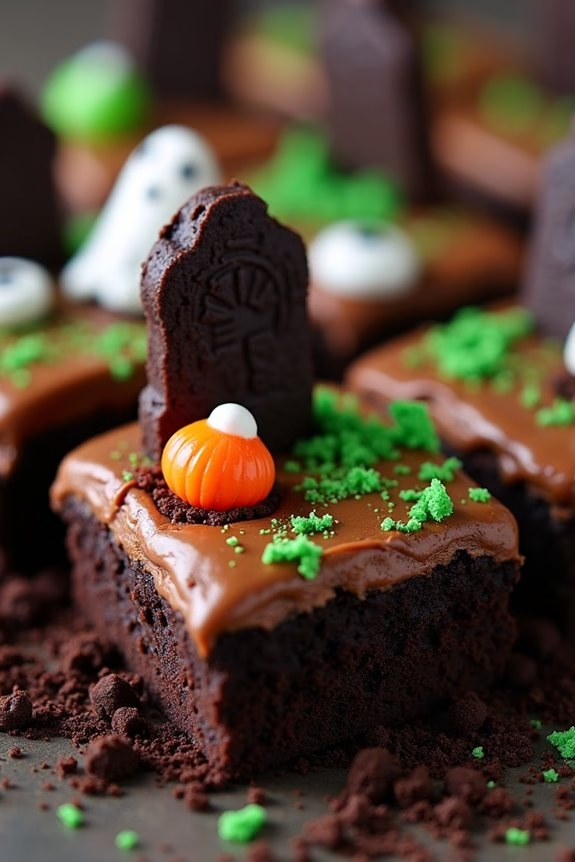
Haunted Graveyard Brownies are a spooky and delightful treat perfect for any Halloween gathering. With a rich chocolatey base, these brownies are adorned with eerie decorations that resemble a haunted graveyard, complete with cookie tombstones and candy ghosts.
This recipe combines the classic taste of brownies with a fun and creative twist that both kids and adults will enjoy. Perfect for a Halloween party or a cozy night in, these brownies are bound to be a hit.
Creating Haunted Graveyard Brownies is a fun and interactive process that allows you to get creative with your decorations. This recipe provides a serving size for 4-6 people, guaranteeing everyone can enjoy a piece of the hauntingly delicious dessert.
Follow the simple instructions below to bring this frighteningly fun treat to life.
Ingredients:
- 1 cup unsalted butter
- 2 cups granulated sugar
- 4 large eggs
- 1 teaspoon vanilla extract
- 1 cup all-purpose flour
- 1 cup unsweetened cocoa powder
- 1/2 teaspoon salt
- 1 teaspoon baking powder
- 1 cup chocolate chips
- 8-10 chocolate sandwich cookies (for tombstones)
- 8-10 candy corn or candy pumpkins
- 1/2 cup chocolate frosting
- Edible candy eyes or mini marshmallows (for ghosts)
- Green colored sugar or sprinkles (for grass effect)
Instructions:
- Preheat and Prepare: Preheat your oven to 350°F (175°C). Line a 9×13-inch baking pan with parchment paper, allowing some paper to hang over the edges for easy removal later.
- Mix Wet Ingredients: In a large microwave-safe bowl, melt the butter. Stir in the granulated sugar until well combined. Add eggs one at a time, mixing after each addition. Stir in the vanilla extract until smooth.
- Combine Dry Ingredients: In a separate bowl, sift together the flour, cocoa powder, salt, and baking powder. Gradually add this dry mixture to the wet ingredients, stirring until just combined.
- Add Chocolate Chips: Fold in the chocolate chips, making sure they’re evenly distributed throughout the batter.
- Bake: Pour the brownie batter into the prepared baking pan, spreading it evenly with a spatula. Bake for 25-30 minutes, or until a toothpick inserted into the center comes out clean. Allow the brownies to cool completely in the pan on a wire rack.
- Decorate: Once the brownies are cool, spread a thin layer of chocolate frosting over the surface. Crush the chocolate sandwich cookies and sprinkle them over the frosting to resemble dirt.
- Create the Graveyard: Stand the remaining whole chocolate sandwich cookies upright into the brownies to act as tombstones. Use the candy corn or candy pumpkins as additional graveyard decorations. Place edible candy eyes or mini marshmallows to create ghostly figures. Sprinkle green colored sugar or sprinkles around the tombstones to simulate grass.
Extra Tips: When decorating your Haunted Graveyard Brownies, feel free to get creative with additional decorations such as gummy worms or licorice for added spookiness.
For an extra touch, you can use a white icing pen to write “RIP” on the cookie tombstones. Remember, the key to these brownies is to have fun and let your imagination run wild.
If you’re serving these at a party, consider cutting them into individual portions before decorating to guarantee each piece is a complete graveyard scene.
Frankenstein’s Monster Brownies
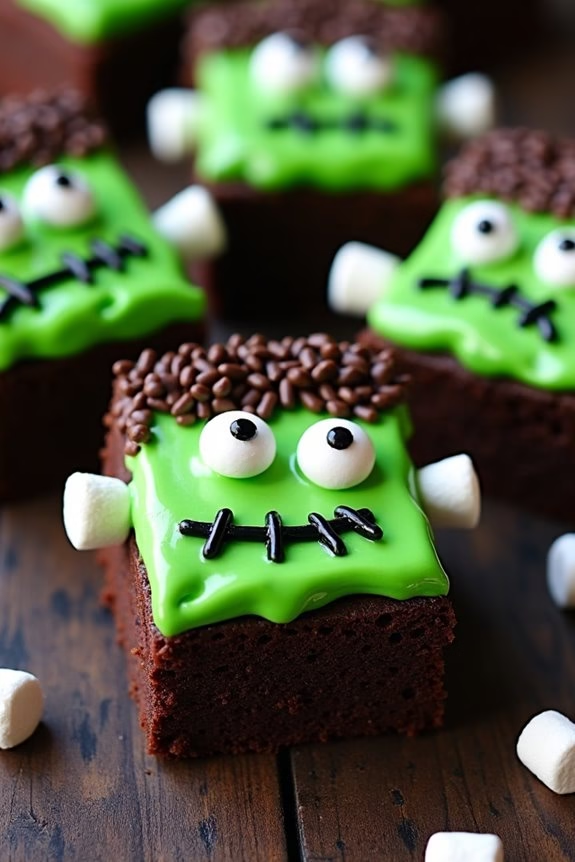
Frankenstein’s Monster Brownies are a spooky and delicious treat perfect for Halloween celebrations. These rich, fudgy brownies are transformed into fun and frightful creations with the help of a little frosting, candy, and imagination. Perfect for a Halloween party or a themed dinner, these brownies are certain to be a hit with both kids and adults.
The best part about this recipe is how easy it’s to customize the faces, allowing for a lot of creativity and fun in the kitchen. The base of this recipe is a classic brownie, deeply chocolatey and moist, serving as the perfect canvas for your monster masterpiece.
Once the brownies are baked and cooled, the decorating begins. By using green frosting as the “skin” and adding candies for eyes, stitches, and hair, you can create your own Frankenstein’s Monster Brownies that are sure to impress and delight. This recipe serves 4-6 people, making it ideal for a small gathering or family treat.
Ingredients:
- 1 cup all-purpose flour
- 1 cup granulated sugar
- 1/2 cup unsweetened cocoa powder
- 1/2 cup melted butter
- 2 large eggs
- 1 teaspoon vanilla extract
- 1/4 teaspoon salt
- 1/2 teaspoon baking powder
- Green food coloring
- 1 cup green frosting
- Candy eyes
- Black decorating gel
- Chocolate sprinkles
- Mini marshmallows
Instructions:
- Preheat the Oven: Set your oven to 350°F (175°C) and prepare an 8×8 inch baking pan by greasing it or lining it with parchment paper.
- Mix Dry Ingredients: In a large mixing bowl, combine the flour, sugar, cocoa powder, salt, and baking powder. Mix these dry ingredients thoroughly.
- Prepare Wet Ingredients: In another bowl, whisk together the melted butter, eggs, and vanilla extract until they’re well combined.
- Combine Mixtures: Pour the wet ingredients into the bowl of dry ingredients. Stir the mixture until just combined, being careful not to overmix.
- Bake the Brownies: Pour the brownie batter into the prepared baking pan, spreading it evenly. Bake in the preheated oven for 20-25 minutes, or until a toothpick inserted into the center comes out with a few moist crumbs.
- Cool the Brownies: Once baked, remove the brownies from the oven and allow them to cool completely in the pan before decorating.
- Decorate the Brownies: Once the brownies are cooled, spread a thin layer of green frosting over the top. Use candy eyes to create the monster’s eyes, black decorating gel for the stitches and mouth, and chocolate sprinkles for hair. Cut mini marshmallows in half and place on either side of each brownie square to represent bolts.
- Serve and Enjoy: Cut the decorated brownies into squares and serve to your guests.
To achieve the best Frankenstein’s Monster Brownies, make certain your brownies are completely cooled before decorating. This guarantees the frosting and candies adhere properly and don’t melt.
Feel free to get creative with the decorations—use different candies for unique facial features or add food coloring to the frosting for a variety of monster shades. Store any leftovers in an airtight container to keep them fresh and delicious.
Black Cat Brownies
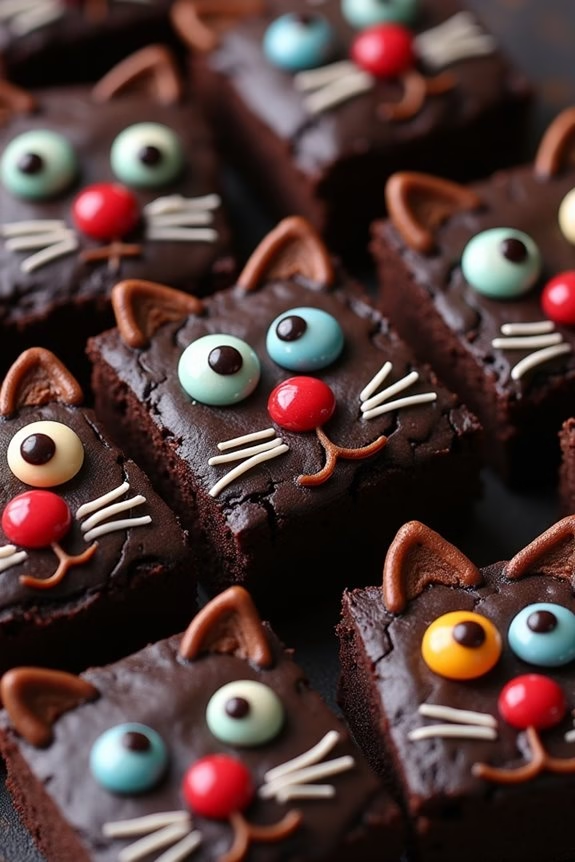
Halloween is a time for spooky treats and creative culinary delights, and what better way to celebrate than with some delightful Black Cat Brownies? These whimsical brownies aren’t only delicious but also add a touch of fun and mystery to your Halloween spread.
Perfect for a family gathering or a Halloween party, Black Cat Brownies are sure to be a hit with both kids and adults alike. The combination of rich, fudgy brownies and creative decorations makes them an irresistible treat that captures the spirit of Halloween.
Black Cat Brownies are easy to make, and they offer a wonderful opportunity for creativity. With a little bit of icing and some candy embellishments, you can transform ordinary brownies into a pack of adorable (or spooky) black cats.
This recipe is designed to serve 4-6 people, making it ideal for a small gathering or a cozy Halloween celebration at home. Whether you’re an experienced baker or a novice in the kitchen, you’ll find this recipe to be both fun and rewarding.
Ingredients (for 4-6 servings):
- 1 cup all-purpose flour
- 1/2 teaspoon baking powder
- 1/4 teaspoon salt
- 1/2 cup unsalted butter
- 1 cup granulated sugar
- 1/3 cup unsweetened cocoa powder
- 2 large eggs
- 1 teaspoon vanilla extract
- Black food coloring
- 1/2 cup semisweet chocolate chips
- Decorative candies (e.g., candy eyes, licorice, jellybeans, etc.)
- Black icing or gel for decoration
Cooking Instructions:
- Preheat the Oven: Start by preheating your oven to 350°F (175°C). This will guarantee your brownies bake evenly.
- Prepare the Baking Pan: Grease an 8×8 inch baking pan or line it with parchment paper, leaving some overhang on the sides for easy removal of the brownies later.
- Mix Dry Ingredients: In a small bowl, whisk together the flour, baking powder, and salt. Set aside.
- Melt the Butter: In a medium saucepan, melt the butter over low heat. Once melted, remove from heat and stir in the sugar and cocoa powder until well combined.
- Add Wet Ingredients: Stir in the eggs, one at a time, making sure each is fully incorporated before adding the next. Add the vanilla extract and a few drops of black food coloring, mixing until the color is evenly distributed.
- Combine Mixtures: Gradually add the dry ingredients to the wet mixture, stirring until just combined. Be careful not to overmix. Fold in the chocolate chips.
- Bake the Brownies: Pour the batter into the prepared baking pan and spread it evenly. Bake in the preheated oven for 20-25 minutes, or until a toothpick inserted into the center comes out with a few moist crumbs.
- Cool and Decorate: Allow the brownies to cool completely in the pan on a wire rack. Once cooled, cut them into squares. Use black icing or gel to draw cat faces and attach decorative candies for eyes and other features.
Extra Tips:
For the best results, verify all your ingredients are at room temperature before you start baking. This will help them blend more smoothly.
When adding food coloring, start with a small amount and gradually increase until you achieve the desired color. Be creative with the decorations – you can use licorice for whiskers or jellybeans for noses to make each cat unique.
Finally, if you’re short on time, you can use a store-bought brownie mix as a base and focus on the decorating. Enjoy your spooky Black Cat Brownies!
Skeleton Brownie Pops
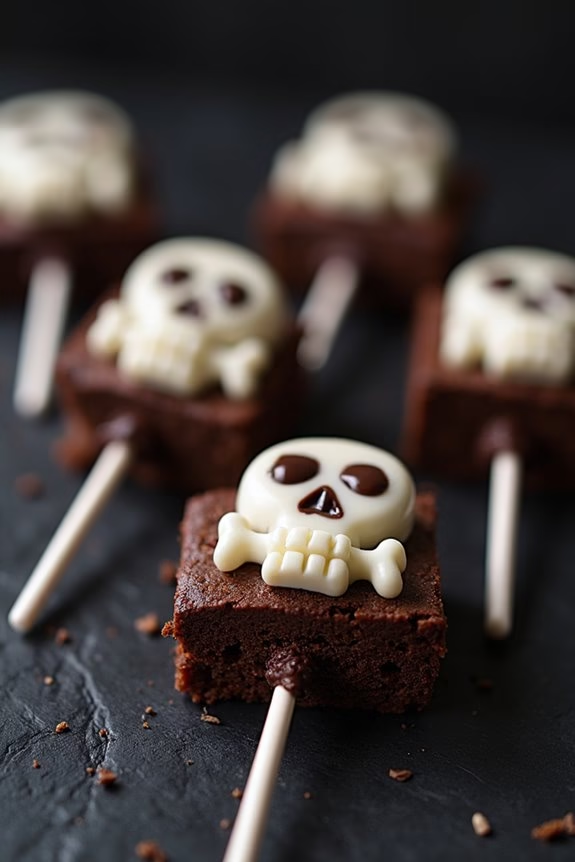
Skeleton Brownie Pops are a fun and spooky treat perfect for Halloween festivities. These delightful pops combine the rich, chocolaty goodness of brownies with a playful skeleton decoration, making them a hit with both kids and adults. The brownie base provides a soft and chewy texture, while the skeleton design adds a touch of creativity and seasonal flair. Perfect for parties, these pops are easy to make and even more fun to decorate.
To make these Skeleton Brownie Pops, you’ll start by baking a batch of your favorite brownies. Once baked and cooled, the brownies are cut into small rectangles or squares, perfect for popping on a stick. The skeleton design is created using white chocolate or icing, giving each pop its unique character. These pops aren’t only delicious but also a fantastic way to engage your children or friends in a fun cooking activity, bringing a little spookiness to your Halloween celebrations.
Ingredients (Serves 4-6):
- 1 box of brownie mix (or homemade brownie recipe)
- 2 large eggs
- 1/2 cup vegetable oil
- 1/4 cup water
- 1 cup white chocolate chips or white icing
- 8-10 lollipop sticks
Cooking Instructions:
- Preheat and Prepare: Preheat your oven according to the brownie mix instructions. Line an 8×8-inch baking pan with parchment paper, leaving some overhang on the sides for easy removal.
- Mix the Brownie Batter: In a large bowl, combine the brownie mix, eggs, vegetable oil, and water. Stir the mixture until fully combined and smooth.
- Bake the Brownies: Pour the prepared brownie batter into the lined baking pan. Spread it evenly and bake according to the package instructions, usually about 20-25 minutes, or until a toothpick inserted into the center comes out with a few moist crumbs.
- Cool and Cut: Remove the brownies from the oven and let them cool in the pan for about 10 minutes. Using the parchment paper, lift the brownies out and transfer them to a wire rack to cool completely.
- Shape the Brownie Pops: Once cooled, cut the brownies into small rectangles or squares. Carefully insert a lollipop stick halfway into each brownie piece.
- Decorate the Skeletons: Melt the white chocolate chips in the microwave or over a double boiler. If using icing, fill a piping bag or a small plastic bag with the icing and cut a small tip. Draw skeleton designs on each brownie pop, including eyes, a mouth, and bones.
- Set and Serve: Allow the chocolate or icing to set before serving. You can place the pops in the refrigerator for a few minutes to speed up the process.
Extra Tips:
For an even more festive look, consider using different colors of icing to add details like bows or hats to your skeletons. If you prefer a homemade brownie recipe, make sure to use one that’s dense and fudgy to hold the stick well.
When melting chocolate, be cautious not to overheat it; gentle heating guarantees a smooth finish. Finally, have fun with the designs, and don’t worry about perfection—each skeleton pop should have its unique character!
Candy Corn Swirl Brownies
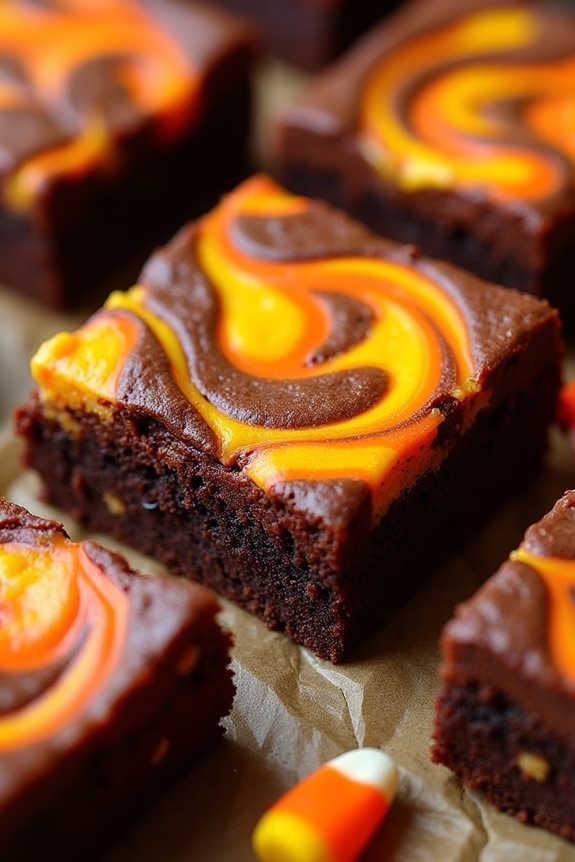
For a festive and spooky treat, these Candy Corn Swirl Brownies are perfect for Halloween celebrations. The rich, chocolatey base pairs beautifully with the vibrant colors and sweet flavor of candy corn, making it a delightful dessert for both kids and adults.
These brownies aren’t only eye-catching with their orange and yellow swirls but also incredibly delicious, ensuring they’ll be a hit at any Halloween party. This recipe makes enough for 4-6 people and is a great way to enjoy the classic Halloween candy in a new and exciting way.
Whether you’re hosting a party or just looking to indulge in some seasonal treats, these brownies will surely satisfy your sweet tooth.
Ingredients:
- 1 cup unsalted butter
- 2 cups granulated sugar
- 4 large eggs
- 1 teaspoon vanilla extract
- 1 cup all-purpose flour
- 3/4 cup unsweetened cocoa powder
- 1/2 teaspoon salt
- 1/2 teaspoon baking powder
- 1 cup candy corn
- 1/4 cup heavy cream
- Orange and yellow food coloring
Cooking Instructions:
- Preheat Oven: Start by preheating your oven to 350°F (175°C). Grease a 9×13 inch baking pan with butter or non-stick spray and line it with parchment paper for easy removal of the brownies later.
- Prepare the Brownie Batter: In a medium saucepan, melt the butter over low heat. Once melted, remove from heat and stir in sugar until fully dissolved. Allow the mixture to cool slightly.
- Mix Wet Ingredients: Add the eggs, one at a time, into the butter-sugar mixture, beating well after each addition. Stir in the vanilla extract.
- Combine Dry Ingredients: In a separate bowl, whisk together the flour, cocoa powder, salt, and baking powder. Gradually add the dry ingredients to the wet mixture, stirring just until combined. Be careful not to overmix.
- Pour & Swirl: Pour the brownie batter into the prepared baking pan, spreading it evenly. In a small saucepan, heat the heavy cream over low heat until warm, then add candy corn and stir until melted and smooth.
- Create Swirls: Divide this candy corn mixture into two bowls, adding a few drops of orange food coloring to one and yellow to the other. Drop spoonfuls of the colored candy corn mixtures over the brownie batter. Use a knife or skewer to gently swirl the colors into the batter, creating a marbled effect.
- Bake: Place the pan in the preheated oven and bake for 25-30 minutes, or until a toothpick inserted into the center comes out with a few moist crumbs. Avoid overbaking to keep the brownies fudgy.
- Cool and Serve: Allow the brownies to cool in the pan on a wire rack. Once cooled, lift them out using the parchment paper and cut into squares.
Extra Tips: When working with candy corn, it’s important to melt it gently to avoid it becoming too hard when it cools. If you find the candy corn mixture too thick to swirl, add a bit more cream to reach the desired consistency.
Additionally, for more vibrant swirls, you can increase the amount of food coloring. These brownies can also be made ahead of time and stored in an airtight container for up to three days, making them a convenient choice for pre-party preparations.
Cauldron Bubble Brownies
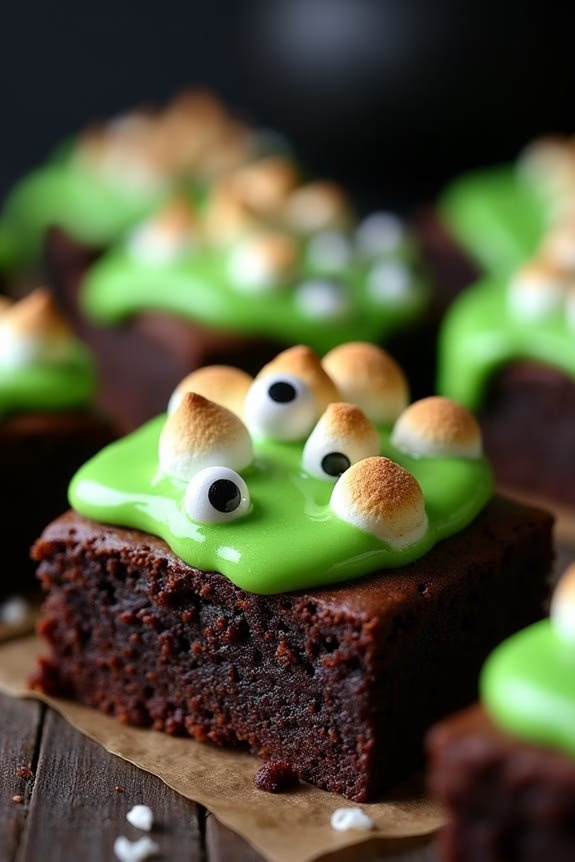
Creating a spooky-themed Halloween treat doesn’t get much more fun than these Cauldron Bubble Brownies. Perfect for a Halloween party or a cozy night in with the family, these brownies are a delightful fusion of rich chocolate, gooey marshmallows, and vibrant green frosting that simulates a bubbling witch’s brew. Not only do they taste delicious, but they also look the part, creating an eerie atmosphere that will have everyone feeling like they’re stepping into a haunted kitchen.
These Cauldron Bubble Brownies are designed to serve 4-6 people, making them ideal for small gatherings or as a special dessert for the family. The rich chocolate base of the brownies provides a satisfying depth, while the marshmallows add a chewy, gooey texture reminiscent of bubbling potion. Topped with a playful green frosting, these brownies are sure to be a hit with both kids and adults alike.
Ingredients (Serves 4-6):
- 1 cup unsalted butter, melted
- 2 cups granulated sugar
- 4 large eggs
- 1 teaspoon vanilla extract
- 1 cup all-purpose flour
- 1 cup unsweetened cocoa powder
- 1/2 teaspoon salt
- 1/2 teaspoon baking powder
- 1 cup mini marshmallows
- 1/2 cup green frosting
- Edible candy eyes for decoration
Cooking Instructions:
- Preheat the oven to 350°F (175°C). Grease a 9×9 inch baking pan with butter or non-stick spray for easy brownie removal.
- Mix the wet ingredients: In a large mixing bowl, combine the melted butter and granulated sugar. Whisk until smooth. Add the eggs one at a time, mixing well after each addition. Stir in the vanilla extract.
- Prepare the dry ingredients: In a separate bowl, sift together the flour, cocoa powder, salt, and baking powder.
- Combine and blend: Gradually add the dry ingredients into the wet mixture, stirring until just combined. Be careful not to overmix, as this can lead to tough brownies.
- Bake the brownies: Pour the batter into the prepared baking pan and spread it evenly. Bake in the preheated oven for 25-30 minutes, or until a toothpick inserted into the center comes out with a few moist crumbs.
- Add the marshmallows: Remove the brownies from the oven and immediately scatter the mini marshmallows over the top. Return to the oven for an additional 3-5 minutes, or until the marshmallows are puffed and lightly golden.
- Cool and decorate: Allow the brownies to cool completely in the pan on a wire rack. Once cooled, drizzle the green frosting over the top, creating a bubbling cauldron effect. Finish by adding edible candy eyes for an extra spooky touch.
Extra Tips:
For an even spookier presentation, consider adding a few drops of green food coloring to the marshmallows before baking to enhance the bubbling effect. If you prefer your brownies on the fudgier side, slightly underbake them by a minute or two.
For a more festive look, you can also sprinkle some edible glitter or crushed chocolate cookies on top to resemble dirt or potion ingredients. Adjust the sweetness by reducing the sugar by a quarter cup if desired, but remember that the marshmallows will also add sweetness.
Enjoy these Cauldron Bubble Brownies as a Halloween treat sure to enchant and delight your guests!