
Halloween morning is the perfect time to surprise the kids with a breakfast that’s both enchanting and tasty. I’ve got 12 delightful Halloween breakfast ideas that are as cute as they are delicious. Think Spooky Spider Pancakes or Ghostly Toast to start the day with a smile. These fun treats promise to spark creativity and make breakfast an adventure. Ready to whip up some magical morning treats?
Spooky Spider Pancakes

Halloween is the perfect time to surprise your kids with a breakfast that’s both fun and frightful! Spooky Spider Pancakes aren’t only a delicious way to start the day, but they also add a bit of Halloween magic to your morning routine. These pancakes are shaped like creepy spiders and are sure to bring smiles to your little ones’ faces.
The pancakes are soft, fluffy, and easy to make, making them an ideal choice for a festive family breakfast. To create these Spooky Spider Pancakes, you’ll need a simple pancake batter and a few decorating essentials to bring the spiders to life. The recipe can be easily adapted to suit your family’s taste preferences, and you can even get the kids involved in the decorating process.
This recipe serves 4-6 people, making it perfect for a family breakfast or a small Halloween gathering. Whether you’re a seasoned cook or a beginner, these pancakes are sure to become a Halloween breakfast tradition.
Ingredients (Serves 4-6)
- 2 cups all-purpose flour
- 2 tablespoons sugar
- 2 teaspoons baking powder
- 1/2 teaspoon baking soda
- 1/2 teaspoon salt
- 2 cups buttermilk
- 2 large eggs
- 1/4 cup melted butter
- Chocolate syrup or spread
- Mini chocolate chips
- Pretzel sticks or thin licorice for legs
Cooking Instructions
- Prepare the Pancake Batter: In a large mixing bowl, whisk together the flour, sugar, baking powder, baking soda, and salt. In another bowl, mix the buttermilk, eggs, and melted butter until well combined.
- Pour the wet ingredients into the dry ingredients and stir until just combined. Be careful not to overmix; a few lumps are fine.
- Heat the Griddle: Preheat a non-stick griddle or a large skillet over medium heat. Lightly grease the surface with butter or cooking spray to prevent sticking.
- Cook the Pancakes: Pour about 1/4 cup of batter onto the griddle for each pancake. To create the spider’s body, use a spoon to make a smaller circle of batter connected to the larger one.
- Cook until bubbles appear on the surface and the edges look set, about 2-3 minutes. Flip and cook for another 2 minutes or until golden brown.
- Assemble the Spiders: Once the pancakes are cooked, use chocolate syrup or spread to create the spider’s eyes and mouth on the smaller circle. Place two mini chocolate chips in the syrup to complete the eyes.
- For the spider’s legs, insert pretzel sticks or thin strips of licorice into the sides of the larger pancake circle.
- Serve and Enjoy: Arrange the pancakes on a serving platter and watch your kids enjoy their spooky breakfast treat.
Extra Tips
For an even spookier effect, consider adding a few drops of black food coloring to the pancake batter to make the spiders darker. If you want to make the pancakes in advance, you can keep them warm in a low oven until serving.
Involving your kids in the decorating process can make breakfast an interactive and fun experience. You can also use assorted candies for additional decorations, letting your creativity run wild with the spider designs.
Ghostly Toast

Ghostly Toast is a spooktacular breakfast treat that’s sure to delight kids on Halloween morning. This recipe combines the fun of festive food with the simplicity that busy parents need. By transforming everyday toast into ghostly apparitions, you can serve up a breakfast that’s both delicious and exciting. The best part? It only takes a few minutes to prepare, making it perfect for a busy holiday morning.
The ghostly appearance is achieved using simple ingredients like bread, cream cheese, and chocolate chips. By cutting the bread into ghost shapes and using the cream cheese as a smooth, white base, you create a canvas for decorating your ghost’s face. Little chocolate chips serve as the eyes and mouth, making these spooky spirits both cute and edible.
Let’s plunge into the recipe and see how you can make these delightful creations for 4-6 little goblins.
Ingredients (for 4-6 servings):
- 8 slices of white bread
- 1 cup cream cheese, softened
- 1/2 cup mini chocolate chips
- 2 tablespoons butter, softened
- 1/4 teaspoon vanilla extract (optional)
Cooking Instructions:
- Prepare the Bread: Start by cutting each slice of bread into a ghost shape. You can use a ghost-shaped cookie cutter or cut the shapes freehand with a knife. Aim for smooth, rounded tops, and flowing bottoms to mimic the classic ghost shape.
- Toast the Bread: Lightly toast each ghost-shaped cutout in a toaster until they’re golden brown. This will give the bread a nice, firm texture that holds the toppings well.
- Make the Cream Cheese Spread: In a small bowl, mix the softened cream cheese with the vanilla extract until smooth and creamy. This adds a subtle flavor to the cream cheese, enhancing the overall taste.
- Apply the Spread: Spread a thin layer of the cream cheese mixture over each toasted ghost, covering the entire surface to give it a ghostly white appearance.
- Decorate the Faces: Use the mini chocolate chips to create eyes and a mouth on each ghost. Place two chocolate chips for the eyes and arrange 3-4 chips to form a spooky or silly mouth.
- Serve and Enjoy: Arrange the decorated Ghostly Toast on a platter and serve immediately while the toast is still warm.
Extra Tips:
To make the Ghostly Toast even more fun, involve your kids in the decorating process. They can create their own ghost faces using the chocolate chips, making breakfast a fun activity.
For a healthier twist, you can use whole grain bread and low-fat cream cheese. Additionally, if you want to prepare a batch in advance, toast the bread and prepare the cream cheese mixture the night before, then simply assemble and serve in the morning.
Enjoy watching your little ones delight in their ghostly breakfast creations!
Monster Face Bagels

Monster Face Bagels are a fun and spooky breakfast idea perfect for Halloween morning! These playful bagels aren’t only delicious but also allow kids to get creative with their food. By using colorful and tasty ingredients, you can transform ordinary bagels into creepy, silly, or even cute monster faces that will surely delight your little ones.
Plus, this is a great opportunity to promote kids to participate in the kitchen, fostering their creativity and love for cooking.
To create the perfect Monster Face Bagels, start by preparing an assortment of toppings that can be used to craft each monster’s unique features. From vibrant vegetables to flavorful spreads, the possibilities are endless. This recipe is designed to serve 4-6 people, making it an ideal choice for a family breakfast or a small Halloween party.
With a variety of toppings and a touch of imagination, each bagel can become a culinary masterpiece that’s both fun to make and eat.
Ingredients:
- 6 whole bagels, sliced in half
- 8 oz cream cheese (plain or flavored)
- 1 cup guacamole or mashed avocado
- 1 cup hummus
- 1 cup sliced cucumbers
- 1 cup sliced black olives
- 1 cup sliced red bell peppers
- 1 cup cherry tomatoes, halved
- 1 cup shredded carrots
- 1 cup baby spinach leaves
- Edible googly eyes (optional)
Instructions:
- Prepare the Bagels: Begin by slicing the bagels in half and toasting them until they reach your desired level of crispiness. This will serve as the base for your monster faces.
- Spread the Base Layer: Choose a spread for each bagel half. Use cream cheese, guacamole, or hummus to cover the top of the bagel, acting as the “skin” of your monster. This will also help the other toppings stick.
- Create the Monster Faces: Let your imagination run wild! Use sliced cucumbers, olives, and bell peppers to craft eyes and mouths. Cherry tomato halves can serve as noses or cheeks, while shredded carrots can be used for hair. Arrange baby spinach leaves to make eyebrows or ears. Apply each topping to create unique and expressive monster faces.
- Add Final Touches: If using, place edible googly eyes on the bagels for an extra spooky effect. Press them gently into the spread to guarantee they stay put.
- Serve and Enjoy: Once your Monster Face Bagels are complete, arrange them on a platter and serve immediately. Encourage kids to admire each other’s creations before digging in!
Extra Tips: When making Monster Face Bagels, feel free to experiment with different spreads and toppings based on your family’s preferences.
For a sweet twist, consider using peanut butter or Nutella with fruit toppings like banana slices or strawberries. Confirm all toppings are bite-sized to make eating easier for kids.
If you’re hosting a Halloween breakfast party, set up a toppings station where children can assemble their own monster faces. This interactive activity provides endless fun and allows everyone to showcase their creativity.
Pumpkin Patch Waffles
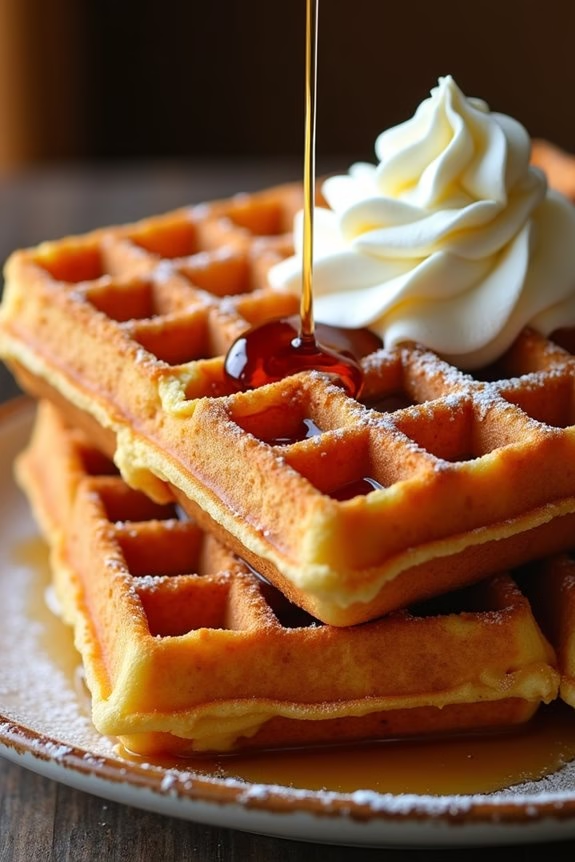
Bring the festive spirit of Halloween to your breakfast table with these delicious Pumpkin Patch Waffles. Perfect for kids and adults alike, these waffles are infused with pumpkin puree and warm spices, creating a comforting and flavorful start to your day. Not only are they delicious, but their golden-orange hue perfectly mimics the appearance of a pumpkin patch, making them an exciting addition to your Halloween breakfast spread.
These Pumpkin Patch Waffles are easy to prepare and can be made in under 30 minutes. With a crispy exterior and a soft, fluffy interior, they’re sure to be a hit with the whole family. Serve them with a drizzle of maple syrup, a sprinkle of powdered sugar, or even some whipped cream to make them extra special. Whether you’re fueling up for a day of trick-or-treating or simply want to enjoy a fun, seasonal breakfast, these waffles are the perfect choice.
Ingredients (serving size: 4-6 people):
- 2 cups all-purpose flour
- 2 tablespoons sugar
- 1 tablespoon baking powder
- 1 teaspoon baking soda
- 1/2 teaspoon salt
- 1 teaspoon ground cinnamon
- 1/2 teaspoon ground nutmeg
- 1/4 teaspoon ground ginger
- 1/4 teaspoon ground cloves
- 1 1/2 cups milk
- 1 cup pumpkin puree
- 2 large eggs
- 1/4 cup unsalted butter, melted
- 1 teaspoon vanilla extract
Cooking Instructions:
- Preheat the Waffle Iron: Start by preheating your waffle iron according to the manufacturer’s instructions. This guarantees that the waffles cook evenly and develop a nice, crispy crust.
- Mix Dry Ingredients: In a large bowl, whisk together the all-purpose flour, sugar, baking powder, baking soda, salt, cinnamon, nutmeg, ginger, and cloves until well combined.
- Prepare Wet Ingredients: In a separate medium bowl, mix together the milk, pumpkin puree, eggs, melted butter, and vanilla extract until the mixture is smooth and uniform.
- Combine Wet and Dry Ingredients: Pour the wet ingredients into the dry ingredients. Gently stir until just combined. Be careful not to overmix; a few lumps are okay.
- Cook the Waffles: Lightly grease the waffle iron with cooking spray or a small amount of melted butter. Pour the appropriate amount of batter onto the waffle iron (refer to your waffle iron’s instructions). Close the lid and cook until the waffles are golden brown and crisp, usually 4-5 minutes.
- Serve and Enjoy: Carefully remove the waffles from the iron and serve immediately with your favorite toppings, such as maple syrup, powdered sugar, or whipped cream.
Extra Tips:
To enhance the pumpkin flavor, consider adding a tablespoon of pumpkin pie spice instead of individual spices. For a healthier variation, you can substitute half of the all-purpose flour with whole wheat flour. If you prefer a sweeter waffle, increase the sugar to 1/4 cup.
When making the batter, don’t overmix, as this can lead to tough waffles. Finally, keep the cooked waffles warm in a preheated oven at 200°F (93°C) while you finish cooking the rest, guaranteeing everyone gets to enjoy them hot and fresh.
Vampire Bat Smoothie Bowl
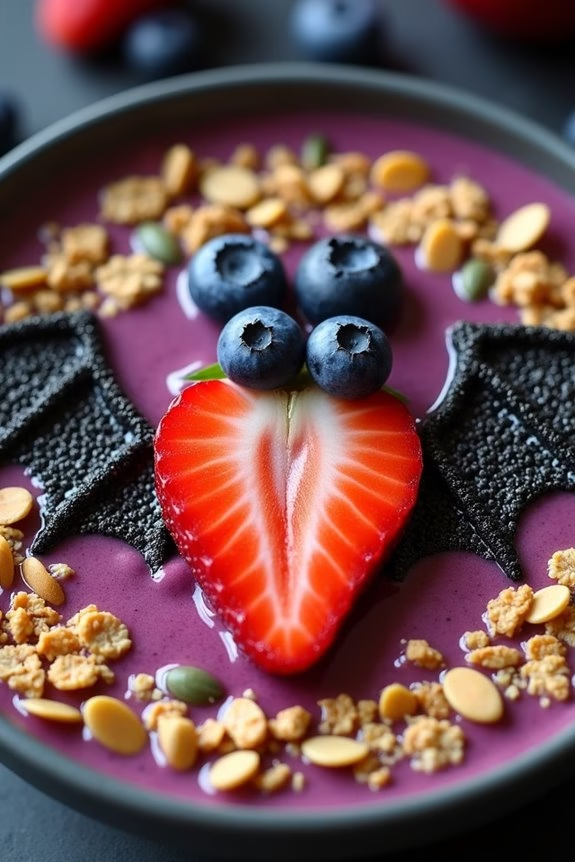
Start Halloween morning with a spooky yet nutritious treat that will leave your little ones howling with delight! The Vampire Bat Smoothie Bowl isn’t just a feast for the eyes but also packed with healthy ingredients that will give your kids the energy they need for a day of trick-or-treating.
This smoothie bowl is a blend of vibrant fruits and vegetables disguised as a creepy, fun breakfast that your children will love. The rich berry flavor combined with spooky bat decorations makes it an irresistible option for Halloween breakfast.
Perfect for serving 4-6, this recipe combines the goodness of berries, bananas, and spinach with a touch of creativity to make your Halloween breakfast both fun and nutritious. You’ll transform a simple smoothie into a Halloween masterpiece by crafting bat wings and eyes using fruit and seeds.
The result is a vibrant, delicious, and spooky breakfast that will kickstart your Halloween festivities in the best way possible.
Ingredients (Serves 4-6):
- 3 cups frozen mixed berries
- 2 ripe bananas
- 1 cup baby spinach leaves
- 1 cup almond milk (or any milk of your choice)
- 2 tablespoons honey or maple syrup
- 1 teaspoon vanilla extract
- 1/2 cup granola
- 1/4 cup black chia seeds
- 6 fresh strawberries
- 12 blueberries
- 1 tablespoon pumpkin seeds
Instructions:
- Prepare the Smoothie Base:
- In a blender, combine the frozen mixed berries, ripe bananas, spinach leaves, almond milk, honey or maple syrup, and vanilla extract. Blend on high speed until the mixture is smooth and creamy. If the smoothie is too thick, add a little more milk to reach your desired consistency.
- Pour and Smooth:
- Divide the smoothie evenly into 4-6 bowls. Use the back of a spoon to smooth out the surface, creating a flat base for your decorations.
- Create Bat Decorations:
- Slice the strawberries in half to make the bat bodies. Place one half in the center of each bowl.
- Use chia seeds to outline bat wings on either side of the strawberry halves. Create pointed edges to mimic bat wings.
- For the bat eyes, place two blueberries at the top of each strawberry half.
- Use pumpkin seeds to form small fangs or details around the bat figure for added effect.
- Add Final Touches:
- Sprinkle granola around the edges of the bowl for extra crunch and flavor contrast.
- Serve immediately with spooky Halloween spoons or cutlery for added fun.
Extra Tips:
For a thicker smoothie bowl, use less almond milk or add more frozen berries. You can also freeze the bananas beforehand for an even creamier texture.
To make it more festive, consider using edible glitter or natural food coloring to create a more vivid color. If you’re making this dish for kids with dietary restrictions, swap out almond milk for any nut, soy, or oat milk they prefer.
Encourage your kids to help decorate their bowls; it’s a fantastic way to spark creativity and make breakfast more enjoyable.
Mummy Sausage Wraps

Mummy Sausage Wraps are a spook-tacular addition to your Halloween breakfast table! These fun and festive wraps aren’t only adorable but also delicious, making them the perfect treat for kids. The delightful combination of savory sausages enveloped in flaky puff pastry creates a satisfying bite that will have your little ones coming back for more. Plus, their playful appearance will surely add some Halloween spirit to your morning meal.
Preparing Mummy Sausage Wraps is a breeze and involves minimal ingredients, making it an easy option for a busy Halloween morning. With a few creative touches, you can transform ordinary sausages into mini mummies that are bound to excite and delight. The recipe serves 4-6 people, making it ideal for a small gathering or family breakfast.
Ingredients (serving size: 4-6 people):
- 12 sausages (preferably breakfast or cocktail sausages)
- 1 sheet of puff pastry (thawed if frozen)
- 1 egg (beaten)
- 24 small edible candy eyes (or use mustard for eyes)
- Ketchup or mustard (for serving)
Cooking Instructions:
- Preheat the Oven: Begin by preheating your oven to 375°F (190°C). This will guarantee your Mummy Sausage Wraps cook evenly and develop a golden-brown exterior.
- Prepare the Puff Pastry: Roll out the thawed puff pastry sheet on a lightly floured surface. Use a sharp knife or pizza cutter to slice the pastry into thin strips, about 1/2 inch wide. These strips will become the mummy’s ‘bandages’.
- Wrap the Sausages: Take each sausage and wrap it with the puff pastry strips, leaving a small gap for the ‘face’. You can overlap the strips for a more mummified look. Be sure to press the ends of the pastry gently to secure them.
- Brush with Egg Wash: Place the wrapped sausages on a baking sheet lined with parchment paper. Brush each one with the beaten egg to give them a glossy finish and help them brown nicely in the oven.
- Bake: Put the baking sheet in the preheated oven and bake for about 15-20 minutes, or until the pastry is puffed and golden brown.
- Add the Eyes: Remove the sausages from the oven and let them cool slightly. Use a small dab of mustard or a bit of the egg wash to stick the edible candy eyes onto the sausages, positioning them in the gap left for the face.
- Serve: Arrange your spooky Mummy Sausage Wraps on a plate and serve them with a side of ketchup or mustard for dipping.
Extra Tips:
To make your Mummy Sausage Wraps even more appealing, consider using sausages with different flavors, such as spicy or cheese-filled, for variety. If you’re unable to find edible candy eyes, a dot of mustard can serve as a simple and effective alternative.
Additionally, make certain the pastry strips aren’t too thick, as they might overshadow the sausage flavor. For a healthier twist, you can use whole-wheat pastry or turkey sausages. Enjoy the fun of making these with your kids, and let them get creative with the wrapping process!
Witch’s Brew Oatmeal

This bewitching oatmeal is easy to make and can be customized with different toppings to suit your child’s taste. You can use natural food coloring to achieve the eerie green hue reminiscent of a bubbling cauldron, and top it with spooky shapes like candy eyeballs or gummy worms for added fun.
The best part is that while it looks like a magical potion, it’s packed with healthy ingredients that will provide energy and focus for your children’s day of Halloween adventures.
Ingredients (Serves 4-6):
- 2 cups rolled oats
- 4 cups milk (or a dairy-free alternative)
- 2 tablespoons honey or maple syrup
- 1 teaspoon vanilla extract
- Green food coloring
- 1/4 cup chocolate chips
- Candy eyeballs
- Gummy worms
- Sprinkles (optional)
Instructions:
- Prepare the Oats: In a medium-sized saucepan, combine the rolled oats and milk. Stir well and bring to a boil over medium heat. Once boiling, reduce the heat to low and let it simmer, stirring occasionally, until the oatmeal is thick and creamy, about 10-12 minutes.
- Sweeten and Flavor: Once the oatmeal reaches your desired consistency, remove it from the heat. Stir in the honey or maple syrup and vanilla extract, mixing until everything is well combined.
- Add Color: Add a few drops of green food coloring to the oatmeal. Stir thoroughly until you achieve your desired shade of spooky green. This step transforms your oatmeal into a witch’s brew.
- Serve: Divide the oatmeal into bowls. Sprinkle chocolate chips on top of each serving to resemble bubbling cauldron bubbles.
- Decorate: Add candy eyeballs and gummy worms to the oatmeal to create a creepy, fun appearance. You can also add sprinkles if desired to enhance the magical effect.
- Enjoy: Serve immediately while warm, and watch your kids’ faces light up with Halloween delight.
Extra Tips:
When making Witch’s Brew Oatmeal, consider using natural food coloring derived from spinach or matcha for a healthier option.
You can also substitute the candy toppings with sliced fruits like bananas or berries to maintain a nutritious balance. If you plan to serve this dish to a larger group, you can easily double the ingredients.
Feel free to experiment with different toppings to create unique and personalized spooky designs. Remember, the key is to make breakfast as fun and engaging as possible for the kids.
Creepy Crawly Muffins

Get ready to surprise your little ghosts and goblins with these delightfully eerie Creepy Crawly Muffins this Halloween. This recipe is perfect for a festive breakfast that not only tastes delicious but also adds a touch of spooky fun to the morning.
These muffins are made with a moist, fluffy batter enriched with chocolate chips and topped with gummy worms to mimic creepy crawlies emerging from the earth. Both kids and adults will love the playful presentation and scrumptious flavor of these freakishly fun muffins.
Ideal for a Halloween breakfast or brunch, these Creepy Crawly Muffins are easy to whip up and can serve a gathering of 4-6 people. The combination of chocolate and gummy candies creates a unique taste experience, ensuring that everyone enjoys a good laugh and a tasty treat.
Whether you’re hosting a Halloween party or just want to bring some spookiness into your home, these muffins are sure to be a hit.
Ingredients (Serving Size: 4-6 people):
- 1 1/2 cups all-purpose flour
- 3/4 cup granulated sugar
- 1/2 cup unsweetened cocoa powder
- 1 tsp baking powder
- 1/2 tsp baking soda
- 1/4 tsp salt
- 1/2 cup unsalted butter, melted
- 2 large eggs
- 1 tsp vanilla extract
- 1 cup milk
- 1 cup chocolate chips
- 1 cup gummy worms, cut in half
Instructions:
- Preheat the Oven: Begin by preheating your oven to 350°F (175°C). Line a 12-cup muffin tin with paper liners or spray with non-stick cooking spray.
- Mix Dry Ingredients: In a large mixing bowl, combine the flour, sugar, cocoa powder, baking powder, baking soda, and salt. Stir well until all dry ingredients are evenly mixed.
- Combine Wet Ingredients: In another bowl, whisk together the melted butter, eggs, vanilla extract, and milk until smooth and well combined.
- Form the Batter: Gradually add the wet ingredients into the dry ingredients, stirring gently until just combined. Be careful not to over-mix as this can make the muffins dense.
- Add Chocolate Chips: Fold in the chocolate chips with a spatula, ensuring they’re evenly distributed throughout the batter.
- Fill the Muffin Cups: Using a spoon or ice cream scoop, fill each muffin cup about 3/4 full with the batter. This should yield about 12 muffins.
- Bake the Muffins: Place the muffin tin in the preheated oven and bake for 18-20 minutes, or until a toothpick inserted into the center comes out clean.
- Decorate with Gummy Worms: Once baked, remove muffins from the oven and let them cool for about 5 minutes in the tin. Then, transfer the muffins to a wire rack to cool completely.
Before they cool completely, while still slightly warm, gently press gummy worm halves into the tops of the muffins to create the “creepy crawly” effect.
Extra Tips:
For extra eerie flair, consider using green or brown cupcake liners to mimic the ground or grass. You can also dust a little cocoa powder on top of the muffins before adding the gummy worms to create a “dirt” effect.
If you want to add more flavor, consider mixing in some chopped nuts or dried fruits with the chocolate chips. These muffins can be stored in an airtight container for up to three days, but they’re best enjoyed fresh.
Make sure to have fun with the decoration—let your kids help out with the gummy worms for a fun family activity!
Frankenstein French Toast
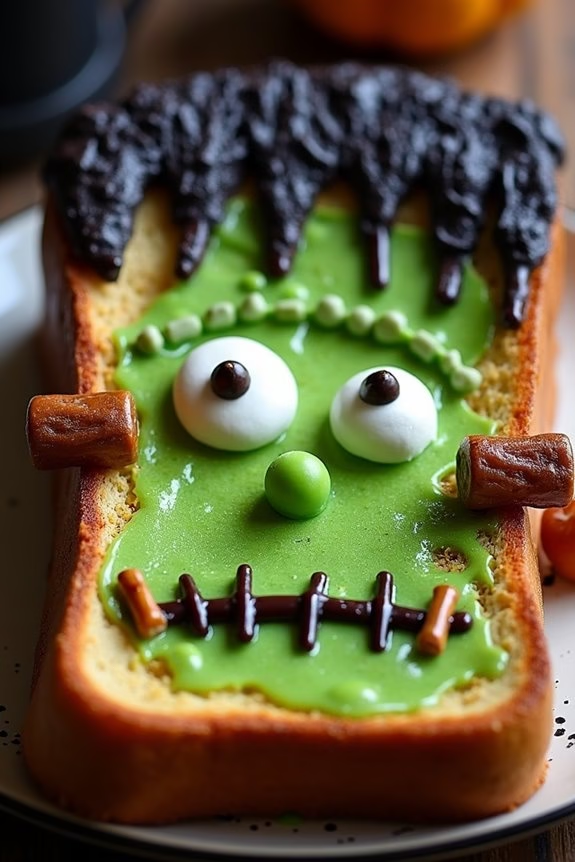
Start your Halloween morning with a monstrous treat that will delight your little ghouls and goblins! This Frankenstein French Toast isn’t only spooky and fun, but it’s also a delicious way to fuel up for a day of trick-or-treating.
With a few simple ingredients and some creative decorations, you can transform ordinary French toast into a breakfast that’s both festive and frightfully good. The key to this dish is the presentation, turning each slice of French toast into a friendly Frankenstein face.
Using green food coloring and a bit of creative flair, you can bring this iconic monster to life on your breakfast table. Not only is this dish fun to look at, but it also guarantees your kids get a hearty start to their Halloween day.
Ingredients for 4-6 People:
- 6 slices of thick white bread
- 4 large eggs
- 1 cup milk
- 1 teaspoon vanilla extract
- 1 teaspoon ground cinnamon
- Green food coloring
- 2 tablespoons butter
- Chocolate chips or raisins
- Black licorice or pretzel sticks
- Whipped cream or icing for decoration
Cooking Instructions:
1. Prepare the Egg Mixture: In a large bowl, whisk together the eggs, milk, vanilla extract, and cinnamon until well combined. Add a few drops of green food coloring and mix until you achieve the desired shade of Frankenstein green.
2. Soak the Bread: Dip each slice of bread into the egg mixture, guaranteeing both sides are evenly coated. Let the bread soak for a few seconds to absorb the mixture.
3. Cook the French Toast: Heat a large skillet or griddle over medium heat and melt the butter. Place the soaked bread slices into the skillet and cook for 2-3 minutes on each side, or until golden brown and cooked through.
4. Create Frankenstein Faces: Remove the French toast from the skillet and place on a serving plate. Use chocolate chips or raisins to form the eyes and mouth of Frankenstein. Cut the black licorice or pretzel sticks into small pieces to create hair and neck bolts.
Use whipped cream or icing to add any additional facial features for a more detailed look.
5. Serve: Serve immediately while warm, and watch your little monsters enjoy their spooky breakfast creation!
Extra Tips:
For an extra touch of Halloween fun, try experimenting with different toppings and decorations. You can use sliced bananas or marshmallows for eyes, and even get creative with different types of candy for facial details.
If you prefer a less sweet option, consider serving the French toast with fresh fruit or a drizzle of maple syrup. Remember to adjust the food coloring to your preference, and feel free to involve the kids in decorating their own Frankenstein faces!
Boo-nana Ghosts
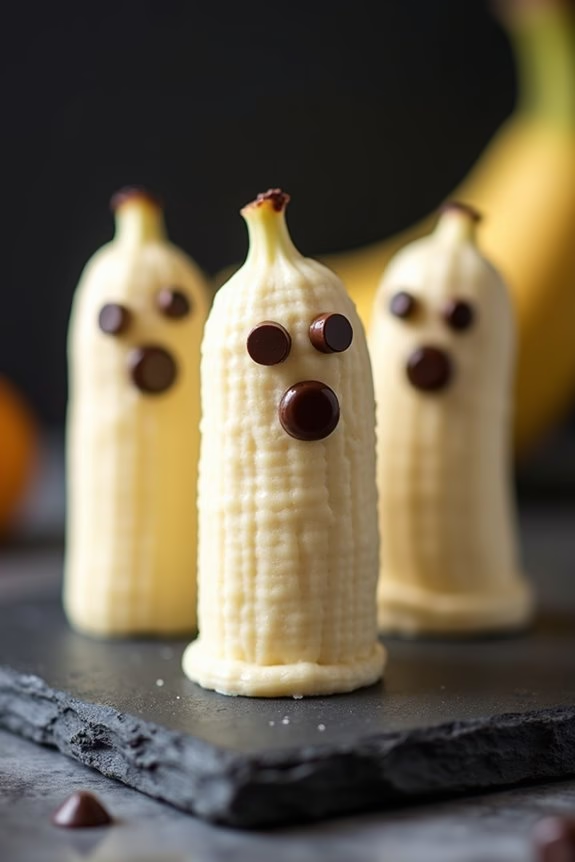
If you’re looking for a frightfully fun and healthy Halloween breakfast idea for kids, Boo-nana Ghosts are a spooktacular choice! These adorable treats aren’t only easy to make but also incredibly nutritious, guaranteeing your little ghouls and goblins start their day with a boost of energy.
Made with fresh bananas and a few simple ingredients, Boo-nana Ghosts are perfect for a Halloween breakfast party or a fun family morning in the spirit of the season.
Boo-nana Ghosts aren’t just visually appealing; they’re also a delicious way to incorporate fruit into your child’s breakfast. The natural sweetness of the bananas, combined with the playful ghostly decoration, is sure to delight both kids and adults alike.
This recipe serves 4-6 people, making it an ideal option for a family breakfast or a small Halloween gathering.
Ingredients (serving size: 4-6 people):
- 3 large bananas
- 12 mini chocolate chips (or small raisins)
- 6 regular-sized chocolate chips
- 6 wooden popsicle sticks or skewers
- 1 tablespoon lemon juice (optional)
Cooking Instructions:
- Prepare the Bananas: Peel the bananas and cut each one in half to create a total of six pieces. If you prefer, you can brush the banana halves lightly with lemon juice to prevent browning.
- Insert the Sticks: Carefully insert a wooden popsicle stick or skewer into the flat end of each banana half. Guarantee the sticks are secure but be gentle to avoid splitting the bananas.
- Create the Ghost Faces: Use the mini chocolate chips or small raisins to form the eyes of the ghost on the pointed end of the banana. Press them gently into the banana to secure them in place.
- Add the Mouths: Place one regular-sized chocolate chip below the eyes to form the ghost’s mouth. Guarantee the pointed side of the chocolate chip is facing inward for a more realistic look.
- Chill the Boo-nana Ghosts: Place the assembled Boo-nana Ghosts on a plate or tray and refrigerate for about 20 minutes. This will help the chocolate chips set and keep the bananas firm.
Extra Tips:
To keep your Boo-nana Ghosts looking fresh and appealing, serve them immediately after chilling. If you’re planning to make them ahead of time, consider covering the bananas with plastic wrap to prevent browning.
For a more indulgent treat, you can dip the banana halves in white yogurt or melted white chocolate before adding the ghostly features. This not only enhances the flavor but also adds a spooky white coating, making your Boo-nana Ghosts even more realistic!
Haunted House Breakfast Sandwiches
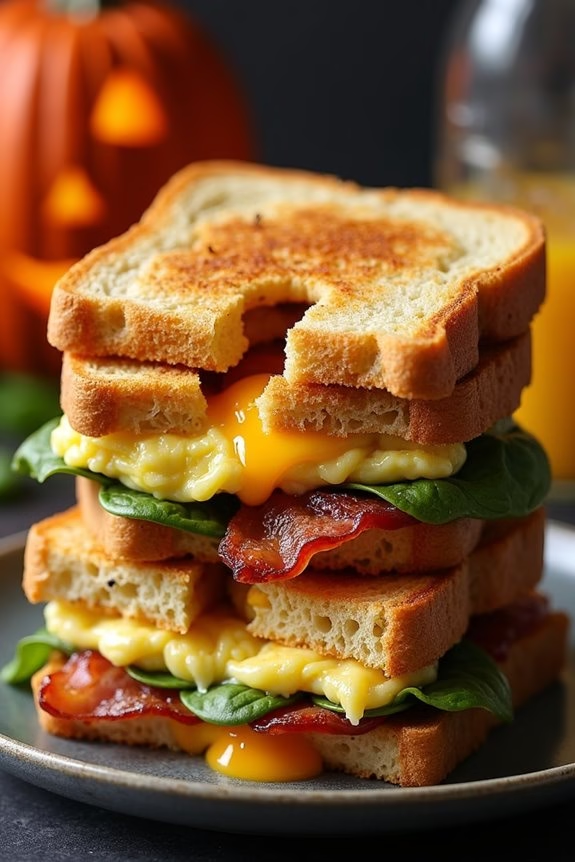
Start your Halloween morning with a spooky twist by creating Haunted House Breakfast Sandwiches! This playful and delicious dish is perfect for kids and adults alike, setting the tone for a day full of fun and festivities.
These sandwiches aren’t only delightful to look at but also packed with flavors that will satisfy your taste buds. With just a few ingredients and a little creativity, you can transform your breakfast table into a haunted scene that will enchant everyone.
The Haunted House Breakfast Sandwich is fundamentally a classic breakfast sandwich with a Halloween makeover. The foundation consists of hearty bread, filled with eggs, cheese, and your favorite breakfast meats. The magic happens when you use cookie cutters to shape the sandwiches into haunted houses, jack-o’-lanterns, or ghostly forms.
This recipe is designed to serve 4-6 people, making it ideal for a small family or a group of spooky breakfast enthusiasts.
Ingredients (Serves 4-6):
- 8 slices of whole-grain or sourdough bread
- 6 large eggs
- 6 slices of cheddar or American cheese
- 8 slices of bacon or ham
- 1 tablespoon of butter
- Salt and pepper to taste
- Halloween-themed cookie cutters (e.g., house, ghost, pumpkin)
- Optional: fresh spinach leaves or tomato slices for extra filling
Cooking Instructions:
- Prepare the Ingredients: Begin by pre-cooking the bacon or ham in a skillet over medium heat until crispy. Set aside on a paper towel to drain excess grease. Crack the eggs into a bowl, whisk them together with a pinch of salt and pepper.
- Cook the Eggs: Melt a tablespoon of butter in the same skillet over medium-low heat. Pour in the whisked eggs and gently scramble them until fully cooked. Remove the eggs from the heat and set aside.
- Prepare the Bread: Lay out the slices of bread on a clean surface. Use your Halloween-themed cookie cutters to cut out shapes from half of the bread slices (these will be the top of your sandwiches).
- Assemble the Sandwiches: On each of the uncut slices, layer a piece of cheese, a scoop of scrambled eggs, a piece of bacon or ham, and any optional fillings like spinach or tomatoes. Top each sandwich with a cut-out slice of bread.
- Cook the Sandwiches: Heat a large skillet or griddle over medium heat. Place the sandwiches in the skillet and grill them for about 2-3 minutes per side, or until the bread is golden brown and the cheese has melted.
- Serve and Enjoy: Once cooked, remove the sandwiches from the skillet, and arrange them on a platter. Serve immediately for a warm, spooky breakfast treat!
Extra Tips:
To enhance the haunted effect, use a variety of cookie cutter shapes to make different themed sandwiches. If you want to add a bit more nutrition, consider using whole-grain bread and adding vegetables like bell peppers or mushrooms into the scrambled eggs.
Additionally, keeping the eggs slightly undercooked before sandwich assembly guarantees they remain moist after the grilling process. Finally, encourage kids to get involved by letting them use the cookie cutters to create their own spooky shapes!
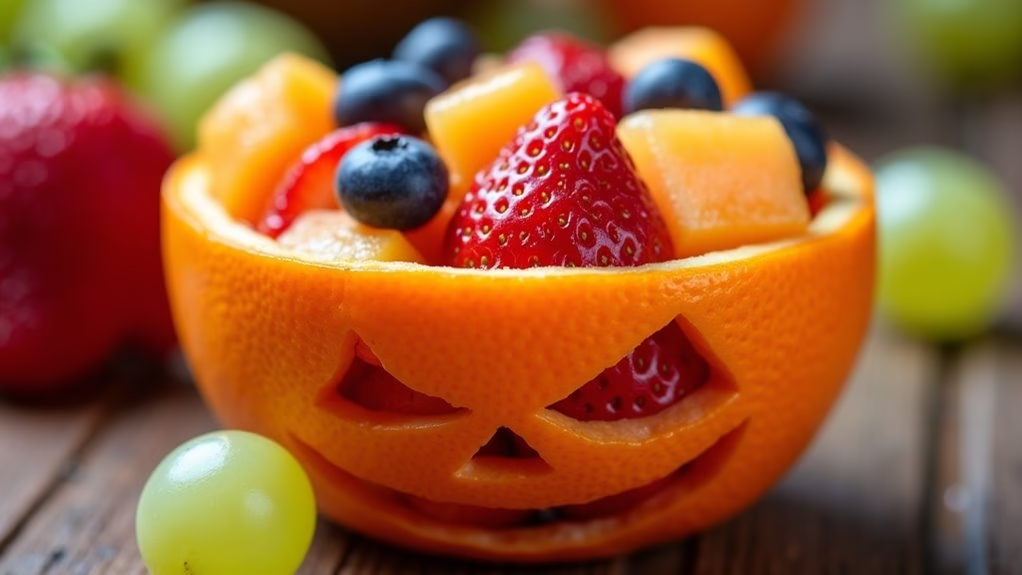
Jack-o’-Lantern Fruit Cups

Celebrate Halloween morning with a fun and healthy treat by making Jack-o’-Lantern Fruit Cups. These adorable fruit cups aren’t only festive but also packed with nutritious fruits that kids will love. Perfect for a Halloween breakfast or snack, these cups are shaped like little jack-o’-lanterns, adding a spooky yet delightful touch to your Halloween spread.
The best part is that they’re easy to make and can be customized with your favorite fruits.
To create these Jack-o’-Lantern Fruit Cups, you’ll need some small oranges or tangerines as the base for your pumpkin-like containers. After carefully hollowing out the oranges, you can fill them with a colorful mix of fruits like berries, grapes, and melon balls. This recipe is both fun and interactive, allowing kids to help with the creation, making it a perfect family activity for Halloween morning.
Ingredients for 4-6 servings:
- 6 small oranges or tangerines
- 1 cup strawberries, hulled and quartered
- 1 cup blueberries
- 1 cup green grapes, halved
- 1 cup cantaloupe or honeydew melon balls
Instructions:
- Prepare the Oranges: Begin by washing the oranges thoroughly. Using a sharp knife, carefully cut the top off each orange to create a lid, similar to a pumpkin lid. Set the lids aside, as they’ll be used later.
- Hollow Out the Oranges: Gently scoop out the inside of each orange with a spoon, being careful not to puncture the peel. Reserve the orange segments to enjoy separately or add to the fruit mix if desired.
- Carve the Faces: Using a paring knife, carve jack-o’-lantern faces into the sides of the hollowed-out orange peels. You can make them as simple or intricate as you like, but make sure the cutouts are large enough to be visible.
- Prepare the Fruit Filling: In a large bowl, combine the strawberries, blueberries, grapes, and melon balls. Toss the fruits gently to mix them evenly.
- Fill the Oranges: Spoon the mixed fruit into each hollowed-out orange until they’re filled to the top.
- Cover and Serve: Place the reserved orange lids back on top of each filled orange to resemble a pumpkin. Arrange the completed Jack-o’-Lantern Fruit Cups on a platter and serve immediately.
Extra Tips:
For an added touch of Halloween fun, consider using a small cookie cutter to shape the fruit pieces into Halloween-themed shapes, like bats or ghosts.
If you want to prepare these ahead of time, you can hollow out and carve the oranges the night before and keep them in the refrigerator. Fill them with fruit just before serving to guarantee the fruit remains fresh and vibrant.
Additionally, consider using different fruit combinations based on your kids’ preferences or what’s in season to keep the recipe exciting and varied.