
Planning a Halloween party just got way more fun with these 10 spooktacular snacks. Think spider crackers and ghostly popcorn balls that are as delicious as they are adorable. From mummy hot dogs to vibrant monster eye pretzels, there’s something here for kids and adults to enjoy. With these creative treats, you’ll wow your guests with minimal effort. Let’s make your Halloween celebration a memorable one!
Spooky Spider Crackers
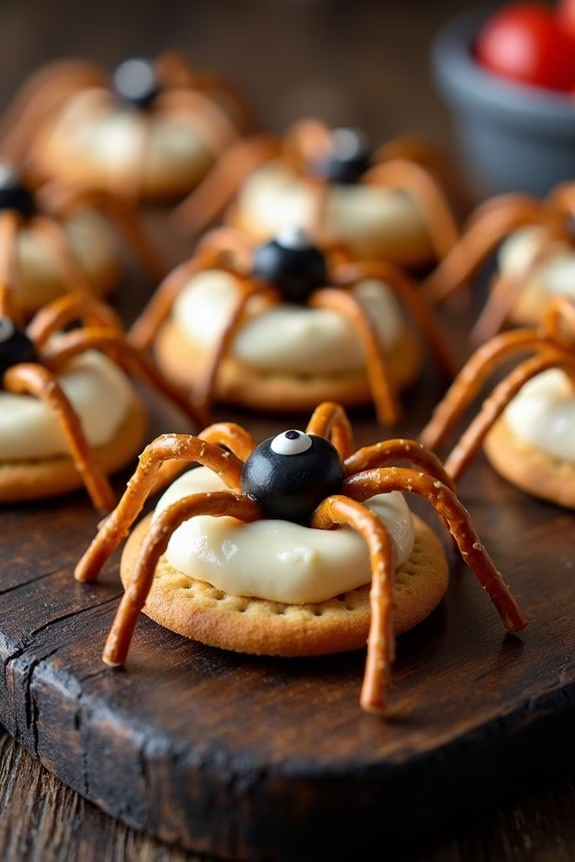
Spooky Spider Crackers are the perfect Halloween snacks to add a touch of frightful fun to your party spread. These creepy-crawly delights aren’t only visually appealing but also delectable, making them an instant hit among both kids and adults. With their crunchy texture and savory flavors, Spooky Spider Crackers are sure to be a memorable addition to your Halloween festivities.
Creating these eerie snacks is a breeze, requiring simple ingredients and minimal preparation time. The crackers serve as the crunchy base, while pretzel sticks form the spider legs, and cream cheese or hummus acts as the binding agent. Decorative touches like olives or cherry tomatoes add eyes to the spiders, completing the spooky look. This recipe is designed to serve 4-6 people, ensuring everyone at your party can enjoy these eerie edibles.
Ingredients for Spooky Spider Crackers (Serves 4-6):
- 24 round crackers
- 1 cup cream cheese or hummus
- 48 small pretzel sticks
- 12 black olives or cherry tomatoes
- 24 candy eyes or small bits of cheese
Cooking Instructions:
- Prepare the Base: Lay out the 24 round crackers on a large serving platter. Make sure they’re evenly spaced to allow room for the spider legs.
- Add the Legs: Take the pretzel sticks and insert four on each side of the crackers to mimic spider legs. Gently press them into the cream cheese or hummus to secure.
- Create the Spider Bodies: Using a small spoon or a piping bag, place a dollop of cream cheese or hummus in the center of each cracker. This will act as the spider’s body and help hold the legs in place.
- Attach the Eyes: Slice the olives or cherry tomatoes into small pieces and place two on each spider for the eyes. Alternatively, you can use candy eyes or small bits of cheese for a more whimsical look. Press them gently into the cream cheese or hummus.
- Final Touches: Arrange the Spooky Spider Crackers on a serving platter, ensuring the legs are visible and evenly spaced. Serve immediately or store in the refrigerator until your guests arrive.
Extra Tips:
When making Spooky Spider Crackers, it’s important to use a spread that’s thick enough to hold the pretzel sticks and toppings in place. If you find the cream cheese or hummus too soft, refrigerate it for a short while before assembling the crackers.
Additionally, feel free to get creative with the eyes and legs—try using different toppings or shapes to customize your spiders. This recipe can easily be doubled or tripled to accommodate larger gatherings, ensuring all your guests can partake in the spooky fun.
Ghostly Popcorn Balls
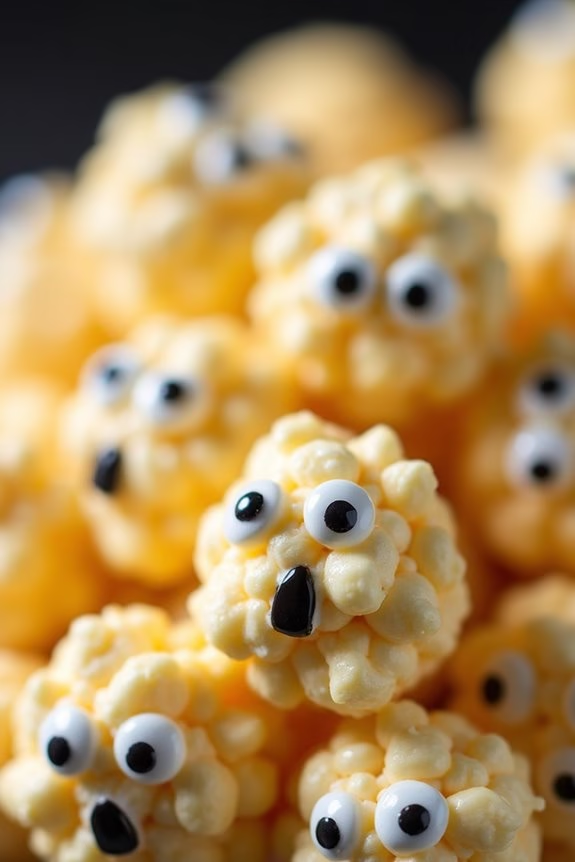
Ghostly Popcorn Balls are a fun and festive treat that are perfect for any Halloween party. These spooky snacks aren’t only delicious but also incredibly easy to make, making them an ideal choice for both seasoned chefs and kitchen novices. With their sweet and salty flavor and eerie appearance, Ghostly Popcorn Balls are sure to be a hit with both kids and adults alike.
Whether you’re hosting a Halloween bash or simply looking to add a little spookiness to your snack time, these popcorn balls are the perfect go-to option. The combination of fluffy popcorn, gooey marshmallow, and a hint of vanilla creates a delightful texture and flavor that’s hard to resist.
You can even decorate your Ghostly Popcorn Balls with candy eyes or colored icing to give them a more ghostly appearance. This recipe yields enough for 4-6 people, making it perfect for a small gathering or family movie night. With just a few simple ingredients and a bit of creativity, you can whip up these ghostly treats in no time.
Ingredients (Serves 4-6):
- 10 cups popped popcorn
- 1/2 cup unsalted butter
- 1 (10 oz) package mini marshmallows
- 1 teaspoon vanilla extract
- Candy eyes or black icing (for decoration)
- Non-stick cooking spray
Cooking Instructions:
- Prepare the Popcorn: Start by popping your popcorn using your preferred method. Once popped, measure out 10 cups and place it in a large bowl. Confirm there are no unpopped kernels, as they can be hard and unpleasant in the finished product.
- Melt the Butter and Marshmallows: In a large saucepan over medium heat, melt the unsalted butter. Add in the mini marshmallows and stir continuously until the marshmallows have completely melted and the mixture is smooth. Stir in the vanilla extract, mixing well to combine.
- Combine with Popcorn: Pour the melted marshmallow mixture over the prepared popcorn. Using a spatula or wooden spoon, gently fold the mixture until all of the popcorn is evenly coated. Be careful not to crush the popcorn as you mix.
- Form the Balls: Spray your hands with non-stick cooking spray to prevent sticking, then take a handful of the popcorn mixture and shape it into a ball. Continue forming balls until all the mixture is used. Place the formed balls onto a baking sheet lined with parchment paper.
- Decorate: Once the popcorn balls have cooled slightly, press candy eyes into each one, or use black icing to draw ghostly faces on the popcorn balls. Allow the decorations to set before serving.
- Serve and Enjoy: Arrange the finished Ghostly Popcorn Balls on a serving platter and watch them disappear as your guests enjoy this spooky treat.
Extra Tips:
For added flavor, consider mixing in some white chocolate chips or a sprinkle of sea salt before forming the balls. If you prefer a less sweet version, reduce the amount of marshmallows slightly.
Keep a small bowl of water nearby to dip your hands in if the mixture becomes too sticky to handle. Finally, confirm that the popcorn balls are completely cool before storing them in an airtight container to maintain their freshness and prevent them from sticking together.
Witch Hat Cookies
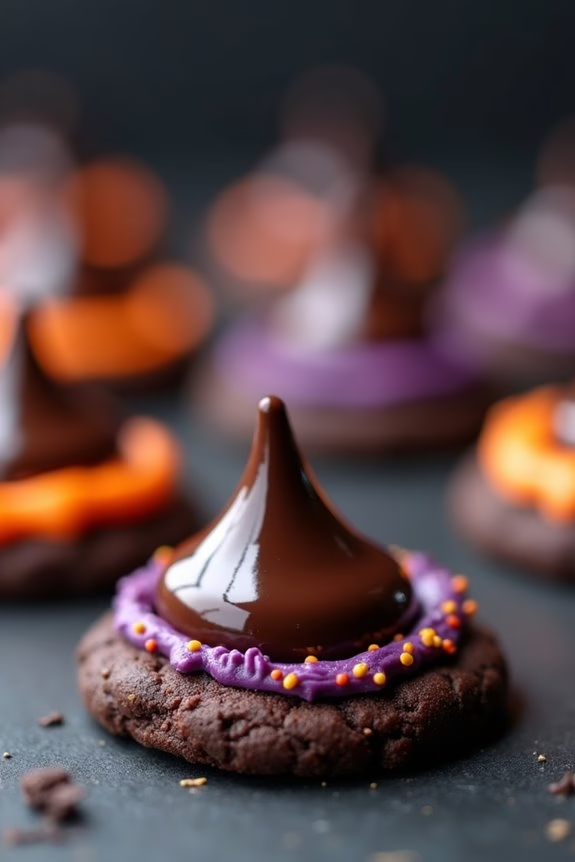
Creating these enchanting cookies is easier than you might think. With a few simple ingredients, you can whip up a batch of these tasty treats in no time.
The base of the hat is made from a chocolate cookie, topped with a chocolate kiss to form the pointed hat, and then adorned with a colored icing band to complete the look. Let your creativity shine by customizing the icing colors and designs to match your party theme.
Ingredients (Serving size: 4-6 people):
- 24 chocolate wafer cookies
- 24 chocolate kisses
- 1/2 cup semi-sweet chocolate chips
- 2 tablespoons unsalted butter
- 1/2 teaspoon almond extract
- Colored icing (such as orange or purple)
Cooking Instructions:
- Prepare the Ingredients: Begin by unwrapping the chocolate kisses and setting them aside for later use. This will make the assembly process smoother.
- Melt the Chocolate: In a small saucepan, combine the semi-sweet chocolate chips and butter. Heat over low heat, stirring constantly until the mixture is completely melted and smooth. Remove from the heat and stir in the almond extract for extra flavor.
- Assemble the Hats: Take one chocolate wafer cookie and place a small dollop of the melted chocolate mixture in the center. This will act as the glue to hold the chocolate kiss in place.
- Attach the Kiss: Press a chocolate kiss onto the melted chocolate on the wafer cookie. Hold it for a few seconds to guarantee it adheres properly.
- Decorate with Icing: Once all the hats are assembled, use the colored icing to pipe a ring around the base of the chocolate kiss, creating a band for the witch hat. Feel free to get creative with the design!
- Let Set: Allow the witch hat cookies to set at room temperature until the chocolate hardens and the icing is firm. This should take about 30 minutes.
Extra Tips: For a more intense chocolate flavor, consider using dark chocolate kisses instead of the regular variety.
You can also experiment with different icing colors to fit your Halloween theme or add edible glitter for a magical touch. If you find the chocolate is hardening too quickly while assembling, simply reheat it gently to regain its smooth consistency.
Remember to store any leftover cookies in an airtight container to maintain freshness.
Mummy Hot Dogs
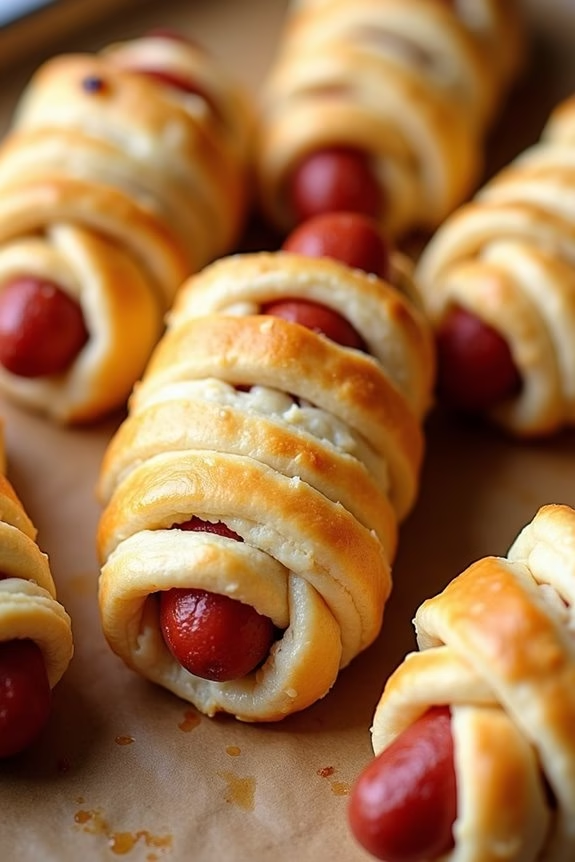
Mummy Hot Dogs are a fun and spooky treat perfect for any Halloween party. These adorable snacks aren’t only easy to make but also a hit with both kids and adults. Wrapped in flaky crescent roll dough and baked to golden perfection, these mummy-themed hot dogs are bound to be the star attraction on your holiday table.
Ideal for a serving size of 4-6 people, this recipe is quick to prepare and requires minimal ingredients. The combination of juicy hot dogs and buttery pastry makes for a deliciously satisfying snack. Add a little creativity with some mustard or ketchup for ‘eyes’ to bring these mummies to life!
Ingredients (Serves 4-6):
- 8 hot dogs
- 1 can of crescent roll dough
- 1 egg (optional, for egg wash)
- Mustard or ketchup (for decoration)
Cooking Instructions:
- Preheat the Oven: Start by preheating your oven to 375°F (190°C) to guarantee it’s ready for baking the mummies.
- Prepare the Dough: Unroll the crescent roll dough and separate it into triangles. Cut each triangle into thin strips (about 1/4 inch wide).
- Wrap the Hot Dogs: Take a hot dog and wrap the strips of dough around it, leaving a small space for the face. Be sure to overlap the dough slightly to create the mummy effect.
- Arrange on Baking Sheet: Place the wrapped hot dogs on a baking sheet lined with parchment paper. Confirm they’re evenly spaced to allow for even cooking.
- Add Egg Wash (Optional): For a shiny finish, lightly beat the egg and brush it over the dough-wrapped hot dogs.
- Bake: Place the baking sheet in the preheated oven and bake for 12-15 minutes or until the dough is golden brown and crispy.
- Decorate: Once baked, remove from the oven and let them cool slightly. Use mustard or ketchup to dot on ‘eyes’ for each mummy.
Extra Tips:
For a more flavorful twist, you can use sausage or bratwurst instead of regular hot dogs. If you prefer a spicier version, consider using jalapeño-flavored sausages or adding a slice of cheese beneath the dough wrap for a gooey surprise.
Additionally, if you’re short on time, pre-made puff pastry can be used instead of crescent roll dough. Don’t forget to keep an eye on the oven as baking times may vary depending on your oven’s efficiency.
Pumpkin Cheese Balls
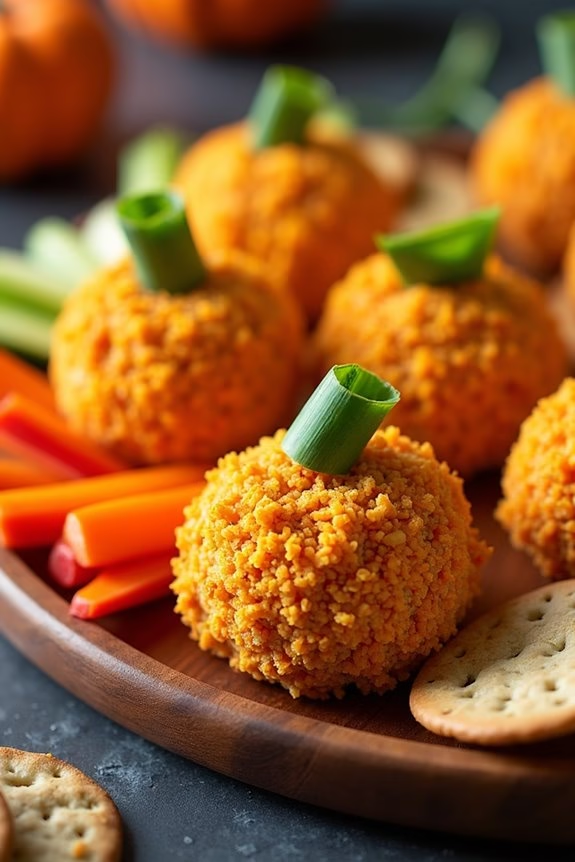
If you’re looking to add a savory and festive touch to your Halloween party, pumpkin cheese balls are the perfect snack. These delightful treats aren’t only delicious but also visually appealing, resembling little pumpkins that fit right into your spooky theme.
With a creamy and tangy flavor, these cheese balls are sure to be a hit among both kids and adults at your gathering. Easy to make and serve, pumpkin cheese balls can be prepared ahead of time, leaving you more freedom to enjoy your party.
The combination of sharp cheddar cheese, cream cheese, and a hint of spices creates a mouthwatering experience that pairs beautifully with crackers, pretzels, or vegetable sticks. Let’s explore the recipe for serving 4-6 people.
Ingredients:
- 2 cups sharp cheddar cheese, shredded
- 8 oz cream cheese, softened
- 1 teaspoon Worcestershire sauce
- 1/2 teaspoon garlic powder
- 1/2 teaspoon paprika
- 1/4 teaspoon cayenne pepper (optional)
- 1 cup crushed pretzels
- 4 stalks of green onion, for stems
- Crackers or vegetable sticks, for serving
Instructions:
- Prepare the Cheese Mixture: In a large mixing bowl, combine the shredded cheddar cheese, softened cream cheese, Worcestershire sauce, garlic powder, paprika, and cayenne pepper if using. Mix thoroughly until the ingredients are well combined and smooth.
- Shape into Balls: Divide the cheese mixture into 4-6 equal portions, depending on the desired size of your cheese balls. Roll each portion into a ball using your hands, ensuring they’re smooth and even.
- Chill the Cheese Balls: Place the cheese balls on a baking sheet lined with parchment paper. Refrigerate them for at least one hour to allow the flavors to meld and the balls to firm up.
- Coat with Crushed Pretzels: Once chilled, roll each cheese ball in the crushed pretzels until fully coated. The pretzels will add a crunchy texture and give the cheese balls their pumpkin-like appearance.
- Add the Stems: Cut the green parts of the green onions into small pieces to resemble pumpkin stems. Insert one piece into the top of each cheese ball to complete the pumpkin look.
- Serve and Enjoy: Arrange the pumpkin cheese balls on a serving platter with crackers or vegetable sticks surrounding them. Serve chilled and enjoy the festive flavors!
Extra Tips:
For an added twist, you can incorporate finely chopped nuts into the crushed pretzels for extra crunch. Adjust the spice level by adding more or less cayenne pepper according to your preference.
If you’re preparing these in advance, keep the cheese balls refrigerated until just before serving to maintain their shape and freshness. Finally, be creative with the presentation by using a variety of crackers and vegetables for a colorful and inviting spread.
Monster Eye Pretzels
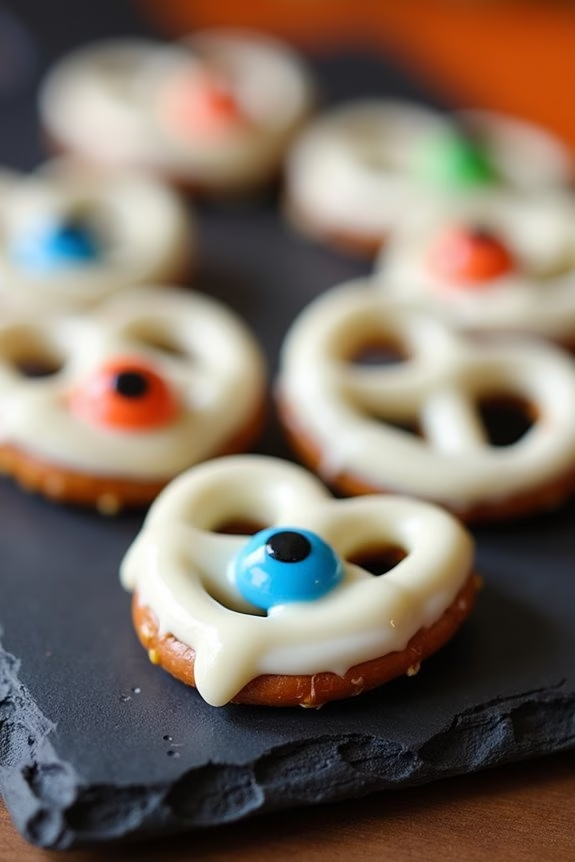
Get ready to add a spooky twist to your Halloween party with these Monster Eye Pretzels! These delightful treats aren’t only delicious but also incredibly fun to make. Perfect for both kids and adults, they combine the salty crunch of pretzels with the sweet gooeyness of melted chocolate and candy eyes.
Whether you’re hosting a party or simply indulging in some festive baking, these Monster Eye Pretzels are guaranteed to be a big hit!
The beauty of these pretzels lies in their simplicity and the creative freedom they allow. You can customize the colors of the monster eyes and use different types of pretzels to suit your taste. Plus, they require minimal ingredients and time, making them an ideal last-minute treat.
Gather your ingredients, invite some friends or family to join in the fun, and let’s get ready to create some monstrously good snacks!
Ingredients (Serving Size: 4-6 people):
- 24 mini pretzel twists
- 1 cup white chocolate chips
- 24 candy eyeballs
- Assorted food coloring (optional)
- 1 tablespoon vegetable oil
Cooking Instructions:
1. Prepare Your Workspace: Line a baking sheet with parchment paper or a silicone mat. This will prevent the pretzels from sticking and make cleanup easier.
2. Melt the Chocolate: In a microwave-safe bowl, combine the white chocolate chips and vegetable oil. Microwave on medium power in 30-second intervals, stirring in between, until the chocolate is fully melted and smooth.
If using food coloring, divide the melted chocolate into separate bowls and add a few drops of your desired colors, stirring until evenly blended.
3. Dip the Pretzels: Using a fork, dip each pretzel twist into the melted chocolate, guaranteeing it’s completely coated. Lift the pretzel out, allowing any excess chocolate to drip off, and place it onto the prepared baking sheet.
4. Add the Eyes: While the chocolate is still soft, place a candy eyeball in the center of each coated pretzel. Press gently to verify it adheres well.
5. Chill the Pretzels: Transfer the baking sheet to the refrigerator and allow the pretzels to chill for about 15-20 minutes, or until the chocolate has fully set.
6. Serve and Enjoy: Once the chocolate is firm, your Monster Eye Pretzels are ready to be served. Arrange them on a platter for a spooky yet delightful presentation.
Extra Tips:
Feel free to experiment with different types of chocolate, such as dark or milk, for a variety of flavors. If you don’t have candy eyeballs, you can use small chocolate chips or edible markers to draw eyes onto the hardened chocolate.
To add more variety, consider using pretzel rods instead of twists for a different shape. For a quicker setup, you can also freeze the pretzels for about 10 minutes instead of refrigerating.
These Monster Eye Pretzels are best enjoyed fresh but can be stored in an airtight container for up to a week if needed.
Bat Chips With Salsa

Bat Chips With Salsa is a fun and festive way to add some spooky flair to your Halloween party spread. This dish combines crispy bat-shaped tortilla chips with a zesty homemade salsa, delivering a delightful crunch and a burst of flavor that guests of all ages will enjoy.
Not only is this snack visually appealing, but it also provides a healthy alternative to traditional party treats, making it a perfect addition to your Halloween menu.
The bat-shaped chips are made by cutting tortillas into bat shapes using a cookie cutter, then baking them to achieve a crispy texture. The accompanying salsa is a vibrant blend of fresh tomatoes, onions, cilantro, and a hint of lime that complements the chips perfectly. This recipe serves 4-6 people, making it a great option for small gatherings or as part of a larger buffet.
Ingredients:
- 10 small flour or corn tortillas
- 2 tablespoons olive oil
- 1 teaspoon sea salt
- 4 ripe tomatoes, diced
- 1 small red onion, finely chopped
- 1 jalapeño pepper, seeded and chopped
- 1/4 cup fresh cilantro, chopped
- 1 lime, juiced
- Salt and pepper to taste
Cooking Instructions:
- Preheat the Oven: Begin by preheating your oven to 350°F (175°C). This will guarantee the chips bake evenly and become nice and crispy.
- Prepare the Tortillas: Use a bat-shaped cookie cutter to cut bat shapes out of the tortillas. Depending on the size of your cutter, you should be able to get about 3-4 bats per tortilla.
- Season and Bake the Chips: Place the tortilla bats on a baking sheet. Lightly brush each piece with olive oil and sprinkle with sea salt. Bake in the preheated oven for 8-10 minutes or until golden brown and crisp. Keep an eye on them to prevent burning.
- Make the Salsa: While the chips are baking, prepare the salsa. In a medium-sized bowl, combine the diced tomatoes, chopped onion, jalapeño, and cilantro. Add lime juice, and season with salt and pepper. Mix well to combine all the flavors.
- Serve: Once the chips are done, remove them from the oven and let them cool slightly. Serve the bat chips alongside the fresh salsa in a decorative bowl for a festive presentation.
Extra Tips:
For an extra twist, you can add a little garlic powder or smoked paprika to the olive oil before brushing it on the tortilla bats for a different flavor profile.
If you prefer a milder salsa, you can skip the jalapeño or reduce the amount to suit your taste. Be sure to make the salsa fresh on the day of the party to maintain its vibrant flavor and color. Happy Halloween!
Haunted Marshmallow Pops
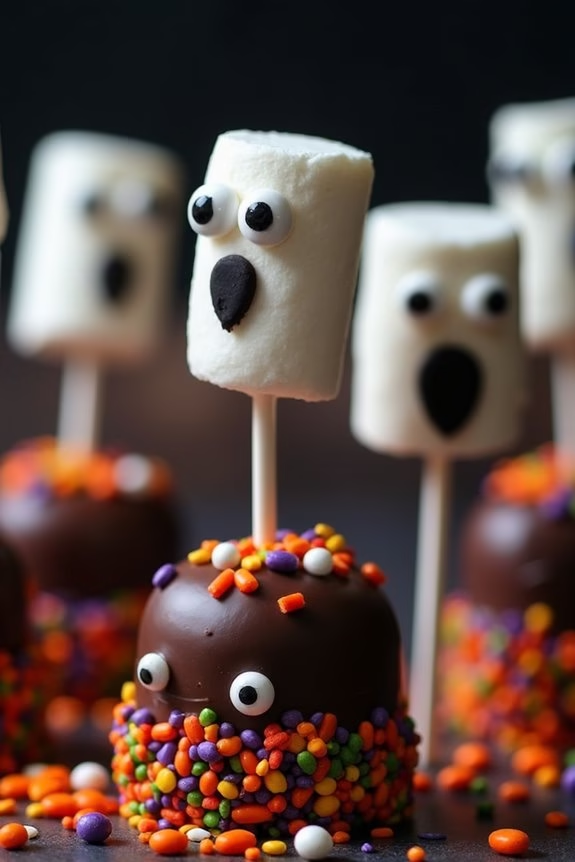
Haunted Marshmallow Pops are a spooky and fun treat that’s perfect for Halloween parties. These delicious pops are easy to make and can be customized with different decorations, making them a hit with both kids and adults alike. With their ghostly appearance and sweet taste, Haunted Marshmallow Pops will add a festive touch to any Halloween gathering. The combination of fluffy marshmallows, rich chocolate, and colorful sprinkles is sure to delight your guests.
For a serving size of 4-6 people, you’ll need just a few simple ingredients and some creativity. The process involves dipping marshmallows in melted chocolate and adding spooky decorations to create a haunting effect. These pops aren’t only enjoyable to make but also serve as a delightful centerpiece for your Halloween party table. Gather your ingredients and get ready to create these fun, haunted treats!
Ingredients:
- 12 large marshmallows
- 1 cup semi-sweet chocolate chips or white chocolate chips
- 12 lollipop sticks
- Assorted Halloween-themed sprinkles or edible decorations (such as candy eyes, black icing, etc.)
- 1 tablespoon vegetable oil
Instructions:
- Prepare the Materials: Begin by laying a sheet of parchment paper on a baking tray. This will be used to place the dipped marshmallows for setting. Make certain to have your lollipop sticks and decorations ready for easy access.
- Melt the Chocolate: In a microwave-safe bowl, combine the chocolate chips with the vegetable oil. Microwave in 30-second intervals, stirring in between, until the chocolate is completely melted and smooth. Alternatively, you can melt the chocolate using a double boiler on the stove.
- Insert Sticks into Marshmallows: Take each marshmallow and carefully insert a lollipop stick into one end, pushing it about halfway through the marshmallow to make sure it stays secure.
- Dip the Marshmallows: Hold a marshmallow by the stick and dip it into the melted chocolate, making sure it’s fully coated. Allow any excess chocolate to drip off before placing the marshmallow onto the prepared parchment paper.
- Decorate: While the chocolate is still wet, quickly add your Halloween-themed decorations. You can use candy eyes to create ghost faces or sprinkle with themed sprinkles for a festive look.
- Set the Pops: Once decorated, place the tray of marshmallow pops in the refrigerator for about 15-20 minutes, or until the chocolate has set completely.
- Serve and Enjoy: Remove the pops from the fridge and serve them as a fun, spooky treat for your guests.
Extra Tips: To make the dipping process easier, you can use a tall glass to hold the melted chocolate; this allows for a more even coating of the marshmallows. If you prefer a different flavor, try using white chocolate or colored candy melts for a variety of spooky effects. Additionally, if you’re planning to make these pops ahead of time, store them in an airtight container in the refrigerator to keep them fresh and delicious until your Halloween party.
Frankenstein Rice Krispie Treats
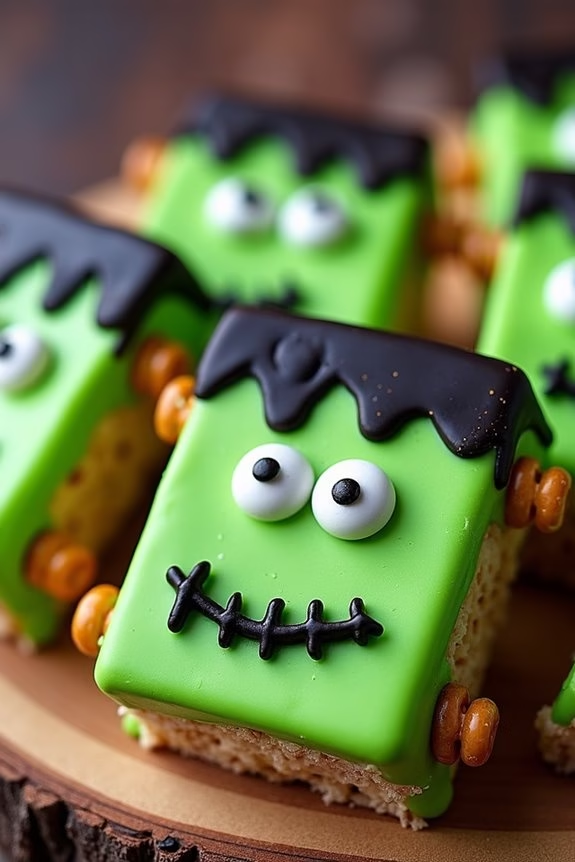
Frankenstein Rice Krispie Treats are a fun and delicious way to add some spookiness to your Halloween party spread. These treats aren’t only delightful to look at but also incredibly tasty, combining the classic flavor of Rice Krispies with a playful, monster-themed twist. Perfect for a party with kids or adults, these treats are bound to be a hit with everyone. The bright green color and cute decorations make them stand out and add a festive touch to your Halloween table.
These treats are easy to make and require only a few simple ingredients. You can prepare them in advance, which is always a plus for party planning. The recipe is designed to serve 4-6 people, making it an ideal choice for a small gathering or for adding to a larger selection of Halloween-themed foods. With just a little bit of creativity and some basic kitchen supplies, you can whip up these adorable Frankenstein Rice Krispie Treats in no time.
Ingredients (Serves 4-6):
- 6 cups of Rice Krispies cereal
- 3 tablespoons of unsalted butter
- 1 package (10 oz) of marshmallows
- Green food coloring
- Chocolate chips or candy eyes
- Black decorating gel
- Mini pretzel sticks
Cooking Instructions:
- Prepare the Ingredients: Begin by gathering all your ingredients and supplies. Line a 9×13-inch baking dish with parchment paper for easy removal of the treats later.
- Melt the Butter and Marshmallows: In a large saucepan, melt the butter over low heat. Once the butter is completely melted, add the marshmallows and stir continuously until they’re fully melted and smooth.
- Add Color: Stir in a few drops of green food coloring into the melted marshmallow mixture, adding more drops as needed to achieve the desired shade of green for Frankenstein’s face.
- Mix in the Cereal: Remove the saucepan from heat and quickly stir in the Rice Krispies cereal until it’s fully coated with the green marshmallow mixture.
- Shape the Treats: Transfer the mixture into the prepared baking dish. Press it down evenly using a spatula or your hands (greased with a small amount of butter to prevent sticking), making sure the surface is smooth and level.
- Cut and Decorate: Once the mixture is set but still slightly warm, cut it into rectangular or square pieces to form Frankenstein’s head. Use chocolate chips or candy eyes to create the eyes, and the black decorating gel to add a mouth and any other facial features. Insert mini pretzel sticks into the sides of each head to represent bolts.
- Cool and Serve: Allow the treats to cool completely before serving. This will guarantee they hold their shape and are easy to handle.
Extra Tips:
For added fun, try experimenting with different decorations to personalize your Frankenstein Rice Krispie Treats. You can use colored icing to add more detail or even add some candy corn for a pop of color.
If you prefer, you can also use different shaped pans to vary the size and shape of the treats. Remember to keep the treats stored in an airtight container if you make them in advance to maintain their freshness.
These playful and delicious treats are sure to bring a smile to your guests’ faces and add a delightful touch to your Halloween festivities.
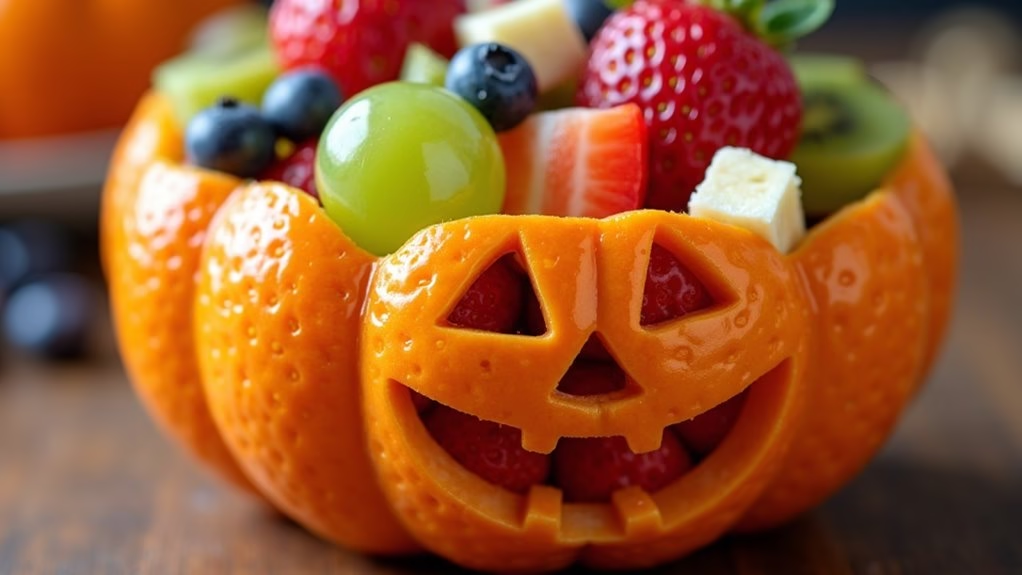
Jack-o’-Lantern Fruit Cups
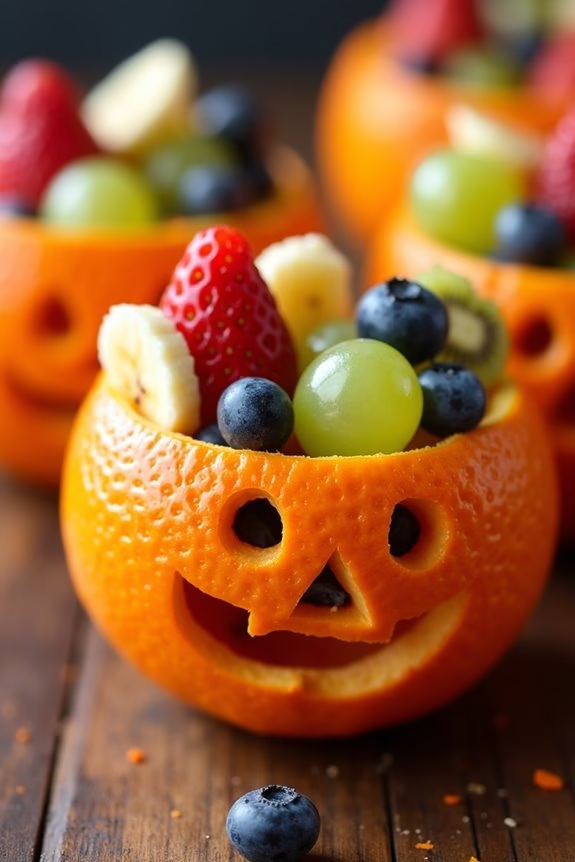
Halloween is a fantastic time to get creative with your party snacks, and Jack-o’-Lantern Fruit Cups are a fun and healthy option that both kids and adults will enjoy. These delightful treats aren’t only easy to prepare, but they also bring a colorful and festive vibe to your Halloween celebration. The best part? They require minimal ingredients and effort, making them a perfect last-minute addition to your spooky spread.
These fruit cups mimic the look of traditional jack-o’-lanterns by using hollowed-out oranges as the “pumpkins.” Filled with a medley of fresh fruits, they offer a revitalizing twist to the usual Halloween candy overload. Each fruit cup serves as an individual portion, making them convenient for party guests to grab and enjoy. The natural sweetness of the fruits is a delightful contrast to the tangy orange shell, creating a delicious harmony of flavors.
Ingredients for 4-6 servings:
- 6 medium oranges
- 1 cup strawberries, diced
- 1 cup green grapes, halved
- 1 cup blueberries
- 1 kiwi, peeled and diced
- 1 banana, sliced
- 1 tablespoon lemon juice
Instructions:
- Prepare the Oranges: Begin by cutting the tops off the oranges. Use a spoon to carefully scoop out the inside of each orange, being cautious not to puncture the skin. Reserve the orange segments for later use in the fruit salad.
- Create Jack-o’-Lantern Faces: With a small paring knife, carefully carve jack-o’-lantern faces into one side of each hollowed-out orange. Have fun with different expressions to give each fruit cup its own personality.
- Prepare the Fruit Filling: In a large mixing bowl, combine the diced strawberries, halved grapes, blueberries, diced kiwi, and sliced banana. Add the reserved orange segments to this mixture. Drizzle the lemon juice over the fruit salad to prevent the banana from browning.
- Assemble the Fruit Cups: Fill each orange “pumpkin” with the prepared fruit salad, gently pressing down to pack the fruit tightly. You can slightly overfill them to create a bountiful appearance.
- Serve and Enjoy: Place the Jack-o’-Lantern Fruit Cups on a serving tray. They can be served immediately or refrigerated for up to a couple of hours before your party begins.
Extra Tips:
To add a bit more flair and flavor, consider sprinkling a little cinnamon or nutmeg over the fruit salad. Alternatively, you can mix in some chopped mint leaves for a revitalizing touch.
When carving the faces, you can use a small cookie cutter for more intricate designs. If you’re preparing these fruit cups ahead of time, cover them with plastic wrap and store them in the refrigerator to maintain freshness. Enjoy this healthy yet festive treat at your Halloween party!