

Halloween is the perfect time to unleash your inner foodie and get creative with some spooky yet fun treats. My favorite way to celebrate is by setting up a table filled with monster eyeball tacos, ghostly deviled eggs, and mummy-wrapped sausages. These hauntingly delicious finger foods are sure to enchant your guests. With a sprinkle of creativity and some themed garnishes, your party spread can turn into a feast for the eyes. Ready to explore more spooktacular options?
Monster Eyeball Tacos
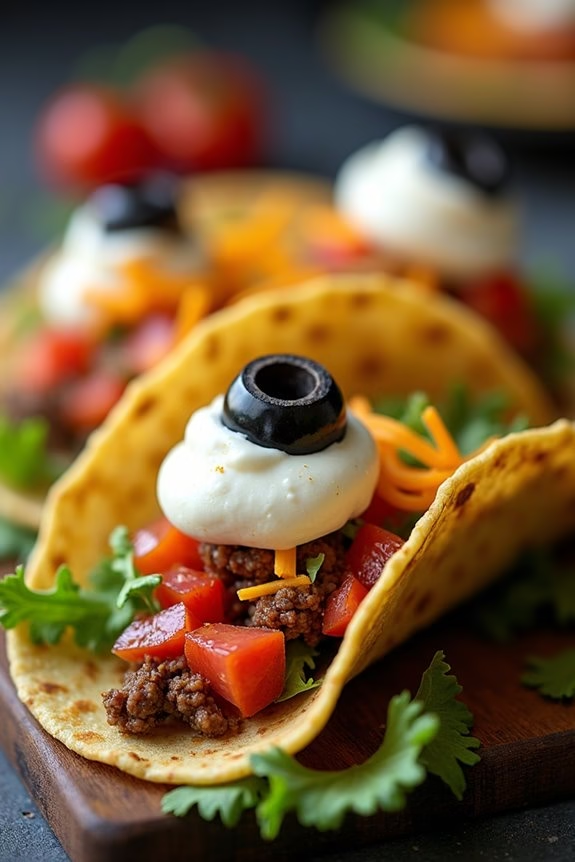
Halloween is the perfect time to get creative in the kitchen, and what better way to do that than with Monster Eyeball Tacos? This spooky twist on traditional tacos will delight both kids and adults at your Halloween gathering. With their eerie appearance and delicious taste, these tacos are sure to be a hit.
Transform ordinary ingredients into a ghoulish presentation that will leave your guests both spooked and satisfied. Monster Eyeball Tacos aren’t only fun to make but also incredibly easy to prepare. The key to their spooky charm lies in the presentation, using olives and cheese to create eyeballs that sit atop each taco.
These tacos can be customized to suit your taste preferences, whether you prefer spicy or mild flavors. Serve them as an appetizer or main dish, and watch your guests devour these creepy creations with glee.
Ingredients for 4-6 servings:
- 1 pound ground beef or turkey
- 1 packet taco seasoning
- 12 small taco shells
- 1 cup shredded lettuce
- 1 cup diced tomatoes
- 1 cup shredded cheese (cheddar or Mexican blend)
- 12 black olives, pitted
- 1 cup sour cream
- 12 cherry tomatoes
- 1 tablespoon olive oil
- Salt and pepper to taste
Cooking Instructions:
- Prepare the Meat: In a large skillet, heat the olive oil over medium heat. Add the ground beef or turkey and cook until browned, breaking it apart with a spoon. Drain excess fat if necessary.
- Season the Meat: Add the taco seasoning to the cooked meat, along with the recommended amount of water as per the seasoning packet instructions. Stir well to combine and simmer for about 5 minutes or until the mixture thickens.
- Assemble the Tacos: Lay out the taco shells on a serving platter. Fill each shell with a layer of shredded lettuce, followed by a generous spoonful of the seasoned meat mixture.
- Add the Toppings: Top each taco with diced tomatoes and shredded cheese. For the eyeball effect, place a cherry tomato on top of the cheese, and then press a black olive into the center of each cherry tomato.
- Finish with Sour Cream: Using a piping bag or a small spoon, add a dollop of sour cream to each olive to create the pupil of the eyeball. Sprinkle with salt and pepper to taste.
- Serve and Enjoy: Arrange the Monster Eyeball Tacos on a spooky Halloween-themed platter and serve immediately.
Extra Tips:
For an added touch of spookiness, serve the tacos with a side of guacamole dyed with a drop of green food coloring for a monster slime effect.
You can also experiment with different fillings like black beans or roasted vegetables for a vegetarian option. If you’re making these tacos ahead of time, keep the components separate and assemble them just before serving to maintain their freshness and presentation.
Witch’s Broomstick Snacks
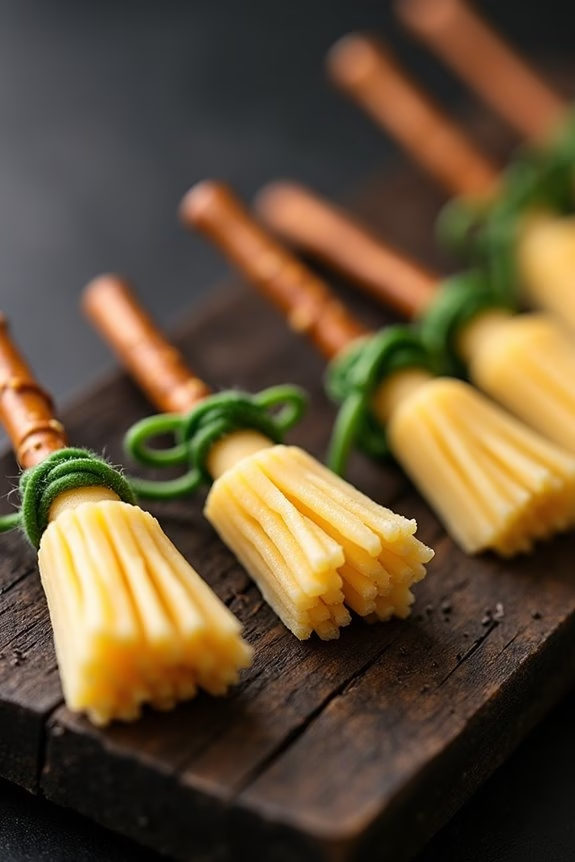
Transform your Halloween party into a spooktacular event with these delightful Witch’s Broomstick Snacks. Perfect for adding a touch of whimsy to your festivities, these snacks aren’t only visually enchanting but also incredibly easy to make.
With just a few simple ingredients, you can whip up a batch of these charming broomsticks that are sure to impress both kids and adults alike. Whether you’re hosting a haunted house gathering or a casual get-together, these appetizers will certainly be a hit.
These Witch’s Broomstick Snacks are made using pretzel sticks, cheese, and chives, providing a scrumptious blend of savory flavors with a satisfying crunch. The combination of the salty pretzels and creamy cheese creates a delightful taste experience that’s hard to resist.
Simple yet effective, these broomsticks are the perfect finger food for your Halloween spread. Not only are they fun to eat, but they also double as a fantastic decoration for your spooky table setting.
Ingredients (Serving size: 4-6 people):
- 12 Pretzel sticks
- 12 String cheese sticks
- 12 Fresh chive stems
Cooking Instructions:
- Prepare the Ingredients: Start by unwrapping the string cheese sticks. Use a knife to cut each stick into three equal pieces. This means you’ll have three smaller pieces from each cheese stick, resulting in a total of 36 pieces.
- Create the Broom Bristles: Take each piece of string cheese and carefully cut fringes into one end using a sharp knife. Make sure to leave the other end intact so that the broomstick shape is maintained. Cut about halfway up the cheese piece to create the appearance of bristles.
- Assemble the Brooms: Insert a pretzel stick into the intact end of the cheese piece. Gently press the cheese around the pretzel to secure it in place, ensuring it resembles a broomstick with bristles.
- Tie with Chives: Take a chive stem and tie it around the upper part of the cheese, just where it meets the pretzel stick. This will help hold the cheese in place and add a touch of green, enhancing the broomstick effect.
- Chill before Serving: Once all the broomsticks are assembled, place them on a tray and chill in the refrigerator for about 15-20 minutes. This will allow the cheese to firm up slightly, making them easier to handle and serve.
Extra Tips:
For a bit of flavor variation, consider using different types of cheese, such as mozzarella or cheddar, to suit your guests’ preferences. If you find the chives difficult to tie, a quick dip in hot water can make them more pliable.
Additionally, if you want to add a little extra flair, consider serving these snacks with a small bowl of mustard or ranch dressing for dipping. Make sure to handle the pretzel sticks carefully to prevent them from breaking, and keep the broomsticks chilled until just before serving for the best presentation.
Mummy Wrapped Sausages

Mummy Wrapped Sausages are the perfect Halloween finger food that combines the savory flavor of sausages with a fun and spooky presentation. These adorable appetizers are quick to prepare and are certain to be a hit at any Halloween gathering. The concept is simple: sausages wrapped in strips of pastry to resemble mummies, complete with little eyes made from mustard or edible decorations. This dish isn’t only visually appealing but also deliciously satisfying, making it a must-have on your Halloween menu.
Whether you’re hosting a party or simply looking for a festive snack to enjoy while watching Halloween movies, Mummy Wrapped Sausages are a fantastic choice. The flaky pastry provides a delightful crunch, while the sausages offer a juicy and flavorful bite. Serve them with a side of mustard or ketchup for dipping, and watch as they disappear from the platter in no time. Perfect for a serving size of 4-6 people, these mummy sausages will keep your guests entertained and well-fed.
Ingredients for Mummy Wrapped Sausages:
- 1 package (14 oz) of cocktail sausages
- 1 sheet of puff pastry, thawed
- 1 egg, beaten
- Mustard or edible eyes for decoration
Cooking Instructions:
- Preheat the oven: Set your oven to 375°F (190°C) and allow it to preheat while you prepare the sausages.
- Prepare the pastry: On a lightly floured surface, roll out the puff pastry sheet to smooth any folds and ascertain it’s evenly flattened. Using a knife or pizza cutter, cut the pastry into thin strips, approximately 1/2 inch wide.
- Wrap the sausages: Take one cocktail sausage and wrap a strip of pastry around it, leaving spaces to mimic mummy bandages. Continue wrapping until all sausages are covered.
- Apply the egg wash: Place the wrapped sausages on a baking sheet lined with parchment paper. Brush each mummy sausage lightly with the beaten egg to give them a golden color when baked.
- Bake the sausages: Put the baking sheet in the preheated oven and bake for 15-20 minutes, or until the pastry is puffed and golden brown.
- Decorate the mummies: Once out of the oven, let the sausages cool slightly. Use mustard or place edible eyes to create the mummy’s eyes, giving them a spooky character.
- Serve and enjoy: Arrange the Mummy Wrapped Sausages on a platter with small bowls of mustard or ketchup for dipping.
Extra Tips:
When making Mummy Wrapped Sausages, verify the puff pastry is well-thawed but still cold, as this makes it easier to cut and wrap around the sausages without tearing.
If you want to add more flavor, consider using flavored sausages like cheese-filled or spicy variants. You can also experiment with different dipping sauces, such as spiced honey mustard or sriracha mayo, to give your guests options to suit their taste preferences.
Ghostly Deviled Eggs
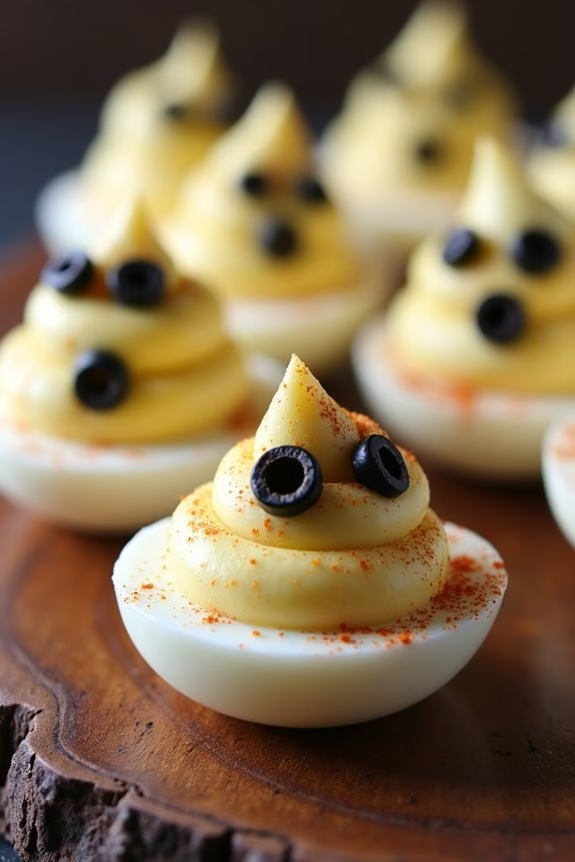
The secret to these spooky deviled eggs lies in the presentation. By using strategically placed black olives, you can create the illusion of ghostly faces peering out from the creamy yolk.
Whether you’re hosting a haunted house party or just enjoying a fun family gathering, these Ghostly Deviled Eggs offer both a visual treat and a flavorful bite. They’re simple to prepare and can be made ahead of time, freeing you up to enjoy the festivities.
Ingredients (Serves 4-6 people):
- 6 large eggs
- 3 tablespoons mayonnaise
- 1 teaspoon Dijon mustard
- 1 teaspoon white vinegar
- Salt and pepper to taste
- Black olives (for decoration)
- Paprika (optional, for garnish)
Cooking Instructions:
- Boil the Eggs: Place the eggs in a saucepan and cover them with cold water. Bring the water to a boil over medium-high heat. Once boiling, reduce the heat to low and simmer for 10 minutes.
- Cool and Peel: After 10 minutes, remove the eggs from heat and transfer them immediately to a bowl of ice water. Let them cool for at least 5 minutes. Once cooled, gently peel the shells off the eggs.
- Prepare the Filling: Slice each egg in half lengthwise and carefully remove the yolks, placing them in a small mixing bowl. Mash the yolks with a fork until they’re crumbly.
- Mix the Filling: Add mayonnaise, Dijon mustard, and white vinegar to the mashed yolks. Mix well until smooth and creamy. Season with salt and pepper to taste.
- Create the Ghosts: Spoon or pipe the yolk mixture back into the egg white halves. Slice the black olives into small pieces to create the eyes and mouth of the ghostly faces, and place them on top of the yolk filling.
- Optional Garnish: Lightly sprinkle paprika over the completed eggs for added color and flavor, if desired.
Extra Tips:
For best results, make sure the eggs are thoroughly cooled before peeling to prevent tearing the egg whites.
If you find peeling difficult, try using eggs that are a few days old, as they tend to peel more easily than fresh ones.
Additionally, if you’re making these ahead of time, store the filled eggs in the refrigerator and add the olive decorations just before serving to keep them looking fresh and sharp.
Spooky Spider Crackers
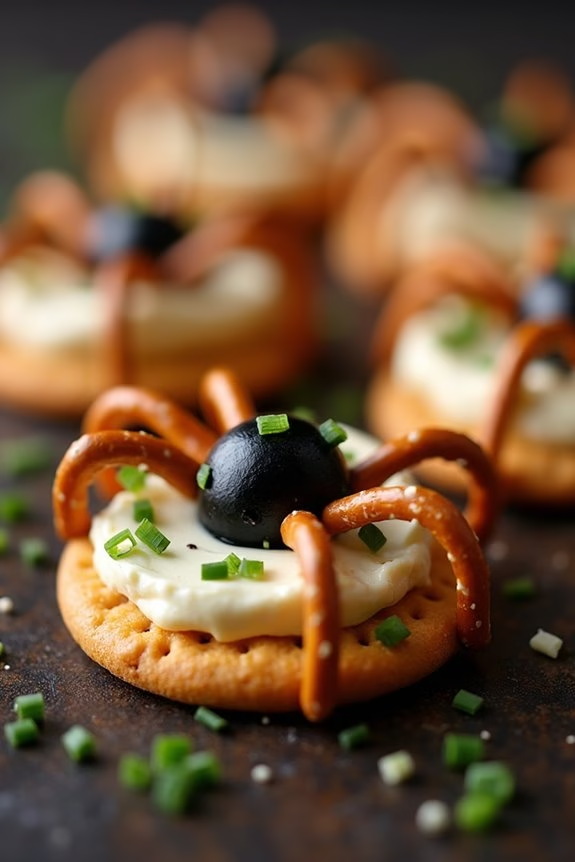
This recipe is designed to serve 4-6 people, making it ideal for a small gathering or as part of a larger Halloween spread. Each spider cracker is carefully crafted to resemble a spooky spider with edible parts that will intrigue and delight your guests.
The best part about this recipe is its flexibility – you can easily adjust the ingredients based on your preferences or what you have on hand. Now, let’s plunge into creating these spooky snacks!
Ingredients:
- 24 round crackers
- 1 cup cream cheese, softened
- 12 black olives
- 48 thin pretzel sticks
- 1 tablespoon chopped chives
- Red or black food coloring gel (optional)
Instructions:
1. Prepare the Cream Cheese Spread:
Start by placing the softened cream cheese in a bowl. If desired, mix in a small amount of red or black food coloring gel until the cheese takes on a spooky tint. This step is optional but adds an extra eerie detail to your spider crackers.
2. Create the Spider Bodies:
Spread a generous layer of the cream cheese mixture onto each of the 24 round crackers. This will form the body of the spiders. Be sure to smooth it out evenly so the crackers are fully covered.
3. Assemble the Spider Legs:
Break the pretzel sticks in half, creating 48 pieces. Insert four pretzel halves into each side of the cream cheese-covered crackers to represent the spider’s legs. Press gently to confirm they adhere to the cheese.
4. Add the Spiderheads:
Slice the black olives in half. Place one half on top of the cream cheese-covered crackers near the edge to serve as the spider’s head. The rounded side should be facing upwards.
5. Finishing Touches:
For an added touch, sprinkle a few chopped chives over the cream cheese to give the spiders a textured appearance. This step enhances the visual appeal and adds a mild onion flavor to the snack.
Extra Tips:
When making Spooky Spider Crackers, it’s important to choose sturdy crackers that can hold the weight of the cream cheese and olives without breaking.
If you’re preparing these in advance, store them in the refrigerator to keep the cream cheese firm. For a different flavor, try using flavored cream cheese or adding herbs and spices to the mixture.
Feel free to experiment with different toppings or use different colored olives to create a variety of spider designs. Most importantly, have fun with the process and let your creativity shine through!
Bloody Finger Hot Dogs

Bloody Finger Hot Dogs are a spooky and fun addition to any Halloween party spread. With their gruesome appearance and savory taste, they’re sure to be a hit with both kids and adults alike. This dish combines classic hot dogs with a few creative touches to transform them into creepy, finger-like snacks that are as delicious as they’re eerie.
Made with simple ingredients, Bloody Finger Hot Dogs are easy to prepare and can be served as a quirky appetizer or a main dish for your Halloween feast. The secret to the realistic look of these hot dogs lies in the strategic use of condiments and a few clever cuts on the hot dogs themselves to mimic the appearance of fingers.
Topped off with a generous amount of ketchup to resemble blood, these hot dogs are sure to make a chilling impression. They’re perfect for serving at a Halloween gathering or a themed dinner, bringing the frightful fun of the holiday straight to your table.
Ingredients for 4-6 servings:
- 8 hot dogs
- 8 hot dog buns
- Ketchup
- Mustard (optional)
- 8 Slices of cheese (optional)
- 1 Onion (optional, for extra detail)
- Butter (for toasting buns)
Cooking Instructions:
- Preheat the Grill or Stovetop: Begin by preheating your grill or stovetop pan over medium heat. This guarantees that the hot dogs cook evenly and develop a nice, slightly crispy exterior.
- Prepare the Hot Dogs: Use a sharp knife to make small, shallow cuts across each hot dog to mimic the appearance of knuckles on a finger. Make one or two deeper cuts at one end of the hot dog to create the appearance of a fingernail bed.
- Cook the Hot Dogs: Place the prepared hot dogs on the grill or stovetop pan. Cook them for about 5-7 minutes, turning occasionally, until they’re heated through and have grill marks or a slightly browned exterior.
- Prepare the Buns: While the hot dogs are cooking, lightly butter the inside of each hot dog bun. Toast the buns on the grill or in a separate pan until they’re golden brown and slightly crispy.
- Assemble the Bloody Finger Hot Dogs: Once the hot dogs are cooked, place each one into a toasted bun. Drizzle ketchup generously over the end of the hot dog with the cuts to simulate blood oozing from a severed finger.
- Add Optional Details: If desired, use a small piece of onion to create a fake fingernail at the end of each hot dog. Optionally, you can also add slices of cheese or a squirt of mustard for added flavor.
Extra Tips:
To make the Bloody Finger Hot Dogs even more gruesome, consider using red-tinted hot dog buns or adding a few drops of red food coloring to the ketchup for an extra vibrant bloody effect.
If you want to create a more detailed look, carve out small sections of the hot dogs to enhance the finger-like appearance, and use a toothpick to etch in more realistic skin lines. Preparing all the garnishes and condiments in advance will streamline the assembly process, confirming your finger foods are ready to serve as soon as the hot dogs are cooked.
Jack-O’-Lantern Stuffed Peppers
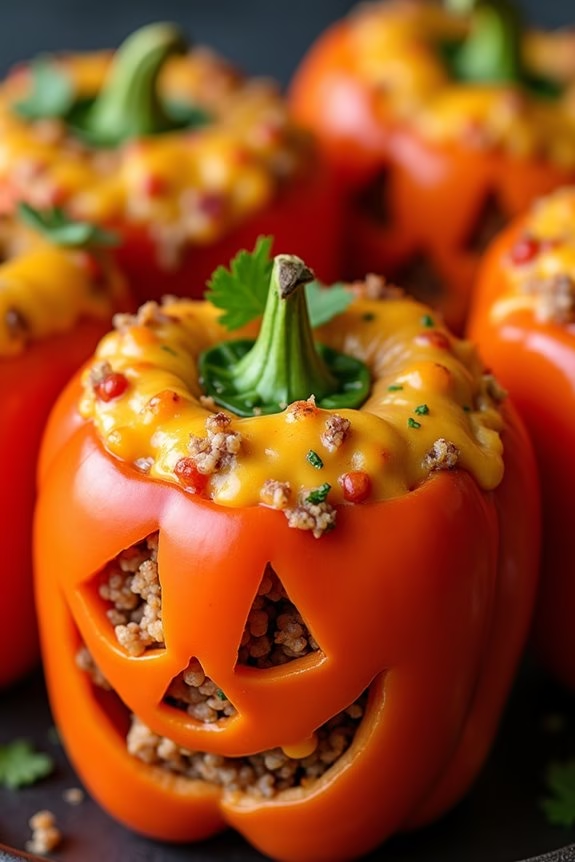
Get ready to spook your guests with these delightfully eerie Jack-O’-Lantern Stuffed Peppers! Perfect for a Halloween gathering, these stuffed peppers are as fun to make as they’re to eat. With a carved jack-o’-lantern face, these peppers not only serve as a delicious meal but also as a centerpiece for your Halloween feast. Filled with a savory mixture of seasoned rice, ground meat, and vegetables, these stuffed peppers are a nutritious and festive dish that will impress both kids and adults alike.
The beauty of Jack-O’-Lantern Stuffed Peppers lies in their versatility. You can customize the filling to suit your taste, whether you prefer beef, turkey, or a vegetarian option. The carved faces add a fun twist, making them look like mini pumpkins. They’re also an excellent way to get creative in the kitchen with little ones. This recipe will yield enough for 4-6 people, making it ideal for a small party or family dinner.
Ingredients (serves 4-6):
- 6 large orange bell peppers
- 1 tablespoon olive oil
- 1 medium onion, diced
- 2 cloves garlic, minced
- 1 pound ground beef or turkey
- 1 teaspoon salt
- 1/2 teaspoon black pepper
- 1 teaspoon smoked paprika
- 1 teaspoon cumin
- 1 1/2 cups cooked rice
- 1 can (14.5 oz) diced tomatoes, drained
- 1 cup shredded cheddar cheese
- 1/4 cup chopped fresh parsley
Instructions:
- Prepare the Peppers:
- Preheat your oven to 375°F (190°C). Wash the peppers and slice off the tops, removing the seeds and membranes. Carefully carve jack-o’-lantern faces into each pepper using a small sharp knife.
- Cook the Filling:
- In a large skillet, heat olive oil over medium heat. Add the diced onion and minced garlic, sautéing until the onion is translucent, about 3-4 minutes.
- Brown the Meat:
- Add the ground beef or turkey to the skillet. Cook until browned, breaking it apart with a spoon, about 7-10 minutes. Drain any excess fat.
- Season the Mixture:
- Stir in salt, black pepper, smoked paprika, and cumin. Mix well to combine the flavors.
- Combine Ingredients:
- Add the cooked rice, drained diced tomatoes, and half of the shredded cheese to the meat mixture. Stir until everything is well combined and heated through.
- Stuff the Peppers:
- Place the prepared peppers in a lightly greased baking dish. Spoon the filling into each pepper, packing it tightly. Sprinkle the remaining cheese over the top of each stuffed pepper.
- Bake the Peppers:
- Cover the dish with aluminum foil and bake in the preheated oven for 25 minutes. Remove the foil and bake for an additional 10-15 minutes, until the cheese is melted and bubbling.
- Garnish and Serve:
- Remove the peppers from the oven and let them cool slightly. Garnish with fresh parsley before serving.
Extra Tips:
To guarantee that the peppers remain upright during baking, consider using a muffin tin or a baking dish that fits the peppers snugly. If you prefer a vegetarian version, substitute the meat with black beans or lentils. For an extra festive touch, use a variety of colored bell peppers to create a colorful spread.
Finally, be sure to cut the jack-o’-lantern faces carefully; a small paring knife or a pumpkin carving tool can make this task easier and safer. Enjoy your spooky and delicious creation!
Creepy Crawly Veggie Platter
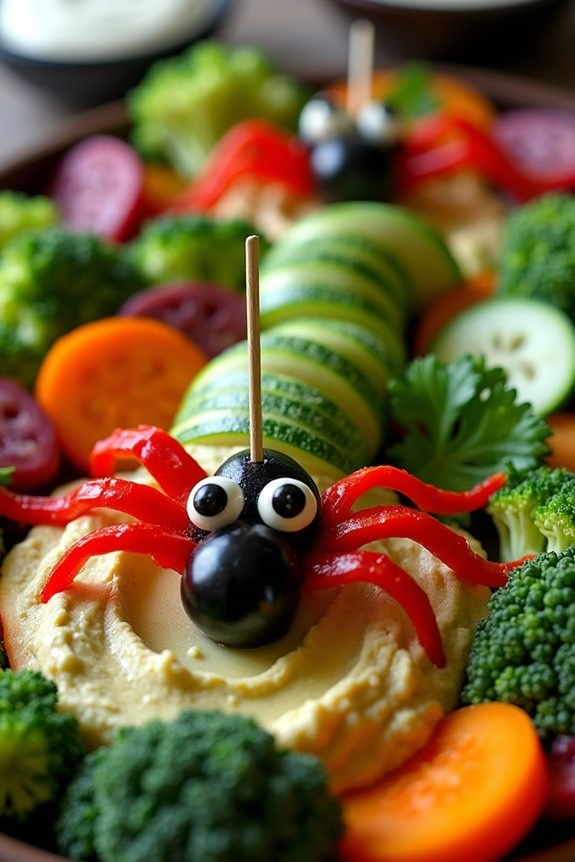
Halloween is the perfect time to have a little fun with your culinary creations, and a Creepy Crawly Veggie Platter will delight guests of all ages. This spooky-themed dish isn’t only healthy but also incredibly easy to put together. Using a variety of colorful veggies, you can assemble a platter that resembles a haunting scene filled with creepy crawlies. Ideal for parties, this platter is sure to be a hit with its festive appearance and fresh flavors.
The Creepy Crawly Veggie Platter is designed to serve 4-6 people, making it great for a small gathering or an addition to a larger spread. The key to this dish is creativity, as you use different vegetables to form creepy creatures like spiders, snakes, and bugs. With the right combination of fresh produce, simple dips, and some clever assembly, you can create a memorable Halloween snack that’s as delicious as it’s eye-catching.
Ingredients for 4-6 servings:
- 1 cucumber
- 1 red bell pepper
- 1 yellow bell pepper
- 1 zucchini
- 1 carrot
- 1 cup cherry tomatoes
- 1 cup broccoli florets
- 1/2 cup black olives
- 1/2 cup hummus
- 1/2 cup ranch dressing
- 1 small bunch of parsley
- Toothpicks
Instructions:
- Prepare the Vegetables: Wash all the vegetables thoroughly. Peel the cucumber and carrot, then slice them into thin rounds. Cut the bell peppers into strips, making sure they’re similar in size. Slice the zucchini into thin rounds as well.
- Arrange the Base: On a large platter, start by placing the hummus and ranch dressing in small bowls on opposite sides. These will serve as the “webs” for your creepy crawlies.
- Create Creepy Creatures: Use the cucumber and zucchini slices to form the bodies of snakes. Lay them in a wavy pattern across the platter. Use the cherry tomatoes and olives to create eyes for the snakes, securing them with toothpicks.
- Add the Bugs: For spiders, use the black olives as the body. Cut small strips of bell pepper to create legs and arrange them around the olive. Use parsley leaves to add texture and a bit of green to your creepy crawly creatures.
- Fill in with Vegetables: Arrange the broccoli florets, carrot rounds, and remaining bell pepper strips around the platter to fill in the gaps. This will create a lush, garden-like appearance.
- Final Touches: Use any remaining parsley to garnish the platter, adding a touch of green and enhancing the spooky theme.
Extra Tips:
To make your Creepy Crawly Veggie Platter even more fun, consider using cookie cutters to shape some of the vegetables into Halloween-themed figures like pumpkins or bats. You can also add a few drops of food coloring to the hummus or ranch dressing for a more eerie effect, such as green or purple.
Keep the platter refrigerated until serving to guarantee the vegetables remain crisp and fresh. Finally, don’t be afraid to get creative with the arrangement; the more imaginative you are, the spookier and more fun the platter will become!
Gory Guacamole Dip
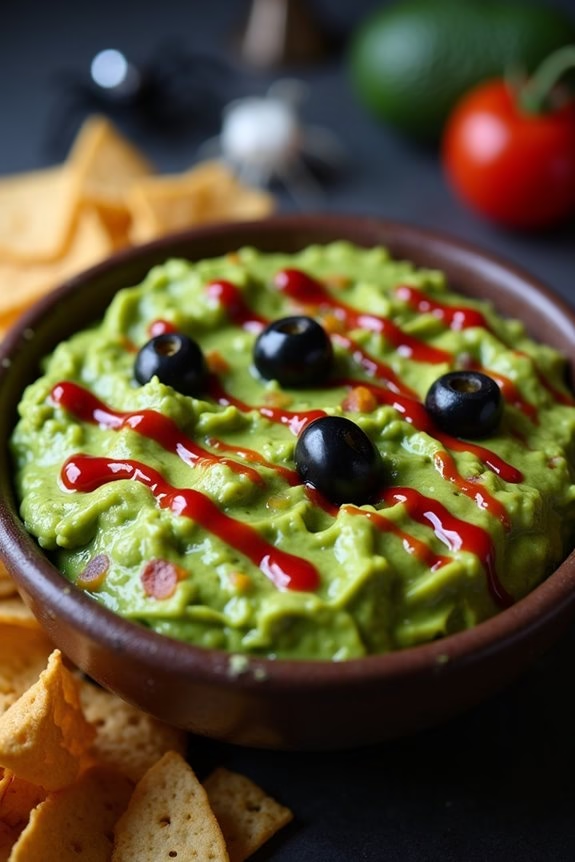
Gory Guacamole Dip is the perfect Halloween treat to add a touch of the macabre to your party spread. This ghastly yet delicious dip combines the classic flavors of guacamole with a spooky presentation, making it an ideal finger food that will leave your guests both creeped out and craving more.
The vibrant green of the avocado paired with red accents creates an eerie effect reminiscent of dripping slime or blood, adding to the Halloween ambiance. Not only does this Gory Guacamole Dip look the part, but it’s also packed with flavor, boasting creamy avocados mixed with zesty lime, fresh cilantro, and a hint of spice.
The dip is quick to make and can be prepared in advance, making it a convenient option for entertaining. Serve it with tortilla chips or vegetable sticks for a healthier option, and watch as your Halloween gathering gets off to a frightfully fun start.
Ingredients for 4-6 servings:
- 4 ripe avocados
- 2 medium tomatoes
- 1 small red onion
- 2 cloves garlic
- 1 lime
- 1/2 cup fresh cilantro leaves
- 1 jalapeño pepper
- Salt to taste
- Black olives (for decoration)
- Hot sauce (optional for extra gore effect)
Cooking Instructions:
- Prepare the Ingredients: Begin by washing all fresh produce. Dice the tomatoes, finely chop the red onion, mince the garlic cloves, and roughly chop the cilantro leaves. If you prefer a spicier dip, finely chop the jalapeño pepper as well.
- Mash the Avocados: Cut the avocados in half, remove the pits, and scoop the flesh into a large mixing bowl. Use a fork or potato masher to mash the avocados to your desired consistency. For a chunkier texture, mash less; for a creamier texture, mash more thoroughly.
- Mix the Guacamole: Add the diced tomatoes, chopped onion, minced garlic, and cilantro to the mashed avocados. Squeeze the juice of one lime over the mixture to add flavor and prevent browning. Mix everything together until well combined.
- Season the Dip: Add salt to taste and, if using, the chopped jalapeño. Stir the mixture thoroughly to guarantee even distribution of the seasonings. Adjust the seasoning as needed, adding more lime juice or salt according to your preference.
- Decorate for a Gory Effect: Transfer the guacamole to a serving bowl. Slice black olives into thin rounds and arrange them on top of the guacamole to resemble creepy eyes or other spooky decorations. Drizzle hot sauce over the top of the dip to simulate blood or add an extra kick of spiciness.
Extra Tips:
To keep your Gory Guacamole Dip looking fresh and vibrant, cover it with plastic wrap pressed directly against the surface to minimize exposure to air, which can cause browning. If you’re making it ahead of time, store the dip in the refrigerator and add the decorative touches just before serving.
For an added Halloween effect, serve the dip in a themed bowl or platter, or use props like fake spiders or skeleton hands to enhance the spooky presentation.
Frankenstein Rice Krispie Treats

Frankenstein Rice Krispie Treats are the perfect Halloween finger food that combines spookiness with a touch of sweetness. These treats aren’t only fun to make, but they also bring an amusing twist to the classic Rice Krispie treats we all know and love. By adding a bit of creativity and a splash of green food coloring, you can transform ordinary treats into Frankenstein’s monster-inspired delights that are sure to be a hit at any Halloween gathering.
These delightful treats are easy to prepare and require just a few ingredients. They can be made in advance, allowing you to focus on other party preparations. With a serving size of 4-6 people, this recipe guarantees that your guests will have plenty to enjoy. These Frankenstein Rice Krispie Treats are a fantastic way to add a festive flair to your Halloween spread, making them an essential addition to your spooky feast.
Ingredients (for 4-6 servings):
- 6 cups Rice Krispies cereal
- 4 cups mini marshmallows
- 3 tablespoons unsalted butter
- Green food coloring
- 1 cup chocolate chips
- 12 large marshmallows (for eyes)
- Black icing or gel (for facial features)
Instructions:
- Prepare the Pan: Start by lightly greasing a 9×13-inch baking dish with non-stick spray or butter. Set aside for later use.
- Melt the Butter: In a large saucepan, melt the 3 tablespoons of unsalted butter over low heat. Stir continuously to prevent it from burning.
- Melt the Marshmallows: Once the butter has completely melted, add the 4 cups of mini marshmallows to the pan. Stir constantly until the marshmallows are fully melted and the mixture is smooth.
- Add Food Coloring: After achieving a smooth consistency, remove the pan from the heat. Add several drops of green food coloring to the melted marshmallow mixture, stirring until the color is evenly distributed and you achieve the desired hue for your Frankenstein treats.
- Combine with Cereal: Gradually add the 6 cups of Rice Krispies cereal to the marshmallow mixture. Use a spatula to gently fold the cereal into the mixture until it’s fully coated.
- Transfer to Pan: Pour the mixture into the prepared baking dish. Use the spatula or your hands (lightly greased to prevent sticking) to press the mixture evenly into the pan.
- Create the Faces: Once the mixture has cooled slightly, cut it into rectangles to form the Frankenstein heads. Melt the 1 cup of chocolate chips in the microwave or using a double boiler, then dip the top of each rectangle into the melted chocolate to create the “hair.”
- Add Eyes and Features: Use a dab of melted chocolate to adhere two large marshmallow “eyes” on each treat. Finally, use black icing or gel to draw the pupils on the marshmallows and additional facial features like scars and stitches.
Extra Tips: To guarantee your Frankenstein Rice Krispie Treats are a spooktacular success, make sure to use fresh marshmallows for the best texture. If you find the mixture sticking to your hands while shaping the treats, lightly grease them with butter or oil.
Additionally, feel free to personalize the faces with different expressions or use candy decorations for added detail. These treats can be stored in an airtight container for up to three days, making them a great make-ahead option for your Halloween festivities.
Vampire Bat Wings
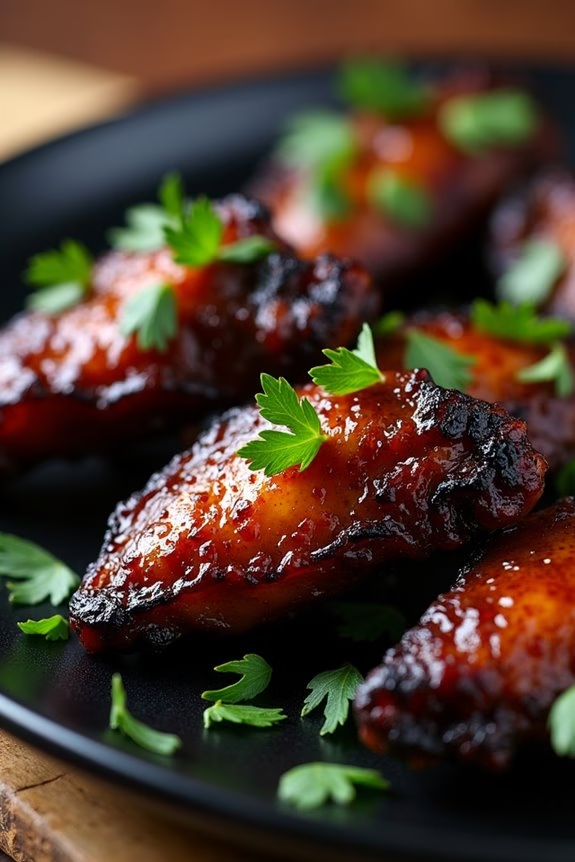
Vampire Bat Wings are a spooky and delicious treat perfect for any Halloween party. These wings aren’t only visually striking with their dark, eerie appearance, but they also pack a flavorful punch that will leave your guests craving more. The combination of sweet, spicy, and tangy flavors will make these wings the star of your Halloween finger foods lineup.
Whether you’re hosting a haunted house party or just enjoying a festive night in, these Vampire Bat Wings are certain to set the mood and tantalize taste buds.
The secret to these wings lies in the marinade, which infuses the chicken with bold flavors and gives them their signature dark color. The marinade combines soy sauce, balsamic vinegar, and a touch of dark food coloring to create wings that look both appetizing and a little bit scary. After marinating, the wings are baked to perfection, resulting in crispy skin and juicy meat.
Serve them up with a side of your favorite dipping sauce, and your guests will be delighted by these ghoulishly good bites.
Ingredients for 4-6 servings:
- 3 pounds chicken wings
- 1/2 cup soy sauce
- 1/4 cup balsamic vinegar
- 1 tablespoon honey
- 1 tablespoon olive oil
- 1 teaspoon garlic powder
- 1 teaspoon onion powder
- 1 teaspoon smoked paprika
- 1/2 teaspoon black pepper
- 1/2 teaspoon cayenne pepper (optional for extra heat)
- A few drops of black food coloring
- Fresh parsley for garnish (optional)
Cooking Instructions:
- Prepare the Marinade: In a large mixing bowl, combine the soy sauce, balsamic vinegar, honey, olive oil, garlic powder, onion powder, smoked paprika, black pepper, and cayenne pepper. Stir well until all ingredients are mixed thoroughly.
- Add Food Coloring: Add a few drops of black food coloring to the marinade and mix until the color is evenly distributed. This will give the wings their dark, “vampire bat” appearance.
- Marinate the Wings: Place the chicken wings into a large zip-top bag or a shallow dish. Pour the marinade over the wings, assuring they’re fully coated. Seal the bag or cover the dish, and refrigerate for at least 2 hours, or overnight for best results.
- Preheat the Oven: Preheat your oven to 400°F (200°C). Line a baking sheet with aluminum foil and place a wire rack on top. This will allow the wings to cook evenly and become crispy.
- Bake the Wings: Remove the wings from the marinade and arrange them in a single layer on the wire rack. Discard any leftover marinade. Bake in the preheated oven for 35-40 minutes, turning once halfway through, until the wings are cooked through and the skin is crispy.
- Garnish and Serve: Once done, remove the wings from the oven and let them cool slightly. Garnish with fresh parsley if desired, and serve with your choice of dipping sauce.
Extra Tips:
For best results, allow the wings to marinate overnight to let the flavors fully penetrate the meat. If you prefer spicier wings, increase the amount of cayenne pepper in the marinade.
When baking, using a wire rack helps the wings cook evenly and develop a crispy texture. Be sure to turn the wings halfway through baking to assure even cooking on all sides.
These wings are best served fresh from the oven, but they can also be reheated in a hot oven for a few minutes to regain their crispiness.
Pumpkin Cheese Ball
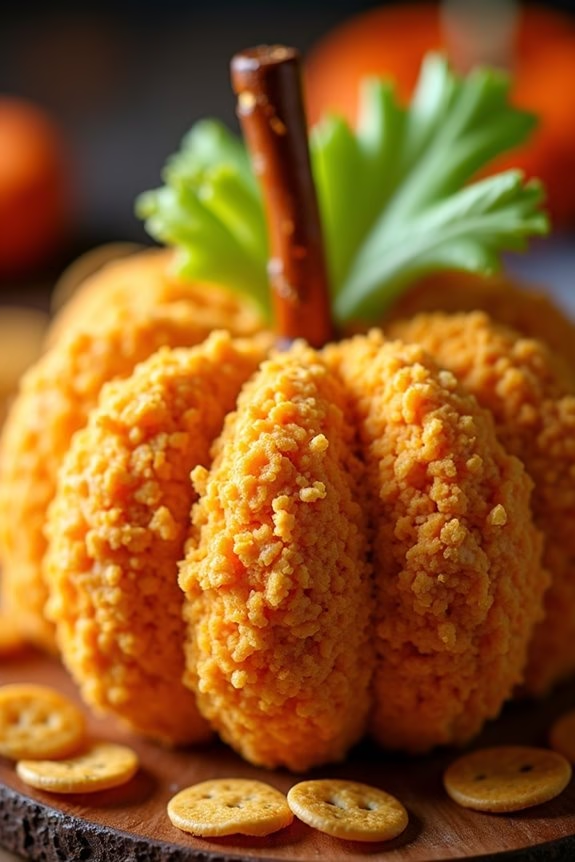
The Pumpkin Cheese Ball is a delightful Halloween finger food that combines the creamy and savory flavors of cheese with the festive appearance of a miniature pumpkin. Perfect for parties, this dish serves as both a conversation starter and a delicious appetizer. The outer layer of the cheese ball is crafted to mimic a pumpkin’s texture, while the inner layers offer a rich blend of cheeses and spices. Ideal for a crowd, this dish is sure to please both children and adults with its appeal and taste.
Creating this whimsical cheese ball involves a blend of various cheeses, which are molded into a pumpkin shape, and a few simple garnishes to complete the look. It’s a straightforward recipe that doesn’t require any cooking, making it an excellent choice for those who want to prepare something impressive without the hassle. This recipe serves 4-6 people, making it perfect for a small gathering or as part of a larger spread of Halloween treats.
Ingredients:
- 8 oz cream cheese, softened
- 2 cups shredded sharp cheddar cheese
- 1/4 cup grated Parmesan cheese
- 1/2 teaspoon garlic powder
- 1/2 teaspoon paprika
- 1/4 teaspoon ground black pepper
- 1/4 teaspoon cayenne pepper (optional, for heat)
- 1/4 cup finely chopped green onions
- 1/2 cup crushed nacho-flavored tortilla chips
- 1 small pretzel rod
- 1 piece of celery stalk with leaves (for pumpkin stem and leaves)
Instructions:
- Prepare the Cheese Mixture: In a large mixing bowl, combine the softened cream cheese, shredded cheddar cheese, and grated Parmesan cheese. Mix thoroughly until the cheeses are well combined and smooth.
- Add Flavor: Stir in the garlic powder, paprika, black pepper, cayenne pepper (if using), and chopped green onions. Mix until all ingredients are evenly distributed throughout the cheese mixture.
- Shape the Cheese Ball: Using your hands, form the cheese mixture into a ball. Place it on a piece of plastic wrap and continue to shape it into a rough pumpkin form by gently pressing and molding it.
- Create Pumpkin Ridges: Once you have a rough pumpkin shape, wrap the ball tightly with the plastic wrap. Use rubber bands to create indentations around the ball to mimic a pumpkin’s ridges. Refrigerate for at least 2 hours, or until the cheese ball is firm.
- Add the Coating: Once the cheese ball is firm, remove it from the refrigerator and discard the plastic wrap. Roll the cheese ball in the crushed tortilla chips until it’s completely coated.
- Finish the Decoration: Insert the pretzel rod into the top of the cheese ball to serve as the pumpkin stem. Add a piece of celery with leaves next to the pretzel to mimic pumpkin leaves.
- Serve: Place the Pumpkin Cheese Ball on a platter and serve with crackers, breadsticks, or fresh vegetables for dipping.
Extra Tips:
For an even more festive presentation, consider placing the cheese ball on a bed of kale or decorative autumn leaves. If you prefer a different flavor profile, you can substitute the cheddar and Parmesan with other cheeses such as gouda or blue cheese.
Make sure to refrigerate the cheese ball for at least 2 hours before serving to guarantee it holds its shape. If you’re preparing this dish in advance, it can be stored in the refrigerator for up to 48 hours before serving.
Skeleton Bone Breadsticks

Skeleton Bone Breadsticks are a spooky and delicious addition to any Halloween party. These breadsticks not only look festive but are also a crowd-pleaser with their soft and chewy texture. Shaped like bones, they add a touch of eerie fun to your table. Perfect for dipping into marinara sauce or serving alongside a creepy-themed dinner, these breadsticks will be a hit with both kids and adults alike.
The beauty of this recipe is in its simplicity, making it an excellent choice for those who want to impress without spending hours in the kitchen. With just a few basic ingredients and a little creativity, you can transform ordinary breadsticks into a Halloween masterpiece. Whether you’re hosting a party or enjoying a quiet night in with the family, these Skeleton Bone Breadsticks are sure to become a new Halloween tradition.
Ingredients for 4-6 servings:
- 1 package of pizza dough (store-bought or homemade)
- 2 tablespoons of olive oil
- 1/2 teaspoon of garlic powder
- 1/2 teaspoon of salt
- 1/4 cup of grated Parmesan cheese
- Marinara sauce for dipping (optional)
Cooking Instructions:
- Preheat the Oven: Start by preheating your oven to 375°F (190°C). Line a baking sheet with parchment paper to prevent sticking.
- Prepare the Dough: Roll out the pizza dough on a lightly floured surface until it’s about 1/4 inch thick. Cut the dough into strips about 6 inches long and 1 inch wide.
- Shape the Breadsticks: To create the bone shape, tie a knot at each end of the strip and then fold the ends over the knot to resemble a bone. Place each shaped breadstick on the prepared baking sheet.
- Season the Breadsticks: Once all your breadsticks are shaped, brush them with olive oil. Sprinkle garlic powder, salt, and Parmesan cheese evenly over the top of the breadsticks for added flavor.
- Bake the Breadsticks: Place the baking sheet in the preheated oven and bake for 12-15 minutes, or until the breadsticks are golden brown and cooked through.
- Serve: Remove breadsticks from the oven and allow them to cool slightly. Serve warm with marinara sauce on the side for dipping.
Extra Tips:
For a little extra flair, you can add some chopped fresh herbs like rosemary or basil to the top of the breadsticks before baking.
If you’re making these breadsticks in advance, you can prepare them up to the baking step and store them in the fridge. When ready to serve, just pop them in the oven.
For a crispier texture, consider baking them on a pizza stone if you have one. This recipe is highly adaptable, so feel free to experiment with different spices and cheeses to suit your taste preferences.
Goblin Grape Skewers
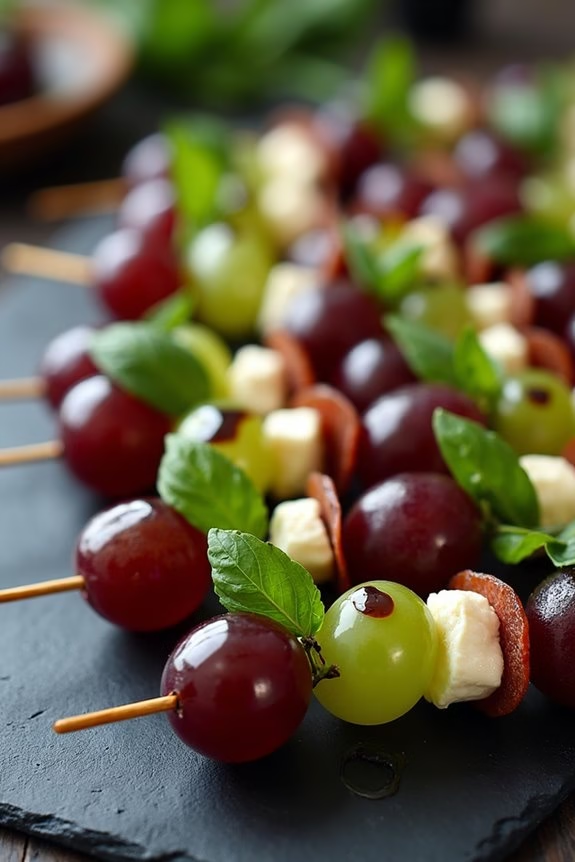
Bring a touch of spooky fun to your Halloween party with these Goblin Grape Skewers. Perfect as a finger food, these skewers are easy to make and delightful to eat. The combination of juicy grapes, creamy cheese, and savory elements makes for a treat that isn’t only visually appealing but also delicious. Guests of all ages will enjoy these skewers, making them a hit at any gathering.
These Goblin Grape Skewers are an ideal addition to your Halloween menu, balancing both sweet and savory flavors in every bite. The skewers can be prepared in advance, allowing you to focus on other party preparations. Plus, their simplicity means that even the littlest goblins can help with assembly, adding to the fun of your Halloween festivities.
Ingredients (Serving Size: 4-6 people):
- 2 cups green grapes
- 2 cups black grapes
- 8 ounces mozzarella cheese, cut into small cubes
- 12 slices of salami or pepperoni
- 6-8 bamboo skewers
- ½ cup fresh basil leaves
- 2 tablespoons balsamic glaze
Instructions:
- Prepare the Ingredients: Wash and dry the green and black grapes thoroughly. Ascertain there are no stems or leaves attached to the grapes.
- Cut the Cheese: Slice the mozzarella cheese into small cubes, roughly the same size as the grapes, to maintain uniformity in the skewers.
- Assemble the Skewers: Take a bamboo skewer and start threading it with a green grape, followed by a cheese cube, a slice of salami or pepperoni folded in half, a basil leaf, and a black grape. Continue this pattern until the skewer is filled, leaving a bit of space at the bottom for handling.
- Repeat the Process: Assemble the remaining skewers by repeating the threading pattern until all ingredients are used.
- Add a Finishing Touch: Once all skewers are assembled, drizzle a small amount of balsamic glaze over the top of each skewer for added flavor and presentation.
- Serve and Enjoy: Arrange the Goblin Grape Skewers on a serving platter and serve immediately or refrigerate until ready to serve.
Extra Tips:
To make these Goblin Grape Skewers even more festive, consider using Halloween-themed skewers or adding small edible decorations such as candy eyes for a spooky touch.
If you want to add a bit of crunch, consider incorporating some toasted nuts or seeds between the layers. For a vegetarian option, you can omit the salami or pepperoni and substitute with sun-dried tomatoes or olives.
Make certain to serve these skewers chilled to keep the cheese fresh and the grapes crisp.
Haunted Candy Corn Popcorn Mix

Looking for a spooktacular treat to serve at your Halloween party? This Haunted Candy Corn Popcorn Mix is the perfect finger food that combines sweet, salty, and spooky in every bite. With its vibrant colors and mix of textures, it’s sure to be a hit with both kids and adults. The delightful blend of popcorn, candy corn, and other goodies makes it a fun and festive snack that captures the essence of Halloween.
This recipe is incredibly easy to make and requires minimal preparation. In just a few simple steps, you’ll have a delicious treat that’s perfect for munching on while watching scary movies or sharing with trick-or-treaters. The combination of flavors and textures in this mix will leave everyone reaching for more, ensuring your Halloween celebration is both tasty and memorable.
Ingredients (Serves 4-6 people):
- 8 cups popped popcorn
- 1 cup candy corn
- 1 cup pretzel sticks
- 1 cup mini marshmallows
- 1 cup Halloween-themed chocolate candies (e.g., M&M’s)
- 1/2 cup white chocolate chips
- 1/4 cup unsalted butter
- 1/4 teaspoon salt
Cooking Instructions:
- Prepare the Popcorn: Start by popping your popcorn. You can use either microwave popcorn or pop it on the stove, making sure you have about 8 cups of popped popcorn. Once popped, place the popcorn in a large mixing bowl and set aside.
- Melt the Chocolate: In a microwave-safe bowl, combine the white chocolate chips and unsalted butter. Microwave in 20-second intervals, stirring between each interval, until the mixture is smooth and fully melted. Be careful not to overheat the chocolate, as it can burn easily.
- Mix the Ingredients: Pour the melted chocolate mixture over the popcorn in the large mixing bowl. Use a large spoon or spatula to gently stir and coat the popcorn evenly with the chocolate mixture. Add the salt and continue to stir until the popcorn is well coated.
- Add the Mix-ins: Once the popcorn is coated, add the candy corn, pretzel sticks, mini marshmallows, and Halloween-themed chocolate candies to the bowl. Gently toss all the ingredients together until they’re evenly distributed throughout the mix.
- Let it Set: Spread the popcorn mix onto a baking sheet lined with parchment paper. Allow it to sit at room temperature for about 15-20 minutes, or until the chocolate has set and the mix is no longer sticky to the touch.
- Serve and Enjoy: Once the mix has set, transfer it to a serving bowl or divide it into individual treat bags for your guests. Enjoy your Haunted Candy Corn Popcorn Mix as a festive Halloween snack!
Extra Tips: To add an extra spooky touch, consider adding some Halloween-themed sprinkles or edible glitter to the mix before the chocolate sets. This will give it an extra festive flair that will delight your guests.
Additionally, you can substitute or add other favorite candies, nuts, or dried fruits to customize the mix to your liking. If you’re planning to make this ahead of time, store it in an airtight container to keep it fresh and crunchy until you’re ready to serve.