
Hosting a Halloween party and want to wow your guests? A platter of creatively decorated cookies is just the thing. Think spiderwebs drizzled with chocolate, charming ghostly meringues, and bewitching black cat designs. These cookies not only taste amazing but also serve as delightful visual treats. Ready to explore the enchanting world of Halloween cookies?
Spooky Spiderweb Cookies
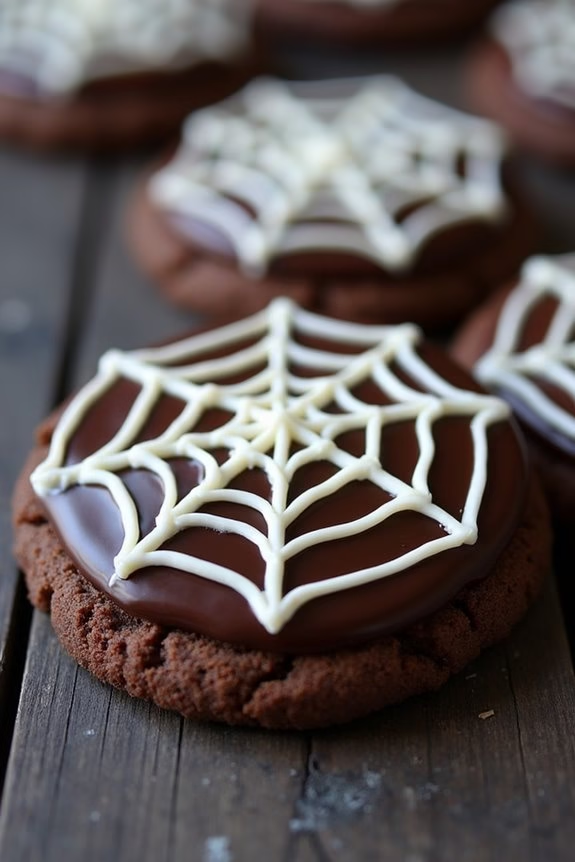
Decorated Halloween Cookies are a delightful treat that adds a festive touch to any Halloween celebration. Among the variety of spooky designs, Spooky Spiderweb Cookies stand out for their intricate patterns and delicious taste. These cookies aren’t only fun to make but also eye-catching and perfect for a Halloween party. The combination of rich chocolate and sweet icing creates a delectable flavor that’s sure to impress both kids and adults alike.
Spooky Spiderweb Cookies are crafted using a classic sugar cookie base, which is then decorated with a chocolate ganache and white icing to create the iconic spiderweb design. The recipe is simple enough for beginner bakers yet offers enough creativity for more experienced ones to enjoy. Whether you’re making these cookies for a Halloween bash or simply as a fun baking activity with family, they’re bound to be a hit.
Ingredients (Serving Size: 4-6 people):
- 2 1/2 cups all-purpose flour
- 1 teaspoon baking powder
- 1/2 teaspoon salt
- 1 cup unsalted butter, softened
- 1 cup granulated sugar
- 1 large egg
- 1 teaspoon vanilla extract
- 1/2 cup heavy cream
- 1 cup semi-sweet chocolate chips
- 1/2 cup powdered sugar
- 2 tablespoons milk
Cooking Instructions:
- Prepare the Dough: In a medium bowl, whisk together the flour, baking powder, and salt. In a separate large bowl, beat the butter and sugar together until light and fluffy. Add the egg and vanilla extract to the butter mixture, and mix until well combined. Gradually add the dry ingredients to the wet ingredients, mixing until a smooth dough forms.
- Chill the Dough: Divide the dough into two equal portions, flatten each into a disk, and wrap them in plastic wrap. Chill in the refrigerator for at least 1 hour to firm up.
- Roll and Cut Cookies: Preheat the oven to 350°F (175°C). Roll out the dough on a lightly floured surface to about 1/4-inch thickness. Use a round cookie cutter to cut out circles and place them on a baking sheet lined with parchment paper.
- Bake the Cookies: Bake the cookies in the preheated oven for 10-12 minutes, or until the edges are lightly golden. Allow them to cool on the baking sheet for a few minutes before transferring to a wire rack to cool completely.
- Make the Ganache: In a small saucepan, heat the heavy cream over medium heat until it begins to simmer. Remove from heat and add the chocolate chips, stirring until smooth and glossy.
- Decorate the Cookies: Spread a layer of chocolate ganache over each cooled cookie. In a small bowl, mix the powdered sugar with milk to create a smooth, pipeable icing. Transfer the icing to a piping bag with a small tip.
- Create the Spiderweb Design: Pipe a spiral of white icing over the chocolate ganache, starting from the center and working outward. Use a toothpick to drag lines from the center of the spiral to the edge of the cookie, creating a spiderweb effect. Allow the icing to set before serving.
Extra Tips: For the best results, make sure your butter is at room temperature before starting the recipe, as this will make it easier to cream with the sugar. If you find the dough is too sticky to work with, add a little more flour as needed. When decorating, be patient with the spiderweb design; practice makes perfect, and each cookie will have its own unique look. Finally, store any leftover cookies in an airtight container to keep them fresh.
Ghoulish Ghost Meringues
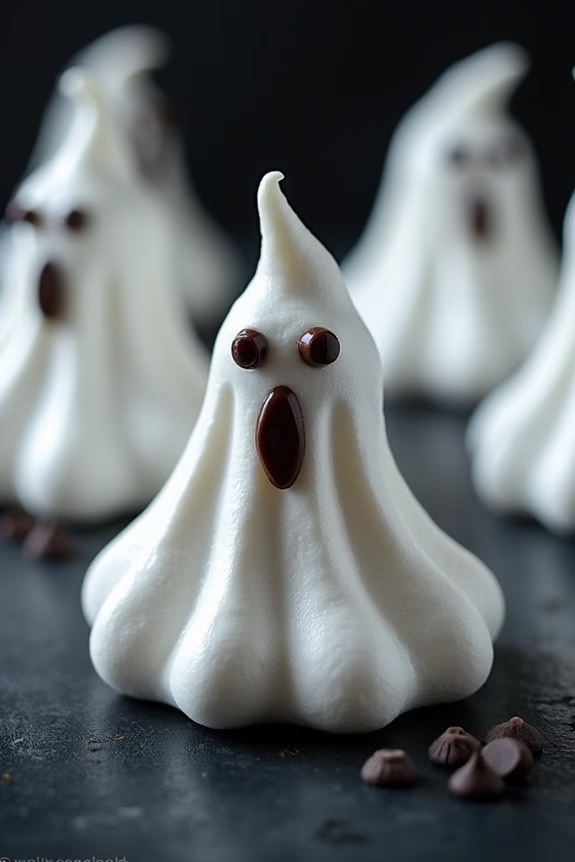
Ghoulish Ghost Meringues are a whimsical and spooky addition to your Halloween cookie platter. These light and airy meringue cookies, shaped like little ghosts, add a delightful touch of fun and eeriness to your Halloween festivities. Their crisp exterior and soft, marshmallow-like interior make them a delicious treat that not only tastes good but also looks the part of a Halloween haunt.
Crafting these ghostly figures isn’t only a culinary adventure but also an artistic outlet, perfect for getting into the Halloween spirit. Perfect for a serving size of 4-6 people, these Ghoulish Ghost Meringues are easy to make with a few simple ingredients. The primary goal is to achieve the right consistency for the meringue, allowing you to pipe out the perfect ghostly shapes. The addition of tiny chocolate chips as eyes adds personality and spookiness to each ghost.
Once baked to perfection, these meringues will become a talking point among your Halloween treats.
Ingredients:
- 4 large egg whites
- 1 cup granulated sugar
- 1/4 teaspoon cream of tartar
- 1/2 teaspoon vanilla extract
- Mini chocolate chips (for eyes)
Cooking Instructions:
- Preheat and Prepare: Preheat your oven to 200°F (93°C). Line two baking sheets with parchment paper to prevent the meringues from sticking.
- Beat Egg Whites: In a clean and dry mixing bowl, add the egg whites and cream of tartar. Using an electric mixer, beat the egg whites on medium-high speed until soft peaks form.
- Add Sugar Gradually: Gradually add the granulated sugar, one tablespoon at a time, while continuing to beat the egg whites. This guarantees that the sugar dissolves completely, which is essential for achieving a glossy and stiff meringue.
- Add Vanilla: Once all the sugar is incorporated and the meringue holds stiff peaks, gently fold in the vanilla extract. Be cautious not to deflate the meringue.
- Pipe Ghosts: Transfer the meringue into a piping bag fitted with a round tip. Pipe ghost shapes onto the prepared baking sheets, leaving some space between each ghost to guarantee even baking.
- Add Eyes: Gently press two mini chocolate chips into each ghost to create eyes.
- Bake: Place the baking sheets in the preheated oven and bake for about 1.5 to 2 hours, or until the meringues are firm and can easily be lifted off the parchment paper without sticking.
- Cool: Turn off the oven and let the meringues cool completely in the oven with the door slightly ajar. This helps prevent any cracking or collapsing.
Extra Tips:
For the best results, make certain that your mixing bowl and all utensils are completely clean and free of any grease, as even a small amount of fat can prevent the egg whites from whipping properly.
If you don’t have cream of tartar, you can substitute it with an equal amount of white vinegar or lemon juice, which also helps stabilize the meringue. Finally, be patient with the baking and cooling process; rushing can lead to less-than-perfect meringues.
Enjoy creating these ghostly delights and have a hauntingly fun Halloween!
Bewitching Black Cat Cookies

Creating Bewitching Black Cat Cookies is a delightful way to add a touch of magic to your Halloween festivities. These cookies aren’t only visually striking but also deliciously enchanting, making them the perfect treat for a spooky celebration. The rich, dark cocoa in the dough gives them a deep black color, while the sweet vanilla icing provides a contrasting detail that brings the feline features to life. Perfect for both kids and adults, these cookies are sure to be a hit at any Halloween gathering.
To begin your Bewitching Black Cat Cookies, you’ll craft a dough that balances between firm and tender, allowing for easy shaping and cutting. Once baked, the cookies will hold their shape, providing a perfect canvas for decorating. The decorating process is where the magic happens—using royal icing and some creative techniques, you can transform these cookies into charming cats that will captivate anyone who sees them. Follow this recipe to create a batch for 4-6 people and watch as your Halloween table becomes a bewitching display.
Ingredients (serving size: 4-6 people):
- 2 3/4 cups all-purpose flour
- 1/2 cup unsweetened cocoa powder
- 1 teaspoon baking powder
- 1/2 teaspoon salt
- 1 cup unsalted butter, softened
- 1 1/2 cups granulated sugar
- 2 large eggs
- 1 teaspoon pure vanilla extract
- Black gel food coloring
- 2 cups powdered sugar
- 2 tablespoons meringue powder
- 5-6 tablespoons warm water
- Edible black and white food coloring pens
Cooking Instructions:
- Prepare the Dough: In a medium bowl, whisk together the flour, cocoa powder, baking powder, and salt. Set aside. In a large bowl, cream the softened butter and sugar until light and fluffy, about 2-3 minutes. Beat in the eggs one at a time, followed by the vanilla extract. Gradually add the dry ingredients into the wet mixture until a dough forms. Add black gel food coloring and mix until the desired shade of black is achieved.
- Chill the Dough: Divide the dough into two portions, flatten into discs, wrap in plastic wrap, and refrigerate for at least 1 hour. This chilling process will make the dough easier to roll out and cut.
- Cut and Bake the Cookies: Preheat the oven to 350°F (175°C). On a lightly floured surface, roll out the dough to about 1/4 inch thickness. Use a cat-shaped cookie cutter to cut out the cookies and place them on a parchment-lined baking sheet. Bake for 10-12 minutes or until the edges are firm. Let the cookies cool on the baking sheet for a few minutes before transferring them to a wire rack to cool completely.
- Prepare the Royal Icing: In a large bowl, whisk together the powdered sugar, meringue powder, and 5 tablespoons of warm water. Beat the mixture until stiff peaks form, adding more water if necessary to achieve the desired consistency for piping. Divide the icing into two portions, leaving one white and coloring the other black with gel food coloring.
- Decorate the Cookies: Fill piping bags with the black and white royal icing. Use the black icing to outline and fill in the cat shapes on the cookies. Allow the base to dry slightly before adding details with the white icing, such as eyes and whiskers. Use edible food coloring pens to add finer details, like pupils and ears.
Extra Tips: To guarantee your cookies hold their shape, avoid overworking the dough, which can make the cookies tough. When rolling out the dough, keep it cool and work quickly. If the dough gets too warm, return it to the fridge to firm up.
For a smoother royal icing finish, gently tap the decorated cookies on the counter to release any air bubbles. Allow the decorated cookies to dry completely before stacking or packaging them, which may take several hours or overnight. Enjoy crafting these Bewitching Black Cat Cookies and delight in the festive spirit they bring!
Creepy Crawly Monster Fingers
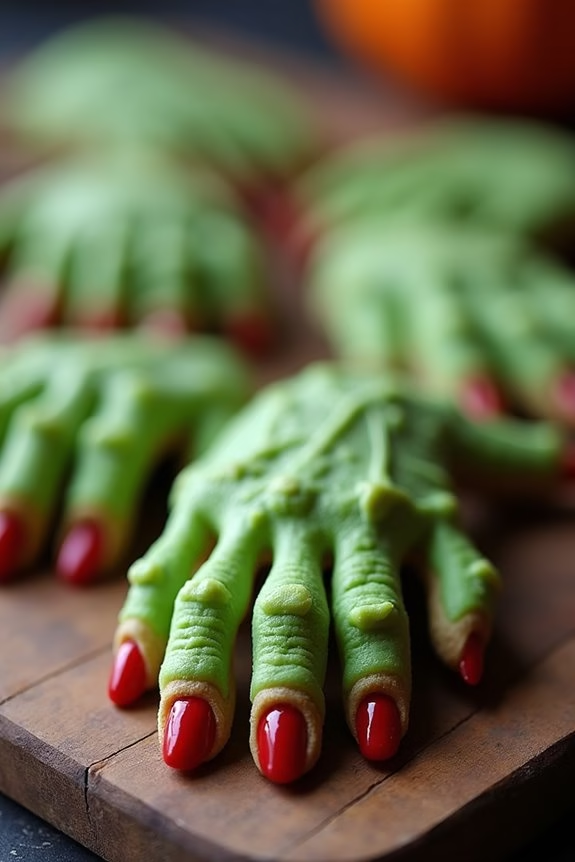
Decorated Halloween Cookies are a delightful treat that perfectly captures the spooky spirit of the season. Among the various themed cookies, Creepy Crawly Monster Fingers stand out as a unique and fun option to serve at your Halloween gathering.
These eerie cookies are shaped like gnarled fingers and decorated with almond nails and a hint of green food coloring, making them look both appetizing and spine-chilling. Despite their unsettling appearance, they’re deliciously buttery and sweet, making them a hit among kids and adults alike.
Creating Creepy Crawly Monster Fingers is as much about creativity as it’s about taste. The process involves making a simple sugar cookie dough, shaping it into long, slender fingers, and adding details to mimic a monster’s hand.
The recipe is straightforward, but the key lies in the details: adding almond slices for nails, using food coloring to achieve the perfect ghoulish tint, and creating knuckle lines for an authentic look. These cookies are sure to be the highlight of your Halloween dessert table.
Ingredients (serves 4-6 people):
- 1 cup (2 sticks) unsalted butter, softened
- 1 cup powdered sugar
- 1 egg
- 1 teaspoon vanilla extract
- 2 2/3 cups all-purpose flour
- 1 teaspoon baking powder
- 1/2 teaspoon salt
- Green food coloring
- 1/2 cup whole blanched almonds
- 1 tube of red decorating gel (optional)
Cooking Instructions:
- Preheat the Oven: Begin by preheating your oven to 325°F (165°C). This guarantees it’s at the right temperature when the cookies are ready to bake.
- Prepare the Dough: In a large mixing bowl, cream together the softened butter and powdered sugar until light and fluffy. Add the egg and vanilla extract, mixing thoroughly.
- Mix the Dry Ingredients: In a separate bowl, whisk together the flour, baking powder, and salt. Gradually add these dry ingredients to the wet mixture, mixing until a dough forms.
- Add Color: Divide the dough into two parts. Add a few drops of green food coloring to one half, kneading until the color is evenly distributed. This will be used for the fingers, while the other half can remain plain or be colored as well, if desired.
- Shape the Fingers: Take small portions of the green dough and roll them into finger-length shapes, approximately 3 inches long. Pinch slightly in the center to form knuckles and use a knife to score lines to give the appearance of skin folds.
- Add the Nails: Press a blanched almond into one end of each finger to create the appearance of a fingernail. Adjust the shape as needed to confirm the almond is secure.
- Bake: Place the shaped fingers onto a baking sheet lined with parchment paper. Bake in the preheated oven for 20-25 minutes or until the cookies are set and lightly golden.
- Cool and Decorate: Allow the cookies to cool on the baking sheet for a few minutes before transferring them to a wire rack to cool completely. If desired, use red decorating gel around the base of the almonds to create a bloody effect.
Extra Tips:
For the most realistic and creepy appearance, consider experimenting with the intensity of the green food coloring to achieve varying shades. You can also add cocoa powder to create a brown hue for a more decayed look.
When shaping the fingers, don’t worry about making them perfect; irregularities contribute to the creepy effect. If you’re concerned about the almonds coming loose, you can secure them with a small dab of dough before baking.
Finally, store the cookies in an airtight container to maintain their freshness and spooky appeal.
Enchanted Eyeball Treats
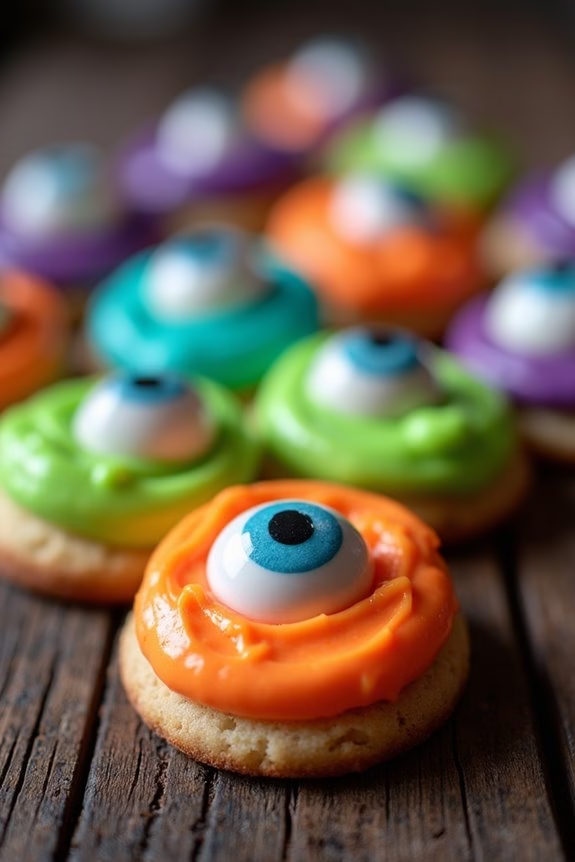
Enchanted Eyeball Treats are the perfect addition to your Halloween festivities, combining a spooky aesthetic with a delicious taste that both children and adults will love. These colorful and whimsical cookies aren’t only a treat for the taste buds but also a feast for the eyes. Made with a buttery sugar cookie base and topped with vibrant icing and edible candy eyes, these cookies are bound to be the centerpiece of your Halloween dessert table. The playful design of the Enchanted Eyeball Treats will captivate your guests and make your Halloween celebration memorable.
The process of making Enchanted Eyeball Treats is both fun and straightforward, allowing you to get creative with colors and designs. The key to these cookies is the perfect balance of a slightly crisp edge and a soft, chewy center. The icing adds a sweet finish, while the candy eyes provide that extra touch of enchantment. Whether you’re hosting a Halloween party or looking for an engaging activity to do with the kids, these cookies are a guaranteed crowd-pleaser. Plus, the recipe can easily be doubled if you’re catering to a larger group.
Ingredients (for 4-6 people):
- 2 1/2 cups all-purpose flour
- 1 cup unsalted butter, softened
- 1 cup granulated sugar
- 1 large egg
- 1 teaspoon vanilla extract
- 1/2 teaspoon almond extract
- 1 teaspoon baking powder
- 1/2 teaspoon salt
- Food coloring (various colors)
- 1 cup powdered sugar
- 2-3 tablespoons milk
- Edible candy eyes (assorted sizes)
Cooking Instructions:
- Prepare the Dough: In a large mixing bowl, cream together the softened butter and granulated sugar until light and fluffy. Beat in the egg, vanilla extract, and almond extract until fully incorporated.
- Combine Dry Ingredients: In a separate bowl, whisk together the all-purpose flour, baking powder, and salt. Gradually add the dry ingredients to the wet mixture, mixing until a dough forms.
- Chill the Dough: Divide the dough into two portions, flatten each into a disc, and wrap in plastic wrap. Chill in the refrigerator for at least 1 hour.
- Preheat and Roll: Preheat your oven to 350°F (175°C). Roll out the chilled dough on a lightly floured surface to about 1/4 inch thickness. Use a round cookie cutter to cut out circles.
- Bake the Cookies: Place the cookies on a baking sheet lined with parchment paper, spacing them about 1 inch apart. Bake for 8-10 minutes, or until the edges are lightly golden. Let them cool on the baking sheet for a few minutes before transferring to a wire rack to cool completely.
- Prepare the Icing: In a small bowl, mix the powdered sugar with milk until you achieve a smooth, slightly thick consistency. Divide the icing into separate bowls and add different food coloring to each to create a variety of colors.
- Decorate the Cookies: Once the cookies are completely cool, use a spoon or piping bag to spread or drizzle the colored icing over each cookie. Before the icing sets, place edible candy eyes on each cookie to create the enchanted eyeball effect.
Extra Tips:
When making Enchanted Eyeball Treats, verify the dough is well-chilled to make rolling and cutting easier, preventing it from sticking to your work surface. If you want more intense colors for your icing, use gel food coloring, which provides vibrant hues without altering the icing’s consistency.
To add extra character to your eyeballs, consider using a toothpick to create small veins with red or purple icing around the candy eyes. Finally, let the icing set completely before serving or storing the cookies in an airtight container to maintain their freshness.
Wicked Witch Hat Cookies
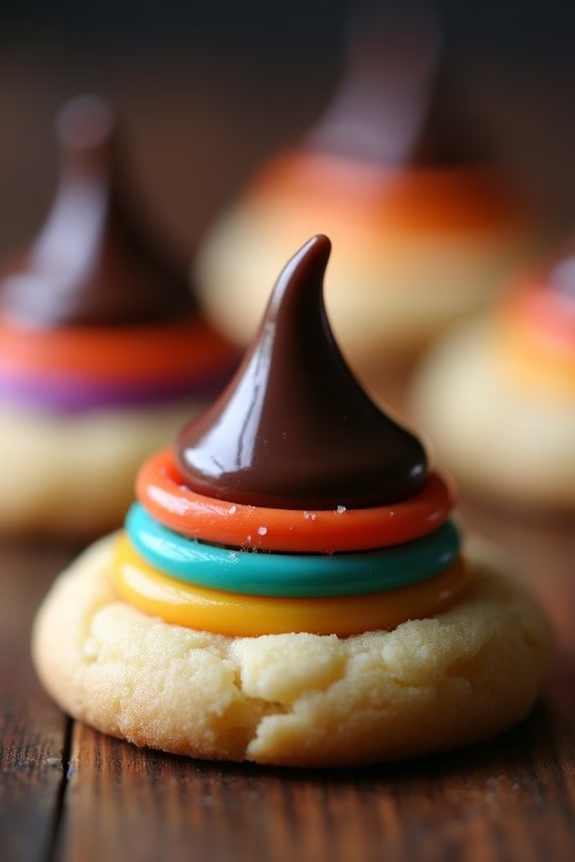
The creation of these cookies involves a two-part process: making the cookie base and then assembling the hats using chocolate and decorated candies. The base is a simple sugar cookie that can be shaped and baked into rounds. After baking, you’ll transform these rounds into witch hats by adding a chocolate kiss and a candy band. The final result is a batch of colorful and creative cookies that are as fun to look at as they’re to eat.
Here’s how you can make them for a serving size of 4-6 people:
Ingredients:
- 1 cup unsalted butter, softened
- 1 cup granulated sugar
- 1 large egg
- 1 teaspoon vanilla extract
- 2 1/2 cups all-purpose flour
- 1/2 teaspoon baking powder
- 1/4 teaspoon salt
- 24 chocolate kisses
- 1 cup chocolate chips, melted
- Assorted colored icing or gel for decorating
- Colored candy strips or belts for hat bands
Instructions:
- Preheat and Prepare: Preheat your oven to 350°F (175°C). Line two baking sheets with parchment paper to prevent the cookies from sticking.
- Make the Cookie Dough: In a large mixing bowl, cream together the softened butter and granulated sugar until light and fluffy. Beat in the egg and vanilla extract until well combined.
- Combine Dry Ingredients: In a separate bowl, whisk together the all-purpose flour, baking powder, and salt. Gradually add the dry ingredients to the wet ingredients, mixing until a dough forms.
- Shape the Cookies: Roll the dough into small balls and place them on the prepared baking sheets. Flatten each ball slightly with your palm to create a round cookie base.
- Bake the Cookies: Place the baking sheets in the preheated oven and bake for 10-12 minutes, or until the edges are lightly golden. Remove from the oven and let the cookies cool on a wire rack.
- Assemble the Witch Hats: Once the cookies are completely cooled, melt the chocolate chips in a microwave-safe bowl, stirring every 30 seconds until smooth. Use the melted chocolate to “glue” a chocolate kiss onto the center of each cookie.
- Decorate the Hats: Wrap a colored candy strip or belt around the base of the chocolate kiss to create a hatband. Use icing or gel to add additional decorations if desired.
Extra Tips: To guarantee your Wicked Witch Hat Cookies look their best, choose brightly colored candy strips that contrast well with the chocolate.
If you have difficulty getting the chocolate kiss to stick, allow the melted chocolate to cool slightly before using it as glue. This will help it set faster. Additionally, if you want to add a little sparkle to your cookies, sprinkle edible glitter over the top before the chocolate sets completely.
Enjoy these cookies as a fun and interactive treat that adds a touch of enchantment to your Halloween celebrations!
Eerie Jack-O’-Lantern Faces
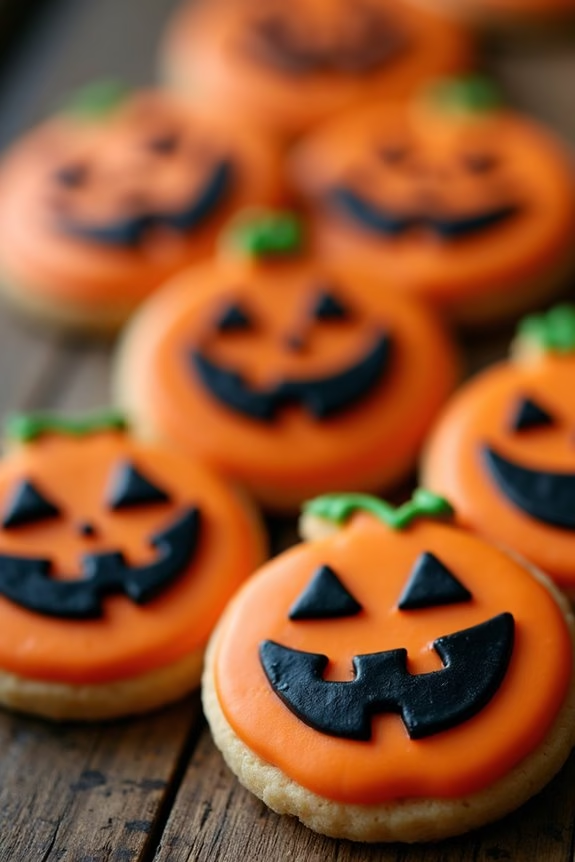
Decorated Halloween Cookies with eerie Jack-O’-Lantern faces are a delightful treat that combines the spirit of Halloween with the joy of baking. These cookies not only taste delicious but also offer a fun and creative activity for the whole family or a Halloween party. The key to these cookies is the combination of a perfectly soft sugar cookie base with vibrant, spooky decorations that capture the eerie charm of Jack-O’-Lanterns.
To make these cookies, you’ll begin with a classic sugar cookie recipe that’s easy to handle and holds its shape well during baking. Once baked, the cookies serve as a blank canvas for your artistic expressions. Using orange and black royal icing, you can transform these simple cookies into miniature pumpkin faces, each with its own unique personality. Whether you’re aiming for a mischievous grin or a ghoulish scowl, these decorated cookies are sure to impress your guests and add a festive touch to your Halloween celebrations.
Ingredients for Serving Size of 4-6 People:
- 2 3/4 cups all-purpose flour
- 1 teaspoon baking soda
- 1/2 teaspoon baking powder
- 1 cup unsalted butter, softened
- 1 1/2 cups white sugar
- 1 egg
- 1 teaspoon vanilla extract
- 1/2 teaspoon almond extract
- Orange and black gel food coloring
- 2 cups powdered sugar
- 2 tablespoons meringue powder
- 5-6 tablespoons water (adjust as needed)
- Decorating bags and tips
Cooking Instructions:
- Prepare the Cookie Dough: In a medium bowl, whisk together the flour, baking soda, and baking powder. In a large bowl, cream together the butter and sugar until smooth. Beat in the egg, vanilla extract, and almond extract. Gradually blend in the dry ingredients until fully incorporated. Cover and chill the dough in the refrigerator for at least one hour.
- Roll and Cut the Dough: Preheat your oven to 350°F (175°C). On a lightly floured surface, roll out the chilled dough to 1/4 inch thickness. Use a pumpkin-shaped cookie cutter to cut out the cookies. Place the cookies 1 inch apart on ungreased baking sheets.
- Bake the Cookies: Bake in the preheated oven for 8 to 10 minutes or until the edges are golden. Allow cookies to cool on the baking sheet for 5 minutes before transferring to wire racks to cool completely.
- Prepare the Royal Icing: In a large bowl, mix together the powdered sugar and meringue powder. Add water a tablespoon at a time, mixing on low speed until the icing is smooth and the desired consistency is reached. Divide the icing into two bowls. Tint one bowl with orange food coloring and the other with black.
- Decorate the Cookies: Fill decorating bags with the colored icing. Using the orange icing, outline and flood the surface of each cookie to create the pumpkin base. Allow the icing to dry slightly. With the black icing, draw Jack-O’-Lantern faces, adding eyes, noses, and mouths to each cookie. Allow the icing to set completely before serving.
Extra Tips:
When decorating your Halloween cookies, practice patience as the icing sets. If you’re new to decorating, start with simple designs and gradually work your way up to more intricate patterns.
Royal icing dries quickly, so work with one color at a time and keep the tips of your decorating bags covered when not in use to prevent the icing from hardening. If your icing is too thick or too thin, adjust the consistency by adding more water or powdered sugar as needed.
Frightful Frankenstein’s Monsters
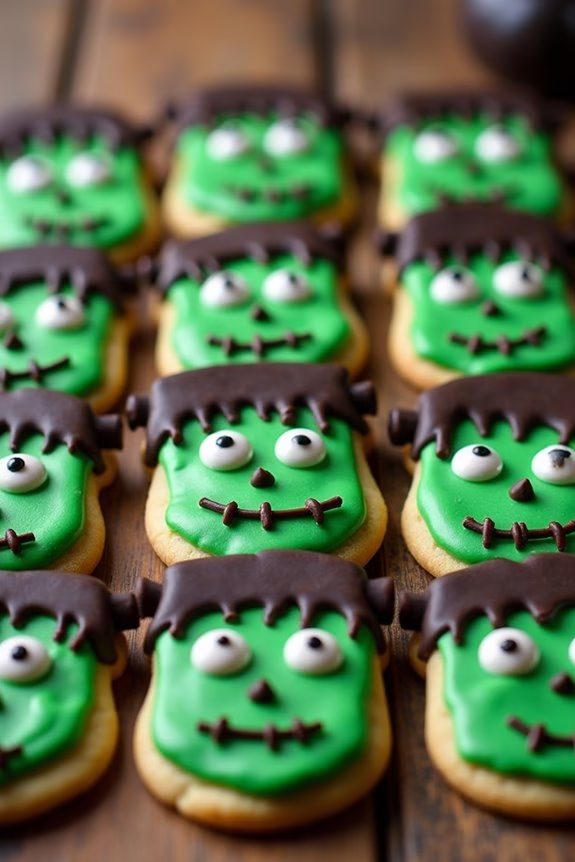
Celebrate Halloween with these spooky and delightful Frightful Frankenstein’s Monsters decorated cookies. These cookies not only taste delicious but also make for an engaging activity with family or friends. Perfect for a Halloween party, these cookies are sure to be a hit with their green monstrous faces and chocolatey details. The recipe yields enough cookies to serve 4-6 people, making it ideal for small gatherings or a fun family evening.
These cookies are made using a basic sugar cookie dough, which is then shaped and decorated to resemble the iconic creature. The vibrant green icing brings Frankenstein to life, while chocolate icing is used to add the finishing touches, like the stitches and facial features. The decorating process is where you can let your creativity run wild, making each cookie unique. Gather the ingredients below and get ready to make some monstrously good cookies!
Ingredients (Serves 4-6)
- 2 ½ cups all-purpose flour
- 1 cup unsalted butter, softened
- 1 cup granulated sugar
- 1 large egg
- 1 teaspoon vanilla extract
- ½ teaspoon baking powder
- ½ teaspoon salt
- Green food coloring
- 1 cup powdered sugar
- 2-3 tablespoons milk
- ¼ cup cocoa powder
- Black gel icing
- Mini chocolate chips or candy eyes
Cooking Instructions
- Prepare the Cookie Dough: In a large mixing bowl, cream together the softened butter and granulated sugar until light and fluffy. Beat in the egg and vanilla extract until well combined.
- Mix Dry Ingredients: In a separate bowl, whisk together the flour, baking powder, and salt. Gradually add the dry ingredients to the wet mixture, mixing until a dough forms.
- Chill the Dough: Divide the dough into two discs, wrap in plastic wrap, and refrigerate for at least 1 hour. This helps the dough firm up, making it easier to roll out.
- Shape and Bake Cookies: Preheat the oven to 350°F (175°C). Roll out the chilled dough on a lightly floured surface to about ¼ inch thickness. Use a rectangular cookie cutter or a knife to cut out rectangular shapes, resembling Frankenstein’s head. Place on a baking sheet lined with parchment paper and bake for 10-12 minutes until the edges are lightly golden. Let them cool completely on a wire rack.
- Make the Icing: Mix the powdered sugar with milk, adding the green food coloring until you achieve the desired shade. Mix thoroughly to avoid any lumps.
- Decorate the Cookies: Once the cookies are cool, spread or pipe the green icing on top. Allow it to set slightly. In a small bowl, mix the cocoa powder with a little water to form a thick paste. Use this to add hair, stitches, and other facial features with a small piping bag or a toothpick. Attach mini chocolate chips or candy eyes using a dab of icing.
- Final Touches: Use black gel icing to add any additional details like eyebrows or mouths. Allow all decorations to set before serving.
Extra Tips
To make the decorating process smoother, make sure your cookies are completely cool before adding the icing. If the icing is too runny, add more powdered sugar to thicken it. For a more vibrant green, use gel food coloring as it provides a more intense color without altering the icing’s consistency. If you don’t have a rectangular cutter, use a sharp knife to cut out the shapes freehand.
And remember, imperfection can add to the monstrous charm of these cookies, so have fun and let your creativity shine!
Sinister Skeleton Bones
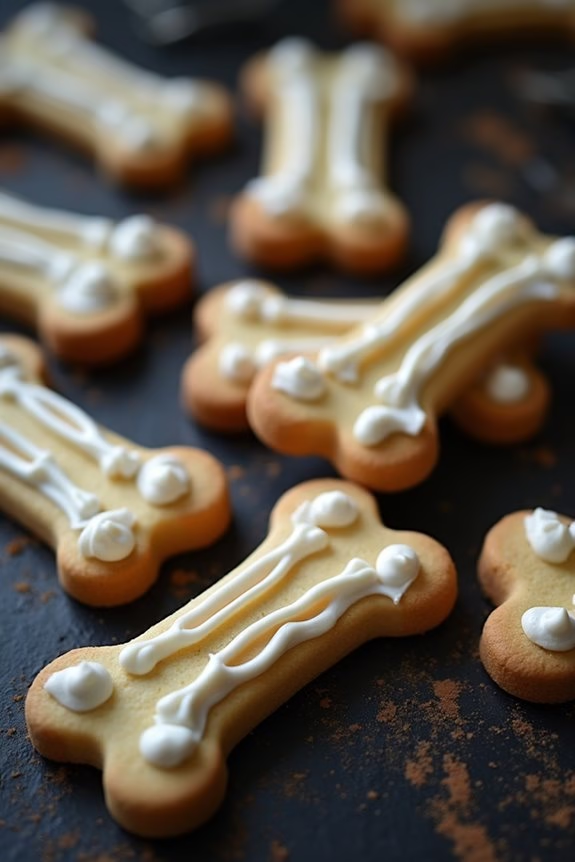
Get ready to thrill your guests with these delightfully eerie Sinister Skeleton Bones cookies, the perfect addition to your Halloween festivities. These hauntingly delicious cookies won’t only satisfy your sweet tooth but also add a spooky touch to your table spread.
Shaped like skeletal bones, these cookies are as fun to make as they’re to eat. They’re a great activity for families and friends to enjoy together, embracing the Halloween spirit with creativity and flavor.
These cookies combine a classic sugar cookie base with a touch of vanilla extract to create a rich, buttery flavor that’s simply irresistible. With a few simple ingredients and some spooky creativity, you can craft these bone-chilling treats that are sure to be a hit with both kids and adults.
Whether you’re hosting a Halloween party or just want to indulge in some themed baking, these Sinister Skeleton Bones are a must-try.
Ingredients for 4-6 servings:
- 2 ½ cups all-purpose flour
- 1 teaspoon baking powder
- ½ teaspoon salt
- 1 cup unsalted butter, softened
- 1 cup granulated sugar
- 1 large egg
- 2 teaspoons vanilla extract
- White icing for decorating
Cooking Instructions:
- Prepare the Dough: In a medium-sized bowl, whisk together the flour, baking powder, and salt until well combined. Set aside. In a separate large bowl, beat the softened butter and granulated sugar using an electric mixer until the mixture is light and fluffy, about 3 minutes.
- Combine Ingredients: Add the egg and vanilla extract to the butter mixture, mixing well until fully incorporated. Gradually add the flour mixture to the wet ingredients, continuing to mix until a smooth dough forms.
- Chill the Dough: Divide the dough into two portions, wrap each in plastic wrap, and refrigerate for at least 1 hour. This step is essential for easier rolling and cutting.
- Preheat and Prepare: Preheat your oven to 350°F (175°C). Line a baking sheet with parchment paper to prevent sticking.
- Shape the Cookies: Roll out the chilled dough on a lightly floured surface to about 1/4 inch thickness. Use a bone-shaped cookie cutter to cut out shapes, placing them on the prepared baking sheet about 1 inch apart.
- Bake the Cookies: Bake in the preheated oven for 10-12 minutes, or until the edges are lightly golden. Allow the cookies to cool on the baking sheet for 5 minutes before transferring them to a wire rack to cool completely.
- Decorate: Once the cookies are completely cool, use white icing to enhance the skeletal appearance. You can pipe the icing to outline the bone shapes or add details as desired.
Extra Tips:
For an extra spooky touch, consider using black icing or edible markers to add skull-like details to your cookies. If you’re having trouble with the dough being too sticky, lightly flour your rolling pin and work surface.
Feel free to get creative with your icing designs to personalize each bone cookie. And remember, chilling the dough is key to maintaining the shape of your cookies during baking, so don’t skip that step!
Enjoy your spook-tacular Sinister Skeleton Bones cookies.
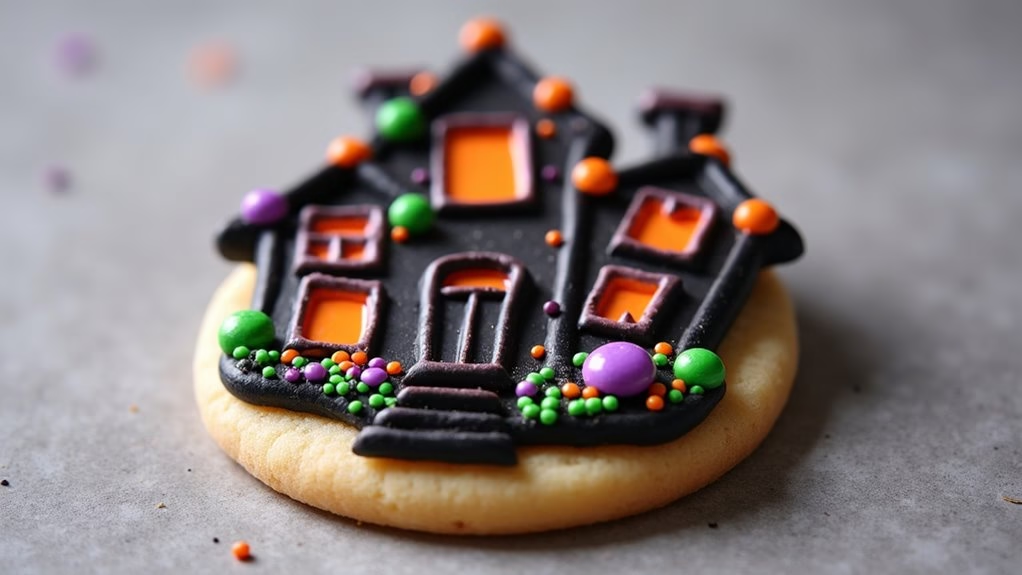
Haunted House Sugar Cookies
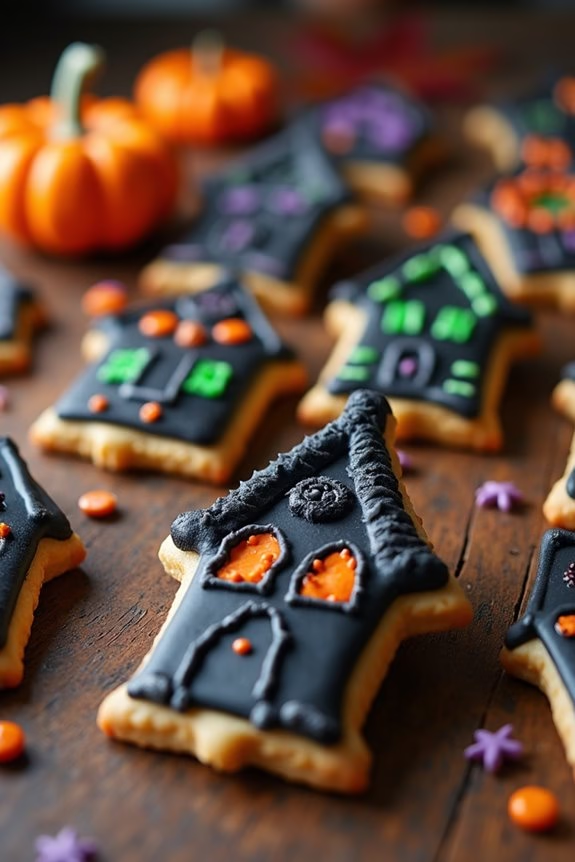
Celebrate Halloween with these spooky and delicious Haunted House Sugar Cookies. These intricately decorated treats aren’t only a feast for the taste buds but also a delightful project for creativity. Whether you’re hosting a Halloween party or just want to enjoy some festive baking, these cookies are bound to be a hit. The soft and buttery sugar cookies act as a perfect canvas, while the royal icing brings the haunted house design to life.
Making Haunted House Sugar Cookies is a fun activity for the whole family. The recipe yields 24-30 cookies, making it perfect for a small gathering of 4-6 people. You can customize the decorations with different colors and designs to suit your spooky theme. Grab your favorite cookie cutters and get ready to create some hauntingly delicious treats that will surely impress your guests.
Ingredients:
- 3 cups all-purpose flour
- 1 teaspoon baking powder
- 1/2 teaspoon salt
- 1 cup unsalted butter, softened
- 1 cup granulated sugar
- 1 large egg
- 1 teaspoon vanilla extract
- 1/2 teaspoon almond extract
- Royal icing (store-bought or homemade)
- Food coloring (black, orange, purple, green)
- Assorted Halloween-themed sprinkles and candy decorations
Instructions:
- Prepare the Dough: In a medium bowl, whisk together the flour, baking powder, and salt. In a large mixing bowl, cream the softened butter and granulated sugar until light and fluffy. Beat in the egg, vanilla extract, and almond extract until well combined.
- Combine Ingredients: Gradually add the dry ingredients to the wet ingredients, mixing until a dough forms. Divide the dough in half, flatten into discs, wrap in plastic wrap, and refrigerate for at least 1 hour or until firm.
- Roll and Cut the Cookies: Preheat the oven to 350°F (175°C). On a lightly floured surface, roll out one disc of dough to about 1/4-inch thickness. Use haunted house cookie cutters to cut out shapes and place them on a baking sheet lined with parchment paper. Repeat with the remaining dough.
- Bake the Cookies: Bake the cookies in the preheated oven for 8-10 minutes or until the edges are lightly golden. Remove from the oven and let them cool on the baking sheet for 5 minutes before transferring to a wire rack to cool completely.
- Decorate the Cookies: Divide the royal icing into separate bowls and tint each with desired food coloring. Use a piping bag or a small piping tip to outline and flood the cookies with icing. Add sprinkles and candy decorations while the icing is still wet to create your haunted house designs.
- Set the Icing: Allow the decorated cookies to sit at room temperature until the icing is completely set and dry. This may take several hours or overnight.
Tips for Perfect Haunted House Sugar Cookies:
For the best results, verify your butter is at room temperature before creaming it with the sugar. This will help achieve a smooth and fluffy texture.
When rolling out the dough, keep it chilled to prevent it from becoming too sticky. If you don’t have haunted house cookie cutters, you can use a sharp knife to cut out house shapes freehand.
Be creative with your decorations—mix and match colors and use different sprinkles and candies to make each cookie unique. Enjoy the process, and don’t worry about perfection; the charm of homemade cookies is in their individuality.