
Breakfast can sometimes feel overwhelming, but I’ve compiled 12 breakfast meal prep ideas that simplify mornings. From overnight oats with fresh berries to freezer-friendly smoothie packs, these recipes are both delicious and practical. Picture waking up to a ready-made Greek yogurt parfait or enjoying a flavorful breakfast burrito. Ready to transform your mornings with these easy recipes? Let’s explore these game-changers together.
Overnight Oats With Fresh Berries
Overnight oats with fresh berries is a delightful and nutritious breakfast option that requires minimal effort yet delivers maximum flavor. This dish is perfect for those busy mornings when you need a quick grab-and-go meal or for leisurely weekends when you can savor each bite.
The beauty of overnight oats lies in their versatility and ease of preparation; you simply combine the ingredients, let them sit in the fridge overnight, and wake up to a delicious, ready-to-eat breakfast. The addition of fresh berries not only adds a burst of color and sweetness but also provides a good dose of antioxidants and vitamins.
This recipe is designed to serve 4-6 people, making it ideal for a family breakfast or a week’s worth of meal prep for one person. The creamy texture of the oats pairs beautifully with the juicy, tangy berries, creating a harmonious blend of flavors and textures.
You can customize the recipe by adding your favorite toppings such as nuts, seeds, or a drizzle of honey to enhance its taste. With just a few simple ingredients and a little bit of prep work, you’ll have a wholesome and satisfying breakfast that will keep you fueled and energized throughout the morning.
Ingredients (for 4-6 servings):
- 2 cups old-fashioned rolled oats
- 2 cups milk (dairy or non-dairy)
- 1 cup Greek yogurt
- 2 tablespoons chia seeds
- 2 tablespoons honey or maple syrup
- 1 teaspoon vanilla extract
- 1 cup fresh strawberries, sliced
- 1 cup fresh blueberries
- 1/2 cup fresh raspberries
- Optional toppings: sliced almonds, walnuts, coconut flakes
Cooking Instructions:
- Prepare the Base: In a large mixing bowl, combine the old-fashioned rolled oats, milk, Greek yogurt, chia seeds, honey or maple syrup, and vanilla extract. Stir the mixture thoroughly until all ingredients are well combined. The chia seeds will help thicken the mixture, giving it a pudding-like consistency.
- Add the Berries: Gently fold in the fresh strawberries, blueberries, and raspberries into the oat mixture. Confirm that the berries are evenly distributed throughout the mixture. This will infuse the oats with the natural sweetness and flavor of the berries.
- Refrigerate Overnight: Transfer the oat and berry mixture into individual serving containers or one large container with a lid. Seal the container(s) and refrigerate overnight, or for at least 6 hours. This allows the oats to soak up the liquid and the flavors to meld together.
- Serve and Garnish: In the morning, give the oats a good stir and divide them into serving bowls. If desired, top with additional fresh berries and your choice of optional toppings like sliced almonds, walnuts, or coconut flakes for added texture and flavor.
- Enjoy: Serve chilled and enjoy your healthy and delicious overnight oats with fresh berries.
Extra Tips:
When preparing overnight oats, feel free to experiment with different types of milk, such as almond, soy, or oat milk, to suit your dietary preferences. You can also substitute Greek yogurt with a plant-based yogurt alternative.
If you prefer a sweeter taste, adjust the amount of honey or maple syrup to your liking. For an extra nutritional boost, consider adding a tablespoon of flax seeds or hemp seeds. The oats can be stored in the refrigerator for up to 3-4 days, making them a perfect meal prep option for the week.
Make-Ahead Breakfast Burritos

Breakfast burritos are a delicious and convenient option that can be prepared ahead of time, making your mornings smoother and more enjoyable. These burritos are packed with protein and flavor, ensuring you start your day with a satisfying meal. Perfect for a family breakfast or a grab-and-go option, they’re versatile and can be tailored to suit your taste preferences.
What’s more, these make-ahead breakfast burritos can be stored in the freezer, allowing you to enjoy them throughout the week with minimal effort.
To begin, you’ll need to gather all the necessary ingredients to make these scrumptious burritos. The recipe below serves 4-6 people, making it an ideal meal prep option for a small family or for individuals who like to plan their meals in advance.
These burritos are filled with fluffy scrambled eggs, savory sausage, melted cheese, and a touch of salsa for a burst of flavor. With these ingredients, you’ll create a breakfast that isn’t only quick to prepare but also satisfying and delicious.
Ingredients:
- 8 large eggs
- 1/4 cup milk
- Salt and pepper to taste
- 1 pound breakfast sausage
- 1 cup shredded cheddar cheese
- 1/2 cup salsa
- 6 large flour tortillas
- 2 tablespoons butter or oil
Cooking Instructions:
- Cook the Sausage: In a large skillet over medium heat, cook the breakfast sausage until browned and fully cooked, breaking it into small pieces with a spatula. Once cooked, drain any excess grease and set the sausage aside.
- Prepare the Eggs: In a bowl, whisk together the eggs, milk, salt, and pepper until well combined. In the same skillet used for the sausage, melt the butter over medium-low heat. Pour in the egg mixture and cook, stirring occasionally, until the eggs are just set but still soft.
- Assemble the Burritos: Lay out the flour tortillas on a clean surface. Evenly distribute the scrambled eggs, cooked sausage, shredded cheese, and salsa among the tortillas.
- Wrap the Burritos: To wrap each burrito, fold in the sides of the tortilla, then roll from the bottom up, ensuring the filling is tightly enclosed.
- Freeze or Cook Immediately: If you plan to store the burritos, wrap each one in aluminum foil or plastic wrap and place them in a freezer-safe bag. To eat immediately, heat the burritos in a skillet over medium heat for 2-3 minutes per side until the tortillas are golden brown and the cheese is melted.
Extra Tips:
For added variety, consider incorporating vegetables such as bell peppers, onions, or spinach into your burritos for extra nutrition. If you prefer a spicier option, add a dash of hot sauce or use spicy sausage.
When reheating frozen burritos, it’s best to thaw them in the refrigerator overnight before reheating for even cooking. Alternatively, you can microwave them directly from frozen by wrapping them in a damp paper towel and heating in 30-second intervals until warmed through.
Chia Seed Pudding Parfaits
- 1 cup chia seeds
- 4 cups almond milk (or milk of choice)
- 1/4 cup maple syrup (or sweetener of choice)
- 1 teaspoon vanilla extract
- 2 cups mixed berries (such as strawberries, blueberries, and raspberries)
- 1 cup granola
- 1/2 cup sliced almonds (optional)
- Fresh mint leaves for garnish (optional)
Cooking Instructions:
- Prepare the Chia Seed Pudding: In a large mixing bowl, combine the chia seeds, almond milk, maple syrup, and vanilla extract. Stir well to make sure that the chia seeds are evenly distributed and not clumping together.
- Refrigerate the Pudding: Cover the bowl with plastic wrap or a lid and place it in the refrigerator overnight, or for at least 4 hours. This allows the chia seeds to absorb the liquid and thicken into a pudding-like consistency.
- Assemble the Parfaits: Once the chia pudding is ready, give it a good stir to break up any clumps. In serving glasses or bowls, layer the chia pudding with mixed berries and granola. Start with a layer of chia pudding, followed by a layer of berries, and then a layer of granola. Repeat the layers until the glasses are filled.
- Add Toppings: Top each parfait with a sprinkle of sliced almonds for an extra crunch and a few fresh mint leaves for garnish if desired.
- Serve or Store: Serve the parfaits immediately for a fresh breakfast option, or cover and store them in the refrigerator for up to 3 days if preparing them as part of meal prep.
Extra Tips:
For a creamier texture, consider using a mix of almond milk and coconut milk in the chia pudding.
Feel free to customize the parfaits with your favorite fruits and nuts; banana slices, kiwi, or mango make excellent additions.
If you prefer a sweeter pudding, adjust the amount of maple syrup to taste.
To save time, you can prepare the chia seed pudding in individual jars for easy grab-and-go breakfasts throughout the week.
Finally, make sure the chia seeds are well-dispersed to avoid clumping, as this will guarantee a smooth and enjoyable pudding texture.
Freezer-Friendly Smoothie Packs

Preparing breakfast in advance can be a game changer, especially when life gets busy. Freezer-friendly smoothie packs are an excellent way to guarantee you start your day with a nutritious boost. These smoothie packs aren’t only convenient but also versatile, allowing you to customize them according to your preferences and dietary needs. By spending just a few minutes prepping these packs, you can have a delicious and healthy breakfast ready to blend in no time.
Creating freezer-friendly smoothie packs involves selecting your favorite fruits, vegetables, and additional ingredients to tailor each pack to your taste. Once assembled, these packs can be stored in the freezer and used whenever needed. The beauty of this method is that you can make a variety of combinations to keep your breakfasts exciting and nutritious. This recipe will provide you with all the necessary steps to create smoothie packs for 4-6 servings, guaranteeing you have a quick and healthy option available every morning.
Ingredients (Serves 4-6):
- 3 bananas, sliced
- 2 cups strawberries, hulled and halved
- 2 cups spinach leaves
- 1 cup blueberries
- 1 1/2 cups Greek yogurt
- 1 cup almond milk (or any preferred milk)
- 4 tablespoons chia seeds
- 4 teaspoons honey (optional)
- 2 tablespoons peanut butter (optional)
- Ice cubes (optional, for blending)
Instructions:
- Prepare Fruits and Vegetables: Wash the strawberries, blueberries, and spinach thoroughly. Hull and halve the strawberries, and slice the bananas. Lay the fruits and spinach on a baking sheet and place them in the freezer for about 2 hours or until they’re partially frozen.
- Assemble Packs: Once the fruits are partially frozen, divide them equally into 4-6 freezer-safe bags. Each bag should contain a mix of bananas, strawberries, blueberries, and spinach.
- Add Additional Ingredients: To each bag, add 1 tablespoon of chia seeds, and if desired, a teaspoon of honey and a tablespoon of peanut butter for added flavor and nutrition.
- Seal and Store: Remove as much air as possible from each bag before sealing them tightly. Label the bags with the date and contents, then store them in the freezer.
- Blending Instructions: When you’re ready to make a smoothie, take a pack from the freezer. Empty the contents into a blender, add 1/4 cup of Greek yogurt, 1/6 cup of almond milk, and a few ice cubes if you prefer a thicker consistency. Blend until smooth.
- Serve: Pour the smoothie into a glass and enjoy immediately for a revitalizing and nutritious breakfast.
Extra Tips:
To maximize the freshness of your smoothie packs, try to use ripe fruits as they tend to blend better and offer a sweeter taste without the need for additional sweeteners.
If you prefer thicker smoothies, consider adding a few ice cubes during blending. Feel free to experiment with different fruits and vegetables to discover new flavor combinations.
Adding a scoop of protein powder can also enhance the nutritional value of your smoothie, making it an even more balanced meal option.
Egg Muffin Cups

Egg Muffin Cups are a delightful and nutritious option for breakfast meal prep, perfect for those who want to start their day with a protein-packed meal. These versatile and customizable egg muffins aren’t only easy to prepare but also convenient to grab on your way out the door. Filled with a variety of vegetables and your choice of protein, they’re a great way to use up leftovers and guarantee you have a wholesome breakfast ready for the entire week.
This recipe yields 12 egg muffin cups, serving 4-6 people, and can be easily adjusted based on your family’s preferences. Whether you prefer classic flavors or want to experiment with unique combinations, Egg Muffin Cups provide a blank canvas for you to play with. They’re best served warm and can be stored in the refrigerator for several days, making them a perfect solution for busy mornings.
Ingredients (Serves 4-6):
- 10 large eggs
- 1 cup diced bell peppers (any color)
- 1 cup chopped spinach
- 1/2 cup diced onion
- 1/2 cup cooked bacon or sausage, crumbled
- 1 cup shredded cheddar cheese
- Salt and pepper to taste
- Non-stick cooking spray
Cooking Instructions:
- Preheat the Oven: Set your oven to 350°F (175°C). While the oven is heating, gather all your ingredients and prepare the muffin tin.
- Prepare the Muffin Tin: Lightly spray a 12-cup muffin tin with non-stick cooking spray. Guarantee that each cup is well-coated to prevent the egg muffins from sticking.
- Mix the Vegetables and Protein: In a large bowl, combine the diced bell peppers, chopped spinach, diced onion, and crumbled bacon or sausage. Mix well to distribute the ingredients evenly.
- Whisk the Eggs: In a separate bowl, crack the eggs and whisk them together until the yolks and whites are fully combined. Add a pinch of salt and pepper to taste.
- Combine Ingredients: Add the vegetable and protein mixture into the bowl of whisked eggs, followed by the shredded cheddar cheese. Stir everything together until the ingredients are well incorporated.
- Fill the Muffin Cups: Pour the egg mixture into each muffin tin cup, filling them about three-quarters full. Be sure each cup has an even distribution of ingredients to guarantee consistent cooking.
- Bake: Place the muffin tin in the preheated oven and bake for 20-25 minutes, or until the egg muffins have risen and are set in the center. A toothpick inserted into the center should come out clean.
- Cool and Serve: Once baked, remove the muffin tin from the oven and allow the egg muffins to cool for a few minutes before removing them. Serve immediately or let them cool completely before storing.
Extra Tips:
To guarantee your Egg Muffin Cups are a hit every time, consider experimenting with different ingredient combinations such as adding mushrooms, tomatoes, or different cheeses.
If you prefer a dairy-free option, you can omit the cheese or use a dairy-free alternative. For easy removal, let the muffins cool slightly before taking them out of the tin.
They can also be stored in an airtight container in the refrigerator for up to 4 days or frozen for longer storage. When reheating, simply microwave them for 30-60 seconds until warmed through.
Peanut Butter Banana Breakfast Bars
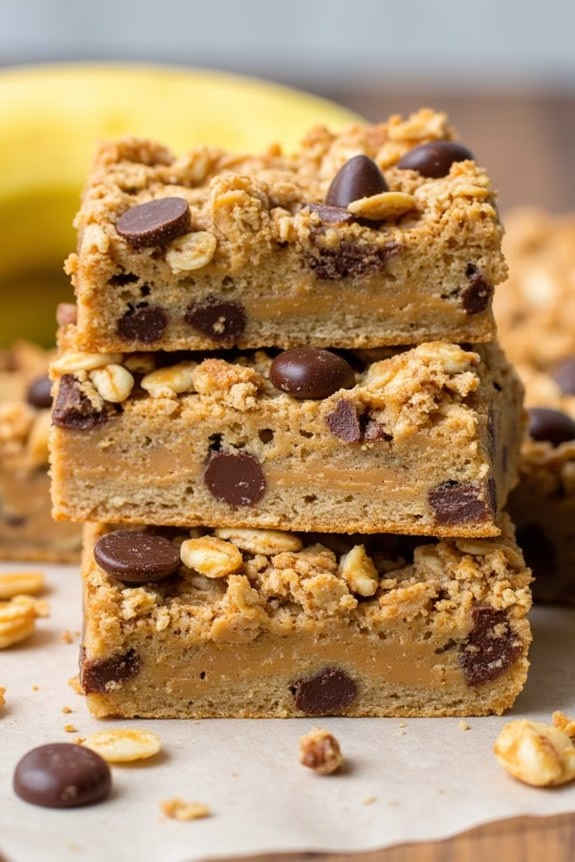
Peanut Butter Banana Breakfast Bars are a perfect solution for those busy mornings when you need a quick, nutritious, and delicious breakfast on the go. These bars combine the creamy richness of peanut butter with the natural sweetness of ripe bananas, resulting in a satisfying snack that’s both energy-boosting and wholesome.
Not only are they easy to make, but they also store well, making them an excellent option for meal prepping at the start of the week. Packed with oats and a touch of honey, these bars provide a healthy dose of fiber and protein to keep you full and focused throughout the morning.
Ideal for serving 4-6 people, this recipe is designed to yield enough bars to last several days or serve a small family breakfast gathering. The ingredients are simple, likely things you already have in your pantry, and the preparation process is straightforward, making it accessible even for beginner cooks.
Enjoy these bars as a standalone breakfast treat, or pair them with a fresh fruit salad for a more complete morning meal.
Ingredients:
- 2 cups rolled oats
- 1/2 cup natural peanut butter
- 2 ripe bananas, mashed
- 1/4 cup honey
- 1 teaspoon vanilla extract
- 1 teaspoon cinnamon
- 1/4 teaspoon salt
- 1/4 cup chopped nuts (optional)
- 1/4 cup chocolate chips (optional)
Instructions:
- Preheat the Oven: Begin by preheating your oven to 350°F (175°C). This guarantees it’s at the right temperature by the time you’re ready to bake the bars.
- Prepare the Baking Dish: Line an 8×8-inch baking dish with parchment paper or lightly grease it with a bit of oil to prevent sticking.
- Combine Dry Ingredients: In a large bowl, mix together the rolled oats, cinnamon, and salt. If you’re adding nuts or chocolate chips, stir them in at this point.
- Mix Wet Ingredients: In a separate bowl, combine the mashed bananas, peanut butter, honey, and vanilla extract. Stir until the mixture is smooth and well blended.
- Combine and Mix: Pour the wet ingredients into the bowl with the dry ingredients. Stir with a wooden spoon or spatula until everything is evenly mixed. The mixture should be thick and sticky.
- Transfer to Baking Dish: Spread the mixture evenly into the prepared baking dish, using the back of a spoon or spatula to press it down firmly and evenly.
- Bake: Place the dish in the preheated oven and bake for 20-25 minutes, or until the edges are golden brown and the center is set.
- Cool and Slice: Remove from the oven and allow the bars to cool in the dish for about 10 minutes. Then, lift them out using the parchment paper or turn them out gently and transfer to a wire rack to cool completely before slicing into bars.
Extra Tips: To make sure your Peanut Butter Banana Breakfast Bars retain their moisture and freshness, store them in an airtight container at room temperature for up to three days, or refrigerate for up to a week.
For a more indulgent version, drizzle melted chocolate over the top after cooling. If you’re looking to make the bars vegan, replace honey with agave syrup and ensure your chocolate chips are dairy-free.
Adjust the sweetness by adding more honey or reducing it according to your preference. Enjoy experimenting with additional mix-ins like dried fruit or seeds for added texture and flavor.
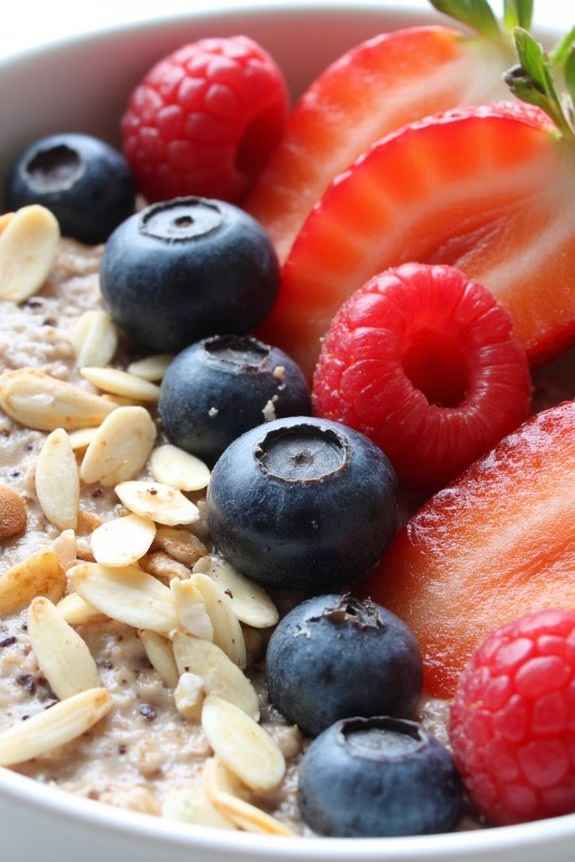
Quinoa Breakfast Bowls
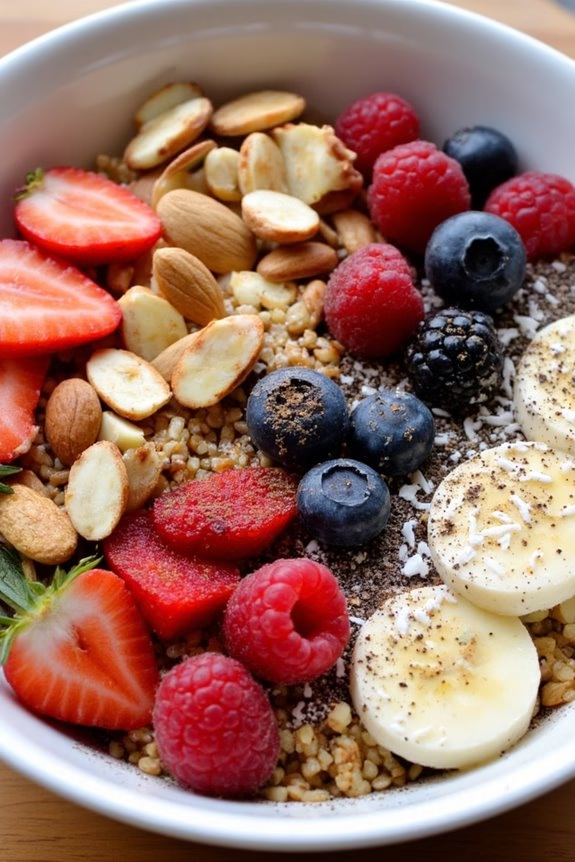
Quinoa breakfast bowls are a nutritious and versatile way to start your day. Packed with protein, fiber, and essential nutrients, quinoa serves as a perfect base for a breakfast that can be both savory and sweet depending on your preferences.
These bowls are ideal for meal prep, allowing you to prepare a large batch in advance and enjoy a hassle-free breakfast throughout the week. Whether you’re looking for a fruity, nutty, or even a veggie-packed breakfast, quinoa breakfast bowls offer endless possibilities to customize according to your taste and dietary needs.
In this recipe, we’ll guide you through creating a delicious and satisfying quinoa breakfast bowl that serves 4-6 people. By incorporating a blend of fresh fruits, nuts, seeds, and a drizzle of honey or maple syrup, you can elevate the flavors and textures, making your morning meal both appealing and wholesome.
This recipe is perfect for those busy mornings when you need a quick yet nourishing start to your day.
Ingredients (Serves 4-6):
- 2 cups quinoa
- 4 cups water
- 1 teaspoon cinnamon
- 1/2 cup almond milk (or milk of choice)
- 1 cup fresh berries (such as strawberries, blueberries, or raspberries)
- 1 sliced banana
- 1/4 cup chopped nuts (such as almonds or walnuts)
- 2 tablespoons chia seeds
- 2 tablespoons honey or maple syrup
- 1/4 cup shredded coconut (optional)
- Pinch of salt
Cooking Instructions:
- Rinse the Quinoa: Start by rinsing 2 cups of quinoa under cold water using a fine mesh strainer. This helps remove any bitterness from the natural coating called saponin.
- Cook the Quinoa: In a medium saucepan, combine the rinsed quinoa with 4 cups of water and a pinch of salt. Bring the mixture to a boil over high heat, then reduce the heat to low, cover, and let it simmer for about 15 minutes until the quinoa is tender and has absorbed the water.
- Fluff and Season: Once the quinoa is cooked, remove it from the heat and let it sit covered for 5 minutes. Then, fluff it with a fork and stir in 1 teaspoon of cinnamon and 1/2 cup of almond milk. This adds a creamy texture and a hint of spice to the quinoa.
- Assemble the Bowls: Divide the quinoa evenly among 4-6 bowls. Top each bowl with a combination of fresh berries, sliced banana, chopped nuts, and chia seeds.
- Drizzle and Garnish: Finally, drizzle about 1 tablespoon of honey or maple syrup over each bowl. For an extra touch, sprinkle with shredded coconut if desired.
Extra Tips:
To make this dish even more convenient, consider cooking the quinoa the night before and storing it in the refrigerator. In the morning, simply reheat the quinoa with a splash of almond milk to restore its creamy texture.
Feel free to swap out the fruits and nuts with your favorites or whatever you have on hand. If you prefer a savory option, try adding roasted veggies, avocado, and a poached egg.
Remember to adjust the sweetness to your taste, and enjoy experimenting with different flavor combinations!
Savory Breakfast Quiche

Savory Breakfast Quiche is a delightful and satisfying dish that can be prepared in advance for a stress-free morning meal. This quiche is packed with flavorful ingredients and provides a perfect balance of protein and vegetables, making it a healthy and delicious choice.
Whether you’re hosting a brunch or simply looking to simplify your mornings, this breakfast quiche is certain to please everyone at the table.
The beauty of a quiche is in its versatility. You can customize it with your favorite ingredients, such as spinach, mushrooms, or bacon, to suit your taste preferences. This recipe is designed for a serving size of 4-6 people, making it ideal for family breakfasts or small gatherings.
By preparing it in advance, you can enjoy a gourmet breakfast without the morning rush, as it can be easily reheated and served warm.
Ingredients for Savory Breakfast Quiche (serving size: 4-6 people):
- 1 ready-made pie crust
- 6 large eggs
- 1 cup milk
- 1 cup shredded cheese (such as cheddar or Swiss)
- 1 cup cooked and crumbled breakfast sausage
- 1 cup fresh spinach, chopped
- 1/2 cup diced bell pepper
- 1/4 cup chopped onion
- Salt and pepper to taste
- 1 tablespoon olive oil
Cooking Instructions:
1. Preheat the Oven: Preheat your oven to 375°F (190°C). This guarantees that the oven is at the right temperature when the quiche is ready to be baked.
2. Prepare the Pie Crust: Place the ready-made pie crust into a 9-inch pie dish. Press it gently into the dish and crimp the edges for a decorative touch. Set aside.
3. Cook the Vegetables and Sausage: In a skillet, heat the olive oil over medium heat. Add the chopped onion and bell pepper, sautéing until they’re soft and translucent, about 5 minutes.
Add the cooked sausage and chopped spinach to the skillet, cooking for another 2 minutes until the spinach is wilted. Remove from heat.
4. Mix the Egg Mixture: In a large mixing bowl, whisk together the eggs and milk until well combined. Season with salt and pepper to taste.
5. Assemble the Quiche: Spread the sausage and vegetable mixture evenly over the bottom of the pie crust. Sprinkle the shredded cheese over the mixture.
Pour the egg mixture over the top, guaranteeing it covers all the ingredients.
6. Bake: Place the quiche in the preheated oven and bake for 35-40 minutes, or until the egg mixture is set and the top is golden brown. A toothpick inserted in the center should come out clean.
7. Cool and Serve: Allow the quiche to cool for about 10 minutes before slicing and serving. This helps the filling set and makes it easier to cut.
Extra Tips:
For a gluten-free option, you can omit the pie crust and pour the egg mixture directly into a greased pie dish or use a gluten-free crust alternative.
Feel free to experiment with different cheeses and vegetables to create your own unique flavor combinations. If you’re short on time, you can prepare the sausage and vegetable mixture the night before and store it in the refrigerator, then simply assemble and bake the quiche in the morning.
For added flavor, consider adding herbs such as thyme or basil to the egg mixture. Enjoy your homemade savory breakfast quiche warm or cold, as it tastes great either way!
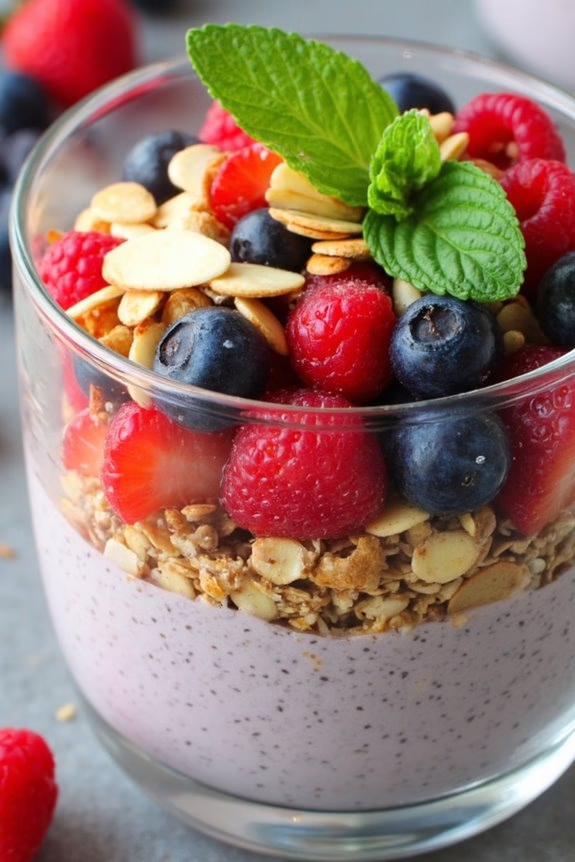
Greek Yogurt Parfait Jars
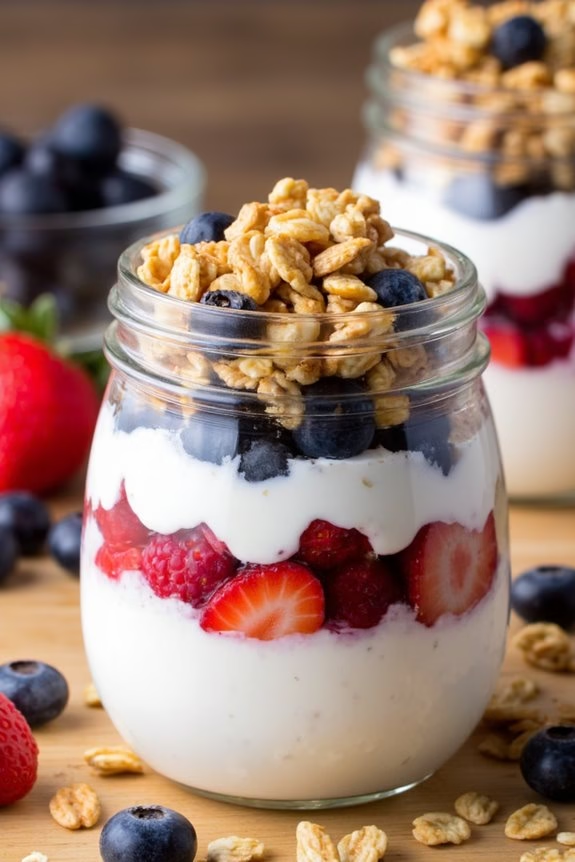
Greek Yogurt Parfait Jars are a perfect breakfast option for busy mornings. These jars aren’t only delicious but also nutritious, offering a balance of protein, healthy fats, and carbohydrates to keep you energized throughout the day. By preparing them in advance, you can save time during your busy mornings and guarantee you start your day with a wholesome meal.
These parfaits are also highly customizable, allowing you to tailor them to your taste preferences by choosing your favorite fruits, nuts, and granola. These parfait jars are ideal for meal prep as they can be stored in the refrigerator for several days, making them a convenient grab-and-go breakfast.
Each layer of the parfait contributes to the delightful combination of flavors and textures, from the creamy Greek yogurt to the sweet, juicy fruits, and crunchy granola. Whether you’re looking for a quick breakfast or a healthy snack, these Greek Yogurt Parfait Jars are sure to satisfy your cravings.
Ingredients (Serves 4-6 people):
- 4 cups Greek yogurt
- 2 cups mixed berries (such as strawberries, blueberries, and raspberries)
- 1 cup granola
- 1/2 cup honey
- 1/4 cup chopped nuts (such as almonds or walnuts)
- 1 teaspoon vanilla extract
- 6 small mason jars or airtight containers
Instructions:
- Prepare the Ingredients: Begin by washing the mixed berries thoroughly under cold water. Pat them dry with a clean kitchen towel. If using strawberries, hull and slice them into smaller pieces.
- Mix the Yogurt Base: In a medium-sized mixing bowl, combine the Greek yogurt, honey, and vanilla extract. Stir well until the mixture is smooth and the honey and vanilla are evenly incorporated into the yogurt.
- Assemble the Parfaits: Take the mason jars or containers, and start by adding a generous spoonful of the yogurt mixture to the bottom of each jar. Spread it out to form an even layer.
- Add the Berries: On top of the yogurt layer, add a layer of mixed berries. Confirm an even distribution of the berries in each jar for a uniform taste in every bite.
- Layer with Granola: Sprinkle a layer of granola over the berries. This will add a delightful crunch to your parfait.
- Repeat the Layers: Continue layering the yogurt, berries, and granola until the jars are filled. Finish with a layer of the yogurt mixture on the top.
- Top with Nuts: As a final touch, sprinkle a few chopped nuts on top of each jar for added texture and flavor.
- Seal and Store: Seal the jars with their lids and store them in the refrigerator. Let them chill for at least 2-3 hours or overnight to allow the flavors to meld together.
Extra Tips:
When preparing Greek Yogurt Parfait Jars, consider using seasonal fruits for the best flavor and freshness. Feel free to experiment with different types of granola or nuts to find your preferred combination.
If you prefer a sweeter parfait, you can adjust the amount of honey to your liking. To maintain the crunchiness of the granola, add it just before serving if you plan to keep the parfaits stored for several days.
Finally, verify your jars or containers are properly sealed to keep your parfaits fresh and prevent any unwanted moisture from entering.
Whole Wheat Pancake Bites
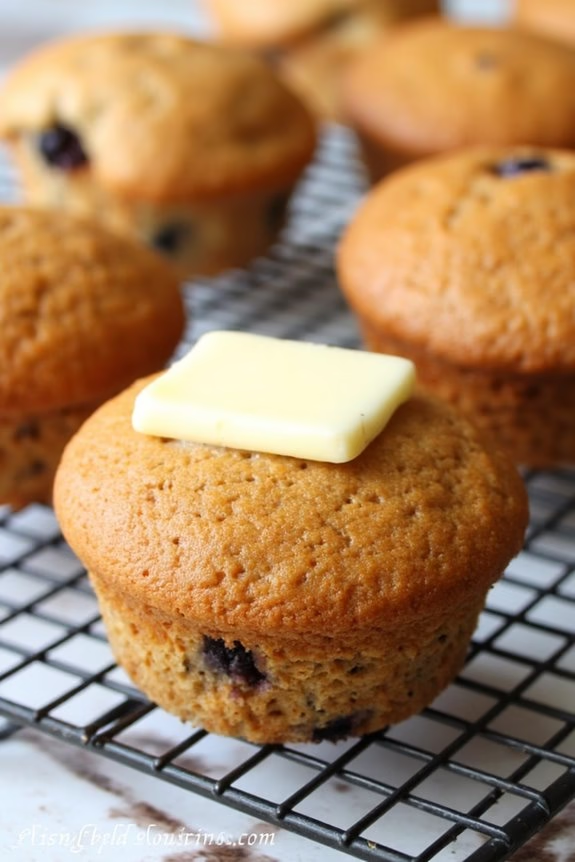
Whole Wheat Pancake Bites are a delightful and convenient breakfast option that can be prepared in advance and enjoyed throughout the week. These mini pancake bites aren’t only wholesome due to the use of whole wheat flour, but they also offer a burst of flavor with various mix-ins like berries, chocolate chips, or nuts.
Perfect for busy mornings, these bite-sized treats can be easily stored and reheated, making them a favorite for families and individuals alike who are looking for a quick, nutritious start to their day.
This recipe yields a batch of 24-30 pancake bites, serving approximately 4-6 people, depending on portion sizes. The batter is simple to prepare and can be customized to suit your taste preferences. With minimal preparation and cooking time, Whole Wheat Pancake Bites make for an excellent meal prep idea that doesn’t compromise on taste or nutrition.
Whether you’re having them fresh out of the oven or reheated, these pancake bites are sure to satisfy your breakfast cravings.
Ingredients:
- 2 cups whole wheat flour
- 2 teaspoons baking powder
- 1/2 teaspoon baking soda
- 1/4 teaspoon salt
- 1/4 cup sugar
- 1 1/2 cups milk
- 2 large eggs
- 1 teaspoon vanilla extract
- 1/4 cup melted butter
- 1/2 cup mix-ins (e.g., blueberries, chocolate chips, chopped nuts)
Cooking Instructions:
- Preheat the Oven: Begin by preheating your oven to 350°F (175°C). Grease a mini muffin tin with non-stick spray or line it with mini cupcake liners.
- Mix Dry Ingredients: In a large bowl, whisk together the whole wheat flour, baking powder, baking soda, salt, and sugar until well combined.
- Prepare Wet Ingredients: In a separate bowl, whisk together the milk, eggs, vanilla extract, and melted butter until smooth and well incorporated.
- Combine Mixtures: Gradually add the wet ingredients to the dry ingredients, stirring gently until just combined. Be careful not to overmix the batter as it can lead to dense pancake bites.
- Add Mix-ins: Gently fold in your chosen mix-ins, making certain they’re evenly distributed throughout the batter.
- Fill the Muffin Tin: Spoon the batter into the prepared mini muffin tin, filling each cup about 3/4 full to allow room for rising.
- Bake: Place the muffin tin in the preheated oven and bake for 12-15 minutes, or until a toothpick inserted into the center of a pancake bite comes out clean.
- Cool and Serve: Allow the pancake bites to cool in the tin for a few minutes before transferring them to a wire rack. Serve warm or store for later use.
Extra Tips:
For best results, verify that all your ingredients are at room temperature before mixing, as this helps the batter combine more smoothly.
If you prefer a sweeter pancake bite, consider adding a bit more sugar or using sweet mix-ins like chocolate chips. These pancake bites are highly versatile and can be made in advance; just store them in an airtight container in the refrigerator for up to a week or freeze them for longer storage.
To reheat, simply microwave them for 20-30 seconds or warm them in the oven until heated through.
Avocado Toast Kits
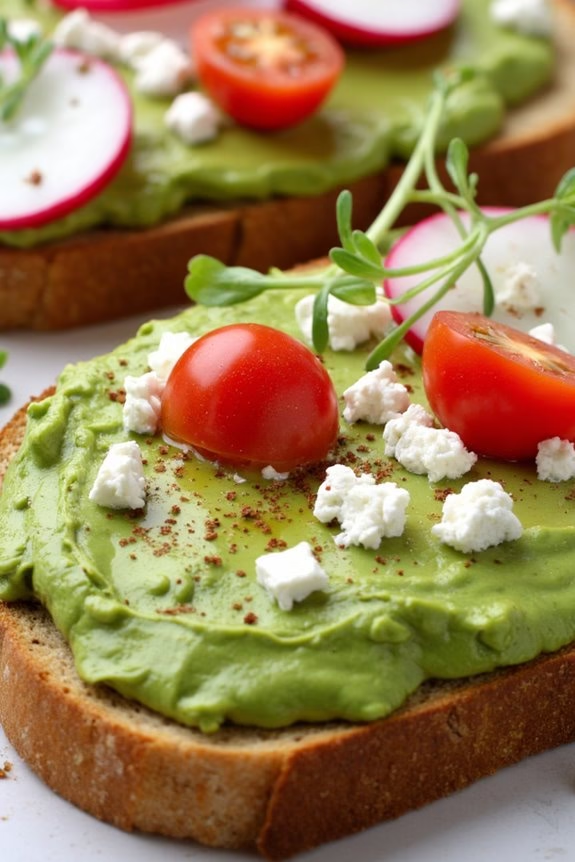
Avocado toast has become a staple breakfast dish loved by many due to its simplicity, versatility, and nutritional benefits. Avocado Toast Kits are an excellent way to prepare this delightful meal in advance, ensuring a quick and delicious breakfast option for busy mornings. This recipe allows you to prepare all the necessary components in advance so that you can assemble your avocado toast effortlessly whenever the craving strikes.
By preparing Avocado Toast Kits, you can enjoy the creamy, savory goodness of avocado toast without the hassle of daily preparation. This recipe serves 4-6 people, making it perfect for families or for meal prepping several breakfasts for the week. The creamy avocado spread, combined with a variety of toppings, creates a balanced and satisfying meal to start your day.
Ingredients (Serves 4-6):
- 4 ripe avocados
- 6 slices of whole-grain bread
- 2 tablespoons lemon juice
- 1/4 cup olive oil
- Salt and pepper to taste
- Optional toppings: cherry tomatoes, radish slices, feta cheese, chili flakes, poached eggs, microgreens, or smoked salmon
Cooking Instructions:
- Prepare the Avocado Spread: Cut the avocados in half, remove the pits, and scoop the flesh into a mixing bowl. Add the lemon juice and olive oil. Mash the avocado mixture with a fork until smooth yet still slightly chunky. Season with salt and pepper to taste. Transfer the avocado spread into an airtight container and refrigerate until ready to use.
- Prepare the Bread: Toast the slices of whole-grain bread until they reach your desired level of crispiness. You can use a toaster or oven for this step. Once toasted, allow the bread to cool slightly before storing in an airtight container or bread box to maintain freshness.
- Assemble the Kits: Divide the avocado spread into 4-6 serving-sized containers. If you plan to use optional toppings, prepare them as needed (e.g., slice cherry tomatoes, crumble feta cheese) and store in separate small containers. Keep all ingredients refrigerated until you’re ready to assemble the toast.
- Assemble the Avocado Toast: When you’re ready to eat, spread a generous layer of the avocado mixture over a slice of toasted bread. Add your choice of toppings to create a personalized avocado toast. Enjoy immediately for the best flavor and texture.
Extra Tips:
To keep your avocado spread fresh and vibrant, store it with a thin layer of lemon juice or olive oil on top to prevent browning. If you don’t have lemon juice, lime juice works as a great substitute.
Additionally, you can experiment with various toppings to keep your avocado toast exciting; try adding different herbs, seeds, or proteins to suit your taste preferences. For a gluten-free option, substitute the whole-grain bread with your favorite gluten-free bread.
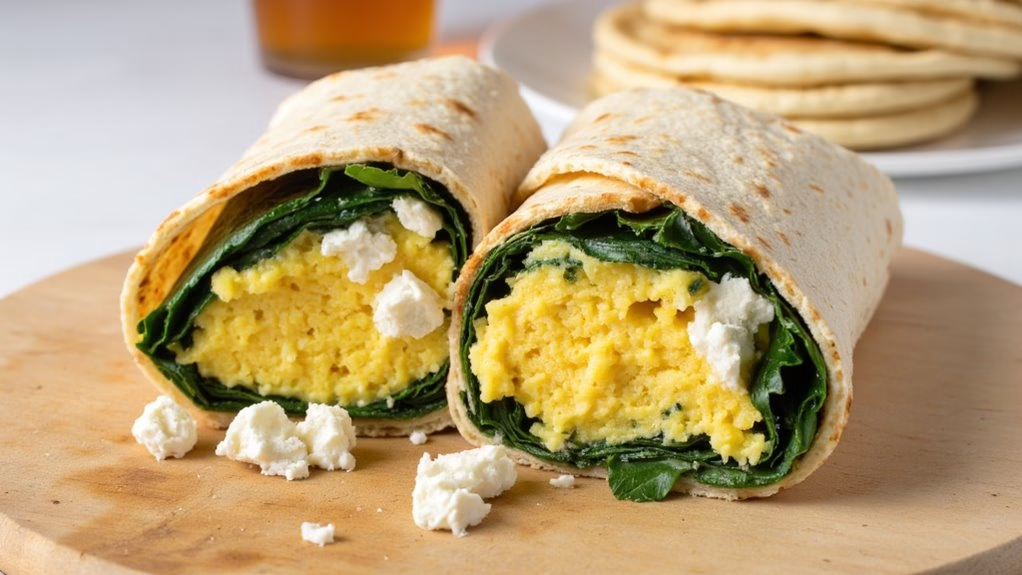
Breakfast Wraps With Spinach and Feta
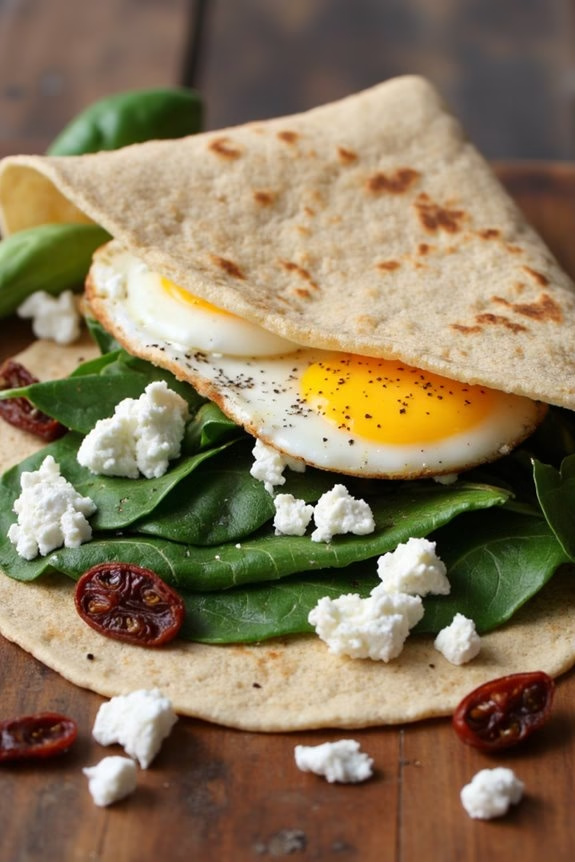
Breakfast wraps are a fantastic way to start the day with a nutritious and delicious meal. They aren’t only easy to prepare but also versatile, allowing you to incorporate a variety of ingredients to suit your taste. One delightful and healthy option is Breakfast Wraps with Spinach and Feta. These wraps combine the earthy flavor of spinach with the creamy texture of feta cheese, all wrapped in a soft tortilla, making them perfect for busy mornings or a sit-down breakfast with family and friends.
This recipe is designed to serve 4-6 people, making it ideal for a family breakfast or meal prep for the week. The combination of spinach and feta provides a good source of vitamins and minerals, while the eggs add protein to keep you energized throughout the morning. Plus, these wraps can be prepared in advance and stored in the refrigerator or freezer, so you can enjoy a quick and satisfying breakfast whenever you need it.
Ingredients (Serves 4-6):
- 6 large eggs
- 1/4 cup milk
- Salt and pepper to taste
- 2 tablespoons olive oil
- 1 onion, diced
- 2 cups fresh spinach leaves
- 1 cup feta cheese, crumbled
- 6 flour tortillas
- Optional: 1/2 cup sun-dried tomatoes, chopped
Cooking Instructions:
- Prepare the Egg Mixture: In a large bowl, whisk together the eggs, milk, salt, and pepper until well combined. This will guarantee the eggs are fluffy and well-seasoned.
- Sauté the Vegetables: Heat the olive oil in a large skillet over medium heat. Add the diced onion and sauté for about 3-4 minutes, until it becomes translucent. Add the fresh spinach leaves and continue to cook until the spinach is wilted, approximately 2-3 minutes.
- Cook the Eggs: Pour the egg mixture into the skillet with the onions and spinach. Stir gently with a spatula, cooking until the eggs are scrambled and fully cooked. This should take about 5-7 minutes.
- Add the Feta: Once the eggs are cooked, remove the skillet from heat and gently fold in the crumbled feta cheese and optional sun-dried tomatoes, if using. The residual heat will slightly melt the feta, enhancing its creamy texture.
- Assemble the Wraps: Lay out the flour tortillas on a clean surface. Divide the egg mixture evenly among the tortillas, placing it in the center of each one.
- Wrap and Serve: Fold the sides of the tortilla over the filling, then roll it up tightly. If you’re serving immediately, cut each wrap in half and serve warm. For meal prep, wrap each one individually in foil or plastic wrap and store in the refrigerator or freezer.
Extra Tips:
For added flavor, consider adding a pinch of chili flakes or a dash of hot sauce to the egg mixture for a bit of heat.
If you’re preparing these wraps in advance, they can be stored in the refrigerator for up to 3 days or frozen for up to 1 month. When reheating, if using a microwave, wrap them in a damp paper towel to prevent the tortilla from drying out.
Alternatively, you can reheat them in an oven or toaster oven for a crispier texture. Customize your wraps by adding other ingredients such as mushrooms, bell peppers, or even a few slices of cooked bacon for a more indulgent version.