

Halloween is creeping up, and I’ve got the perfect treat to share – 10 fang-tastically fun pizza ideas that kids will adore. Transforming simple ingredients into Mini Mummy Pizzas or crafting Ghostly Cheese Pizzas with mozzarella cut into festive shapes is a breeze. These recipes aren’t just about flavor; they’re a chance to spark creativity and family fun in the kitchen. Are you ready to enchant your little ghouls and goblins with these delightful pizzas? Let’s get started on this spooktacular culinary adventure!
Mini Mummy Pizzas

Mini Mummy Pizzas are a delightful and spooky treat that’s perfect for kids during Halloween. These fun-sized pizzas aren’t only adorable but also incredibly easy to make, making them an ideal choice for a festive activity that the whole family can enjoy together. With their mummy-like appearance crafted with simple ingredients, these pizzas are sure to bring smiles and giggles to your Halloween celebration.
The charm of Mini Mummy Pizzas lies in their simplicity and creativity. Using English muffins or small pizza bases as the foundation, you can transform these into mummies with the clever use of string cheese, olives, and pizza sauce. This recipe is great for a small gathering or party, serving between 4 to 6 people, and can easily be doubled or halved depending on your needs. Perfect for little hands to help with the preparation, these pizzas make for a fun cooking project where kids can get involved and express their creativity.
Ingredients (Serves 4-6):
- 6 English muffins or small pizza bases
- 1 cup pizza sauce
- 12 string cheese sticks
- 1 can of sliced black olives
- 1 cup sliced pepperoni (optional)
- 1 tablespoon olive oil
- 1 teaspoon garlic powder
Cooking Instructions:
- Preheat the Oven: Set your oven to 375°F (190°C) and allow it to preheat while you prepare the pizzas.
- Prepare the Base: Slice the English muffins in half and place them on a baking sheet. If using small pizza bases, arrange them directly on the sheet.
- Add the Sauce: Spread a generous tablespoon of pizza sauce on each muffin half or pizza base, ensuring it covers the surface evenly.
- Create the Mummy Effect: Peel the string cheese sticks into thin strips. Lay the strips across the sauced muffins or bases in a crisscross pattern to resemble mummy bandages.
- Add the Eyes: Place two sliced black olives on each pizza to create the mummy’s eyes. If using pepperoni, put a small slice beneath each olive for an extra spooky effect.
- Season and Prepare for Baking: Lightly brush the edges of the muffins or bases with olive oil and sprinkle a little garlic powder over the top for added flavor.
- Bake: Place the baking sheet in the preheated oven and bake for about 10-12 minutes, or until the cheese is melted and the edges are golden brown.
- Serve: Once baked, allow the Mini Mummy Pizzas to cool slightly before serving. Enjoy your spooky creation!
Extra Tips:
For an even more personalized touch, consider adding different toppings that your kids love, such as bell peppers or mushrooms, before adding the cheese strips.
If you want to make the pizzas even spookier, try using green or purple olives for the eyes. Remember that these pizzas are versatile, so feel free to experiment with the ingredients to suit your family’s taste preferences.
Additionally, if you don’t have string cheese, you can use slices of mozzarella cheese cut into thin strips.
Ghostly Cheese Pizzas
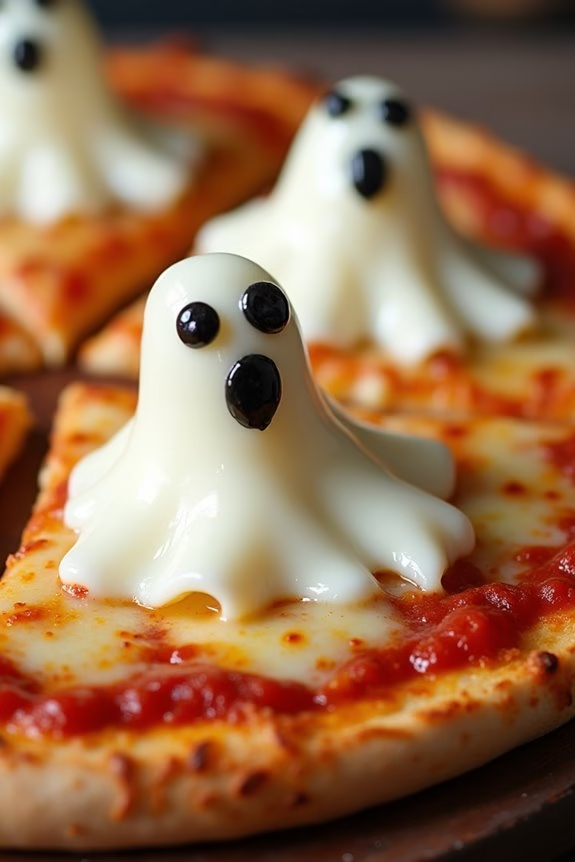
Get ready to spook your little ones with these delightful Ghostly Cheese Pizzas, the perfect Halloween treat! These fun and easy-to-make pizzas feature ghostly shapes that are sure to enchant kids and adults alike. Ideal for a Halloween party or a cozy family night in, these pizzas combine creativity with delicious flavors. The best part? They’re simple enough for kids to help with, making it a delightful family activity.
The Ghostly Cheese Pizzas are fundamentally mini pizzas topped with gooey mozzarella cheese shaped like adorable ghosts. You can use ready-made pizza dough or make your own from scratch if you prefer. These pizzas are customizable, allowing you to add your family’s favorite toppings beneath the ghostly cheese for a surprise in every bite. This recipe serves 4-6 people, guaranteeing there’s enough for everyone to enjoy.
Ingredients (serves 4-6 people):
- 1 lb pizza dough
- 1 cup pizza sauce
- 2 cups shredded mozzarella cheese
- 1 package mozzarella cheese slices
- Black olives for eyes
- Cornmeal or flour for dusting
- Olive oil for brushing
Cooking Instructions:
- Prepare the Dough: Preheat your oven to 450°F (230°C). Lightly dust a baking sheet or pizza stone with cornmeal or flour to prevent sticking. Roll out the pizza dough on a floured surface into a large circle or rectangle, approximately ¼-inch thick.
- Cut the Ghost Shapes: Using a ghost-shaped cookie cutter, cut out ghost shapes from the mozzarella cheese slices. You can also use a knife to carefully cut ghost shapes if you don’t have a cutter.
- Assemble the Pizzas: Spread a thin layer of pizza sauce evenly over the rolled-out dough, leaving a small border around the edges. Sprinkle the shredded mozzarella cheese evenly over the sauce.
- Add the Ghosts: Place the ghost-shaped mozzarella slices on top of the shredded cheese, leaving enough space between each ghost for them to melt without merging.
- Create the Eyes: Slice black olives into small rounds or pieces and place them on the ghost shapes to form eyes.
- Bake the Pizzas: Brush the edges of the dough with olive oil to help them brown nicely. Transfer the pizza to the preheated oven and bake for 10-12 minutes, or until the crust is golden brown and the cheese is melted and bubbly.
- Serve: Remove the pizzas from the oven and let them cool for a few minutes before slicing and serving. Enjoy your spooky creation!
Extra Tips: To guarantee your ghost shapes hold their form, avoid over-baking the pizza; keep an eye on it as it cooks.
If you want to add more toppings like pepperoni or veggies, place them under the ghost shapes to maintain the ghostly appearance. For a gluten-free version, opt for a gluten-free pizza crust.
To make the activity even more fun, let the kids create their own ghost designs and faces using the olives and other toppings. Happy haunting!
Jack-o’-Lantern Pepperoni Pizzas

Halloween is a magical time for kids, and what better way to celebrate than with some spooky-themed food? Jack-o’-Lantern Pepperoni Pizzas aren’t only fun to make but also delicious to eat. These mini pizzas are shaped like pumpkins and adorned with pepperoni cutouts that resemble the classic jack-o’-lantern face. They’re perfect for a Halloween party or a cozy family dinner. Kids will have a blast helping out in the kitchen, from shaping the dough to designing their own unique jack-o’-lantern faces.
These pizzas are straightforward to prepare, making them an excellent choice for a family cooking activity. You can use store-bought pizza dough if you’re short on time, or make your own from scratch if you prefer. The pizzas are topped with a simple tomato sauce, mozzarella cheese, and pepperoni slices, but you can customize them with your family’s favorite toppings. The key is to cut out fun shapes from the pepperoni slices to create the jack-o’-lantern faces, adding a touch of creativity to your meal.
Ingredients for 4-6 servings:
- 1 pound pizza dough
- 1 cup tomato pizza sauce
- 2 cups shredded mozzarella cheese
- 24-30 pepperoni slices
- 1 small green bell pepper (optional, for stem)
- Flour (for dusting)
- Olive oil (for brushing)
- Baking sheet or pizza stone
Cooking Instructions:
- Preheat and Prepare: Preheat your oven to 450°F (232°C). If using a pizza stone, place it in the oven to heat up. Lightly dust your work surface with flour to prevent sticking.
- Shape the Dough: Divide the pizza dough into 4-6 equal portions, depending on how many servings you want. Roll each portion into a ball, then flatten it into a round shape about 1/4-inch thick. Use a knife to trim the top of each circle to make it resemble the shape of a pumpkin with a flat top.
- Assemble the Pizzas: Place the dough rounds on a baking sheet or pizza stone. Spread a thin layer of tomato pizza sauce over each one, leaving a small border around the edge. Sprinkle shredded mozzarella cheese evenly over the sauce.
- Create the Faces: Cut the pepperoni slices into shapes for the eyes, nose, and mouth of the jack-o’-lantern. Arrange these pieces on each pizza to form faces. For an added touch, cut small strips of green bell pepper to mimic a pumpkin stem and place them at the top of each pizza.
- Bake: Lightly brush the edges of the dough with olive oil to encourage browning. Bake the pizzas in the preheated oven for 10-12 minutes, or until the crust is golden brown and the cheese is bubbly and slightly browned.
- Serve: Remove the pizzas from the oven and let them cool for a minute before serving. Enjoy your spooky and tasty Jack-o’-Lantern Pepperoni Pizzas with family and friends!
Extra Tips:
For a crispier crust, use a pizza stone and preheat it in the oven before placing the pizzas on it. If you’re making homemade dough, allow it to rise sufficiently to achieve a light and airy texture.
To make the pizza experience more interactive, set up a toppings station with various ingredients like olives, mushrooms, or different cheeses, allowing each child to personalize their jack-o’-lantern face.
And remember, these pizzas are best enjoyed fresh out of the oven, but leftovers can be reheated in a hot oven for a quick snack.
Spider Web Pizzas
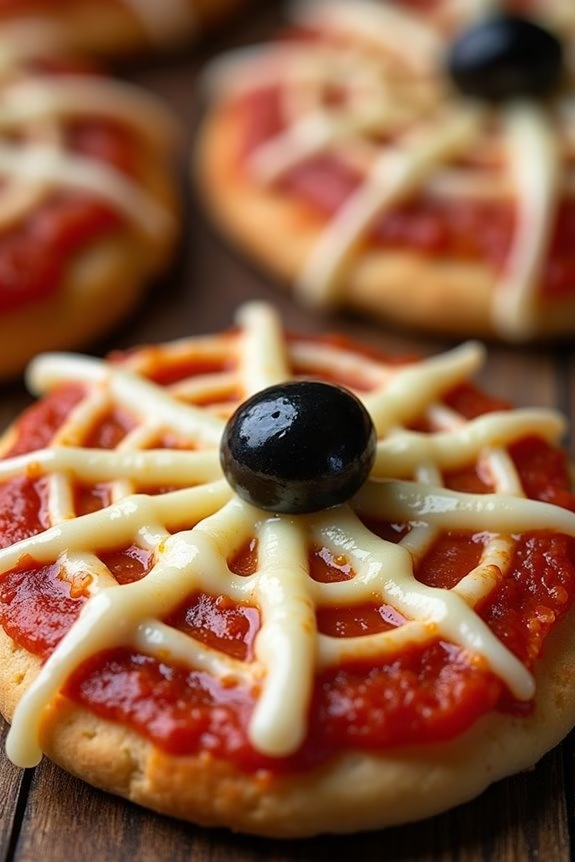
Halloween is the perfect time to get creative in the kitchen, and Spider Web Pizzas are a fun and spooky treat that will delight kids of all ages. This frightfully delicious recipe is a fantastic way to celebrate the holiday, combining the classic appeal of pizza with a festive twist. The pizzas are adorned with a web-like pattern made from gooey mozzarella cheese, creating a creepy effect that’s certain to be a hit at any Halloween gathering.
These pizzas aren’t only visually appealing but also incredibly easy to make, making them a perfect cooking project for little hands to help with. Simply prepare some mini pizza bases, spread tomato sauce over them, and arrange mozzarella cheese strings in a web-like pattern. With a few black olive slices for the spiders, these pizzas come to life in no time. Ideal for serving 4-6 people, this recipe will bring smiles to your Halloween party or family dinner table.
Ingredients (for serving size of 4-6):
- 6 mini pizza bases
- 1 cup pizza sauce
- 2 cups shredded mozzarella cheese
- 12 black olives
- 1 tablespoon olive oil
Instructions:
- Preheat the Oven: Start by preheating your oven to 400°F (200°C). This guarantees that the pizzas will cook evenly and quickly.
- Prepare the Pizza Bases: Lay the mini pizza bases on a baking sheet. Brush each base lightly with olive oil. This adds extra flavor and helps the crust become crispy.
- Spread the Sauce: Evenly spread a generous amount of pizza sauce over each base. Make sure to leave a small border around the edge to form the pizza crust.
- Create the Web: Sprinkle shredded mozzarella cheese over the sauce. To create the spider web effect, use additional cheese strips to form concentric circles on each pizza. Then, use a toothpick to drag lines from the center outward to mimic a spider web.
- Add the Spiders: Slice black olives in half to form the spider bodies and cut small strips for the legs. Arrange them on top of the cheese webs.
- Bake the Pizzas: Place the pizzas in the preheated oven and bake for about 10-12 minutes, or until the cheese is melted and bubbly, and the crust is golden brown.
- Cool and Serve: Remove the pizzas from the oven and let them cool for a few minutes before serving. This will allow the cheese to set slightly, making them easier to eat.
Extra Tips:
For an extra spooky touch, consider using different colored vegetables to create more intricate designs on your Spider Web Pizzas. Red, orange, or yellow bell pepper strips can add a pop of color, while spinach leaves can give a ghoulish green effect.
Additionally, you can prepare the pizza bases and arrange the toppings in advance, storing them in the refrigerator until you’re ready to bake. This makes it easy to plan ahead, especially if you’re hosting a Halloween party.
Enjoy the fun and festivity of these Spider Web Pizzas with your little ones, and watch as they devour this deliciously eerie treat!
Monster Face Pizzas
Looking for a fun and spooky treat to delight your kids this Halloween? Monster Face Pizzas are the perfect combination of creativity and taste. These pizzas allow your little ones to express their wild imaginations by designing their own edible monsters with various toppings.
Whether it’s a cheesy one-eyed creature or a pepperoni grinning ghoul, Monster Face Pizzas are sure to be a hit at any Halloween gathering or simply as a festive family dinner.
These pizzas aren’t only fun to make but also incredibly easy to prepare, making them a great activity for children to participate in. Using ready-made pizza dough or store-bought crusts, you can have these monstrous creations ready in no time.
Gather your kids in the kitchen, lay out a spread of vibrant toppings, and let their creativity run wild as they assemble their own personalized Monster Face Pizzas. This recipe serves 4-6 people, making it ideal for a family dinner or a small Halloween party.
Ingredients (Serves 4-6):
- 4-6 individual pizza crusts (store-bought or homemade)
- 1 cup pizza sauce
- 2 cups shredded mozzarella cheese
- 1 cup pepperoni slices
- 1 cup sliced black olives
- 1 cup sliced bell peppers (assorted colors)
- 1 cup sliced mushrooms
- 1 cup diced tomatoes
- 4-6 slices of ham or turkey (optional)
- 1 cup corn kernels
- 1 cup sliced onions
- 1 cup pineapple chunks (optional)
Cooking Instructions:
1. Preheat the Oven: Begin by preheating your oven to 425°F (220°C). This guarantees a crispy crust and perfectly melted cheese.
2. Prepare the Pizza Base: Place the individual pizza crusts on a large baking sheet. If using pizza dough, roll it out into individual circles about 6-8 inches in diameter.
3. Spread the Sauce: Using a spoon, evenly spread a generous layer of pizza sauce over each crust, leaving a small border around the edge for the crust.
4. Add the Cheese: Sprinkle a layer of shredded mozzarella cheese over the sauce on each pizza. The cheese will act as the base for your monster faces.
5. Create Monster Faces: Now it’s time for the fun part! Let the kids select their toppings and create their own monster faces. Use pepperoni slices for eyes or mouths, black olives for pupils, bell peppers for hair, and mushrooms or tomatoes for noses or ears.
Encourage creativity and use a variety of toppings.
6. Bake: Once all the monster faces are complete, place the baking sheet in the preheated oven. Bake for 10-12 minutes or until the cheese is bubbly and the crust is golden brown.
7. Cool and Serve: Remove the pizzas from the oven and allow them to cool for a few minutes. Serve warm and watch as the kids enjoy their monstrous creations!
Extra Tips:
When making Monster Face Pizzas, it’s crucial to have a variety of colorful toppings available to inspire creativity. Encourage kids to use contrasting colors to make their monster faces more vivid and expressive.
If you’re using homemade pizza dough, consider involving the kids in rolling and shaping it to add another layer of fun. Remember, there are no rules when it comes to creating monster faces, so let the kids experiment with different combinations.
Finally, make sure to supervise young children during the baking process to promote safety in the kitchen. Enjoy the spooky fun!
Witch Hat Pizzas

Get ready to cast a delicious spell on your kids this Halloween with these fun and spooky Witch Hat Pizzas! Perfect for a festive Halloween dinner or a party snack, these pizzas aren’t only easy to make but also a delightful way to get kids involved in the kitchen.
Shaped like pointy witch hats, these pizzas are topped with everyone’s favorite ingredients, creating a bewitching treat that’s as enjoyable to make as it’s to eat.
This recipe serves 4-6 people, making it ideal for family gatherings or small Halloween parties. With a few simple ingredients and a dash of creativity, you can whip up these witch hat pizzas in no time. The recipe is versatile, allowing you to customize the toppings to suit your little ones’ preferences, guaranteeing that even the pickiest eaters will be enchanted.
Ingredients:
- 1 package of pizza dough (enough for 1 large pizza)
- 1 cup pizza sauce
- 2 cups shredded mozzarella cheese
- 1/2 cup sliced black olives
- 1/4 cup sliced green bell peppers
- 1/4 cup sliced pepperoni
- 1/4 teaspoon dried oregano
- 1/4 teaspoon garlic powder
- Cooking spray or olive oil
Cooking Instructions:
- Preheat the Oven: Start by preheating your oven to 450°F (232°C). This will guarantee that the pizzas bake quickly and evenly.
- Prepare the Dough: Roll out the pizza dough on a lightly floured surface to about 1/4 inch thickness. Use a sharp knife or a pizza cutter to cut out triangle shapes resembling witch hats. You can use a template or do it freehand for a more rustic look.
- Add the Sauce: Place the dough triangles on a baking sheet lined with parchment paper. Spread a thin layer of pizza sauce over each triangle, leaving a small border around the edges to create a crust.
- Cheese and Toppings: Sprinkle mozzarella cheese generously over the sauce-covered triangles. Arrange the sliced olives, bell peppers, and pepperoni artfully on each hat to mimic a witch hat design. Get creative with the placement to make each pizza unique.
- Season and Bake: Lightly sprinkle the dried oregano and garlic powder over the top for added flavor. Bake in the preheated oven for 10-12 minutes, or until the cheese is bubbly and the crust is golden brown.
- Serve: Once baked, remove the pizzas from the oven and let them cool for a few minutes. Serve warm and watch as your kids delight in these whimsical witch hat creations!
Extra Tips:
When shaping the dough into witch hat triangles, make sure they aren’t too thin, as this can lead to overly crisp edges.
If you want to add a little extra flair, you can use different colored bell peppers or add a sprinkle of parmesan cheese on top before baking.
Additionally, if you want to involve your kids, let them add their own toppings and create their own designs; it’s a great way to make them feel like part of the cooking process.
Finally, if you’re short on time, pre-made pizza dough or even crescent roll dough can be used as a convenient alternative. Enjoy your magical culinary adventure!
Creepy Crawly Bug Pizzas

Halloween is the perfect time to let your culinary creativity run wild, and what better way to do that than with Creepy Crawly Bug Pizzas? These delightful mini pizzas aren’t only fun to make but are also a hit with kids who love the spooky holiday. By transforming ordinary ingredients into spooky, edible bugs, you can provide a Halloween treat that’s as entertaining as it’s delicious.
These pizzas are ideal for a Halloween party or a fun family dinner, guaranteeing everyone enjoys both the festive spirit and a tasty meal.
The Creepy Crawly Bug Pizzas are designed to be both visually appealing and easy to prepare. Using pre-made pizza dough and a variety of toppings, you can craft these creepy creations in no time. This recipe serves 4-6 people, making it perfect for a small gathering or a family night in. Kids will love helping to assemble the pizzas, giving them a sense of accomplishment as they see their creepy crawly creations come to life in the oven.
The recipe allows for customization, so feel free to get creative with your choice of toppings and bug designs.
Ingredients (serves 4-6):
- 2 cups shredded mozzarella cheese
- 1 cup pizza sauce
- 1 package of pre-made pizza dough or 6 mini pizza bases
- 1 small can of black olives
- 1 red bell pepper
- 1 green bell pepper
- Pepperoni slices
- 1 cup sliced mushrooms
- Fresh basil leaves
- 1 cup cherry tomatoes
- 1 tablespoon olive oil
- Salt and pepper to taste
Cooking Instructions:
- Prepare the Dough: Preheat your oven to 425°F (220°C). If using pre-made pizza dough, roll it out on a floured surface and cut it into 6 mini pizza bases, or simply use ready-made mini pizza bases.
- Create the Base: Place the mini pizza bases onto a baking sheet lined with parchment paper. Brush each base lightly with olive oil to create a crispy crust.
- Add the Sauce: Spread a thin layer of pizza sauce over each mini pizza base. Confirm even coverage to enhance the flavor of each bite.
- Sprinkle Cheese: Generously sprinkle shredded mozzarella cheese over the sauce, covering the entire surface.
- Design the Bugs: Now, let your imagination run wild! Use black olives, sliced mushrooms, and pepperoni slices to create the body of the bugs. Slice the red and green bell peppers into thin strips to form legs and antennae. Halve the cherry tomatoes to create heads or eyes for your bugs.
- Assemble Toppings: Arrange the toppings on each pizza to create different bug designs. You can make spiders, beetles, or any creepy crawly creature that comes to mind.
- Bake the Pizzas: Place the baking sheet in the preheated oven and bake for 12-15 minutes, or until the cheese is melted and bubbly and the crust is golden brown.
- Garnish and Serve: Once baked, remove the pizzas from the oven and let them cool for a minute. Garnish with fresh basil leaves for an added touch of flavor before serving.
Extra Tips:
When making Creepy Crawly Bug Pizzas, it’s important to involve the kids in the crafting process to make it a fun family activity. Encourage them to get creative with their bug designs and try different topping combinations.
If you want to add a bit more flavor, consider adding a sprinkle of Italian seasoning or garlic powder to the pizza sauce. For a healthier option, you can use whole wheat pizza dough or add more veggie toppings.
Eyeball Olive Pizzas

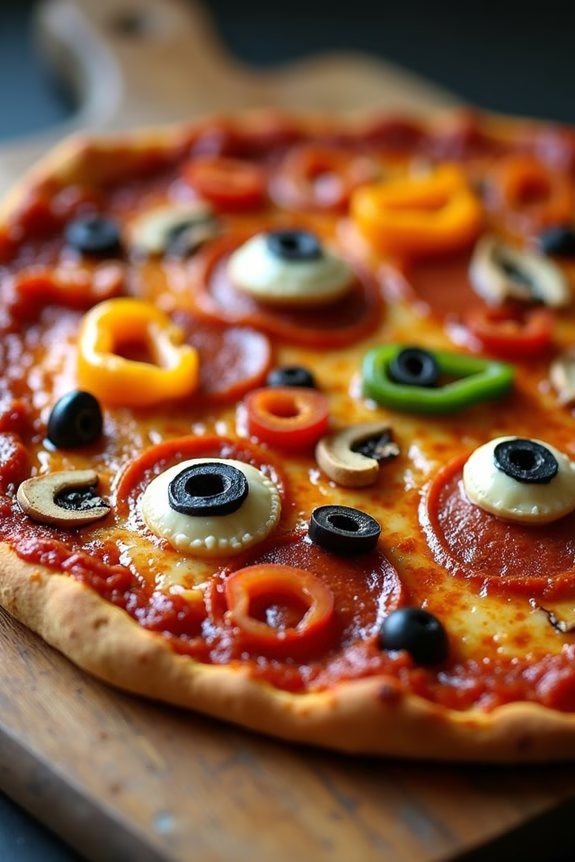
Halloween is a time for creativity and fun, and what better way to celebrate than with some spooky-themed treats? Eyeball Olive Pizzas are a perfect way to get kids excited about their meal while staying in the spirit of the holiday.
These mini pizzas aren’t only delicious but also easy to make, making them an excellent choice for a Halloween party or a special family dinner. The playful design of the eyeball pizzas will delight children and adults alike.
Each mini pizza is topped with a cheesy base, a slice of pepperoni, and an olive to create the look of a creepy eyeball. This recipe is crafted to serve 4-6 people, making it ideal for a small gathering. Plus, it’s a straightforward recipe that allows kids to get involved in the cooking process, providing a fun and engaging activity for the whole family.
Ingredients (Serves 4-6 people):
- 6 mini pizza crusts
- 1 cup pizza sauce
- 2 cups shredded mozzarella cheese
- 12 slices pepperoni
- 12 black olives, halved
- 2 tablespoons olive oil
- 1 teaspoon dried oregano
- 1 teaspoon garlic powder
Instructions:
- Preheat the Oven: Begin by preheating your oven to 400°F (200°C). This guarantees that your pizzas cook evenly and the crust turns perfectly crispy.
- Prepare the Crusts: Lay out the mini pizza crusts on a baking sheet. Lightly brush each crust with olive oil to help them achieve a golden, crispy texture.
- Add the Sauce: Spread about 2 tablespoons of pizza sauce on each mini crust. Use the back of a spoon to spread it evenly, leaving a small border around the edges.
- Cheese Layer: Sprinkle a generous amount of shredded mozzarella cheese over the sauce on each crust. This layer will act as the base for your eyeball design.
- Create the Eyeball: Place two slices of pepperoni on each pizza, ensuring they’re spaced out enough to resemble eyes. In the center of each pepperoni slice, place a halved black olive to complete the eyeball look.
- Season: Sprinkle a pinch of dried oregano and garlic powder over the top of each pizza to enhance the flavor.
- Bake: Place the baking sheet in the preheated oven and bake for about 10-12 minutes, or until the cheese is melted and bubbly and the crust is golden brown.
- Serve: Once baked, remove the pizzas from the oven and let them cool slightly. Serve warm and watch as everyone enjoys their spooky treats!
Extra Tips:
For a healthier version, consider using whole wheat mini pizza crusts or cauliflower crusts. You can also add a variety of veggies under the cheese for added nutrition without compromising the look of the eyeballs.
If you want to add a bit more spookiness, use green olives instead of black for a more eerie appearance. Make sure to supervise younger children during the assembly process, as they might need help with spreading the sauce and placing the olives. Enjoy your Halloween-themed culinary adventure!
Frankenstein’s Face Pizzas
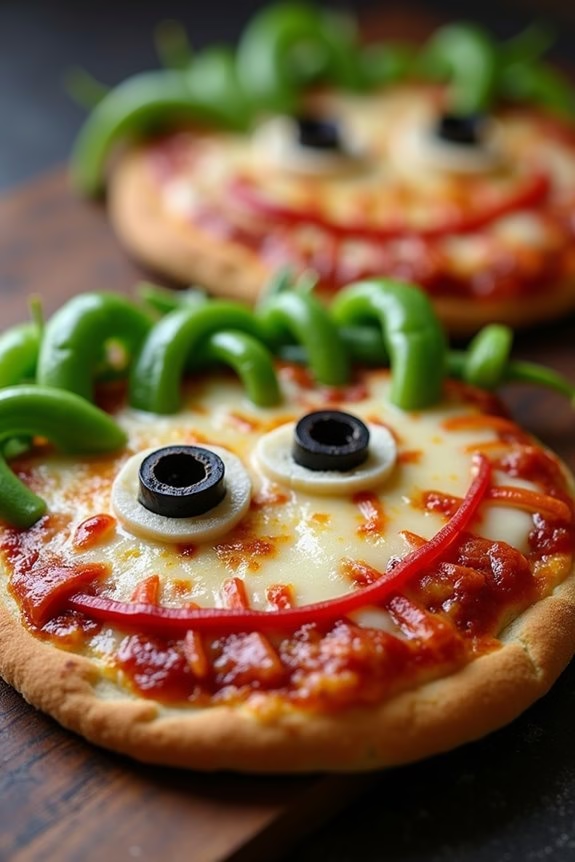
Turn your Halloween dinner into a monstrously fun event with these Frankenstein’s Face Pizzas. Perfect for kids, these pizzas aren’t only delicious but also a creative way to engage little ones in the kitchen. Each pizza is designed to look like everyone’s favorite green monster, making them an exciting addition to any Halloween party or spooky family meal.
Customize each face with various toppings to create unique expressions that are sure to delight both the young and young at heart. These mini pizzas are simple to make and can be prepared in under an hour. With a few basic ingredients and a dash of imagination, you can whip up a batch of these ghoulishly good pizzas that serve 4-6 people.
Whether you’re hosting a Halloween bash or just want to add some spooky fun to dinner, these Frankenstein’s Face Pizzas are certain to be a hit!
Ingredients for Frankenstein’s Face Pizzas (Serves 4-6):
- 6 mini pizza bases or English muffins (split in half)
- 1 cup pizza sauce
- 2 cups shredded mozzarella cheese
- 6 slices of turkey pepperoni or salami
- 1 green bell pepper
- 1 black olive can
- 1 red bell pepper
- 1 small onion
- 1/2 cup fresh spinach leaves
Cooking Instructions:
1. Preheat the Oven: Start by preheating your oven to 375°F (190°C) to guarantee it’s ready to bake your pizzas to perfection.
2. Prepare the Mini Pizza Bases: Lay out the mini pizza bases or split English muffins on a large baking sheet, cut-side up. This will be the canvas for your Frankenstein faces.
3. Spread the Sauce: Evenly spread a thin layer of pizza sauce over each pizza base. This will serve as the foundation for your toppings.
4. Add the Cheese: Sprinkle shredded mozzarella cheese over the sauce. Make sure the cheese is evenly distributed to cover the entire surface of each pizza base.
5. Create the Faces: Slice the green bell pepper into thin strips to resemble hair. Place them at the top of each pizza. Use turkey pepperoni or salami slices for the eyes, and cut small circles from the black olives for pupils.
Cut the red bell pepper into small strips for the mouth, and slice the onion into thin rings for scars or additional facial features. Use spinach leaves to add extra details, like eyebrows.
6. Bake the Pizzas: Place the decorated pizzas in the preheated oven. Bake for 12-15 minutes or until the cheese is bubbly and lightly golden, and the toppings are heated through.
7. Serve and Enjoy: Once baked, remove the pizzas from the oven. Allow them to cool slightly before serving. Enjoy the spooky meal with your family and friends!
Extra Tips:
To make the experience even more fun, involve the kids in the decorating process. Let them create their own monster faces with the toppings, encouraging creativity.
If you’re looking for a healthier option, use whole-wheat English muffins or a cauliflower-based crust. For those who prefer a vegetarian version, simply omit the pepperoni or salami and add more vegetables for decoration.
Bat Wing Pizzas

Bring a spooky twist to your Halloween celebrations with these delightful Bat Wing Pizzas! Perfectly designed for kids, these pizzas aren’t only fun to make but also delicious to eat. The unique bat wing shape is sure to excite young ones, making this dish a hit at any Halloween party or family gathering.
With a crispy crust, gooey cheese, and your choice of toppings, these pizzas are a festive way to enjoy a classic favorite. Crafted to serve 4-6 people, Bat Wing Pizzas are easy to assemble and can be customized to suit different taste preferences. This recipe calls for simple ingredients that you might already have in your pantry, and it offers room for creativity with toppings.
Whether you prefer pepperoni, veggies, or a mix of both, these bat-shaped pizzas will be a memorable treat for kids and adults alike.
Ingredients:
- 2 pre-made pizza doughs
- 1 cup of pizza sauce
- 2 cups shredded mozzarella cheese
- 1/2 cup sliced black olives
- 1/2 cup pepperoni slices
- 1/2 cup sliced bell peppers (red, green, or yellow)
- 1 teaspoon olive oil
- 1/2 teaspoon dried oregano
- 1/2 teaspoon garlic powder
- Flour (for dusting)
Cooking Instructions:
- Preheat the Oven: Start by preheating your oven to 425°F (220°C). This will guarantee your pizzas cook evenly and develop a nice, crispy crust.
- Prepare the Dough: On a lightly floured surface, roll out the pizza dough into a large rectangle. Using a sharp knife or a pizza cutter, cut the dough into bat wing shapes. You can use a bat-shaped cookie cutter if you have one for consistency.
- Add the Sauce: Brush a thin layer of olive oil over the top of each bat wing shape. Then, spread a generous amount of pizza sauce over each piece, leaving a small border around the edges.
- Add the Cheese and Toppings: Sprinkle shredded mozzarella cheese evenly over each bat wing. Decorate with black olives, pepperoni slices, and bell peppers, arranging them creatively to mimic bat features.
- Season and Bake: Sprinkle a touch of oregano and garlic powder on top of the assembled bat wings. Place the pizzas on a baking sheet lined with parchment paper and bake in the preheated oven for 12-15 minutes, or until the crust is golden brown and the cheese is bubbly.
- Cool and Serve: Once cooked, remove the pizzas from the oven and let them cool for a few minutes. This will make them easier to handle and eat. Serve warm and enjoy your spooky creation!
Extra Tips:
For an even spookier effect, consider using black food coloring in the dough to enhance the bat-like appearance. You can also encourage kids to participate by allowing them to choose their favorite toppings and create their own designs.
If you’re short on time, store-bought pizza dough and pre-sliced toppings can speed up the preparation process. Remember to adjust baking time if you make smaller or larger bat wings, guaranteeing they cook through without burning.