

When Halloween arrives, the air is filled with the allure of sugary treats tempting every sweet tooth. But for those of us who crave a little balance, salty snacks are the perfect companion to all that sugar. I’m excited to share ten scrumptious salty Halloween snacks that perfectly complement the festive sweets. From ghostly garlic parmesan popcorn to eerie everything bagel crackers, these savory bites bring a delightful twist to the spooky season. Ready to add a pinch of salt to your Halloween celebrations?
Savory Pumpkin Seed Mix
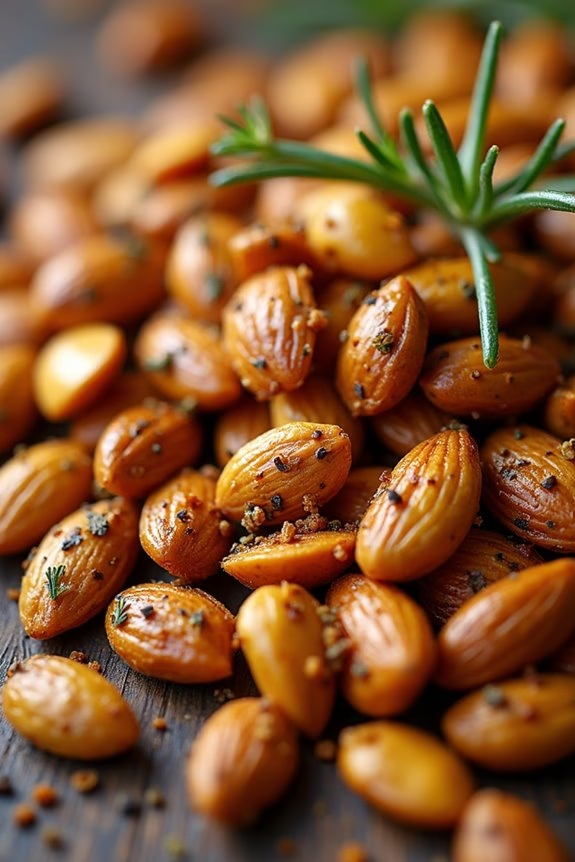
Savory Pumpkin Seed Mix is the perfect snack to add a deliciously salty twist to your Halloween festivities. Packed with a variety of flavors and textures, this mix brings together roasted pumpkin seeds, nuts, and spices for a crunchy treat that will keep your guests coming back for more.
Not only is it easy to make, but it’s also a healthier alternative to the usual sugary Halloween treats, making it a great option for those who want something savory to munch on during spooky movie marathons or Halloween parties.
The beauty of this Savory Pumpkin Seed Mix lies in its versatility—feel free to experiment with different nuts and spices to tailor it to your taste preferences. Whether you’re hosting a large gathering or just looking for a quick snack to enjoy at home, this recipe is designed to serve 4-6 people, making it an ideal choice for sharing.
With its delightful combination of flavors, this snack is sure to become a seasonal favorite.
Ingredients (Serves 4-6):
- 1 cup raw pumpkin seeds
- 1/2 cup almonds
- 1/2 cup cashews
- 2 tablespoons olive oil
- 1 teaspoon smoked paprika
- 1 teaspoon garlic powder
- 1 teaspoon onion powder
- 1/2 teaspoon cayenne pepper (optional)
- 1 teaspoon salt
- 1/2 teaspoon black pepper
- 1 tablespoon fresh rosemary, finely chopped
Instructions:
- Preheat the Oven: Begin by preheating your oven to 350°F (175°C). This guarantees that it’s at the right temperature for roasting the seeds and nuts evenly.
- Prepare the Seeds and Nuts: In a large mixing bowl, combine the pumpkin seeds, almonds, and cashews. This forms the base of your savory mix.
- Season the Mix: Drizzle the olive oil over the seeds and nuts, then sprinkle on the smoked paprika, garlic powder, onion powder, cayenne pepper (if using), salt, and black pepper. Toss everything together until the seeds and nuts are evenly coated with the oil and spices.
- Roasting: Spread the seasoned mixture in a single layer on a baking sheet lined with parchment paper. This prevents sticking and guarantees even roasting. Place the baking sheet in the preheated oven.
- Bake: Roast for about 15-20 minutes, stirring halfway through to guarantee even cooking. Keep a close eye on them to prevent burning; they should be golden brown and fragrant when done.
- Add Fresh Herbs: Once roasted, remove the baking sheet from the oven and immediately sprinkle the fresh rosemary over the warm seeds and nuts. Toss well to distribute the rosemary evenly as it releases its aroma.
- Cool and Serve: Allow the mix to cool completely on the baking sheet before transferring it to a serving bowl or an airtight container for storage. This cooling step is essential for achieving maximum crunchiness.
Extra Tips:
For the best results, make sure your pumpkin seeds are well-dried before roasting. If using seeds straight from a pumpkin, wash them thoroughly and pat them dry with a towel to remove excess moisture.
Feel free to experiment with different spices such as cumin or chili powder to customize the mix to your liking. If you prefer a milder blend, you can omit the cayenne pepper.
This mix also stores well in an airtight container for up to a week, making it a convenient make-ahead snack option.
Ghostly Garlic Parmesan Popcorn

Ghostly Garlic Parmesan Popcorn is the perfect savory snack to add a spooky twist to your Halloween festivities. This eerie treat combines the light, fluffy texture of freshly popped popcorn with the bold flavors of garlic and parmesan. The result is a deliciously addictive snack that will keep your guests reaching for more.
Not only is this popcorn easy to make, but it also provides a fun and festive way to enjoy Halloween without the sugar overload. Ideal for a movie night or as a party appetizer, Ghostly Garlic Parmesan Popcorn is sure to be a hit with kids and adults alike.
The key to this recipe lies in creating the perfect balance between the buttery garlic infusion and the sharp, tangy notes of parmesan cheese. Whether you’re hosting a Halloween bash or simply enjoying a quiet night in, this popcorn promises to deliver a hauntingly good time.
Ingredients (Serves 4-6 people):
- 1/2 cup popcorn kernels
- 3 tablespoons vegetable oil
- 4 tablespoons unsalted butter
- 2 cloves garlic, minced
- 1/2 cup grated Parmesan cheese
- 1 teaspoon salt
- 1 teaspoon garlic powder
- 1 teaspoon dried parsley (optional for garnish)
Cooking Instructions:
- Pop the Popcorn: Begin by heating the vegetable oil in a large pot over medium heat. Add a few popcorn kernels to the pot to test the heat. Once they pop, add the remaining popcorn kernels in an even layer, cover the pot with a lid, and shake occasionally until the popping slows down to a few seconds between pops. Remove from heat and transfer the popcorn to a large bowl.
- Prepare the Garlic Butter: In a small saucepan, melt the unsalted butter over low heat. Add the minced garlic and cook for about 1 minute, stirring frequently, until fragrant. Be careful not to burn the garlic.
- Season the Popcorn: Drizzle the garlic-infused butter over the popcorn, ensuring to distribute it evenly. Next, sprinkle the grated Parmesan cheese, salt, and garlic powder over the popcorn. Toss the popcorn thoroughly to make sure each kernel is well coated with the seasoning.
- Garnish (Optional): If desired, sprinkle dried parsley over the popcorn for a touch of color and extra flavor.
Extra Tips:
For best results, use freshly grated Parmesan cheese as it melts more evenly and enhances the flavor of the popcorn. If you prefer a spicier version, consider adding a pinch of cayenne pepper or red pepper flakes to the seasoning mix.
Additionally, if making this snack ahead of time, store the popcorn in an airtight container to maintain its crunchiness. Enjoy your Ghostly Garlic Parmesan Popcorn while watching your favorite Halloween classics!
Spooky Sea Salt Pretzel Bites

Spooky Sea Salt Pretzel Bites are the perfect Halloween treat for those who prefer savory over sweet. These bite-sized snacks aren’t only delicious but also fun to make and serve. Shaped like little pretzel twists or bites, they’re generously sprinkled with sea salt, giving them a delightful crunch. Perfect for Halloween parties or a cozy night in, these pretzel bites are a crowd-pleaser that will add a spooky twist to your spread.
The magic of these Spooky Sea Salt Pretzel Bites lies in their simplicity and the balance of flavors. The dough, enriched with a hint of sweetness from sugar, contrasts beautifully with the coarse sea salt topping. The baking soda bath is an essential step, as it gives the pretzels their signature chewy texture and golden-brown color. With this recipe, you can make enough pretzel bites to serve 4-6 people, making it an ideal option for small gatherings or family snack time.
Ingredients (Serves 4-6):
- 1 1/2 cups warm water (110°F)
- 1 packet active dry yeast (about 2 1/4 teaspoons)
- 1 teaspoon sugar
- 4 cups all-purpose flour
- 2 teaspoons salt
- 2/3 cup baking soda
- 10 cups water
- 1 large egg yolk, beaten with 1 tablespoon water
- Coarse sea salt
Instructions:
- Prepare the Dough: In a large bowl, combine the warm water, yeast, and sugar. Let it sit for about 5 minutes until it becomes frothy. This activates the yeast.
- Mix the Dough: Add the flour and salt to the yeast mixture, and mix until the dough comes together. You can use a stand mixer with a dough hook or knead by hand for about 8 minutes, until the dough is smooth and elastic.
- Let it Rise: Place the dough in a lightly oiled bowl, cover it with plastic wrap, and let it rise in a warm place for about 1 hour, or until doubled in size.
- Preheat the Oven: Preheat your oven to 450°F (232°C). Line two baking sheets with parchment paper and set aside.
- Prepare the Baking Soda Bath: In a large pot, bring 10 cups of water and the baking soda to a rolling boil.
- Shape the Pretzels: Punch down the risen dough and divide it into small pieces. Roll each piece into a rope and then shape into pretzel bites or twists.
- Boil the Pretzel Bites: Carefully drop each pretzel bite into the boiling baking soda water for about 30 seconds. Use a slotted spoon to remove them and place them on the prepared baking sheets.
- Egg Wash and Salt: Brush each pretzel bite with the beaten egg yolk mixture. Sprinkle generously with coarse sea salt.
- Bake: Bake the pretzel bites for 12-15 minutes, or until they’re a deep golden brown color.
- Cool and Serve: Let them cool slightly on a wire rack before serving.
Extra Tips:
When making the dough, verify your water isn’t too hot, as this can kill the yeast and prevent the dough from rising.
Be mindful of the baking soda bath time; too long can alter the taste and texture of the pretzels.
If you’re feeling creative, you can add food coloring to the dough for an extra spooky effect or shape the pretzels into Halloween-themed shapes like bats or pumpkins. Enjoy these Spooky Sea Salt Pretzel Bites fresh out of the oven for the best taste and texture.
Creepy Cheddar Cheese Crisps

Halloween is the perfect time to indulge in some creative and spooky treats, and Creepy Cheddar Cheese Crisps are a delightful way to add some savory flavor to your Halloween spread. These crisps aren’t only delicious but also bring a touch of spookiness to your table with their eerie shapes. Made from sharp cheddar cheese, these crisps are baked until golden and crisp, making them an irresistible snack for both kids and adults alike.
Perfectly crunchy and packed with flavor, they’re certain to be a hit at your Halloween party. Creating these Creepy Cheddar Cheese Crisps is surprisingly easy and requires only a few simple ingredients. With a little bit of creativity and easy-to-find Halloween-themed cookie cutters, you can transform ordinary cheese into a fun and festive snack.
Whether you’re hosting a Halloween gathering or simply looking to enjoy a spooky snack, these crisps are a must-try. Easy to prepare in just under an hour, they’re a quick way to add some savory delight to your Halloween celebrations.
Ingredients (Serving Size: 4-6 people):
- 2 cups of sharp cheddar cheese, grated
- 1 cup of all-purpose flour
- 1/2 cup of unsalted butter, softened
- 1/2 teaspoon of garlic powder
- 1/4 teaspoon of cayenne pepper (optional)
- Halloween-themed cookie cutters
Instructions:
- Preheat the Oven: Preheat your oven to 350°F (175°C) to guarantee it’s ready for baking the crisps.
- Prepare the Dough: In a large mixing bowl, combine the grated cheddar cheese, all-purpose flour, softened butter, garlic powder, and cayenne pepper (if using). Mix the ingredients until they form a smooth dough. You may need to use your hands to guarantee everything is well combined.
- Roll Out the Dough: Lightly flour a clean surface and roll out the dough to about 1/4-inch thickness. Guarantee the dough is evenly rolled out to achieve uniform crisps.
- Cut the Shapes: Using Halloween-themed cookie cutters, cut out spooky shapes from the rolled dough. Place each shape on a baking sheet lined with parchment paper. Gather any leftover dough, roll it out again, and cut more shapes until all the dough is used.
- Bake the Crisps: Place the baking sheet in the preheated oven and bake for 10-12 minutes, or until the edges of the crisps are golden brown. Keep an eye on them to avoid burning.
- Cool the Crisps: Once baked, remove the crisps from the oven and let them cool on the baking sheet for a few minutes. Then transfer them to a wire rack to cool completely before serving.
Extra Tips:
For an extra cheesy flavor, you can sprinkle a little bit of grated parmesan over the crisps before baking. If you want to add more spice, increase the amount of cayenne pepper or add a pinch of smoked paprika for a smoky flavor.
These crisps can be stored in an airtight container for up to a week, making them a convenient make-ahead snack for your Halloween festivities. Adjust the spice level according to your preference if you’re serving them to children or guests with sensitive palates.
Monster Munch Trail Mix

Monster Munch Trail Mix is the perfect salty snack to add some festive flair to your Halloween celebrations. This playful and crunchy mix is a delightful combination of savory, spicy, and nutty flavors that will have both kids and adults reaching for more.
It’s easy to prepare, making it an ideal treat for Halloween parties, movie nights, or simply to enjoy while handing out candy to trick-or-treaters. Plus, with its colorful and quirky ingredients, it fits right into the spooky theme of the holiday.
This recipe combines classic snack elements with a few surprise ingredients to create a trail mix that’s as exciting as a bag of Halloween candy, but with a savory twist. The Monster Munch Trail Mix is versatile and customizable to cater to different taste preferences and dietary needs.
Whether you’re hosting a gathering or packaging it in small bags as party favors, this mix is destined to be a hit.
Ingredients (serving size: 4-6 people):
- 2 cups pretzel twists
- 1 cup cheddar cheese crackers
- 1 cup roasted and salted peanuts
- 1 cup candy corn
- 1 cup roasted pumpkin seeds
- 1/2 cup wasabi peas
- 1 cup mini pretzel sticks
- 1/2 teaspoon smoked paprika
- 1/2 teaspoon garlic powder
- 1/4 teaspoon cayenne pepper
- 2 tablespoons olive oil
Instructions:
- Preheat the Oven: Start by preheating your oven to 300°F (150°C). This will guarantee that your trail mix gets a nice, even toast, enhancing the flavors of the ingredients.
- Mix the Dry Ingredients: In a large mixing bowl, combine the pretzel twists, cheddar cheese crackers, peanuts, candy corn, pumpkin seeds, wasabi peas, and mini pretzel sticks. Stir them together until they’re well mixed.
- Prepare the Seasoning: In a small bowl, mix together the smoked paprika, garlic powder, and cayenne pepper. These spices will add a subtle kick to your trail mix, making it more exciting.
- Coat with Olive Oil: Drizzle the olive oil over the dry ingredients in the large bowl. Toss the mixture gently to guarantee each piece is lightly coated with oil, which will help the spices adhere and promote even toasting.
- Season the Mix: Sprinkle the prepared seasoning over the trail mix. Toss everything together until the spices are evenly distributed throughout the mix.
- Bake the Trail Mix: Spread the seasoned mix onto a large baking sheet in an even layer. Place the baking sheet in the preheated oven and bake for 20-25 minutes, stirring halfway through, until the mix is lightly toasted and fragrant.
- Cool and Serve: Remove the trail mix from the oven and allow it to cool completely on the baking sheet. Once cooled, transfer the mix to a large serving bowl, or divide it into individual portions for serving.
Extra Tips: Feel free to adjust the spice levels in the seasoning to suit your taste. If you prefer a milder mix, reduce the cayenne pepper, or omit it altogether.
You can also add or substitute your favorite nuts, cereals, or dried fruits to create a mix that’s perfect for you. Store any leftover trail mix in an airtight container to keep it fresh and crunchy for up to a week.
Wicked Wasabi Peas

Wicked Wasabi Peas are a tantalizing treat perfect for adding a spicy twist to your Halloween snack spread. Their vibrant green color and fiery flavor make them an ideal addition to your spooky festivities, offering a delightful crunch that pairs well with any assortment of sweet treats.
Whether you’re hosting a Halloween party or simply looking for a unique snack to enjoy while watching your favorite horror films, these wasabi peas will satisfy your craving for something savory and spirited.
The process of making Wicked Wasabi Peas is straightforward and rewarding. By using simple ingredients and allowing the flavors to meld, you can create a snack that’s both delicious and memorable. This recipe is designed to serve 4-6 people, making it perfect for small gatherings or as a personal treat you can enjoy over several days.
Prepare to delight in the wickedly spicy kick that these peas deliver, leaving you and your guests reaching for more.
Ingredients (serving size: 4-6 people):
- 2 cups dried green peas
- 2 tablespoons wasabi powder
- 1 tablespoon soy sauce
- 1 tablespoon vegetable oil
- 1 teaspoon salt
- 1 teaspoon sugar
- 1/2 teaspoon garlic powder
Cooking Instructions:
- Prepare the Peas: Begin by soaking the dried green peas in a large bowl of water for at least 8 hours or overnight. This will guarantee they rehydrate properly and cook evenly.
- Preheat the Oven: Once your peas are rehydrated and drained, preheat your oven to 250°F (120°C). This low temperature will help dry out the peas without burning them.
- Season the Peas: In a large mixing bowl, combine the wasabi powder, soy sauce, vegetable oil, salt, sugar, and garlic powder. Stir until you have a smooth paste. Add the drained peas to the bowl and toss until they’re evenly coated with the wasabi mixture.
- Bake the Peas: Spread the seasoned peas in a single layer on a baking sheet lined with parchment paper. Place the baking sheet in the preheated oven and bake for about 1 to 1.5 hours, stirring every 20 minutes to guarantee even cooking. The peas should become dry and crispy.
- Cool and Store: Once baked, remove the peas from the oven and allow them to cool completely on the baking sheet. Once cooled, store them in an airtight container to maintain their crunchiness.
Extra Tips:
To achieve the perfect texture and flavor balance, keep an eye on the peas as they bake. Overbaking can lead to an overly crunchy, hard texture, while underbaking can result in a chewy consistency.
Adjust the wasabi powder to your personal spice preference, starting with less if you’re sensitive to heat and adding more for a more intense kick. You can also experiment with additional seasonings such as chili powder or paprika for extra flavor complexity.
Enjoy your Wicked Wasabi Peas as a standalone snack or as a zesty topping for salads and soups.
Frightful Black Olive Tapenade
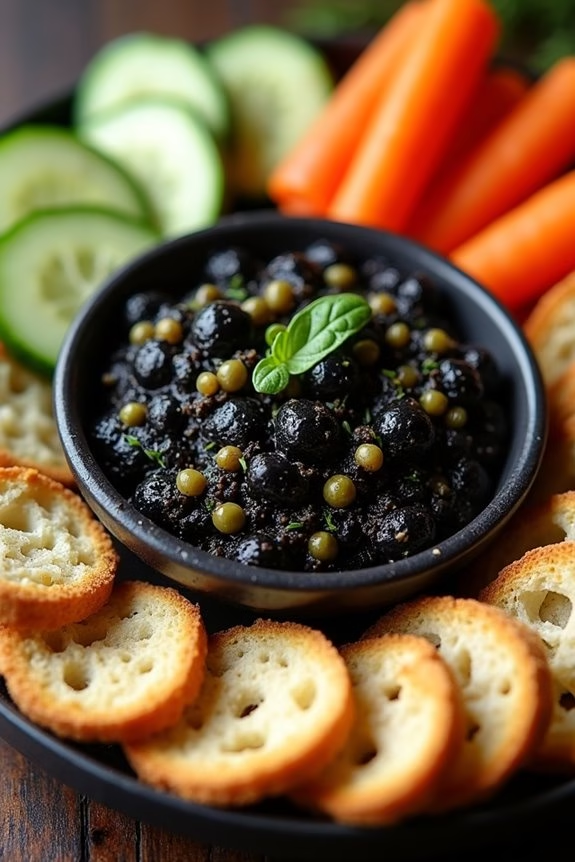
Frightful Black Olive Tapenade is the perfect savory snack to add a spooky touch to your Halloween festivities. This eerie appetizer combines the rich flavors of black olives, garlic, and capers to create a delightfully haunting spread.
Whether you’re hosting a Halloween party or simply want to indulge in a tasty treat, this tapenade is certain to impress your guests with its bold and savory taste. This versatile dish can be served with a variety of accompaniments, such as crusty bread, crackers, or fresh vegetables.
Its dark, mysterious appearance makes it a fitting addition to your Halloween snack spread, while its robust flavors guarantee it will be a hit among both adults and children. With a preparation time of just minutes, you’ll be able to whip up this Frightful Black Olive Tapenade in no time.
Ingredients for Serving 4-6 People:
- 2 cups black olives, pitted
- 2 tablespoons capers, drained
- 2 cloves garlic, minced
- 2 tablespoons fresh lemon juice
- 1/4 cup extra-virgin olive oil
- 1/4 teaspoon black pepper
- 1/4 teaspoon salt
- 1 teaspoon fresh thyme leaves
- 1 teaspoon fresh rosemary leaves
Cooking Instructions:
- Prepare the Ingredients: Start by gathering all the ingredients. Make sure the black olives are pitted and the garlic is minced. Rinse the capers to remove excess brine.
- Blend the Base: In a food processor, combine the black olives, capers, and garlic. Pulse the mixture a few times until the ingredients are coarsely chopped.
- Add Seasoning: Add the fresh lemon juice, black pepper, salt, thyme, and rosemary to the food processor. Pulse a few more times until everything is well mixed.
- Incorporate the Olive Oil: Slowly drizzle in the extra-virgin olive oil while continuing to pulse the mixture. Blend until you achieve your desired consistency, whether that’s a chunky or smooth paste.
- Taste and Adjust: Taste the tapenade and adjust the seasoning if necessary, adding more salt, pepper, or lemon juice to suit your preference.
- Chill the Tapenade: Transfer the tapenade to a bowl and cover it with plastic wrap. Allow it to chill in the refrigerator for at least 30 minutes to let the flavors meld together.
- Serve: Once chilled, serve the Frightful Black Olive Tapenade with your choice of accompaniments such as sliced baguette, crackers, or fresh vegetables.
Extra Tips:
For the best flavor, use high-quality olives and fresh herbs. If you can’t find fresh thyme or rosemary, dried herbs will work, but use them sparingly as they’re more potent.
The tapenade can be made a day in advance, which allows the flavors to develop even further. If you prefer a spicier version, consider adding a pinch of red pepper flakes to the mix. Additionally, you can customize the tapenade by adding sun-dried tomatoes or anchovies for an extra layer of flavor.
Haunted Herb-Roasted Nuts
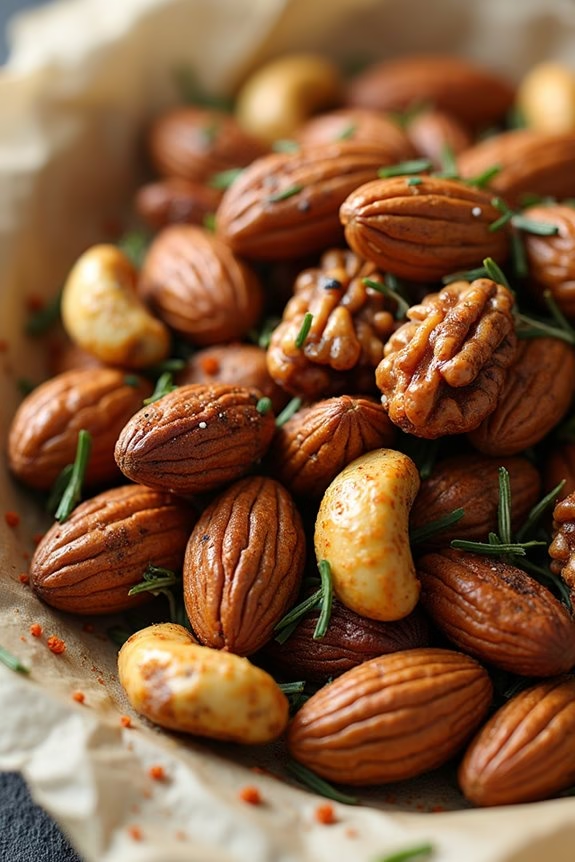
If you’re looking to add a spooky twist to your Halloween snack lineup, these Haunted Herb-Roasted Nuts are the perfect savory treat. Combining a medley of nuts with a blend of flavorful herbs and a hint of ghostly spiciness, this recipe is bound to be a hit at any Halloween gathering. Not only do these nuts offer a delightful crunch, but they also feature a haunting aroma and taste that will have your guests coming back for more.
Herb-roasted nuts are a versatile snack, and for this haunted version, we’ll be using a combination of rosemary, thyme, and a dash of cayenne pepper for a subtle kick. The nuts are roasted to perfection, bringing out their natural oils and flavors, while the herbs infuse them with an aromatic essence.
Whether you’re hosting a Halloween party or simply want to enjoy a festive snack, these nuts are easy to prepare and can be made in advance.
Ingredients (Serving size: 4-6 people):
- 1 cup raw almonds
- 1 cup raw cashews
- 1 cup raw walnuts
- 2 tablespoons olive oil
- 1 tablespoon fresh rosemary, chopped
- 1 tablespoon fresh thyme, chopped
- 1 teaspoon cayenne pepper
- 2 teaspoons sea salt
- 1 teaspoon black pepper
Cooking Instructions:
- Preheat the Oven: Begin by preheating your oven to 350°F (175°C). This will guarantee that the nuts roast evenly and develop a nice golden color.
- Mix the Nuts: In a large bowl, combine the almonds, cashews, and walnuts. Make sure they’re well mixed for even roasting.
- Prepare the Herb Mixture: In a small bowl, combine olive oil, rosemary, thyme, cayenne pepper, sea salt, and black pepper. Mix these ingredients thoroughly to create a uniform herb mixture.
- Coat the Nuts: Pour the herb mixture over the mixed nuts. Use a spatula or your hands to verify that all the nuts are evenly coated with the herb and oil mixture.
- Spread and Roast: Spread the seasoned nuts in a single layer on a baking sheet lined with parchment paper. This will prevent sticking and make cleanup easier. Roast the nuts in the preheated oven for 15-20 minutes, stirring halfway through to verify even roasting.
- Cool and Serve: Once the nuts are golden brown and fragrant, remove them from the oven. Allow them to cool completely on the baking sheet. Once cooled, they’re ready to serve.
Extra Tips:
For a more intense flavor, allow the nuts to marinate in the herb mixture for an hour before roasting. If you prefer a milder spice level, reduce the cayenne pepper to half a teaspoon.
You can also experiment with different nut varieties or add pumpkin seeds for an extra festive touch. Store any leftovers in an airtight container to maintain freshness and crunch.
Vampire Veggie Chips

Vampire Veggie Chips are the perfect savory addition to any Halloween gathering, offering a deliciously crunchy and eerie treat for both kids and adults. These colorful chips mimic the hues of a vampire’s lair, with deep reds, dark purples, and vibrant orange hues coming from a variety of vegetables. Not only are they festive and fun, but they also provide a healthier alternative to traditional potato chips. Serve them with a dip of your choice, and you have a ghoulishly good snack that’s sure to be a hit.
Creating Vampire Veggie Chips is a straightforward process that involves selecting seasonal vegetables, slicing them thinly, and baking them to crispy perfection. The key to this snack is in the seasoning — a mixture of salt and paprika enhances the natural flavors of the veggies and gives them a slightly smoky taste. Whether you’re hosting a Halloween party or just want a themed snack for a spooky movie night, these chips are sure to satisfy your salty snack cravings.
Ingredients (Serves 4-6):
- 2 medium-sized beets
- 2 medium-sized sweet potatoes
- 2 medium-sized carrots
- 2 tablespoons olive oil
- 1 teaspoon sea salt
- 1 teaspoon smoked paprika
- 1/2 teaspoon garlic powder
- 1/2 teaspoon onion powder
Cooking Instructions:
- Preheat the Oven: Preheat your oven to 375°F (190°C). Preparing the oven early guarantees it reaches the right temperature by the time you’re ready to bake.
- Prepare the Vegetables: Wash and peel the beets, sweet potatoes, and carrots. Using a mandoline slicer, slice the vegetables into thin, uniform chips about 1/8 inch thick. Uniform thickness guarantees even cooking.
- Dry the Vegetables: Pat the slices dry with a paper towel to remove excess moisture. This step is essential for achieving a crispy texture.
- Season the Chips: In a large mixing bowl, combine the olive oil, sea salt, smoked paprika, garlic powder, and onion powder. Add the vegetable slices to the bowl and toss them until they’re evenly coated with the seasoning mixture.
- Arrange on Baking Sheets: Line two baking sheets with parchment paper. Spread the seasoned vegetable slices in a single layer on the sheets, making sure they don’t overlap for even cooking.
- Bake the Chips: Place the baking sheets in the preheated oven and bake for 15-20 minutes. Midway through baking, flip the chips to guarantee both sides cook evenly. Keep an eye on them towards the end to prevent burning.
- Cool and Serve: Once the chips are golden and crisp, remove them from the oven and let them cool on a wire rack. Serve them immediately or store them in an airtight container for later.
Extra Tips: For the crispiest Vampire Veggie Chips, make sure your vegetable slices are as uniform as possible, which helps them bake evenly. If you want an extra kick, add a pinch of cayenne pepper to the seasoning mix.
Keep in mind that cooking times can vary based on the thickness of the slices, so watch them closely to avoid burning. Finally, using a mandoline slicer is highly recommended for achieving consistent slices, but a sharp knife will work in a pinch if you don’t have one.
Eerie Everything Bagel Crackers
Eerie Everything Bagel Crackers are the perfect spooky snack for your Halloween festivities. These crackers are flavored with the iconic taste of everything bagel seasoning, providing a savory bite that pairs well with a variety of dips or can be enjoyed on their own. With their crispy texture and hauntingly good flavor, they’re sure to be a hit at any Halloween party.
This recipe for Eerie Everything Bagel Crackers is simple and quick to make, requiring minimal ingredients while delivering maximum flavor. You can whip them up in no time and have them ready to serve as a salty complement to all the sweet treats typically associated with Halloween. This recipe yields enough crackers to serve 4-6 people, making it an excellent choice for small gatherings or family snacking.
Ingredients:
- 1 cup all-purpose flour
- 1/2 teaspoon salt
- 1/2 teaspoon baking powder
- 1/3 cup cold unsalted butter, cubed
- 1/4 cup cold water
- 2 tablespoons everything bagel seasoning
- 1 egg (for egg wash)
Instructions:
- Preheat the oven to 375°F (190°C). This guarantees that your oven is at the right temperature when you’re ready to bake the crackers, which will help them cook evenly and achieve the desired crispiness.
- Mix the dry ingredients: In a large bowl, combine the all-purpose flour, salt, and baking powder. Stir these ingredients together until they’re evenly mixed, which will guarantee even flavor distribution in the crackers.
- Incorporate the butter: Add the cubed cold unsalted butter to the flour mixture. Using a pastry cutter or your fingers, blend the butter into the flour until the mixture resembles coarse crumbs. This step is vital for achieving a flaky texture in the crackers.
- Add water: Gradually add the cold water, a little at a time, mixing with a fork until the dough begins to come together. You want the dough to be moist but not sticky.
- Knead and roll out the dough: Transfer the dough to a lightly floured surface and knead it gently until smooth. Roll the dough out to about 1/8-inch thickness using a rolling pin.
- Cut the crackers: Using a knife or a pizza cutter, cut the rolled-out dough into your desired cracker shapes. You can get creative with spooky Halloween-themed cookie cutters if you have them.
- Prepare for baking: Place the cut-out dough pieces on a baking sheet lined with parchment paper. Brush the tops lightly with beaten egg, which will help the seasoning stick and give the crackers a golden finish.
- Season and bake: Sprinkle the everything bagel seasoning evenly over the crackers. Bake in the preheated oven for about 12-15 minutes or until the edges are golden brown and the crackers are crispy.
- Cool and serve: Allow the crackers to cool on a wire rack. Once cooled, serve them with your choice of Halloween-themed dips or enjoy them on their own.
Extra Tips:
For extra crispiness, verify that your butter is cold before incorporating it into the flour mixture. If you prefer a richer flavor, you can experiment by adding a teaspoon of garlic powder or onion powder to the dough.
These crackers can be stored in an airtight container for up to a week, maintaining their fresh crunch. If you want to make them ahead of time, consider baking them a day in advance to save time on the day of your gathering.