
When it comes to hosting a Halloween party, serving snacks that are both tasty and visually stunning is a must. With these 15 savory options, like Witch’s Finger Breadsticks and Spider Deviled Eggs, you’ll have your guests enchanted at first bite. These creative snacks promise to add a touch of magic to your spooky celebration. Ready to impress with dishes that are as bewitching as they are delicious? Let’s explore these hauntingly good ideas together!
Witch’s Finger Breadsticks

Bring a touch of the spooky season to your table with these delightful Witch’s Finger Breadsticks. Perfect for Halloween gatherings, these eerie breadsticks won’t only entertain your guests but also satisfy their palates. Shaped like witch fingers and complete with almond nails, these breadsticks are a fun and savory snack that pairs wonderfully with dips like marinara sauce or a creamy cheese spread.
With a crispy exterior and soft, chewy interior, they provide a delightful contrast in textures that makes them an irresistible treat.
These breadsticks are surprisingly easy to make, using basic bread dough that you can either prepare from scratch or purchase pre-made from the store for convenience. The key to achieving the spooky finger appearance lies in the shaping and the addition of sliced almonds as fingernails. A little score here and there creates realistic knuckles, making them a hit not only with kids but with adults as well.
Serve these Witch’s Finger Breadsticks at your next Halloween party and watch them disappear faster than a witch on a broomstick!
Ingredients (Serves 4-6):
- 1 package (13.8 oz) refrigerated pizza dough
- 2 tablespoons unsalted butter, melted
- 1/4 cup grated Parmesan cheese
- 20-24 whole blanched almonds
- 1/2 teaspoon garlic powder
- 1/2 teaspoon dried oregano
- Salt to taste
- Red food coloring (optional)
Cooking Instructions:
- Preheat the Oven: Begin by preheating your oven to 375°F (190°C). This guarantees that the breadsticks bake evenly and develop a nice crust.
- Prepare the Dough: Roll out the refrigerated pizza dough on a lightly floured surface to prevent sticking. Cut the dough into 20-24 thin strips, each about 4-5 inches long, to resemble fingers.
- Shape the Fingers: Take each strip and gently roll it to form a cylinder. Pinch one end to create a pointed tip for the fingernail. Press lightly in two places along the length of the strip to form knuckles, and use a knife to make small cuts across the knuckles for a realistic look.
- Add the Fingernails: Press a whole blanched almond into the pointed end of each dough strip to create a fingernail. If desired, you can brush the almonds with a little red food coloring to make them look bloodier.
- Season the Breadsticks: Place the shaped fingers on a baking sheet lined with parchment paper. Brush each breadstick with melted butter, then sprinkle with grated Parmesan cheese, garlic powder, dried oregano, and a little salt.
- Bake: Place the baking sheet in the preheated oven and bake for 10-15 minutes, or until the breadsticks are golden brown and cooked through.
- Cool and Serve: Allow the breadsticks to cool slightly on a wire rack. Serve warm with your choice of dip.
Extra Tips:
For an extra spooky effect, you can add a drop of red food coloring to the end of each breadstick, near the almond, to mimic blood.
If you’re making the dough from scratch, allow it to rise for about an hour before shaping the fingers for a fluffier texture. To guarantee the almonds stay in place during baking, press them firmly into the dough and consider using a dab of egg white as glue.
These breadsticks can also be made a day ahead and reheated in the oven for a quick party snack.
Spooky Stuffed Jalapeños

If you’re looking to add a kick to your Halloween snack lineup, these Spooky Stuffed Jalapeños are the perfect choice. With their vibrant green color and irresistible cheesy filling, these spicy treats aren’t only delicious but also a fun addition to your party spread. The combination of creamy cheese and tangy jalapeños creates a flavor explosion that will leave your guests craving more.
Whether you’re hosting a Halloween party or just want to enjoy a festive snack, these stuffed jalapeños are sure to be a hit.
These jalapeños are stuffed with a mixture of cream cheese, cheddar, and crispy bacon, then baked to excellence. The result is a warm, gooey treat with a hint of spice that pairs beautifully with the creamy filling. Perfect for serving a crowd, these savory bites are easy to prepare and can be made ahead of time, making them an ideal choice for busy hosts.
They’re best served hot and fresh out of the oven, but can also be reheated if needed.
Ingredients (serves 4-6 people):
- 12 large jalapeño peppers
- 8 oz cream cheese, softened
- 1 cup shredded cheddar cheese
- 8 slices bacon, cooked and crumbled
- 1 teaspoon garlic powder
- 1 teaspoon onion powder
- 1/2 teaspoon smoked paprika
- Salt and pepper to taste
- Fresh chives, chopped (optional, for garnish)
Cooking Instructions:
- Preheat the Oven: Begin by preheating your oven to 375°F (190°C). This will guarantee your jalapeños cook evenly and the filling becomes perfectly melty.
- Prepare the Jalapeños: Carefully slice each jalapeño in half lengthwise. Using a spoon, scoop out the seeds and membranes to reduce the heat. If you prefer spicier jalapeños, leave some seeds intact.
- Make the Filling: In a medium-sized mixing bowl, combine the softened cream cheese, shredded cheddar cheese, crumbled bacon, garlic powder, onion powder, smoked paprika, salt, and pepper. Mix well until all ingredients are fully incorporated.
- Stuff the Jalapeños: Using a small spoon or piping bag, fill each jalapeño half with the cheese and bacon mixture. Be sure to pack the filling tightly into each pepper for maximum taste and texture.
- Bake the Jalapeños: Arrange the stuffed jalapeños on a baking sheet lined with parchment paper. Bake in the preheated oven for 15-20 minutes, or until the cheese is bubbly and the jalapeños are tender.
- Garnish and Serve: Once baked, remove the jalapeños from the oven and allow them to cool slightly. Garnish with freshly chopped chives if desired. Serve warm and enjoy!
Extra Tips:
When handling jalapeños, it’s always a good idea to wear gloves to protect your hands from the spicy oils, which can cause irritation. If you don’t have gloves, be sure to wash your hands thoroughly after handling the peppers.
For a milder version, consider using mini sweet peppers instead of jalapeños. If you’re making these ahead of time, prepare the jalapeños up to the point of baking, then cover and refrigerate. Simply bake them just before serving for the freshest taste.
Mummy Meatball Skewers
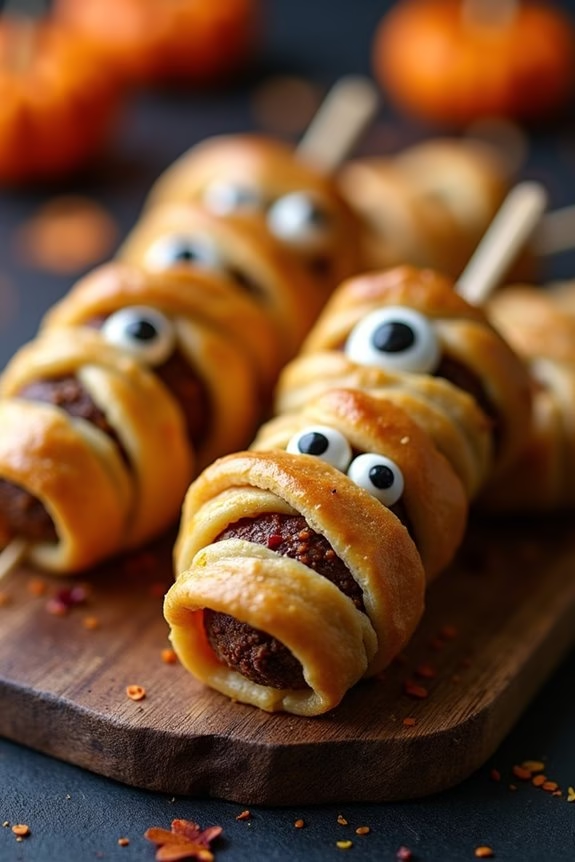
Mummy Meatball Skewers are a fun and spooky addition to your Halloween snack table. These savory treats combine the timeless appeal of meatballs with a playful twist—wrapping them in strips of dough to resemble mummies. Perfect for both kids and adults, these skewers are easy to make and guaranteed to be a hit at any Halloween gathering.
With a few simple ingredients, you can create a delicious and visually appealing appetizer that will have your guests coming back for more.
These skewers aren’t only visually delightful but also pack a punch of flavor. The seasoned meatballs are wrapped in crescent roll dough, which bakes to a golden perfection, adding a flaky and buttery texture. The addition of edible eyes gives these mummies a whimsical touch, making them an ideal choice for those who want to bring a bit of fun to their Halloween festivities.
With this recipe, you can serve a party of 4-6 people, delighting everyone with a savory snack that’s both easy to prepare and entertaining to eat.
Ingredients:
- 1 pound of ground beef
- 1/2 cup of breadcrumbs
- 1 egg
- 1/4 cup grated Parmesan cheese
- 2 cloves garlic, minced
- 1 teaspoon Italian seasoning
- Salt and pepper to taste
- 1 can (8 ounces) refrigerated crescent roll dough
- Edible candy eyes or black olives for eyes
- Wooden skewers
Cooking Instructions:
- Prepare the Meatballs: Preheat your oven to 375°F (190°C). In a mixing bowl, combine the ground beef, breadcrumbs, egg, Parmesan cheese, minced garlic, Italian seasoning, salt, and pepper. Mix thoroughly until all ingredients are well incorporated.
- Form the Meatballs: Roll the meat mixture into 1-inch balls and place them on a baking sheet lined with parchment paper. You should end up with about 20-24 meatballs.
- Bake the Meatballs: Bake the meatballs in the preheated oven for 15-20 minutes, or until they’re cooked through and have a nice browned exterior.
- Prepare the Dough: While the meatballs are baking, unroll the crescent dough and cut it into thin strips, about 1/4 inch wide.
- Wrap the Meatballs: Once the meatballs are cool enough to handle, wrap each meatball with a strip of dough, leaving a small gap for the eyes. Confirm the ends of the dough strips are tucked underneath the meatball to secure them.
- Bake the Mummies: Return the wrapped meatballs to the oven and bake for an additional 10-12 minutes, or until the dough is golden brown.
- Assemble the Skewers: Once the mummies are baked, allow them to cool slightly. Insert a wooden skewer through the center of each meatball mummy.
- Add the Eyes: Place the edible eyes or small pieces of black olive on each mummy to give them a spooky appearance.
Extra Tips:
When preparing the meatballs, confirm they’re uniform in size to promote even cooking. For an extra layer of flavor, consider adding a pinch of red pepper flakes to the meat mixture for a slight kick.
If you prefer a different type of ground meat, such as turkey or chicken, feel free to substitute. Additionally, if you can’t find edible eyes, black sesame seeds can be used as a creative alternative for the eyes.
These Mummy Meatball Skewers are best served warm, but can also be enjoyed at room temperature, making them a versatile addition to any Halloween spread.
Spider Deviled Eggs

Spider Deviled Eggs are an exciting and frightful twist on the classic deviled eggs, making them perfect for your Halloween festivities. These spooky snacks combine the rich, creamy texture of traditional deviled eggs with a visually enchanting design. By using black olives as the main embellishment, you can transform these appetizers into creepy crawly treats that are bound to delight both kids and adults alike.
Not only are they fun to make, but they also add an eerie charm to your Halloween spread. This recipe is designed to serve 4-6 people, making it ideal for small gatherings or as part of a larger Halloween buffet. The preparation involves creating the creamy filling and assembling the spider decoration on top of each egg. With a few simple ingredients and a little creativity, you can craft these chilling snacks that are as delicious as they’re decorative.
Ingredients:
- 6 large eggs
- 2 tablespoons mayonnaise
- 1 teaspoon Dijon mustard
- 1 teaspoon white vinegar or apple cider vinegar
- Salt and pepper to taste
- Paprika for garnish (optional)
- 1 can of black olives, pitted
Instructions:
- Boil the Eggs: Place the eggs in a single layer in a saucepan and cover them with cold water. Bring the water to a rolling boil over medium-high heat. Once boiling, remove the saucepan from heat, cover, and let the eggs sit for 10-12 minutes.
- Prepare the Eggs: After the eggs have cooked, drain the hot water and transfer the eggs to a bowl of ice water to cool for about 5 minutes. Once cooled, peel the eggs carefully.
- Slice and Scoop: Cut each egg in half lengthwise. Gently remove the yolks and place them in a mixing bowl. Set the egg whites aside.
- Make the Filling: Mash the egg yolks with a fork until smooth. Add mayonnaise, Dijon mustard, vinegar, salt, and pepper. Mix until well combined and creamy.
- Fill the Egg Whites: Spoon or pipe the yolk mixture back into the cavities of the egg whites, creating a slightly mounded top.
- Create the Spider Decoration: Slice the black olives in half. Place one half on the yolk mixture to form the spider’s body. Cut the remaining halves into thin strips to create the spider legs. Arrange four strips on each side of the olive body to complete the spider look.
- Add Final Touches: Lightly dust the tops with paprika for added color and flavor, if desired.
Extra Tips: When making Spider Deviled Eggs, make sure that the eggs are boiled just right to avoid a greenish yolk. Chilling the eggs in ice water not only stops the cooking process but also makes peeling easier.
For a more uniform and professional look, consider using a piping bag to fill the egg whites with the yolk mixture. If you want to save time, consider preparing the egg mixture a day in advance and storing it in the refrigerator, assembling the spiders shortly before serving.
Enjoy crafting these eerie yet tasty treats that will surely be a hit at your Halloween gathering!
Pumpkin-Shaped Cheese Ball

Pumpkin-Shaped Cheese Ball is a playful and festive dish that’s perfect for Halloween gatherings or fall-themed parties. This savory snack not only captures the essence of the season with its fun pumpkin shape but also brings a delightful blend of flavors and textures to your table.
With a creamy cheese mixture at its core, coated in a vibrant orange layer, and adorned with a stem for authenticity, this cheese ball is guaranteed to be a hit among both kids and adults alike.
Creating a Pumpkin-Shaped Cheese Ball is a straightforward process, requiring minimal cooking skills but plenty of creativity. The key is to balance the flavors within the cheese mixture while making certain the shape holds well.
Once formed, the cheese ball is coated with crushed cheese-flavored snacks to give it that classic pumpkin color and texture. The final touch involves adding a pretzel rod as the pumpkin stem, making this appetizer as visually appealing as it’s delicious.
Ingredients (Serves 4-6)
- 2 cups of shredded sharp cheddar cheese
- 8 oz cream cheese, softened
- 1/2 cup grated Parmesan cheese
- 2 teaspoons Worcestershire sauce
- 1/2 teaspoon garlic powder
- 1/2 teaspoon onion powder
- 1/4 teaspoon paprika
- 1/4 teaspoon ground mustard
- 1/8 teaspoon cayenne pepper (optional)
- 1 cup crushed cheese-flavored snack crackers (e.g., Cheez-Its)
- 1 pretzel rod
- Fresh parsley leaves for garnish
Cooking Instructions
1. Prepare the Cheese Mixture: In a large mixing bowl, combine the shredded cheddar cheese, softened cream cheese, grated Parmesan, Worcestershire sauce, garlic powder, onion powder, paprika, ground mustard, and cayenne pepper. Mix thoroughly until all ingredients are well combined and the mixture is smooth and uniform.
2. Shape the Cheese Ball: Transfer the cheese mixture onto a large piece of plastic wrap. Gather the plastic wrap around the cheese mixture and shape it into a ball. Make certain the ball is round and smooth, resembling a pumpkin.
Place the wrapped cheese ball in the refrigerator and chill for at least 2 hours, or until firm.
3. Coat the Cheese Ball: Once chilled, remove the cheese ball from the refrigerator and unwrap it. Roll the cheese ball in the crushed cheese-flavored snack crackers until completely coated. Press gently to make sure the crackers adhere well to the cheese surface.
4. Create the Pumpkin Appearance: Insert a pretzel rod into the top center of the cheese ball to act as the pumpkin stem. Use a small knife to create shallow vertical lines around the cheese ball, mimicking the grooves of a pumpkin.
5. Garnish and Serve: Decorate the base of the pumpkin stem with fresh parsley leaves to resemble pumpkin leaves. Place the cheese ball on a serving platter and serve with crackers or vegetable sticks for dipping.
Extra Tips
For the best flavor, make the cheese ball a day ahead and allow it to chill overnight. This will give the flavors time to meld and enhance the overall taste.
If you’re concerned about the cheese ball losing its shape while serving, consider placing it on a round piece of parchment paper or a small dish to maintain its form. Additionally, feel free to customize the cheese ball by adding other ingredients like chopped nuts or herbs to the cheese mixture for added texture and flavor.
Ghostly Guacamole Dip
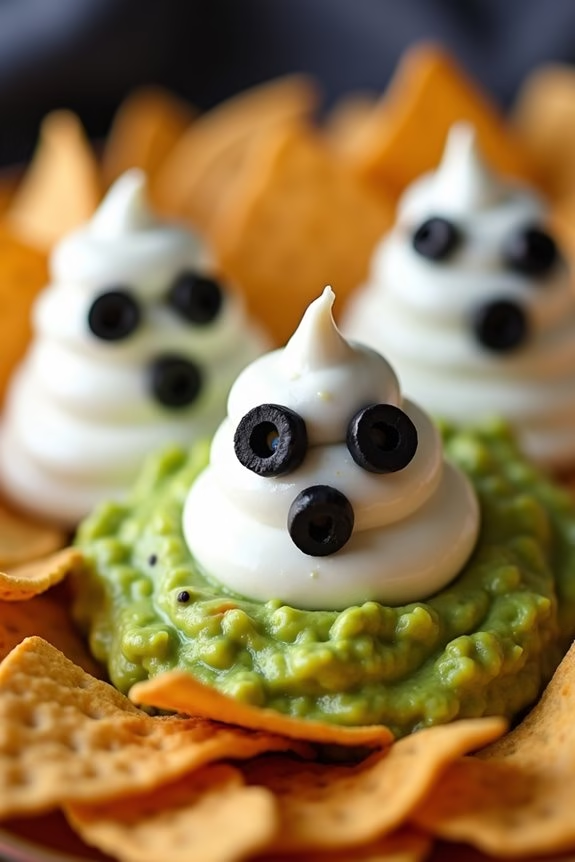
Ghostly Guacamole Dip is a hauntingly delightful appetizer perfect for any Halloween gathering. With its vibrant green hue and spooky ghostly garnishes, this dip is sure to be a crowd-pleaser among both kids and adults. It’s a fun twist on the classic guacamole that combines the creamy texture of ripe avocados with a hint of lime, cilantro, and a touch of spice. Serve it alongside your favorite tortilla chips, and you’ll have a festive and flavorful addition to your Halloween menu.
Not only is this Ghostly Guacamole Dip delicious, but it’s also incredibly easy to prepare, making it an excellent choice for busy hosts. The recipe uses fresh ingredients that are readily available and can be whipped up in no time. Whether you’re planning a large Halloween party or a small family gathering, this dip is versatile enough to fit any occasion. Plus, it’s a healthy option that adds a revitalizing twist to your snack table.
Ingredients (Serves 4-6 people):
- 4 ripe avocados
- 1/2 cup diced red onion
- 2 Roma tomatoes, diced
- 1/4 cup chopped fresh cilantro
- 2 tablespoons lime juice
- 1 jalapeño, seeded and finely chopped
- Salt to taste
- Black olives (for decoration)
- Sour cream (for decoration)
Instructions:
- Prepare the Avocados: Begin by cutting the avocados in half and removing the pits. Scoop the avocado flesh into a large mixing bowl.
- Mash the Avocados: Use a fork or a potato masher to mash the avocados until you achieve your desired level of chunkiness. Some people prefer a smooth texture, while others like it a bit chunky.
- Mix in Ingredients: Add the diced red onion, Roma tomatoes, chopped cilantro, lime juice, and jalapeño to the mashed avocados. Mix well to combine all the ingredients evenly.
- Season: Add salt to taste, adjusting as necessary. Mix again to make sure the seasoning is distributed throughout the guacamole.
- Create Ghostly Faces: Spoon the guacamole into a serving bowl. Using black olives, create eyes for your ghostly faces on the surface of the guacamole. Use a piping bag or a plastic sandwich bag with the corner snipped off to pipe sour cream into spooky mouth shapes.
- Serve: Arrange the decorated guacamole with tortilla chips around it and serve immediately for best flavor and presentation.
Extra Tips:
To make sure your Ghostly Guacamole Dip stays vibrant and fresh, prepare it just before serving. If you need to make it ahead of time, cover the guacamole with plastic wrap pressed directly onto the surface to prevent browning.
If you prefer a milder dip, you can omit the jalapeño or remove additional seeds. Additionally, be creative with your ghostly decorations; you can add more spooky elements using different edible decorations like sliced radishes or pickled jalapeños.
Bat Wings With Spicy Sauce

Halloween is the perfect time to get creative in the kitchen and surprise your guests with eerie yet delicious treats. One such dish that’s sure to be a hit at your Halloween party is Bat Wings With Spicy Sauce. These “bat wings” are actually chicken wings marinated in a flavorful blend of spices, then baked to crispy perfection and coated with a tantalizing spicy sauce. Not only do they make for a spooky presentation, but they also pack a punch of flavor that will leave your guests coming back for more.
The combination of savory spices and a spicy coating gives these bat wings a unique twist that’s both fun and delicious. Perfect for a party of 4-6 people, this dish can be easily prepared and served alongside other Halloween-themed snacks. Whether you’re hosting a large gathering or a small get-together, these Bat Wings With Spicy Sauce will surely add a ghoulish touch to your menu and delight your guests with their fiery taste.
Ingredients (Serves 4-6):
- 2 pounds of chicken wings
- 1 tablespoon olive oil
- 2 teaspoons smoked paprika
- 1 teaspoon garlic powder
- 1 teaspoon onion powder
- 1 teaspoon salt
- 1/2 teaspoon black pepper
- 1/2 teaspoon cayenne pepper
- 1/2 cup hot sauce (such as Frank’s RedHot)
- 1/4 cup unsalted butter
- 1 tablespoon honey
- 1 tablespoon apple cider vinegar
Cooking Instructions:
- Prepare the Wings: Preheat your oven to 400°F (200°C). Line a baking sheet with aluminum foil and place a wire rack on top. This will allow the heat to circulate around the wings, ensuring they bake evenly and become crispy.
- Season the Wings: In a large bowl, combine the chicken wings, olive oil, smoked paprika, garlic powder, onion powder, salt, black pepper, and cayenne pepper. Toss the wings until they’re evenly coated with the seasoning.
- Bake the Wings: Arrange the wings in a single layer on the prepared wire rack. Bake them in the preheated oven for 40-45 minutes, flipping halfway through, until the wings are golden brown and crispy.
- Prepare the Spicy Sauce: While the wings are baking, melt the butter in a small saucepan over medium heat. Once melted, add the hot sauce, honey, and apple cider vinegar. Stir the mixture until well combined and smooth. Remove from heat and set aside.
- Coat the Wings: Once the wings are done, transfer them to a large bowl. Pour the spicy sauce over the wings and toss them until they’re completely coated.
- Serve: Transfer the coated wings to a serving platter. Serve immediately with your choice of dipping sauces or alongside other Halloween-themed snacks.
Extra Tips:
For an extra crispy texture, pat the chicken wings dry with paper towels before seasoning them. This removes excess moisture, allowing the wings to crisp up beautifully in the oven.
If you prefer a milder sauce, reduce the amount of cayenne pepper or use a milder hot sauce. Additionally, you can prepare the spicy sauce a day in advance and store it in the refrigerator, then simply reheat it before coating the wings.
These Bat Wings With Spicy Sauce are sure to be a crowd-pleaser at your Halloween party!
Creepy Cheesy Eyeballs

Creepy Cheesy Eyeballs are the perfect savory snack to serve at your Halloween party, certain to delight your guests with their spooky appearance and delicious taste. These bite-sized treats combine the richness of cream cheese with the sharpness of olives, all nestled in a soft, flaky dough that melts in your mouth. A touch of spice adds an extra kick, making them an irresistible addition to your Halloween spread.
Whether you’re hosting a haunted house gathering or just want to surprise your family with a themed treat, these Creepy Cheesy Eyeballs are assured to please.
This recipe is designed to serve 4-6 people, offering enough Creepy Cheesy Eyeballs for everyone to enjoy. You can easily adjust the quantities if you’re expecting more guests or if you simply can’t get enough of these delicious bites. The ingredients are simple, and the preparation process is straightforward, making it an ideal choice for both novice and experienced cooks.
Plus, these eyeballs can be prepared in advance, leaving you with more time to enjoy the festivities.
Ingredients (Serves 4-6):
- 1 package (8 oz) cream cheese, softened
- 1 cup shredded mozzarella cheese
- 1/2 teaspoon garlic powder
- 1/4 teaspoon crushed red pepper flakes
- 1/4 cup pitted black olives
- 1/4 cup pitted green olives
- 1 package (8 oz) refrigerated crescent roll dough
- 1 egg, beaten
- Red food coloring (optional)
Instructions:
- Preheat and Prepare Dough: Preheat your oven to 375°F (190°C). Unroll the crescent roll dough onto a lightly floured surface. Press the perforations to seal and create one large rectangle.
- Mix the Filling: In a medium bowl, combine the softened cream cheese, shredded mozzarella cheese, garlic powder, and crushed red pepper flakes. Mix until well combined and smooth.
- Form the Eyeballs: Spoon about a tablespoon of the cheese mixture onto each section of the dough, spreading it evenly. Place one black or green olive in the center of each cheese mound to form the “pupil” of the eyeball.
- Shape and Seal: Cut the dough into squares around each cheese mound. Carefully wrap the dough around the cheese mixture, pinching the edges to seal completely. Roll gently into a ball shape and place seam-side down on a baking sheet lined with parchment paper.
- Add Detail and Bake: Brush each ball with the beaten egg to guarantee a golden finish. If desired, add a drop of red food coloring to create a bloodshot effect around the “pupil”. Place the baking sheet in the oven and bake for 12-15 minutes or until the dough is golden brown.
- Cool and Serve: Remove the Creepy Cheesy Eyeballs from the oven and allow them to cool slightly on the baking sheet. Serve warm and watch your guests delight in the spooky presentation.
Extra Tips:
For an even spookier look, try using a toothpick dipped in red food coloring to draw thin lines on the dough, mimicking blood vessels. You can also experiment with flavored cream cheeses, such as herb or jalapeño, to add a new dimension of flavor to your creepy creations.
Remember to serve these eyeballs warm for the best flavor and texture, but they can be reheated if prepared in advance.
Zombie Hand Pies
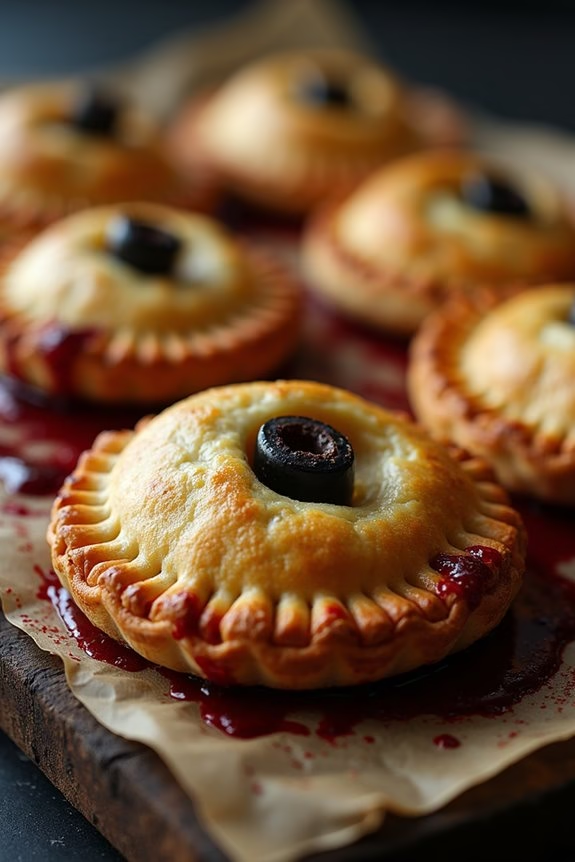
Zombie Hand Pies are a thrilling addition to your Halloween spread, bringing a touch of the macabre to your festive menu. These savory snacks are fundamentally flaky pastries filled with a deliciously seasoned meat mixture, shaped to resemble creepy zombie hands. Easy to make and equally delightful to eat, they’re bound to be a hit with both kids and adults at your Halloween gathering. Perfectly fitting the spooky theme, these hand pies aren’t only visually impressive but also incredibly tasty.
Making Zombie Hand Pies is a fun culinary project that you can even involve kids in, allowing their imaginations to run wild as they shape the pastry into eerie hand forms. The preparation involves crafting a simple, yet flavorful filling that combines ground meat with vegetables and spices, wrapped in a buttery pastry dough. The end result is a savory snack that’s both satisfying and eye-catching. Follow this recipe to create a serving size for 4-6 people, making sure your Halloween party is a ghoulish success.
Ingredients for Zombie Hand Pies (serving size: 4-6 people):
- 1 lb ground beef or turkey
- 1 medium onion, finely chopped
- 1 cup mushrooms, finely chopped
- 2 cloves garlic, minced
- 1 teaspoon salt
- 1/2 teaspoon black pepper
- 1 teaspoon paprika
- 1 tablespoon Worcestershire sauce
- 1/2 cup beef broth
- 1 tablespoon tomato paste
- 2 sheets of puff pastry, thawed
- 1 egg, beaten (for egg wash)
- Black olives (sliced for fingernails)
- Red food coloring (optional, for blood effect)
- Olive oil (for cooking)
Cooking Instructions:
- Prepare the Filling: In a large skillet over medium heat, add a drizzle of olive oil. Once hot, add the chopped onions and garlic, sautéing until the onions become translucent. Add the mushrooms and continue cooking until they soften.
- Cook the Meat: Add the ground beef or turkey to the skillet, breaking it up with a spoon. Cook until the meat is browned and fully cooked. Season with salt, pepper, and paprika.
- Add Flavors: Stir in the Worcestershire sauce, beef broth, and tomato paste. Let the mixture simmer for about 5 minutes, allowing the flavors to meld and the liquid to reduce slightly. Remove from heat and let it cool.
- Prepare the Pastry: Roll out the thawed puff pastry sheets on a lightly floured surface. Cut each sheet into hand shapes using a sharp knife or kitchen scissors. Be sure to cut pairs for each pie, one for the top and one for the bottom.
- Assemble the Pies: Spoon the meat mixture onto one hand-shaped pastry, leaving some space at the edges. Place the matching pastry hand on top, pressing the edges together to seal the filling inside. Use a fork to crimp the edges for an additional seal.
- Add the Details: Decorate each hand by placing a slice of black olive at the tip of each finger to resemble fingernails. If desired, use a small brush to apply a bit of red food coloring around the edges for a bloody effect.
- Bake the Pies: Preheat the oven to 400°F (200°C). Place the hand pies on a baking sheet lined with parchment paper. Brush each one with the beaten egg to achieve a golden finish. Bake for 20-25 minutes or until the pastry is puffed and golden brown.
- Serve: Allow the pies to cool slightly before serving. Enjoy them warm for the best flavor and texture.
Extra Tips: When crafting the hand shapes, feel free to get creative with the design, adding jagged edges or bent fingers for a more grotesque look. If you’re short on time, you can prepare the filling a day in advance and store it in the refrigerator until you’re ready to assemble the pies.
To make the pies extra spooky, consider using a small amount of red food coloring mixed with water to paint veins onto the pastry before baking. This dish is best enjoyed fresh out of the oven, but you can reheat leftovers in a 350°F (175°C) oven for about 10 minutes.
Bloody Mary Shrimp Shooters

This recipe is ideal for serving 4-6 people and is sure to be a hit at your next Halloween party. The Bloody Mary Shrimp Shooters are served in shot glasses for an easy, mess-free experience that allows guests to both sip and snack with ease. Not only is this dish simple to prepare, but it also gives your Halloween spread a touch of sophistication with its vibrant colors and exciting flavors.
Ingredients:
- 1 pound large shrimp, peeled and deveined
- 2 cups tomato juice
- 1 tablespoon prepared horseradish
- 2 tablespoons lemon juice
- 1 tablespoon Worcestershire sauce
- 1 teaspoon hot sauce (adjust to taste)
- 1/2 teaspoon celery salt
- 1/4 teaspoon black pepper
- 1 tablespoon olive oil
- Lemon wedges, for garnish
- Celery sticks, for garnish
Cooking Instructions:
1. Prepare the Shrimp: Begin by heating a large skillet over medium heat and adding the olive oil. Once the oil is hot, add the shrimp in a single layer. Cook the shrimp for about 2-3 minutes on each side, or until they turn pink and are fully cooked through.
Remove the shrimp from the skillet and set them aside to cool.
2. Make the Bloody Mary Mix: In a large mixing bowl, combine the tomato juice, horseradish, lemon juice, Worcestershire sauce, hot sauce, celery salt, and black pepper. Stir the mixture well until all the ingredients are fully incorporated.
3. Assemble the Shooters: Once the shrimp have cooled, place one or two shrimp in each shot glass. Pour the Bloody Mary mix over the shrimp until the glass is about three-quarters full.
4. Garnish and Serve: Add a lemon wedge and a small celery stick to each shooter for garnish. Make certain to serve the shooters cold, and provide small forks or skewers for easy shrimp consumption.
Extra Tips:
When selecting shrimp for this recipe, aim for large, fresh shrimp to guarantee the best flavor and texture.
Adjust the level of spiciness in the Bloody Mary mix to match your guests’ preferences by varying the amount of hot sauce.
For added flair, consider rimming the shot glasses with celery salt before filling them with the mix.
Also, prepare the Bloody Mary mixture in advance and chill it for a couple of hours to enhance the flavors, making the final assembly quick and seamless.
Monster Sliders

Monster Sliders are a fun and spooky addition to any Halloween party menu. These delicious mini burgers aren’t only visually appealing but are also packed with flavor, making them a perfect treat for both kids and adults. Whether you’re hosting a ghoulish gathering or simply want to surprise your family with a Halloween-themed dinner, Monster Sliders are sure to be a hit.
The key to making these sliders monstrous is in the details. With a few simple ingredients and a bit of creativity, you can transform ordinary sliders into a delightful Halloween snack. These sliders are designed to look like little monsters, complete with olive eyes and sharp cheese teeth. They’re quick to prepare and can be customized with your favorite toppings and condiments.
Ingredients (Serving Size: 4-6 people):
- 1 pound ground beef
- 1 teaspoon salt
- 1/2 teaspoon black pepper
- 1 tablespoon Worcestershire sauce
- 1 teaspoon garlic powder
- 6 slider buns
- 6 slices of cheddar cheese
- 2 tablespoons ketchup
- 2 tablespoons mustard
- 12 small green olives, pitted
- Toothpicks
- Lettuce leaves
- Sliced tomatoes
- Pickles
Cooking Instructions:
- Prepare the Meat Mixture: In a large bowl, combine the ground beef, salt, black pepper, Worcestershire sauce, and garlic powder. Mix well until all the ingredients are evenly distributed.
- Shape the Patties: Divide the meat mixture into 6 equal portions. Shape each portion into a small, round patty, slightly larger than the slider buns, as they’ll shrink when cooked.
- Cook the Patties: Heat a skillet or grill over medium-high heat. Once hot, add the patties and cook for about 3-4 minutes on each side, or until they reach the desired level of doneness. Remove from heat and set aside.
- Prepare the Cheese: While the patties are cooking, cut the cheddar cheese slices into triangles to resemble monster teeth. Each slice should yield about 4-5 triangles.
- Assemble the Sliders: On the bottom half of each slider bun, place a lettuce leaf, a slice of tomato, and a cooked beef patty. Add a squirt of ketchup and mustard on top of each patty.
- Add Cheese Teeth: Arrange the cheddar cheese triangles along the edge of the patty so they look like teeth sticking out from the slider.
- Create Monster Eyes: Insert a toothpick into each olive and place two olives on top of each slider to form the monster’s eyes.
- Finish the Sliders: Place the top half of the slider buns on each patty, ensuring the toothpick eyes are positioned securely.
Extra Tips:
For an extra spooky effect, consider using colored cheese slices or adding food coloring to the ketchup to make it look like “monster blood.”
If you want to add more flavor, try mixing some finely chopped onions or bell peppers into the ground beef mixture.
Remember to keep an eye on the patties while cooking to avoid overcooking, as they’re small and can dry out quickly. Enjoy these Monster Sliders warm for the best taste and texture.
Frightening Flatbread Pizza
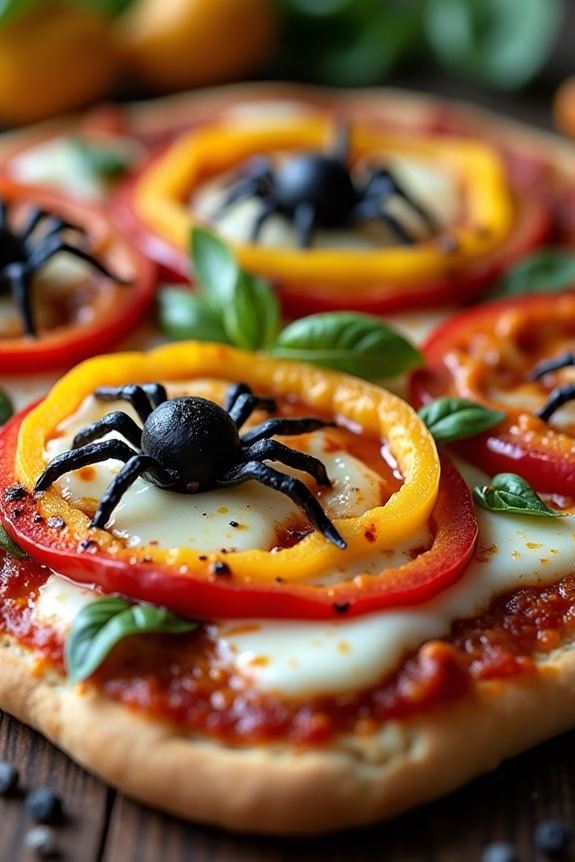
Frightening Flatbread Pizza is a deliciously spooky twist on the classic pizza, perfect for a Halloween gathering. This dish combines the crunchy texture of flatbread with a variety of savory toppings that are creatively arranged to give a frightening appearance. Think of ghostly shapes made of cheese, creepy olive spiders, and bell pepper jack-o’-lanterns, all baked to perfection on a crispy base.
It’s an ideal snack to serve at your Halloween party to delight all ages, from the little ghouls to the grown-up goblins.
The great thing about this Frightening Flatbread Pizza is its versatility and ease of preparation. You can customize the toppings to suit your guests’ preferences while maintaining the spooky theme. Whether you’re hosting a big Halloween bash or a smaller family gathering, this recipe is sure to be a hit.
Not only is it visually appealing, but it’s also packed with flavors that will leave your guests asking for more. Here is how you can make this savory dish for 4-6 people:
Ingredients:
- 4 flatbreads (store-bought or homemade)
- 1 cup tomato sauce
- 2 cups shredded mozzarella cheese
- 1 cup sliced black olives
- 1 red bell pepper
- 1 yellow bell pepper
- 1 cup sliced mushrooms
- 2 tablespoons olive oil
- 1 teaspoon dried oregano
- 1 teaspoon garlic powder
- Salt and pepper to taste
- Fresh basil leaves for garnish
Instructions:
- Preheat Your Oven: Begin by preheating your oven to 425°F (220°C). This will guarantee that your flatbread pizzas have a crispy crust and that the toppings are perfectly cooked.
- Prepare the Flatbreads: Place the flatbreads on a large baking sheet lined with parchment paper. Brush each flatbread with olive oil to create a golden, crispy base.
- Spread the Sauce: Evenly spread a thin layer of tomato sauce over each flatbread, leaving a small border around the edges to mimic a pizza crust.
- Add Cheese and Seasonings: Sprinkle the shredded mozzarella cheese generously over the tomato sauce. Then, evenly distribute the oregano, garlic powder, salt, and pepper over the cheese for added flavor.
- Create Spooky Toppings: Slice the bell peppers into thin strips and use them to create jack-o’-lantern faces on the flatbreads. Arrange the black olives to form spiders, and place mushroom slices to add a creepy forest vibe.
- Bake the Pizzas: Place the baking sheet in the preheated oven and bake for 12-15 minutes, or until the cheese is melted and bubbly, and the edges of the flatbread are crisp.
- Garnish and Serve: Once baked, remove the flatbreads from the oven and let them cool slightly. Garnish with fresh basil leaves for a touch of color and flavor. Slice and serve warm to your guests.
Extra Tips:
For an even more terrifying look, consider using cookie cutters to shape the cheese into ghosts or bats before placing them on the pizza. Additionally, you can add a touch of chili flakes or hot sauce for those who enjoy a bit of heat.
If some guests have dietary restrictions, you can easily make this dish vegetarian or gluten-free by selecting appropriate flatbread and toppings. Remember, the key to a successful Frightening Flatbread Pizza is creativity, so feel free to experiment with different toppings and arrangements to achieve the ultimate Halloween effect!
Skeleton Veggie Platter
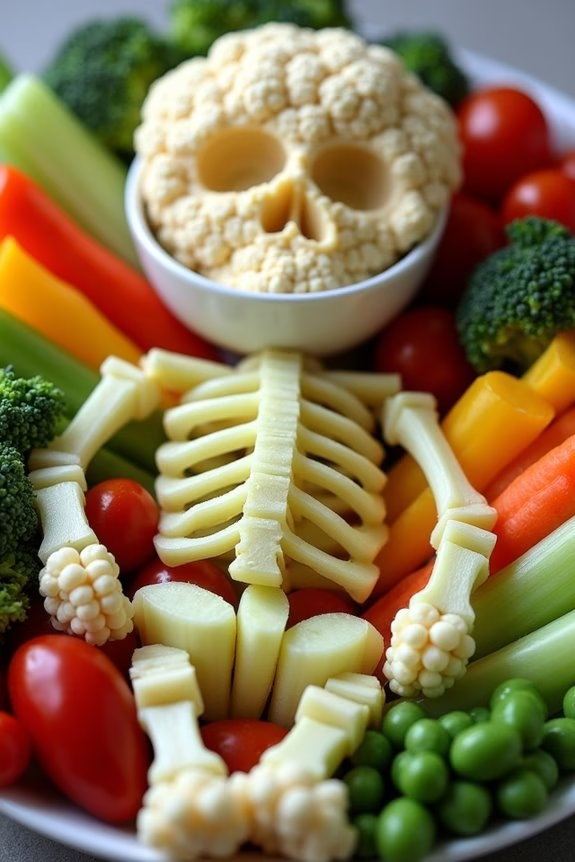
Halloween isn’t just about sweet treats; it’s also a great time to include some healthy options like the Skeleton Veggie Platter. This dish is a fun and creative way to serve vegetables, making them more appealing to kids and adults alike. Assembling a skeleton using a variety of colorful vegetables not only creates a festive display but also encourages everyone to munch on nutrient-rich snacks during the spooky celebrations. The platter serves as both a centerpiece and a delicious appetizer.
The key to a successful Skeleton Veggie Platter is using a mix of textures and colors to create a visually appealing and tasty creation. It’s all about creativity—think of the platter as your canvas and the vegetables as your paints. You’ll use a variety of veggies to form the skeleton’s head, ribs, arms, legs, and feet, along with a tasty dip as the “brain.” This recipe is designed to serve 4-6 people, making it perfect for a Halloween gathering or party.
Ingredients (serves 4-6):
- 1 head of cauliflower
- 1 cucumber
- 1 red bell pepper
- 1 yellow bell pepper
- 1 orange bell pepper
- 1 bunch of celery
- 1 small bunch of radishes
- 1 pint cherry tomatoes
- 1 cup baby carrots
- 1 cup sugar snap peas
- 1 cup broccoli florets
- 1 cup hummus or your favorite dip
Cooking Instructions:
- Prepare the Vegetables:
- Wash all vegetables thoroughly under cold water.
- Cut the cauliflower into medium-sized florets to form the skeleton’s head and “brain” when placed around the dip.
- Slice the cucumber into thin rounds for the spine and arms.
- Cut the bell peppers into strips for the ribs and hips, with some pieces reserved for decoration.
- Slice the celery into sticks to form the bones of the arms and legs.
- Halve the radishes, and keep the leafy tops to resemble the feet or hands.
- Halve the cherry tomatoes for decorative use.
- Assemble the Skeleton:
- On a large platter, place a small bowl in the center and fill it with hummus or your favorite dip. Arrange the cauliflower florets around the bowl to form the head.
- Lay the cucumber slices vertically down the center to create the spine.
- Arrange the bell pepper strips as ribs emanating from the cucumber spine.
- Use celery sticks to form the arms and legs, attaching radish halves at the end for hands and feet.
- Surround the skeleton with broccoli florets, cherry tomatoes, baby carrots, and sugar snap peas to fill in the gaps and add color.
- Use small pieces of bell pepper or radish to create eyes and a mouth on the cauliflower head.
Extra Tips:
For an extra festive touch, consider adding small edible decorations like slices of black olives for eyes or using a sharp knife to carve jack-o’-lantern faces into the bell peppers.
You can also provide additional dips like ranch or guacamole for more flavor options. Remember to keep the platter covered with plastic wrap until serving to maintain freshness, and refrigerate any leftovers promptly. This platter can be customized with your favorite veggies, so feel free to experiment with different colors and shapes to fit your Halloween theme.
Haunted Hummus Platter
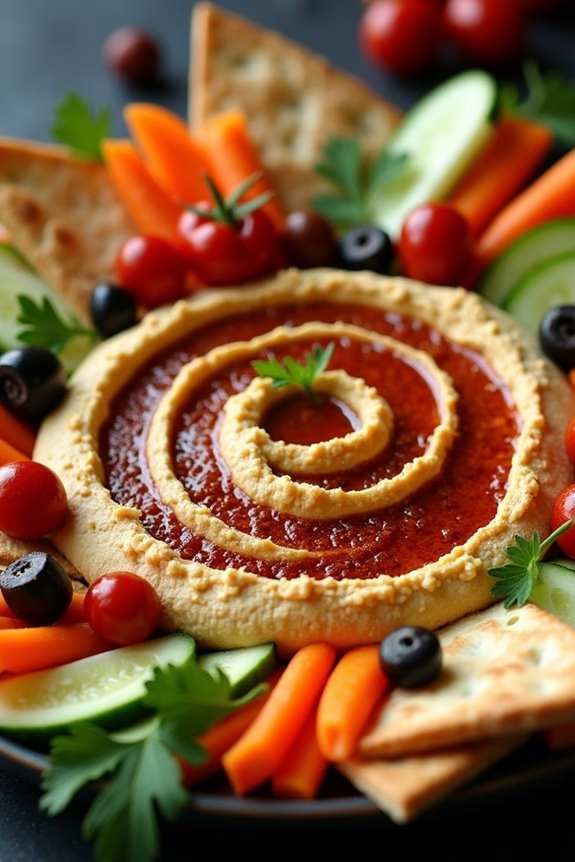
Embrace the spooky season with a Haunted Hummus Platter, a savory snack perfect for Halloween gatherings. This platter combines the creamy, tangy flavors of hummus with an array of colorful and creatively cut veggies and pita chips, all styled to evoke the chills of Halloween.
Whether you’re hosting a costume party or simply enjoying a cozy night in, this platter is sure to delight both kids and adults with its playful presentation and delicious taste.
This recipe serves 4-6 people, making it ideal for a small gathering or as a side dish for a larger feast. The key to this platter is in the details—arranging the items to create a spooky scene and incorporating ingredients that contrast in color and texture.
With a little creativity, you can transform a simple hummus platter into a Halloween masterpiece that tastes as good as it looks.
Ingredients:
- 2 cups of hummus
- 1 medium carrot
- 1 cucumber
- 1 red bell pepper
- 1 yellow bell pepper
- 1 small bunch of radishes
- 1 pack of pita bread or pita chips
- 1/2 cup black olives
- 1/2 cup cherry tomatoes
- 1 tablespoon olive oil
- 1 teaspoon smoked paprika
- 1 teaspoon cumin
- Fresh parsley for garnish
Cooking Instructions:
- Prepare the Vegetables: Wash and dry all vegetables thoroughly. Peel the carrot and slice it into thin sticks. Slice the cucumber into rounds. Cut the red and yellow bell peppers into strips, and slice the radishes into thin rounds.
- Cut and Toast the Pita Bread: If using pita bread, cut it into triangular wedges. Lightly brush each piece with olive oil. Arrange the wedges on a baking sheet and toast in an oven preheated to 350°F (175°C) for about 10 minutes or until they’re golden brown and crispy.
- Decorate the Hummus: Spread the hummus evenly onto a large platter or shallow bowl. Use a spoon to create a swirling pattern on the surface. Sprinkle the smoked paprika and cumin evenly over the top for added flavor and a pop of color.
- Assemble the Platter: Arrange the carrot sticks, cucumber rounds, bell pepper strips, and radish slices around the hummus in a spooky, artful pattern. Position the black olives and cherry tomatoes strategically to resemble eyes or other eerie features. Place the toasted pita wedges or chips around the edges of the platter.
- Garnish and Serve: Add fresh parsley leaves around the platter for a touch of green. Serve the Haunted Hummus Platter immediately, or cover it with plastic wrap and refrigerate until ready to serve.
Extra Tips:
For an extra touch of Halloween fun, consider using small Halloween-themed cookie cutters to shape some of the vegetables into bats, ghosts, or pumpkins.
If you prefer a spicier hummus, add a pinch of cayenne pepper to the mix. You can also enhance the olive eyes by slicing them in half and placing a small piece of red bell pepper inside for a bloodshot effect.
Remember to keep the platter chilled if preparing it ahead of time, and always serve with a spooky smile!
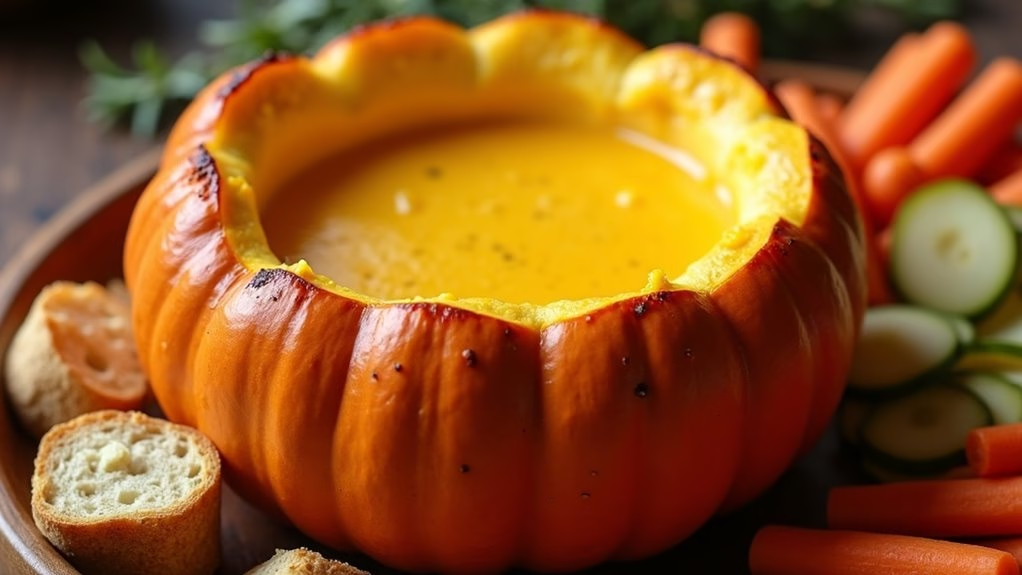
Cheesy Cauldron Fondue

This dish isn’t only fun but also relatively simple to prepare. With a few basic ingredients, you can create a rich and creamy cheese fondue that bursts with flavors. The mix of cheeses provides a perfect blend of sharpness and creaminess, while the addition of spices and optional wine or broth adds depth to the flavor. A serving size of 4-6 people guarantees that everyone gets a taste of the deliciousness, making it an ideal choice for small gatherings.
Ingredients (Serves 4-6):
- 1 medium-sized pumpkin
- 1 clove garlic, halved
- 1 cup dry white wine or low-sodium chicken broth
- 1 tablespoon lemon juice
- 3 cups shredded Gruyère cheese
- 2 cups shredded Cheddar cheese
- 1 tablespoon cornstarch
- 1/2 teaspoon ground nutmeg
- 1/4 teaspoon cayenne pepper
- Assorted dippers: crusty bread cubes, apple slices, carrot sticks, cooked sausage pieces
Instructions:
- Prepare the Pumpkin: Preheat your oven to 350°F (175°C). Cut the top off the pumpkin and remove the seeds and pulp. Rub the inside with the cut sides of the garlic clove. Place the hollowed pumpkin on a baking sheet and bake for about 30 minutes, until slightly tender but still firm.
- Prepare the Cheese Mixture: In a large bowl, toss the shredded Gruyère and Cheddar cheeses with the cornstarch until well-coated. This helps to thicken the fondue and prevents the cheese from clumping.
- Create the Fondue Base: In a medium saucepan, combine the wine (or broth) and lemon juice. Bring to a gentle simmer over medium heat.
- Melt the Cheese: Gradually add the cheese to the simmering liquid, stirring constantly with a wooden spoon. Allow each addition of cheese to melt before adding more. Continue until all the cheese is melted and the mixture is smooth.
- Season the Fondue: Stir in the nutmeg and cayenne pepper, adjusting seasonings to taste. If the fondue is too thick, you can add a bit more wine or broth to reach the desired consistency.
- Transfer to the Pumpkin: Carefully pour the cheese mixture into the prepared pumpkin. Place the pumpkin back in the oven and bake for an additional 10-15 minutes, until the fondue is heated through and bubbly.
- Serve: Place the pumpkin on a platter and arrange the dippers around it. Serve immediately, encouraging guests to dip their selections into the cheesy cauldron with fondue forks or skewers.
Extra Tips:
- Choose a pumpkin that’s sturdy and has a flat base to avoid tipping over.
- If you prefer a smoother texture, you can blend the cheese mixture with an immersion blender before pouring it into the pumpkin.
- For a unique twist, try experimenting with different cheese combinations, such as adding Fontina or Emmental.
- If you don’t have a pumpkin, a regular fondue pot or a large bread bowl can be used as an alternative serving vessel.