
With Halloween just around the corner, I’m bubbling with excitement to share some spirited and healthy snack ideas that will make your party table the talk of the night. Think vibrant Monster Apple Bites and whimsical Ghostly Banana Pops that are sure to delight both kids and adults. These aren’t just treats packed with flavor, they’re also bursting with wholesome goodness. Perfect for encouraging healthy habits and creating sweet family moments. Let’s get inspired with these creative, festive recipes!
Monster Apple Bites
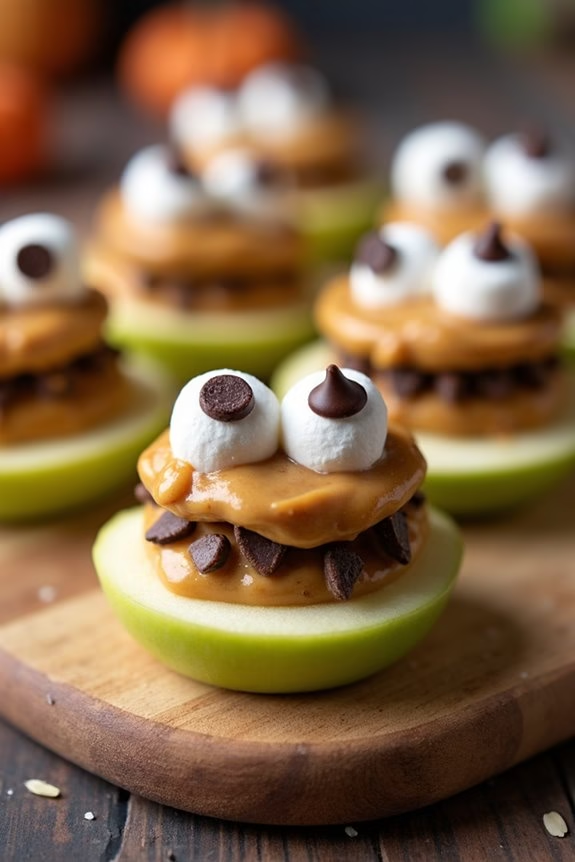
Monster Apple Bites are a fun and nutritious way to celebrate Halloween without the sugar overload. These spooky snacks combine the crisp texture of apple slices with the creamy goodness of almond or peanut butter, creating a delightful treat that kids and adults alike will enjoy.
Not only are they visually appealing with their monster-like appearance, but they also provide essential nutrients from the fruit and healthy fats from the nut butter. Perfect for Halloween parties or a festive after-school snack, Monster Apple Bites are easy to assemble and can be customized to fit your family’s taste preferences.
By incorporating simple ingredients such as apples, nut butter, and edible decorations, you can create a delicious, healthy snack that’s as fun to make as it’s to eat. This recipe serves 4-6 people, making it ideal for small gatherings.
Ingredients:
- 3 large apples (Granny Smith or another firm variety)
- 1/2 cup almond or peanut butter
- 1/4 cup sunflower seeds
- 1/4 cup mini marshmallows
- 1/4 cup chocolate chips or raisins
- 1 tablespoon lemon juice (optional)
Instructions:
1. Prepare the Apples: Wash the apples thoroughly and pat them dry. Slice each apple into quarters and then cut each quarter into half to make eight wedges per apple.
If using lemon juice, lightly brush it over the apple slices to prevent browning.
2. Spread the Nut Butter: Using a small spatula or butter knife, spread a thin layer of almond or peanut butter onto one side of each apple wedge. The nut butter will help the decorations stick and add a creamy texture to each bite.
3. Add Sunflower Seeds: Press a few sunflower seeds into the nut butter on each apple slice to resemble monster teeth. You can arrange them in a line or scatter them for a more haphazard, monstrous appearance.
4. Decorate with Eyes: Place two mini marshmallows at the top edge of each apple slice to serve as eyes. Use a small dab of nut butter to adhere a chocolate chip or raisin to each marshmallow for pupils, giving your monster a googly-eyed look.
5. Arrange and Serve: Place the Monster Apple Bites on a platter or serving tray. Arrange them in a fun, festive manner, and serve immediately to enjoy them at their crispiest and freshest.
Extra Tips: For a nut-free option, substitute almond or peanut butter with sunflower seed butter or soy nut butter. You can also get creative with the eyes by using candy eyes instead of marshmallows and chocolate chips.
If you plan to prepare these ahead of time, store them in an airtight container in the refrigerator and add the decorations just before serving to maintain freshness and texture.
Ghostly Banana Pops
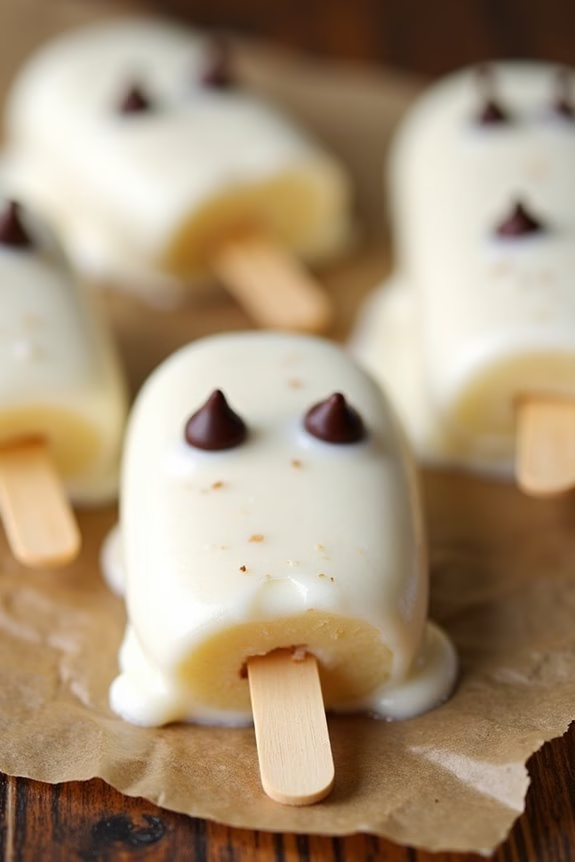
Celebrate Halloween with a fun and healthy treat that’s sure to be a hit with kids and adults alike: Ghostly Banana Pops. These delightful snacks aren’t only easy to make but also a much healthier alternative to the typical sugar-laden Halloween candies. Made from fresh bananas, Greek yogurt, and a few spooky decorations, these pops are a perfect way to add some ghostly charm to your Halloween festivities.
Ghostly Banana Pops are a great way to get kids involved in the kitchen, letting them express their creativity while keeping things nutritious. The combination of creamy yogurt and sweet bananas creates a deliciously satisfying treat that provides a boost of energy, making them an ideal choice for a Halloween party snack or a special after-school treat. With just a few ingredients and minimal prep time, you’ll have a batch of these spooky pops ready in no time.
Ingredients for 4-6 servings:
- 3 large ripe bananas
- 1 cup Greek yogurt (plain or vanilla)
- 1 tablespoon honey or maple syrup (optional)
- 1 teaspoon vanilla extract
- 12 mini chocolate chips
- 12 popsicle sticks or skewers
Cooking Instructions:
- Prepare the Bananas: Start by peeling the bananas and cutting each one in half crosswise. This will give you two shorter pieces per banana, ideal for the pops. Insert a popsicle stick or skewer into the flat, cut end of each banana piece to create a handle.
- Make the Yogurt Coating: In a medium-sized bowl, mix together the Greek yogurt, honey or maple syrup (if using), and vanilla extract until well combined. This will be the coating for your banana pops, giving them a delicious creamy texture.
- Coat the Bananas: Dip each banana piece into the yogurt mixture, using a spoon to help cover it evenly if necessary. Make sure the bananas are completely coated in yogurt for the best ghostly effect.
- Add the Faces: While the yogurt is still wet, press two mini chocolate chips into each banana to create the eyes of the ghost. Position them near the top of the banana where the curve starts, for a more realistic ghostly appearance.
- Freeze the Pops: Place the banana pops on a baking sheet lined with parchment paper, making sure they don’t touch each other. Freeze for at least 2 hours, or until the yogurt is firm to the touch.
- Serve and Enjoy: Once the banana pops are frozen, they’re ready to be enjoyed. Serve them straight from the freezer for the best texture and flavor.
Extra Tips:
For an even more festive touch, you can use different colored yogurt (like orange or green) to coat the bananas, transforming them into pumpkins or monsters. If you prefer a sweeter treat, use vanilla-flavored yogurt instead of plain.
Additionally, for those with dietary restrictions, you can substitute the Greek yogurt with a dairy-free alternative like coconut or almond yogurt. Remember to work quickly when coating the bananas, as the yogurt can start to melt. Enjoy your Ghostly Banana Pops as a fun and nutritious way to celebrate Halloween!
Pumpkin Spice Roasted Chickpeas
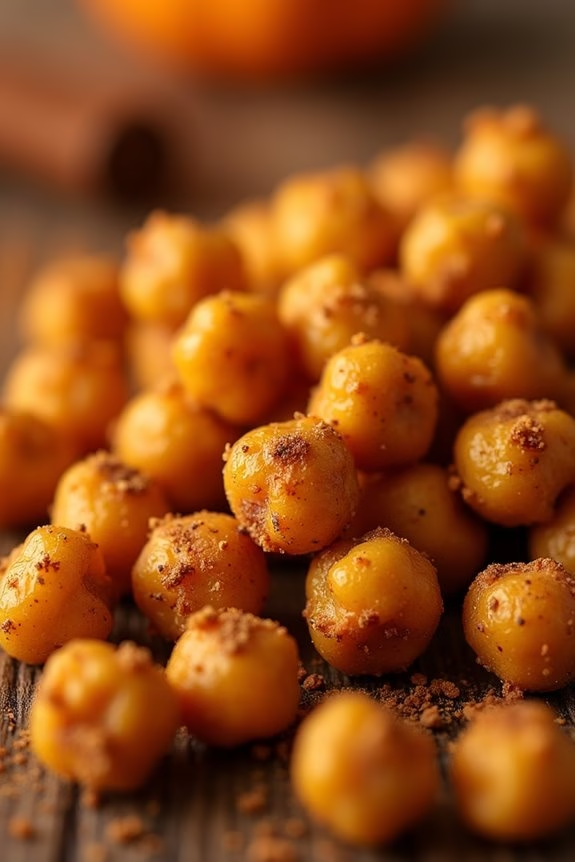
Pumpkin Spice Roasted Chickpeas are a delightful and healthy treat perfect for Halloween or any autumn occasion. These crunchy snacks offer a satisfying blend of sweet and savory flavors, making them a fantastic alternative to traditional candy. Packed with protein and fiber, roasted chickpeas are both nutritious and filling. When combined with the warm, aromatic spices of pumpkin spice, they become an irresistible snack.
Ideal for sharing at Halloween parties or for enjoying as a wholesome snack on a cozy fall day, this dish is both simple to prepare and full of flavor. The recipe is easy to follow, requiring just a few basic ingredients and minimal prep time. In less than an hour, you can transform ordinary chickpeas into a festive treat that both kids and adults will love.
Ingredients (Serves 4-6):
- 2 cans (15 ounces each) chickpeas, drained and rinsed
- 2 tablespoons olive oil
- 1 tablespoon maple syrup
- 2 teaspoons pumpkin spice
- 1/2 teaspoon cinnamon
- 1/2 teaspoon salt
Instructions:
- Preheat the Oven: Set your oven to 400°F (200°C) and allow it to fully preheat while you prepare the chickpeas. This guarantees even cooking and crisping.
- Prepare the Chickpeas: Drain and rinse the chickpeas thoroughly. Spread them out on a clean kitchen towel or paper towels, and gently pat them dry. Removing excess moisture is essential for achieving a crispy texture.
- Mix the Seasoning: In a large bowl, combine the olive oil, maple syrup, pumpkin spice, cinnamon, and salt. Stir the mixture until it’s well blended.
- Coat the Chickpeas: Add the dried chickpeas to the bowl with the seasoning mixture. Toss until all chickpeas are evenly coated. This step guarantees every chickpea is flavorful.
- Roast: Spread the chickpeas in a single layer on a baking sheet lined with parchment paper. Place in the preheated oven and roast for 25-30 minutes, stirring halfway through the cooking time. They should be golden brown and crispy when done.
- Cool and Serve: Remove the baking sheet from the oven and let the chickpeas cool completely. This will enhance their crunchiness. Once cooled, serve them in a bowl or store them in an airtight container.
Extra Tips:
For the best results, verify the chickpeas are completely dry before coating them with the seasoning mixture. This step is important for getting them crispy.
Adjust the amount of pumpkin spice and cinnamon according to your taste preference; some may prefer a more pronounced spice flavor. If you like a little heat, consider adding a pinch of cayenne pepper to the seasoning mix for a spicy twist.
Roasted chickpeas can be stored for up to a week in an airtight container, making them a convenient snack to have on hand.
Witch’s Broomstick Pretzels

Witch’s Broomstick Pretzels are a fun and creative way to add a touch of spooky charm to your Halloween festivities. These savory snacks aren’t only visually appealing but also delightfully delicious, making them a perfect treat for both kids and adults. Crafted with pretzel sticks and cheese, they mimic the iconic tool of witches, bringing a playful element to your Halloween spread.
Plus, they’re incredibly easy to make, guaranteeing you spend more time enjoying the party than preparing for it. Whether you’re hosting a Halloween bash or just looking to add a festive twist to your usual snack routine, Witch’s Broomstick Pretzels are an excellent choice. They can be prepared ahead of time and require minimal ingredients, which makes them a convenient option for any busy host.
Perfectly portioned for individual servings, these snacks are ideal for maintaining hygiene, especially at gatherings. Let’s jump into the recipe and see how you can whip up these enchanting broomsticks for a serving size of 4-6 people.
Ingredients (serving size: 4-6 people):
- 12 pretzel sticks
- 6 cheese sticks (string cheese)
- Fresh chives (or thin strips of green onions)
Cooking Instructions:
- Prepare the Cheese: Start by unwrapping the string cheese sticks. Cut each cheese stick into two equal pieces, resulting in 12 pieces total. These will form the bristles of the broomsticks.
- Shape the Cheese: Take one piece of cheese and carefully use a small knife to make lengthwise cuts around the bottom two-thirds of the cheese piece. Be sure not to cut all the way through; this will create a broomstick bristle effect.
- Insert the Pretzel Stick: Gently insert a pretzel stick into the uncut end of the cheese piece. Push it in about halfway to guarantee it holds firmly without breaking the cheese.
- Secure with Chives: Take a fresh chive (or a thin strip of green onion) and wrap it around the top of the cheese piece, right where the cheese meets the pretzel stick. Tie it in a small knot to secure the cheese to the pretzel, giving the appearance of a broomstick handle.
- Repeat the Process: Repeat steps 2 to 4 for the remaining pretzel sticks and cheese pieces until all broomsticks are assembled.
- Serve and Enjoy: Arrange the Witch’s Broomstick Pretzels on a festive platter and serve them immediately or store them in the refrigerator until your guests arrive.
Extra Tips: For an extra touch of flavor, consider using flavored string cheese, such as pepper jack or mozzarella with herbs. If you find that the cheese is too firm, allow it to sit at room temperature for a few minutes to soften slightly before cutting.
Additionally, if fresh chives are unavailable, thin strips of bell pepper or green onion can be used as a substitute. These broomsticks can be made a few hours in advance and kept chilled to guarantee they remain fresh until serving time.
Spooky Deviled Eggs
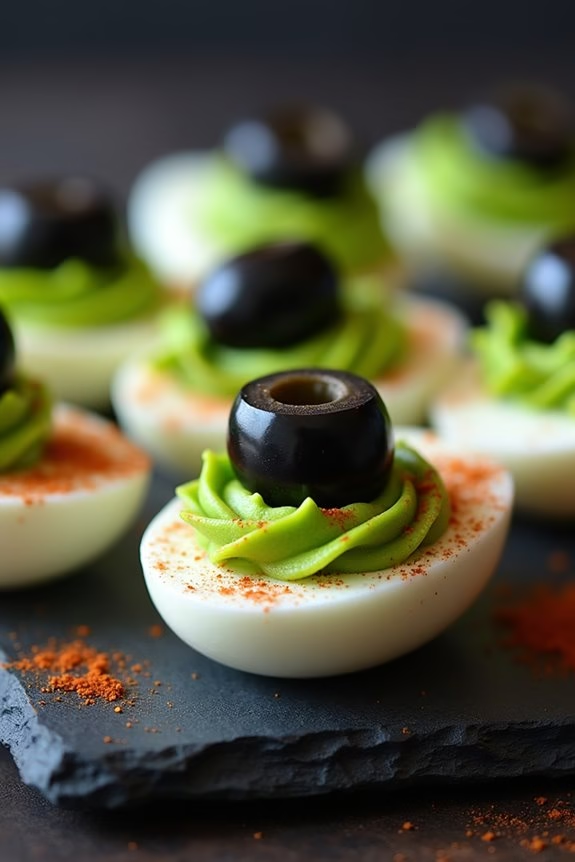
Spooky Deviled Eggs are a fun and delicious twist on the classic dish, perfect for a Halloween party or gathering. These eggs aren’t only healthy but also visually appealing, adding an eerie touch to your festive table. The creamy yolk filling is enhanced with a touch of natural food coloring to give it a ghoulish green hue, while the addition of olives and paprika gives each egg a spooky, yet appetizing, appearance.
This recipe makes enough for 4-6 people, guaranteeing that everyone at your Halloween bash can enjoy these delightfully devilish treats. The dish is both simple to prepare and packed with flavor, making it a great choice for busy hosts who want to provide a healthy option without sacrificing on taste or creativity.
Ingredients:
- 6 large eggs
- 1/4 cup mayonnaise
- 1 teaspoon Dijon mustard
- 1 teaspoon white vinegar
- Salt and pepper to taste
- Natural green food coloring (such as spinach or matcha powder)
- 12 black olives, pitted and halved
- Paprika for garnish
Instructions:
- Boil the Eggs: Place the eggs in a large pot and cover them with water. Bring the water to a boil over medium-high heat. Once boiling, remove the pot from heat and cover it with a lid. Let the eggs sit in the hot water for about 10-12 minutes.
- Cool and Peel the Eggs: After the eggs have cooked, drain the hot water and transfer the eggs to a bowl filled with ice water to cool for about 5 minutes. Once cooled, gently peel the shells off the eggs.
- Prepare the Filling: Cut each egg in half lengthwise and carefully remove the yolks, placing them in a medium-sized bowl. Set the egg whites aside on a serving platter. Mash the yolks with a fork until they reach a crumbly texture.
- Mix the Filling Ingredients: Add mayonnaise, Dijon mustard, vinegar, and a pinch of salt and pepper to the mashed yolks. Stir until the mixture is smooth and creamy. Add a small amount of natural green food coloring to achieve your desired shade of spooky green.
- Fill the Egg Whites: Using a spoon or a piping bag, fill each egg white half with the green yolk mixture. Be generous with the filling to guarantee each bite is flavorful.
- Decorate: Garnish each filled egg with a sprinkle of paprika to add a touch of color. Top each egg with an olive half, placing it in the center to resemble an eerie eyeball.
Extra Tips: To make peeling easier, use eggs that are at least a week old, as fresher eggs tend to cling to their shells more. If you prefer a stronger color, be careful with the amount of natural food coloring as it can alter the taste.
You can experiment with different decorations, such as using capers for pupils or tiny slices of pickles for a different spooky effect. Store any leftover Spooky Deviled Eggs in the refrigerator and consume them within 2 days for the best taste and freshness.
Mummy Carrot Sticks
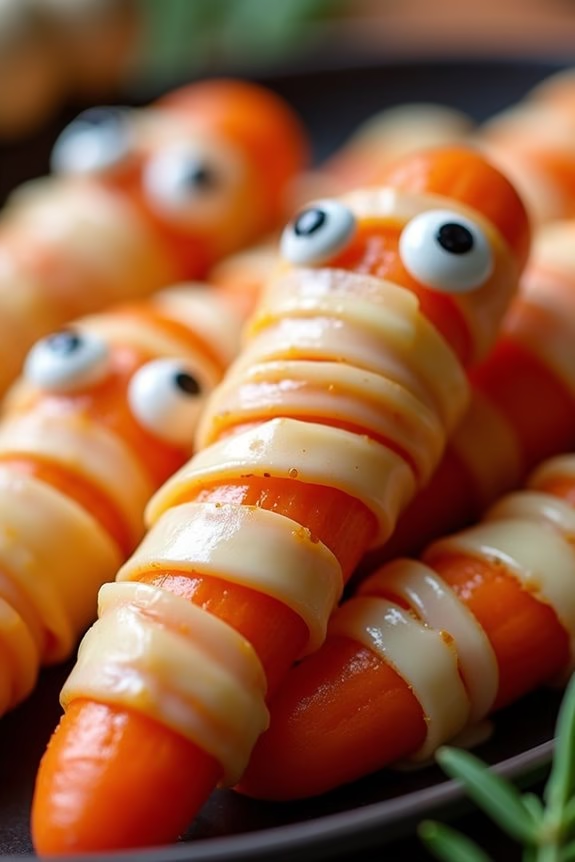
Mummy Carrot Sticks are a fun and healthy Halloween snack that will delight both children and adults. These creatively wrapped carrot sticks mimic the look of playful mummies, making them a perfect addition to any festive gathering. Not only are they visually appealing, but they also offer a nutritious alternative to the typical sugar-laden treats associated with Halloween. Packed with vitamins and minerals, carrots are a great source of beta-carotene, fiber, and potassium, which can contribute to overall health and wellness.
Making Mummy Carrot Sticks is a straightforward process that involves just a few simple ingredients. The use of cheese and a touch of creativity transforms ordinary carrot sticks into cute, spooky snacks. This recipe is perfect for involving kids in the kitchen, as they can have fun helping to wrap the carrots and add the finishing touches. With a few easy steps, you can create a batch of Mummy Carrot Sticks that will be a hit at any Halloween party or as a delicious after-school snack.
Ingredients for 4-6 servings:
- 12 large carrots
- 6 slices of cheese (e.g., mozzarella or cheddar)
- 24 edible candy eyes
- 1 tablespoon olive oil
- Salt and pepper to taste
Cooking Instructions:
- Prepare the Carrots: Start by peeling the carrots and cutting them into sticks approximately 4 inches long. Aim for a uniform size to guarantee even cooking and presentation.
- Wrap the Carrots: Lay out the cheese slices and cut them into thin strips. Wrap these strips around each carrot stick to mimic the look of mummy bandages. Leave small gaps to create the appearance of a wrapped mummy.
- Secure the Cheese: Lightly brush the wrapped carrot sticks with olive oil. This will help the cheese adhere better and give a glossy finish.
- Bake the Mummies: Preheat your oven to 375°F (190°C). Place the wrapped carrot sticks on a baking sheet lined with parchment paper. Bake for about 15-20 minutes, or until the carrots are tender, and the cheese is melted and slightly golden.
- Add the Eyes: Once removed from the oven, allow the carrot sticks to cool slightly before carefully placing two edible candy eyes on each stick. The warmth of the carrots will help the eyes stick better.
- Season and Serve: Sprinkle a pinch of salt and pepper over the Mummy Carrot Sticks. Serve them warm or at room temperature, and enjoy the delightful Halloween-themed snack.
For extra tips, verify that the cheese is wrapped securely enough around the carrots so it doesn’t peel off during baking. If using pre-sliced cheese, consider using a cheese that melts well to achieve the best mummy effect.
You can also experiment with different types of edible eyes or make your own from small dots of cream cheese and sliced olives. Adjust the amount of seasoning to fit your taste, and enjoy these fun, healthy treats!
Frankenstein Kiwi Cups
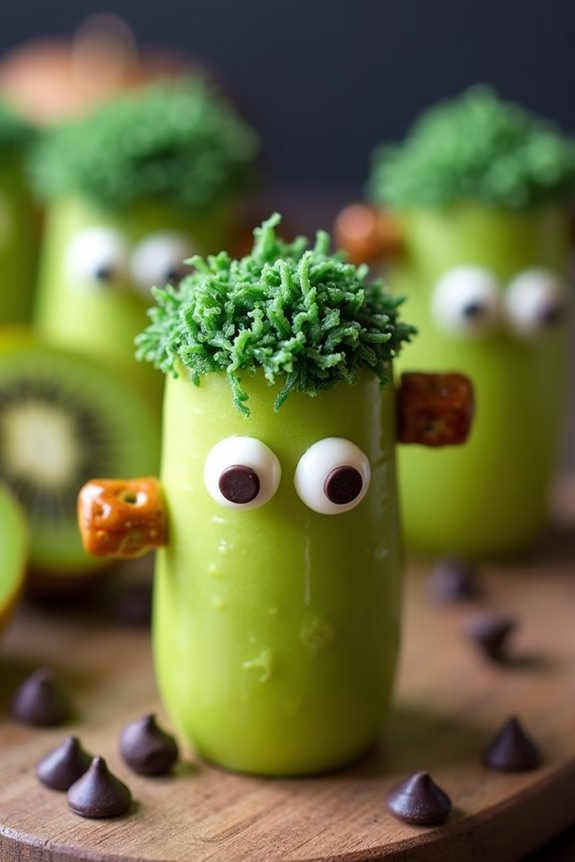
Frankenstein Kiwi Cups are a fun and healthy treat perfect for Halloween festivities. These spooky snacks aren’t only visually appealing but also packed with nutrients. With their vibrant green color and creative presentation, they’re sure to be a hit among both kids and adults.
Transforming simple kiwis into adorable mini Frankensteins is an engaging activity that can involve the whole family, making it a memorable experience.
Creating these Frankenstein Kiwi Cups requires minimal ingredients and effort, guaranteeing you spend more time enjoying the festivities rather than worrying about complex recipes. The combination of fresh fruit and creative decoration provides a perfect balance of taste and aesthetics. By offering a sweet alternative to the usual candy overload of Halloween, these cups are an excellent choice for health-conscious hosts.
Ingredients (Serves 4-6)
- 6 ripe kiwis
- 1 cup of Greek yogurt (plain or vanilla)
- 1/2 cup of mini chocolate chips
- 12 pretzel sticks
- 1/4 cup of honey or agave syrup
- Green food coloring (optional)
- 1/2 cup of blueberries or raisins for decoration
Instructions
- Prepare the Kiwis: Start by peeling the kiwis carefully to keep their shape intact. Once peeled, slice off a small portion from the bottom so they can stand up flat on a plate.
- Make the Yogurt Mixture: In a bowl, mix the Greek yogurt with a few drops of green food coloring until you achieve the desired shade of green. If you prefer a naturally green hue, you can skip the food coloring.
- Assemble the Faces: Use the mini chocolate chips to create the eyes by gently pressing them into the kiwi. For the mouth, use a small piece of a pretzel stick or blueberry to form a smile.
- Add the Hair: Insert mini chocolate chips on the top of the kiwis to resemble Frankenstein’s hair. You can also use a spoonful of the green yogurt mixture to make a messy hair effect.
- Attach the Bolts: Break the pretzel sticks in half and insert one piece on each side of the kiwi to resemble Frankenstein’s bolts.
- Finishing Touches: Use blueberries or raisins to add extra features like scars or eyebrows. Drizzle honey or agave syrup over the yogurt for added sweetness.
- Serve: Place the decorated kiwis on a serving platter and chill in the refrigerator for at least 30 minutes before serving to enhance the flavors.
Extra Tips
For added fun, involve children in the decorating process; they can express their creativity by crafting different facial expressions.
You can also experiment with different fruits to create varied textures and colors – for example, using banana slices for eyes or slices of strawberries for a pop of color.
Verify the kiwis are ripe but firm to make them easier to handle and decorate. Additionally, these treats can be prepared a few hours in advance and stored in the refrigerator, making them a convenient option for party planning.
Eyeball Caprese Bites
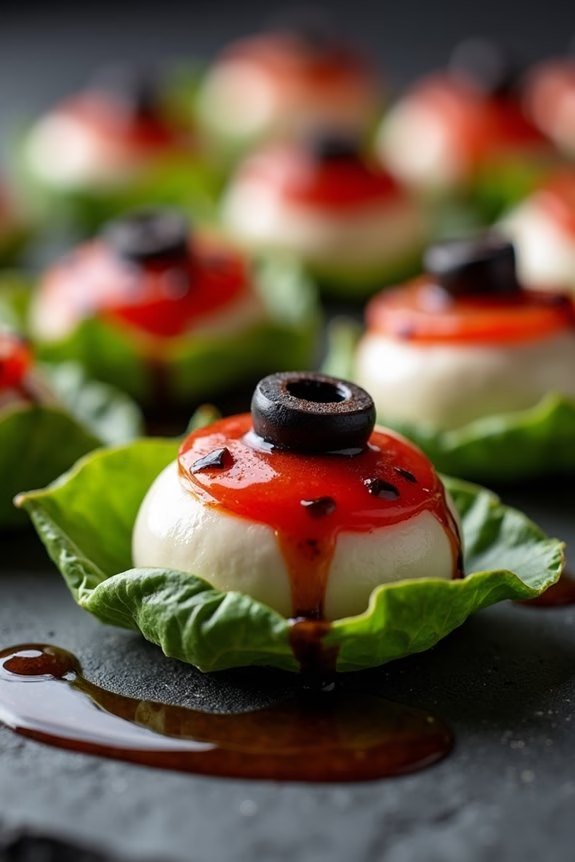
Eyeball Caprese Bites are a spooky and delightful twist on the classic Italian appetizer, perfect for adding some Halloween flair to your snack table. These fun and eerie bites aren’t only visually striking but also incredibly tasty, combining the fresh flavors of tomatoes, mozzarella, and basil.
They’re a great way to enjoy the fun of Halloween while still keeping things light and healthy. Perfect for a party or a family gathering, Eyeball Caprese Bites are easy to assemble and require minimal ingredients, making them an excellent choice for busy hosts.
The playful presentation will certainly catch the attention of your guests, and the fresh ingredients guarantee that these bites are as nutritious as they’re amusing. With a serving size suitable for 4-6 people, these bites are sure to be a hit at any Halloween event.
Ingredients (for 4-6 servings):
- 12 cherry tomatoes
- 12 small fresh mozzarella balls (bocconcini)
- 6 large basil leaves
- 12 black olives (pitted)
- 1 tablespoon balsamic glaze
- 1 tablespoon extra virgin olive oil
- Salt and pepper to taste
- Toothpicks or small skewers
Cooking Instructions:
- Prepare the Ingredients: Begin by washing the cherry tomatoes and basil leaves thoroughly. Pat them dry with a paper towel. Slice each cherry tomato in half and set aside.
- Assemble the Eyeballs: Take a mozzarella ball and place it in the center of a basil leaf. Wrap the basil leaf around the mozzarella ball so that it resembles an eyeball with a green iris.
- Create the Pupil: Place a half cherry tomato on top of the wrapped mozzarella ball, cut side facing up. This will give the appearance of the pupil of the eyeball.
- Add the Olive: Cut the black olives into small rings. Place an olive ring on top of the cherry tomato half to complete the eyeball look.
- Secure with Toothpicks: Insert a toothpick or small skewer through the center of the assembly to hold everything in place.
- Season and Drizzle: Arrange the completed Eyeball Caprese Bites on a serving platter. Lightly drizzle extra virgin olive oil and balsamic glaze over the bites. Sprinkle with salt and pepper to taste.
- Serve Immediately: These bites are best served fresh, so prepare them just before serving to confirm the ingredients remain crisp and flavorful.
Extra Tips:
When selecting mozzarella balls, opt for the smallest size available to make the assembly process easier and to confirm the proportions look correct for an “eyeball”.
If you can’t find small bocconcini, you can cut larger mozzarella balls into halves or quarters. For an added Halloween flair, use colored toothpicks or skewers to match your party theme.
Experiment with different tomato and olive varieties for a unique look and flavor. Finally, feel free to adjust the amount of balsamic glaze and olive oil based on your personal taste preferences.
Candy Corn Fruit Parfaits
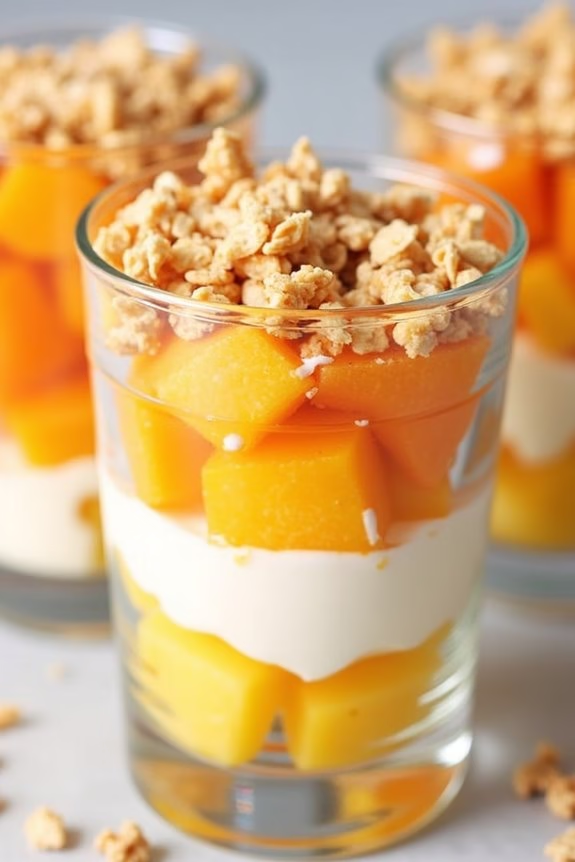
Candy Corn Fruit Parfaits are a delightful and healthy twist on the traditional Halloween candy. This vibrant dish not only captivates with its colorful layers that mimic the iconic candy corn but also offers a nutritious alternative to sugary treats. Made with layers of fresh fruits and creamy yogurt, these parfaits are perfect for festive gatherings or an exciting snack for kids and adults alike.
Creating Candy Corn Fruit Parfaits is simple and quick, making it an ideal recipe to prepare with family or friends. The dish combines the natural sweetness of pineapple and oranges with the creamy texture of yogurt, topped with a sprinkle of crunchy granola. This recipe serves 4-6 people and is a great way to enjoy the Halloween spirit with a touch of healthiness.
Ingredients (serving size: 4-6 people):
- 2 cups pineapple chunks
- 2 cups orange segments
- 2 cups vanilla yogurt
- 1 cup granola
- 1/4 cup shredded coconut (optional)
- Honey or maple syrup (optional, for drizzling)
Cooking Instructions:
- Prepare the Fruits: Start by cutting fresh pineapple into small chunks and segmenting the oranges. Make sure all the fruits are bite-sized to guarantee easy layering and eating.
- Layer the Parfaits: In clear glasses or small bowls, begin by adding a layer of pineapple chunks at the bottom. The vibrant yellow will form the base of your candy corn-inspired layers.
- Add the Yogurt: On top of the pineapple, spoon a generous layer of vanilla yogurt. This creamy layer acts as the middle white section of the candy corn.
- Top with Oranges: Add a layer of orange segments on top of the yogurt. This completes the candy corn color scheme with the bright orange hue.
- Add Crunchy Toppings: Sprinkle granola over the top of the orange layer for a crunchy texture. If desired, add a touch of shredded coconut for extra flavor.
- Drizzle with Sweetener: For added sweetness, drizzle a small amount of honey or maple syrup over the granola. This step is optional based on your preference for sweetness.
- Chill and Serve: Refrigerate the parfaits for at least 30 minutes to allow the flavors to meld together. Serve chilled and enjoy!
Extra Tips:
For a more festive presentation, consider using themed glassware or jars with decorative Halloween designs.
If you’re preparing these parfaits ahead of time, keep the granola separate and add it just before serving to maintain its crunch.
Feel free to swap vanilla yogurt for Greek yogurt if you prefer a thicker consistency or want to add more protein.
Finally, you can experiment with different fruit combinations, such as mango or peaches, to suit your taste or availability.
Haunted Veggie Skeleton
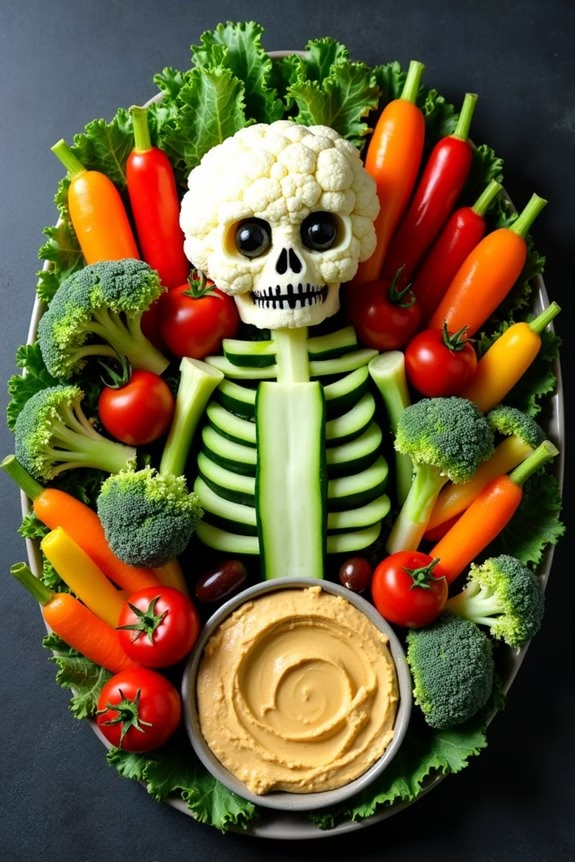
The beauty of this dish lies in its versatility, allowing you to customize it with your favorite vegetables. For this recipe, we’ll be using a variety of vegetables that are in season and readily available, creating a delicious and eye-catching display.
The vibrant colors and different textures will add to the fun, making it a great activity to engage kids in the kitchen. Serve it with a side of hummus or your favorite dip to add an extra layer of flavor and guarantee that everyone enjoys their veggies in a playful and festive way.
Ingredients (Serves 4-6)
- 1 head of cauliflower
- 1 cucumber
- 1 red bell pepper
- 1 yellow bell pepper
- 1 bunch of celery
- 1 cup baby carrots
- 1 cup cherry tomatoes
- 1 bunch of kale
- 1 cup broccoli florets
- Black olives
- Hummus or preferred dip
Instructions
- Prepare the Base: Start by washing all the vegetables thoroughly. Pat them dry with a clean kitchen towel to remove excess water. This will help the veggies stay crisp and fresh.
- Assemble the Skeleton Head: Take the cauliflower and detach a medium-sized floret to form the skull. Place it at the top center of your serving platter. Use small pieces of black olives to create eyes and a mouth on the cauliflower skull.
- Create the Spine and Ribs: Slice the cucumber lengthwise into thin strips. Lay them vertically below the cauliflower to form the spine. For the ribs, cut the celery stalks into 3-inch pieces and arrange them horizontally on either side of the spine.
- Add the Arms and Legs: Use the baby carrots to form the arms and legs. Position them extending from the ‘ribs’ and ‘spine’ to create a skeletal form. You can snap some carrots in half if they’re too long.
- Fill in the Body: For the shoulders, use the yellow and red bell peppers. Slice them into rings and place them above the arms. Next, arrange the broccoli florets around the spine to form the body.
- Decorate with Cherry Tomatoes: Use the cherry tomatoes to decorate the skeleton, placing them around the arms, legs, or wherever you see fit to add color and fill gaps.
- Add Final Details: Arrange the kale leaves around the edges of the platter as a spooky border. This will enhance the Halloween theme and add a touch of green to the dish.
- Serve with Dip: Place a small bowl of hummus or your favorite dip at the bottom of the platter, near the skeleton’s feet, for easy dipping.
Extra Tips
When setting up your Haunted Veggie Skeleton, consider using a large, flat platter to guarantee there’s enough space for all the vegetables.
You can prepare the veggies in advance and store them in the refrigerator, but it’s best to assemble the skeleton just before serving to keep everything fresh and crisp.
Feel free to get creative with the design and use any vegetables you have on hand. Different colored peppers, radishes, or even asparagus can be great additions to your veggie skeleton. Enjoy the process and have fun embracing the Halloween spirit with this healthy and festive snack!
Vampire Grape Pops
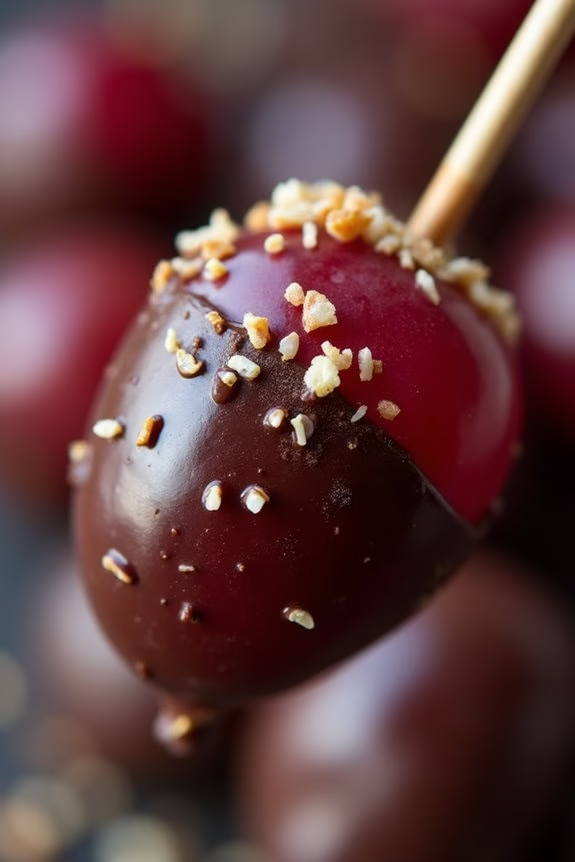
Searching for a fun and healthy treat to serve this Halloween? Search no further than Vampire Grape Pops! These spooky yet delicious snacks are perfect for a Halloween party or a festive family gathering. Packed with juicy grapes and a hint of sweet chocolate, they’re sure to be a crowd-pleaser for both kids and adults alike.
Plus, they’re quick and easy to make, meaning you can spend more time enjoying the festivities. Vampire Grape Pops aren’t only visually entertaining but also a nutritious choice compared to traditional Halloween candies. Grapes are naturally sweet and full of antioxidants, while the dark chocolate adds a touch of indulgence without too much guilt.
With just a few ingredients and minimal preparation, you can whip up these delightful pops in no time. They’re sure to add a creative twist to your Halloween snack table.
Ingredients (for 4-6 people):
- 2 cups seedless red or black grapes
- 1 cup dark chocolate chips
- 1 tablespoon coconut oil
- 1/4 cup shredded coconut (optional)
- 1/4 cup crushed nuts (optional)
- 12 lollipop sticks or skewers
Instructions:
1. Prepare the Grapes: Start by washing and thoroughly drying the grapes to guarantee they’re clean and free of any debris. This will help the chocolate adhere better.
Once dried, thread 3-4 grapes onto each lollipop stick or skewer, leaving enough room at the end for a handle.
2. Melt the Chocolate: In a small microwave-safe bowl, combine the dark chocolate chips and coconut oil. Microwave in 30-second intervals, stirring in between, until the chocolate is completely melted and smooth.
3. Dip the Grapes: Carefully dip each grape skewer into the melted chocolate, turning to coat evenly. Allow any excess chocolate to drip off before placing the skewers onto a parchment-lined baking sheet.
4. Add Toppings: If desired, sprinkle the chocolate-covered grapes with shredded coconut or crushed nuts immediately after dipping, before the chocolate sets. This adds a fun texture and flavor to your Vampire Grape Pops.
5. Chill: Place the baking sheet in the refrigerator for about 30 minutes, or until the chocolate is fully set.
6. Serve: Once the chocolate has hardened, your Vampire Grape Pops are ready to be served! Arrange them on a platter for a festive presentation.
Extra Tips:
For an extra touch of Halloween flair, consider using different colored grapes or adding a few drops of red food coloring to the melted chocolate. This will give your Vampire Grape Pops a blood-red hue, perfect for the spooky season.
If you don’t have coconut oil on hand, you can substitute it with butter or any neutral oil to help melt the chocolate smoothly. Remember to keep these pops refrigerated until serving to prevent the chocolate from melting. Enjoy your delicious and healthy Halloween treat!
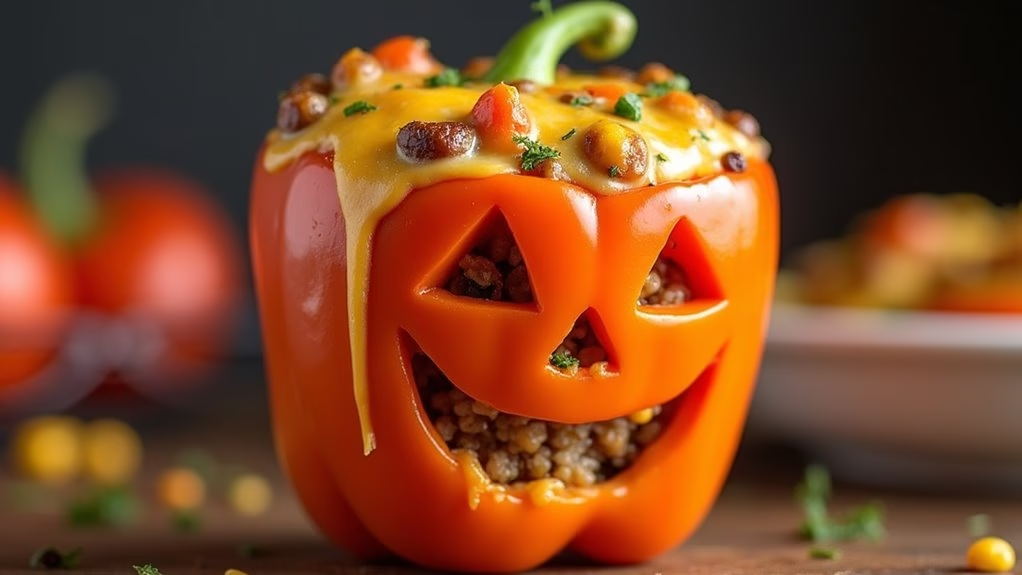
Jack-O’-Lantern Stuffed Peppers
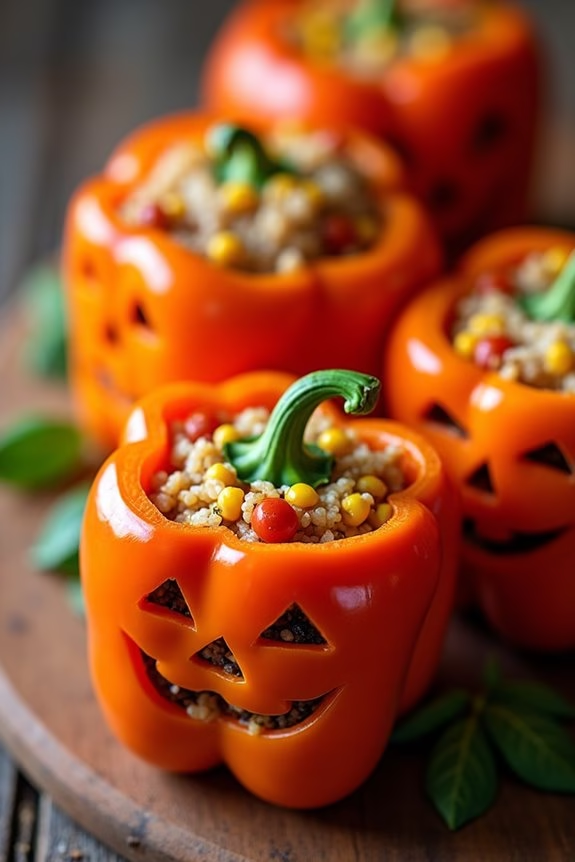
Celebrate Halloween with a healthy twist by making Jack-O’-Lantern Stuffed Peppers. These festive peppers aren’t only visually appealing but also packed with nutritious ingredients that make them a perfect addition to any Halloween gathering.
By carving the peppers like mini jack-o’-lanterns and filling them with a delicious mixture, you can create a dish that’s both fun and wholesome. These stuffed peppers are sure to be a hit with both kids and adults alike, offering a healthy alternative to the usual sugary treats.
Jack-O’-Lantern Stuffed Peppers are versatile and can be customized to suit various dietary preferences. You can choose to fill them with a classic combination of rice, vegetables, and ground turkey or beef, or opt for a vegetarian version using quinoa and black beans.
The carved faces add a playful touch, making them an exciting project to involve children in the kitchen. Whether you’re hosting a Halloween party or looking for a unique dinner idea, these stuffed peppers are a delightful way to enjoy the holiday spirit while staying on track with healthy eating.
Ingredients for Serving Size of 4-6 People:
- 6 large orange bell peppers
- 1 cup cooked rice or quinoa
- 1 pound ground turkey or beef (or 1 can black beans for vegetarian option)
- 1 medium onion, diced
- 2 cloves garlic, minced
- 1 cup corn kernels (fresh, canned, or frozen)
- 1 cup diced tomatoes (fresh or canned)
- 1 teaspoon chili powder
- 1 teaspoon cumin
- 1 cup shredded cheese (cheddar or mozzarella)
- Salt and pepper to taste
- Olive oil
Cooking Instructions:
- Preheat the Oven: Preheat your oven to 350°F (175°C) to get it ready for baking the stuffed peppers.
- Prepare the Peppers: Slice the tops off the bell peppers and remove the seeds and membranes. Using a small knife, carve jack-o’-lantern faces on one side of each pepper. Set the carved peppers aside.
- Cook the Filling: In a large skillet over medium heat, add a tablespoon of olive oil. Sauté the diced onion and minced garlic until fragrant and translucent. If using ground meat, add it to the skillet and cook until browned. If using black beans, skip this step.
- Combine Ingredients: Add the cooked rice or quinoa, corn, diced tomatoes, chili powder, cumin, and salt and pepper to the skillet. Mix everything well and let it cook for another 5 minutes to blend the flavors.
- Stuff the Peppers: Carefully fill each carved pepper with the prepared mixture. Press the filling down gently to pack it in.
- Bake the Peppers: Place the stuffed peppers in a baking dish, standing upright. Cover the dish with aluminum foil and bake in the preheated oven for 30 minutes.
- Add Cheese: Remove the foil, sprinkle shredded cheese on top of each stuffed pepper, and bake for another 10 minutes until the cheese is melted and bubbly.
- Serve: Once done, remove the peppers from the oven and let them cool slightly before serving.
Extra Tips:
When carving the faces on the peppers, be gentle to avoid tearing the pepper walls. If you’re involving kids in the process, you can pre-cut simple shapes for eyes and mouths.
For a spicier filling, consider adding diced jalapeños or a dash of hot sauce. Feel free to experiment with different grains or proteins to suit your taste and dietary needs.
These stuffed peppers can be made a day in advance and stored in the refrigerator, making them a convenient option for busy Halloween nights.