
With Halloween just around the corner, it’s the perfect time to add a touch of magic to your morning routine. Picture waking up to a plate of ghostly pancakes or sipping on a vibrant Vampire Blood smoothie. These breakfast ideas aren’t just about flavor—they’re about starting your day with a delightful dose of creativity. Ready to enchant your taste buds and bring a little spookiness to your table? Let’s explore each eerie option, one ghoulish delight at a time.
Ghostly Pancake Stack
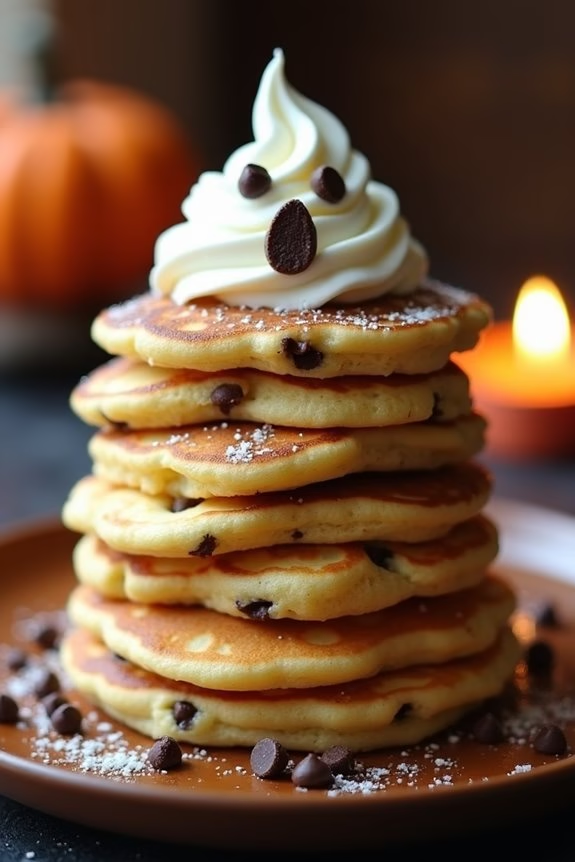
Start your Halloween morning with a spook-tacular breakfast by making a Ghostly Pancake Stack. This whimsical dish will delight both kids and adults with its festive flair and delicious taste. Imagine a stack of light and fluffy pancakes, each one shaped like a ghost, complete with spooky faces made from chocolate chips and whipped cream.
Whether you’re planning a Halloween brunch or simply want to surprise your family with a themed breakfast, this recipe is sure to set the mood for a day full of treats and fun.
Creating these ghostly pancakes isn’t only simple but also a great opportunity to get creative in the kitchen. The key is to use a basic pancake batter as the foundation, and then give it a ghoulish makeover with some cleverly placed toppings.
These pancakes can be paired with maple syrup, fresh fruits, or even a dollop of whipped cream for added deliciousness. Gather your ingredients, fire up the griddle, and let’s get cooking!
Ingredients (Serves 4-6):
- 2 cups all-purpose flour
- 2 tablespoons granulated sugar
- 1 tablespoon baking powder
- 1/2 teaspoon salt
- 2 large eggs
- 1 3/4 cups milk
- 1/4 cup unsalted butter, melted
- 1 teaspoon vanilla extract
- Cooking spray or extra butter for the pan
- 1/2 cup chocolate chips
- Whipped cream for decoration
- Maple syrup for serving
Instructions:
1. Prepare the pancake batter: In a large mixing bowl, whisk together the all-purpose flour, granulated sugar, baking powder, and salt. In another bowl, beat the eggs and then add the milk, melted butter, and vanilla extract.
Slowly pour the wet ingredients into the dry ingredients, stirring until just combined. Be careful not to overmix; a few lumps are okay.
2. Heat the griddle or pan: Place a non-stick griddle or large frying pan over medium heat. Lightly coat the surface with cooking spray or a small amount of butter to prevent sticking.
3. Create the ghost shapes****: Using a ladle or measuring cup, pour a portion of the batter onto the griddle to form an oval or slightly elongated circle, which will be the body of the ghost.
Use a spoon to shape the batter into a ghostly form, dragging the batter slightly outward to create arms if desired.
4. Add the spooky features****: Once you pour the batter on the griddle, quickly place chocolate chips on the top side of the pancake to form the eyes and mouth of the ghost.
The chocolate chips should be positioned before the batter sets.
5. Cook the pancakes: Allow the pancakes to cook for about 2-3 minutes, or until bubbles form on the surface and the edges start to look set.
Carefully flip the pancakes and cook for another 2 minutes or until golden brown.
6. Serve and decorate: Stack the ghost pancakes on a plate. Top each stack with a dollop of whipped cream, adding extra chocolate chips or syrup as desired.
Serve warm with maple syrup on the side.
Extra Tips:
When making ghost shapes, keep the pancakes on the smaller side for easier handling and flipping. If the batter is too thick to spread easily, you can add a splash more milk to reach the desired consistency.
Additionally, make sure your griddle is preheated properly; a drop of water should sizzle and evaporate quickly on contact. For an extra touch, you can also use edible black gel to enhance the ghostly faces once the pancakes are cooked. Enjoy your ghoulish breakfast!
Vampire Blood Smoothie
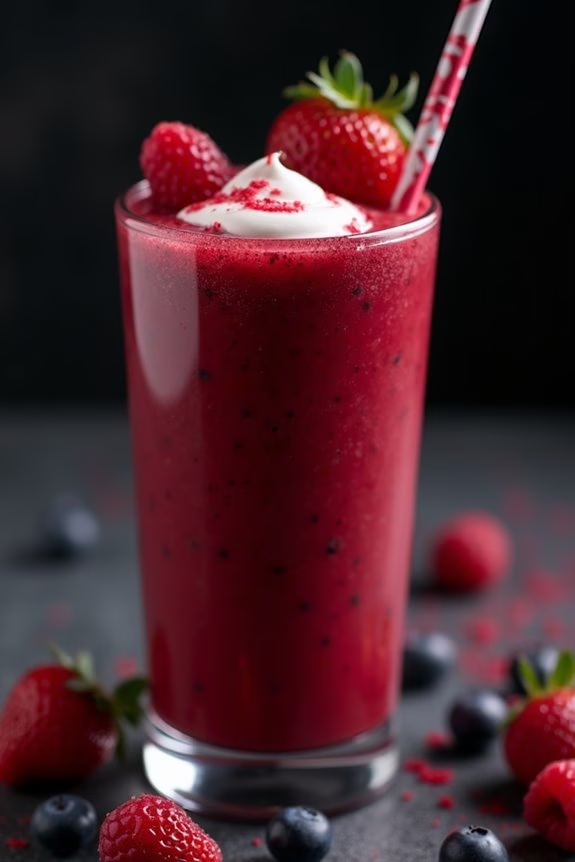
Start your Halloween morning with a ghoulishly delightful and nutritious Vampire Blood Smoothie. This spooky treat is perfect for setting the tone for a day filled with fun and frights. With its rich, red color and invigorating taste, this smoothie mimics the look of vampire blood, but don’t worry, it’s packed with vitamins and antioxidants. Perfect for kids and adults alike, this smoothie combines the vibrant flavors of berries and bananas, making it both a delicious and healthy way to start your day.
This Halloween-themed smoothie isn’t only visually striking but also simple to prepare. It’s an ideal choice for a festive breakfast or a revitalizing snack. The ingredients are easily available, and the preparation requires just a few minutes, ensuring you have more time to enjoy the day’s festivities. Whether you’re hosting a Halloween brunch or just want to surprise your family with a spooky treat, the Vampire Blood Smoothie is sure to be a hit.
Ingredients for 4-6 Servings:
- 2 cups fresh or frozen strawberries
- 1 cup fresh or frozen raspberries
- 1 cup fresh or frozen blueberries
- 2 ripe bananas
- 2 cups almond milk (or any milk of your choice)
- 1 cup plain yogurt
- 1 tablespoon honey (optional)
- 1 teaspoon vanilla extract
- Ice cubes (as desired)
Cooking Instructions:
- Prepare the Fruit: If using fresh berries, rinse them thoroughly under cold water. Peel the bananas and slice them into small pieces for easier blending.
- Combine Ingredients: In a blender, add the strawberries, raspberries, and blueberries. Follow with the banana slices. Pour in the almond milk and plain yogurt.
- Add Flavor: Add the honey and vanilla extract to the blender. These ingredients will enhance the sweetness and aroma of the smoothie, making it more enjoyable.
- Blend Smoothly: Blend the mixture on a high setting until it reaches a smooth consistency. If the smoothie is too thick, add a little more milk to achieve your desired consistency.
- Adjust and Chill: Taste the smoothie and adjust the sweetness by adding more honey if needed. For an extra cold smoothie, add a handful of ice cubes and blend again.
- Serve: Pour the smoothie into glasses. For an added Halloween touch, use themed straws or garnish with a few additional berries on top. Serve immediately for the freshest taste.
Extra Tips:
For a thicker smoothie, consider using Greek yogurt instead of plain yogurt, as it adds creaminess and extra protein. If you’d like to make it dairy-free, substitute the yogurt with a non-dairy alternative like coconut yogurt.
To enhance the spooky look, consider adding a drop of red food coloring for an even more vibrant “blood” effect. You can also freeze some of the berries beforehand to reduce the need for ice cubes and keep the smoothie from becoming watered down.
Enjoy this festive treat as a fun way to celebrate Halloween with a healthy twist!
Monster Eye Bagels

Start your Halloween morning with a spooky treat that will delight both kids and adults alike – Monster Eye Bagels! These creepy yet delicious bagels are perfect for setting the mood on a festive morning. With just a few simple ingredients, you can create a breakfast that not only satisfies hunger but also brings a playful sense of Halloween fun to your table.
Whether you’re preparing for a Halloween party or just want to surprise your family with something special, Monster Eye Bagels are sure to be a hit.
To create these monstrous delights, you’ll need to gather some bagels along with a variety of toppings to transform them into eerie eyeballs. The key to this recipe is in the presentation, so feel free to get creative with your design. The combination of creamy spreads, crunchy veggies, and vivid colors will make these bagels both visually striking and delicious.
So, roll up your sleeves and get ready to create a breakfast that will have everyone asking for more!
Ingredients (Serves 4-6):
- 6 plain or flavored bagels
- 1 cup of cream cheese
- 12 slices of cucumber
- 12 large black olives, pitted
- 1 red bell pepper
- 1 small carrot
- 1 tablespoon of black sesame seeds (optional)
Cooking Instructions:
- Prepare the Bagels: Begin by slicing the bagels in half horizontally. Toast them lightly if desired, to add a bit of crunch to your Monster Eye Bagels.
- Spread the Cream Cheese: Generously spread cream cheese over each bagel half. This won’t only add flavor but also serve as the adhesive for your toppings.
- Create the Eyes: Place two slices of cucumber on each bagel half, positioning them as the whites of your monster eyes. Confirm they’re evenly spaced to create a balanced look.
- Add the Pupils: Take the black olives and place one in the center of each cucumber slice. The olives will serve as the pupils of your monster eyes, giving them a haunting appearance.
- Decorate with Veggies: Cut the red bell pepper into thin strips and arrange them around the cucumbers to resemble spooky veins. Use a vegetable peeler to create thin carrot strips and add them as additional details, like monster lashes or eyebrows.
- Final Touches: For an extra eerie touch, sprinkle black sesame seeds over the cream cheese to resemble tiny spiders or specks of dirt.
Extra Tips:
Feel free to experiment with different types of bagels and flavored cream cheeses to suit your taste preferences.
If you’re serving this to a crowd, consider setting up a “decorate your own monster eye bagel” station with various toppings. This not only makes it interactive but also allows guests to customize their own spooky creations.
Finally, if you’re preparing these in advance, keep the assembled bagels in the refrigerator until ready to serve to maintain their freshness. Enjoy your eerie yet delicious breakfast!
Pumpkin Patch Oatmeal
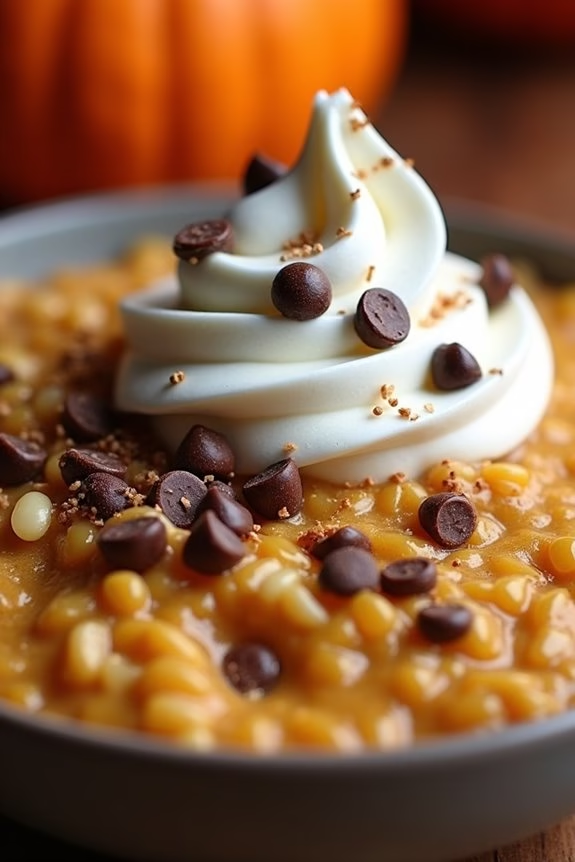
Start your Halloween morning with a festive and nutritious breakfast by preparing Pumpkin Patch Oatmeal. This delightful dish combines the creamy texture of oats with the rich, earthy flavors of pumpkin and spices, creating a comforting start to your day. Perfect for a family breakfast, this oatmeal isn’t only delicious but also visually appealing, making it an excellent choice to set a Halloween mood.
With a few simple ingredients and some creative garnishing, you can transform your usual breakfast into a spooky yet cozy treat. The Pumpkin Patch Oatmeal is designed to serve 4-6 people, making it an ideal option for a small family or a group of friends. This recipe uses canned pumpkin puree for convenience and a blend of spices to enhance the autumn flavors.
To add a bit of excitement to your oatmeal, consider using toppings like pumpkin seeds, nuts, or even chocolate chips. Follow the steps below to create this delectable Halloween-themed breakfast that will surely be a hit with both kids and adults alike.
Ingredients for 4-6 servings:
- 2 cups rolled oats
- 4 cups milk (or a milk alternative)
- 1 cup canned pumpkin puree
- 1/4 cup brown sugar
- 1 teaspoon vanilla extract
- 1 teaspoon ground cinnamon
- 1/2 teaspoon ground nutmeg
- 1/4 teaspoon ground cloves
- 1/4 teaspoon ground ginger
- Pinch of salt
- Optional toppings: pumpkin seeds, chopped nuts, chocolate chips, whipped cream
Cooking Instructions:
- Prepare the Base: In a large saucepan, combine the rolled oats and milk. Place the saucepan over medium heat and bring the mixture to a gentle simmer, stirring occasionally to prevent the oats from sticking to the bottom.
- Add Pumpkin and Spices: Once the oats begin to soften, stir in the canned pumpkin puree, brown sugar, vanilla extract, ground cinnamon, nutmeg, cloves, ginger, and a pinch of salt. Mix well to guarantee the spices and pumpkin are evenly distributed throughout the oatmeal.
- Simmer the Oatmeal: Reduce the heat to low and continue to cook the oatmeal for about 5-7 minutes, stirring occasionally. This allows the oats to fully absorb the flavors and achieve a creamy consistency.
- Check Consistency: Taste and adjust the consistency to your liking by adding more milk if necessary. If you prefer a sweeter oatmeal, feel free to add a bit more brown sugar at this stage.
- Serve and Garnish: Once the oatmeal is cooked to your desired texture, remove it from the heat and ladle it into individual bowls. Garnish with your choice of optional toppings such as pumpkin seeds, chopped nuts, or chocolate chips. A dollop of whipped cream can also add a touch of indulgence.
Extra Tips:
For an even richer flavor, consider roasting your own pumpkin and using fresh puree in place of canned. Be sure to adjust the spices to suit your personal taste preferences, adding more or less as desired.
If you want to prepare this dish ahead of time, the oatmeal can be made the night before and reheated in the morning with a splash of milk to restore its creamy texture. Finally, encourage kids to create their own “pumpkin patches” by arranging toppings into fun shapes or patterns on their oatmeal. Enjoy your Halloween breakfast!
Witch’s Brew Latte

Transform your morning routine into a magical experience with a Witch’s Brew Latte, a bewitching concoction perfect for celebrating Halloween. This delightful drink combines the rich, robust flavor of espresso with the creamy sweetness of steamed milk, all enhanced by a touch of spiced pumpkin and a hint of vanilla.
Whether you’re hosting a spooky brunch or just want to add some festive flair to your breakfast, this latte is sure to enchant your taste buds and warm your spirit. Ideal for a gathering of 4-6 people, the Witch’s Brew Latte is both a treat for the eyes and a delight for the palate.
The blend of seasonal spices and the deep, comforting aroma of freshly brewed coffee will fill your kitchen with the scents of autumn, creating a cozy atmosphere perfect for the Halloween season. With just a few simple steps, you can whip up this enchanting brew and become the morning hero of the season.
Ingredients (Serves 4-6):
- 2 cups strong brewed espresso or coffee
- 4 cups milk (whole, almond, or oat milk)
- 1 cup pumpkin puree
- 1/2 cup sugar
- 1 teaspoon vanilla extract
- 1 teaspoon ground cinnamon
- 1/2 teaspoon ground nutmeg
- 1/4 teaspoon ground ginger
- Whipped cream (optional for topping)
- Cinnamon sticks (optional for garnish)
- Green food coloring (optional for a spooky effect)
Instructions:
- Prepare the Coffee Base: Brew 2 cups of strong espresso or coffee using your preferred method. Set aside to keep warm.
- Create the Pumpkin Mixture: In a medium saucepan, combine the pumpkin puree, sugar, vanilla extract, ground cinnamon, nutmeg, and ginger. Stir the mixture over medium heat until the sugar is fully dissolved and the spices are well combined.
- Heat the Milk: In a separate saucepan, heat 4 cups of milk over low heat, stirring occasionally to prevent scorching. Don’t bring the milk to a boil; it should be hot but not simmering.
- Mix the Components: Gradually whisk the hot milk into the pumpkin-spice mixture until fully blended. If desired, add a few drops of green food coloring to achieve a spooky hue.
- Blend with Coffee: Pour the brewed coffee into the milk and pumpkin mixture, stirring until all components are thoroughly mixed.
- Serve and Garnish: Pour the Witch’s Brew Latte into mugs. Top with whipped cream for an indulgent touch and add a cinnamon stick for garnish. Serve immediately while hot.
Extra Tips:
For an extra touch of Halloween fun, consider adding edible glitter or Halloween-themed sprinkles on top of the whipped cream.
If you’re serving guests with dietary restrictions, feel free to substitute the milk with any non-dairy alternatives such as almond or oat milk. To intensify the flavor, you can adjust the spices according to your personal taste.
For a chilled version, let the mixture cool and serve over ice. Enjoy this spooky delight and embrace the seasonal spirit!
Mummy Toast

Halloween mornings can be just as spooky and fun as the evening festivities, especially when you serve up some delicious Mummy Toast. This breakfast treat isn’t only easy to make but also a hit among kids and adults alike. The combination of melted cheese, crispy toast, and the creative presentation makes it a delightful addition to any Halloween-themed breakfast spread.
Whether you’re hosting a Halloween brunch or simply adding a festive twist to a regular morning, Mummy Toast is the perfect dish to get everyone in the spooky spirit.
The beauty of Mummy Toast lies in its simplicity and the capability to customize it to suit different tastes. All you need is some bread, cheese, and a few additional toppings to create these adorable and tasty mummies. This recipe is designed to serve 4-6 people, making it ideal for family breakfasts or small gatherings.
With just a few ingredients and a little creativity, you can whip up a breakfast that’s sure to impress your guests.
Ingredients for Mummy Toast (Serving Size: 4-6 people):
- 6 slices of whole-grain or white bread
- 12 slices of mozzarella or provolone cheese
- 1/2 cup pizza sauce or marinara sauce
- Black olives (for eyes)
- 1 tablespoon olive oil
- Optional: red pepper flakes, basil, or other herbs for garnish
Cooking Instructions:
- Preheat the Oven: Begin by preheating your oven to 375°F (190°C). This will guarantee your Mummy Toast bakes evenly and gets perfectly crispy.
- Prepare the Bread: Lay the slices of bread on a baking sheet. Lightly brush each slice with olive oil on both sides. This will help the bread toast evenly and add a bit of flavor.
- Add Sauce: Spread a thin layer of pizza sauce or marinara sauce over each slice of bread. Be sure to cover the entire surface, leaving a small border around the edges.
- Layer the Cheese: Cut the cheese slices into thin strips. Lay the strips across the bread slices in a crisscross pattern to resemble mummy bandages, leaving some gaps for the eyes.
- Create the Mummy Eyes: Slice the black olives into small rounds and place two on each slice of bread to create the eyes of the mummy.
- Bake: Place the baking sheet in the preheated oven and bake for about 10-12 minutes, or until the cheese is melted and bubbly and the bread is crispy.
- Garnish and Serve: Once baked, remove the Mummy Toast from the oven. If desired, sprinkle with red pepper flakes or fresh herbs like basil for added flavor. Serve immediately while hot.
Extra Tips:
To make your Mummy Toast even more festive, consider using different types of cheese for varied flavors, such as cheddar or pepper jack. If you want to add some protein, thinly sliced ham or turkey can be placed under the cheese strips.
For a spicier version, add jalapeño slices along with the olives. Remember, the key to perfect Mummy Toast isn’t to overbake them, as you want the cheese to be melty but not browned. Enjoy your spooky breakfast creation!
Skeleton Bone Pastries

Halloween is a time of ghoulish fun and excitement, and what better way to start the day than with a spooky breakfast? Skeleton Bone Pastries are the perfect eerie treat to serve up for a Halloween-themed morning.
These delightfully creepy pastries not only look the part but taste delicious too. With a buttery, flaky exterior and a sweet filling, they’re sure to be a hit with both kids and adults alike. Whether you’re hosting a Halloween breakfast party or just want to surprise your family with a fun and festive treat, these Skeleton Bone Pastries are a must-try.
The recipe is straightforward, and the results are impressive enough to make it look like you spent hours crafting these bone-chilling delights. Using puff pastry simplifies the process, allowing you to focus on shaping the pastries into convincing bone shapes. Filled with your choice of sweet jam or nutty chocolate spread, these pastries can be customized to suit your taste preferences.
Perfect for a serving size of 4-6 people, this recipe makes enough to share, guaranteeing everyone gets a taste of the Halloween spirit.
Ingredients (Serving Size: 4-6 people)
- 2 sheets of puff pastry, thawed
- 1/2 cup raspberry jam or chocolate hazelnut spread
- 1 egg, beaten
- 2 tablespoons granulated sugar
- 1 tablespoon flour (for dusting)
- Powdered sugar (for dusting, optional)
Instructions
- Preheat the Oven: Start by preheating your oven to 400°F (200°C). Line a baking sheet with parchment paper to prevent the pastries from sticking.
- Prepare the Pastry: Lightly dust your work surface with flour to prevent sticking. Roll out the puff pastry sheets to smooth any creases. Cut each sheet into 8 strips, approximately 1 inch wide.
- Shape the Bones: Take each strip and use your fingers to gently shape them into bones by pinching and twisting the center to form an indentation. Flare out the ends to resemble the knobby ends of a bone. Repeat with all strips.
- Add the Filling: Using a small spoon, place a small amount of raspberry jam or chocolate spread in the center of each pastry strip. Be careful not to overfill to prevent leakage during baking.
- Seal and Brush: Fold the pastry over the filling, pinching the edges together to seal. Arrange the pastries on the prepared baking sheet. Brush the tops with beaten egg to give them a golden color as they bake.
- Bake: Sprinkle the pastries with granulated sugar for extra sweetness and crunch. Bake in the preheated oven for 15-20 minutes, or until golden brown and puffed.
- Cool and Dust: Allow the pastries to cool on a wire rack for a few minutes. If desired, dust with powdered sugar for a bone-chilling effect before serving.
Extra Tips
For best results, verify your puff pastry is chilled but pliable before you start working with it. If the pastry becomes too warm, pop it back into the fridge for a few minutes to firm up.
When shaping the bones, get creative with the shapes to add extra character to each pastry. If you’re using jam as a filling, consider straining it to remove any seeds for a smoother finish.
Finally, serve these pastries with a side of fresh fruit or a dollop of whipped cream to enhance the spooky breakfast experience.
Spooky Spider Waffles
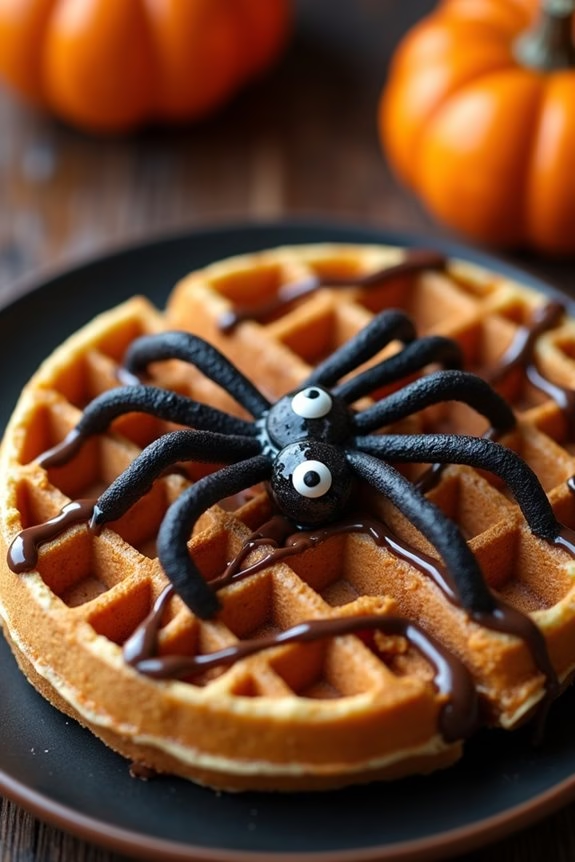
Creating Spooky Spider Waffles is easier than it seems, and the result is as visually appealing as it’s tasty.
Whether you’re hosting a Halloween brunch or just want to surprise your family with a festive breakfast, this recipe will surely impress.
The key to achieving the perfect spooky spider look lies in the careful arrangement of the toppings and the use of a little creativity.
So, gather your ingredients, preheat your waffle iron, and get ready to make breakfast that’s both eerie and enjoyable.
Ingredients for 4-6 servings:
- 2 cups all-purpose flour
- 2 tablespoons granulated sugar
- 1 tablespoon baking powder
- 1/2 teaspoon salt
- 2 large eggs
- 2 cups milk
- 1/3 cup unsalted butter, melted
- 1 teaspoon vanilla extract
- Chocolate syrup
- Black licorice strings
- Edible candy eyes
Cooking Instructions:
1. Prepare the batter: In a large mixing bowl, whisk together the flour, sugar, baking powder, and salt.
In a separate bowl, beat the eggs and then add the milk, melted butter, and vanilla extract.
Mix well until combined.
2. Combine wet and dry ingredients: Gradually pour the wet ingredients into the dry ingredients, stirring gently until just combined.
Be careful not to overmix; a few lumps are okay.
3. Preheat the waffle iron: Plug in your waffle iron and allow it to preheat according to the manufacturer’s instructions.
Lightly grease the plates if necessary.
4. Cook the waffles: Pour an appropriate amount of batter onto the hot waffle iron, ensuring even coverage.
Close the lid and cook until the waffles are golden brown and crisp, usually about 3-5 minutes.
5. Create the spider design: Once the waffles are cooked, transfer them to a serving plate.
Use the chocolate syrup to draw a spider web pattern on top of each waffle.
6. Add the spider legs and eyes: Cut the black licorice strings into short pieces to form the spider legs.
Arrange eight licorice legs around the central chocolate syrup pattern on each waffle.
Place edible candy eyes on the center of the spider web to complete the spooky spider look.
7. Serve: Serve the Spooky Spider Waffles warm with additional syrup if desired.
Enjoy the Halloween-themed breakfast with your family or guests.
Extra Tips:
To make these waffles even more festive, consider adding a few drops of orange or black food coloring to the batter before cooking.
This will give your waffles a more Halloween-inspired look.
If you don’t have edible candy eyes, small chocolate chips or raisins can be used as an alternative.
For an added crunch, you can sprinkle some crushed nuts or candy corn on top of the spider web design.
Creepy Crawly Fruit Salad
Transform your breakfast into a spooktacular treat with this Creepy Crawly Fruit Salad, perfect for setting a festive Halloween mood. This dish combines fresh and juicy fruits with a creative twist that will delight both kids and adults alike.
With the addition of some fun and edible creepy crawlies, it’s not only a nutritious way to start the day but also a great conversation piece for your Halloween breakfast table.
To make this fruit salad truly eerie, we’ll use a mix of vibrant fruits, each chosen for their color and texture, and some gummy worms to give it that creepy crawly effect. The key is in the presentation, so let your imagination run wild as you arrange the fruit and worms in a way that looks both spooky and delicious.
Whether you’re hosting a Halloween breakfast or just want to surprise your family with a fun start to their day, this Creepy Crawly Fruit Salad is certain to be a hit.
Ingredients (Serves 4-6):
- 2 cups of strawberries, hulled and halved
- 2 cups of seedless grapes (green and red)
- 2 bananas, sliced
- 1 cup of blueberries
- 2 kiwis, peeled and sliced
- 1 cup of mandarin orange segments
- 1 cup of pineapple chunks
- 1/4 cup of pomegranate seeds
- 10-12 gummy worms
Instructions:
- Prepare the Fruits: Begin by washing all the fruits thoroughly under cold water. Hull the strawberries and cut them into halves. Slice the bananas and kiwis, ensuring the slices aren’t too thin so they hold their shape. Peel the mandarin oranges and separate the segments.
- Mix the Fruits: In a large mixing bowl, combine the strawberries, grapes, banana slices, blueberries, kiwi slices, mandarin segments, pineapple chunks, and pomegranate seeds. Gently toss the fruits together using a large spoon to confirm they’re evenly mixed.
- Add the Creepy Crawlies: Once the fruits are well mixed, carefully add in the gummy worms. Tuck them among the fruit pieces to create the illusion that they’re crawling through the salad. Be sure to distribute them evenly so each serving has a few worms for that creepy effect.
- Chill Before Serving: Cover the bowl with plastic wrap and place it in the refrigerator for at least 30 minutes before serving. This will help the flavors meld together and also keep the fruit fresh and crisp.
- Serve: Once chilled, serve the Creepy Crawly Fruit Salad in individual bowls or a large serving dish. Consider adding a few extra gummy worms on top for added spookiness.
Extra Tips:
To make your Creepy Crawly Fruit Salad even more festive, consider using a mold or shaped bowl to give the salad a unique shape.
You can also use cookie cutters to cut the fruit into fun shapes like bats or pumpkins. If you want to add a bit of sweet and tangy flavor, drizzle a little honey or a squeeze of lime juice over the salad just before serving.
This dish is versatile, so feel free to substitute or add your favorite fruits to the mix. Enjoy your Halloween breakfast with a dash of creativity and fun!
Black Cat Doughnuts
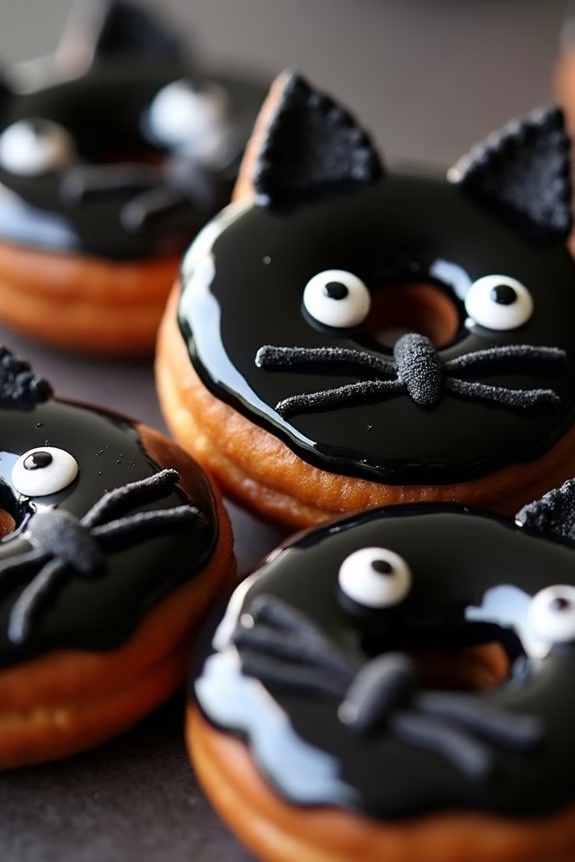
Celebrate the spooky season with these delightful Black Cat Doughnuts, a perfect breakfast treat for Halloween morning. These doughnuts aren’t only delicious but also visually engaging, with their glossy black glaze and playful cat features.
Whether you’re hosting a Halloween brunch or simply want to surprise your family with a festive breakfast, these doughnuts will surely be a hit. The soft, fluffy texture of the doughnut pairs perfectly with the rich chocolate glaze, and the cute decorations bring the spirit of Halloween right to your breakfast table.
This recipe makes enough doughnuts to serve 4-6 people, guaranteeing everyone gets a taste of these charming treats. Each doughnut is carefully decorated to resemble a cat, complete with almond ears and candy eyes. The black glaze is achieved using food coloring, giving the doughnuts their iconic Halloween look. With a little creativity and a few simple ingredients, you can create a breakfast that’s both festive and delicious.
Ingredients:
- 2 cups all-purpose flour
- 1/2 cup granulated sugar
- 1/4 cup unsweetened cocoa powder
- 1 tablespoon baking powder
- 1/2 teaspoon salt
- 1 cup whole milk
- 2 large eggs
- 1/4 cup unsalted butter, melted
- 1 teaspoon vanilla extract
- Black food coloring
- 1 cup powdered sugar
- 1/4 cup water
- 1/4 cup semi-sweet chocolate chips
- Almond slivers (for ears)
- Candy eyes
- Black licorice strings (for whiskers)
Instructions:
- Preheat and Prepare: Preheat your oven to 375°F (190°C). Lightly grease a doughnut pan with nonstick spray or butter to make sure the doughnuts don’t stick.
- Mix Dry Ingredients: In a large mixing bowl, combine the flour, granulated sugar, cocoa powder, baking powder, and salt. Whisk these ingredients together until they’re evenly mixed.
- Combine Wet Ingredients: In a separate bowl, whisk together the milk, eggs, melted butter, and vanilla extract. Mix until all wet ingredients are fully combined.
- Create Doughnut Batter: Gradually add the wet ingredients to the dry ingredients, stirring gently until just combined. Be careful not to overmix, as this can result in tough doughnuts.
- Add Color: Add black food coloring to the batter, stirring until you achieve the desired black hue. The amount of food coloring may vary based on the type used, so add gradually.
- Fill Doughnut Pan: Spoon or pipe the batter into the prepared doughnut pan, filling each cavity about 3/4 full. This will allow room for the doughnuts to rise without overflowing.
- Bake: Place the pan in the preheated oven and bake for 10-12 minutes, or until a toothpick inserted into the doughnuts comes out clean. Let them cool in the pan for about 5 minutes before transferring to a wire rack.
- Prepare Glaze: In a small saucepan over low heat, melt the chocolate chips with the water, stirring until smooth. Gradually whisk in the powdered sugar until a glaze forms. Add a few drops of black food coloring to achieve a deep black color.
- Glaze Doughnuts: Dip the top of each cooled doughnut into the black glaze, allowing any excess to drip off. Return the doughnuts to the wire rack for the glaze to set slightly.
- Decorate: While the glaze is still slightly wet, attach almond slivers as ears at the top of each doughnut. Place candy eyes below the ears and cut small pieces of licorice strings to act as whiskers.
Extra Tips:
When mixing the batter, avoid overmixing as it can make the doughnuts dense. If you don’t have a doughnut pan, you can use a muffin tin and create a hole in the center with a small spoon or piping bag.
For a more intense black color, you may need to adjust the amount of food coloring, especially if you’re using a natural variant. Make sure the glaze isn’t too hot when dipping the doughnuts, as it can become too runny and not set properly.
Enjoy these Black Cat Doughnuts fresh, as they’re best eaten on the day they’re made for prime texture and flavor.
Haunted House French Toast

Start your Halloween morning with a frightfully delicious breakfast that the whole family can enjoy: Haunted House French Toast. This spooky twist on a classic breakfast favorite combines the warm, comforting flavors of traditional French toast with a playful Halloween theme. Perfect for setting the mood on a crisp October morning, these ghostly slices will delight kids and adults alike with their hauntingly delicious taste and festive presentation.
Creating Haunted House French Toast is a simple yet fun activity that invites creativity in the kitchen. You’ll craft your own edible haunted house using spooky cookie cutters, and a few decorative touches to bring this eerie breakfast to life. Serve it up with maple syrup, fresh fruit, or even a dusting of powdered sugar to complete the experience. This recipe serves 4-6 people, making it ideal for family gatherings or Halloween parties.
Ingredients (Serving Size: 4-6 people):
- 8 slices of thick-cut bread (such as brioche or challah)
- 4 large eggs
- 1 cup of milk
- 2 teaspoons vanilla extract
- 1 teaspoon ground cinnamon
- 1/4 teaspoon ground nutmeg
- 1/4 teaspoon salt
- Butter or cooking spray for the pan
- Halloween-themed cookie cutters (e.g., haunted houses, ghosts, bats)
- Powdered sugar, for dusting
- Maple syrup, for serving
- Fresh fruit, for garnish
Cooking Instructions:
- Prepare the Batter: In a medium bowl, whisk together the eggs, milk, vanilla extract, cinnamon, nutmeg, and salt until well combined.
- Cut the Bread: Using the Halloween-themed cookie cutters, cut spooky shapes out of each slice of bread to resemble a haunted house and other Halloween figures.
- Dip the Bread: Heat a large non-stick skillet over medium heat and add a small amount of butter or spray with cooking spray. Dip each shaped slice of bread into the egg mixture, ensuring both sides are well-coated but not overly soaked.
- Cook the Toast: Place the dipped bread shapes onto the heated skillet. Cook each side for 2-3 minutes or until golden brown. Work in batches if necessary, and add more butter or cooking spray to the skillet as needed.
- Serve and Decorate: Once cooked, arrange the French toast shapes on a serving platter. Dust with powdered sugar to create a ghostly effect, and serve with maple syrup on the side. Add fresh fruit around the plate for a pop of color and extra flavor.
Extra Tips:
For an even spookier touch, use edible decorations like candy eyes or chocolate chips to give your haunted house characters personality.
Additionally, consider making the French toast batter the night before to save time in the morning. This recipe is versatile, so feel free to use any bread or milk substitutes that suit your dietary preferences.
Enjoy your Haunted House French Toast hot, and watch the smiles grow as your family and friends dig into this fun Halloween breakfast!
Zombie Brain Muffins
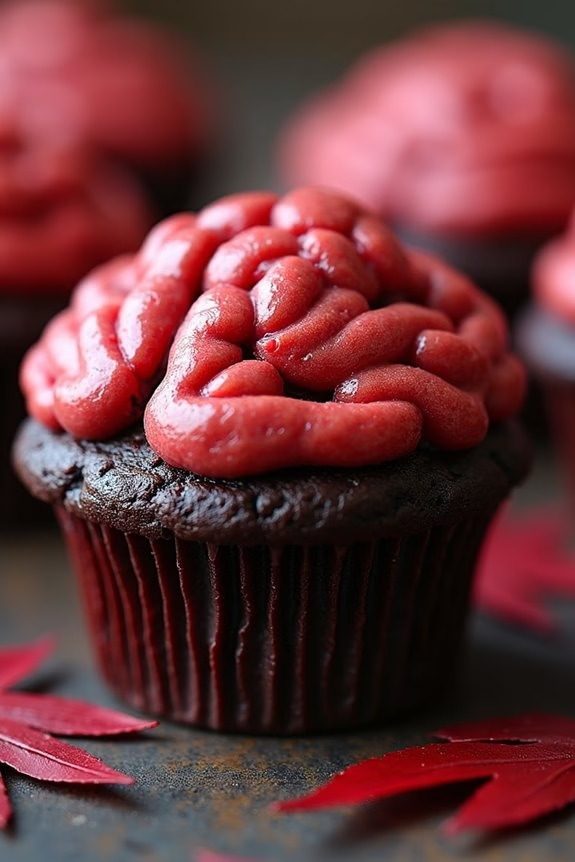
Zombie Brain Muffins are a delightfully spooky treat, perfect for adding a little fright to your Halloween breakfast. These muffins aren’t only ghastly to behold, but they also pack a delicious punch with their moist and flavorful interior. The brains are made from a unique mixture that mimics the look of a real brain, making these muffins a fun and festive addition to your Halloween morning routine.
Whether you’re hosting a Halloween brunch or simply want to surprise your family with a creepy culinary creation, Zombie Brain Muffins are sure to be a hit.
The secret to these muffins lies in their gory appearance and the mouthwatering taste that hides underneath. The eerie brain topping is made from a clever combination of raspberry jam and cream cheese, which not only gives it the perfect look but also adds a tangy sweetness to the muffins.
The muffin base itself is infused with rich cocoa and studded with chunks of dark chocolate, creating a decadent treat that pairs perfectly with the brainy topping. With just a few simple steps, you can bring this creepy culinary masterpiece to life and delight your guests with a Halloween breakfast they won’t soon forget.
Ingredients (Serves 4-6 people):
- 1 1/2 cups all-purpose flour
- 1/2 cup unsweetened cocoa powder
- 1 cup granulated sugar
- 1 tsp baking powder
- 1/2 tsp baking soda
- 1/4 tsp salt
- 1 cup buttermilk
- 1/2 cup vegetable oil
- 2 large eggs
- 1 tsp vanilla extract
- 1 cup dark chocolate chunks
- 1/2 cup raspberry jam
- 4 oz cream cheese, softened
- Red food coloring (optional)
Cooking Instructions:
- Preheat the Oven: Begin by preheating your oven to 350°F (175°C). Line a standard muffin tin with paper liners to prepare for the batter.
- Prepare Dry Ingredients: In a large mixing bowl, sift together the all-purpose flour, cocoa powder, sugar, baking powder, baking soda, and salt. Mix well to confirm all dry ingredients are evenly distributed.
- Mix Wet Ingredients: In another bowl, whisk together the buttermilk, vegetable oil, eggs, and vanilla extract until the mixture is smooth and well combined.
- Combine Ingredients: Gradually add the wet ingredients to the dry ingredients, stirring gently until just combined. Be careful not to overmix as this can lead to dense muffins.
- Add Chocolate Chunks: Fold in the dark chocolate chunks with a spatula, confirming they’re evenly distributed throughout the batter.
- Fill Muffin Tins: Divide the batter evenly among the prepared muffin liners, filling each about 3/4 full to allow room for rising.
- Bake the Muffins: Place the muffin tin in the preheated oven and bake for 18-20 minutes, or until a toothpick inserted into the center comes out clean.
- Prepare the Brain Topping: While the muffins are baking, mix the softened cream cheese and raspberry jam in a small bowl. If desired, add a few drops of red food coloring to enhance the brain-like appearance.
- Cool and Decorate: Allow the muffins to cool slightly before topping them with the raspberry cream cheese mixture. Use a piping bag or spoon to create a brain-like pattern on top of each muffin.
Extra Tips:
To confirm the best results, make sure that all your ingredients are at room temperature before you begin baking. This will help the ingredients blend more evenly and result in a smoother batter.
If you want to make the muffins extra spooky, consider adding some edible decorations like candy eyes or gummy worms to the top of each muffin after applying the brain topping.
Finally, these muffins are best enjoyed fresh but can be stored in an airtight container for up to two days.
Bat Wing Bacon

Transform your typical breakfast bacon into a spooky Halloween treat with our Bat Wing Bacon recipe. This fun and easy dish will add a touch of the macabre to your morning meal, perfect for Halloween gatherings or just a festive morning at home. Crispy, savory, and visually striking, these “bat wings” are sure to delight both kids and adults.
By slightly altering the shape and presentation of ordinary bacon, you can create a unique breakfast experience that’s both delicious and visually appealing. Bat Wing Bacon is a great addition to any Halloween-themed breakfast spread.
This recipe involves a simple trick to shape your bacon into bat-like wings, followed by a seasoning that brings out the best in the crispy strips. With minimal ingredients and effort, you can prepare a batch of these spooky snacks in no time, making them ideal for quick breakfasts or brunches. Let’s plunge into creating this hauntingly delightful dish!
Ingredients (Serves 4-6)
- 1 pound of thick-cut bacon
- 2 tablespoons maple syrup
- 1 tablespoon smoked paprika
- 1 teaspoon garlic powder
- 1 teaspoon onion powder
- 1/2 teaspoon black pepper
- 1/2 teaspoon cayenne pepper (optional, for a spicy kick)
Cooking Instructions
- Preheat the Oven: Start by preheating your oven to 400°F (200°C). This will guarantee that your bacon cooks evenly and crisps up nicely.
- Prepare the Baking Sheet: Line a large baking sheet with aluminum foil for easy cleanup. Place a wire rack on top of the baking sheet. This setup helps the bacon cook from all sides and prevents it from sitting in its grease.
- Shape the Bacon: Lay the bacon strips on the wire rack. To create the “bat wing” effect, gently twist each strip of bacon in the center, forming a slight “V” shape. This will mimic the bat wing’s curve when baked.
- Season the Bacon: In a small bowl, mix together the maple syrup, smoked paprika, garlic powder, onion powder, black pepper, and cayenne pepper. Using a pastry brush, lightly apply this mixture over the bacon strips, ensuring each piece is well-coated with the seasoning blend.
- Bake the Bacon: Place the baking sheet in the preheated oven and bake for 15-20 minutes. Keep an eye on the bacon to avoid burning, as cooking times may vary depending on the thickness of your bacon and your oven’s efficiency.
- Cool and Serve: Once the bacon is crispy and has taken on a dark, bat-like appearance, remove it from the oven. Let it cool for a few minutes on the wire rack before serving. This allows the bacon to firm up and hold its shape.
Extra Tips
For the best results, use thick-cut bacon, as it holds its shape better during the twisting process and crisps up evenly. If you prefer a sweeter or spicier flavor, adjust the amount of maple syrup or cayenne pepper accordingly.
For added visual effect, consider serving the Bat Wing Bacon on a platter lined with black napkins or paper for a dramatic presentation. Remember to keep an eye on the bacon while it bakes, as the sugar in the maple syrup can cause it to caramelize quickly.
Jack-o’-Lantern Omelette
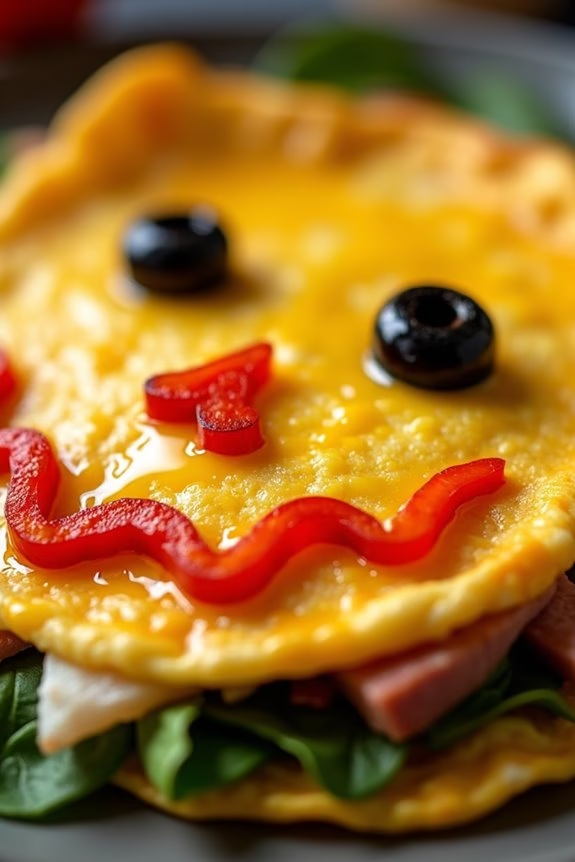
Celebrate Halloween morning with a festive Jack-o’-Lantern Omelette that brings a spooky yet delicious twist to your breakfast table. This whimsical dish isn’t only fun to make but also packed with flavor and nutrition. The omelette is shaped and decorated to resemble a classic Jack-o’-Lantern, featuring vibrant orange colors from bell peppers and a cheesy, savory filling that will delight both kids and adults alike.
Perfect for a family breakfast or a Halloween brunch party, the Jack-o’-Lantern Omelette is designed to serve 4-6 people, guaranteeing everyone gets a taste of this creative treat. The key to this dish is achieving the perfect balance of flavors and textures, from the creamy eggs to the crisp vegetables. With a little creativity and the right ingredients, you can transform a simple omelette into a Halloween masterpiece that’s as pleasing to the eye as it’s to the palate.
Ingredients (serves 4-6):
- 12 large eggs
- 1/4 cup whole milk
- Salt and black pepper, to taste
- 2 tablespoons butter
- 1 orange bell pepper
- 1 cup shredded cheddar cheese
- 1 cup diced cooked ham
- 1 small onion, finely chopped
- 1 cup fresh spinach leaves
- Olive oil, for cooking
- Black olives (for decoration)
Cooking Instructions:
- Prepare the Ingredients: Begin by dicing the orange bell pepper into small cubes, reserving a few strips for decoration. Finely chop the onion and slice the black olives into small pieces for the Jack-o’-Lantern’s facial features.
- Whisk the Eggs: In a large bowl, crack the eggs and add the whole milk. Season with salt and black pepper to taste. Whisk the mixture until it’s well combined and slightly frothy.
- Cook the Filling: In a large non-stick skillet, heat a tablespoon of olive oil over medium heat. Add the chopped onion and diced bell pepper, sautéing until they’re softened. Add the diced ham and spinach leaves, cooking until the spinach wilts. Remove from the skillet and set aside.
- Cook the Omelette: In the same skillet, melt butter over medium-low heat. Pour in half of the egg mixture, tilting the skillet to guarantee even coverage. Cook until the edges start to set but the center is still slightly runny.
- Add the Filling: Sprinkle a portion of the cooked filling evenly over the omelette, followed by a generous amount of shredded cheddar cheese. Fold the omelette in half gently and allow it to cook for another minute until the cheese is melted.
- Shape and Decorate: Carefully slide the omelette onto a serving platter. Use the reserved bell pepper strips to create the pumpkin’s stem and mouth, and the sliced black olives for the eyes and nose to complete the Jack-o’-Lantern face.
- Repeat: Repeat the cooking process with the remaining egg mixture and filling to make additional omelettes as needed for the serving size.
Extra Tips:
For the best results, use a non-stick skillet to prevent the omelette from sticking and tearing. Adjust the heat as needed to cook the eggs evenly without browning them too much. If you’re serving this dish to kids, consider letting them help with the decoration to make it a fun family activity. Additionally, you can customize the filling with other ingredients like mushrooms, tomatoes, or different types of cheese according to personal preference.
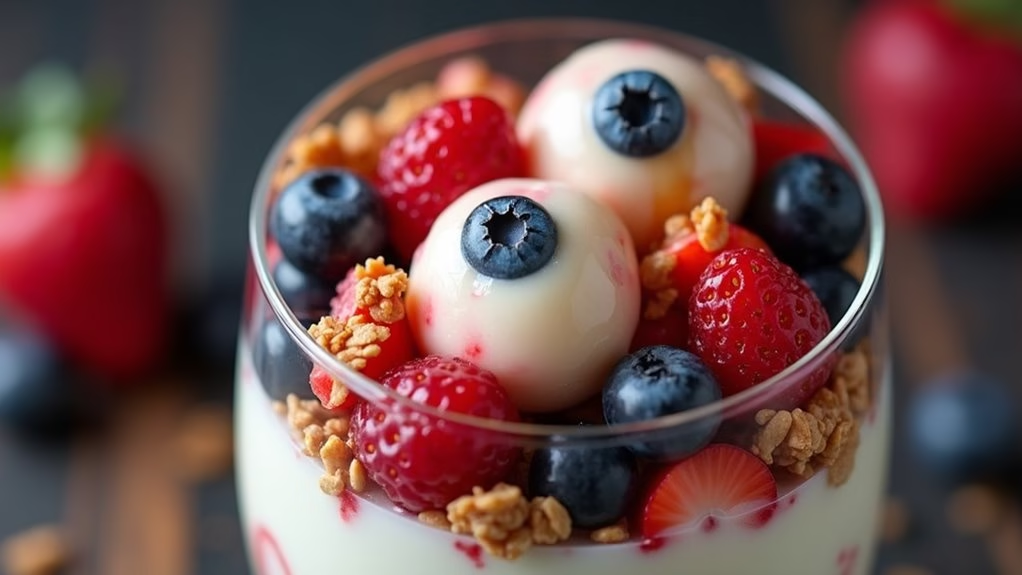
Eyeball Yogurt Parfaits

Get ready to spook your breakfast table with these delightfully eerie Eyeball Yogurt Parfaits! Perfect for a Halloween morning or to impress your little ghouls and goblins, these parfaits are both fun and nutritious. Layers of creamy yogurt, vibrant fruit, and a surprise “eyeball” at the center make for a frighteningly good start to your day. Not only are they visually striking, but they’re also packed with vitamins and nutrients to give your day a healthy boost.
These parfaits are as easy to make as they’re to devour. Ideal for serving 4-6 people, they combine the tartness of yogurt with the sweetness of fresh berries, and the “eyeballs” are made with lychee and blueberries for a creepy yet tasty effect. Whether you’re hosting a Halloween brunch or just want to add a little spookiness to breakfast, these parfaits are sure to be a hit with both kids and adults alike.
Ingredients (Serves 4-6)
- 4 cups vanilla yogurt
- 1 can (about 20 ounces) lychee, drained
- 1 pint fresh blueberries
- 1 cup granola
- 1 cup mixed berries (such as raspberries, strawberries, or blackberries)
- Red food coloring (optional)
- 1 tablespoon honey (optional)
Cooking Instructions
- Prepare the “Eyeballs”: Take the drained lychee and place a fresh blueberry in the center of each lychee. If desired, add a drop of red food coloring around the edge of the lychee to create a bloodshot effect. Set aside.
- Layer the Yogurt: In each serving glass or bowl, add a generous layer of vanilla yogurt at the bottom.
- Add the Eyeballs: Place one or two lychee “eyeballs” on top of the yogurt layer in each glass.
- Continue Layering: Add a layer of mixed berries over the “eyeballs,” followed by a sprinkle of granola for a crunchy texture.
- Repeat Layers: Continue to layer yogurt, “eyeballs,” mixed berries, and granola until the glasses are filled. Make sure the top layer is yogurt.
- Finish with Eyeballs: Top each parfait with an additional lychee “eyeball” for a creepy finishing touch.
- Drizzle with Honey: If desired, drizzle a small amount of honey over the top for added sweetness.
Extra Tips
For an even more festive look, consider using Halloween-themed serving glasses or bowls. You can also customize the parfaits by using different types of yogurt or fruit to suit your taste preferences.
If you’re serving these to younger children, be sure to cut any large pieces of fruit into smaller, bite-sized pieces to prevent choking. Additionally, these parfaits can be made a day in advance; just wait to add the granola until right before serving to maintain its crunch.