
When it comes to Halloween, nothing sets the mood quite like festive cookies that capture the spooky spirit with flair.
I’ve got a list of 12 tantalizing treats that’ll transform your celebration into a sweet, eerie delight.
From spider web sugar cookies to ghostly meringue bites, each one promises a unique twist on the traditional.
Curious about how these ghoulish goodies can elevate your Halloween festivities?
Let’s explore the delicious details.
Spooky Spider Web Sugar Cookies
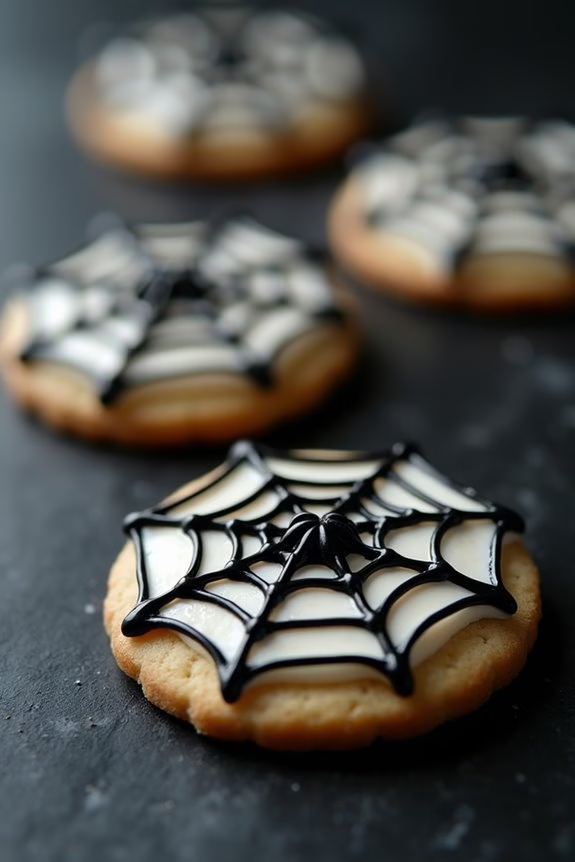
Get ready to cast a deliciously sweet spell with these Spooky Spider Web Sugar Cookies, perfect for your Halloween festivities. These cookies not only capture the eerie essence of the holiday with their intricate web designs, but they also deliver a classic sugar cookie taste that everyone will love.
Whether you’re hosting a Halloween party or simply looking for a fun baking project, these cookies are bound to impress both kids and adults alike.
Crafting these enchanting cookies requires a bit of patience and a steady hand, but the results are well worth the effort. The combination of a buttery sugar cookie base and royal icing allows for a delightful crunch with every bite, while the decorative spider web icing brings a touch of spooky charm.
Follow this recipe to create a batch of 24-30 cookies, perfect for serving 4-6 people.
Ingredients:
- 2 1/2 cups all-purpose flour
- 1/2 teaspoon baking powder
- 1/4 teaspoon salt
- 3/4 cup unsalted butter, softened
- 1 cup granulated sugar
- 1 large egg
- 1 teaspoon vanilla extract
- 1/2 teaspoon almond extract (optional)
- Royal icing:
- 3 cups confectioners’ sugar
- 2 large egg whites
- 1/2 teaspoon vanilla extract
- Black gel food coloring
Cooking Instructions:
- Prepare the Dough: In a medium bowl, whisk together the all-purpose flour, baking powder, and salt. In a separate large bowl, cream the softened butter and granulated sugar together using an electric mixer until light and fluffy.
- Beat in the egg, vanilla extract, and almond extract (if using) until well combined.
- Combine Ingredients: Gradually add the dry ingredients to the wet mixture, mixing on low speed until the dough is smooth and all ingredients are combined. If the dough feels too sticky, add a little more flour, one tablespoon at a time.
- Chill the Dough: Divide the dough into two portions, flatten each into a disc, wrap in plastic wrap, and refrigerate for at least 1 hour. This helps to firm up the dough, making it easier to roll out.
- Preheat and Roll: Preheat your oven to 350°F (175°C). On a lightly floured surface, roll out one disc of dough to about 1/4 inch thickness. Use a round cookie cutter to cut out circles and place them on a lined baking sheet.
- Bake the Cookies: Bake the cookies in the preheated oven for 8-10 minutes or until the edges are lightly golden. Remove from the oven and let them cool on the baking sheet for 5 minutes before transferring to a wire rack to cool completely.
- Prepare the Royal Icing: In a clean bowl, beat the confectioners’ sugar, egg whites, and vanilla extract together until smooth and glossy. Divide the icing into two bowls; leave one bowl white and add black gel food coloring to the other bowl, mixing until the color is uniform.
- Decorate the Cookies: Fill two piping bags with the white and black icings. First, pipe a white circle around the edge of each cookie and flood the center. While the white icing is still wet, pipe concentric circles with the black icing.
- Use a toothpick to gently drag lines from the center to the edge to create a web effect.
- Set the Icing: Allow the icing to set and harden completely before serving or storing the cookies.
Extra Tips:
To guarantee the best results for your Spooky Spider Web Sugar Cookies, make sure to chill the dough thoroughly before rolling it out to maintain the shape of the cookies during baking.
When creating the spider web design, work quickly while the white icing is still wet to achieve a smooth, clean look. If you’d like to add a little extra flair, consider adding a small candy spider on top of each cookie once the icing has set.
Happy Halloween baking!
Creepy Crawly Monster Eyeball Cookies
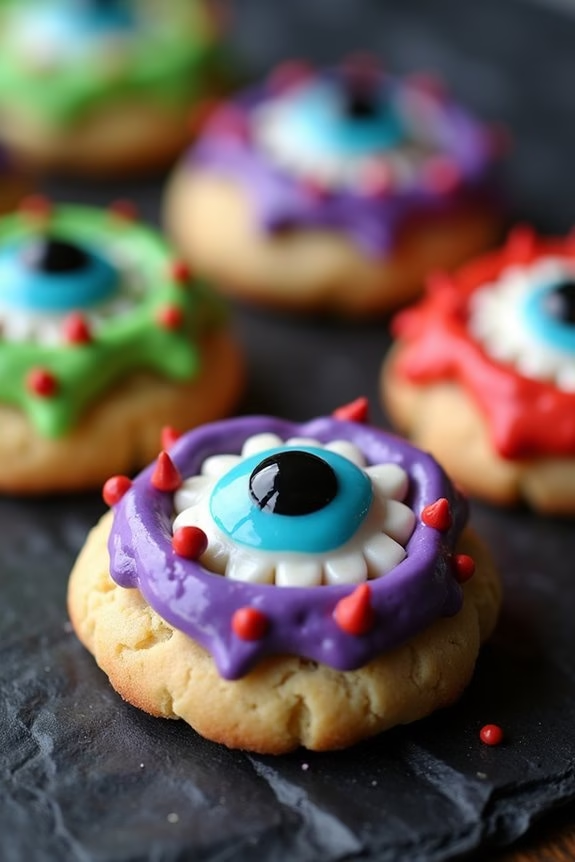
Creepy Crawly Monster Eyeball Cookies are the perfect treat to add a spooky touch to your Halloween festivities. These cookies aren’t only delicious but also visually striking, resembling eerie monster eyes that are sure to fascinate both kids and adults alike.
With a combination of vibrant colors and playful designs, these monstrous cookies will be a hit at any Halloween party or gathering. The best part is that they’re easy to make, allowing you to have fun in the kitchen while creating a memorable dessert.
The recipe combines classic cookie ingredients with a few creative embellishments to transform ordinary cookies into ghoulish delights. A buttery cookie dough serves as the base, while food coloring and candies are used to create the eerie eyeball effect.
This recipe makes enough for 4-6 people, guaranteeing that there are plenty of cookies to go around. Whether you’re hosting a Halloween party or looking for a fun baking activity, these Creepy Crawly Monster Eyeball Cookies are sure to impress.
Ingredients:
- 2 ½ cups all-purpose flour
- 1 teaspoon baking powder
- ½ teaspoon baking soda
- ½ teaspoon salt
- 1 cup unsalted butter, softened
- 1 cup granulated sugar
- 1 large egg
- 1 teaspoon vanilla extract
- Assorted food coloring (green, purple, red, etc.)
- Candy eyeballs or small round candies
- Decorating gel or icing
Cooking Instructions:
- Preheat the Oven: Preheat your oven to 350°F (175°C) and line two baking sheets with parchment paper or silicone baking mats. This guarantees that your cookies bake evenly and don’t stick to the sheets.
- Mix Dry Ingredients: In a medium bowl, whisk together the flour, baking powder, baking soda, and salt. Set aside. This step guarantees that the dry ingredients are well combined and evenly distributed throughout the dough.
- Cream Butter and Sugar: In a large mixing bowl, use an electric mixer to cream together the softened butter and granulated sugar until light and fluffy. This usually takes about 2-3 minutes.
- Add Egg and Vanilla: Beat in the egg and vanilla extract until well combined. This adds flavor and helps to bind the dough together.
- Combine Wet and Dry Ingredients: Gradually add the dry ingredients to the wet ingredients, mixing until a dough forms. Be careful not to overmix, as this can make the cookies tough.
- Divide and Color the Dough: Divide the dough into separate bowls, depending on how many colors you want to use. Add food coloring to each bowl and mix until the desired color is achieved.
- Shape the Cookies: Roll the dough into 1-inch balls and place them onto the prepared baking sheets, leaving about 2 inches of space between each ball. Flatten each ball slightly with the palm of your hand.
- Bake the Cookies: Bake in the preheated oven for 10-12 minutes, or until the edges are lightly golden. Remove from the oven and allow them to cool on the baking sheets for 5 minutes before transferring to a wire rack to cool completely.
- Decorate the Cookies: Once the cookies are cooled, use decorating gel or icing to attach candy eyeballs to each one. Use the gel to add lines or designs around the eyes to create a monster-like appearance.
Extra Tips:
For an extra spooky effect, you can add a few drops of black food coloring gel to the decorating gel to create dark veins or pupils on the eyeballs.
If you can’t find candy eyeballs, small round candies or chocolate chips can serve as a great alternative. Feel free to get creative with your designs, adding extra details like fangs or scars using icing or gel.
These cookies are best enjoyed fresh, but they can be stored in an airtight container for up to a week. Happy Halloween baking!
Boo-tiful Ghostly Meringue Cookies
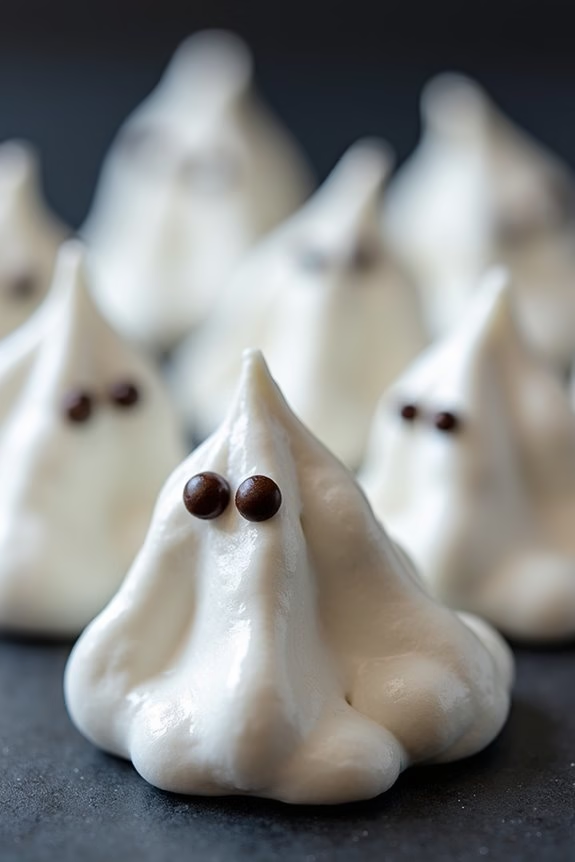
Boo-tiful Ghostly Meringue Cookies are the perfect Halloween treat that combines spooky fun with delightful sweetness. These ethereal confections are shaped like tiny ghosts, giving them a playful and whimsical touch that will captivate kids and adults alike. The cookies are light and airy, with a crisp exterior that melts into a sugary cloud with each bite. They aren’t only delicious but also make for an eye-catching addition to any Halloween party spread.
Creating these ghostly cookies is a fun and straightforward process, requiring simple ingredients that you likely already have in your pantry. The main component of meringue cookies is egg whites, which, when beaten to perfection, create the glossy, stiff peaks necessary for shaping. With just a few strategic pipework and a sprinkle of creativity, you can transform a humble mixture into a batch of charming ghostly figures.
Whether you’re an experienced baker or a novice in the kitchen, these Boo-tiful Ghostly Meringue Cookies are an enjoyable baking project for all.
Ingredients (Serves 4-6 people):
- 4 large egg whites
- 1 cup granulated sugar
- 1/4 teaspoon cream of tartar
- 1/2 teaspoon vanilla extract
- Mini chocolate chips or edible marker for eyes
Cooking Instructions:
- Preheat the Oven: Start by preheating your oven to 200°F (93°C) and line a baking sheet with parchment paper to prevent sticking.
- Prepare the Meringue: In a clean, dry mixing bowl, add the egg whites and cream of tartar. Using a hand mixer or a stand mixer with the whisk attachment, beat the egg whites on medium speed until frothy.
- Add Sugar Gradually: Increase the mixer speed to high and gradually add the granulated sugar, one tablespoon at a time. Continue beating the mixture until stiff, glossy peaks form. This process may take about 7-10 minutes. The meringue should hold its shape and not slide around the bowl.
- Flavor the Meringue: Gently fold in the vanilla extract using a spatula, making certain not to deflate the meringue.
- Pipe the Ghost Shapes: Transfer the meringue into a piping bag fitted with a large round tip. Pipe the meringue onto the prepared baking sheet in the shape of small, rounded ghost bodies, approximately 2 to 3 inches tall.
- Create the Eyes: Place two mini chocolate chips on each ghost to form the eyes, or you can add them later using an edible marker after baking.
- Bake the Meringues: Place the baking sheet in the preheated oven and bake for about 1.5 to 2 hours. The meringues should be firm to the touch and easily lift off the parchment paper.
- Cool Completely: Once baked, turn off the oven and allow the meringues to cool completely inside the oven with the door slightly ajar. This helps prevent cracks.
Extra Tips:
To guarantee the perfect meringue, make sure your mixing bowl and utensils are completely free from grease or any residue, as this can prevent the egg whites from whipping properly.
When adding sugar, do so gradually to avoid deflating the meringue. It’s also important to bake the meringues at a low temperature to avoid browning, maintaining their ghostly white appearance.
Finally, store the cookies in an airtight container at room temperature to keep them crisp and delicious for up to a week.
Wicked Witch Hat Chocolate Cookies

Indulge in the spooky spirit of Halloween by making Wicked Witch Hat Chocolate Cookies, a deliciously fun treat that combines the rich flavors of chocolate with a whimsical design. These cookies are perfect for a Halloween party or simply as a festive treat to enjoy at home. Inspired by the classic witch hat, each cookie is crafted to resemble a pointed hat, complete with a chocolatey base and a charming candy decoration.
Whether you’re baking with kids or looking to impress guests with your creative culinary skills, these cookies are sure to create a delightful spell on all who taste them.
The key to achieving the perfect Wicked Witch Hat Chocolate Cookies lies in the balance of flavor and presentation. The cookies are made using a rich chocolate dough, which forms the base of the hat, while a chocolate kiss candy serves as the hat’s peak. The vibrant band around the hat is created using colorful icing or a strip of fondant, adding a pop of color and enhancing the overall design.
This recipe serves 4-6 people, making it an ideal choice for small gatherings or as a charming addition to a Halloween dessert spread.
Ingredients:
- 1 cup unsalted butter, softened
- 1 cup granulated sugar
- 1 teaspoon vanilla extract
- 2 large eggs
- 2 1/2 cups all-purpose flour
- 1/2 cup unsweetened cocoa powder
- 1 teaspoon baking powder
- 1/2 teaspoon salt
- 24 chocolate kiss candies
- Colored icing or fondant for decoration
Instructions:
- Preheat the Oven: Begin by preheating your oven to 350°F (175°C) to guarantee it’s ready for baking.
- Prepare the Dough: In a large mixing bowl, cream together the softened butter and granulated sugar until light and fluffy. Add the vanilla extract and eggs, mixing well after each addition.
- Combine Dry Ingredients: In a separate bowl, whisk together the all-purpose flour, cocoa powder, baking powder, and salt. Gradually add the dry ingredients to the butter mixture, mixing until a smooth dough forms.
- Shape the Cookies: Roll the dough into small balls, about one inch in diameter. Place them on a baking sheet lined with parchment paper, spacing them about 2 inches apart to allow for spreading.
- Bake the Cookies: Place the baking sheet in the preheated oven and bake for 10-12 minutes, or until the edges are firm but the centers are still soft.
- Add the Hat Peak: As soon as the cookies are out of the oven, gently press a chocolate kiss candy into the center of each cookie to create the witch hat peak. Allow the cookies to cool on the baking sheet for 5 minutes, then transfer to a wire rack to cool completely.
- Decorate the Hats: Once the cookies are completely cooled, use colored icing or fondant strips to create a decorative band around the base of each chocolate kiss, mimicking the brim of a witch hat.
Extra Tips:
For a more uniform look, consider using a small cookie scoop to portion the dough, guaranteeing each cookie is the same size. If you prefer a less sweet cookie, you can reduce the sugar by a quarter cup without affecting the texture.
To add an extra spooky touch, use Halloween-themed sprinkles or edible glitter on the icing band. Remember to store the cookies in an airtight container to keep them fresh, and they can be made a day in advance to save time on the day of your event. Enjoy crafting and sharing these enchanting Wicked Witch Hat Chocolate Cookies!
Ghoulishly Glazed Pumpkin Cookies
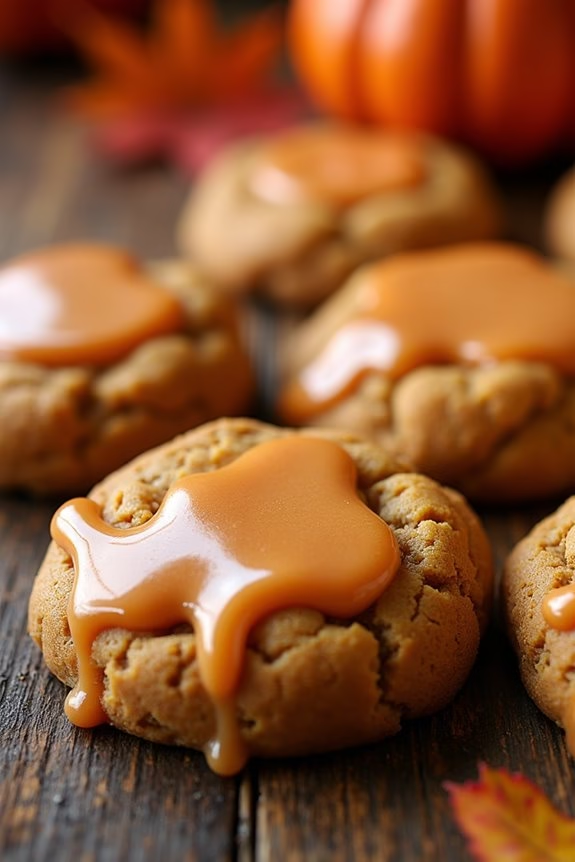
Ghoulishly Glazed Pumpkin Cookies are a perfect treat to get you in the spooky spirit of Halloween. These deliciously soft and chewy cookies, infused with rich pumpkin flavor and a hint of autumn spices, are topped with a shimmering glaze that makes them look eerily enchanting. Perfect for a Halloween party or a cozy night in, these cookies are sure to be a hit with both kids and adults alike.
The combination of pumpkin and spices creates a comforting aroma that fills your home with the essence of fall.
To make these Ghoulishly Glazed Pumpkin Cookies, you’ll need a mix of pantry staples and some special ingredients that bring out the best in pumpkin. The glaze, with its glossy finish, adds a sweet touch and a bit of Halloween magic. This recipe yields enough cookies to serve 4-6 people, making it perfect for small gatherings or family treats. Be prepared to be asked for seconds, as these cookies are delightfully addictive.
Ingredients:
- 1 cup pumpkin puree
- 1 cup granulated sugar
- 1/2 cup unsalted butter, softened
- 1 large egg
- 2 cups all-purpose flour
- 1 teaspoon baking powder
- 1 teaspoon baking soda
- 1 teaspoon ground cinnamon
- 1/2 teaspoon ground nutmeg
- 1/4 teaspoon ground ginger
- 1/4 teaspoon salt
- 1 teaspoon vanilla extract
- 1 1/2 cups powdered sugar
- 2 tablespoons milk
- Orange food coloring (optional)
Cooking Instructions:
- Preheat and Prepare: Preheat your oven to 350°F (175°C). Line two baking sheets with parchment paper or a silicone baking mat to prevent the cookies from sticking.
- Mix the Wet Ingredients: In a large mixing bowl, cream together the softened butter and granulated sugar until smooth and fluffy. Add the pumpkin puree, egg, and vanilla extract. Mix until well combined.
- Combine Dry Ingredients: In a separate bowl, whisk together the flour, baking powder, baking soda, cinnamon, nutmeg, ginger, and salt. Make sure all the spices are evenly distributed.
- Combine Wet and Dry Mixtures: Gradually add the dry ingredients to the wet mixture, stirring until just combined. Be careful not to overmix, as this can make the cookies tough.
- Shape and Bake: Using a tablespoon or cookie scoop, drop rounded spoonfuls of dough onto the prepared baking sheets, spacing them about 2 inches apart. Bake in the preheated oven for 10-12 minutes, or until the edges are lightly golden.
- Cool the Cookies: Remove the cookies from the oven and let them cool on the baking sheets for about 5 minutes before transferring them to a wire rack to cool completely.
- Prepare the Glaze: In a small bowl, mix the powdered sugar and milk until smooth. If desired, add a few drops of orange food coloring to achieve a festive look.
- Glaze the Cookies: Once the cookies are completely cool, drizzle or spread the glaze over each cookie. Allow the glaze to set for at least 10 minutes before serving.
Extra Tips:
For an added touch of Halloween flair, you can use black or purple sprinkles on top of the glaze to make the cookies extra spooky. If you prefer a more robust pumpkin flavor, consider adding a dash more cinnamon or nutmeg.
Make sure the cookies are completely cool before glazing to prevent the glaze from melting off. These cookies can be stored in an airtight container for up to three days, but they’re best enjoyed fresh.
Eerie Black Cat Sandwich Cookies
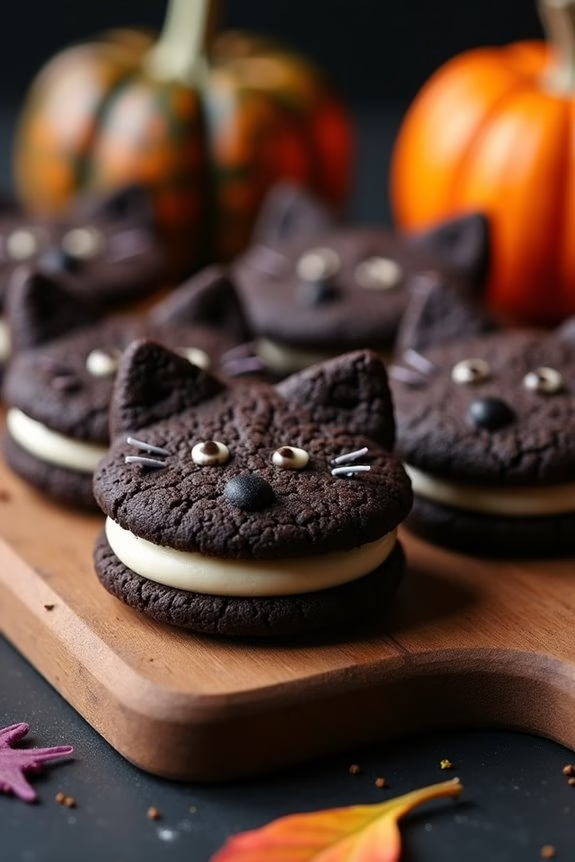
Eerie Black Cat Sandwich Cookies are a spooktacular treat perfect for your Halloween festivities. These delightful cookies not only taste delicious but also add a playful touch to your Halloween dessert table. With their dark cocoa color and enchanting cat shape, these cookies are sure to be a hit with both kids and adults alike.
The sandwich cookies are filled with a luscious cream cheese filling that perfectly complements the rich chocolate flavor of the cookies, making them irresistible for any sweet tooth.
To create these Eerie Black Cat Sandwich Cookies, you’ll start by making a simple dough enriched with cocoa powder to give it a deep, dark hue, perfect for mimicking the spooky spirit of Halloween. Once the dough is ready, it’s rolled out and cut into adorable cat shapes using a cookie cutter.
After baking, the cookies are sandwiched together with a creamy filling, creating a delightful contrast in both texture and color. These cookies aren’t only fun to make but also a delight to serve at any Halloween gathering.
Ingredients (serves 4-6 people):
- 1 cup unsalted butter, softened
- 1 cup granulated sugar
- 1 large egg
- 1 teaspoon vanilla extract
- 2 cups all-purpose flour
- 1/2 cup unsweetened cocoa powder
- 1/2 teaspoon baking powder
- 1/4 teaspoon salt
- 4 ounces cream cheese, softened
- 1/2 cup powdered sugar
- 1 teaspoon vanilla extract (for filling)
Cooking Instructions:
- Prepare the Dough: In a large mixing bowl, cream together the softened butter and granulated sugar until light and fluffy. Beat in the egg and vanilla extract until well combined.
- Mix Dry Ingredients: In a separate bowl, whisk together the all-purpose flour, cocoa powder, baking powder, and salt. Gradually add the dry mixture to the wet ingredients, mixing until a smooth dough forms.
- Chill the Dough: Divide the dough into two portions, shape each into a disk, wrap in plastic wrap, and refrigerate for at least 1 hour. This will make it easier to roll out.
- Preheat and Roll: Preheat your oven to 350°F (175°C). Roll out the chilled dough on a lightly floured surface to about 1/4 inch thickness. Use a cat-shaped cookie cutter to cut out cookies.
- Bake the Cookies: Place the cut-out cookies onto a baking sheet lined with parchment paper, leaving some space between each. Bake in the preheated oven for 8-10 minutes, or until the edges are firm. Let them cool completely on a wire rack.
- Prepare the Filling: In a medium bowl, beat together the cream cheese, powdered sugar, and vanilla extract until smooth and creamy.
- Assemble the Sandwiches: Spread a generous amount of the cream cheese filling onto the backside of one cookie and sandwich it with another cookie, pressing gently to adhere.
Extra Tips:
For an extra touch of Halloween magic, consider adding edible glitter or small candy eyes to the tops of the cookies before baking. If you find the dough too sticky while rolling, dust your rolling pin and surface with a little more flour.
Remember to keep an eye on the cookies while baking, as they can quickly overbake due to their dark color. These cookies can be stored in an airtight container for up to a week, making them perfect to prepare in advance for your Halloween celebrations.
Haunted House Gingerbread Cookies
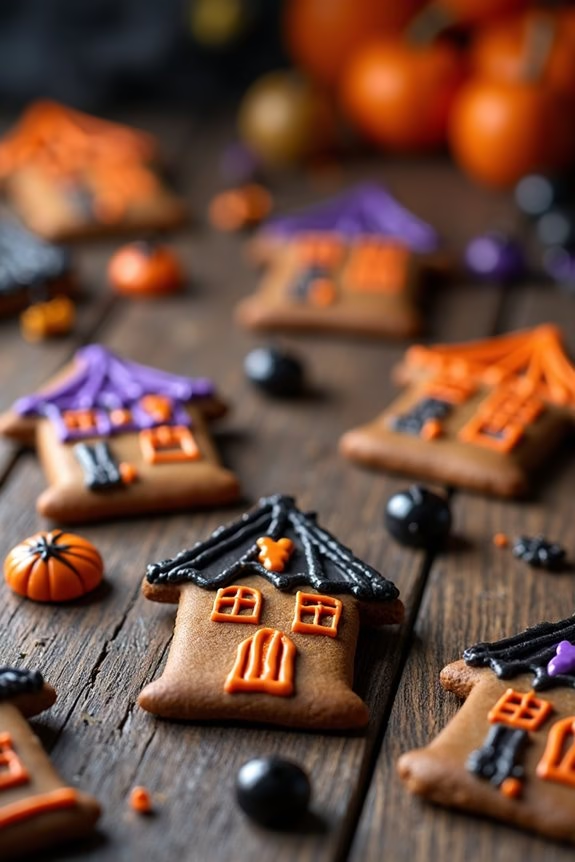
Haunted House Gingerbread Cookies are a festive and spooky treat perfect for celebrating Halloween with family and friends. These cookies aren’t only delicious but also allow for creative decoration, turning them into haunted houses that will delight both children and adults.
Whether you’re hosting a Halloween party or simply looking to indulge in some seasonal baking, these cookies are a tasty way to get into the spirit of the holiday. This recipe yields enough Haunted House Gingerbread Cookies for 4-6 people, making it ideal for a small gathering or family treat.
The gingerbread cookies are flavored with warm spices and molasses, providing a rich and aromatic base. Once baked, the cookies can be decorated with icing, candies, and edible decorations to create spooky haunted houses that are both fun to make and eat.
Ingredients:
- 3 cups all-purpose flour
- 1 teaspoon baking soda
- 1/2 teaspoon salt
- 1 tablespoon ground ginger
- 1 tablespoon ground cinnamon
- 1/2 teaspoon ground cloves
- 1/2 teaspoon nutmeg
- 3/4 cup unsalted butter, softened
- 3/4 cup dark brown sugar, packed
- 1 large egg
- 1 teaspoon vanilla extract
- 1/2 cup molasses
- 1 cup powdered sugar (for icing)
- 2-3 tablespoons milk (for icing)
- Black, orange, and purple food coloring
- Assorted Halloween candies for decoration
Cooking Instructions:
- Prepare the Dough: In a medium bowl, whisk together the flour, baking soda, salt, ginger, cinnamon, cloves, and nutmeg. In a large bowl, beat the softened butter and brown sugar together until light and fluffy. Add the egg, vanilla extract, and molasses, mixing well. Gradually add the dry ingredients to the wet ingredients, mixing until a dough forms.
- Chill the Dough: Divide the dough into two portions, flatten each into a disk, and wrap in plastic wrap. Refrigerate for at least 1 hour, or until firm enough to roll out.
- Roll and Cut the Cookies: Preheat your oven to 350°F (175°C). On a lightly floured surface, roll out each dough disk to about 1/4-inch thickness. Use haunted house cookie cutters or a knife to cut out shapes. Place cookies on baking sheets lined with parchment paper, leaving some space between each.
- Bake the Cookies: Bake in the preheated oven for 8-10 minutes, or until the edges are firm and the centers are set. Remove from the oven and let cool on the baking sheets for a few minutes before transferring to wire racks to cool completely.
- Decorate the Cookies: In a small bowl, mix the powdered sugar with enough milk to make a smooth icing. Divide the icing into separate bowls and tint with food coloring as desired. Use piping bags or zip-top bags with the corner snipped off to decorate the cookies with icing. Add Halloween candies for windows, doors, and spooky accents.
- Let the Icing Set: Allow the decorated cookies to sit at room temperature until the icing is set and firm, which usually takes about an hour.
Extra Tips:
For perfectly shaped cookies, chill the cut dough shapes on the baking sheet for about 10 minutes before baking. This helps the cookies retain their shape in the oven.
When decorating, be creative with your designs and use a variety of candies for added texture and color. If you don’t have specific cookie cutters, you can create templates using cardboard and cut around them with a knife for unique shapes.
Finally, if you prefer a softer cookie, reduce the baking time slightly, but keep an eye on them to prevent overbaking.
Bloodcurdling Vampire Fang Cookies
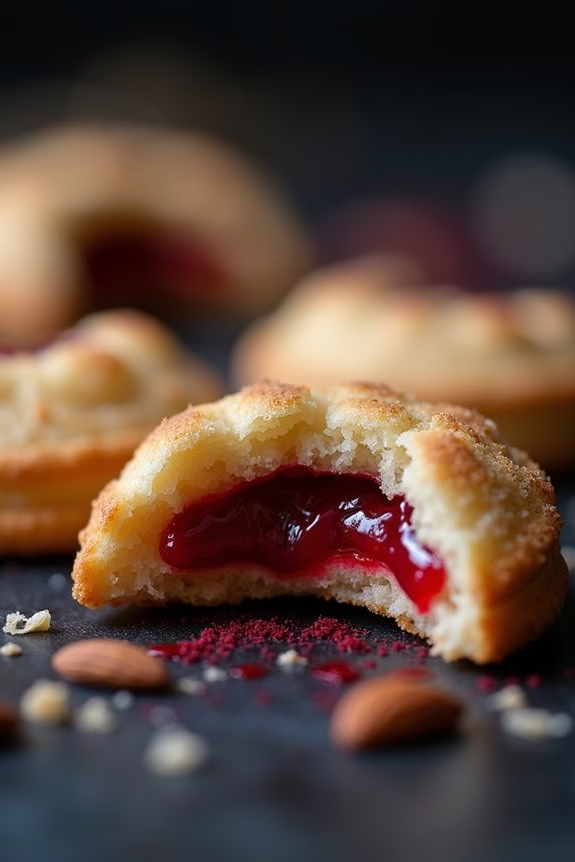
Bloodcurdling Vampire Fang Cookies are a spooktacular treat perfect for adding a frightful touch to your Halloween festivities. These eerie cookies are designed to resemble sinister vampire fangs, with a deliciously crisp exterior and a sweet, gooey filling that will send shivers down your spine.
Perfect for serving at Halloween parties or as a fun baking activity with the family, these cookies will be a hit with both kids and adults alike.
The dough is made from a simple sugar cookie base, which is shaped into fang-like crescents before baking. Once baked to golden perfection, the cookies are sandwiched with a blood-red filling made from strawberry or raspberry preserves, giving them their signature vampiric look.
Whether enjoyed on their own or as part of a Halloween dessert spread, these Bloodcurdling Vampire Fang Cookies are sure to leave a lasting impression.
Ingredients (for 4-6 servings):
- 1 cup unsalted butter, softened
- 1 cup granulated sugar
- 1 large egg
- 1 teaspoon vanilla extract
- 2 1/2 cups all-purpose flour
- 1/2 teaspoon baking powder
- 1/4 teaspoon salt
- 1/2 cup strawberry or raspberry preserves
- 1/4 cup slivered almonds
- Red food coloring (optional)
Instructions:
- Preheat the oven: Set your oven to 350°F (175°C) and line two baking sheets with parchment paper.
- Prepare the dough: In a large bowl, cream together the softened butter and granulated sugar until light and fluffy. Beat in the egg and vanilla extract until well combined.
- Mix dry ingredients: In a separate bowl, whisk together the all-purpose flour, baking powder, and salt. Gradually add the dry ingredients to the wet mixture, stirring until a dough forms.
- Shape the cookies: Divide the dough into small balls, then roll each ball into a log shape. Gently curve each log into a crescent shape to resemble vampire fangs. Place on the prepared baking sheets, leaving space between each cookie.
- Bake the cookies: Bake in the preheated oven for 8-10 minutes, or until the edges are lightly golden brown. Allow the cookies to cool on the baking sheet for a few minutes before transferring them to a wire rack to cool completely.
- Prepare the filling: While the cookies cool, use a small saucepan to gently heat the strawberry or raspberry preserves over low heat until smooth. If desired, add a few drops of red food coloring to intensify the color.
- Assemble the cookies: Once the cookies have cooled, spread a small amount of the preserves on the flat side of one cookie, then press a second cookie on top to create a sandwich. Insert a slivered almond into the filling on one side to mimic a fang.
- Finish and serve: Repeat with remaining cookies and filling, then arrange on a platter for serving.
Extra Tips:
For an extra spooky touch, consider adding a drop of red food coloring to the cookie dough to give the fangs a bloody hue. If you prefer a more subtle look, you can skip this step.
Additionally, make sure the cookies have cooled completely before assembling to prevent the preserves from melting and becoming too runny. Finally, store any leftover cookies in an airtight container to maintain their crispness and flavor for up to a week.
Sinister Skeleton Bone Cookies

Halloween is the perfect time to get creative in the kitchen, and what better way to celebrate than by whipping up some Sinister Skeleton Bone Cookies? These spooky treats aren’t only delicious but also make for a fun and eerie addition to any Halloween party.
With their bone-like appearance and sweet, crispy texture, these cookies are sure to be a hit with both kids and adults. Whether you’re hosting a Halloween bash or just want to indulge in some festive baking, these cookies will certainly add a touch of macabre charm to your dessert table.
The Sinister Skeleton Bone Cookies are surprisingly easy to make, requiring just a few basic ingredients you might already have in your pantry. The secret to their bone-like appearance is shaping the dough into elongated forms before baking, giving them a creepy-yet-tasty look.
The cookies are then dusted with powdered sugar to give them a spooky, ghostly finish. Enjoy these cookies with a glass of milk or serve them alongside other Halloween treats for a ghoulishly delightful snack.
Ingredients (Serves 4-6):
- 1 cup unsalted butter, softened
- 1 cup granulated sugar
- 1 large egg
- 1 teaspoon vanilla extract
- 2 1/2 cups all-purpose flour
- 1/4 teaspoon salt
- 1/4 teaspoon baking powder
- Powdered sugar, for dusting
Instructions:
- Preheat the Oven: Begin by preheating your oven to 350°F (175°C). This guarantees that the cookies will bake evenly and achieve that perfect crispiness.
- Prepare the Dough: In a large mixing bowl, cream together the softened butter and granulated sugar until light and fluffy. Add the egg and vanilla extract, mixing well until fully incorporated.
- Mix Dry Ingredients: In a separate bowl, whisk together the all-purpose flour, salt, and baking powder. Gradually add this dry mixture to the wet ingredients, mixing until a smooth dough forms.
- Shape the Cookies: Take small portions of the dough and roll them into elongated “bone” shapes about 4-5 inches long. You can use your fingers to create indents in the middle to give them a more bone-like appearance.
- Bake the Cookies: Place the shaped dough onto a baking sheet lined with parchment paper, leaving some space in between each cookie. Bake in the preheated oven for 10-12 minutes or until the edges are slightly golden.
- Cool and Dust: Remove the cookies from the oven and allow them to cool on the baking sheet for a few minutes before transferring them to a wire rack. Once completely cool, dust with powdered sugar to give them a ghostly finish.
Extra Tips:
For an extra touch of eeriness, consider adding a few drops of food coloring to the dough to create a bone-chilling hue.
If you want more detailed bone shapes, use a small knife or a toothpick to carve out more defined bone structures before baking. Additionally, confirm that the dough isn’t too sticky when shaping—if it is, simply refrigerate it for 15 minutes to firm it up.
Enjoy these Sinister Skeleton Bone Cookies as a fun activity with kids, letting them help shape the bones and dust with sugar for a hands-on Halloween experience.
Bewitching Bat-Shaped Biscotti
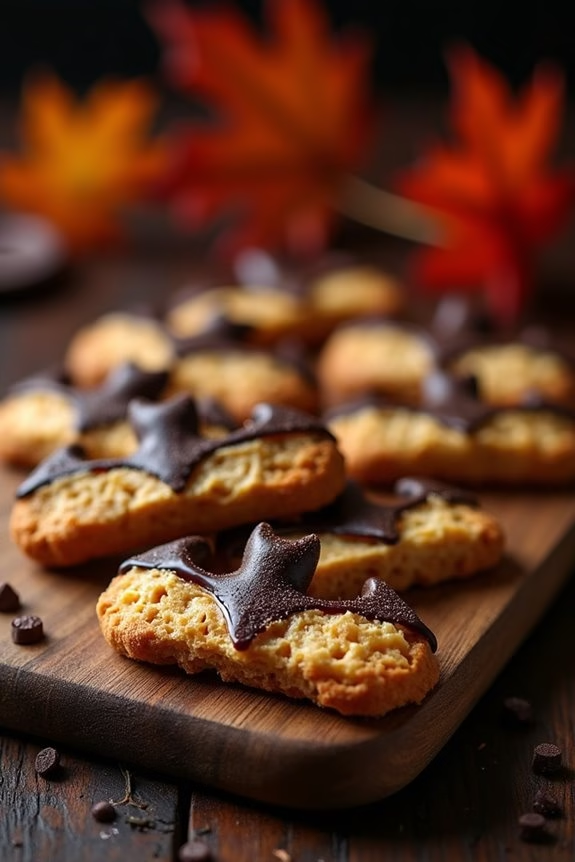
When the leaves begin to turn and the air grows crisp, there’s no better time to indulge in the spirit of Halloween with some festive treats. Bewitching Bat-Shaped Biscotti are the perfect addition to your holiday table, combining the classic crunch of biscotti with a whimsical, spooky twist.
These delightful cookies aren’t only fun to make but also to eat, offering a delightful balance of flavors and textures. Perfect for serving with a cup of hot coffee or cocoa, they’re sure to enchant guests of all ages at your next Halloween gathering.
These biscotti are shaped like bats, adding a playful and thematic element to your Halloween dessert spread. With a hint of almond and chocolate, each bite is a delicious reminder of the season. Whether you’re hosting a Halloween party or simply looking to add some seasonal flair to your everyday baking, these Bewitching Bat-Shaped Biscotti are a must-try.
Let’s explore the ingredients and process of creating these charming cookies that serve 4-6 people.
Ingredients:
- 2 cups all-purpose flour
- 1 cup granulated sugar
- 1/2 teaspoon baking powder
- 1/4 teaspoon salt
- 3 large eggs
- 1 teaspoon vanilla extract
- 1 teaspoon almond extract
- 1/4 cup unsweetened cocoa powder
- 1 cup sliced almonds
- 1 cup mini chocolate chips
- Black food coloring (optional for extra spooky effect)
Cooking Instructions:
- Preheat and Prepare: Preheat your oven to 350°F (175°C). Line a baking sheet with parchment paper to prevent sticking.
- Mix Dry Ingredients: In a medium-sized bowl, whisk together the flour, sugar, baking powder, and salt. This guarantees even distribution of the leavening agent.
- Combine Wet Ingredients: In a separate large bowl, beat the eggs with the vanilla and almond extracts until well combined. If using black food coloring, add a few drops to achieve the desired shade.
- Incorporate Cocoa: Add the cocoa powder to the wet mixture and mix until fully incorporated, giving the dough a rich chocolatey base.
- Form the Dough: Gradually add the dry ingredients to the wet mixture, stirring until a dough forms. Fold in the sliced almonds and mini chocolate chips.
- Shape the Biscotti: Divide the dough in half and shape each portion into a flat log about 12 inches long and 3 inches wide. Place the logs on the prepared baking sheet.
- Bake the Logs: Bake in the preheated oven for about 25 minutes, or until lightly firm to the touch. Remove from the oven and let cool for about 10 minutes.
- Slice and Shape: Using a serrated knife, carefully slice the logs diagonally into 1/2-inch thick slices. To create bat shapes, use a bat-shaped cookie cutter on each piece, or trim the edges with a knife for a more rustic look.
- Second Bake: Arrange the bat-shaped slices on the baking sheet, cut side down. Return to the oven and bake for an additional 10-15 minutes, or until crisp and dry. Flip halfway through to guarantee even baking on both sides.
- Cool and Serve: Allow the biscotti to cool completely on a wire rack. Once cooled, serve with your favorite warm beverage.
Extra Tips:
For an even spookier presentation, consider dipping the wings of the bat-shaped biscotti in melted dark chocolate for a glossy finish. If you’re using food coloring, remember that a little goes a long way, especially when working with dark shades.
For added flavor, you can toast the almonds before mixing them into the dough. Store any leftover biscotti in an airtight container to maintain their crispness. Enjoy your Bewitching Bat-Shaped Biscotti as a delightful Halloween treat!
Frightful Frankenstein Rice Krispie Treat Cookies
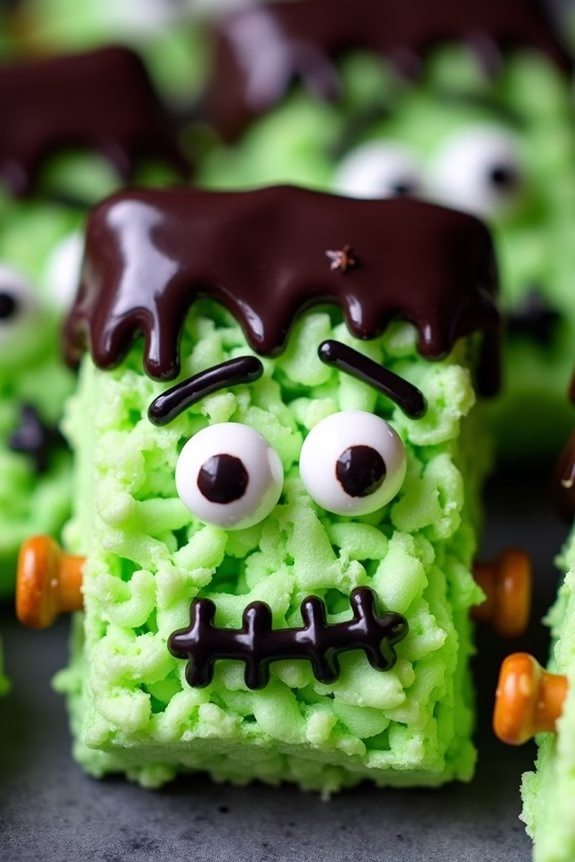
Create a monstrously fun treat with these Frightful Frankenstein Rice Krispie Treat Cookies, perfect for Halloween festivities. These vibrant and creepy cookies are sure to be a hit with kids and adults alike, combining the gooey goodness of Rice Krispie treats with a playful twist. Featuring a green-tinted marshmallow base and decorated with spooky features, these cookies aren’t only delicious but also a visual delight that will add a ghoulish charm to your Halloween spread.
Making Frightful Frankenstein Rice Krispie Treat Cookies is an enjoyable and creative activity that you can share with family and friends. The recipe is simple enough for even beginner bakers, and you can customize the decorations to match the spookiness level you desire. With just a few ingredients and some creativity, you can whip up these delightful cookies that are perfect for a Halloween party or a cozy night in. This recipe yields 4-6 servings, making it ideal for a small gathering.
Ingredients (serving size: 4-6 people):
- 3 tablespoons unsalted butter
- 4 cups mini marshmallows
- Green food coloring
- 6 cups Rice Krispies cereal
- 1 cup semisweet chocolate chips
- Candy eyes
- Black icing or edible marker
- Pretzel sticks
Cooking Instructions:
- Prepare the Pan: Line a 9×13 inch baking dish with parchment paper or lightly grease it with butter to prevent sticking.
- Melt the Butter and Marshmallows: In a large saucepan, melt the butter over low heat. Once melted, add the mini marshmallows and stir continuously until they’re completely melted and smooth.
- Add Color: Remove the saucepan from heat and add green food coloring to the marshmallow mixture. Stir until the color is evenly distributed and reaches your desired shade of green.
- Mix in the Cereal: Gradually add the Rice Krispies cereal to the green marshmallow mixture. Stir gently until all the cereal is well-coated.
- Shape the Treats: Transfer the mixture into the prepared baking dish. With a buttered spatula or wax paper, evenly press the mixture into the dish. Allow it to cool for about 20 minutes.
- Cut and Decorate: Once cooled, cut the mixture into rectangular cookie shapes. Melt the chocolate chips in a microwave-safe bowl, stirring every 30 seconds until smooth. Dip the top of each rectangle into the melted chocolate to create Frankenstein’s hair.
- Add Features: Place candy eyes onto the chocolate hair before it sets. Use black icing or an edible marker to draw a mouth and scars on each cookie. Break pretzel sticks in half and insert them on each side of the cookies to resemble bolts.
- Set and Serve: Allow the decorated cookies to set completely before serving. Enjoy these spooky treats with your Halloween guests!
Extra Tips: When making Frightful Frankenstein Rice Krispie Treat Cookies, be mindful of the marshmallow mixture’s heat as it can harden quickly. Work swiftly when mixing in the cereal and transferring the mixture into the dish. If the chocolate starts to harden while decorating, reheat it briefly to keep it smooth. For a nut-free version, omit pretzel sticks or replace them with a nut-free alternative. Customize the decorations by using different colored icings or candies to give each Frankenstein cookie its unique personality.
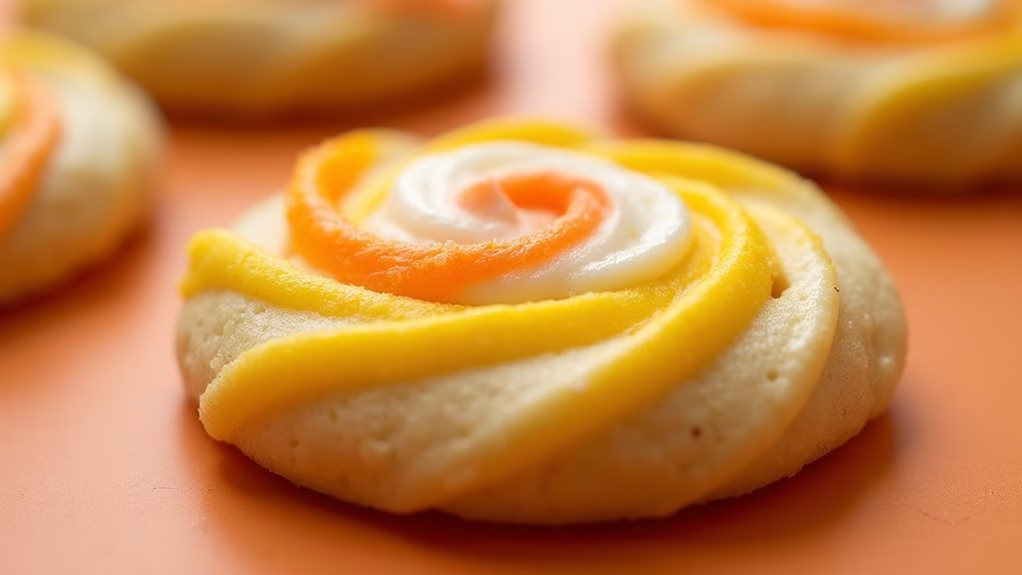
Enchanting Candy Corn Swirl Cookies
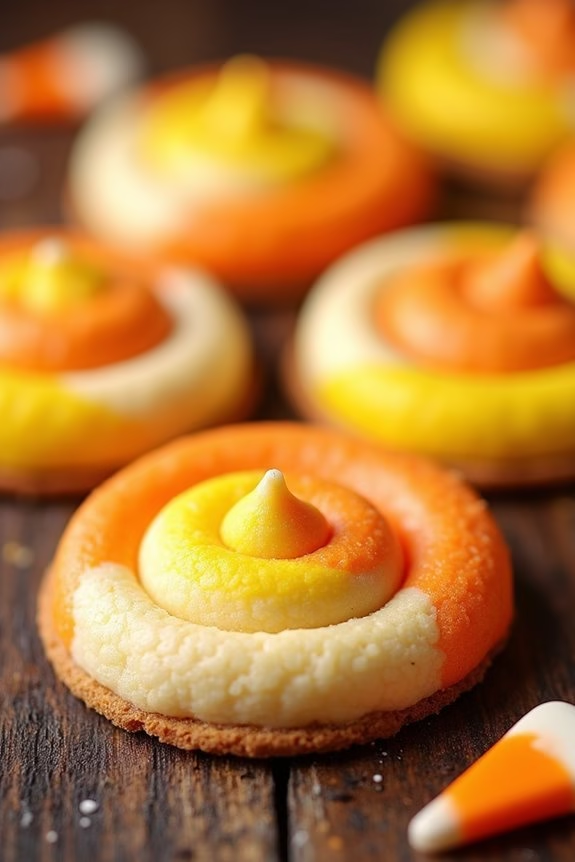
Enchanting Candy Corn Swirl Cookies are a delightful treat that perfectly captures the spirit of Halloween. These cookies have a whimsical swirl of colors reminiscent of candy corn, making them a festive addition to any Halloween celebration. With a buttery vanilla base, they’re both visually stunning and deliciously satisfying, providing a delightful crunch with each bite.
These cookies are sure to be a hit with both kids and adults alike, bringing a burst of Halloween fun to your dessert table. Creating these eye-catching cookies is easier than it looks, and the process is just as enjoyable as the end result. The secret to achieving the perfect swirl lies in dividing the dough and adding vibrant food coloring to each portion.
Then, by rolling the different colored doughs together, you create a charming candy corn effect. This recipe yields approximately 24 cookies, making it perfect for serving 4-6 people at a Halloween gathering or party.
Ingredients:
- 2 1/2 cups all-purpose flour
- 1/2 teaspoon baking powder
- 1/4 teaspoon salt
- 1 cup unsalted butter, softened
- 1 cup granulated sugar
- 1 large egg
- 1 teaspoon vanilla extract
- Yellow and orange gel food coloring
Instructions:
- Prepare the Dry Ingredients: In a medium bowl, whisk together the all-purpose flour, baking powder, and salt. Set aside for later use.
- Cream Butter and Sugar: In a large mixing bowl, beat together the softened butter and granulated sugar using an electric mixer on medium speed until light and fluffy, about 3-4 minutes.
- Add Wet Ingredients: Add the egg and vanilla extract to the butter and sugar mixture. Beat until well combined.
- Combine Wet and Dry Ingredients: Gradually add the dry ingredient mixture to the wet ingredients, mixing on low speed until just combined and a dough forms.
- Divide and Color Dough: Divide the dough into three equal portions. Leave one portion plain, dye one portion yellow, and the third portion orange using the gel food coloring. Mix each portion until the color is even.
- Chill the Dough: Wrap each colored dough portion separately in plastic wrap and refrigerate for at least 1 hour to firm up.
- Form the Swirl: Roll each portion of dough into a log approximately 12 inches long. Place the logs next to each other and gently twist them together. Roll the twisted dough into a single log, then wrap in plastic wrap and refrigerate for another 30 minutes.
- Preheat the Oven: Preheat your oven to 350°F (175°C) and line a baking sheet with parchment paper.
- Slice and Bake: Unwrap the chilled dough log and slice it into 1/4-inch thick rounds. Place the rounds onto the prepared baking sheet, spacing them about 2 inches apart.
- Bake the Cookies: Bake in the preheated oven for 10-12 minutes, or until the edges are set and just beginning to turn golden. Remove from the oven and allow cookies to cool on the baking sheet for a few minutes before transferring to a wire rack to cool completely.
Extra Tips:
For the most vibrant colors, make sure to use gel food coloring rather than liquid, as it provides more intense hues without altering the dough’s consistency. If the dough becomes too soft while you’re working with it, pop it back in the fridge for a few minutes to firm up again.
Additionally, for added flavor, consider incorporating almond extract or a pinch of cinnamon into the dough. These cookies can be stored in an airtight container for up to a week, maintaining their delightful texture and flavor.