
As Halloween approaches, I’m brimming with excitement to craft the perfect charcuterie board for a spooky gathering. Picture a Spooky Cheese and Meat Medley alongside a Ghoulishly Green Veggie Platter that will delight every guest. For those with a sweet tooth, a Candy Cornucopia Confection is sure to be a treat. And don’t miss out on the themed delights like Mummy Wrap Delight. Let’s embrace the season with these festive charcuterie board ideas that promise to enchant your taste buds!
Spooky Cheese and Meat Medley
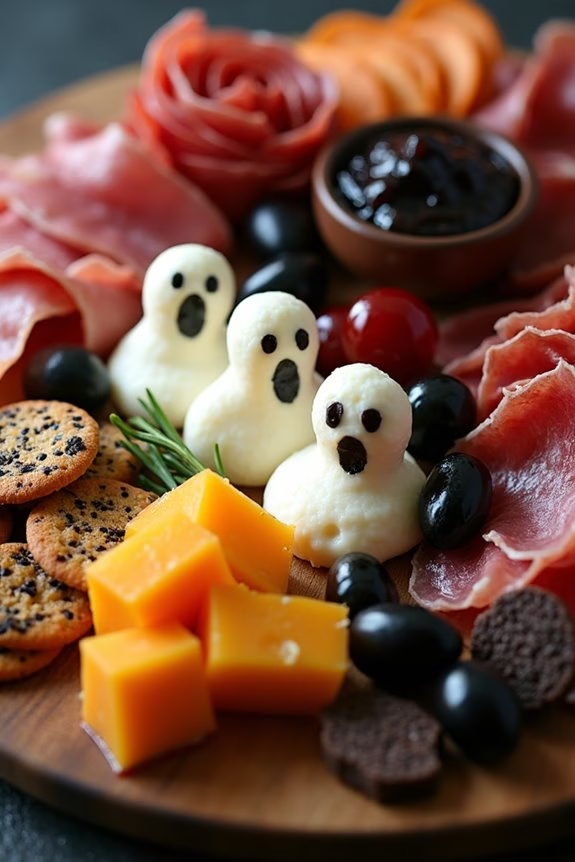
This Halloween Charcuterie Board, dubbed the “Spooky Cheese and Meat Medley,” is a hauntingly delicious spread that will captivate your guests with its eerie yet delightful presentation. Perfect for a gathering of 4-6 people, this board combines a medley of cheeses, cured meats, and ghoulish accompaniments that not only look the part but taste amazing too.
The key to this board is selecting items that offer a variety of textures, flavors, and colors that play into the Halloween theme, such as dark-hued crackers, blood-red jams, and ghostly white cheeses.
Begin by selecting a wooden board or platter as your base, and strategically choose items that can be cut into spooky shapes or presented in thematic ways. For instance, use cookie cutters to shape slices of cheese into bats or ghosts, and arrange thin slices of salami to resemble roses. Pair these with black olives, fig preserves, and dark chocolate to add depth and richness to the palate.
This medley aims to be as visually engaging as it’s delicious, making it a perfect centerpiece for your Halloween festivities.
Ingredients (Serving Size: 4-6 people):
- 8 ounces aged cheddar cheese
- 8 ounces brie cheese
- 8 ounces mozzarella cheese
- 6 ounces salami
- 6 ounces prosciutto
- 6 ounces cured chorizo
- 1 cup black olives
- 1/2 cup fig preserves
- 1/2 cup red pepper jelly
- 1/2 cup dark chocolate pieces
- 1 cup assorted crackers (including charcoal or black sesame crackers)
- Fresh rosemary sprigs for garnish
Instructions:
- Prepare the Board: Start by selecting a large wooden board or platter. Clean it thoroughly and dry it. This will serve as the base for your charcuterie arrangement.
- Cut the Cheese: Use Halloween-themed cookie cutters to cut the mozzarella cheese into ghost or bat shapes. Slice the aged cheddar into thin squares or triangles. Leave the brie in its wedge form and place it on the board for a creamy option.
- Arrange the Meats: Roll the salami slices into small cones or fold them into rose shapes. Drape the prosciutto in gentle waves, and slice the chorizo into thin rounds. Arrange these meats around the cheeses, ensuring a balanced mix of colors and textures.
- Add the Accompaniments: Fill in gaps on the board with black olives and strategically place small bowls of fig preserves and red pepper jelly. These add a sweet and savory contrast to the meats and cheeses.
- Incorporate the Crackers: Place assorted crackers around the board, focusing on darker varieties to emphasize the Halloween theme. Make sure they’re easily reachable for guests.
- Finish with Garnishes: Add dark chocolate pieces for an unexpected treat. Tuck in fresh rosemary sprigs around the board for a pop of color and a fragrant touch.
Extra Tips:
For a truly spooky effect, consider using small LED candles or fairy lights around the board to enhance the presentation and create an eerie glow. Confirm that the cheese and meats are taken out of the refrigerator about 30 minutes before serving to allow them to reach prime flavor and texture.
Additionally, variety is key; offer a mix of soft and hard cheeses, as well as mild and spicy meats, to cater to different taste preferences. Remember, the visual appeal is just as important as the taste, so take the time to arrange each element thoughtfully.
Ghoulishly Green Veggie Platter
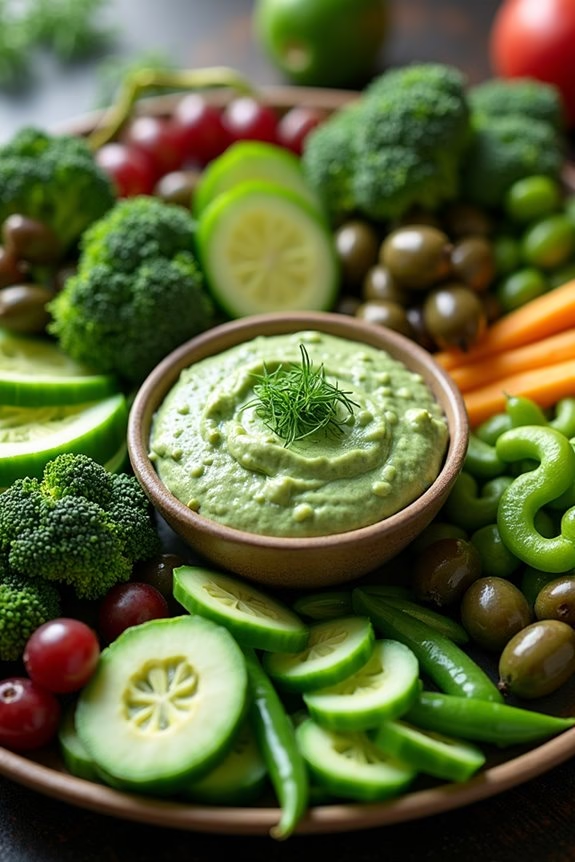
Transform your Halloween gathering with a Ghoulishly Green Veggie Platter that combines the eerie with the edible. This creatively spooky charcuterie board isn’t just a feast for the eyes but also a healthy burst of flavors. A selection of fresh, green vegetables arranged to mimic a ghoulish landscape will captivate your guests and add a fun, thematic twist to your holiday spread.
This vibrant platter is perfect for those looking to add a nutritious option to the Halloween festivities, ensuring there’s something for everyone amid the sweet treats and indulgent offerings. The green theme embodies Halloween’s ghostly yet fun spirit, making this platter a delightful centerpiece.
The array of crunchy vegetables, complemented by a creamy, herby dip, offers a satisfying snack that can be enjoyed by both kids and adults. This platter isn’t only visually appealing but also customizable, allowing you to adjust the ingredients based on availability and personal preference. Whether you’re hosting a party or attending one, this Ghoulishly Green Veggie Platter serves 4-6 people and is sure to be a hit.
Ingredients for 4-6 people:
- 1 cucumber, sliced
- 1 green bell pepper, sliced into strips
- 1 cup sugar snap peas
- 1 cup broccoli florets
- 1 cup green grapes
- 1/2 cup edamame (shelled)
- 1 avocado, sliced
- 1/4 cup green olives
- 1/4 cup pumpkin seeds
- 1 cup spinach dip (store-bought or homemade)
- Fresh dill sprigs for garnish
Cooking Instructions:
- Prepare the Veggies: Wash all the vegetables thoroughly. Slice the cucumber into rounds, cut the green bell pepper into strips, and separate broccoli into bite-sized florets. Make sure the sugar snap peas are clean and de-stringed if necessary.
- Arrange the Platter: Begin by placing the spinach dip in a small bowl at the center of your serving platter. This acts as the focal point.
- Set the Scene: Around the dip, arrange the cucumber slices and bell pepper strips to form a base layer. This gives a structured look and provides a variety of textures.
- Add More Elements: Next, scatter the sugar snap peas and broccoli florets around the platter. Add the green grapes for a hint of sweetness and a different texture.
- Include the Details: Place slices of avocado strategically to add creaminess, and sprinkle the edamame and pumpkin seeds over the platter for a crunchy contrast.
- Finalize with Garnish: Finish by adding green olives around the edges and garnishing with fresh dill sprigs for an added touch of flavor and a pop of color.
Extra Tips:
For a more cohesive look, try to keep the color palette mainly green, with occasional pops of other colors if desired. You can prepare the veggies a few hours in advance and store them in the refrigerator to keep them fresh.
Consider adding other green-hued items like zucchini slices or green apple wedges for additional variety. If you’re making your spinach dip, blending in some fresh basil or dill can enhance the flavor and add to the green theme. Finally, be sure to have some small plates and forks available for your guests to make serving easier.
Candy Cornucopia Confection
Create a spooktacular Halloween charcuterie board with our delightful Candy Cornucopia Confection, perfect for adding a sweet twist to your festive gathering. This colorful board combines a medley of sweet treats and savory bites, arranged to bring out the best of autumn flavors and the spooky spirit of Halloween.
Whether you’re having a small gathering or a larger get-together, this board is sure to captivate your guests, offering an array of textures and tastes that cater to both the young and the young-at-heart.
This Candy Cornucopia Confection is designed to serve 4-6 people, making it an ideal centerpiece for a Halloween party. The key to a successful charcuterie board is variety, so we’ve included a mix of candies, fruits, nuts, and small savory items that complement each other beautifully.
Let your creativity shine through as you assemble this delightful board, and be certain to tailor it to your own tastes and preferences.
Ingredients:
- 1 cup candy corn
- 1 cup gummy worms
- 1 cup chocolate-covered pretzels
- 1 cup salted nuts (e.g., almonds or cashews)
- 1 cup dried cranberries
- 1 cup assorted Halloween-themed candies (e.g., mini chocolates, candy pumpkins)
- 1 cup fresh grapes (preferably a mix of green and red)
- 1 cup apple slices
- 1 cheese block (e.g., cheddar or gouda), cut into cubes
- 1 small bowl of caramel dip
- 1 small bowl of chocolate dip
Cooking Instructions:
- Prepare the Base: Begin by selecting a large wooden or slate board as your base. This will serve as the canvas for your Candy Cornucopia Confection.
- Arrange the Candies: Start by placing the candy corn, gummy worms, and assorted Halloween-themed candies in separate sections on the board. Use small bowls if needed to keep them organized and neat.
- Add the Savory Elements: Place the chocolate-covered pretzels and salted nuts near the candies to create a balance of sweet and savory. Arrange them in small piles or clusters to make them easily accessible.
- Incorporate the Fruits: Distribute the grapes and apple slices around the board, filling in any gaps. The fresh fruit adds a revitalizing contrast to the sweeter elements.
- Cheese Placement: Arrange the cheese cubes in a way that they’re easily accessible. Consider placing them near the apple slices as they pair well together.
- Dips Setup: Position the bowls of caramel and chocolate dip on opposite sides of the board, ensuring they’re easily reachable. These will complement the apples, pretzels, and other items on the board.
- Final Touches: Garnish with dried cranberries scattered across the board for a pop of color and additional texture. Adjust the placement of items as needed to achieve a balanced and visually appealing display.
Extra Tips:
To make your Candy Cornucopia Confection even more festive, consider adding seasonal decorations like small decorative pumpkins or Halloween-themed napkins around the board.
If you’re serving this outdoors or in a warm environment, keep an eye on the chocolate elements to make sure they don’t melt. Offer toothpicks or small tongs for easy serving, especially for the sticky or delicate items.
Finally, encourage guests to mix and match different elements for a personalized tasting experience that truly embodies the spirit of Halloween.
Eerie Fruit and Nut Mix
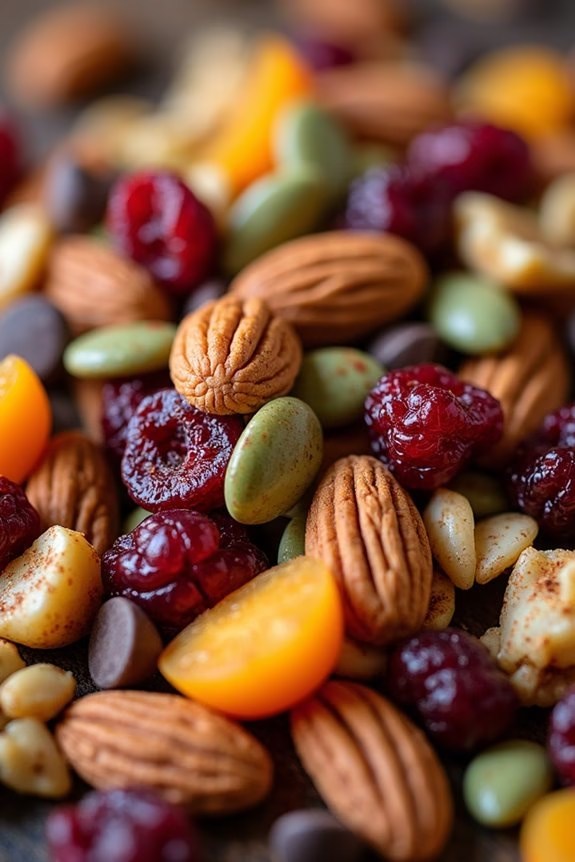
Crafting a Halloween charcuterie board is a delightful way to add a touch of spookiness to your festive gatherings, and the Eerie Fruit and Nut Mix is a wonderfully creepy addition that complements the assortment of cheeses, meats, and other snacks. This recipe combines a variety of dried fruits, nuts, and seeds with hauntingly delicious spices to create a savory and sweet blend that will tantalize the taste buds. Perfect for serving as part of your Halloween spread, this mix isn’t only easy to prepare but also offers a healthy snacking option.
The Eerie Fruit and Nut Mix can be tailored to suit your preferences by choosing different fruits and nuts, but the key is to maintain a balance of flavors and textures. Using a combination of dried fruits like cranberries and apricots with nuts such as almonds and pecans provides a rich, satisfying base. A sprinkle of cinnamon and a pinch of cayenne pepper add a mysterious warmth, while pumpkin seeds lend a festive touch. This mix is sure to be a hit at your Halloween celebration, offering a perfect blend of sweet, salty, and spicy notes.
Ingredients (serving size: 4-6 people):
- 1 cup dried cranberries
- 1 cup dried apricots, chopped
- 1 cup almonds
- 1 cup pecans
- 1/2 cup pumpkin seeds
- 1/2 cup sunflower seeds
- 1/4 cup chocolate chips (optional)
- 2 teaspoons cinnamon
- 1/2 teaspoon cayenne pepper
- 1/2 teaspoon salt
Instructions:
- Prepare the Ingredients: Begin by gathering all your ingredients. Measure out the dried cranberries, dried apricots, almonds, pecans, pumpkin seeds, sunflower seeds, and chocolate chips (if using). Chop the dried apricots into small, bite-sized pieces.
- Mix the Spices: In a small bowl, combine the cinnamon, cayenne pepper, and salt. Stir them together until they’re well mixed. This spice blend will add a subtle heat and depth of flavor to the fruit and nut mix.
- Combine Fruits and Nuts: In a large mixing bowl, combine the dried cranberries, chopped apricots, almonds, pecans, pumpkin seeds, and sunflower seeds. Gently toss them together so they’re evenly distributed.
- Add the Spices: Sprinkle the spice mix over the fruit and nut combination. Use a large spoon or your hands to mix everything thoroughly, making sure the spices coat the fruits and nuts evenly.
- Include Chocolate Chips: If you’re using chocolate chips, add them to the mix after the spices have been incorporated. Stir gently to avoid melting the chocolate.
- Serve or Store: Once all ingredients are well-mixed, transfer the Eerie Fruit and Nut Mix to a serving bowl. If you’re preparing it in advance, store it in an airtight container to maintain freshness until you’re ready to serve.
Extra Tips:
For an additional layer of flavor, consider lightly toasting the nuts and seeds before combining them with the dried fruits. This can enhance their natural oils and bring out a richer taste.
If you prefer more or less spice, adjust the amount of cayenne pepper to suit your taste. The mix is versatile and can accommodate substitutions, like swapping out apricots for dried mango or using different nuts if you have preferences or allergies.
Finally, to guarantee the chocolate chips don’t melt, add them to the mix just before serving. Happy Halloween snacking!
Monster Mashup Minis
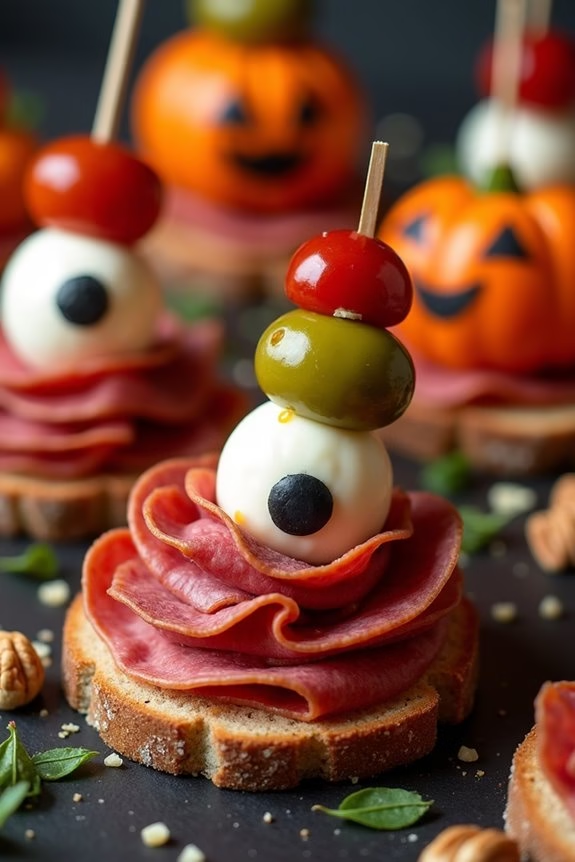
Elevate your Halloween charcuterie board with these delightfully spooky Monster Mashup Minis. Perfectly sized for a serving of 4-6 people, these bite-sized treats aren’t only visually exciting but also packed with flavors that will surprise and enchant your guests.
Combining savory meats, cheeses, and a medley of garnishes, these minis are perfect for those who enjoy a little creativity with their snacks. Ideal for Halloween parties, these Monster Mashup Minis are sure to be a hit with both kids and adults alike.
Each mini is a unique creation, featuring an array of ingredients that come together to form a monstrous masterpiece. With an emphasis on simplicity and fun, these culinary creations require minimal prep time and allow for plenty of customization.
Whether you’re aiming for a ghoulish ghost or a terrifying witch, the possibilities are endless. Let your imagination run wild as you conjure up these edible creatures!
Ingredients (Serving Size: 4-6 People):
- 8 slices of salami
- 8 slices of prosciutto
- 8 mini mozzarella balls
- 1 cup of green and black olives
- 1 cup of cherry tomatoes
- 1/2 cup of mixed nuts
- 8 small pickles
- 8 slices of cheddar cheese
- 8 slices of pepper jack cheese
- 1/4 cup of dried cranberries
- 1/4 cup of mixed herbs (parsley, basil, or chives)
- 16 toothpicks
- 8 small rye or pumpernickel bread slices
Cooking Instructions:
- Prepare the Base: Start by cutting the rye or pumpernickel bread slices into smaller, bite-sized pieces that will serve as the base for your minis. Arrange them neatly on your serving platter.
- Assemble the Minis: Take a slice of salami or prosciutto and fold it into quarters, placing it on top of the bread slice. This forms the body of your monster.
- Add the Cheese: Place a slice of cheddar or pepper jack cheese on top of the meat. For added spookiness, use a small cookie cutter to cut the cheese into festive shapes, such as bats or pumpkins.
- Decorate with Olives and Tomatoes: Use toothpicks to skewer a mini mozzarella ball, followed by a green or black olive, and a cherry tomato. Place this skewer into the meat and cheese stack to create the monster’s head.
- Garnish Creatively: Add small pickles and dried cranberries around your minis to serve as arms or legs. Sprinkle mixed herbs over the top for a fresh flavor and a touch of green.
- Finish with Extras: Scatter mixed nuts around the platter for an extra crunchy texture and to fill in any gaps on the board.
Extra Tips:
When crafting your Monster Mashup Minis, feel free to experiment with different combinations of meats, cheeses, and garnishes to suit your preferences or dietary needs.
You can also use edible food coloring to add extra details to your minis, such as eyes or mouths, for an added touch of whimsy. Remember to keep the arrangement simple and balanced, ensuring that each mini is easy to pick up and enjoy in a single bite.
Most importantly, have fun and let your creativity shine as you design these spooky snacks!
Haunted House of Crackers
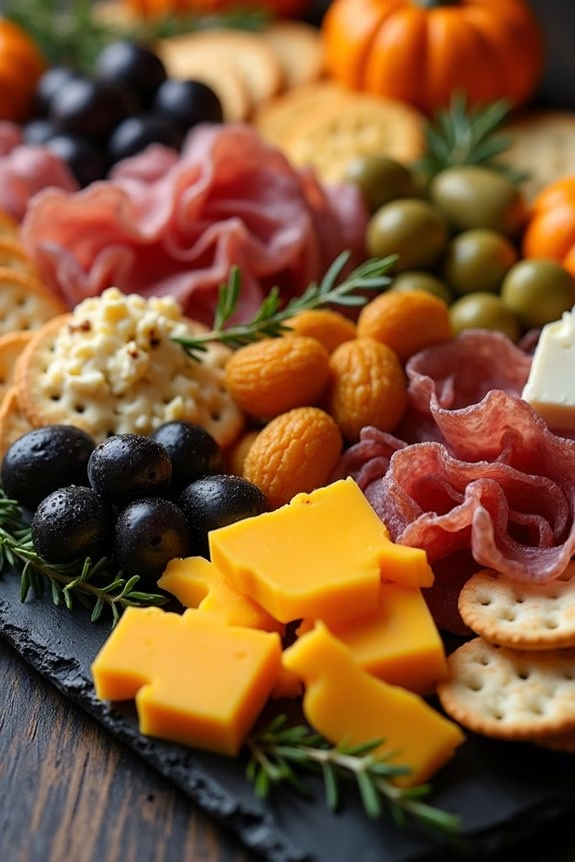
Creating a Halloween Charcuterie Board with a Haunted House of Crackers theme is a delightful way to celebrate the spookiest night of the year. This creative dish combines an assortment of crackers, cheeses, meats, fruits, and spooky-themed decorations to create a visually striking and delicious appetizer display. Perfect for a gathering of 4-6 people, this charcuterie board can be customized with your favorite ingredients, guaranteeing there’s something for everyone to enjoy.
The Haunted House of Crackers charcuterie board isn’t only a treat for the taste buds but also a feast for the eyes. By selecting crackers with different shapes and textures, and pairing them with a variety of cheeses, meats, and themed toppings, you can create an intriguing and eerie display. This board will serve as both a centerpiece for your Halloween table and a conversation starter at your festive gathering.
Ingredients for 4-6 servings:
- Assorted crackers (round, square, and specialty shapes)
- 8 oz. sharp cheddar cheese, cubed
- 8 oz. pepper jack cheese, sliced
- 4 oz. brie cheese
- 6 oz. salami slices
- 6 oz. prosciutto
- 1 cup black grapes
- 1/2 cup dried apricots
- 1/2 cup mixed nuts (almonds, walnuts)
- 1/4 cup green olives
- Decorative Halloween-themed picks and cutters
- Small decorative pumpkins or gourds
- Fresh rosemary or thyme sprigs (for decoration)
Cooking Instructions:
- Prepare the Base: Start by selecting a large wooden or slate board as the base for your charcuterie spread. Arrange a few small decorative pumpkins or gourds on the board to create the foundation of your haunted theme.
- Arrange the Crackers: Place assorted crackers around the board, making sure to leave ample space for the other ingredients. Use a variety of shapes and sizes to add visual interest.
- Add the Cheeses: Cut the cheddar cheese into cubes and slice the pepper jack cheese, arranging them in separate sections on the board. Place the brie cheese whole, or cut into wedges for easier serving.
- Layer the Meats: Fold the salami and prosciutto slices into quarters or roll them into rosettes. Distribute them evenly across the board, ensuring each section of the board has a good mix of meats.
- Incorporate the Fruits and Nuts: Scatter the black grapes and dried apricots around the board, filling in gaps between crackers and cheeses. Add clusters of mixed nuts for additional texture and flavor.
- Decorate with Olives and Herbs: Place the green olives in small clusters, using Halloween-themed picks to add a spooky touch. Tuck fresh rosemary or thyme sprigs around the board to add a touch of greenery and aroma.
- Final Touches: Use Halloween-themed cutters to shape some of the cheese slices into spooky shapes like bats or ghosts, adding them to the board for extra flair. Adjust the arrangement to guarantee a balanced and visually appealing presentation.
Extra Tips:
When creating your Haunted House of Crackers charcuterie board, consider the colors and textures of the ingredients you choose. Darker fruits and olives add a mysterious element, while bright cheeses and meats provide contrast.
Be sure to use a variety of shapes and sizes for visual appeal. If you want to add even more Halloween spirit, consider including small bowls of themed spreads or dips, such as a pumpkin hummus or black bean dip.
Ultimately, remember that charcuterie boards are meant to be enjoyed leisurely, so encourage your guests to mix and match flavors to find their perfect bite.
Witch’s Brew Cheese Spread

Witch’s Brew Cheese Spread is a bewitchingly delicious addition to any Halloween charcuterie board. This eerily enchanting spread combines creamy cheeses with a touch of garlic and herbs, making it the perfect savory treat to complement the sweeter elements of your board.
The vibrant green color, reminiscent of a bubbling witch’s potion, is achieved through the addition of fresh spinach, guaranteeing a visually striking and absolutely delectable spread that will captivate your guests.
Perfect for serving 4-6 people, this Witch’s Brew Cheese Spread isn’t only a feast for the eyes but also a delightful treat for the taste buds. Whether you’re hosting a spooky gathering or simply want to add a touch of Halloween magic to your culinary creations, this cheese spread is easy to make and pairs wonderfully with a variety of crackers, breads, and vegetables.
Let’s brew up some kitchen magic!
Ingredients
- 1 cup cream cheese, softened
- 1/2 cup shredded cheddar cheese
- 1/4 cup grated Parmesan cheese
- 1/4 cup fresh spinach leaves
- 2 cloves garlic, minced
- 1 tablespoon fresh chives, chopped
- 1 tablespoon fresh parsley, chopped
- 1 tablespoon lemon juice
- 1/2 teaspoon salt
- 1/4 teaspoon black pepper
Instructions
- Prepare the Ingredients: Begin by gathering all your ingredients. Make sure the cream cheese is softened to room temperature to guarantee it mixes smoothly. Wash and dry the spinach, chives, and parsley thoroughly.
- Blend the Base: In a food processor, combine the softened cream cheese, shredded cheddar cheese, and grated Parmesan cheese. Blend until the mixture is smooth and creamy.
- Add the Flavor: Add the minced garlic, fresh spinach leaves, chopped chives, chopped parsley, lemon juice, salt, and black pepper to the cheese blend. Pulse the food processor until the spinach is fully incorporated, and the mixture turns a vibrant green color.
- Adjust the Seasoning: Taste the spread and adjust the seasoning if necessary. Add a bit more salt or pepper to suit your taste preferences. Blend again to guarantee everything is well mixed.
- Chill the Spread: Transfer the cheese spread to a serving bowl. Cover it with plastic wrap and refrigerate for at least 1 hour. This will help the flavors meld together and firm up the consistency.
- Serve and Enjoy: Once chilled, serve the Witch’s Brew Cheese Spread with an assortment of crackers, bread slices, or fresh vegetable sticks. Enjoy the spooky theme with your guests!
Tips
To make the spread even more festive, consider using Halloween-themed cookie cutters to shape the spread into fun forms before chilling.
You can also garnish the spread with edible flowers or herbs for added visual appeal. If you prefer a spicier version, add a pinch of cayenne pepper or a few drops of hot sauce to the mixture.
For a smoother texture, blend the spread longer, and for a chunkier texture, pulse it less. Remember, the key to a successful charcuterie board is variety, so feel free to pair this spread with a selection of cheeses, meats, and other treats for a complete Halloween experience!
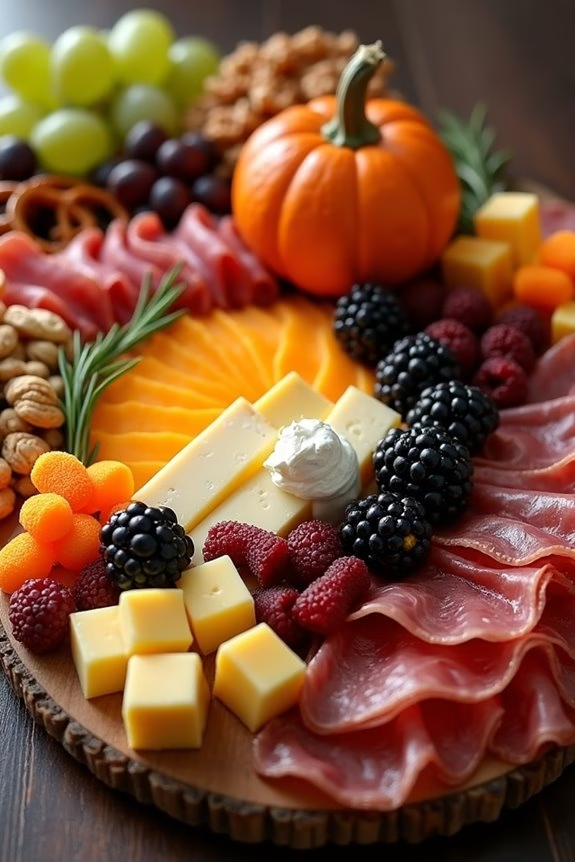
Pumpkin Patch Party Platter
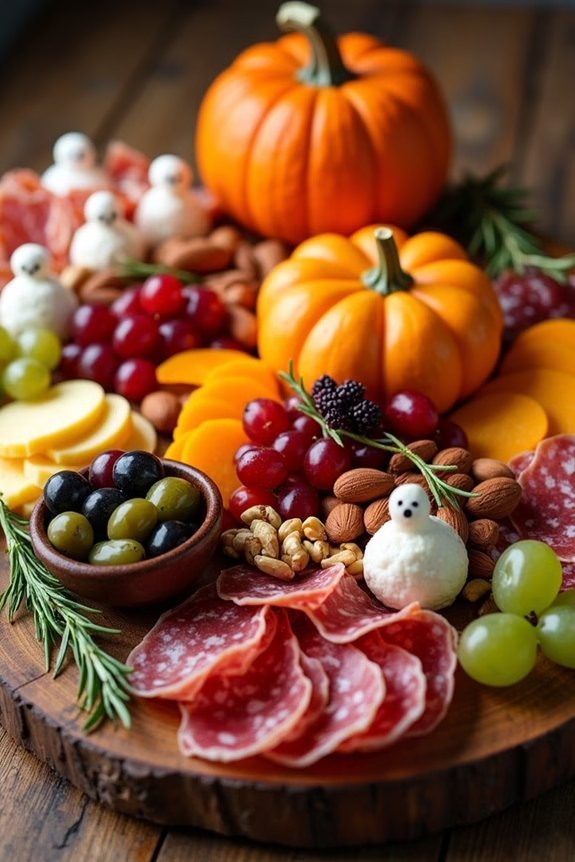
A Pumpkin Patch Party Platter is the perfect way to celebrate Halloween with a delightful and spooky twist. This charcuterie board isn’t only visually appealing but also offers a variety of flavors and textures that will excite your guests. By incorporating themed ingredients such as pumpkin-shaped cheese and ghostly crackers, you create an inviting centerpiece for your Halloween gathering. The platter is designed to be both savory and sweet, ensuring there’s something for everyone to enjoy.
The key to crafting a successful Pumpkin Patch Party Platter is balancing the elements of taste and presentation. Begin by selecting a large, flat board or tray that will serve as your canvas. Arrange the ingredients thoughtfully, focusing on color contrast and complementary flavors. This platter is ideal for serving 4-6 people and can be adjusted to suit larger or smaller gatherings. Let your creativity shine as you assemble this festive and delicious display.
Ingredients for Serving 4-6 People:
- 8 ounces of pumpkin-shaped cheddar cheese
- 4 ounces of goat cheese
- 4 ounces of prosciutto
- 8 ounces of assorted cured meats (such as salami and pepperoni)
- 1 cup of mixed olives (green and black)
- 1/2 cup of dried apricots
- 1/2 cup of dried cranberries
- Assorted crackers (including ghost-shaped crackers)
- 1 cup of mixed nuts (such as almonds, walnuts, and pistachios)
- Fresh fruit (such as sliced apples, grapes, and figs)
- 1 small pumpkin for decoration
- Fresh rosemary sprigs for garnish
Cooking Instructions:
- Prepare the Board: Start by choosing a large wooden or slate board. Place the small pumpkin in the center as a focal point. This will set the theme for your platter and provide a festive touch.
- Arrange the Cheese: Cut the pumpkin-shaped cheddar into thin slices and place them around the pumpkin. Next, shape the goat cheese into small balls and scatter them around the board.
- Add the Meats: Fold the prosciutto into rosettes and arrange them beside the cheese. Then, fan out the assorted cured meats in different sections of the board for easy access.
- Incorporate the Savory Elements: Place the mixed olives in a small bowl or directly on the board. Scatter the assorted crackers, ensuring the ghost-shaped ones are prominently displayed.
- Add Sweet Components: Fill in spaces with dried apricots and cranberries, creating pockets of sweetness. Tuck the fresh fruit around the board, varying the colors for visual interest.
- Finish with Nuts and Garnish: Sprinkle the mixed nuts throughout the platter. Finally, add fresh rosemary sprigs for a touch of green and fragrant aroma.
Extra Tips:
For an extra festive touch, consider using cookie cutters to shape additional cheeses or fruits into Halloween-themed designs, such as bats or witches’ hats. If you want a more substantial offering, add a variety of dips such as hummus or a creamy pumpkin dip.
Be sure to replenish the board as needed throughout the party to keep it looking fresh and inviting. And don’t forget to provide small plates and utensils for your guests to enjoy the platter conveniently.
Mummy Wrap Delight
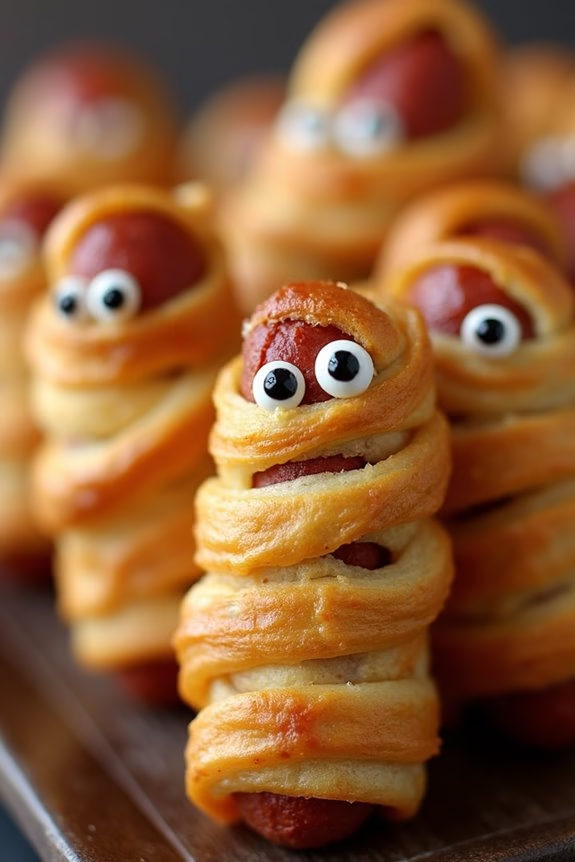
The concept is straightforward but the execution is delightfully effective. Each mini hot dog is wrapped in a strip of dough to mimic the appearance of a mummy, complete with two tiny mustard eyes that give each one a playful personality. By baking them to golden perfection, you get a crispy outer layer with a juicy interior, perfectly complemented by the tangy taste of mustard. Serve them with a side of ketchup or your favorite dipping sauce for a complete treat that will have your guests enchanted.
Ingredients for Mummy Wrap Delight (Serving Size: 4-6 People)
- 1 can (8 oz) refrigerated crescent roll dough
- 1 package (14 oz) mini hot dogs or cocktail sausages
- 1 tablespoon mustard
- Cooking spray
- Optional: ketchup or dipping sauce of choice for serving
Cooking Instructions
- Preheat the Oven: Start by preheating your oven to 375°F (190°C). This guarantees that it’s hot enough to cook the dough evenly and give it a nice golden-brown color.
- Prepare the Dough: Open the can of crescent roll dough and unroll it onto a clean work surface. If the dough is pre-cut into triangles, gently press the perforations to seal them and create a single sheet of dough.
- Slice the Dough: Using a pizza cutter or a sharp knife, cut the dough into thin strips, approximately 1/4 inch wide. These strips will be used to wrap around the mini hot dogs, creating the mummy effect.
- Wrap the Hot Dogs: Take a mini hot dog and start wrapping a strip of dough around it, leaving a small space near one end to create a face for the mummy. Make sure to leave some gaps to mimic the look of bandages.
- Arrange on Baking Sheet: Spray a baking sheet with cooking spray to prevent sticking. Place each wrapped hot dog on the sheet, ensuring they’re spaced evenly apart to allow for even baking.
- Bake the Mummies: Place the baking sheet in the preheated oven and bake for 12-15 minutes, or until the dough is golden brown and cooked through.
- Add the Eyes: Remove the baking sheet from the oven and let the mummies cool slightly. Using a small amount of mustard, apply two dots on each hot dog to create eyes. A toothpick can be helpful for precision.
- Serve: Arrange the Mummy Wrap Delights on your Halloween charcuterie board or a serving platter. Serve with a side of ketchup or your dipping sauce of choice for a complete Halloween treat.
Extra Tips
For an extra spooky touch, consider using different types of sausages such as chicken or turkey to cater to various dietary preferences.
If you want to make the process even more fun, you can involve kids in the wrapping and decorating steps.
For a twist, try sprinkling some poppy seeds or sesame seeds on the dough before baking to add texture and a visually spooky effect.
Be sure to keep an eye on the baking time to avoid over-browning the dough, as ovens may vary.
Frighteningly Fresh Seafood Selection
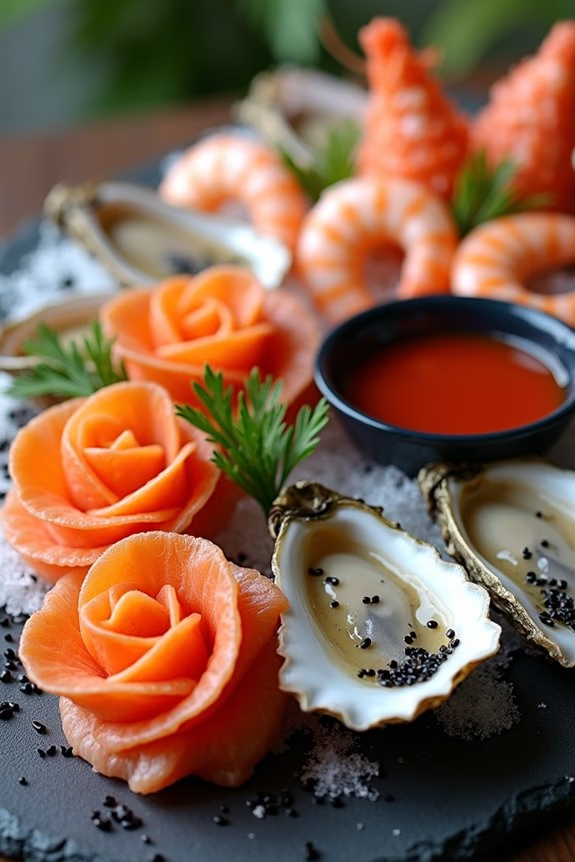
Create a spine-chilling Halloween charcuterie board that will leave your guests both impressed and a little spooked with a Frighteningly Fresh Seafood Selection. This dish is all about showcasing the ocean’s bounty with a mysterious twist that suits the eerie theme of the night. The seafood selection isn’t only a treat for the taste buds but also a visual delight that can be artfully arranged to resemble ghostly forms, sea creatures, or mysterious underwater landscapes.
The key to a memorable Frighteningly Fresh Seafood Selection is using the freshest seafood available and incorporating a variety of textures and flavors to make each bite unique. Balance the smoothness of smoked salmon with the brininess of oysters, and add a touch of spice with shrimp cocktail. You can even introduce a hint of sweetness with a delectable crab salad. Adorn your board with Halloween-themed garnishes like black sesame seeds, edible seaweed, and a drizzle of squid ink to enhance the spooky aesthetic.
Ingredients (Serves 4-6):
- 12 fresh oysters
- 200g smoked salmon
- 12 large shrimp, cooked and peeled
- 200g crab meat
- 1 lemon, sliced into wedges
- 1/2 cup cocktail sauce
- 1 tablespoon black sesame seeds
- 1 tablespoon squid ink
- 6 sheets of nori (edible seaweed)
- Fresh dill sprigs for garnish
Cooking Instructions:
- Prepare the Oysters: Begin by carefully shucking the oysters. Place them on a bed of crushed ice on your board to keep them chilled. Squeeze a little lemon juice over each oyster to enhance their natural flavor.
- Arrange the Smoked Salmon: Roll or fold the smoked salmon into rose-like shapes or spooky spirals, then place them strategically around your board. This not only adds elegance but also visual intrigue.
- Cook the Shrimp: If your shrimp aren’t already cooked, bring a pot of salted water to a boil. Add the shrimp and cook for 2-3 minutes until they turn pink. Drain and cool them under cold water. Arrange them in a circle on the board and serve with a bowl of cocktail sauce in the center.
- Prepare the Crab Salad: Mix the crab meat with a little lemon juice, a pinch of salt, and pepper. Form the crab salad into small mounds or creepy crawly shapes, then place them on the board.
- Garnish and Final Touches: Sprinkle black sesame seeds over the seafood for a mysterious look. Add dollops of squid ink around the board for that extra spooky effect. Cut the nori sheets into strips or fun Halloween shapes and place them around the seafood. Finish by garnishing with fresh dill sprigs.
Extra Tips:
For an added Halloween effect, consider using a black or dark-colored board to make the seafood and garnishes stand out. You can also incorporate small decorative elements, such as fake spider webs or mini pumpkins, to enhance the theme.
When serving, ascertain that all seafood is kept chilled until ready to eat, and always use fresh, high-quality ingredients for the best flavor and safety. For an extra touch of luxury, consider offering a small selection of artisan crackers or breadsticks to complement the seafood.
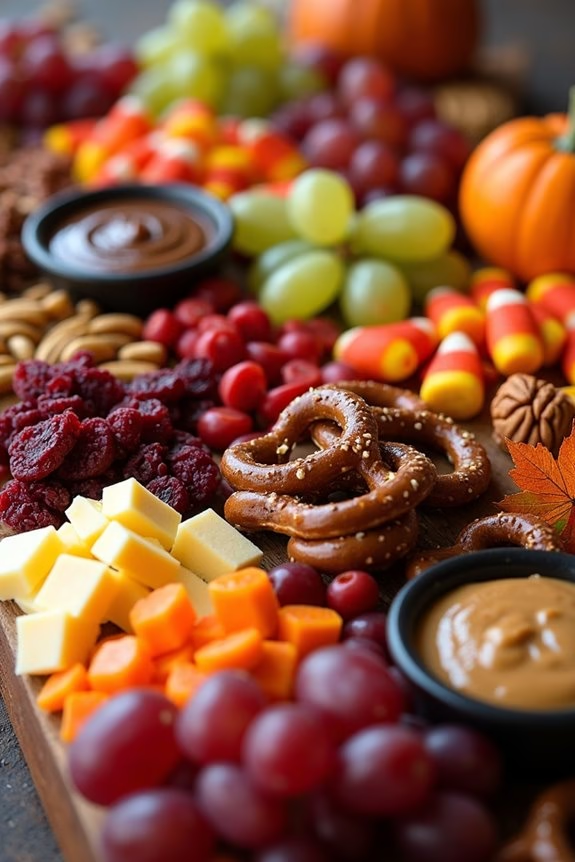
Trick-or-Treat Snack Spread
Get ready to wow your guests with a tantalizing Trick-or-Treat Snack Spread, a Halloween-themed charcuterie board that’s both spooky and delicious. This fun and festive board is designed to capture the essence of Halloween with a variety of treats that cater to both sweet and savory palates. Perfect for a gathering of 4-6 people, this charcuterie board combines classic flavors with a creative Halloween twist, ensuring that your guests are both entertained and satisfied.
Creating a Halloween charcuterie board is all about balancing flavors, textures, and colors. You’ll want to incorporate a mix of cheeses, meats, fruits, nuts, and candies to achieve a harmonious and visually appealing spread. Additionally, using Halloween-themed props and decorations can add an extra layer of fun to your board. The key is to make it interactive and thematic, encouraging guests to explore the different treats and build their own snack combinations.
Let’s plunge into the ingredients and steps needed to bring this ghoulishly delightful creation to life.
Ingredients (for 4-6 people):
- 8 oz cheddar cheese, cubed
- 8 oz brie cheese, sliced
- 8 oz salami, sliced
- 8 oz prosciutto
- 1 cup green grapes
- 1 cup blackberries
- 1/2 cup dried apricots
- 1/2 cup mixed nuts
- 1/2 cup candy corn
- 1/2 cup gummy worms
- 1/2 cup chocolate-covered pretzels
- 1 small pumpkin or gourd (for decoration)
- Assorted crackers
- Fresh rosemary sprigs (for garnish)
Cooking Instructions:
- Prepare the Base: Start by selecting a large wooden board or platter to serve as the base for your charcuterie board. Wash the board thoroughly and dry it completely before arranging the ingredients.
- Position the Cheeses: Place the cubed cheddar cheese and sliced brie cheese on opposite ends of the board. This will create a balanced look and allow guests to easily access both types of cheese.
- Arrange the Meats: Fold the salami and prosciutto slices into small, easy-to-grab portions and arrange them next to the cheeses. Alternating between the meats and cheeses will create a pleasing visual pattern.
- Add Fruits and Nuts: Scatter the green grapes and blackberries across the board, filling in empty spaces. Add the dried apricots and mixed nuts in small clusters for added texture and flavor.
- Incorporate Sweet Treats: Place the candy corn, gummy worms, and chocolate-covered pretzels in small piles around the board. These sweets add a playful touch and a pop of color to the arrangement.
- Finish with Crackers and Decor: Arrange assorted crackers in stacks or rows, filling in any remaining gaps. Place a small pumpkin or gourd in the center or off to the side as a decorative element. Finally, tuck fresh rosemary sprigs around the board for a touch of greenery and to enhance the presentation.
Extra Tips:
When assembling your Trick-or-Treat Snack Spread, consider using small bowls or containers for loose items like nuts and candies to keep them from scattering. Additionally, feel free to customize the board based on your guests’ preferences by including their favorite cheeses or meats. Seasonal fruits like figs or pomegranate seeds can also be added for an autumnal touch.
Finally, remember to have fun with the presentation – the more creative and thematic, the better!
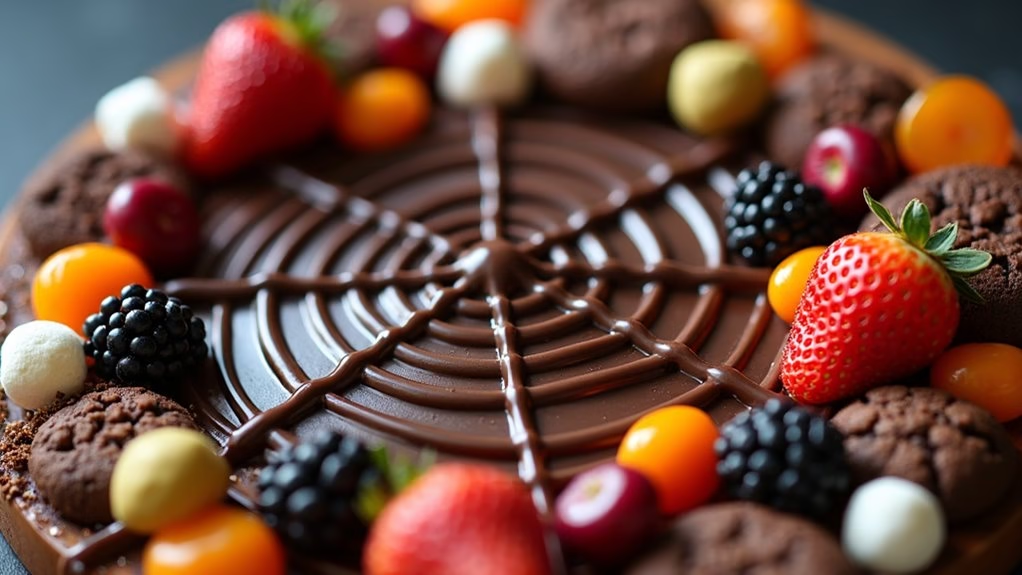
Cobweb Chocolate Dessert Board
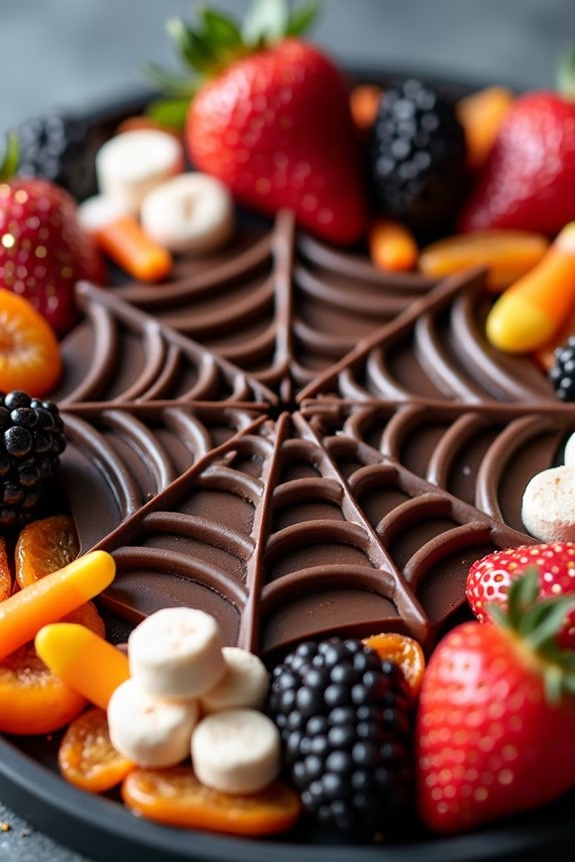
Creating a Halloween charcuterie board is a delightful way to bring festive flair to your dessert spread, and a Cobweb Chocolate Dessert Board is the perfect spooky treat to elevate your Halloween celebration. This board combines a variety of sweet treats with a fun chocolate cobweb design to create a visually striking and delicious centerpiece. Ideal for a gathering of 4-6 people, this dessert board offers a range of flavors and textures that will satisfy any sweet tooth, all while maintaining a hauntingly beautiful presentation.
The Cobweb Chocolate Dessert Board features a mix of chocolates, candies, and fruits artfully arranged around a central chocolate cobweb. This dessert board isn’t only a feast for the eyes but also a delight for the palate, with each component complementing the others. Whether you’re hosting a Halloween party or simply enjoying a spooky movie night with friends, this dessert board is sure to impress with its creative design and delicious offerings.
Ingredients for 4-6 people:
- 1 cup dark chocolate chips
- 1 tablespoon coconut oil
- 6-8 chocolate cookies
- 1/2 cup mini marshmallows
- 1/2 cup assorted Halloween candies (e.g., candy corn, gummy worms)
- 1/2 cup strawberries, hulled and halved
- 1/2 cup blackberries
- 1/2 cup dried apricots
- 1/4 cup white chocolate chips
- 1 tablespoon heavy cream
- Edible glitter or Halloween-themed sprinkles (optional)
Instructions:
- Melt Dark Chocolate: In a microwave-safe bowl, combine the dark chocolate chips and coconut oil. Microwave in 30-second intervals, stirring between each, until smooth and fully melted. This will be used to create the cobweb design.
- Create Cobweb Base: On a large serving board, use a spoon to drizzle the melted chocolate in a circular pattern, starting from the center and working outward to mimic a cobweb. Allow the chocolate to set slightly, about 10-15 minutes.
- Prepare White Chocolate Drizzle: While the cobweb sets, melt the white chocolate chips with the heavy cream in a separate microwave-safe bowl, following the same microwave and stirring method as before. Once smooth, transfer the melted white chocolate to a small piping bag or a plastic sandwich bag with a small corner snipped off.
- Decorate Cobweb: Once the dark chocolate cobweb is set, use the white chocolate to draw additional lines and spirals over the dark chocolate to enhance the cobweb effect. Allow this to set completely, about 10 minutes.
- Arrange Board: Around the cobweb design, arrange the chocolate cookies, mini marshmallows, assorted Halloween candies, strawberries, blackberries, and dried apricots in a visually appealing way. Feel free to get creative with the arrangement to enhance the spooky theme.
- Add Finishing Touches: Sprinkle the board with edible glitter or Halloween-themed sprinkles for an extra festive touch. This step is optional but adds a magical effect to the presentation.
Extra Tips:
When creating the Cobweb Chocolate Dessert Board, make sure to melt the chocolates slowly to prevent them from burning. If you don’t have a microwave, a double boiler can also be used to melt the chocolate gently.
For the best results, allow each layer of chocolate to set fully before moving on to the next step, ensuring a clean and defined cobweb design. Feel free to customize the board with your favorite candies and fruits—there’s no wrong way to make it your own.
Finally, if you’re preparing in advance, store the completed board in a cool, dry place to keep the chocolate from melting.