

As Halloween approaches, I love finding ways to balance out all those sugary treats with something savory and fun.
Think about serving Spooky Stuffed Bell Peppers or Mummy Jalapeño Poppers at your next Halloween bash.
These appetizers are not only festive but also a delicious alternative to sweets.
Are you ready to explore other savory delights you can create this Halloween?
Spooky Stuffed Bell Peppers

Spooky Stuffed Bell Peppers are the perfect Halloween appetizer to delight and frighten your guests. These cleverly carved bell peppers resemble mini jack-o’-lanterns, making them both a feast for the taste buds and a treat for the eyes. The filling is a savory mix of ground beef, rice, and a medley of spices, offering a satisfying bite that balances the sweetness of the peppers.
Whether you’re hosting a spooky bash or simply enjoying a festive meal with family, these stuffed peppers are sure to be a hit.
The preparation of Spooky Stuffed Bell Peppers is a fun and interactive experience that can be enjoyed by cooks of all ages. The recipe is designed for a serving size of 4-6 people, making it ideal for small gatherings. As you carve faces into each bell pepper, you can release your creativity, crafting unique or classic jack-o’-lantern expressions. Not only do these peppers look great, but they also pack a nutritious punch, with ingredients that provide a well-rounded meal.
Let’s explore the ingredients and steps to create this show-stopping dish.
Ingredients (Serves 4-6):
- 6 large bell peppers (orange or red preferred)
- 1 pound ground beef
- 1 cup cooked rice
- 1 small onion, finely chopped
- 2 cloves garlic, minced
- 1 can (14.5 oz) diced tomatoes, drained
- 1 cup shredded mozzarella cheese
- 2 tablespoons olive oil
- 1 teaspoon salt
- 1/2 teaspoon black pepper
- 1 teaspoon dried oregano
- 1 teaspoon smoked paprika
- 1 cup tomato sauce
Instructions:
- Prepare the Bell Peppers: Preheat your oven to 375°F (190°C). Wash the bell peppers thoroughly. Using a sharp knife, cut off the tops of the bell peppers and remove the seeds and membranes inside. Carefully carve out faces on one side of each pepper, mimicking a jack-o’-lantern.
- Cook the Filling: Heat olive oil in a large skillet over medium heat. Add the chopped onion and minced garlic, sautéing until the onion becomes translucent. Add the ground beef to the skillet, cooking and stirring until it browns. Drain any excess fat from the skillet.
- Mix the Filling: Stir the drained diced tomatoes, cooked rice, salt, black pepper, oregano, and smoked paprika into the skillet with the beef. Cook for an additional 5 minutes, allowing the flavors to meld. Remove from heat and mix in half of the shredded mozzarella cheese.
- Stuff the Peppers: Fill each carved bell pepper with the beef and rice mixture, pressing down gently to pack the filling. Place the stuffed peppers upright in a baking dish.
- Add Sauce and Bake: Pour tomato sauce over and around the stuffed peppers in the baking dish. Cover the dish with aluminum foil and bake in the preheated oven for 25 minutes.
- Finish with Cheese: Remove the foil, sprinkle the remaining mozzarella cheese on top of the peppers, and bake uncovered for an additional 10-15 minutes, or until the cheese is melted and bubbly.
- Serve Warm: Carefully transfer the peppers to a serving platter, and enjoy the spooky yet delicious meal.
Extra Tips:
When carving the faces on the bell peppers, use a small paring knife for precise cuts, and consider using a vegetable peeler to smooth out edges if needed. If you prefer a vegetarian version, substitute the ground beef with black beans or a meat substitute of your choice.
For added flavor, consider using different types of cheese or adding more herbs to suit your taste. Finally, if you’re short on time, the filling can be prepared a day in advance, making assembly quick and easy on the day of your event.
Witch’s Finger Breadsticks

Witch’s Finger Breadsticks are a spooktacular addition to your Halloween appetizer spread. These eerie breadsticks aren’t only delicious but also fun to make, adding a witchy flair to your party table. Shaped like fingers, complete with almond “nails” and a hint of herbs, they’re sure to be a hit with both kids and adults. The dough is flavored with garlic and herbs, making these breadsticks not just a visual treat but a flavorful one too.
Perfect for serving 4-6 people, these Witch’s Finger Breadsticks can be made with simple ingredients you likely have in your pantry. The process is straightforward, involving preparing a basic dough, shaping it into fingers, and adding a few creative touches to transform them into creepy, yet delicious, appendages. Whether you’re hosting a Halloween party or just want to delight your family with a themed treat, these breadsticks are a must-try.
Ingredients:
- 1 packet (2 1/4 teaspoons) active dry yeast
- 1 cup warm water (110°F/45°C)
- 2 1/2 cups all-purpose flour
- 1 teaspoon salt
- 1 tablespoon sugar
- 1 tablespoon olive oil
- 1 teaspoon garlic powder
- 1 teaspoon dried Italian herbs (such as oregano or basil)
- 24-30 whole almonds
- 1 egg, beaten (for egg wash)
- Red food coloring (optional, for nails)
Instructions:
- Prepare the Dough:
- In a large bowl, dissolve the yeast in warm water and let it sit for about 5 minutes until it becomes frothy.
- Add the flour, salt, sugar, olive oil, garlic powder, and Italian herbs to the yeast mixture. Stir until a dough begins to form.
- Knead the Dough:
- Transfer the dough to a floured surface and knead it for about 5-7 minutes until it becomes smooth and elastic.
- Place the dough in a lightly oiled bowl, cover it with a damp cloth, and let it rise in a warm place for about 1 hour or until doubled in size.
- Shape the Fingers:
- Preheat your oven to 375°F (190°C) and line a baking sheet with parchment paper.
- Punch down the risen dough and divide it into 24-30 equal pieces.
- Roll each piece into a thin log, about the length of a finger and slightly thicker than a pencil.
- Add the Details:
- Press an almond into one end of each dough log to create the “fingernail.” Use a knife to make small cuts to resemble knuckles.
- If desired, brush the almonds with red food coloring for a bloodied nail effect.
- Bake the Breadsticks:
- Place the shaped fingers on the prepared baking sheet. Brush them with the beaten egg to give a golden finish when baked.
- Bake in the preheated oven for 15-20 minutes or until the breadsticks are golden brown and cooked through.
- Cool and Serve:
- Allow the breadsticks to cool slightly on a wire rack before serving.
Extra Tips:
When shaping the fingers, remember that they’ll expand slightly in the oven, so make them a bit thinner than you want the final product to be.
If you want to add a little more character, you could tint the dough a light green or grey before baking. For a sweeter version, you can replace the garlic and herbs with cinnamon and sugar, but be sure to adjust the topping to match.
Enjoy your Halloween festivities with these delightfully creepy snacks!
Monster Eyeball Meatballs
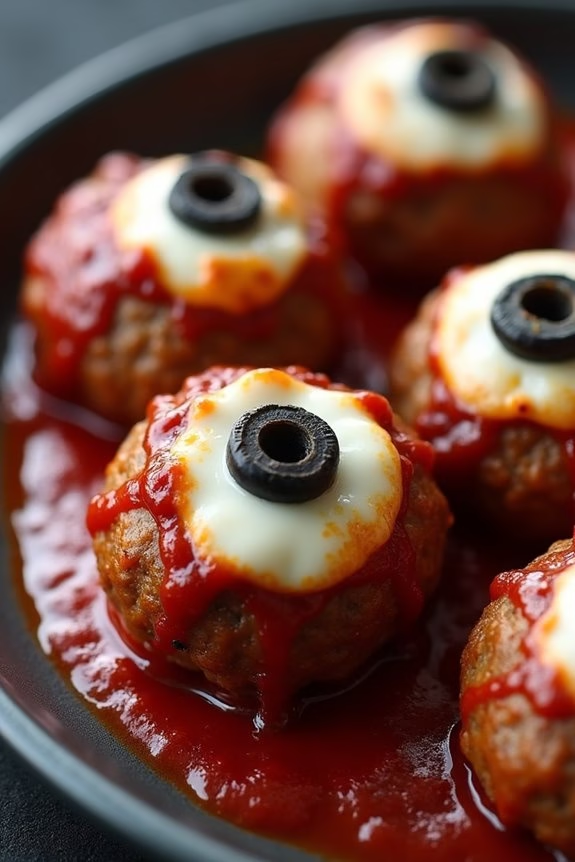
Monster Eyeball Meatballs are the perfect spooky addition to your Halloween appetizer spread. These creepy yet delicious morsels not only look the part but are bursting with savory flavors that will delight both kids and adults.
The combination of hearty meatballs topped with eerie olive “eyeballs” offers a fun and festive touch to your Halloween festivities. They’re easy to make and can be prepared ahead of time, guaranteeing you have more time to enjoy the company of your guests.
This recipe makes a serving size for 4-6 people, ideal for a small gathering or as part of a larger Halloween party spread. The meatballs are flavored with classic Italian seasonings and baked to perfection, then transformed into monstrous eyeballs using simple, everyday ingredients.
With a little bit of creativity and some basic kitchen skills, you can whip up these Monster Eyeball Meatballs in no time.
Ingredients
- 1 pound ground beef
- 1/2 cup breadcrumbs
- 1/4 cup grated Parmesan cheese
- 1 egg
- 2 cloves garlic, minced
- 1 teaspoon Italian seasoning
- 1/2 teaspoon salt
- 1/4 teaspoon black pepper
- 1 cup marinara sauce
- 12 small mozzarella balls (bocconcini)
- 12 black olives, pitted and sliced
- 1 tablespoon olive oil
Instructions
- Preheat the Oven: Preheat your oven to 400°F (200°C). This guarantees the oven is hot enough to cook the meatballs evenly.
- Prepare the Meatball Mixture: In a large mixing bowl, combine the ground beef, breadcrumbs, Parmesan cheese, egg, garlic, Italian seasoning, salt, and black pepper. Use your hands or a spoon to mix the ingredients until they’re well incorporated.
- Form the Meatballs: Roll the mixture into small balls, about 1.5 inches in diameter. You should have about 12 meatballs. Place them on a baking sheet lined with parchment paper or lightly greased with olive oil.
- Bake the Meatballs: Place the baking sheet in the preheated oven and bake for 20-25 minutes, or until the meatballs are browned and cooked through.
- Prepare the Eyeballs: While the meatballs are baking, slice the mozzarella balls in half and slice the black olives into rounds.
- Assemble the Monster Eyeballs: Once the meatballs are cooked, remove them from the oven and spoon about a tablespoon of marinara sauce over each one. Place a halved mozzarella ball on top of each meatball, followed by an olive slice to create the “eyeball” effect.
- Melt the Cheese: Return the meatballs to the oven for 3-5 minutes, just until the cheese begins to melt slightly and adhere to the meatballs.
- Serve: Remove from the oven and transfer to a serving platter. Allow to cool slightly before serving, as the cheese can be hot.
Extra Tips
For an extra burst of flavor, consider adding a dash of Worcestershire sauce or a pinch of red chili flakes to the meatball mixture.
If you want to make these in advance, prepare the meatballs and store them in the refrigerator for up to a day or freeze them for longer storage. When ready to serve, simply assemble the eyeballs and reheat in the oven.
Additionally, you can get creative with the “eyeball” toppings by using green olives or adding a drop of red food coloring to the mozzarella for a bloodshot effect.
Mummy Jalapeño Poppers
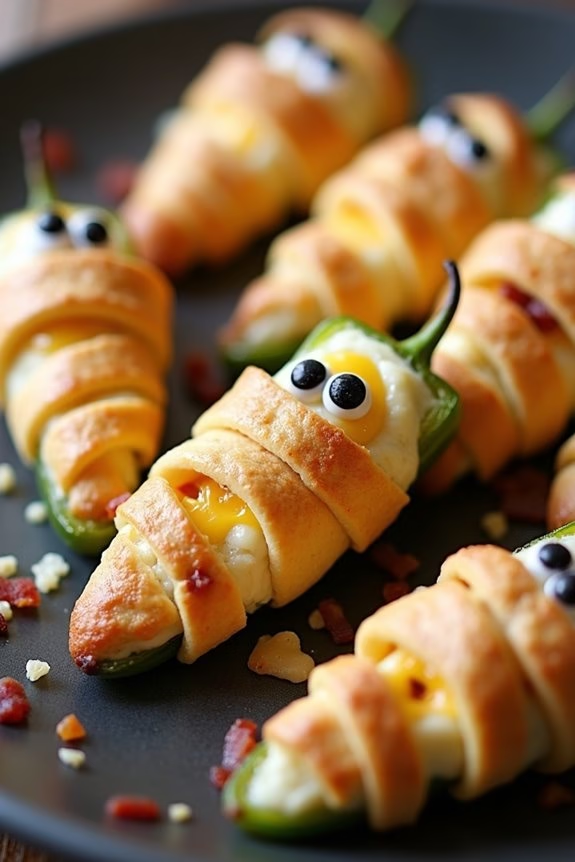
Mummy Jalapeño Poppers are a spooktacular appetizer that will add a delightful bite to any Halloween gathering. These poppers aren’t only visually appealing, wrapped in crescent roll “bandages” to resemble mummies, but they’re also deliciously spicy and cheesy. The combination of creamy cheese filling, crispy bacon, and spicy jalapeños wrapped in golden brown dough makes them an irresistible treat for both kids and adults alike.
Perfect for serving 4-6 people, these Mummy Jalapeño Poppers are easy to prepare and certain to be a hit at your Halloween party. Whether you’re hosting a themed dinner or just looking for a fun snack, these poppers promise to deliver both flavor and festive flair. With a few simple ingredients and a bit of creativity, you’ll have a dish that’s both delicious and delightful.
Ingredients:
- 12 medium jalapeño peppers
- 8 oz cream cheese, softened
- 1 cup shredded cheddar cheese
- 6 slices crispy bacon, crumbled
- 1 tsp garlic powder
- 1 tsp onion powder
- 1 can (8 oz) crescent roll dough
- 1 egg, beaten
- Candy eyes or black olives for decoration
Instructions:
- Preheat the Oven: Start by preheating your oven to 375°F (190°C). This guarantees that the poppers cook evenly and the dough turns a lovely golden brown.
- Prepare the Jalapeños: Slice the jalapeños in half lengthwise and remove the seeds and membranes. This can help to reduce the heat level slightly, making them more palatable to those sensitive to spice.
- Make the Filling: In a medium bowl, mix together the softened cream cheese, shredded cheddar cheese, crumbled bacon, garlic powder, and onion powder. Stir until all ingredients are well combined.
- Stuff the Jalapeños: Using a spoon, carefully fill each jalapeño half with the cheese mixture, ensuring they’re generously stuffed but not overflowing.
- Prepare the Dough: Unroll the crescent roll dough and cut it into thin strips. These will be used to wrap around the jalapeños, creating the mummy effect.
- Wrap the Jalapeños: Wrap each stuffed jalapeño with the dough strips, leaving a small gap for the eyes. It doesn’t have to be perfect—mummies are meant to look a bit tattered!
- Add Eyes: Gently press candy eyes or small pieces of black olive into the exposed section of the cheese filling to create the mummy’s eyes.
- Brush with Egg Wash: Lightly brush the dough-wrapped jalapeños with the beaten egg. This will help the dough turn a nice golden color and add a slight sheen.
- Bake: Place the wrapped jalapeños on a baking sheet lined with parchment paper. Bake in the preheated oven for 12-15 minutes, or until the dough is golden brown and cooked through.
- Cool and Serve: Allow the poppers to cool slightly before serving. This will guarantee the cheese filling isn’t too hot to eat and safe for all guests to enjoy.
Extra Tips:
When handling jalapeños, consider wearing gloves to avoid any irritation from the oils, which can be quite potent. If you prefer less spicy poppers, you can soak the jalapeño halves in cold water for about 15 minutes after deseeding them, which can help reduce some of the heat.
Additionally, feel free to experiment with different cheeses or add extra spices to the filling to suit your taste preferences.
Ghostly Deviled Eggs
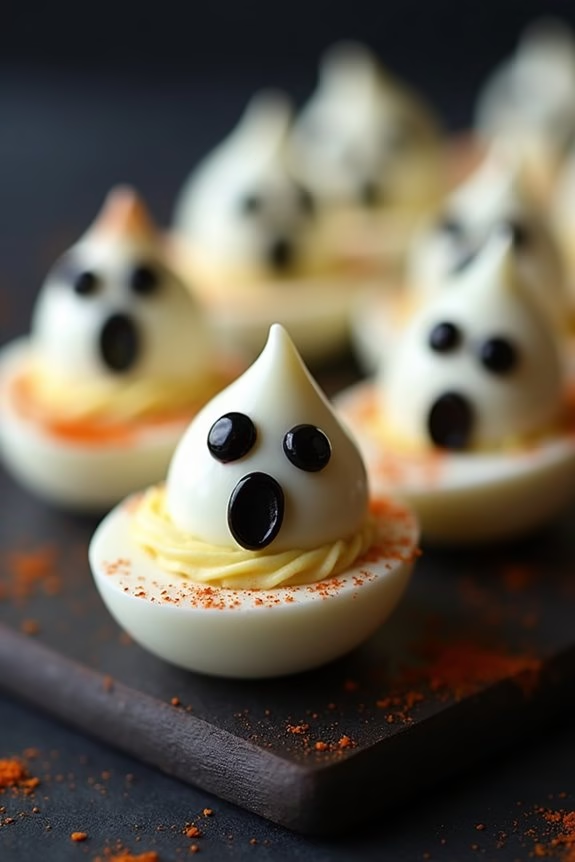
Ghostly Deviled Eggs make for a spook-tacular addition to your Halloween appetizers spread. These eerie yet delicious treats feature classic deviled eggs cleverly transformed into cute little ghosts. Their haunting appearance is sure to captivate the eyes and taste buds of your guests, making them a perfect finger food for any Halloween party.
Using simple ingredients, you can craft these ghostly delights that not only look festive but also pack a flavorful punch. The creamy filling of these deviled eggs is infused with a hint of mustard and a sprinkle of paprika, giving them a delightful kick. The ghostly appearance is achieved using small edible decorations to create eyes and mouths, adding a whimsical touch to each bite.
You can prepare these Ghostly Deviled Eggs in advance, allowing you to focus on other party preparations while ensuring you have a frightfully fun dish ready to serve.
Ingredients for Ghostly Deviled Eggs (Serves 4-6):
- 6 large eggs
- 3 tablespoons mayonnaise
- 1 teaspoon Dijon mustard
- 1 teaspoon white vinegar
- Salt and pepper, to taste
- Paprika, for garnish
- Edible black gel or black olives for eyes and mouth
Cooking Instructions:
- Boil the Eggs: Place the eggs in a saucepan and cover them with cold water. Bring the water to a boil over medium-high heat. Once boiling, cover the saucepan, remove from heat, and let the eggs sit for 10-12 minutes.
- Cool and Peel the Eggs: After the eggs have cooked, transfer them to a bowl of ice water to cool for at least 5 minutes. Once cooled, gently peel the eggs under running water to remove the shells.
- Prepare the Filling: Slice each egg in half lengthwise and carefully remove the yolks. Place the yolks in a separate bowl and mash them with a fork until smooth.
- Mix the Filling: Add mayonnaise, Dijon mustard, white vinegar, salt, and pepper to the mashed yolks. Mix until the filling is creamy and well combined.
- Fill the Egg Whites: Spoon or pipe the yolk mixture back into the egg white halves, mounding slightly.
- Create the Ghost Faces: Use edible black gel or small pieces of black olives to create eyes and a mouth on each deviled egg, transforming them into little ghosts.
- Garnish and Serve: Lightly sprinkle paprika over the deviled eggs for added flavor and a touch of color. Arrange on a platter and serve chilled.
Extra Tips:
When boiling the eggs, adding a teaspoon of salt or a splash of vinegar to the water can help make peeling easier by preventing the egg whites from sticking to the shells.
If you’re short on time, you can prepare the eggs a day in advance; just store the egg whites and yolk filling separately, assembling them shortly before serving.
Also, feel free to get creative with the ghostly faces – using different sized olive pieces or varying expressions can add a playful variety to your party platter.
Bat Wings (Chicken Wings)

Transform your ordinary chicken wings into spooky Bat Wings, a Halloween appetizer that’s sure to be a hit at your gathering. This fun and delicious recipe will add a touch of eerie elegance to your party spread while keeping your guests’ taste buds delighted. The chicken wings are marinated in a flavorful soy and honey mixture, then baked to a crispy perfection that resembles the wings of a bat, all while maintaining a tender and juicy interior.
Perfect for a crowd of 4-6 people, these Bat Wings aren’t only visually striking but also easy to prepare, making them an ideal choice for your Halloween celebration. Follow the recipe below for a hauntingly good appetizer that will leave your guests begging for more.
Ingredients (Serving Size: 4-6 people):
- 2 pounds chicken wings
- 1/2 cup soy sauce
- 1/4 cup honey
- 2 tablespoons dark brown sugar
- 1 tablespoon sesame oil
- 1 tablespoon rice vinegar
- 3 cloves garlic, minced
- 1 teaspoon freshly grated ginger
- 1 teaspoon black food coloring (optional)
- Salt and pepper to taste
- Sesame seeds for garnish
- Chopped green onions for garnish
Cooking Instructions:
- Prepare the Marinade: In a large mixing bowl, combine the soy sauce, honey, dark brown sugar, sesame oil, rice vinegar, minced garlic, and freshly grated ginger. Stir the ingredients together until the sugar is completely dissolved. If you want to enhance the color, add the black food coloring and mix well.
- Marinate the Wings: Add the chicken wings to the bowl, ensuring they’re fully submerged in the marinade. Cover the bowl with plastic wrap and refrigerate for at least 2 hours, or overnight for best results, allowing the flavors to penetrate the meat.
- Preheat the Oven: When ready to cook, preheat your oven to 400°F (200°C). Line a baking sheet with aluminum foil and place a wire rack on top of the foil.
- Arrange the Wings: Remove the chicken wings from the marinade and arrange them on the wire rack, skin side up. Discard the excess marinade. Season the wings with salt and pepper to taste.
- Bake the Wings: Place the baking sheet in the preheated oven and bake for 25-30 minutes, turning once halfway through, until the wings are crispy and cooked through.
- Garnish and Serve: Once the wings are done, remove them from the oven and let them rest for a few minutes. Transfer the wings to a serving platter and garnish with sesame seeds and chopped green onions before serving.
Extra Tips:
For an extra crispy texture, pat the wings dry with paper towels before marinating. This helps remove any excess moisture that could prevent the skin from crisping up in the oven.
If you prefer a spicier kick, feel free to add a pinch of cayenne pepper or a splash of hot sauce to the marinade. Additionally, if you’re using the black food coloring for a more dramatic effect, be aware that a little goes a long way—start with a small amount and gradually increase until you achieve the desired color.
Enjoy your spooky and delicious Bat Wings!
Pumpkin Cheese Ball
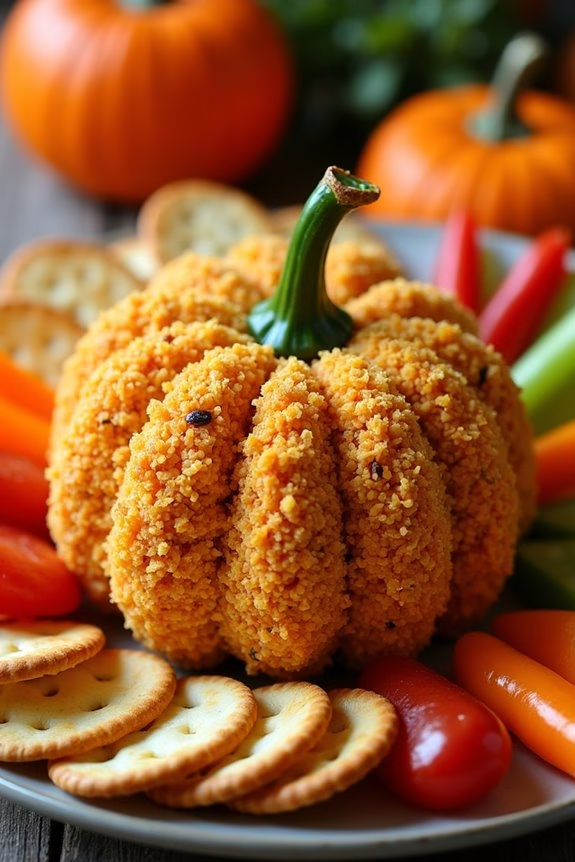
Get ready to impress your guests this Halloween with a delightful Pumpkin Cheese Ball. This festive appetizer not only looks the part with its charming pumpkin shape but also delights the taste buds with a rich and creamy cheese blend. Perfect for a party of 4-6 people, this cheese ball combines the flavors of sharp cheddar, rich cream cheese, and savory spices, all rolled in a coating of crushed pretzels to add a satisfying crunch.
With just a few simple steps, you can create a centerpiece that’s both visually appealing and irresistibly delicious. The Pumpkin Cheese Ball is versatile and can be paired with a variety of dippers such as crackers, pretzel rods, or fresh vegetables. It’s an easy-to-make dish that can be prepared in advance, allowing you to enjoy your Halloween festivities without the stress of last-minute preparations.
Whether you’re hosting a spooky party or simply wanting to add a touch of autumn flair to your table, this cheese ball is sure to be a crowd-pleaser.
Ingredients for 4-6 people:
- 16 oz cream cheese, softened
- 2 cups sharp cheddar cheese, shredded
- 1 teaspoon garlic powder
- 1 teaspoon onion powder
- 1/2 teaspoon paprika
- 1/2 teaspoon salt
- 1/4 teaspoon black pepper
- 1 cup crushed pretzels
- 1 small bell pepper, stem removed (for the pumpkin stem)
- Crackers, pretzel rods, or fresh vegetables for serving
Cooking Instructions:
- In a large mixing bowl, combine the softened cream cheese and shredded sharp cheddar cheese. Mix them thoroughly until they’re well blended and smooth.
- Add in the garlic powder, onion powder, paprika, salt, and black pepper to the cheese mixture. Stir until all the spices are evenly incorporated.
- Shape the cheese mixture into a round ball. Place the ball on a piece of plastic wrap, then wrap it tightly to maintain the shape. Refrigerate the cheese ball for at least 2 hours, or until it’s firm enough to hold its shape.
- Once the cheese ball is firm, roll it in the crushed pretzels, pressing them gently into the cheese to guarantee they stick and form an even coating on all sides.
- To create the pumpkin shape, gently press the sides of the cheese ball to form slight indentations, mimicking the ridges of a pumpkin. Use the stem of a small bell pepper and insert it into the top center of the cheese ball to resemble a pumpkin stem.
- Place the completed Pumpkin Cheese Ball on a serving platter and surround it with your choice of crackers, pretzel rods, or fresh vegetables.
Extra Tips:
For a more intense flavor, consider preparing the cheese mixture a day in advance to allow the spices to meld together. If you’re short on time, using store-bought crushed pretzels can save preparation time.
If you want to add some heat, feel free to include a pinch of cayenne pepper or a few dashes of hot sauce to the cheese mixture. To make the pumpkin shape more pronounced, you can use a piece of string to gently score the sides of the cheese ball before rolling it in pretzels.
Enjoy your Pumpkin Cheese Ball chilled for the best texture!
Creepy Caprese Skewers
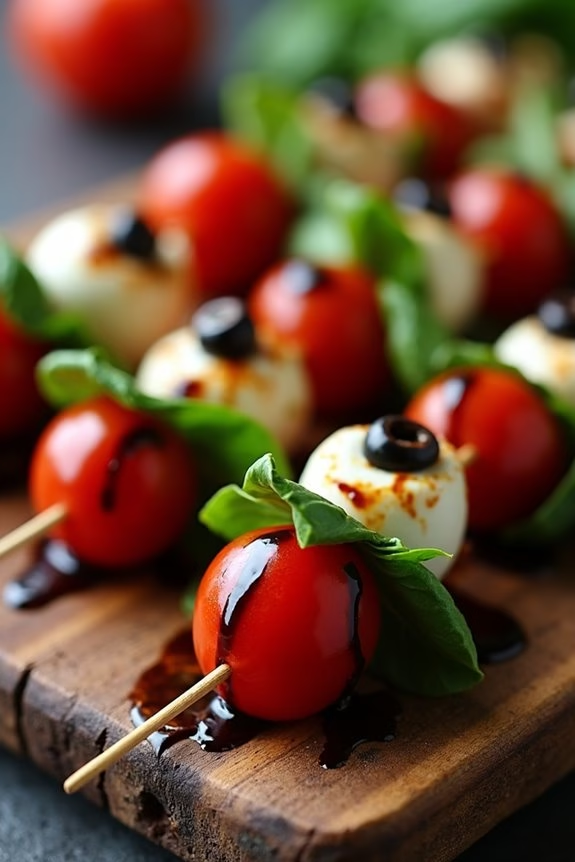
Creepy Caprese Skewers are a delightfully spooky twist on the classic Italian appetizer, perfect for your Halloween celebrations. These skewers are as delicious as they’re fun to make, combining the fresh flavors of mozzarella, basil, and tomatoes with a playful Halloween theme. Ideal for parties, these skewers aren’t only easy to assemble but also a healthy option that your guests will love.
To add a touch of creepiness, olives and balsamic glaze transform these simple ingredients into a festive treat. The key to perfecting these skewers is in the presentation—using a little creativity to turn each element into a spooky surprise. Whether you’re hosting a Halloween bash or just enjoying a themed dinner at home, these Creepy Caprese Skewers will be a hit with both kids and adults.
Ingredients for 4-6 servings:
- 1 pint grape tomatoes
- 8 ounces fresh mozzarella balls (ciliegine)
- Fresh basil leaves
- 1/2 cup pitted black olives
- 1/4 cup balsamic glaze
- 12-18 wooden skewers
- Salt and pepper to taste
Cooking Instructions:
- Prepare the Ingredients: Rinse the grape tomatoes and basil leaves under cold water, then pat them dry with a paper towel. Drain the mozzarella balls and set them aside in a bowl.
- Slice the Olives: Cut the pitted black olives into thin slices. These will be used to create a ‘creepy’ effect on the mozzarella balls.
- Assemble the Skewers: Begin by sliding a grape tomato onto the skewer, followed by a basil leaf folded in half. Next, add a mozzarella ball, and place an olive slice on top to mimic an ‘eyeball’. Repeat the process until the skewer is filled, leaving space at the top for easy handling.
- Drizzle with Balsamic Glaze: Once all the skewers are assembled, arrange them on a platter. Drizzle the balsamic glaze over the skewers, adding a touch of rich flavor and a dark ‘creepy’ look to the dish.
- Season and Serve: Lightly season the skewers with salt and pepper. Serve immediately or refrigerate for up to an hour before serving to keep them fresh.
Extra Tips: When assembling the skewers, make sure that the basil leaves are fresh and vibrant for the best presentation and flavor. If you prefer a bit more bite, consider using cherry tomatoes instead of grape tomatoes for a larger size. Additionally, if you can’t find ciliegine mozzarella balls, you can cut larger mozzarella balls into bite-sized pieces. For a more intense flavor, marinate the mozzarella balls in olive oil and Italian herbs before assembling the skewers.
Spider Web Dip
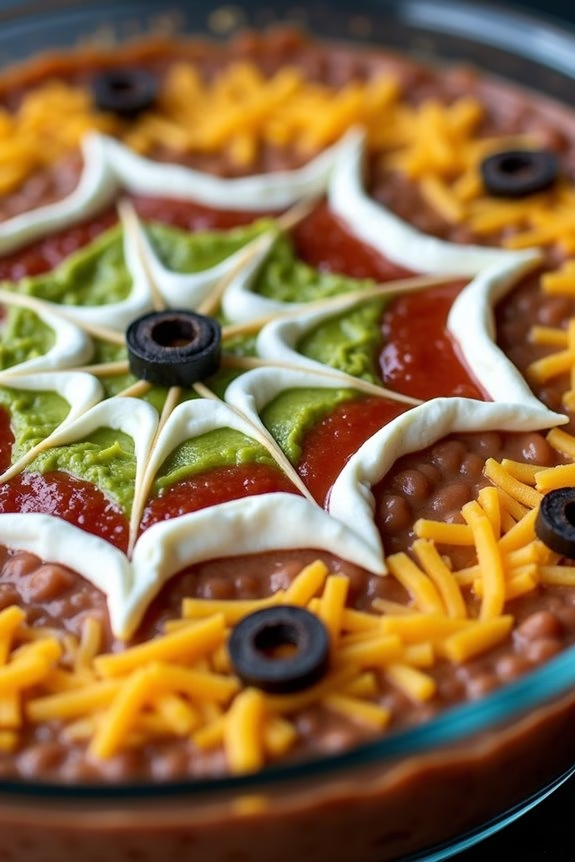
Spider Web Dip is a spooktacular addition to any Halloween gathering, combining the creamy and zesty flavors of a classic seven-layer dip with a festive twist. This appetizer not only looks impressive with its web-like design but also delivers layers of deliciousness in every bite. Perfect for a party of goblins and ghouls, Spider Web Dip is sure to delight both kids and adults alike with its tantalizing taste and eye-catching presentation.
The beauty of this dish lies in the contrast between the bright, colorful layers and the eerie spider web topping. The dip starts with a base of refried beans, followed by layers of guacamole, sour cream, salsa, and shredded cheese, all topped off with a spooky spider web made from sour cream and olives. The result is a visually stunning appetizer that’s as fun to make as it’s to eat. Ideal for serving 4-6 people, this dish will surely be the highlight of your Halloween spread.
Ingredients:
- 1 can (16 oz) refried beans
- 1 cup guacamole
- 1 cup sour cream
- 1 cup salsa
- 1 cup shredded cheddar cheese
- 1/2 cup sliced black olives
- 1 tablespoon taco seasoning
- Tortilla chips, for serving
- Optional: Plastic spider for decoration
Cooking Instructions:
- Prepare the Base: Start by spreading the refried beans evenly across the bottom of a round serving dish. This will act as the sturdy base layer for your dip.
- Layer the Flavors: Sprinkle the taco seasoning over the beans for added flavor. Next, carefully spread the guacamole over the beans, followed by a layer of sour cream. It’s important to spread each layer evenly to guarantee a balanced taste in every scoop.
- Add the Salsa and Cheese: Spread the salsa evenly over the sour cream layer, making sure you leave a small border around the edges to prevent overflow. Sprinkle the shredded cheddar cheese over the salsa, ensuring it covers the entire surface.
- Create the Web: Fill a piping bag or a plastic sandwich bag with a small amount of sour cream. If using a sandwich bag, snip a tiny corner off to create a piping tool. Carefully pipe the sour cream in concentric circles over the cheese layer. Use a toothpick to drag lines from the center to the edges, creating a spider web effect.
- Finish with Olives and Decor: Scatter the sliced black olives over the top for an extra touch of Halloween flair. If desired, place a plastic spider in the center of the web to enhance the spooky presentation.
- Chill and Serve: Refrigerate the dip for at least 30 minutes to allow the flavors to meld and firm up slightly. Serve with a generous bowl of tortilla chips for dipping and watch your guests engage!
Extra Tips:
To guarantee the best presentation, use a clear glass dish so your guests can see the layers from the sides. If you’re making the dip a few hours in advance, cover it tightly with plastic wrap to prevent the guacamole from browning.
For a healthier twist, consider using Greek yogurt instead of sour cream, and experiment with different types of beans or cheese to suit your taste. Remember, the key to a successful Spider Web Dip is in the evenness of the layers and the precision of the web design, so take your time with each step for a truly stunning appetizer.
Bloody Mary Shrimp Shooters

Creating a spooky and delicious appetizer for Halloween can be both fun and impressive, and Bloody Mary Shrimp Shooters are the perfect dish to add a touch of elegance to your Halloween spread. This appetizer combines the classic flavors of a Bloody Mary cocktail with succulent shrimp, served in individual shot glasses for a stylish presentation. The combination of spicy, tangy tomato juice and fresh shrimp makes for a zesty and invigorating starter that’s sure to please your guests.
Bloody Mary Shrimp Shooters aren’t only easy to prepare but also allow you to get creative with your presentation. The deep red color of the tomato juice sets the scene for a Halloween-themed gathering, while the shrimp adds a touch of luxury. This recipe serves 4-6 people, ideal for a small party or gathering. Let’s explore the ingredients and instructions to whip up these delightful shooters.
Ingredients (Serving Size: 4-6 people):
- 1 pound large shrimp, peeled and deveined
- 1 cup tomato juice
- 1 tablespoon lemon juice
- 1 tablespoon Worcestershire sauce
- 1 tablespoon prepared horseradish
- 1 teaspoon hot sauce
- 1/4 teaspoon celery salt
- 1/4 teaspoon freshly ground black pepper
- 1 celery stalk, finely chopped
- 1 tablespoon vodka (optional)
- Lemon wedges for garnish
- Celery leaves for garnish
Instructions:
1. Prepare the Shrimp: Start by bringing a pot of salted water to a boil. Add the shrimp and cook for about 2-3 minutes, or until they turn pink and opaque. Be careful not to overcook them.
Once cooked, transfer the shrimp to a bowl of ice water to cool them quickly and stop the cooking process. Drain and set aside.
2. Make the Bloody Mary Mix: In a mixing bowl, combine the tomato juice, lemon juice, Worcestershire sauce, horseradish, hot sauce, celery salt, and black pepper. Stir well until all the ingredients are fully mixed.
If you wish to add a little kick, mix in the vodka at this stage.
3. Assemble the Shooters: Pour the Bloody Mary mix into individual shot glasses until each is about 3/4 full. Add a couple of pieces of finely chopped celery to each glass.
4. Add the Shrimp: Place one or two shrimp on the rim of each shot glass, allowing them to hang over the edge for a dramatic effect.
5. Garnish: Finish each shooter with a small lemon wedge and a few celery leaves for garnish.
Extra Tips:
To make your Bloody Mary Shrimp Shooters even more flavorful, consider marinating the shrimp in a bit of lemon juice and garlic before cooking them. This will infuse them with extra flavor.
If you’re preparing the dish ahead of time, keep the shrimp and Bloody Mary mix separate until just before serving to maintain the shrimp’s fresh texture.
Don’t hesitate to adjust the spiciness of the Bloody Mary mix according to your guests’ preferences; you can add more hot sauce for a spicier kick or reduce it for a milder flavor.