When it comes to hosting a Halloween party, there’s nothing more thrilling than impressing your guests with a spread of easy and spooky appetizers. Think creepy spider deviled eggs, mummy jalapeño poppers, and ghostly guacamole dip. Each bite offers a bewitching blend of eerie presentation and scrumptious flavor. These appetizers are not just simple to whip up but are perfect for setting the stage for a festive and fun celebration. Ready for more ghoulishly good ideas?
Spooky Spider Deviled Eggs
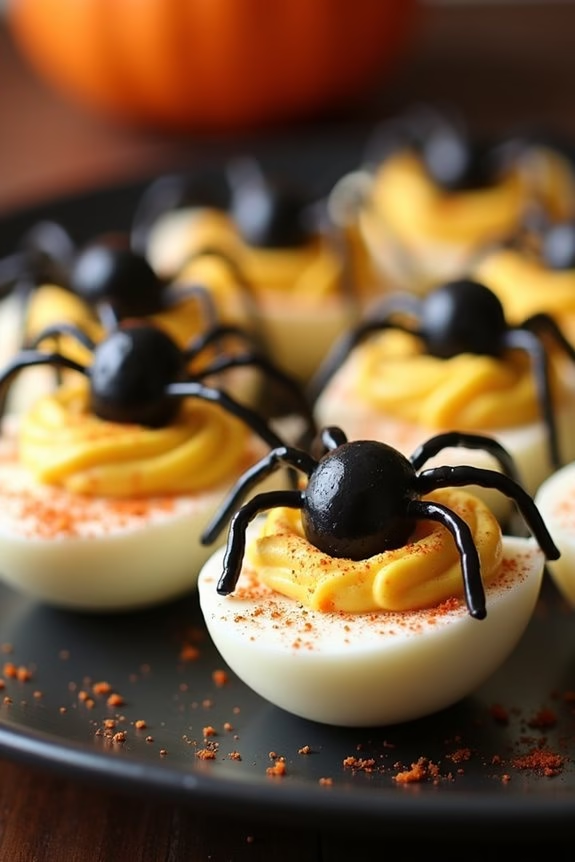
Get ready to spook your guests with these creepy yet delicious Spooky Spider Deviled Eggs, a perfect appetizer for your Halloween celebration. These devilish delights combine the creamy richness of traditional deviled eggs with an eerie twist, featuring black olive spiders that crawl across the surface. Not only are they visually enchanting, but they also pack a punch of flavor that will leave your guests craving more.
Whether you’re hosting a Halloween party or a family gathering, these deviled eggs will make a bewitching addition to your menu. Prepare to impress with this easy-to-make recipe that enhances the classic deviled egg with a touch of Halloween magic. The velvety egg yolk mixture is seasoned to perfection and complemented by the bold, salty tang of black olives.
As you assemble these eggs, the black olives transform into little arachnids, giving the dish a fun and festive flair. With simple ingredients and straightforward instructions, even novice cooks can create these ghoulish gourmet treats to delight friends and family alike.
Ingredients for 4-6 people:
- 12 large eggs
- 1/2 cup mayonnaise
- 1 tablespoon Dijon mustard
- 1 tablespoon white vinegar
- Salt and pepper to taste
- Paprika for garnish
- 1 can (6 ounces) of whole pitted black olives
Cooking Instructions:
- Boil the Eggs: Place the eggs in a single layer in a saucepan and cover them with water. Bring to a boil over high heat. Once boiling, remove from heat and cover the pan. Let the eggs sit in the hot water for about 12 minutes.
- Cool and Peel: After 12 minutes, transfer the eggs to a bowl of ice water to cool for at least 5 minutes. Once cooled, gently tap the eggs on a hard surface and peel off the shells.
- Prepare the Yolks: Slice the eggs in half lengthwise and carefully remove the yolks, placing them in a medium-sized mixing bowl. Arrange the egg whites on a serving platter.
- Make the Filling: Mash the yolks with a fork until smooth. Add mayonnaise, Dijon mustard, white vinegar, salt, and pepper to taste. Mix until creamy and well combined.
- Fill the Egg Whites: Using a spoon or a piping bag, fill each egg white half with the yolk mixture, mounding it slightly.
- Create the Spiders: Slice the black olives in half, using one half per egg for the spider body. Cut the remaining halves into thin strips to form the spider legs. Arrange one olive half on each deviled egg and position the strips around it to resemble legs.
- Garnish: Lightly sprinkle paprika over the deviled eggs for a pop of color and a hint of spice.
Extra Tips:
For the best results, make certain that your eggs are cold before peeling to prevent sticking. If you prefer a smoother filling, consider using a food processor to blend the yolk mixture instead of mashing it by hand.
To save time, you can prepare the yolk filling and the spiders in advance, storing them separately, and assemble the eggs just before serving. Remember, the secret to perfect Spooky Spider Deviled Eggs is in the details, so take your time with the decoration to make them as eerie and appetizing as possible!
Mummy Jalapeño Poppers
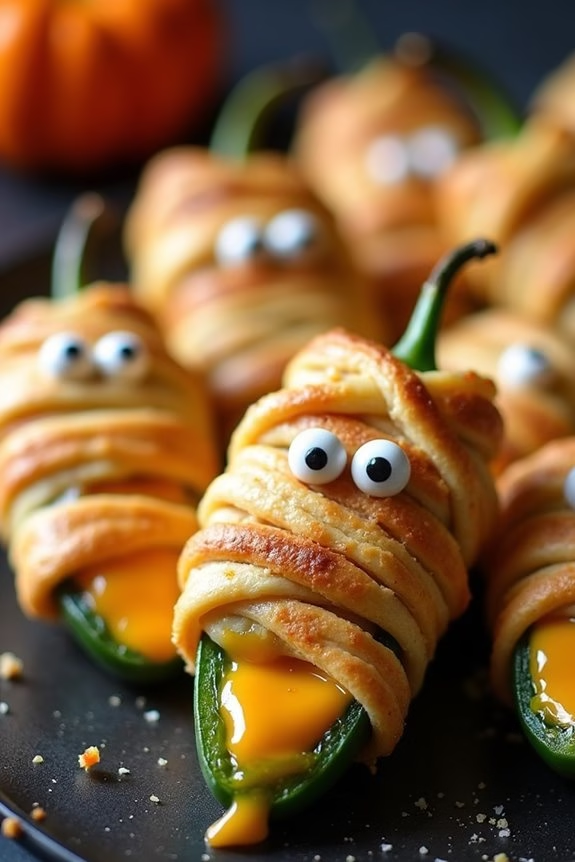
Mummy Jalapeño Poppers are a spooky and delicious treat perfect for any Halloween gathering. These poppers are a fun twist on the classic appetizer, wrapped in crescent dough to resemble mummies, complete with little edible eyes.
They’re filled with a creamy, cheesy mixture that complements the heat of the jalapeños, making them an irresistible snack that will surely be a hit with both kids and adults. The combination of spicy jalapeños and a rich, cheesy filling wrapped in golden, flaky dough makes these poppers an ideal addition to your Halloween appetizer spread.
Not only are they tasty, but they’re also visually appealing, adding a festive charm to your table. Perfect for a party of 4-6 people, these Mummy Jalapeño Poppers are easy to prepare and promise a fun culinary experience for everyone involved.
Ingredients for Mummy Jalapeño Poppers (serves 4-6):
- 12 large jalapeño peppers
- 8 oz cream cheese, softened
- 1 cup shredded cheddar cheese
- 1/2 teaspoon garlic powder
- 1/4 teaspoon onion powder
- 1/4 teaspoon smoked paprika
- 1/4 teaspoon salt
- 1 can (8 oz) refrigerated crescent roll dough
- 24 candy eyeballs
Cooking Instructions:
1. Prepare the Jalapeños: Preheat your oven to 375°F (190°C). Slice each jalapeño pepper in half lengthwise and remove the seeds and membranes. Use gloves to protect your hands from the pepper’s heat.
2. Make the Filling: In a medium bowl, combine the softened cream cheese, shredded cheddar cheese, garlic powder, onion powder, smoked paprika, and salt. Mix until well blended and smooth.
3. Fill the Jalapeños: Spoon the cheese mixture into each jalapeño half, filling them generously. Use the back of the spoon to smooth the tops.
4. Wrap with Dough: Unroll the crescent roll dough and separate it into four rectangles, pressing the perforations to seal. Cut each rectangle into thin strips about 1/4 inch wide. Wrap each stuffed jalapeño half with the dough strips, leaving space for eyes.
It’s okay if they don’t look perfect; the rustic look adds to the mummy effect.
5. Bake the Poppers: Place the wrapped jalapeños on a baking sheet lined with parchment paper. Bake in the preheated oven for 12-15 minutes, or until the dough is golden brown and cooked through.
6. Add the Eyes: Remove the poppers from the oven and allow them to cool slightly. Press two candy eyeballs into the exposed filling of each popper to create the mummy’s eyes.
Extra Tips:
When handling jalapeños, consider wearing gloves to avoid irritation from the peppers’ oils. If you prefer a milder popper, choose jalapeños that are smaller in size or soak them in cold water after seeding to reduce their heat.
For added flavor, you can incorporate cooked bacon bits into the cheese mixture. Mummy Jalapeño Poppers are best served warm, so plan to bake them just before your guests arrive to guarantee they’re at their freshest and most delicious.
Ghostly Guacamole Dip

Ghostly Guacamole Dip is a spooktacular way to kick off your Halloween festivities. This eerie appetizer isn’t only visually haunting but also deliciously creamy and flavorful. Perfect for a crowd of 4-6 people, this dip combines the rich taste of avocados with a ghoulish presentation that will thrill both adults and children.
The key to making this dish truly ghostly is in the presentation—transforming a simple guacamole into something that looks like it’s straight out of a haunted house.
To create this chilling concoction, you’ll need to blend ripe avocados with traditional Mexican flavors like lime, jalapeños, and cilantro. This combination results in a tangy and spicy guacamole that stands out on any appetizer table. The final touch is the ghostly decoration, which involves using sour cream to create spooky ghost faces on the surface of the dip.
Served with a side of tortilla chips, this Ghostly Guacamole Dip is sure to be a hit at your Halloween party.
Ingredients for Ghostly Guacamole Dip (Serves 4-6):
- 4 ripe avocados
- 1 small onion, finely chopped
- 2 tomatoes, diced
- 1 jalapeño, seeded and minced
- 2 cloves garlic, minced
- 1/4 cup fresh cilantro, chopped
- Juice of 2 limes
- Salt and pepper to taste
- 1/2 cup sour cream
- Tortilla chips for serving
Cooking Instructions:
- Prepare the Avocados: Cut the avocados in half, remove the pits, and scoop the flesh into a mixing bowl. Use a fork or a potato masher to mash the avocados until they’re mostly smooth, leaving a few chunks for texture.
- Mix the Ingredients: Add the chopped onions, tomatoes, minced jalapeño, minced garlic, and cilantro to the mashed avocados. Pour in the lime juice and season with salt and pepper. Stir everything together until well combined.
- Transfer to a Serving Bowl: Spoon the guacamole into a shallow serving dish, smoothing out the top with a spatula to create an even surface.
- Create Ghost Faces: Fill a small plastic bag or piping bag with sour cream. Cut a small tip off one corner of the bag, and gently squeeze the sour cream over the guacamole to create ghost shapes. You can make simple ghost faces by adding two dots for eyes and an oval for a mouth.
- Serve: Place the Ghostly Guacamole Dip on a table surrounded by a generous helping of tortilla chips. Encourage guests to dip into the spooky creation.
Extra Tips:
For an added touch, consider serving the dip in a black or orange bowl to enhance the Halloween theme. If you want to increase the spook factor, use black olives cut into small pieces to add eyes or other details to the ghost faces.
Monster Eyeball Caprese Bites
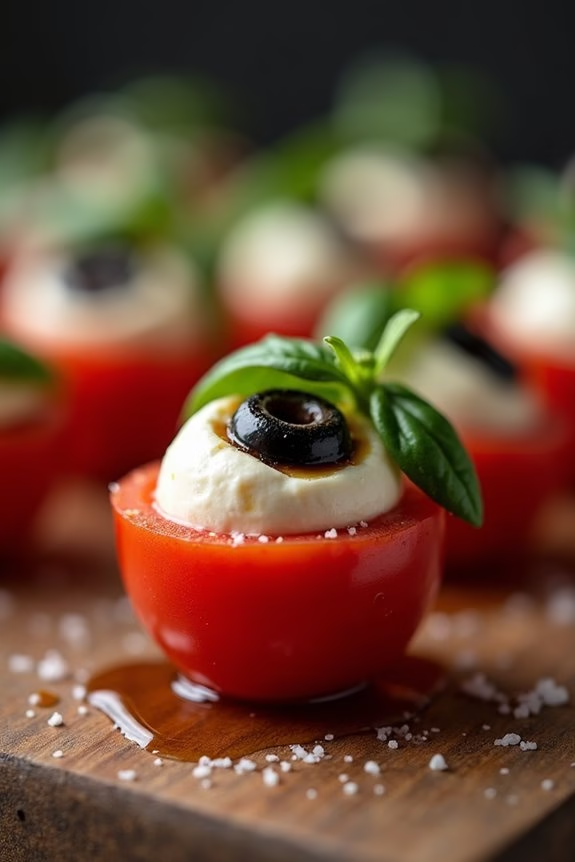
Get ready to spook your guests with these delightfully eerie Monster Eyeball Caprese Bites! Perfect for a Halloween gathering, these appetizers aren’t only visually striking but also deliciously satisfying. Combining the classic flavors of a Caprese salad with a creepy twist, these bites are sure to be a hit at your Halloween party. The fresh mozzarella, ripe tomatoes, and aromatic basil come together beautifully, while the creepy eyeball effect will have everyone talking.
These Monster Eyeball Caprese Bites are easy to prepare and require minimal cooking, allowing you to focus on other party preparations. With just a few simple ingredients and a bit of creativity, you can transform ordinary ingredients into a festive and fun appetizer. This recipe serves 4-6 people, making it ideal for a small gathering or as part of a larger spread of Halloween treats.
Ingredients:
- 12 cherry tomatoes
- 12 mini mozzarella balls (bocconcini)
- 12 fresh basil leaves
- 12 black olives
- 2 tablespoons balsamic glaze
- 1 tablespoon olive oil
- Salt and pepper to taste
- 12 toothpicks
Instructions:
- Prepare the Ingredients: Begin by washing the cherry tomatoes and basil leaves thoroughly. Pat them dry with a paper towel to guarantee there’s no excess moisture.
- Assemble the Eyeballs: For each eyeball, take a cherry tomato and slice off the bottom so it can stand upright. Make a small incision at the top and insert a mini mozzarella ball. This will create the eyeball effect.
- Add the Pupil: Slice a black olive into thin rings. Place an olive ring on top of each mozzarella ball to resemble the pupil of an eyeball. Use a toothpick to secure all the layers together.
- Add the Basil: Tuck a fresh basil leaf under each tomato, allowing the leaf to peek out slightly as if it’s the monster’s eyelid.
- Drizzle with Dressing: Arrange the monster eyeball bites on a serving platter. Drizzle them lightly with olive oil and balsamic glaze. Sprinkle a pinch of salt and pepper over the top for added flavor.
- Chill and Serve: Place the platter in the refrigerator for at least 15 minutes to allow the flavors to meld. Serve chilled and enjoy the spooky treat with your guests!
Extra Tips:
For an even more dramatic effect, you can use edible food coloring to paint veins on the mozzarella eyeballs, enhancing the creepy look.
If you want to add a bit of heat, you can sprinkle some red pepper flakes over the bites along with the salt and pepper.
Make sure to use fresh, high-quality ingredients for the best flavor, and feel free to adjust the quantities to suit your guest list. Enjoy the festive fun and watch these Monster Eyeball Caprese Bites disappear before your eyes!
Witch’s Broomstick Cheese Sticks
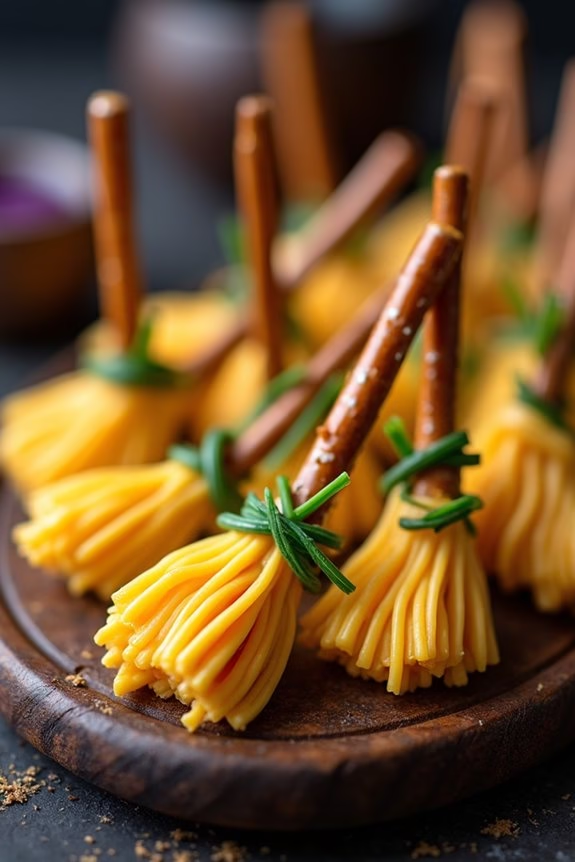
Witch’s Broomstick Cheese Sticks are a whimsical and savory treat that will add a magical touch to your Halloween appetizer spread. Perfect for parties or family gatherings, these cheese sticks are shaped to resemble witch’s broomsticks, bringing a fun and festive element to your table.
Made with simple ingredients, they’re easy to prepare and are guaranteed to be a hit with both kids and adults alike. The combination of salty pretzel sticks and creamy cheese strips creates a delicious balance of flavors and textures.
Tied with fresh chives to resemble the bristles of a broomstick, these appetizers are as delightful to look at as they’re to eat. Serve them with a side of marinara or ranch dipping sauce for an added burst of flavor. This recipe serves 4-6 people, making it a great addition to your Halloween menu.
Ingredients:
- 12 string cheese sticks
- 12 pretzel sticks
- Fresh chives (about 12)
- Optional: Marinara or ranch dipping sauce
Cooking Instructions:
- Prepare the Cheese Sticks: Unwrap each string cheese stick and cut them in half to create two shorter sticks. Gently pull apart the bottom half of each cheese stick to create a fringed effect, resembling the bristles of a broomstick.
- Assemble the Broomsticks: Carefully insert a pretzel stick into the uncut end of each cheese stick, pushing it in slightly to secure.
- Tie the Chives: Take a fresh chive and wrap it around the top of the fringed part of the cheese stick, just below the pretzel insertion point. Tie it into a small knot or bow to hold the cheese tightly against the pretzel, enhancing the appearance of a broomstick.
- Serve: Arrange the Witch’s Broomstick Cheese Sticks on a platter. If desired, serve them with a side of marinara or ranch dipping sauce for an extra layer of flavor.
Extra Tips:
For best results, use fresh string cheese and chives to guarantee that your broomstick sticks hold their shape and appearance. If the chives are difficult to tie, blanch them in hot water for a few seconds to make them more pliable.
Additionally, when pulling apart the cheese to create the fringe, be gentle to avoid breaking the cheese stick. This recipe is highly adaptable; feel free to experiment with different types of cheese or dip to suit your taste preferences.
Creepy Crawly Pretzel Bites
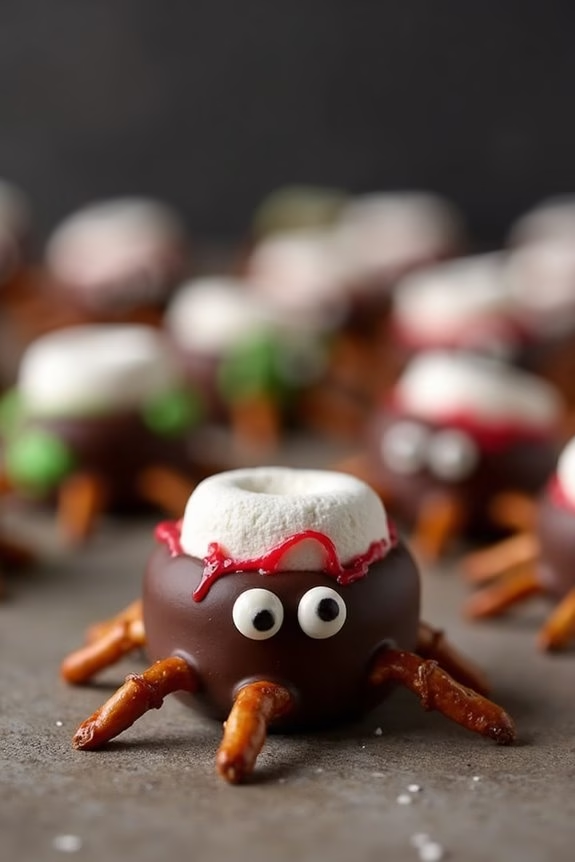
Halloween is the perfect time to conjure up some spooky treats, and Creepy Crawly Pretzel Bites are sure to be a hit at any gathering. These deliciously eerie snacks combine the salty crunch of pretzels with gooey marshmallows, and are decorated to resemble creepy crawly critters. They’re not only fun to make, but also delightful to eat, making them a fantastic option for both kids and adults at your Halloween party.
Crafting these Creepy Crawly Pretzel Bites is a straightforward process that involves a few simple ingredients and steps. The key is in the details, from the choice of pretzels to the decoration process that gives these bites their creepy appearance. With this recipe, you’ll be able to make enough to serve 4-6 people, making it ideal for a small party or family gathering.
Let’s plunge into the ingredients and steps needed to create these spooky snacks.
Ingredients (for 4-6 people):
- 1 cup mini pretzel twists
- 1 cup mini marshmallows
- 1/2 cup chocolate chips
- 1/4 cup candy eyes
- 1/4 cup red or green candy melts
- 1 tablespoon unsalted butter
- 1 tablespoon vegetable oil
Cooking Instructions:
- Prepare the Baking Sheet: Line a baking sheet with parchment paper to prevent sticking and make for easy cleanup.
- Melt the Chocolate: In a microwave-safe bowl, combine chocolate chips and vegetable oil. Microwave in 30-second intervals, stirring in between, until the chocolate is fully melted and smooth.
- Coat the Pretzels: Dip each mini pretzel twist into the melted chocolate, confirming they’re fully coated. Lay them flat on the prepared baking sheet.
- Add the Marshmallows: Gently press a mini marshmallow onto the center of each chocolate-coated pretzel while the chocolate is still wet. This will act as the body of the creepy crawly.
- Attach the Candy Eyes: Before the chocolate sets, place two candy eyes on each marshmallow to create the face of your creepy crawly.
- Melt the Candy Melts: In a separate microwave-safe bowl, melt the candy melts using the same method as the chocolate chips. Once melted, transfer to a small piping bag or ziplock bag with a tiny corner snipped off.
- Decorate the Bodies: Drizzle the melted candy over the marshmallows in thin lines to create legs and other scary details.
- Set the Bites: Allow the decorated pretzel bites to set at room temperature or speed up the process by placing them in the refrigerator for 15 minutes.
Extra Tips:
For best results, verify that your chocolate and candy melts are smooth and free from lumps before coating or decorating. If you prefer a less sweet version, you can use dark chocolate for coating.
Additionally, feel free to experiment with different colors of candy melts to match your Halloween theme. These Creepy Crawly Pretzel Bites are versatile and can be stored in an airtight container for up to a week, making them a convenient make-ahead treat.
Bloody Mary Shrimp Shooters

Bloody Mary Shrimp Shooters are a perfect Halloween appetizer that combines the classic cocktail flavors with succulent shrimp for a spooky and sophisticated treat. These shooters aren’t only visually impressive but also pack a punch of flavor, making them a delightful addition to any Halloween party spread. The combination of spicy Bloody Mary mix, fresh shrimp, and a touch of horseradish creates a chillingly delicious experience that guests will love.
The presentation of these shooters can be as creative as you want, with options to serve them in shot glasses or small cups for that extra eerie feel. This recipe is designed to serve 4-6 people, providing a perfect starter or finger food option for your Halloween gathering. Whether you’re hosting a large party or an intimate get-together, these Bloody Mary Shrimp Shooters are sure to be a hit with both seafood lovers and cocktail enthusiasts alike.
Ingredients (Serves 4-6):
- 1 pound large shrimp, peeled and deveined
- 1 cup Bloody Mary mix
- 1 tablespoon lemon juice
- 2 teaspoons Worcestershire sauce
- 1 teaspoon hot sauce
- 1 teaspoon prepared horseradish
- 1 teaspoon celery salt
- 1/4 teaspoon black pepper
- Lemon wedges, for garnish
- Celery stalks, for garnish
- Fresh parsley, for garnish
Cooking Instructions:
- Prepare the Shrimp: Start by bringing a pot of salted water to a boil. Add the shrimp and cook for about 2-3 minutes until they turn pink and opaque. Immediately transfer the shrimp to an ice bath to stop the cooking process, then drain and set aside.
- Mix the Bloody Mary Base: In a mixing bowl, combine the Bloody Mary mix, lemon juice, Worcestershire sauce, hot sauce, prepared horseradish, celery salt, and black pepper. Stir well to verify all ingredients are fully integrated, creating a flavorful and spicy base.
- Assemble the Shooters: Arrange shot glasses or small cups on a serving tray. Pour the Bloody Mary mixture into each glass, filling them halfway. Take the cooked shrimp and skewer them onto cocktail picks or toothpicks, then place one shrimp in each glass with the tail end hanging over the edge.
- Garnish and Serve: Add a lemon wedge, a small celery stalk, and a sprig of fresh parsley to each shooter for garnish. This not only enhances the visual appeal but also adds an extra layer of flavor. Serve immediately, verifying the shrimp remains cold and the Bloody Mary mix is invigorating.
Extra Tips: For an added twist, you can rim the glasses with a mixture of celery salt and black pepper for a seasoned edge. If you prefer a milder flavor, adjust the amount of hot sauce and horseradish to suit your taste. To save time on the day of your event, prepare the Bloody Mary mix and cook the shrimp a few hours in advance, storing them in the refrigerator until you’re ready to assemble the shooters. This will allow you to focus on enjoying your Halloween festivities.
Frankenstein Avocado Toast Bites
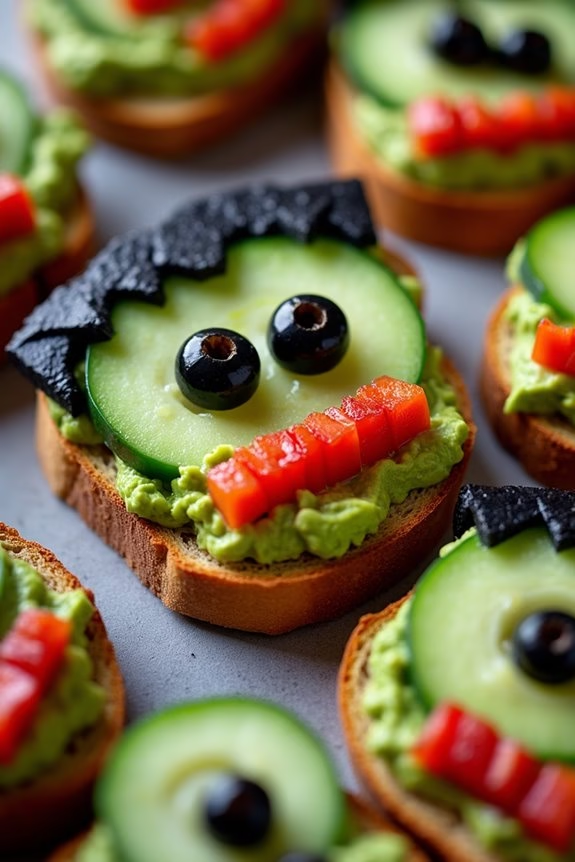
Frankenstein Avocado Toast Bites are the perfect Halloween appetizer to delight your guests with both taste and creativity. These spooky bites aren’t only visually impressive but are also packed with nutrients thanks to the creamy avocado base.
With just a few simple ingredients and a little bit of imagination, you can transform ordinary avocado toast into a festive and fun dish that both adults and kids will enjoy.
These bites are easy to assemble and require minimal cooking, making them an ideal choice for party preparations. The key to their success lies in the presentation, as the toppings are arranged to resemble Frankenstein’s iconic face.
Whether you’re hosting a Halloween party or just looking for a fun snack to celebrate the season, these Frankenstein Avocado Toast Bites will definitely be a hit.
Ingredients (Serves 4-6):
- 4-6 slices of whole-grain bread
- 3 ripe avocados
- 1 tablespoon lime juice
- Salt and pepper to taste
- 1 small cucumber
- 4-6 black olives
- 8-12 cloves
- 1 red bell pepper
- 1-2 tablespoons olive oil
Cooking Instructions:
- Prepare the Avocado Spread:
- Cut the avocados in half, remove the pits, and scoop the flesh into a bowl.
- Add lime juice, a pinch of salt, and pepper. Mash the mixture with a fork or potato masher until smooth and creamy.
- Toast the Bread:
- Preheat your oven to 375°F (190°C) or use a toaster.
- Lightly brush each slice of whole-grain bread with olive oil.
- Toast the bread slices until they’re golden brown and crisp.
- Assemble the Frankenstein Faces:
- Spread a generous layer of avocado mash over each slice of toasted bread.
- Slice the cucumber into thin rounds to create Frankenstein’s eyes and place them on the avocado layer.
- Halve the black olives to make pupils and place them on top of the cucumber slices.
- Use cloves to create Frankenstein’s eyebrows.
- Add the Final Touches:
- Cut the red bell pepper into small squares to form Frankenstein’s mouth.
- Arrange the pieces into a zigzag pattern to mimic stitches.
- Serve:
- Cut each slice into halves or quarters, depending on the desired bite size.
- Arrange the Frankenstein Avocado Toast Bites on a serving platter and enjoy!
Extra Tips:
For best results, use ripe avocados to guarantee a smooth and creamy spread.
You can prepare the avocado spread a few hours in advance and store it in the refrigerator with a layer of plastic wrap directly on the surface to prevent browning.
Feel free to get creative with the toppings—use different vegetables or add cheese to create unique expressions on your Frankenstein faces.
If you’re serving children, you might want to replace the cloves with small pieces of olive to avoid any choking hazards.
Pumpkin Patch Cheese Ball
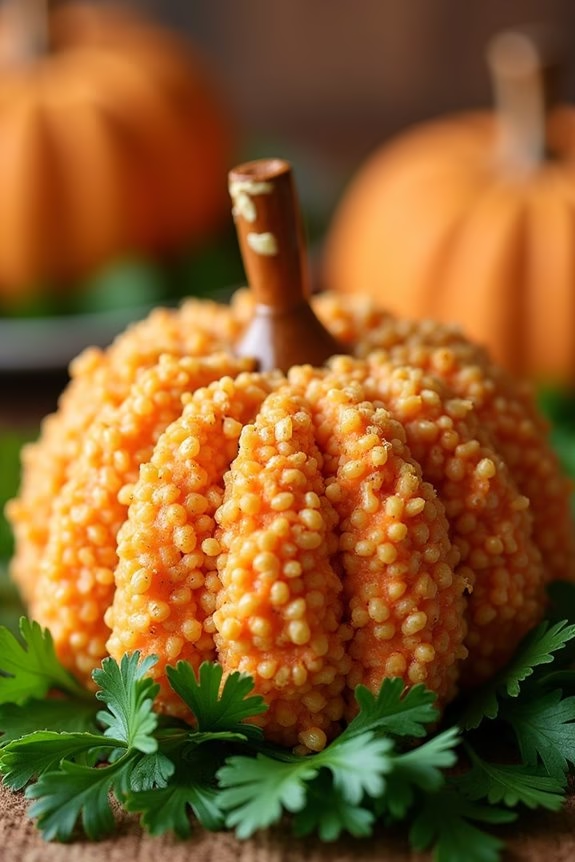
Pumpkin Patch Cheese Ball is an exciting and delicious appetizer that’s perfect for your Halloween celebrations. This delightful dish combines the creamy texture of cheese with the earthy richness of pumpkin, creating a visually striking centerpiece for your Halloween table. Shaped like a mini pumpkin patch, this cheese ball not only looks festive but also tantalizes the taste buds with its savory and slightly sweet flavors.
The Pumpkin Patch Cheese Ball is a simple yet impressive dish that will leave your guests enthusiastic about reaching for more. The combination of cheeses, spices, and pumpkin guarantees a unique flavor profile, while the decorative aspect makes it a fun and interactive appetizer. With just a bit of creativity and a few straightforward steps, you can create a Halloween dish that’s sure to be a hit at any party.
Ingredients (Serves 4-6)
- 2 cups shredded sharp cheddar cheese
- 8 ounces cream cheese, softened
- 1/2 cup canned pumpkin puree
- 1 teaspoon garlic powder
- 1 teaspoon onion powder
- 1/2 teaspoon smoked paprika
- 1/4 teaspoon ground cinnamon
- 1/4 teaspoon salt
- 1/4 teaspoon black pepper
- 1 cup crushed pretzels
- 1 small pretzel stick (for the pumpkin stem)
- Fresh parsley or cilantro leaves (for decoration)
Cooking Instructions
- Prepare the Cheese Mixture: In a large mixing bowl, combine the shredded sharp cheddar cheese, softened cream cheese, and canned pumpkin puree. Mix these ingredients thoroughly until you achieve a smooth and homogeneous mixture.
- Season the Mixture: Add the garlic powder, onion powder, smoked paprika, ground cinnamon, salt, and black pepper to the cheese and pumpkin mixture. Stir well to make certain the spices are evenly distributed throughout the mixture.
- Shape the Cheese Ball: Once the mixture is well combined, use your hands to shape it into a large ball. Make sure the ball is firm enough to hold its shape. If the mixture is too soft, refrigerate it for about 15 minutes to help it set.
- Coat the Cheese Ball: Spread the crushed pretzels on a large plate. Roll the cheese ball in the crushed pretzels, pressing gently to make sure they adhere to the surface. The pretzels will give the cheese ball a crunchy texture and a slightly salty flavor.
- Decorate the Cheese Ball: Insert a small pretzel stick into the top of the cheese ball to resemble a pumpkin stem. Arrange fresh parsley or cilantro leaves around the base of the pretzel stick to mimic pumpkin leaves.
- Chill Before Serving: Place the decorated cheese ball in the refrigerator for at least 30 minutes before serving. This will allow the flavors to meld and the ball to firm up further.
Extra Tips
For an extra festive touch, consider using food coloring to tint the cheese mixture a deeper orange shade, making it resemble a real pumpkin even more. If you want to add more flavor, consider mixing in chopped nuts or dried cranberries to the cheese mixture before shaping it into a ball.
Also, confirm the cream cheese is fully softened before mixing to achieve a smoother texture. When serving, pair the Pumpkin Patch Cheese Ball with an assortment of crackers, sliced vegetables, or toasted bread for a delightful appetizer spread.
Vampire Bat Wings

Vampire Bat Wings are the perfect Halloween appetizer, offering a spooky twist on classic chicken wings. These wings are marinated in a dark, savory sauce that gives them a deliciously eerie appearance, reminiscent of bat wings, while packing a flavorful punch.
Whether you’re hosting a Halloween party or simply want to add some themed fun to your dinner table, Vampire Bat Wings are bound to be a hit with both kids and adults.
The secret to these wings lies in their rich, blood-red glaze, made with a combination of soy sauce, honey, and dark spices. As they bake, the wings develop a deep color and a slightly sticky texture that will have your guests coming back for more.
Serve these wings with a creamy garlic dip to complement their bold flavors and add an extra layer of deliciousness to your Halloween spread.
Ingredients for Vampire Bat Wings (Serves 4-6):
- 3 pounds of chicken wings
- 1/2 cup soy sauce
- 1/4 cup honey
- 1 tablespoon balsamic vinegar
- 1 tablespoon Worcestershire sauce
- 2 teaspoons smoked paprika
- 1 teaspoon garlic powder
- 1 teaspoon onion powder
- 1/2 teaspoon cayenne pepper
- 1 teaspoon salt
- 1/2 teaspoon black pepper
- 1 tablespoon olive oil
- 2 tablespoons ketchup
- 1 tablespoon sriracha sauce
Cooking Instructions:
- Prepare the Marinade: In a medium-sized mixing bowl, combine the soy sauce, honey, balsamic vinegar, Worcestershire sauce, smoked paprika, garlic powder, onion powder, cayenne pepper, salt, and black pepper. Whisk the ingredients together until they’re thoroughly blended.
- Marinate the Wings: Place the chicken wings in a large resealable plastic bag or a shallow dish. Pour the marinade over the wings, making certain they’re well-coated. Seal the bag or cover the dish with plastic wrap and refrigerate for at least 2 hours, preferably overnight, to allow the flavors to infuse the meat.
- Preheat the Oven: Once the wings have marinated, preheat your oven to 400°F (200°C). Line a baking sheet with aluminum foil and lightly grease it with olive oil to prevent sticking.
- Bake the Wings: Arrange the marinated wings in a single layer on the prepared baking sheet. Reserve the remaining marinade for basting. Bake the wings in the preheated oven for 20 minutes.
- Prepare the Glaze: While the wings are baking, combine the ketchup and sriracha sauce in a small saucepan over medium heat. Stir occasionally until the glaze is smooth and slightly thickened, about 5 minutes.
- Baste and Finish Baking: After 20 minutes of baking, remove the wings from the oven and brush them with the prepared glaze. Return the wings to the oven and bake for an additional 10-15 minutes, or until the wings are cooked through and the glaze is caramelized.
- Serve: Remove the wings from the oven and let them cool slightly before serving. Arrange them on a platter and serve with a side of creamy garlic dip, if desired.
Extra Tips:
When making Vampire Bat Wings, it’s important to let the wings marinate for as long as possible to guarantee they absorb the rich flavors of the marinade. If you’re short on time, a minimum of 2 hours will still yield tasty results.
Additionally, for a smokier flavor, consider grilling the wings instead of baking them. Just remember to turn them frequently and baste with the glaze as needed.
For an extra spooky touch, serve the wings with a side of blood-red hot sauce or a tangy blackberry dipping sauce.
Skeleton Veggie Platter
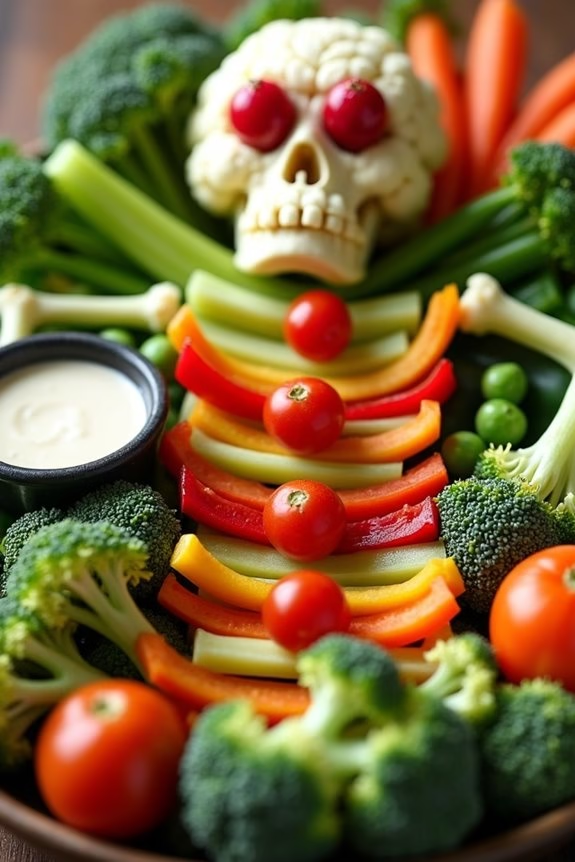
Creating a spooky yet nutritious Halloween appetizer can set the tone for a festive gathering, and a Skeleton Veggie Platter is the perfect choice. This artistic and fun dish combines the healthy crunch of fresh vegetables with the creativity of arranging them in the shape of a human skeleton. Not only does it make for an eye-catching centerpiece, but it also promotes guests to munch on something light and wholesome amid the usual Halloween treats.
The Skeleton Veggie Platter is ideal for serving 4-6 people and can be customized with an array of colorful vegetables. The key is to use a variety of textures and colors to best mimic the skeletal structure. Once assembled, this dish not only serves as a delicious appetizer but also as a conversation starter that will intrigue both kids and adults alike. Pair it with a delicious dip, and you’ve got yourself a hit for any Halloween party.
Ingredients for Serving 4-6 People:
- 1 small head of cauliflower
- 1 bunch of celery
- 1 red bell pepper
- 1 yellow bell pepper
- 1 cucumber
- 1 cup cherry tomatoes
- 1 cup baby carrots
- 1 small broccoli crown
- 1 cup sugar snap peas
- 1 radish
- 1 cup of your favorite dip (such as hummus or ranch)
Cooking Instructions:
- Prepare the Vegetables: Start by washing all the vegetables thoroughly and patting them dry. This confirms they’re clean and ready to eat, and drying them helps them stay crisp.
- Create the Skull: Break the cauliflower into bite-sized florets, keeping them as whole as possible. Arrange them at the top of your platter to form the shape of a skull. Use a small piece of radish as the nose and cut two small holes in the cauliflower to place cherry tomatoes for eyes.
- Assemble the Spine and Ribs: Cut the celery stalks into evenly sized pieces to form the spine down the center of the platter. For the ribs, slice the red and yellow bell peppers into strips and place them on either side of the celery spine.
- Form the Arms and Legs: Use the cucumber and snap peas to form the arms and legs. Slice the cucumber into long, thin sticks and arrange them as arms extending from the ribs. Place the sugar snap peas as fingers and toes.
- Add Hands and Feet: Use the baby carrots to create hands and feet by positioning them at the ends of the arms and legs. Cut them in half lengthwise if needed for a better fit.
- Finish with Vegetables and Dip: Fill in any gaps with broccoli florets to add texture. Place the dip in a small bowl or ramekin nearby, or incorporate it as the “stomach” of the skeleton by placing it in the middle of the platter.
Extra Tips:
When creating your Skeleton Veggie Platter, feel free to substitute with any vegetables you prefer or those that are in season. This dish is highly customizable, so don’t hesitate to get creative with the arrangement to make it as spooky or silly as you like.
If you want to save time, you can pre-cut the vegetables a day in advance and store them in airtight containers in the refrigerator. Just make sure to assemble the platter shortly before serving to maintain freshness and crispness.
Witches’ Cauldron Spinach Dip
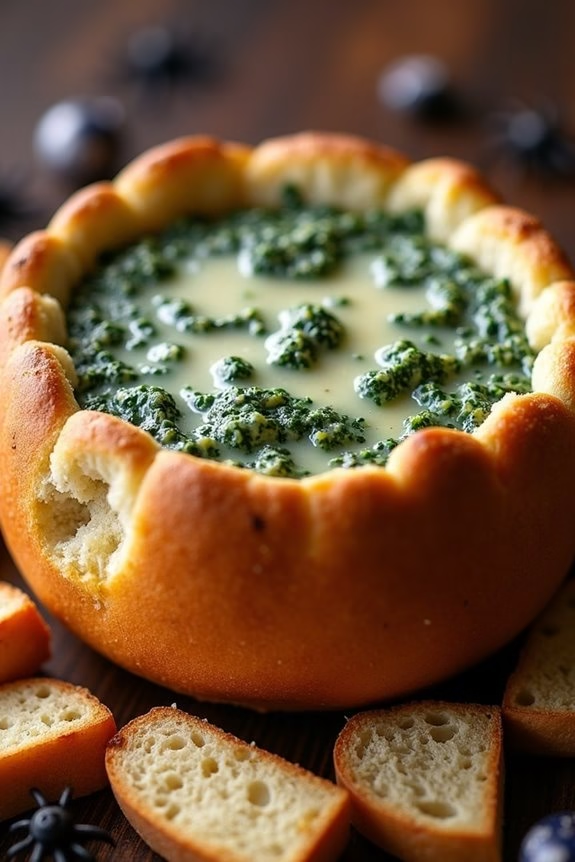
Witches’ Cauldron Spinach Dip is a spooky and delicious addition to your Halloween spread. This creamy, cheesy dip, served in a hollowed-out bread bowl, looks just like a bubbling cauldron, making it perfect for your haunted festivities. The combination of spinach, cheese, and spices creates a savory flavor that will have your guests coming back for more. Plus, it’s an easy recipe to whip up, so you can spend more time enjoying the party and less time in the kitchen.
Imagine your guests gathering around the table, eyeing the mysterious cauldron filled with a rich, velvety dip that’s both visually appealing and delectable. The Witches’ Cauldron Spinach Dip not only satisfies the taste buds but also adds a touch of Halloween magic to your appetizer table. It’s the ideal dish for sharing, dipping, and delighting all those who dare to taste its deliciousness.
Ingredients for 4-6 people:
- 1 round bread loaf (sourdough or pumpernickel recommended)
- 10 oz frozen chopped spinach, thawed and drained
- 1 cup sour cream
- 1 cup mayonnaise
- 1 cup grated Parmesan cheese
- 1 packet (1 oz) dry vegetable soup mix
- 2 cloves garlic, minced
- Salt and pepper, to taste
Cooking Instructions:
- Prepare the Bread Bowl: Start by cutting the top off the bread loaf and hollowing out the center to create a bowl. Make sure to leave about 1 inch of bread around the sides to support the dip. Keep the removed bread pieces for serving.
- Mix the Dip Ingredients: In a large mixing bowl, combine the thawed and drained spinach, sour cream, mayonnaise, Parmesan cheese, dry vegetable soup mix, and minced garlic. Stir until all ingredients are well-incorporated. Season with salt and pepper according to your taste.
- Fill the Cauldron: Spoon the spinach dip mixture into the hollowed-out bread loaf. Make sure to fill it up to the brim to give it that cauldron-like appearance.
- Bake the Dip: Preheat your oven to 350°F (175°C). Place the filled bread bowl on a baking sheet and bake for 25-30 minutes, or until the dip is bubbly and the bread is slightly crispy.
- Serve: Once baked, remove the Witches’ Cauldron Spinach Dip from the oven and let it cool slightly before serving. Arrange the reserved bread pieces around the bread bowl for dipping, or serve with crackers or vegetable sticks.
Extra Tips: To make your Witches’ Cauldron Spinach Dip even more visually appealing, consider adding some decorations to mimic a real cauldron. You can use breadsticks as “broomsticks” or place a few small plastic spiders or bats around the cauldron for an extra touch of Halloween flair.
Eyeball Stuffed Mushrooms
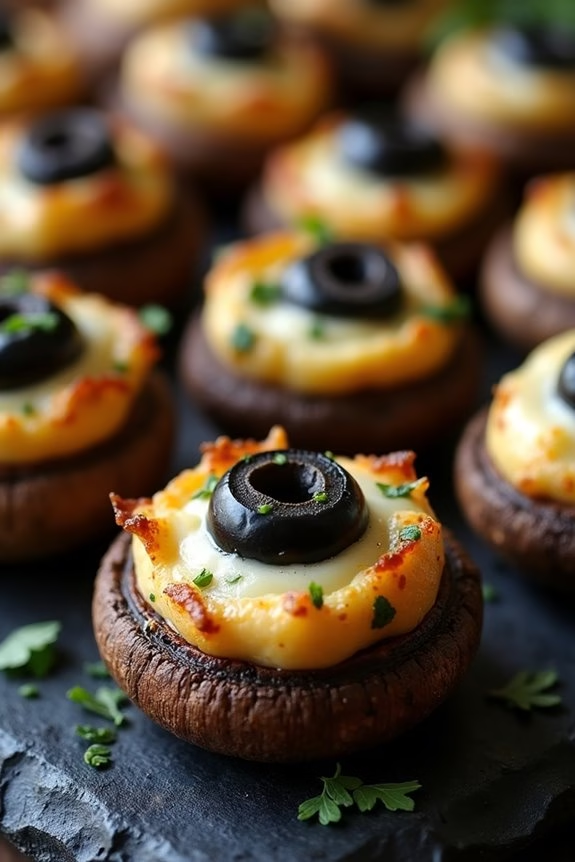
Eyeball Stuffed Mushrooms are a spooky and delicious addition to any Halloween gathering. These creepy yet tasty appetizers won’t only add a touch of eerie fun to your table but will also delight your guests with their savory flavor. The combination of juicy mushroom caps, creamy cheese filling, and olive “eyeballs” make for a visually striking and delectable treat.
Whether you’re hosting a Halloween party or simply want to get into the festive spirit, these stuffed mushrooms are bound to impress. This dish involves hollowing out large mushroom caps and filling them with a rich mixture of cream cheese, garlic, and herbs. The stuffed mushrooms are then topped with sliced olives to create the appearance of bloodshot eyeballs, adding to the Halloween theme.
With simple ingredients and straightforward preparation, Eyeball Stuffed Mushrooms come together quickly and can be made ahead of time, allowing you to focus on other aspects of your celebration.
Ingredients for 4-6 servings:
- 20 large button mushrooms
- 8 ounces cream cheese, softened
- 1/2 cup grated Parmesan cheese
- 2 cloves garlic, minced
- 1 tablespoon fresh parsley, chopped
- 1/2 teaspoon dried thyme
- Salt and pepper to taste
- 10 pitted black olives, sliced in half
- 1 tablespoon olive oil
Cooking Instructions:
- Preheat the oven to 375°F (190°C). This guarantees that the oven is at the right temperature when the mushrooms are ready to be baked.
- Prepare the mushrooms. Carefully remove the stems from the mushrooms and use a small spoon to scoop out any remaining stem pieces, creating a hollow cavity for the filling.
- Make the filling. In a medium bowl, mix the softened cream cheese, Parmesan cheese, minced garlic, chopped parsley, dried thyme, salt, and pepper until well combined.
- Stuff the mushrooms. Using a spoon or a piping bag, fill each mushroom cap with the cream cheese mixture, making sure it’s generously mounded over the top.
- Create the eyeballs. Press a sliced olive half, cut side up, into the center of each filled mushroom cap to resemble an eyeball.
- Prepare for baking. Lightly grease a baking sheet with olive oil and arrange the stuffed mushrooms on the sheet.
- Bake the mushrooms. Place the baking sheet in the preheated oven and bake for 20-25 minutes, or until the mushrooms are tender and the filling is lightly golden.
- Serve. Allow the mushrooms to cool slightly before transferring them to a serving platter. Serve warm as a spooky appetizer.
Extra Tips:
When making Eyeball Stuffed Mushrooms, verify that the mushrooms are cleaned and dried thoroughly to prevent excess moisture from affecting the texture of the filling.
If you prefer a spicier kick, consider adding a pinch of red pepper flakes to the cheese mixture. For a more dramatic presentation, arrange the stuffed mushrooms on a platter with fake spider webs or plastic spiders.
These appetizers can be prepared a day in advance and stored in the refrigerator, making them convenient for busy hosts. Simply bake them just before serving for a fresh and warm treat.
Goblin Guacamole Cups
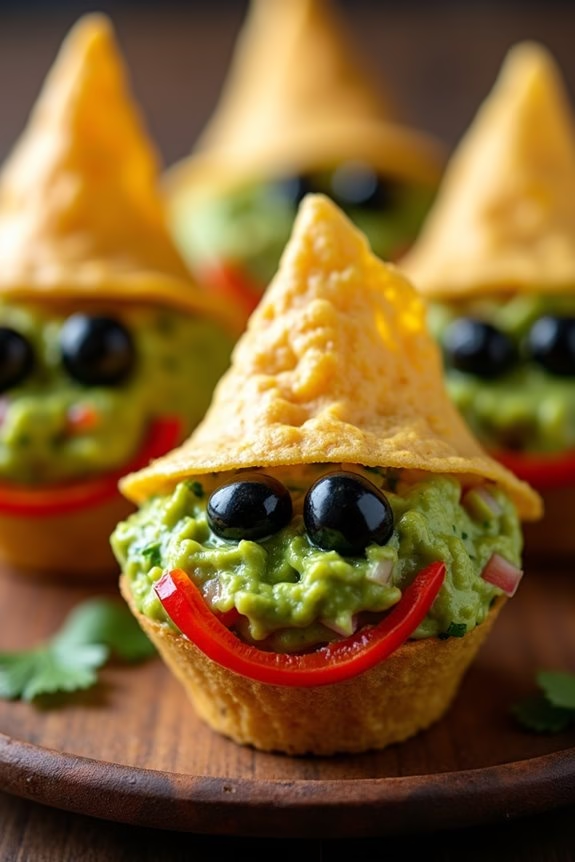
Goblin Guacamole Cups are the perfect spooky appetizer for your Halloween gathering. These delightful and eerie treats combine the creamy goodness of guacamole with the playful presentation of edible “goblin” faces. Whether you’re hosting a haunted house party or a simple family get-together, these guacamole cups will add a touch of fun and flavor to your festivities.
Easy to prepare and guaranteed to delight guests of all ages, they make for a fantastic addition to any Halloween spread.
The key to creating these whimsical Goblin Guacamole Cups lies in both the taste and presentation. The homemade guacamole, rich with the flavors of ripe avocados, lime, and cilantro, provides a delicious base. Meanwhile, the goblin faces come to life with the use of clever decorations like black olive eyes, bell pepper mouths, and tortilla chip hats.
Not only do they look impressive, but they also allow for a bit of creativity and personalization, making them a fun project to do with kids or friends.
Ingredients for Goblin Guacamole Cups (Serves 4-6):
- 3 ripe avocados
- 1 lime, juiced
- 1 small red onion, finely chopped
- 1 clove garlic, minced
- 1-2 Roma tomatoes, diced
- 2 tablespoons fresh cilantro, chopped
- Salt and pepper to taste
- 1/4 cup black olives, sliced
- 1 small red bell pepper, cut into small strips
- 1 bag of tortilla chips
- 6 small plastic or ceramic cups
Cooking Instructions:
- Prepare the Guacamole: Cut the avocados in half, remove the pits, and scoop the flesh into a mixing bowl. Add lime juice immediately to prevent browning.
- Mash and Mix: Mash the avocados with a fork or potato masher until smooth but still a bit chunky. Stir in chopped red onion, minced garlic, diced tomatoes, and cilantro. Season with salt and pepper to taste.
- Assemble the Cups: Divide the guacamole evenly among the small cups, smoothing the tops with a spoon.
- Decorate the Goblin Faces: Place two black olive slices on each cup to create eyes. Use the red bell pepper strips for mouths. Press a tortilla chip into the guacamole on top of each cup to act as a hat.
- Chill and Serve: Refrigerate the assembled Goblin Guacamole Cups for at least 20 minutes to let the flavors meld. Serve chilled as a festive appetizer.
Extra Tips:
For an added touch of Halloween spirit, you can use different colored bell peppers or olives to vary the goblin expressions. If preferred, you can also add a bit of spice to the guacamole with some diced jalapeños.
To keep your guacamole from browning too quickly, make certain that the lime juice is well mixed in, and cover the cups with plastic wrap, pressing it directly onto the surface of the guacamole. This will keep your goblin cups fresh and vibrant until they’re ready to be enjoyed.
Zombie Finger Hot Dogs

Are you ready to spook your guests with a creepy yet delicious treat this Halloween? Search no further than Zombie Finger Hot Dogs! These ghoulish appetizers are perfect for setting the eerie mood at your Halloween party. With their realistic look and savory taste, kids and adults alike will get a thrill out of these finger foods. The combination of juicy hot dogs, flaky puff pastry, and a touch of ketchup “blood” makes this dish a hit at any gathering.
Zombie Finger Hot Dogs not only look fantastic but are also incredibly easy to make. They require minimal ingredients and effort, allowing you to focus on other party preparations. Serve these hot dogs alongside other spooky snacks, and watch as your guests are both horrified and delighted by your culinary creativity. This recipe serves 4-6 people, making it perfect for a small gathering or as part of a larger spread.
Ingredients:
- 8 hot dogs
- 1 sheet of puff pastry
- 1 egg (for egg wash)
- 8 sliced almonds
- Ketchup
Cooking Instructions:
- Preheat the Oven: Start by preheating your oven to 375°F (190°C). Line a baking sheet with parchment paper to prevent sticking.
- Prepare the Puff Pastry: Roll out the puff pastry on a lightly floured surface. Cut the pastry into strips that are about 1-inch wide and long enough to wrap around a hot dog.
- Wrap the Hot Dogs: Take each hot dog and wrap a strip of puff pastry around it, leaving one end slightly exposed to mimic a severed finger. Press the ends of the pastry to secure it around the hot dog.
- Create the Fingernail: Place a sliced almond at the exposed end of each hot dog to resemble a fingernail. Gently press it into the hot dog so it stays in place.
- Apply the Egg Wash: Beat the egg in a small bowl and use a brush to apply a light coat of egg wash over the puff pastry. This will give the pastry a golden, crispy finish.
- Bake the Hot Dogs: Arrange the wrapped hot dogs on the prepared baking sheet. Bake in the preheated oven for 15-20 minutes, or until the pastry is golden brown and puffed.
- Add the Bloody Touch: Once baked, allow the hot dogs to cool slightly. Then, use ketchup to add a gory touch by applying it to the almond fingernail and along the exposed end of the hot dog.
Extra Tips:
For an extra spooky look, you can carve small knuckle lines into the hot dogs before wrapping them in puff pastry. This will make them resemble fingers even more.
If you want to make the fingers look more realistic, use a toothpick to add some texture to the puff pastry or brush a little soy sauce on the pastry before baking for a darker appearance.
Additionally, consider serving these Zombie Finger Hot Dogs with a side of mustard or a dipping sauce to add more flavor options for your guests. Enjoy your creepy creation and have a monstrously fun Halloween!

