

As Halloween approaches, I’m thrilled to share some fun and spooky appetizers that are perfect for little trick-or-treaters. Picture their excitement as they munch on Monster Mouths Apple Bites or get tangled up with Spider Pizza Bites. These treats are not only festive but also safe and nutritious. Whether you’re throwing a party or enjoying a cozy family night, these appetizers will enchant your guests with their creative flair. Let’s embark on this culinary adventure together!
Monster Mouths Apple Bites
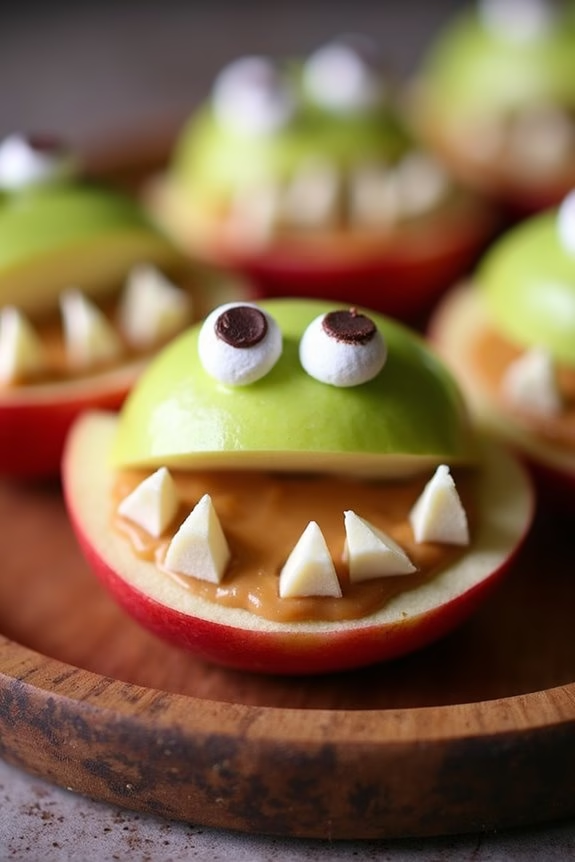
With Halloween just around the corner, these Monster Mouths Apple Bites are the perfect spooky treat to get kids excited for the festivities. Not only are these apple bites adorable and fun to make, but they’re also a healthy alternative to the usual sugar-laden Halloween treats. Made with crunchy apples, creamy peanut butter, and a few simple decorative touches, these monster mouths will bring a smile to any child’s face and add a playful twist to your Halloween spread.
The best part about Monster Mouths Apple Bites is their simplicity and versatility. You can personalize them with different types of nuts, seeds, or even chocolate chips to create unique monster expressions. This recipe serves 4-6 people, making it a great choice for small gatherings or family get-togethers. Plus, involving kids in the preparation can be an enjoyable activity that sparks their creativity and culinary curiosity.
Ingredients (Serves 4-6):
- 3 medium-sized apples (preferably red or green)
- 1/2 cup peanut butter (or any nut butter of choice)
- 1/4 cup slivered almonds
- 1/4 cup mini marshmallows
- 1/4 cup sunflower seeds
- 1 tablespoon lemon juice (optional, to prevent browning)
Cooking Instructions:
- Prepare the Apples: Begin by washing the apples thoroughly. Slice each apple into quarters and remove the core. To create the mouth shape, carefully cut a wedge from the skin side of each apple quarter, forming a mouth-like opening.
- Prevent Browning: If desired, brush the apple slices with lemon juice to prevent them from browning. This step is particularly useful if you plan to make the bites ahead of time.
- Add the Peanut Butter: Use a small spoon or a butter knife to spread a thin layer of peanut butter inside the wedge cut of each apple slice. This will serve as the “gums” of the monster mouth.
- Create the Teeth: Press slivered almonds into the peanut butter to form jagged teeth. You can also use sunflower seeds or other small nuts for variety.
- Add the Eyes: For the eyes, place two mini marshmallows above the mouth on each apple quarter. Use a dab of peanut butter to stick a sunflower seed or a small chocolate chip onto each marshmallow, creating pupils.
- Assemble and Serve: Once all the components are in place, arrange the Monster Mouths Apple Bites on a platter and serve immediately or store in the refrigerator until ready to enjoy.
Extra Tips:
If you’re making these apple bites for a party, consider setting up a “make your own monster mouth” station. Provide various toppings and let the kids assemble their monster creations.
For a nut-free version, substitute the peanut butter with sunflower seed butter or cream cheese. Finally, for an extra touch of fun, use a food-safe marker to draw silly expressions on the marshmallows before assembling the monster eyes.
Ghostly Cheese Sticks
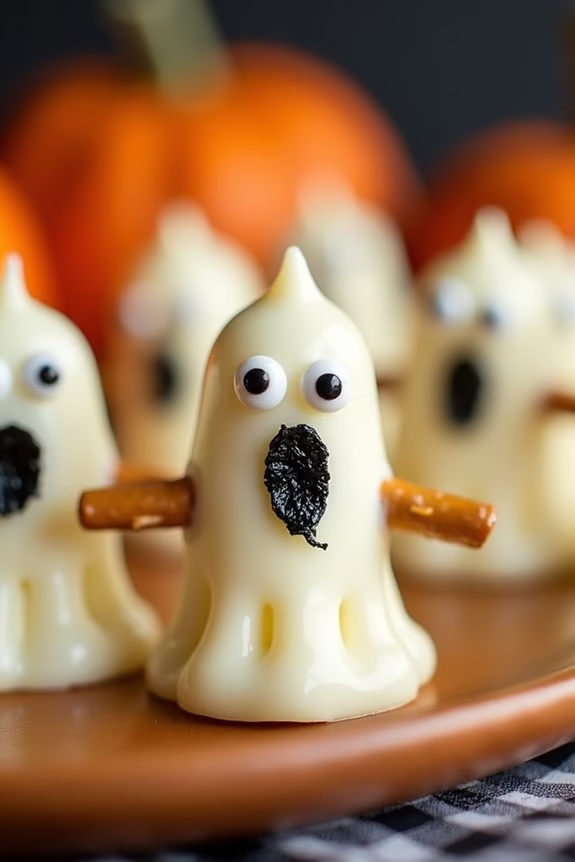
Searching for a fun and spooky appetizer to delight the kids this Halloween? Seek no further than Ghostly Cheese Sticks! These adorable, ghost-shaped goodies aren’t only simple to prepare, but they also make for a deliciously cheesy treat that’s sure to be a hit at any Halloween gathering.
Whether you’re hosting a party or just searching for a themed snack for the kids, these Ghostly Cheese Sticks will add a touch of festive fun to your menu. Perfectly portioned for little hands, these cheese sticks are made with string cheese and creatively shaped to resemble friendly ghosts.
With just a few simple ingredients, you can whip up this eerie appetizer in no time. Kids will love the playful presentation, and parents will appreciate the ease of preparation and the fact that they’re a healthier option compared to sugary treats.
Let’s plunge into the recipe and get ready to create some spooky fun!
Ingredients (Serves 4-6 people):
- 6 string cheese sticks
- 12 candy eyes
- 1 tablespoon of cream cheese or edible adhesive
- 1 sheet of nori (seaweed) or edible markers
- Optional: small pretzel sticks
Cooking Instructions:
- Prepare the Cheese Sticks: Start by unwrapping each string cheese stick. These will form the body of your ghost. Make sure the cheese sticks are straight and unbroken for the best ghostly effect.
- Create the Ghost Faces: Using a small amount of cream cheese or edible adhesive, carefully attach two candy eyes to each cheese stick near the top. This will form the eyes of the ghost.
- Add the Mouth: Cut small pieces of nori to create the mouth for each ghost. Alternatively, you can use edible markers to draw on a mouth. Affix the mouth just below the eyes on each cheese stick.
- Optional Arms: If you’d like to add arms to your ghost, insert a small pretzel stick into each side of the cheese stick, about halfway down. This gives the appearance of arms reaching out.
- Serve and Enjoy: Once all of your Ghostly Cheese Sticks are assembled, arrange them on a serving platter. They’re ready to serve immediately and are best enjoyed fresh for the ideal cheese texture.
Extra Tips:
To make the Ghostly Cheese Sticks even more festive, you can create a spooky serving platter by adding Halloween-themed decorations like mini pumpkins or faux cobwebs.
If you’re making these for a party, consider doubling the recipe to guarantee there are plenty to go around. If you don’t have nori or edible markers, you can also use small pieces of black olives to create the ghost’s mouth.
Keep the cheese sticks refrigerated until just before serving to maintain their firmness. Enjoy your ghostly creations and have a spook-tacular Halloween!
Mummy Hot Dogs
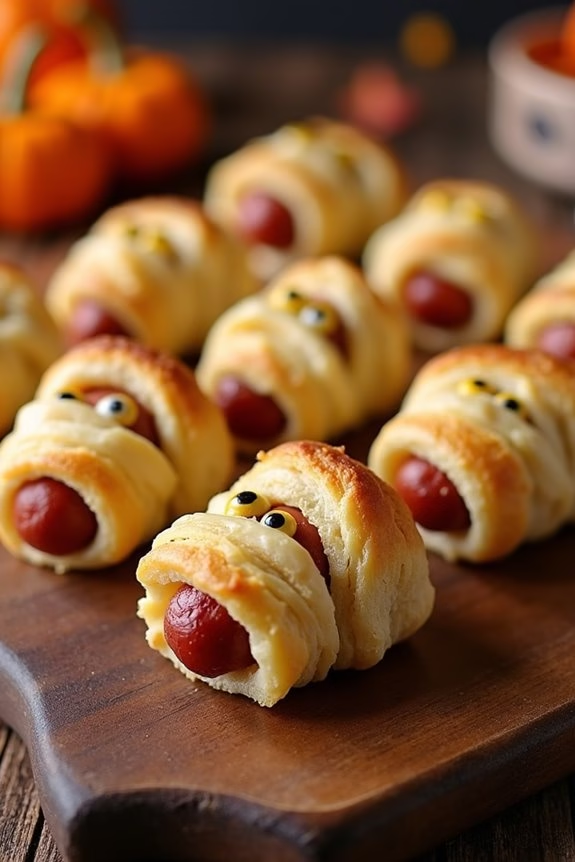
Mummy Hot Dogs are a fun and spooky treat that’s perfect for Halloween parties, especially for kids. These playful appetizers combine the classic taste of hot dogs with a creative twist, making them look like cute little mummies. Wrapped in crescent roll dough to resemble bandages, they aren’t only visually appealing but also delicious and easy to eat. Perfect for a spooky-themed snack that will delight both children and adults alike, Mummy Hot Dogs are assured to be a hit at any Halloween gathering.
Creating Mummy Hot Dogs is a simple process that doesn’t require extensive cooking skills, making it an ideal recipe to involve kids in the kitchen. The preparation is straightforward, and the ingredients are easily accessible, often comprising items you may already have at home. This recipe is for a serving size of 4-6 people, guaranteeing there are enough spooky snacks to go around. Whether you’re hosting a Halloween party or looking for a fun dinner idea, Mummy Hot Dogs are sure to be a crowd-pleaser.
Ingredients:
- 1 can of crescent roll dough
- 8 hot dogs
- 2 tablespoons of mustard or ketchup (for decoration)
- Cooking spray or parchment paper
Cooking Instructions:
- Preheat the Oven: Begin by preheating your oven to 375°F (190°C). This guarantees that the Mummy Hot Dogs will bake evenly and achieve that golden-brown color.
- Prepare the Dough: Unroll the crescent roll dough and press the perforations together to form a single sheet. Using a knife or a pizza cutter, slice the dough into thin strips, approximately 1/4 inch wide.
- Wrap the Hot Dogs: Take each hot dog and start wrapping it with the dough strips, leaving a small gap at the top for the eyes. Wrap the dough randomly to mimic mummy bandages, and be sure to leave a bit of hot dog showing for the face.
- Bake the Mummies: Place the wrapped hot dogs on a baking sheet lined with parchment paper or lightly sprayed with cooking spray. Bake in the preheated oven for 12-15 minutes, or until the dough is golden brown.
- Decorate the Mummies: Once baked, remove the Mummy Hot Dogs from the oven and let them cool slightly. Use a dab of mustard or ketchup to create eyes on the exposed part of the hot dog, giving your mummies a fun and spooky expression.
Extra Tips:
When making Mummy Hot Dogs, you can experiment with different types of sausages or even use vegetarian options to cater to dietary preferences. If you want to make them even more festive, consider adding small pieces of cheese under the dough for a gooey surprise.
You can also use edible eyes, available at most baking supply stores, for a more defined look. Remember to supervise children closely if they’re helping in the kitchen, especially when using the oven or sharp tools. Enjoy your spooky, yummy Mummy Hot Dogs!
Spider Pizza Bites
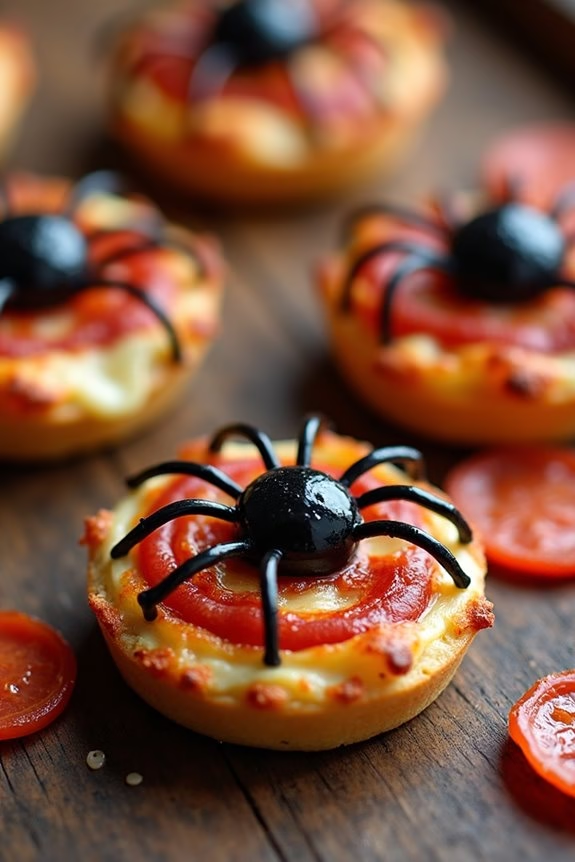
The recipe is designed to serve 4-6 people, making it suitable for small gatherings or family dinners. With simple ingredients, these spider pizza bites can be quickly assembled and baked in no time. You can use store-bought pizza dough and sauce to save time, or make your own if preferred. The highlight, of course, is the decoration, where black olives are used creatively to form spiders on each mini pizza, adding to the Halloween theme.
Ingredients for 4-6 servings:
- 1 package of pizza dough or 6 pre-made mini pizza crusts
- 1 cup pizza sauce
- 2 cups shredded mozzarella cheese
- 1 can (6 oz) black olives
- 1/2 cup mini pepperoni slices
- 1 tablespoon olive oil
- 1 teaspoon dried oregano
Cooking Instructions:
- Prepare the Dough: If using pizza dough, roll it out on a lightly floured surface to about 1/4 inch thickness. Use a round cookie cutter or the rim of a glass to cut out 6 mini pizza bases. If using pre-made mini pizza crusts, skip this step.
- Preheat the Oven: Set your oven to 400°F (200°C) to preheat while you prepare the pizzas.
- Assemble the Pizza Bites: Place the mini pizza bases on a baking sheet lined with parchment paper. Brush each base lightly with olive oil to create a crispy crust.
- Add Sauce and Cheese: Spread 1-2 tablespoons of pizza sauce over each mini crust. Sprinkle a generous amount of shredded mozzarella cheese on top of the sauce.
- Create Spider Toppings: Cut black olives in half lengthwise for the spider bodies. Slice the other half into thin strips to form the legs. Arrange one olive half in the center of each pizza to create the spider body, then place 4 olive strips on each side to form the legs. Scatter mini pepperoni slices around the spiders for added flavor.
- Season and Bake: Sprinkle a pinch of dried oregano over each pizza for extra flavor. Place the baking sheet in the preheated oven and bake for 10-12 minutes, or until the cheese is melted and bubbly, and the crust is golden brown.
- Serve: Remove from the oven and let cool slightly before serving to enthusiastic trick-or-treaters.
Extra Tips:
For a healthier option, you can substitute whole wheat pizza dough or crusts and use low-fat cheese.
Feel free to add additional toppings that your kids love, such as diced bell peppers or mushrooms, to enhance the flavors.
If you’re running short on time, you can assemble the pizzas a few hours in advance and refrigerate them until ready to bake.
Always supervise children in the kitchen, especially when using the oven, and encourage them to get creative with their spider designs for a fun and engaging cooking experience.
Witch’s Broomstick Pretzels

Bring a touch of magical whimsy to your Halloween celebration with Witch’s Broomstick Pretzels, a fun and delightful appetizer that will enchant kids and adults alike. This simple yet creative snack combines the salty crunch of pretzels with the creamy deliciousness of cheese, perfectly embodying the spooky spirit of the season. Not only are they a visual treat, but they also offer a delightful mixture of flavors and textures that are sure to be a hit at any Halloween gathering.
Crafting these broomstick pretzels is as easy as it’s fun, making it an ideal cooking activity for children to join in on. With just a few ingredients and a little imagination, you can create a batch of these charming snacks that serve 4-6 people, perfect for a small party or gathering. Whether you’re serving them as part of a larger Halloween feast or enjoying them as a standalone treat, these Witch’s Broomstick Pretzels are sure to add a magical touch to your festivities.
Ingredients for 4-6 people:
- 12 pretzel sticks
- 12 mozzarella string cheese sticks
- 12 fresh chives or green onion strands
Cooking Instructions:
- Prepare the Cheese: Unwrap each mozzarella string cheese and cut each stick into thirds. These will form the bristles of the broomsticks.
- Create the Broom Bristles: At one end of each cheese piece, use a knife to carefully slice thin strips about halfway up the cheese stick to resemble broom bristles. Be gentle to avoid breaking the cheese.
- Attach the Pretzel: Gently insert a pretzel stick into the uncut end of each cheese piece. Press it in just far enough to secure the pretzel without breaking it or the cheese.
- Secure with Chives: Take a strand of chive or green onion and wrap it around the top of the cheese where it meets the pretzel. Tie it into a small knot or bow to secure the cheese to the pretzel and complete the broomstick look.
- Repeat and Serve: Repeat the process with the remaining ingredients until all broomsticks are assembled. Arrange them on a platter for a magical presentation.
Extra Tips:
For best results, make sure the cheese is cold when you start working with it, as this helps prevent it from becoming too soft and breaking apart. If chives or green onion strands aren’t available, you can use thin strips of fresh basil for a different flavor.
Additionally, consider offering a small bowl of marinara or ranch dressing for dipping, adding an extra layer of flavor to these delightful Halloween snacks.
Frankenstein’s Veggie Cups

Frankenstein’s Veggie Cups are a fun and nutritious Halloween appetizer perfect for kids. These spooky veggie cups aren’t only healthy but also visually appealing, making them an ideal choice for your Halloween party spread. The dish combines a variety of fresh vegetables creatively arranged to resemble the iconic Frankenstein monster, providing a delightful way to encourage children to eat their veggies.
The key to these Frankenstein’s Veggie Cups is in the presentation. Using a green-colored dip as a base, you’ll top each cup with an assortment of vegetables to mimic Frankenstein’s recognizable features. Whether you’re hosting a Halloween bash or simply want to make snack time more festive, these veggie cups are sure to be a hit with kids and adults alike. The recipe provided serves 4-6 people, making it perfect for small gatherings or family treats.
Ingredients (Serves 4-6):
- 2 cups broccoli florets
- 1 green bell pepper
- 1 small cucumber
- 1 cup baby carrots
- 1 cup cherry tomatoes
- 1 cup hummus (preferably spinach or avocado flavored for green color)
- 6 black olives
- 6 clear plastic cups
- 1 tablespoon black food coloring (optional)
- 1 tablespoon edible black gel or icing
Cooking Instructions:
- Prepare the Vegetables: Wash all the vegetables thoroughly. Slice the cucumber into thin rounds, chop the green bell pepper into strips, and halve the cherry tomatoes. Keep the broccoli florets and baby carrots whole.
- Prepare the Dip: Add a few drops of black food coloring to the green hummus to achieve a slightly darker, spooky hue if desired. Mix well until the color is evenly distributed.
- Assemble the Cups: Spoon a generous amount of the green hummus into the bottom of each clear plastic cup. This will serve as Frankenstein’s “face.”
- Create Frankenstein’s Hair: Arrange broccoli florets across the top of each cup to mimic Frankenstein’s hair. The broccoli should be placed with the stems down, so the florets resemble the iconic flat-top hairstyle.
- Add Facial Features: Use sliced cucumber rounds for eyes, placing two in each cup. Halve black olives and place one half over each cucumber slice to complete the eyes. Use baby carrots to represent the “bolt” on each side of the cup, by placing them at the edges.
- Add Final Touches: Use a black edible gel or icing to draw a mouth below the eyes on the hummus surface. If desired, use additional black gel to add stitches or scars to the “face” for a more authentic Frankenstein look.
Extra Tips: For an extra spooky effect, consider serving these veggie cups with a dim light ambiance to highlight the eerie green hue of the hummus. If you have picky eaters, involve them in the decoration process as this can make them more inclined to try the veggies. You can also customize the vegetables based on your children’s preferences or dietary restrictions, ensuring everyone can enjoy these creative and healthy treats.
Jack-o’-Lantern Stuffed Peppers
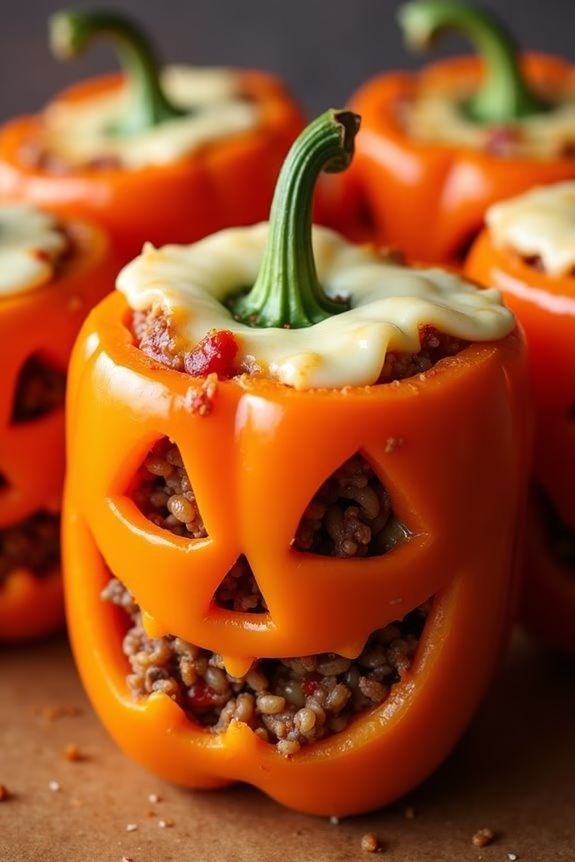
Transform your Halloween festivities with these delightful Jack-o’-Lantern Stuffed Peppers. Perfectly suited for kids, these charming appetizers will add a whimsical touch to your spooky celebrations. Not only do they look festive, but they also offer a nutritious and delicious option that can be filled with a variety of ingredients to please even the pickiest eaters.
These stuffed peppers are carved to resemble mini pumpkins, making them an exciting addition to any Halloween party. The soft, savory stuffing complements the sweetness of the bell peppers, creating a balanced flavor profile that’s bound to be a hit with children and adults alike. This recipe is designed to serve 4-6 people and is perfect for a family gathering or small party.
By involving your kids in the preparation process, you can make cooking this dish a fun and engaging activity that everyone can enjoy.
Ingredients (Serves 4-6):
- 6 medium orange bell peppers
- 1 pound ground turkey or beef
- 1 cup cooked rice (white or brown)
- 1 small onion, finely chopped
- 2 cloves garlic, minced
- 1 cup shredded mozzarella cheese
- 1 can (15 ounces) diced tomatoes, drained
- 1 teaspoon Italian seasoning
- Salt and pepper to taste
- 2 tablespoons olive oil
Cooking Instructions:
- Preheat Oven: Preheat your oven to 375°F (190°C) to guarantee it’s ready for baking the stuffed peppers.
- Prepare Peppers: Wash the peppers thoroughly. Cut the tops off and remove the seeds and membranes. Using a small paring knife, carefully carve jack-o’-lantern faces into one side of each pepper. Be cautious not to cut too large holes to prevent the filling from spilling out.
- Cook Filling: In a large skillet, heat the olive oil over medium heat. Add the chopped onion and minced garlic, sautéing until the onion is translucent. Add the ground turkey or beef, cooking until browned and fully cooked. Drain any excess fat.
- Mix the Stuffing: In a large bowl, combine the cooked meat mixture with the cooked rice, drained diced tomatoes, Italian seasoning, salt, and pepper. Mix until well combined. Stir in half of the shredded mozzarella cheese.
- Stuff the Peppers: Fill each prepared pepper with the meat and rice mixture, pressing down gently to make sure they’re well-packed. Sprinkle the remaining mozzarella cheese over the top of each stuffed pepper.
- Bake: Place the stuffed peppers upright in a baking dish. If needed, trim the bottoms slightly to make them stand upright. Cover with aluminum foil and bake in the preheated oven for 30 minutes. Remove the foil and bake for an additional 10-15 minutes, or until the peppers are tender and the cheese is bubbly and golden.
- Serve: Allow the peppers to cool slightly before serving to make sure they hold their shape and are safe to eat.
Extra Tips:
When carving the jack-o’-lantern faces, use a small, sharp knife for precision and take your time to create fun designs. If you’re short on time, you can also prepare the stuffing ahead of time and refrigerate it until you’re ready to stuff the peppers.
For added flavor, consider adding a splash of Worcestershire sauce or a pinch of red pepper flakes to the stuffing mixture. If you want to add more vegetables, finely chopped mushrooms or spinach can be mixed into the filling as well. Enjoy your festive Halloween creation!
Eyeball Deviled Eggs
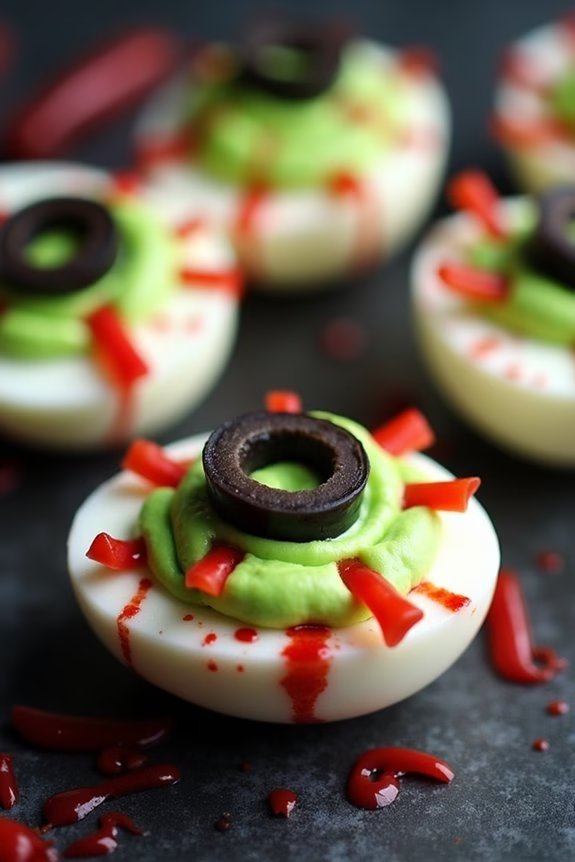
Halloween is the perfect time to get creative in the kitchen, especially when it comes to making fun and spooky appetizers for kids. One of the most popular options is Eyeball Deviled Eggs. These creepy yet delicious treats are sure to be a hit at any Halloween party. Not only do they look impressively eerie, but they also pack all the classic flavors of traditional deviled eggs, making them a delightful snack for the little goblins and ghosts in attendance.
The best part about Eyeball Deviled Eggs is that they’re easy to make and require only a few ingredients. The key is to give the eggs a spooky makeover by transforming the yolk mixture into a bright, creepy color and adding some edible decorations to mimic bloodshot eyes. This recipe is designed to serve 4-6 people, making it perfect for a small gathering or party.
Ingredients (for 4-6 servings):
- 6 large eggs
- 3 tablespoons mayonnaise
- 1 teaspoon mustard
- Salt and pepper to taste
- Red food coloring
- Green food coloring
- 6 black olives
- 12 small pieces of red bell pepper
Cooking Instructions:
- Boil the Eggs: Place the eggs in a medium saucepan and cover them with water. Bring the water to a boil over medium-high heat. Once boiling, remove the saucepan from heat and let the eggs sit for 10 minutes. Afterward, transfer the eggs to a bowl of ice water to cool.
- Peel and Halve the Eggs: Once the eggs are cool enough to handle, gently peel them. Slice each egg in half lengthwise, and carefully remove the yolks, placing them in a separate bowl.
- Prepare the Filling: Mash the egg yolks with a fork until they’re smooth. Add mayonnaise, mustard, salt, and pepper to the yolks and mix until well combined. Add a few drops of green food coloring to achieve a desired spooky shade, and mix thoroughly.
- Fill the Egg Whites: Spoon or pipe the yolk mixture back into the egg white halves, creating a mound that resembles an eyeball.
- Create the Eyeball: Slice the black olives into thin rings and place one ring on top of each yolk mound to mimic the pupil. Cut small strips of red bell pepper and arrange them around the yolk to create the appearance of bloodshot veins.
- Add Finishing Touches: Using a small food-safe brush, add a few drops of red food coloring around the bell pepper veins for an extra spooky effect. Refrigerate the eggs until ready to serve.
Extra Tips:
When boiling the eggs, make sure not to overcook them, as this can cause the yolks to develop a greyish color. If you don’t have a piping bag for the yolk mixture, a plastic sandwich bag with the corner snipped off works just as well.
For a fun variation, you can use different colored food dyes for the yolk mixture to create a variety of eerie eyeballs. Ultimately, these Eyeball Deviled Eggs can be made a few hours in advance, saving you some time on the day of your Halloween gathering.
Bat-shaped Quesadillas

Transform your Halloween gathering into a spooktacular event with Bat-shaped Quesadillas! These festive treats aren’t only fun to make but also deliciously cheesy, making them a hit with both kids and adults. The quesadillas are crafted into adorable bat shapes using simple ingredients and a bit of creativity. Perfect for a Halloween party or a fun family meal, these bat-shaped goodies will surely add a playful touch to your festive table.
The great thing about Bat-shaped Quesadillas is their versatility. You can customize the fillings to suit your family’s taste preferences, whether you prefer a classic cheese filling or want to add some protein like chicken or beans. These quesadillas are easy to make and require minimal preparation, so you can spend more time enjoying the Halloween festivities.
Here’s a quick and easy recipe to make approximately 4-6 servings of Bat-shaped Quesadillas.
Ingredients for Bat-shaped Quesadillas (Serves 4-6):
- 8 large flour tortillas
- 2 cups shredded cheese (cheddar, Monterey Jack, or a blend)
- 1 cup cooked chicken, shredded (optional)
- 1/2 cup black beans, drained and rinsed (optional)
- 1/2 cup salsa or pico de gallo
- 2 tablespoons butter or cooking oil
- Bat-shaped cookie cutter
Instructions:
- Prepare Your Workspace: Begin by setting up a clean workspace. Lay out your tortillas, shredded cheese, and any additional fillings you plan to use, such as chicken or black beans.
- Cut the Bat Shapes: Use a bat-shaped cookie cutter to cut out bat shapes from the flour tortillas. You should be able to get 2 bat shapes from each tortilla, depending on the size of your cutter.
- Assemble the Quesadillas: On one bat-shaped tortilla, sprinkle a layer of shredded cheese, followed by a layer of your desired fillings (chicken, black beans, salsa). Top with additional cheese and place another bat-shaped tortilla on top to form a sandwich.
- Cook the Quesadillas: Heat a skillet over medium heat and add a small amount of butter or cooking oil. Once the skillet is hot, place the assembled bat-shaped quesadilla in the skillet. Cook for about 2-3 minutes on each side, or until the tortilla is golden brown and the cheese is melted. Repeat with the remaining quesadillas.
- Serve and Enjoy: Let the quesadillas cool slightly before serving. Arrange them on a platter and serve with extra salsa or sour cream on the side for dipping.
Extra Tips:
For an extra spooky touch, consider using a black food-safe marker or edible ink pen to draw little faces on your bat quesadillas once they’ve cooled. You can also experiment with different fillings to cater to various dietary preferences, such as adding vegetables or using gluten-free tortillas.
If you’re making a large batch, keep cooked quesadillas warm in an oven set at a low temperature until ready to serve. Remember, creativity is key, so have fun with your bat-shaped creations!
Creepy Crawly Nacho Dip
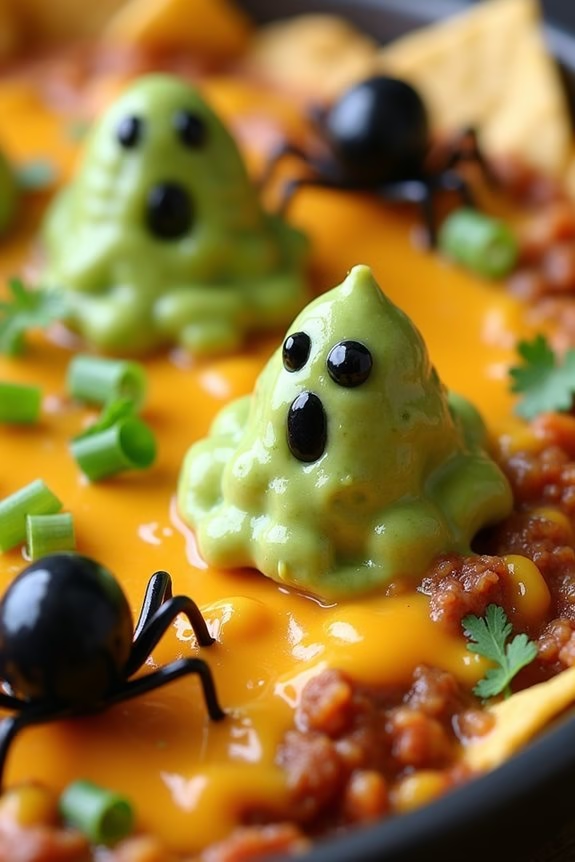
Halloween is a perfect time to get creative with your food, especially when it comes to appetizers for kids. The Creepy Crawly Nacho Dip is a fun and spooky treat that’s sure to be a hit at any Halloween gathering. This dish combines the classic flavors of nachos with a playful twist, incorporating “creepy crawly” edible decorations that will delight and entertain young guests.
It’s easy to prepare, visually striking, and delicious, making it an ideal choice for the holiday. In this recipe, you’ll create a flavorful nacho dip layered with seasoned ground beef, creamy cheese, and fresh vegetables, all while adding a touch of Halloween flair with olive spiders and guacamole ghosts.
Designed to serve 4-6 people, this appetizer will be the centerpiece of your Halloween spread, providing both nourishment and entertainment. With easy-to-find ingredients and simple preparation, you’ll be able to whip up this dish in no time, leaving you more room to enjoy the festivities.
Ingredients for 4-6 people:
- 1 pound ground beef
- 1 packet taco seasoning mix
- 1 cup water
- 2 cups shredded cheddar cheese
- 1 can (15 oz) refried beans
- 1 cup salsa
- 1/2 cup sour cream
- 1/2 cup guacamole
- 1 small can sliced black olives
- 1 bag tortilla chips
- 1/4 cup chopped green onions
- 1/4 cup chopped fresh cilantro
Cooking Instructions:
- Prepare the Ground Beef: In a large skillet over medium heat, cook the ground beef until it’s browned and fully cooked. Drain any excess fat from the skillet.
- Add Taco Seasoning: Stir in the taco seasoning mix and 1 cup of water. Continue to cook for about 5 minutes, allowing the mixture to thicken slightly. Remove from heat.
- Create the Base Layer: In a large serving dish or shallow baking dish, spread the refried beans evenly across the bottom.
- Layer the Ingredients: Pour the beef mixture over the refried beans, spreading it out evenly. Next, sprinkle the shredded cheddar cheese over the top, followed by a layer of salsa.
- Add the Final Touches: Dollop sour cream and guacamole over the top, creating small ghost shapes with the guacamole. Use sliced black olives to create “spiders” by placing a whole olive for the body and slicing another olive into thin pieces for the legs.
- Garnish: Sprinkle chopped green onions and cilantro over the top for added color and flavor.
- Serve with Chips: Arrange tortilla chips around the edge of the dish or serve them on the side for dipping.
Extra Tips:
For the best Creepy Crawly Nacho Dip, make sure your beef is well-seasoned with the taco mix to enhance the flavor of the dish. When creating the olive spiders, you can use a toothpick to arrange the legs more precisely, ensuring they look realistic.
Guacamole can oxidize quickly and turn brown, so prepare and add it just before serving to maintain its vibrant green color. If you want to add more spookiness, consider using food coloring to tint the sour cream orange or purple, adding another layer of Halloween fun to your dish.
Goblin Guacamole Cups

Goblin Guacamole Cups are a fun and delicious way to add some spooky flair to your Halloween party spread, especially when catering to younger guests. These delightful appetizers aren’t only visually enchanting with their goblin-green hue, but they’re also packed with flavor and nutrition.
Perfect for little hands, these cups combine the creamy texture of guacamole with the crispy crunch of tortilla chips, all cleverly presented to resemble a goblin’s mischievous face.
To make your Goblin Guacamole Cups extra special, you’ll be crafting each cup with care, ensuring that the presentation is as appealing as the taste. This recipe serves 4-6 people, making it a great choice for small gatherings or as part of a larger Halloween-themed menu.
Easy to prepare and sure to be a hit with kids and adults alike, these Goblin Guacamole Cups will be the talk of your Halloween celebration.
Ingredients:
- 3 ripe avocados
- 1 lime, juiced
- 1 small red onion, finely chopped
- 1 small tomato, diced
- 1 clove garlic, minced
- Salt and pepper to taste
- 1/4 cup fresh cilantro, chopped
- 6 mini bell peppers (green or red)
- 1 cup tortilla chips
- Black olives, sliced (for decoration)
- Cherry tomatoes, halved (for decoration)
Instructions:
- Prepare the Guacamole:
- Cut the avocados in half, remove the pits, and scoop the flesh into a mixing bowl.
- Mash the avocado with a fork until you achieve a smooth, creamy consistency.
- Add the lime juice, chopped red onion, diced tomato, minced garlic, and chopped cilantro to the avocado. Mix everything well to combine.
- Season the guacamole with salt and pepper to taste. Set aside.
- Prepare the Bell Pepper Cups:
- Slice the tops off the mini bell peppers and remove any seeds and membranes inside.
- Carefully cut small triangles or circles out of the sides of the peppers to create “eyes” and “mouths” for the goblin faces.
- Assemble the Goblin Guacamole Cups:
- Fill each bell pepper cup with a generous serving of guacamole.
- Place each filled cup on a plate surrounded by tortilla chips.
- Use black olive slices to create “eyes” and halved cherry tomatoes to fashion “noses” or “ears” on each goblin face.
- Serve and Enjoy:
- Arrange the completed Goblin Guacamole Cups on a festive serving platter and watch as your little ghouls and goblins dig in with delight!
Extra Tips:
For the best flavor, allow the guacamole to sit for at least 15 minutes before serving to let the flavors meld together.
If you want to make these in advance, keep the guacamole refrigerated and covered with plastic wrap directly on the surface to prevent browning.
If you have extra time, consider carving more intricate designs on the bell peppers to enhance the goblin effect or offering additional toppings like shredded cheese or diced jalapeños for older kids or adults who enjoy a little spice.
Bloody Berry Smoothie Shooters
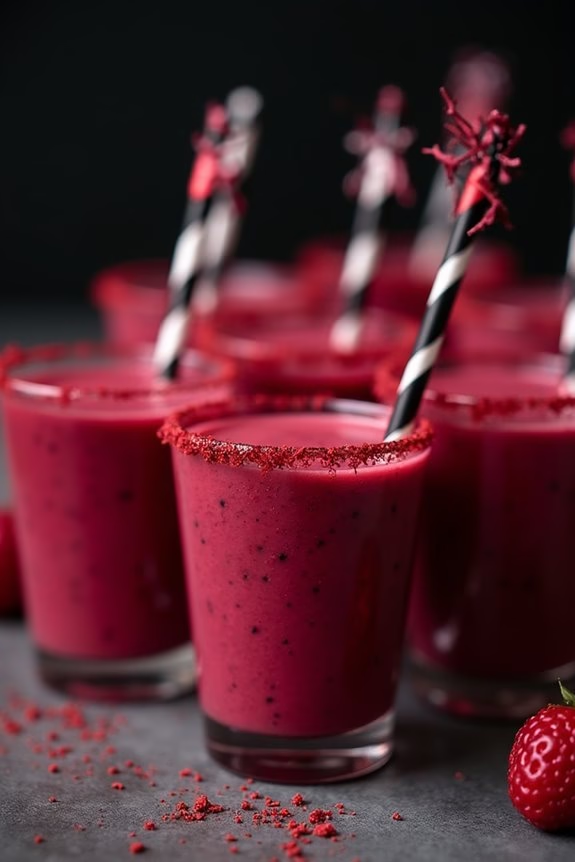
Creating a spooky and fun Halloween appetizer for kids can be both delightful and nutritious with these Bloody Berry Smoothie Shooters. This recipe is perfect for a Halloween party or a cozy family gathering, giving a spooky twist on a classic fruit smoothie. The deep red color, reminiscent of “blood,” is achieved using delicious berries, which not only look festive but are packed with vitamins and antioxidants.
These smoothie shooters are sure to be a hit with children, offering a sweet yet healthy treat that fits perfectly with the Halloween theme. The Bloody Berry Smoothie Shooters are easy to prepare and can be made ahead of time, allowing you to focus on other party preparations. The use of fresh or frozen berries makes this recipe versatile and convenient, and the addition of yogurt and honey adds creaminess and natural sweetness.
Serve these shooters in small shot glasses or mini cups to keep them fun and kid-friendly. Not only will your little monsters love the taste, but the presentation will add a frightfully festive touch to your Halloween spread.
Ingredients (Serves 4-6):
- 2 cups mixed berries (fresh or frozen)
- 1 cup vanilla yogurt
- 1/2 cup apple juice
- 1 tablespoon honey
- 1 teaspoon lemon juice
- Ice cubes (optional)
- Decorative Halloween-themed picks or straws
Instructions:
- Prepare the Berries: If you’re using fresh berries, wash them thoroughly under cold water. If you’re using frozen berries, let them thaw slightly so they blend easily.
- Blend the Ingredients: In a blender, combine the mixed berries, vanilla yogurt, apple juice, honey, and lemon juice. Blend on high until the mixture is smooth and creamy. If you prefer a thicker smoothie, add a few ice cubes and blend again until desired consistency is reached.
- Taste and Adjust: Taste the smoothie and adjust the sweetness if needed by adding more honey. If the smoothie is too thick, add a little more apple juice and blend again.
- Serve: Pour the smoothie into small shot glasses or mini cups, filling them nearly to the top. For an extra spooky effect, garnish with Halloween-themed picks or straws.
- Chill (Optional): If you have prepared the shooters in advance, store them in the refrigerator until you’re ready to serve. This will keep them fresh and chilled.
Extra Tips:
For a more dramatic presentation, you can rim the glasses with red sugar or edible glitter before pouring in the smoothie. Simply rub the edge of each glass with a little lemon juice, then dip the rim into a small plate of red sugar. This adds an exciting visual element and a touch of sweetness.
Additionally, feel free to experiment with different types of berries like strawberries, raspberries, or blackberries to achieve varying shades of “bloody” red. If you have children with dietary restrictions, you can substitute the yogurt with a dairy-free option and adjust the honey for a vegan-friendly version.