

As Halloween is just around the corner, I can’t wait to share some fun and spooky food ideas that are super easy to whip up. Picture serving Spider Deviled Eggs or a Ghostly Caprese Salad—festive treats that are as simple as they are impressive. Wondering what else you can make for a hauntingly good time? There’s plenty more to discover, with each dish adding a touch of eerie elegance to your celebration. Let’s get creative and make this Halloween unforgettable with these delightful recipes!
Spooky Spider Deviled Eggs
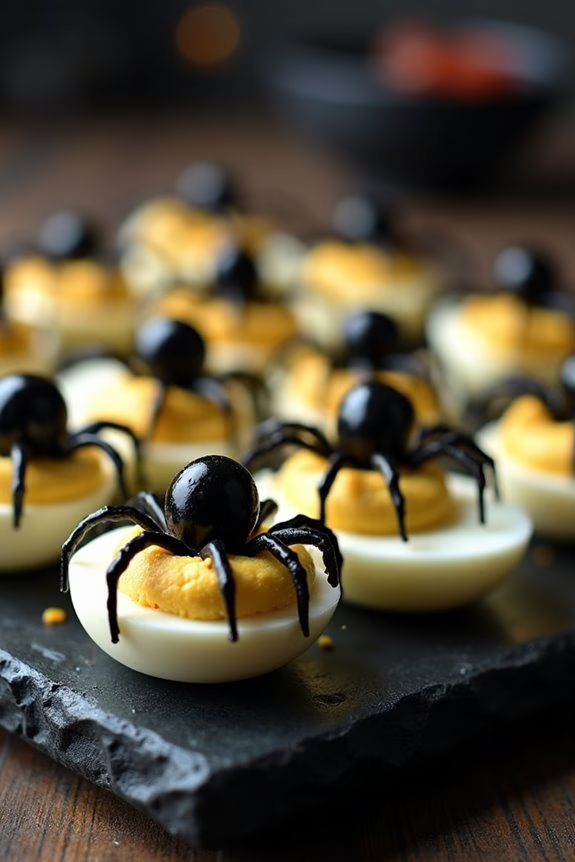
Get ready to add a creepy twist to your Halloween party with Spooky Spider Deviled Eggs. This ghoulish dish is a perfect blend of classic deviled eggs and eerie decorations that will surely captivate your adult guests. The rich, creamy filling combined with the savory black olive spiders makes this appetizer not only delicious but also a conversation starter.
Perfect for an adult Halloween gathering, these devilish treats are as fun to make as they’re to eat. The presentation of these Spooky Spider Deviled Eggs is both charming and chilling, guaranteeing you maintain the Halloween spirit throughout your event. The key to this recipe is the creative use of black olives to create haunting spider shapes that rest atop the deviled eggs.
Whether you’re hosting a costume party or a haunted dinner gathering, these eerie eggs will be a hit. Now, let’s plunge into the ingredients and instructions for making this creepy culinary creation for 4-6 people.
Ingredients:
- 6 large eggs
- 1/4 cup mayonnaise
- 1 teaspoon Dijon mustard
- 1 teaspoon white vinegar
- Salt and pepper to taste
- 1 can (6 oz) black olives
Instructions:
- Boil the Eggs: Place the eggs in a pot and cover them with water. Bring the water to a rolling boil over medium-high heat. Once boiling, cover the pot, remove it from heat, and let the eggs sit for 10-12 minutes.
- Cool and Peel: After the eggs have cooked, transfer them to a bowl of ice water to cool for about 5 minutes. Once cooled, gently peel the shells off the eggs.
- Prepare the Filling: Cut each egg in half lengthwise and carefully scoop out the yolks into a mixing bowl. Set the egg whites aside on a serving platter.
- Mix the Filling: Add mayonnaise, Dijon mustard, white vinegar, salt, and pepper to the egg yolks. Mash the mixture with a fork until smooth and creamy.
- Fill the Egg Whites: Using a spoon or a piping bag, fill the egg white halves with the creamy yolk mixture.
- Create the Olive Spiders: Cut the black olives in half lengthwise. Use one half for the spider body and slice the other half into thin strips to create 8 legs for each spider.
- Assemble the Spiders: Place one olive half in the center of each filled egg as the spider’s body. Arrange the sliced olive pieces around the body to form the legs.
- Serve: Arrange the deviled eggs on a platter and serve them chilled.
Extra Tips:
When making Spooky Spider Deviled Eggs, be certain the eggs are thoroughly cooled in ice water before peeling to prevent the whites from tearing.
For a spicier version, consider adding a dash of hot sauce or a pinch of paprika to the yolk mixture. If you don’t have a piping bag, a plastic sandwich bag with a small corner cut off works just as well for filling the eggs.
Finally, try to use olives of uniform size to maintain a consistent look for your spiders.
Witch’s Brew Cocktails

Halloween isn’t just for kids, and the adults deserve some spooky fun too! One way to add a touch of magic to your Halloween party is with a bewitching Witch’s Brew Cocktail. This vibrant drink is both eerie and enchanting, perfect for serving a crowd of 4-6 people. The deep green color, complemented by bubbling dry ice, gives it a mysterious and mesmerizing look. Not only does it look spectacular, but it also tastes delicious with a blend of fruity and revitalizing flavors.
A Witch’s Brew Cocktail is an excellent way to showcase your mixology skills with a simple but effective recipe. The key to this drink is the balance of flavors that include tart lime, sweet pineapple, and a hint of sparkling soda. When topped with a frosty cloud of dry ice, it creates an impressive fog effect that will leave your guests spellbound. Let’s plunge into how you can conjure up this magical potion for your Halloween festivities.
Ingredients (Serves 4-6):
- 1 cup of vodka
- 1/2 cup of blue curaçao
- 1/2 cup of Midori (melon liqueur)
- 2 cups of pineapple juice
- 1 cup of fresh lime juice
- 2 cups of lemon-lime soda
- Lime slices and maraschino cherries for garnish
- Ice cubes
- Dry ice (optional, for special effects)
Instructions:
- Prepare the Base Mix: In a large pitcher, combine the vodka, blue curaçao, and Midori. Stir them together to create a witchy green base. This forms the flavorful backbone of the cocktail.
- Add the Fruity Elements: Pour in the pineapple juice and lime juice into the pitcher. Stir well to verify the flavors meld together. The pineapple juice adds sweetness, while the lime juice brings a revitalizing tartness.
- Chill the Mixture: Add ice cubes to the pitcher to cool the mixture. This step is essential for a revitalizing cocktail experience.
- Incorporate the Fizz: Just before serving, add the lemon-lime soda to the pitcher. Stir gently to mix in the fizz without losing the carbonation. The soda gives the cocktail a delightful effervescence.
- Serve with a Spooky Touch: Pour the Witch’s Brew into individual glasses, leaving some space at the top. Garnish each glass with a lime slice and a maraschino cherry for a festive look.
- Optional Dry Ice Effect: If using dry ice, carefully add a small piece to each glass right before serving. This will create a foggy effect, perfect for a Halloween celebration. Verify that the dry ice is handled safely and doesn’t come into direct contact with the drink.
Extra Tips:
When using dry ice, remember to handle it with care, wearing gloves to avoid skin burns. Only use food-grade dry ice and verify it’s completely dissolved before drinking. Keep the dry ice in a well-ventilated area to prevent the buildup of carbon dioxide.
If you prefer a non-alcoholic version, simply replace the vodka, blue curaçao, and Midori with equal parts of lemon-lime soda and a few drops of green food coloring. Enjoy this enchanting cocktail responsibly and create a memorable Halloween experience!
Ghostly Caprese Salad
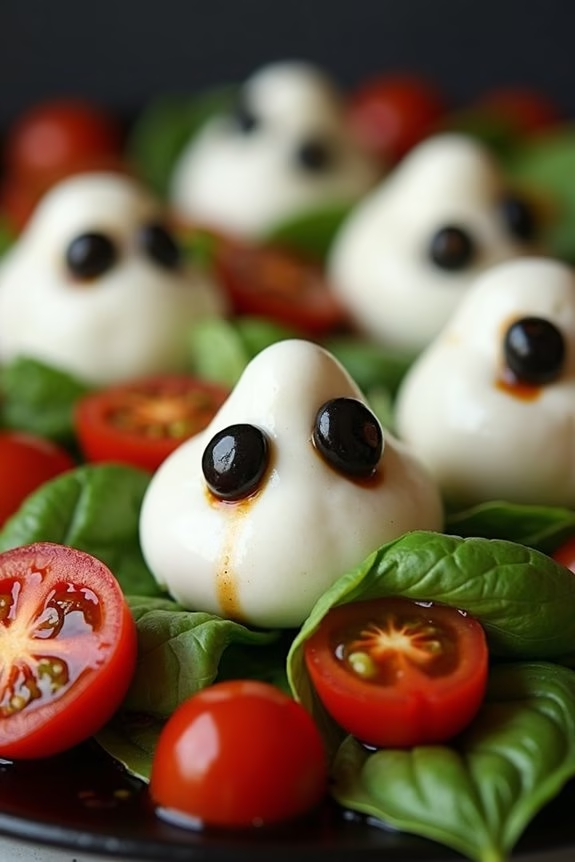
For a ghoulishly delightful appetizer that’s perfect for your Halloween gathering, the Ghostly Caprese Salad is both a visual treat and a delicious start to your spooky soirée. This dish takes the classic caprese salad and gives it a haunting twist, featuring mozzarella balls transformed into ghostly figures, perched on a lush bed of fresh basil and ripe tomatoes. The combination of flavors is a timeless one, with the mozzarella providing a creamy contrast to the sweet acidity of the tomatoes and the fragrant freshness of the basil.
The ghostly elements of the dish not only add an eerie elegance but also make for a fun and festive presentation that will surely captivate your guests. With just a few simple ingredients, you can create a show-stopping salad that’s perfect for an adult Halloween party. The key is in the details: using black olives to give the mozzarella balls their ghostly faces, and drizzling with a balsamic reduction to enhance the overall flavor profile.
Ingredients (Serves 4-6):
- 12 small mozzarella balls (bocconcini)
- 12 ripe cherry tomatoes
- Fresh basil leaves
- 1/4 cup balsamic reduction
- 2 tablespoons extra virgin olive oil
- Salt and pepper to taste
- 6 black olives (pitted and sliced into small pieces)
Instructions:
- Prepare the Ghosts: Start by patting dry the mozzarella balls with a paper towel to remove any excess moisture. This will help the olive pieces stick better to the cheese.
- Create the Ghost Faces: Using a small, sharp knife, make tiny incisions in the mozzarella balls where you want the eyes and mouth to be. Insert small pieces of black olive into these incisions to form the ghostly faces. Set aside.
- Prepare the Tomatoes and Basil: Wash and halve the cherry tomatoes. Rinse the basil leaves and pat them dry with a paper towel.
- Assemble the Salad: On a large platter, arrange the basil leaves to create a leafy bed. Place the halved cherry tomatoes on top of the basil leaves, cut side up.
- Place the Ghosts: Carefully place the mozzarella ghosts on top of the tomatoes, ensuring the faces are visible. This will give the appearance of ghosts floating above the salad.
- Dress the Salad: Drizzle the extra virgin olive oil over the entire salad, followed by the balsamic reduction. Season with salt and pepper to taste.
- Serve: Serve immediately, allowing your guests to admire the spooky presentation before digging in.
Extra Tips:
For an added touch of Halloween spirit, consider using a small amount of edible black food coloring on the mozzarella to enhance the ghostly effect. If you can’t find bocconcini, you can use sliced fresh mozzarella and use cookie cutters to shape them into ghostly figures.
To make the balsamic reduction yourself, simply simmer balsamic vinegar in a saucepan until it thickens and coats the back of a spoon. This dish is best when served fresh, so prepare it just before your guests arrive to keep the basil leaves crisp and vibrant.
Mummy Brie Bites
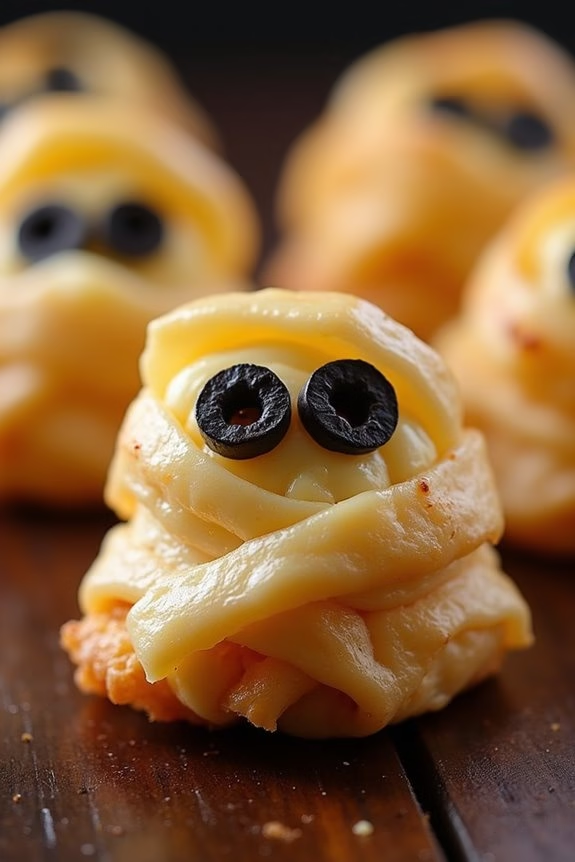
Mummy Brie Bites are a delightful and spooky treat that will definitely impress your Halloween party guests. These bite-sized morsels aren’t only delicious but also visually striking, making them a perfect addition to any adult Halloween gathering. The dish features creamy brie cheese wrapped in puff pastry strips, which are then baked to a golden perfection. The pastry is cut and arranged to resemble mummy bandages, complete with olive slice eyes that add an eerie touch.
This recipe is simple to follow and requires only a handful of ingredients, making it an ideal choice for those who want to prepare something unique without spending hours in the kitchen. The combination of the buttery pastry and the rich, creamy brie creates a flavor profile that’s both indulgent and satisfying. These Mummy Brie Bites are sure to be a hit, providing a fun and sophisticated snack option for adults who want to celebrate Halloween in style.
Ingredients for 4-6 People:
- 1 sheet of puff pastry, thawed
- 1 wheel of brie cheese (about 8 ounces)
- 1 egg, beaten
- 2 tablespoons of flour (for dusting)
- 8-10 black olive slices
Cooking Instructions:
- Prepare the Puff Pastry: Preheat your oven to 375°F (190°C). Lightly dust a clean surface with flour and roll out the puff pastry to smooth it. Using a sharp knife or pizza cutter, slice the pastry into thin strips (about ¼ inch wide).
- Wrap the Brie: Cut the brie wheel into small wedges, about 1 inch each. Wrap each brie wedge with the puff pastry strips, leaving small gaps to mimic mummy bandages. Confirm the brie is completely covered, except for a small space where you’ll place the olive eyes.
- Add the Eyes: Place two olive slices on each wrapped brie piece to create the appearance of eyes.
- Egg Wash and Bake: Place the wrapped brie bites on a baking sheet lined with parchment paper. Brush each bite with the beaten egg to give the pastry a nice golden color when baked. Bake in the preheated oven for 15-20 minutes or until the pastry is puffed and golden brown.
- Serve: Remove from the oven and let cool for a few minutes before serving. These bites are best served warm, allowing the brie to be gooey and delicious.
Extra Tips: When working with puff pastry, confirm it’s cold but pliable; this makes it easier to handle and shape. If the pastry warms up too much, put it back in the refrigerator for a few minutes to firm it up.
You can prepare the Mummy Brie Bites ahead of time and store them in the refrigerator before baking. This allows you to simply pop them in the oven when your guests arrive, providing a freshly baked treat without the last-minute rush.
Bloody Mary Shrimp Shots

Get ready to vamp up your Halloween festivities with these ghoulishly delightful Bloody Mary Shrimp Shots. This adult-friendly appetizer brings the classic cocktail to life with a seafood twist, perfect for a spooky soirée. The spicy, tangy essence of a Bloody Mary is paired with succulent, chilled shrimp to create a bewitching starter that’s both eye-catching and palate-pleasing.
Whether you’re hosting a Halloween bash or just want to enjoy a frightfully fun snack, these Bloody Mary Shrimp Shots will surely be a hit.
Elevate your Halloween spread with this creative dish that doubles as both a cocktail and an appetizer. Served in shot glasses, each portion is beautifully presented, combining the rich red hue of tomato juice with the elegant curve of a shrimp garnish. The combination of flavors is perfectly balanced, offering the right amount of heat and citrus, complemented by the briny sweetness of the shrimp.
Prepare to impress your guests with this unique, fun-to-eat treat that embodies the spirit of Halloween.
Ingredients for 4-6 servings:
- 1 pound large shrimp, peeled and deveined
- 1 cup vodka
- 2 cups tomato juice
- 2 tablespoons horseradish
- 1 tablespoon Worcestershire sauce
- 1 tablespoon hot sauce
- Juice of 1 lemon
- Salt and pepper, to taste
- Celery salt, for rimming the glasses
- 1 lemon, sliced into wedges
- Fresh dill, for garnish
Cooking Instructions:
- Prepare the Shrimp: Fill a pot with water and bring it to a boil. Add the shrimp and cook for 2-3 minutes, or until they turn pink and opaque. Drain and immediately transfer the shrimp to an ice bath to stop the cooking process. Once cooled, pat them dry with paper towels.
- Mix the Bloody Mary Base: In a large pitcher, combine the vodka, tomato juice, horseradish, Worcestershire sauce, hot sauce, and lemon juice. Stir well until all ingredients are fully incorporated. Season with salt and pepper to taste.
- Rim the Glasses: Pour some celery salt onto a small plate. Moisten the rim of each shot glass with a lemon wedge, then dip the rim into the celery salt, coating it evenly.
- Assemble the Shots: Pour the Bloody Mary mixture into each prepared shot glass, filling about three-quarters full. Place one shrimp on the rim of each glass, allowing it to hang elegantly over the edge.
- Garnish and Serve: Add a sprig of fresh dill to each shot for an aromatic touch. Serve immediately with lemon wedges on the side for an extra citrusy kick.
Extra Tips:
For an added layer of flavor, consider marinating the shrimp in a bit of the Bloody Mary mixture for about 30 minutes before cooking. This will infuse the shrimp with the cocktail’s spicy-tangy essence.
Adjust the level of heat by altering the amount of hot sauce to your preference—it’s your call if you want to make it a terrifyingly spicy treat or a milder affair.
Finally, keep your Bloody Mary mixture chilled until just before serving to guarantee the freshest taste and presentation.
Ghastly Guacamole and Chips
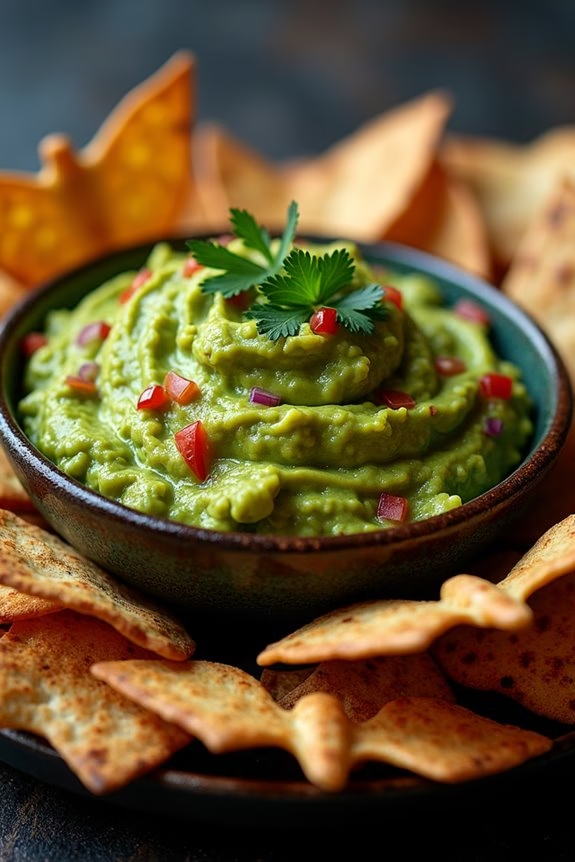
As Halloween approaches, it’s time to bring a touch of spookiness to your appetizers with Ghastly Guacamole and Chips. This dish is perfect for adult gatherings, offering a deliciously creepy twist on a classic favorite. The ghoulish green hue of the guacamole, paired with the crunch of homemade bat-shaped tortilla chips, will leave your guests both impressed and satiated. The freshness of the avocados combined with zesty lime and a hint of heat from the jalapeños creates a flavor profile that’s both revitalizing and tantalizing.
Presentation is key when it comes to this dish, as the guacamole isn’t only a treat for the taste buds but also a visual centerpiece. By carving your tortilla chips into bat shapes, you add an extra layer of Halloween flair that’s sure to spark conversation. Whether you’re hosting a costume party or just a casual get-together, this recipe is a must-have addition to your spooky spread. Preparing it’s simple, and the result is a hauntingly good appetizer that will leave your guests howling for more.
Ingredients for 4-6 People:
- 4 ripe avocados
- 1 small red onion, finely chopped
- 2 roma tomatoes, diced
- 2 jalapeños, finely chopped
- 1/4 cup fresh cilantro, chopped
- 2 limes, juiced
- Salt and pepper to taste
- 6 large flour tortillas
- 1 tablespoon olive oil
- 1 teaspoon smoked paprika
- Black food coloring (optional)
Cooking Instructions:
- Prepare the Tortilla Chips:
- Preheat the oven to 350°F (175°C). Using a bat-shaped cookie cutter, cut the tortillas into bat shapes.
- Place the bat-shaped tortilla pieces on a baking sheet lined with parchment paper.
- In a small bowl, mix the olive oil with smoked paprika, and if desired, a few drops of black food coloring for a spooky tint.
- Brush the tortilla bats lightly with the olive oil mixture.
- Bake in the preheated oven for 10-12 minutes or until they’re crispy and golden brown. Remove from oven and let cool.
- Make the Guacamole:
- Cut the avocados in half, remove the pits, and scoop the flesh into a mixing bowl.
- Add lime juice to the avocados and mash them using a fork or potato masher until you reach your desired consistency.
- Stir in the finely chopped red onion, tomatoes, jalapeños, and cilantro.
- Season with salt and pepper to taste, mixing everything thoroughly.
- Serve:
- Transfer the guacamole to a serving bowl, arranging the bat-shaped tortilla chips around it or sticking them into the guacamole for visual effect.
- For an extra spooky presentation, consider sprinkling a little extra smoked paprika or drizzling a few drops of black food coloring on top of the guacamole.
Extra Tips:
When making guacamole, it’s important to use ripe avocados for the best taste and texture. If your avocados are too firm, leave them at room temperature for a few days until they soften.
Additionally, to prevent the guacamole from browning, retain one of the avocado pits and place it in the guacamole before covering tightly with plastic wrap, ensuring minimal air exposure.
For those who enjoy a bit more heat, consider leaving some of the jalapeño seeds in the mix or adding a dash of hot sauce.
Finally, if you’re short on time, pre-made tortilla chips can be used, but crafting your own adds a special homemade touch that’s worth the effort.
Eyeball Pasta Salad
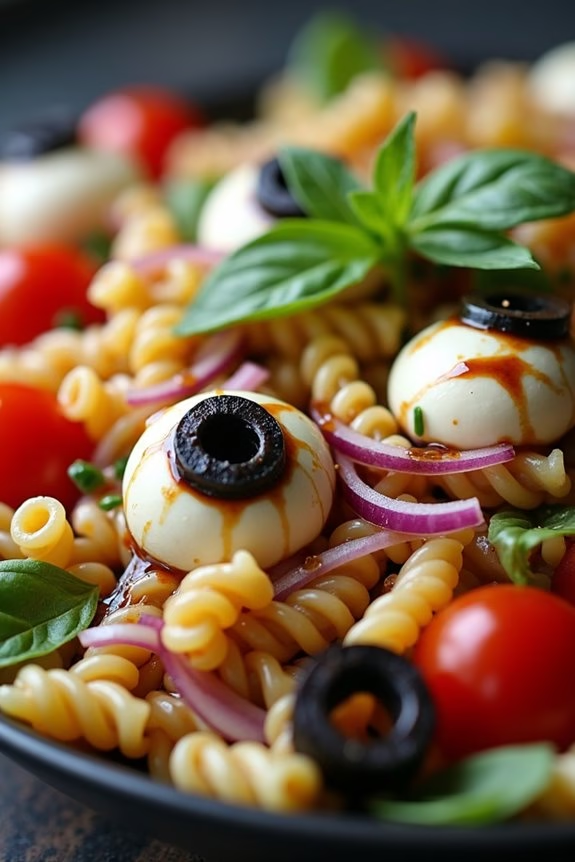
Halloween is the perfect time to get creative with your culinary skills and surprise your guests with fun and spooky dishes. One dish that’s sure to grab attention is the Eyeball Pasta Salad. This eerie yet delicious salad is both a feast for the eyes and the palate, making it an ideal choice for adults looking to enjoy a festive meal.
By using ingredients that mimic the appearance of eyeballs, this pasta salad transforms into a creepy creation that will surely be a hit at any Halloween gathering. The trick to making Eyeball Pasta Salad lies in its presentation, where mozzarella balls become eyeballs and olives turn into pupils.
This dish combines the creamy texture of pasta with the tanginess of olives and the freshness of vegetables, creating a well-balanced and flavorful salad. It’s not only visually appealing but also satisfying and nutritious, making it suitable for adults who want to indulge in Halloween-themed food without compromising on taste or quality.
Ingredients for 4-6 servings:
- 12 ounces of rotini pasta
- 1 cup cherry tomatoes, halved
- 1 cup black olives, sliced
- 1 cup mozzarella balls (ciliegine)
- 1/2 cup red onion, thinly sliced
- 1/2 cup Italian dressing
- 1 tablespoon balsamic glaze
- Salt and pepper to taste
- Fresh basil leaves for garnish
Instructions:
- Cook the Pasta: Begin by bringing a large pot of salted water to boil. Add the rotini pasta and cook according to package instructions until al dente. Drain the pasta and rinse with cold water to stop the cooking process. Set it aside to cool completely.
- Prepare the Eyeballs: While the pasta is cooling, prepare the eyeball ingredients. Take each mozzarella ball and use a small knife to make a shallow indentation on one side. Place a slice of black olive into the indentation to create the appearance of an eyeball. Repeat this process for all mozzarella balls.
- Mix the Salad: In a large mixing bowl, combine the cooled pasta, cherry tomatoes, red onion, and olive slices. Toss with Italian dressing until everything is well coated. Season with salt and pepper to taste.
- Assemble the Salad: Transfer the pasta mixture to a serving platter or bowl. Arrange the mozzarella eyeballs evenly throughout the salad, ensuring they’re visible on top.
- Add the Finishing Touches: Drizzle the balsamic glaze over the entire salad for added flavor and a touch of drama. Garnish with fresh basil leaves to enhance the color and aroma.
- Chill and Serve: Refrigerate the salad for at least 30 minutes before serving to allow the flavors to meld together. Serve cold and enjoy your spooky creation.
Extra Tips:
To make the Eyeball Pasta Salad even more visually striking, consider using colored pasta, such as spinach or beetroot rotini, which can add an extra layer of festivity to the dish.
If you prefer a spicier kick, add a pinch of red pepper flakes to the Italian dressing. For a more personalized touch, consider adding other ingredients like artichoke hearts or roasted red peppers to enhance the flavor profile.
Finally, if you’re short on time, pre-made mozzarella balls with olives can be found in some grocery stores, making the preparation process even quicker.
Vampire Bat Wings

Spook up your Halloween party with these deliciously eerie Vampire Bat Wings. This dish is perfect for adults who want to add a touch of fright to their feast. These wings are marinated in a savory blend of spices and sauces, then baked to perfection to give them a crispy, tangy finish.
The dark, glossy appearance of the wings is achieved by using soy sauce and balsamic vinegar, creating a mysterious and appetizing dish that will surely be the highlight of your Halloween spread.
Vampire Bat Wings aren’t only visually impressive but also pack a punch of flavor that will leave your guests craving more. The combination of garlic, ginger, and spice creates a savory depth, while the hint of sweetness from honey rounds out the flavor profile. This recipe yields enough for 4-6 people, making it an ideal choice for a small gathering.
Follow the recipe below to craft these delectable, ghoulish treats.
Ingredients for 4-6 servings:
- 3 pounds of chicken wings
- 1/2 cup soy sauce
- 1/4 cup balsamic vinegar
- 1/4 cup honey
- 2 tablespoons olive oil
- 4 cloves garlic, minced
- 1 tablespoon fresh ginger, grated
- 1 teaspoon smoked paprika
- 1/2 teaspoon cayenne pepper
- 1/2 teaspoon black pepper
- 1/2 teaspoon salt
- Green onions, chopped (optional, for garnish)
- Sesame seeds (optional, for garnish)
Instructions:
- Prepare the Marinade: In a large bowl, combine the soy sauce, balsamic vinegar, honey, olive oil, garlic, ginger, smoked paprika, cayenne pepper, black pepper, and salt. Whisk the ingredients together until well combined to create a rich marinade.
- Marinate the Wings: Place the chicken wings in a resealable plastic bag or a large bowl. Pour the marinade over the wings, making certain they’re fully coated. Seal the bag or cover the bowl and refrigerate for at least 2 hours, or overnight for best results, allowing the flavors to infuse into the meat.
- Preheat the Oven: Preheat your oven to 400°F (200°C). Line a baking sheet with aluminum foil and place a wire rack on top. This setup will help the wings cook evenly and become crispy.
- Arrange the Wings: Remove the wings from the marinade, letting any excess drip off. Arrange them in a single layer on the wire rack, making sure they aren’t touching to promote even cooking.
- Bake the Wings: Place the baking sheet in the preheated oven. Bake the wings for 35-40 minutes, or until they’re cooked through and the skin is crispy, turning them halfway through to promote even browning.
- Garnish and Serve: Once baked, remove the wings from the oven and let them cool slightly. Garnish with chopped green onions and sesame seeds if desired. Serve hot and enjoy the spooky, savory delight of Vampire Bat Wings.
Extra Tips:
To enhance the flavor, consider broiling the wings for an additional 3-5 minutes after baking to achieve an extra crispy finish. Be sure to keep an eye on them to prevent burning.
For a smoky flavor, you can also grill the wings instead of baking. Adjust the level of spice by adding more or less cayenne pepper according to your preference. These wings pair wonderfully with a side of ranch or blue cheese dressing for dipping.
Creepy Cheese Board

Celebrate Halloween with a twist on the traditional cheese board by creating a Creepy Cheese Board that’s sure to impress your guests. This eerie yet sophisticated appetizer is perfect for a Halloween party, offering a delicious assortment of cheeses and accompaniments artfully arranged to evoke the spirit of the holiday.
With a mix of textures, flavors, and a touch of spooky flair, this cheese board will delight adults looking for a festive yet grown-up treat. To assemble the perfect Creepy Cheese Board, you’ll need to carefully select a variety of cheeses and complementary items that not only taste great but also add a bit of Halloween fun to your table.
Consider using dark, rich flavors and textures, along with seasonal fruits and nuts, to create an inviting yet chilling presentation. This recipe will guide you through creating a cheese board that serves 4-6 people, making it a great centerpiece for a small gathering or a festive addition to a larger buffet.
Ingredients:
- 8 oz aged cheddar cheese
- 8 oz blue cheese
- 8 oz brie cheese
- 8 oz gouda cheese
- 1 cup black grapes
- 1 cup dried apricots
- 1 cup candied pecans
- 1/2 cup black olives
- 1/2 cup fig jam
- 1 small baguette, sliced
- 1 package of assorted crackers
- Fresh rosemary sprigs for garnish
Instructions:
- Prepare the Board: Start with a large wooden board or platter. Lay out the cheeses first, spacing them evenly apart to allow room for the other ingredients. Slice the brie and gouda into wedges for easy serving, while leaving the blue cheese and cheddar in blocks to create a variety of shapes and textures.
- Arrange the Fruits: Next, add the black grapes and dried apricots to the board. Place the grapes in small clusters around the cheeses, and scatter the dried apricots in small piles. This will add both color and sweetness to the board.
- Add the Nuts and Olives: Sprinkle the candied pecans in between the cheeses and fruits. Add the black olives in a small bowl or directly on the board, ensuring they’re easily accessible and add a touch of darkness to the presentation.
- Include the Spreads: Place the fig jam in a small dish and set it on the board. This will provide a sweet and savory element that pairs well with both the cheeses and the other accompaniments.
- Arrange the Bread and Crackers: Fan out the sliced baguette and arrange the crackers around the board, making sure they’re easily accessible from all sides. This will provide guests with a variety of options for enjoying the cheese.
- Final Touches: Garnish the board with fresh rosemary sprigs to add a hint of greenery and aroma. This will tie the whole presentation together and provide a lovely contrast to the darker elements.
Extra Tips:
When selecting cheeses, opt for varieties with a range of textures and flavors to keep the board interesting. You can also incorporate seasonal elements like small pumpkins or decorative skeletons to enhance the Halloween theme.
Make certain the cheeses are at room temperature before serving, as this allows the flavors to fully develop. Feel free to customize the board with your favorite ingredients or local specialties to make it unique and tailored to your taste.
Monster Meatballs

Monster Meatballs are a frightfully delicious addition to any Halloween celebration, perfect for adding a ghoulish twist to your adult-themed party. These savory meatballs are crafted with a blend of flavors that will enchant your guests with their taste and presentation. They’re not only fun to look at but also packed with rich, zesty flavors that will keep everyone coming back for more.
Whether you’re hosting a spooky gathering or just want to add a festive touch to your meal, these Monster Meatballs are sure to be a hit.
The secret to these Monster Meatballs lies in their perfect combination of spices and ingredients that come together to create a mouth-watering dish. The meatballs are crafted from a mixture of ground beef and pork, ensuring they’re juicy and flavorful. A hint of garlic and onion adds depth, while Worcestershire sauce gives them an extra punch of umami flavor.
Once cooked, these delectable spheres are topped with a tangy tomato sauce and garnished with mozzarella cheese and olives to give them their monster-like appearance. Serve these meatballs as a main dish or as a tantalizing appetizer that your guests can enjoy as they mingle.
Ingredients for 4-6 servings:
- 1 pound ground beef
- 1/2 pound ground pork
- 1/2 cup breadcrumbs
- 1/4 cup grated Parmesan cheese
- 2 cloves garlic, minced
- 1 small onion, finely chopped
- 1 large egg
- 2 tablespoons Worcestershire sauce
- 1 teaspoon salt
- 1/2 teaspoon black pepper
- 1 teaspoon dried oregano
- 1 cup tomato sauce
- 1 cup shredded mozzarella cheese
- 12 pimento-stuffed green olives, halved
Cooking Instructions:
- Preheat the Oven: Preheat your oven to 375°F (190°C) to get it ready for baking the meatballs.
- Prepare the Meatball Mixture: In a large mixing bowl, combine the ground beef, ground pork, breadcrumbs, Parmesan cheese, minced garlic, chopped onion, egg, Worcestershire sauce, salt, black pepper, and oregano. Mix all the ingredients thoroughly using your hands until they’re well combined.
- Shape the Meatballs: Roll the mixture into balls about 1.5 inches in diameter, ensuring they’re evenly sized for consistent cooking. You should get approximately 24 meatballs.
- Bake: Place the meatballs on a baking sheet lined with parchment paper. Bake in the preheated oven for about 20-25 minutes, or until they’re browned and cooked through.
- Add the Sauce and Cheese: Remove the meatballs from the oven and spoon the tomato sauce over each one. Sprinkle the shredded mozzarella cheese on top of the meatballs, ensuring they’re well-covered.
- Broil: Place the meatballs back in the oven under the broiler setting for 2-3 minutes, or until the cheese is melted and bubbly.
- Garnish: Once the cheese is melted, remove the meatballs from the oven and top each with a halved olive to create a “monster eye” effect.
Extra Tips:
For an extra touch of creativity, you can use different types of olives or even add a slice of roasted red pepper for a more colorful monster eye. If you want your meatballs to have a spicier kick, consider adding a pinch of red pepper flakes to the meat mixture.
Make sure to let the meatballs rest for a few minutes after baking to allow the juices to redistribute, ensuring they remain juicy and flavorful when served.
Sinister Sweets Platter

The Sinister Sweets Platter is a perfect addition to any adults-only Halloween gathering, offering a spooky twist on classic sweet treats. This platter isn’t only a feast for the eyes but also a delight for the taste buds, combining rich flavors with Halloween-themed presentation.
You’ll find that with a little creativity and some simple ingredients, you can transform ordinary desserts into something truly sinister yet deliciously appealing. This platter features a selection of eerie sweets, each designed to bring a touch of fright to your Halloween celebration.
Expect a combination of chocolatey, fruity, and nutty flavors, all presented in a way that will impress your guests. Whether you’re hosting a Halloween party or simply want to indulge in some spooky treats, the Sinister Sweets Platter will certainly set the right mood for the occasion.
Ingredients for 4-6 servings:
- 12 chocolate cupcakes
- 1 cup of black frosting
- 1/2 cup of red jam
- 1/4 cup of crushed Oreo cookies
- 12 gummy worms
- 1/2 cup of dark chocolate chips
- 1/2 cup of white chocolate chips
- 1/2 cup of pretzel sticks
- 1/4 cup of assorted nuts (optional)
- Edible eyes or candy eyes
- Red food dye
Instructions:
- Prepare the Cupcakes: Begin by baking your chocolate cupcakes according to your preferred recipe or using a box mix. Allow them to cool completely before decorating.
- Create the Black Frosting: In a mixing bowl, blend black food dye into vanilla or chocolate frosting until you achieve the desired shade of black. Frost each cooled cupcake generously.
- Decorate with Jam: Use a small spoon to create a small crater in the center of each frosted cupcake. Fill the crater with red jam to resemble a bleeding effect.
- Add the Oreo Dirt: Crush Oreo cookies until they resemble fine dirt. Sprinkle the crushed cookies over the frosted cupcakes.
- Place Gummy Worms: Insert gummy worms into the jam-filled craters of each cupcake, allowing them to hang out slightly for a creepy effect.
- Prepare the Chocolate Bites: Melt the dark and white chocolate chips in separate bowls using a double boiler or microwave. Drizzle the melted chocolate over pretzel sticks and nuts, then let them harden on a parchment-lined tray.
- Assemble the Platter: Arrange the decorated cupcakes, chocolate-dipped pretzels, and nuts on a large serving platter. Add edible or candy eyes to the pretzels for a spooky touch.
- Add Final Touches: Use any remaining red food dye to splatter over the platter for a blood-splattered effect. Arrange the platter with additional gummy worms and candy eyes as desired.
Extra Tips:
To enhance the eerie atmosphere, consider serving the Sinister Sweets Platter with dim lighting or candlelight to accentuate the spooky details.
If you want to add a little more variety, you can also include small bowls of Halloween-themed candies or chocolate-covered fruits on the platter. Additionally, feel free to customize the cupcake decorations to match any specific Halloween theme you have in mind.
For a more dramatic presentation, use a tiered cake stand to display the sweets at different heights.
Haunted Chocolate Bark

Halloween is the perfect time to indulge in some spooky-themed treats, and Haunted Chocolate Bark is a delightful option for adults who enjoy a mix of sweet, salty, and a touch of the eerie. This recipe combines rich, dark chocolate with a variety of toppings to create a visually haunting yet deliciously tempting treat. The best part? It’s incredibly easy to make, requiring just a few simple steps and ingredients that you can customize to your taste.
This Haunted Chocolate Bark isn’t only a feast for the eyes but also a treat for the taste buds. With a serving size designed for 4-6 people, it’s perfect for a small Halloween gathering or as a contribution to a potluck. The base of the bark is made from high-quality dark chocolate, which is then adorned with a spooky assortment of nuts, dried fruits, and decorative candies to give it that haunted look. You’ll love the combination of textures and flavors with each bite!
Ingredients (Serving Size: 4-6 people):
- 16 ounces of dark chocolate chips or chunks
- 1/4 cup of white chocolate chips (for drizzling)
- 1/4 cup of dried cranberries
- 1/4 cup of salted pumpkin seeds (pepitas)
- 1/4 cup of slivered almonds
- 1/4 cup of candy eyeballs
- 1 teaspoon of sea salt flakes
- Optional: edible glitter or sprinkles for decoration
Cooking Instructions:
- Prepare the Baking Sheet: Line a large baking sheet with parchment paper. This will prevent the chocolate from sticking and make it easier to break apart once set.
- Melt the Dark Chocolate: In a microwave-safe bowl, melt the dark chocolate chips in 30-second intervals, stirring after each interval until completely smooth and melted. Alternatively, you can melt the chocolate using a double boiler.
- Spread the Chocolate: Pour the melted dark chocolate onto the prepared baking sheet. Use a spatula to spread the chocolate evenly into a rectangle about 1/4 inch thick.
- Melt the White Chocolate: In a separate bowl, melt the white chocolate chips in the same manner as the dark chocolate. Once melted, use a spoon to drizzle the white chocolate over the dark chocolate in a fun, zigzag pattern.
- Add Toppings: Quickly, before the chocolate sets, sprinkle the dried cranberries, salted pumpkin seeds, slivered almonds, and candy eyeballs over the melted chocolate. Press them gently to guarantee they stick.
- Sprinkle with Sea Salt: Evenly sprinkle the sea salt flakes over the top to add a savory contrast to the sweet chocolate.
- Set the Bark: Allow the chocolate bark to cool at room temperature for about 1 hour or until completely hardened. For quicker setting, you can place the baking sheet in the refrigerator for 30 minutes.
- Break into Pieces: Once the chocolate is set, break it into irregular pieces using your hands or a knife.
- Decorate (Optional): For a little extra magic, sprinkle with edible glitter or sprinkles.
Extra Tips:
When making Haunted Chocolate Bark, the quality of your chocolate matters, so opt for good-quality dark chocolate for the best results. You can customize the toppings based on your preferences; try adding other nuts or dried fruits for a personal touch.
If you’re planning to store the bark for later, keep it in an airtight container at room temperature or in the fridge if your kitchen is warm. The bark can be made a day or two in advance, making it a convenient option for party planning. Enjoy experimenting with different spooky decorations to make your bark uniquely haunting!