
As Halloween night draws near, the excitement of conjuring up spooky treats is in the air. Last year’s party was a hit with Creepy Crawly Cupcakes topped with gummy worms and Witch’s Brew Brownies drizzled with green glaze. These treats were both delightful and slightly eerie, leaving my friends talking for weeks. This year, let’s create more spine-tingling memories with hauntingly delicious ideas. Are you ready to get inspired?
Creepy Crawly Cupcakes
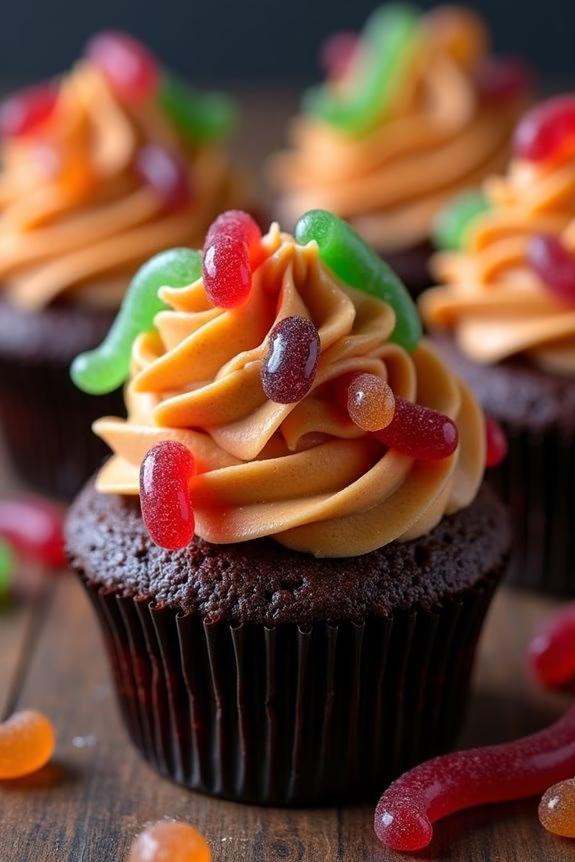
Halloween is the perfect time to let your imagination run wild in the kitchen, and Creepy Crawly Cupcakes are a fun and delicious way to celebrate the spooky season. These cupcakes not only taste delicious but also add a frightfully fun element to your Halloween spread. The moist chocolate cupcakes are topped with rich, velvety buttercream frosting and decorated with assorted gummy worms and candy insects to give them that creepy, crawly appearance.
Perfect for a Halloween party or a fun treat for the kids, these cupcakes are sure to delight and spook in equal measure.
The best part about Creepy Crawly Cupcakes is that they’re incredibly easy to make, even for those who mightn’t consider themselves expert bakers. This recipe yields enough cupcakes for about 4-6 people, making it a great choice for a small gathering or family treat. You can easily double or triple the recipe if you’re expecting more guests or simply want to guarantee there are plenty of creepy crawly delights to go around.
With a little creativity and some basic baking supplies, you’ll have a batch of deliciously eerie cupcakes in no time.
Ingredients (Serving Size: 4-6 people):
- 1 cup all-purpose flour
- 1/2 cup unsweetened cocoa powder
- 1 cup granulated sugar
- 1 teaspoon baking powder
- 1/2 teaspoon baking soda
- 1/4 teaspoon salt
- 1/2 cup vegetable oil
- 1/2 cup milk
- 2 large eggs
- 1 teaspoon vanilla extract
- 1/2 cup hot water
- 1/2 cup unsalted butter, softened
- 2 cups powdered sugar
- 2 tablespoons milk or heavy cream
- 1 teaspoon vanilla extract
- Assorted gummy worms and candy insects for decoration
Instructions:
- Preheat and Prepare: Preheat your oven to 350°F (175°C). Line a muffin tin with cupcake liners to prepare for the batter.
- Mix Dry Ingredients: In a bowl, combine the flour, cocoa powder, sugar, baking powder, baking soda, and salt. Stir together until well mixed.
- Combine Wet Ingredients: In a separate large bowl, whisk together the vegetable oil, milk, eggs, and vanilla extract until fully combined.
- Create Batter: Gradually add the dry ingredients to the wet ingredients, mixing until just combined. Slowly pour in the hot water and mix until the batter is smooth. The batter will be thin, but that’s okay.
- Fill and Bake: Pour the batter into the lined muffin tin, filling each cup about two-thirds full. Bake in the preheated oven for 18-20 minutes, or until a toothpick inserted into the center of a cupcake comes out clean.
- Cool: Once baked, remove the cupcakes from the oven and let them cool completely on a wire rack.
- Prepare Frosting: For the frosting, beat the softened butter in a large bowl until creamy. Gradually add the powdered sugar, beating until smooth. Add the milk and vanilla extract, and continue to beat until the frosting is light and fluffy.
- Decorate: Frost each cooled cupcake generously. Decorate with gummy worms and candy insects, arranging them so they appear to crawl over the frosting for a creepy effect.
Extra Tips:
For an extra spooky touch, consider adding a few drops of black or green food coloring to your frosting to give it an eerie hue. You can also use crushed chocolate cookies as “dirt” to sprinkle over the frosting, giving the cupcakes a truly graveyard-like appearance.
If you’re short on time, store-bought chocolate cake mix and frosting can be used as a quick alternative to making everything from scratch. Just remember, the fun is in the decoration, so let your creativity shine as you design your creepy crawly creatures!
Witch’s Brew Brownies
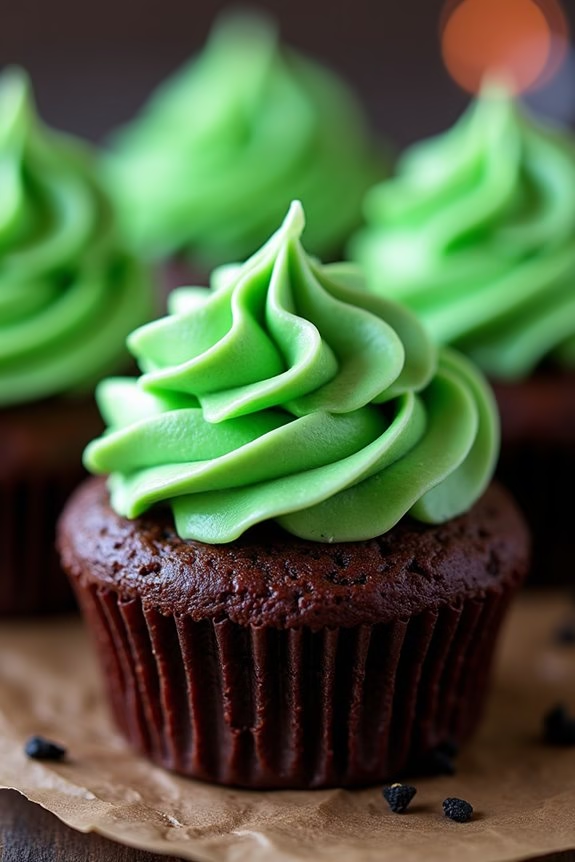
Witch’s Brew Brownies are a spooktacular treat perfect for any Halloween gathering. These decadent brownies are infused with a magical mix of dark chocolate and a hint of espresso, giving them a rich and deep flavor.
Topped with a swirl of green-tinted cream cheese frosting, they resemble a bubbling witch’s cauldron, making them both a visual and culinary delight. These brownies aren’t only delicious but also a fun project to make with family and friends during the Halloween season.
The recipe yields a serving size of 4-6 people and includes a combination of traditional brownie ingredients with a spooky twist. The addition of green food coloring to the cream cheese frosting creates the signature “witch’s brew” look.
Follow the instructions closely to create these enchanting treats that are sure to be a hit at any Halloween party or gathering.
Ingredients:
- 1 cup unsalted butter
- 8 oz dark chocolate, chopped
- 1 1/2 cups granulated sugar
- 4 large eggs
- 1 tsp vanilla extract
- 1/2 cup all-purpose flour
- 1/4 cup cocoa powder
- 1/2 tsp salt
- 1 tsp instant espresso powder
- 8 oz cream cheese, softened
- 1/4 cup unsalted butter, softened
- 2 cups powdered sugar
- 1 tsp vanilla extract
- Green food coloring
Instructions:
- Preheat the Oven: Preheat your oven to 350°F (175°C). Grease a 9×9-inch baking pan and line it with parchment paper, leaving some overhang for easy removal.
- Melt the Chocolate and Butter: In a medium saucepan over low heat, melt the unsalted butter and dark chocolate together, stirring constantly until smooth. Remove from heat and let it cool slightly.
- Mix the Wet Ingredients: In a large mixing bowl, combine the granulated sugar, eggs, and vanilla extract. Whisk until the mixture is smooth and slightly frothy.
- Combine Wet and Dry Ingredients: Slowly pour the melted chocolate mixture into the sugar and egg mixture, stirring continuously. Add the flour, cocoa powder, salt, and instant espresso powder. Stir until just combined.
- Bake the Brownies: Pour the brownie batter into the prepared baking pan. Smooth the top with a spatula. Bake in the preheated oven for 25-30 minutes, or until a toothpick inserted into the center comes out with a few moist crumbs.
- Prepare the Frosting: While the brownies are baking, prepare the cream cheese frosting. In a medium bowl, beat the softened cream cheese and butter together until creamy. Gradually add the powdered sugar and vanilla extract, beating until smooth. Add a few drops of green food coloring until the desired color is reached.
- Cool and Frost the Brownies: Once the brownies are done, remove them from the oven and let them cool completely in the pan. Once cooled, spread the green cream cheese frosting evenly over the top.
- Serve: Cut the frosted brownies into squares and serve. Enjoy your Witch’s Brew Brownies!
Extra Tips: For a more intense chocolate flavor, use high-quality dark chocolate with at least 70% cocoa content. If you prefer a less vibrant green frosting, start with a smaller amount of food coloring and adjust as needed.
To make cutting the brownies easier, chill them in the refrigerator for about 30 minutes after frosting before slicing. These brownies can be stored in an airtight container in the refrigerator for up to a week.
Ghostly Meringue Pops
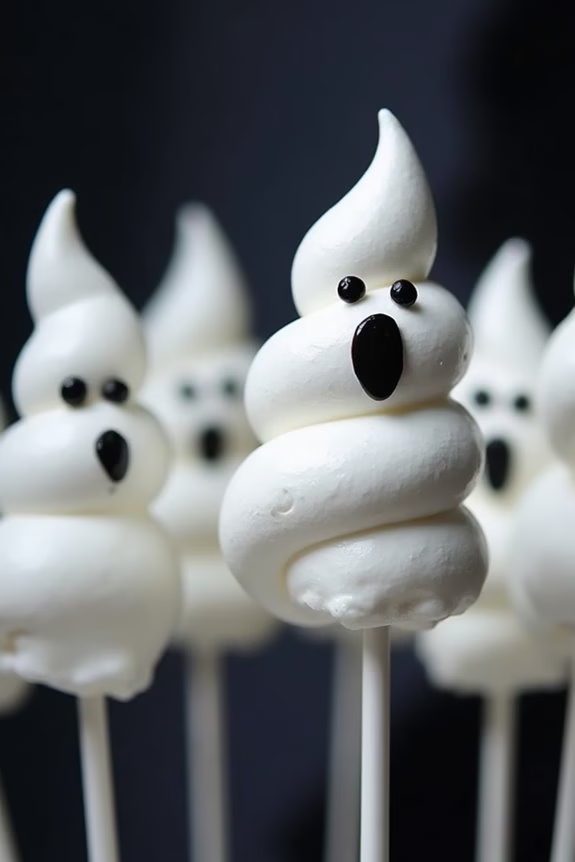
Ghostly Meringue Pops are a spook-tacular treat that will add a delightful chill to your Halloween festivities. These ethereal confections are both a visual and gustatory delight, perfect for adding a hauntingly sweet touch to your party spread. With their crisp exterior and melt-in-your-mouth interior, these meringue pops are a whimsical nod to the playful spirit of Halloween. Their ghostly appearance is easily achieved with a few simple ingredients and a touch of creativity.
Creating these meringue pops isn’t only fun but also a fantastic opportunity to get the whole family involved in some holiday baking. With just a few steps, you can transform basic pantry ingredients into a memorable and enchanting dessert. Whether you’re serving them at a party or simply enjoying them at home, these Ghostly Meringue Pops are sure to be a hit with both kids and adults alike.
Ingredients (Serving size: 4-6 people)
- 4 large egg whites
- 1 cup granulated sugar
- 1/4 teaspoon cream of tartar
- 1 teaspoon vanilla extract
- Black food coloring gel or pen
- Lollipop sticks
Instructions
- Preheat and Prepare: Preheat your oven to 200°F (95°C). Line two baking sheets with parchment paper and set them aside. This guarantees that your meringue pops bake evenly and don’t stick to the pan.
- Beat Egg Whites: In a clean, dry bowl, use an electric mixer to beat the egg whites on medium speed until they become frothy. Gradually add the cream of tartar and continue beating until soft peaks form.
- Add Sugar: Increase the mixer speed to high and add the granulated sugar, one tablespoon at a time. Continue beating until stiff peaks form and the mixture is glossy. This can take about 5-7 minutes. Add the vanilla extract and beat until it’s just combined.
- Pipe Meringue: Transfer the meringue mixture to a piping bag fitted with a large round tip. Pipe ghost shapes onto the prepared baking sheets, leaving space between each. Insert a lollipop stick into the base of each ghost.
- Bake Meringues: Bake in the preheated oven for 1.5 to 2 hours, or until the meringues are dry to the touch. Turn off the oven and leave the door slightly ajar, allowing the meringues to cool completely in the oven.
- Decorate: Once cooled, use a black food coloring gel or edible pen to draw spooky faces on each ghost. Get creative with different expressions to add character!
Extra Tips
For the best results, make sure that your mixing bowl and beaters are completely free of any grease or residue, as this can prevent the egg whites from whipping properly.
When separating eggs, be extra careful to avoid any yolk in the whites, as even a small amount of fat can prevent the meringue from achieving stiff peaks.
If you prefer a slightly different flavor profile, consider adding almond or peppermint extract in place of vanilla.
Finally, make sure your ghosts are completely cooled before drawing on them to prevent the decorations from running.
Monster Eyeball Truffles
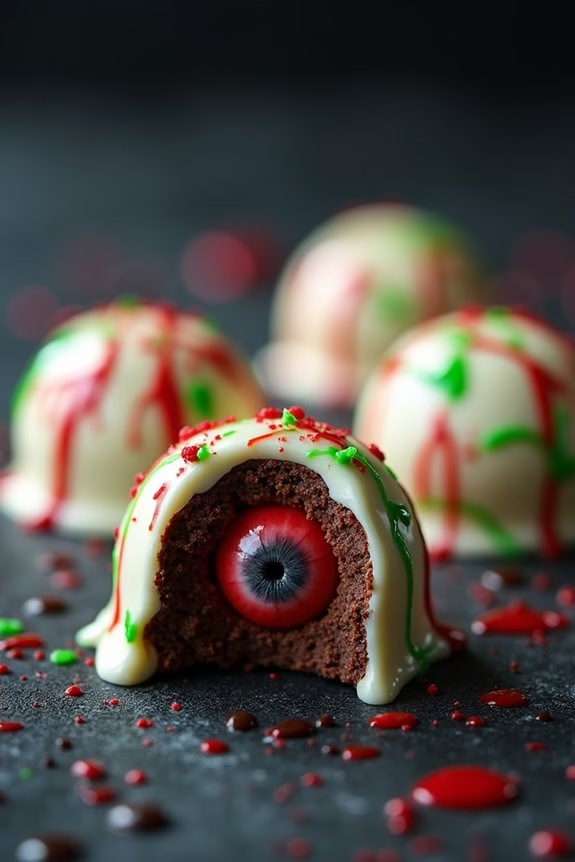
Monster Eyeball Truffles are a spooktacular treat perfect for Halloween festivities. These delectable truffles aren’t only fun to make but also delightful to eat, with a rich chocolate interior and a ghoulishly creepy exterior that mimics the look of monster eyeballs. Kids and adults alike will enjoy the surprise of biting into these eerie confections, making them a hit at any Halloween party or gathering.
The process of creating Monster Eyeball Truffles involves crafting a rich chocolate ganache, forming it into small balls, and then decorating them to resemble creepy eyeballs. The key is in the details of the decoration, which can be customized to suit your desired level of spookiness. With just a few simple ingredients and some creative flair, you can whip up a batch of these truffles to delight your goblins and ghouls.
Ingredients for 4-6 servings:
- 12 ounces semi-sweet chocolate chips
- 1/2 cup heavy cream
- 1 teaspoon vanilla extract
- 1/4 cup unsalted butter
- White chocolate melting wafers
- Red food coloring gel
- Candy eyeballs
- Green candy melts
Cooking Instructions:
- Prepare the Ganache:
- In a medium saucepan over low heat, combine the semi-sweet chocolate chips, heavy cream, vanilla extract, and unsalted butter. Stir continuously until the mixture is smooth and the chocolate is completely melted.
- Chill the Mixture:
- Pour the chocolate mixture into a shallow dish and let it cool to room temperature. Once cooled, cover the dish with plastic wrap and refrigerate for about 2 hours, or until the ganache is firm enough to scoop.
- Form the Truffles:
- Using a small scoop or a tablespoon, scoop out portions of the chilled ganache and roll them into small balls with your hands. Place the balls onto a lined baking sheet.
- Decorate the Eyeballs:
- Melt the white chocolate wafers according to the package instructions. Dip each truffle into the melted white chocolate to create a smooth coating. Allow excess chocolate to drip off before placing them back onto the baking sheet.
- Add Details:
- While the white chocolate is still wet, press a candy eyeball into the center of each truffle. Use a toothpick to add red food coloring gel around the edges of the eyeball to create a bloodshot effect.
- Finish with a Creepy Touch:
- Melt the green candy melts and use a piping bag or a small spoon to add green veins around the eyeball to enhance the spooky effect. Allow the truffles to set completely before serving.
Extra Tips:
For a twist on flavor, consider adding a splash of liqueur, such as orange or raspberry, to the ganache mixture before chilling it.
If you’re short on time, you can speed up the chilling process by placing the ganache in the freezer for about 30 minutes instead of the refrigerator.
When decorating, have fun with the colors and patterns—feel free to experiment with different food coloring gels and candy melts to give your Monster Eyeball Truffles a unique, monstrous appearance.
Spider Web Pretzels

Spider Web Pretzels are a fun and festive treat that are perfect for any Halloween gathering. These delightful snacks combine the salty crunch of pretzels with the sweet and creamy taste of white chocolate. The result is a spooky, web-like creation that’s as delicious as it’s decorative.
Whether you’re hosting a Halloween party or just want to enjoy a seasonal snack with your family, Spider Web Pretzels will surely be a hit.
The best part about Spider Web Pretzels is that they’re incredibly easy to make and require minimal ingredients. This recipe is perfect for involving kids in the kitchen, as they can help with the assembly and decoration of the webs.
With just a few simple steps and a dash of creativity, you can whip up this delightful treat in no time. This recipe serves 4-6 people, making it perfect for a small gathering or family treat.
Ingredients:
- 1 bag of mini pretzel twists
- 1 cup of white chocolate chips
- 1 tablespoon of coconut oil or vegetable shortening
- 1 tube of black decorating gel
- Assorted Halloween-themed sprinkles (optional)
Instructions:
1. Prepare the Work Area:
Start by lining a baking sheet with parchment paper. This will prevent the pretzels from sticking and make clean-up much easier.
2. Melt the White Chocolate:
In a microwave-safe bowl, combine the white chocolate chips and coconut oil or shortening. Microwave in 30-second intervals, stirring in between, until the chocolate is fully melted and smooth.
3. Arrange the Pretzels:
On the prepared baking sheet, arrange the mini pretzel twists in a circular pattern, with the edges slightly overlapping to resemble a web. Each “spider web” should be about 3-4 inches in diameter.
4. Create the Web:
Carefully drizzle the melted white chocolate over the arranged pretzels, making sure to cover the intersections where the pretzels meet. This will help hold the web together once the chocolate sets.
5. Decorate:
While the chocolate is still wet, use the black decorating gel to draw lines and additional web patterns on top of the white chocolate. Add Halloween-themed sprinkles if desired for extra decoration and fun.
6. Set the Chocolate:
Allow the pretzels to sit at room temperature or refrigerate them for about 15-20 minutes until the chocolate has completely set.
7. Serve:
Once the chocolate has hardened, gently peel the Spider Web Pretzels from the parchment paper and arrange them on a serving platter.
Extra Tips:
When melting the white chocolate, be careful not to overheat it, as it can seize and become unworkable. Stirring frequently and using short bursts in the microwave will help achieve a smooth consistency.
If you don’t have black decorating gel, you can use melted dark chocolate or a small tube of black icing as a substitute. For added flavor, consider using flavored white chocolate chips, such as vanilla or peppermint.
Store any leftover pretzels in an airtight container to keep them fresh and crunchy.
Pumpkin Patch Rice Krispie Treats
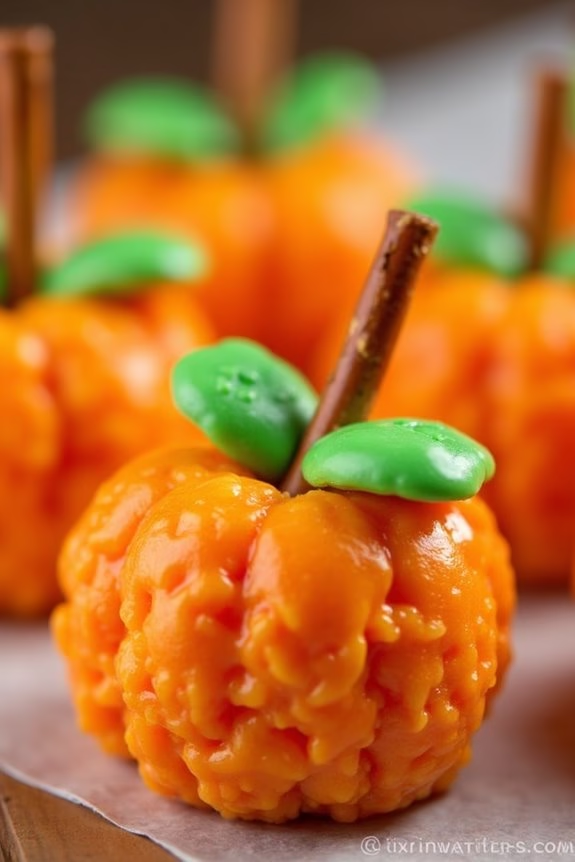
Pumpkin Patch Rice Krispie Treats are a delightful Halloween-themed twist on the classic rice cereal treat. These festive goodies not only look adorable with their pumpkin-like appearance, but they also have a deliciously sweet taste that everyone will love. Perfect for a Halloween party or a fun family activity, these treats are simple to make and require just a few ingredients that are likely already in your pantry.
The combination of marshmallows and rice cereal creates a chewy and crispy texture, while the addition of food coloring and candy embellishments turns them into charming pumpkin patches. This recipe is designed to serve 4-6 people, making it ideal for a small gathering or a weekend treat.
The process involves melting marshmallows, tinting the mixture with food coloring, and shaping the cereal mixture into pumpkin shapes. With just a little creativity and some quick work, you’ll have a batch of Pumpkin Patch Rice Krispie Treats ready to enjoy. Gather your ingredients and let’s get ready to make this festive treat!
Ingredients:
- 3 tablespoons unsalted butter
- 1 package (10 oz) mini marshmallows
- 6 cups crispy rice cereal
- Red and yellow food coloring
- 12 green candy-coated chocolates (like M&Ms) or small green candies
- 12 pretzel sticks, broken in half
Instructions:
- Prepare the Work Area: Line a baking sheet with parchment paper or a silicone baking mat. This will guarantee your treats don’t stick and make cleanup easier.
- Melt the Butter and Marshmallows: In a large saucepan, melt the butter over low heat. Once melted, add the mini marshmallows and stir continuously until they’re completely melted and smooth.
- Add Food Coloring: Remove the saucepan from the heat. Add red and yellow food coloring to the melted marshmallow mixture, stirring until you achieve a vibrant orange color. Start with a few drops and increase as needed to get the desired shade.
- Mix in the Cereal: Gradually add the crispy rice cereal to the marshmallow mixture, stirring until the cereal is evenly coated.
- Shape the Pumpkins: Allow the mixture to cool slightly until it’s safe to handle. With buttered hands, scoop a small amount of the mixture and shape it into a ball, approximately the size of a small apple. Place each ball onto the prepared baking sheet.
- Create Pumpkin Stems and Leaves: While the treats are still pliable, gently push a pretzel stick half into the top of each ball to form a stem. Press one green candy into the top next to the pretzel to resemble a leaf.
- Cool and Set: Allow the Pumpkin Patch Rice Krispie Treats to cool completely and set, approximately 30 minutes, before serving.
Extra Tips:
When working with the warm marshmallow mixture, it’s helpful to keep a bowl of cold water nearby to dip your fingers in, which prevents sticking and makes shaping easier. Additionally, if desired, you can enhance the flavor by adding a teaspoon of vanilla extract to the melted marshmallow mixture before adding the food coloring.
For extra fun, consider using candy eyes or other edible decorations to give your pumpkin treats unique personalities. Enjoy these delightful treats as a fun and tasty Halloween snack!
Bloody Finger Sugar Cookies
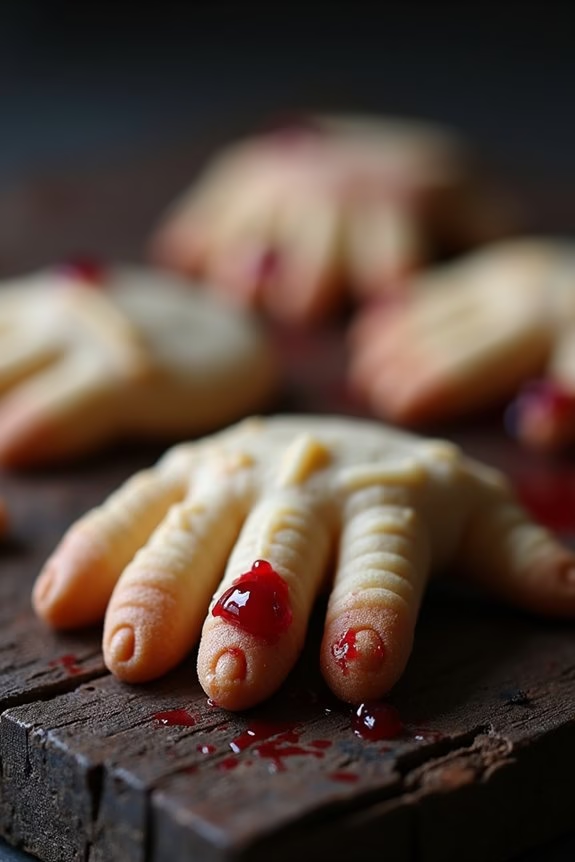
Get ready to spook your guests with these deliciously gruesome Bloody Finger Sugar Cookies. Perfect for Halloween, these cookies aren’t only a treat for the taste buds but also a sight to behold. Each cookie is shaped like a severed finger, complete with a bloody almond ‘nail’ and a realistic finger wrinkle effect. They’re bound to be a hit at any Halloween party, and they’re fun to make with the whole family.
These cookies are fundamentally classic sugar cookies with a spooky twist. The dough is easy to prepare and is flavored with vanilla and almond extract for a sweet, nutty flavor. The ‘bloody’ effect is created using strawberry jam or red food coloring, which adds an extra layer of fun and flavor. This recipe makes enough cookies to serve 4-6 people, making it perfect for a small gathering or to share with friends and family.
Ingredients:
- 1 cup unsalted butter, softened
- 1 cup powdered sugar
- 1 large egg
- 1 teaspoon vanilla extract
- 1 teaspoon almond extract
- 2 3/4 cups all-purpose flour
- 1 teaspoon baking powder
- 1/4 teaspoon salt
- 3/4 cup whole blanched almonds
- 1/4 cup strawberry jam or red food coloring
Instructions:
- Preheat the Oven: Begin by preheating your oven to 325°F (163°C) and line a baking sheet with parchment paper.
- Prepare the Dough: In a large mixing bowl, cream together the softened butter and powdered sugar until light and fluffy. Beat in the egg, vanilla extract, and almond extract until well combined.
- Mix Dry Ingredients: In a separate bowl, whisk together the flour, baking powder, and salt. Gradually add the dry ingredients to the wet mixture, mixing until a smooth dough forms.
- Shape the Fingers: Take a tablespoon of dough and roll it into a finger-like shape. Press a whole almond into one end to create the ‘fingernail’. Use a knife to make small lines on the dough, mimicking the knuckles and wrinkles of a finger.
- Bake the Cookies: Place the shaped cookies on the prepared baking sheet and bake in the preheated oven for 20-25 minutes or until they’re lightly golden. Remove from the oven and allow them to cool on a wire rack.
- Create the Bloody Effect: Once cooled, remove the almond ‘nail’ and place a small amount of strawberry jam or a drop of red food coloring in the indent before replacing the almond. This creates the bloody nail effect.
- Serve and Enjoy: Arrange the cookies on a spooky platter and serve them to your guests for a creepy culinary experience.
Extra Tips:
For the most realistic finger effect, verify the dough isn’t overworked, as this can cause it to spread too much during baking. If your dough feels too sticky, refrigerate it for about 30 minutes before shaping.
For an extra touch of realism, you can add a few drops of green food coloring to the dough to give the fingers a ghastly, decomposed look. Additionally, if you prefer a less sweet cookie, reduce the amount of powdered sugar to your taste.
Bat Wing Chocolate Bark
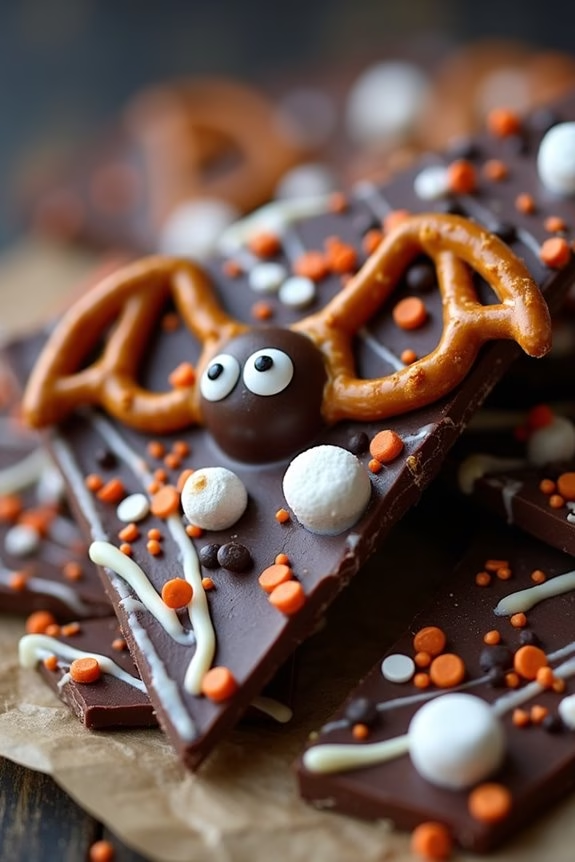
Bat Wing Chocolate Bark is a ghoulishly delightful treat perfect for Halloween festivities. This eerie snack combines the rich flavors of dark chocolate with the crunchy texture of pretzels and the sweetness of marshmallows. The chocolate bark is decorated to resemble bat wings, adding a spooky touch to any Halloween table. With a balance of sweet and salty, this treat is bound to be a hit among both kids and adults.
This recipe isn’t only easy to make but also allows for creative customization. Whether you’re hosting a Halloween party or just want to surprise your family with a festive treat, Bat Wing Chocolate Bark is a fun and engaging project. The recipe requires minimal ingredients and can be whipped up in no time. Plus, it offers the perfect opportunity to let your imagination run wild with different toppings and designs.
Ingredients (Serves 4-6):
- 12 ounces dark chocolate
- 1 cup mini pretzel twists
- 1/2 cup mini marshmallows
- 1/4 cup white chocolate chips
- 1/4 cup orange and black sprinkles
- 1/4 cup candy eyes
Instructions:
- Prepare the Baking Sheet: Line a baking sheet with parchment paper or a silicone baking mat. This will prevent the chocolate from sticking and make it easier to remove the bark once it sets.
- Melt the Dark Chocolate: In a microwave-safe bowl, melt the dark chocolate in 30-second intervals, stirring in between, until fully melted and smooth. Alternatively, you can use a double boiler for this step.
- Spread the Chocolate: Pour the melted dark chocolate onto the prepared baking sheet. Use a spatula to spread it into an even layer, about 1/4 inch thick.
- Add the Pretzels: Arrange the mini pretzel twists on top of the melted chocolate to resemble bat wings. Press them gently into the chocolate to verify they stick.
- Add Marshmallows and Sprinkles: Scatter the mini marshmallows and sprinkles over the chocolate and pretzels, pressing them lightly so they adhere to the chocolate.
- Melt and Drizzle White Chocolate: Melt the white chocolate chips in a microwave-safe bowl or using a double boiler. Drizzle the white chocolate over the bark using a spoon or a piping bag for a more controlled design.
- Add Candy Eyes: Place candy eyes strategically on the bark to create spooky bat faces. Press them gently to verify they stick.
- Set the Bark: Allow the chocolate bark to set at room temperature for about 1 hour, or place it in the refrigerator for about 20 minutes until it hardens completely.
- Break into Pieces: Once the chocolate has set, use your hands to break the bark into irregular pieces. Serve and enjoy your Bat Wing Chocolate Bark!
Extra Tips:
When melting chocolate, be careful not to overheat it, as it can scorch and become unusable. If you don’t have candy eyes, you can use small dots of white chocolate with a tiny dot of dark chocolate in the center as a substitute.
Feel free to experiment with additional toppings like crushed cookies or nuts for an extra crunch. If serving the bark at a party, prepare it a day in advance to save time and confirm it’s properly set.
Zombie Brain Jello Shots
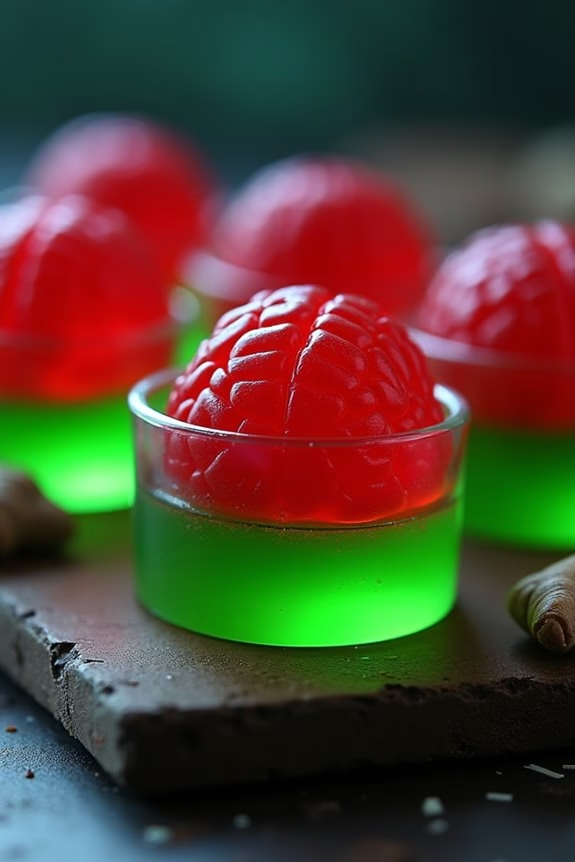
Zombie Brain Jello Shots are a spooktacular addition to any Halloween party. These ghoulish treats aren’t only visually enchanting but also delightfully delicious, making them a hit among party-goers. With a unique presentation that mimics the look of a brain, these shots are sure to send shivers of excitement down your spine. They combine the fun and flavor of traditional jello shots with a creepy twist perfect for the season.
Perfect for serving a small gathering of 4-6 people, these Zombie Brain Jello Shots can be easily made with a few ingredients and a bit of creativity. The recipe includes the use of a brain-shaped mold, which can be found at most party supply stores or online. The end result is a wobbly, jiggly treat that will be the talk of your Halloween party. So, gather your ingredients and let’s get started on crafting these eerie delights.
Ingredients (serves 4-6):
- 1 package (3 oz) lime-flavored gelatin mix
- 1 package (3 oz) raspberry-flavored gelatin mix
- 2 cups boiling water
- 1 cup vodka (or substitute with water for a non-alcoholic version)
- 1 cup cold water
- 1/2 cup sweetened condensed milk
- Red food coloring
- Brain-shaped mold
Instructions:
- Prepare the Gelatin Mixtures: Begin by boiling 2 cups of water. In a medium-sized bowl, dissolve the lime-flavored gelatin mix in 1 cup of boiling water. Stir until completely dissolved, then add 1/2 cup of vodka and 1/2 cup of cold water. Set aside to cool slightly.
- Create the Brain Base: Pour the lime gelatin mixture into the brain-shaped mold, filling it halfway to create the base layer. Allow this layer to set in the refrigerator for about 30 minutes, or until slightly firm.
- Prepare the Raspberry Layer: Dissolve the raspberry-flavored gelatin mix in the remaining 1 cup of boiling water. Stir until completely dissolved, then add the remaining 1/2 cup of vodka and 1/2 cup of cold water. Add a few drops of red food coloring to enhance the color, creating a more realistic ‘brain’ look.
- Mix the Condensed Milk: In a separate bowl, combine the sweetened condensed milk with the raspberry gelatin mixture. Mix well to achieve a smooth consistency.
- Pour the Top Layer: Once the lime gelatin layer is firm, gently pour the raspberry condensed milk mixture over the lime layer in the brain mold. Make sure to fill the mold to the top. Refrigerate for at least 4 hours or until fully set.
- Unmold the Brain: Once the jello has set completely, gently remove the brain from the mold. To do this, dip the mold in warm water for a few seconds to loosen the jello. Place a plate over the mold and invert it to release the jello brain.
Extra Tips:
For best results, verify each layer is slightly set before adding the next to prevent them from blending together. If you prefer a more intense flavor, consider using flavored vodka that complements the gelatin flavors.
When using food coloring, start with a few drops and gradually add more until you achieve the desired look, as a little goes a long way. To make these shots kid-friendly, simply substitute the vodka with cold water. Enjoy these creepy treats and watch as they disappear before your eyes!
Candy Corn Parfaits
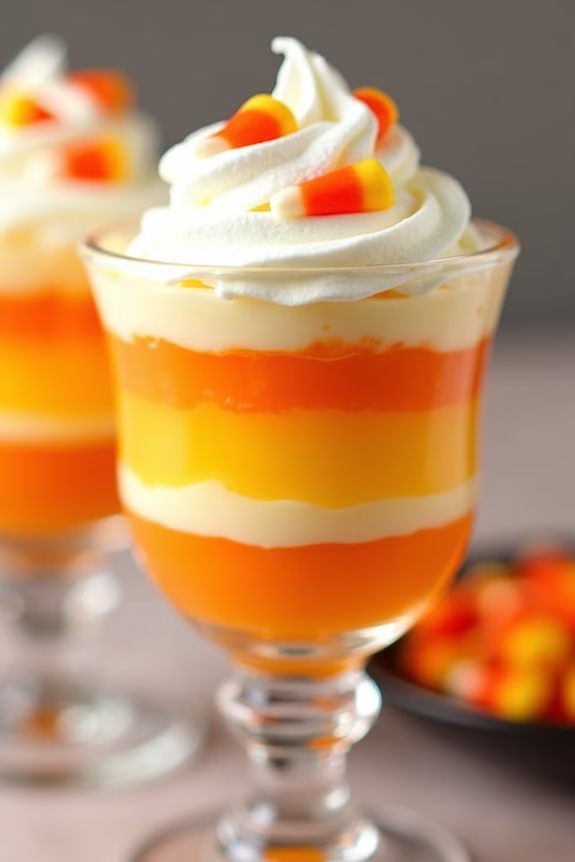
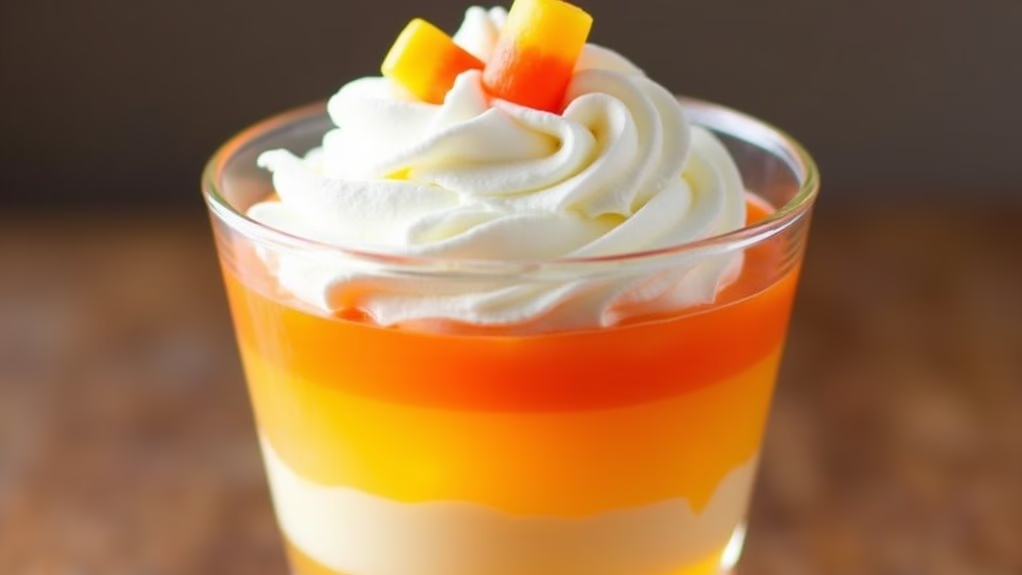
Candy Corn Parfaits are a delightful Halloween treat that combines layers of sweet, creamy goodness with the iconic colors of candy corn. This dessert isn’t only visually appealing but also incredibly easy to make, making it a perfect choice for Halloween gatherings or a spooky-themed dessert table.
The parfaits feature layers of orange-flavored gelatin, a rich vanilla pudding, and are topped with a generous amount of whipped cream, creating a harmonious blend of flavors and textures that mimic the classic candy corn.
These parfaits are wonderfully versatile and can be easily adapted to suit various dietary needs or preferences. They can be made in advance, allowing you to focus on other aspects of your Halloween festivities. Serving these in clear glasses highlights the beautiful layers and adds an elegant touch to your dessert presentation.
This recipe will make enough to serve 4-6 people, ensuring everyone gets to enjoy a piece of the Halloween magic.
Ingredients (Serves 4-6):
- 1 package (3 oz) orange-flavored gelatin
- 1 package (3.5 oz) instant vanilla pudding mix
- 3 cups cold milk
- 1 cup whipped cream or whipped topping
- Yellow food coloring
- Candy corn for garnish (optional)
Cooking Instructions:
- Prepare the Orange Gelatin:
- In a medium-sized bowl, dissolve the orange-flavored gelatin in 1 cup of boiling water. Stir until completely dissolved.
- Add 1 cup of cold water and stir well. Refrigerate until the gelatin is partially set, about 1.5 hours.
- Prepare the Vanilla Pudding:
- In another bowl, whisk together the vanilla pudding mix with 2 cups of cold milk until smooth and thickened. This usually takes about 2 minutes.
- Divide the pudding into two portions. Leave one portion as is, and add a few drops of yellow food coloring to the second portion. Stir until the color is evenly distributed.
- Assemble the Parfaits:
- Once the orange gelatin is partially set, layer the bottom of each serving glass with the gelatin.
- Next, add a layer of the yellow-colored pudding, followed by a layer of the plain vanilla pudding.
- Top each parfait with a generous dollop of whipped cream.
- Chill and Serve:
- Refrigerate the assembled parfaits for at least 1 hour to set completely.
- Before serving, you can add a few candy corn pieces on top for decoration.
Extra Tips:
For a more festive look, consider using clear glass cups or jars to serve the parfaits, as this will show off the vibrant layers more effectively.
If you prefer a lighter dessert, you can substitute sugar-free gelatin and pudding mix. Additionally, homemade whipped cream can add a richer taste compared to store-bought whipped toppings.
Adjust the sweetness by adding a touch of vanilla extract to the whipped cream if desired. Remember that chilling the parfaits is essential for the layers to set properly and hold their shape.