
As someone who loves a flavorful breakfast but doesn’t want to spend too much time in the kitchen, I’ve put together a collection of 12 vibrant and quick sandwich recipes. These are perfect for busy mornings when you still want something delicious. From spicy avocado toast to a savory egg and cheese croissant, these sandwiches pack bold flavors with minimal effort. Ready to transform your mornings with these tasty ideas? Let’s explore these mouthwatering combinations together.
Spicy Avocado Toast Sandwich
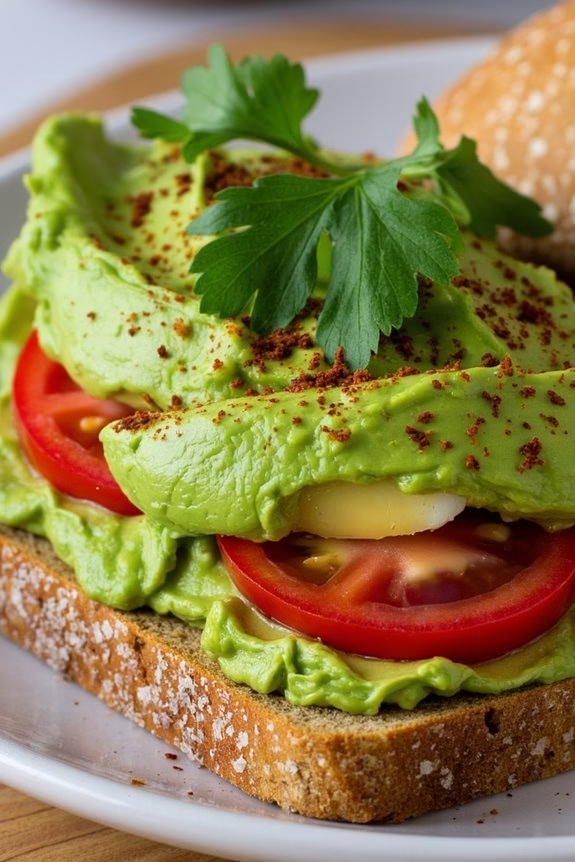
Spicy Avocado Toast Sandwich is a delightful twist on the classic breakfast favorite, combining the creamy richness of avocados with the fiery kick of spices. This dish is perfect for those mornings when you’re in a rush but still want to enjoy a nutritious and satisfying meal.
The balance of textures and flavors, from the crunch of the toast to the smooth avocado and the burst of heat from the spices, makes this sandwich a standout option for breakfast lovers.
This recipe is ideal for serving 4-6 people, and it can be easily adjusted to suit individual spice preferences. The key lies in selecting ripe avocados and the freshest ingredients possible to guarantee a delicious and wholesome meal.
Whether you’re preparing for a family breakfast or a casual brunch with friends, this Spicy Avocado Toast Sandwich is sure to impress and please everyone at the table.
Ingredients (Serves 4-6):
- 6 slices of whole grain bread
- 3 ripe avocados
- 1 lime, juiced
- 1 teaspoon salt
- 1 teaspoon black pepper
- 1 teaspoon red pepper flakes
- 1 teaspoon paprika
- 1/2 cup cherry tomatoes, halved
- 1/4 cup cilantro, chopped
- 2 tablespoons olive oil
- 1 clove garlic, minced
- Optional: fried or poached eggs
Instructions:
- Prepare the Avocado Mixture: Peel and pit the avocados, then place them in a bowl. Add lime juice, salt, black pepper, red pepper flakes, and paprika. Use a fork or potato masher to combine the ingredients until you achieve a smooth, creamy consistency. Set aside.
- Toast the Bread: Drizzle olive oil over each slice of bread and toast them in a preheated oven at 350°F (175°C) or in a toaster until they’re golden brown and crispy.
- Prepare the Garlic and Tomato Topping: Heat a small pan over medium heat, add a tablespoon of olive oil, and sauté the minced garlic until fragrant. Add the cherry tomatoes and cook for about 2 minutes until they start to soften. Remove from heat.
- Assemble the Sandwiches: Spread a generous layer of the avocado mixture on each slice of toasted bread. Top with the sautéed garlic and cherry tomatoes.
- Garnish and Serve: Sprinkle chopped cilantro over each sandwich. If desired, top with a fried or poached egg for added protein. Serve immediately and enjoy the spicy, zesty flavors.
Extra Tips:
For the best results, choose avocados that are just ripe, as they’ll mash easily and provide a creamy texture. Adjust the amount of red pepper flakes according to your heat preference, and consider adding a pinch of cumin for an earthy flavor.
If you’re serving this dish to guests, prepare the avocado mixture just before serving to prevent browning. Finally, experiment with different types of bread, such as sourdough or rye, to complement the flavors in the sandwich.
Caprese Breakfast Sandwich
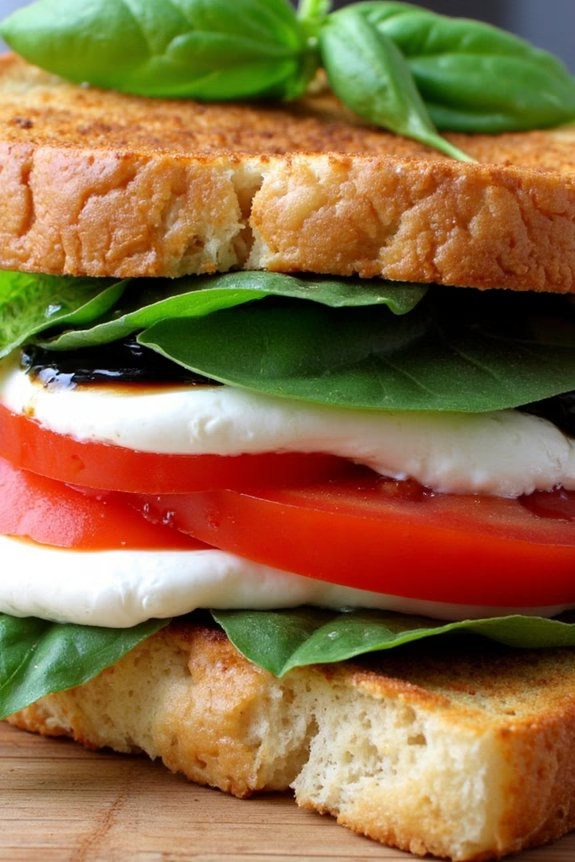
Caprese Breakfast Sandwich is a delightful twist on the traditional Caprese salad, perfect for those mornings when you crave something fresh yet satisfying. This sandwich brings together the classic flavors of ripe tomatoes, creamy mozzarella, and fragrant basil, all nestled between golden, toasted slices of bread. Ideal for a quick breakfast, this sandwich isn’t only easy to prepare but also provides a balanced meal to kick-start your day.
This breakfast recipe takes the essence of Italian cuisine and transforms it into a portable, morning-friendly dish. The combination of ingredients creates a harmonious blend of flavors and textures, making it a favorite for both adults and children alike. Whether you’re serving it for a family breakfast or a casual brunch with friends, the Caprese Breakfast Sandwich is sure to impress with its vibrant taste and inviting appearance.
Ingredients for 4-6 servings:
- 8-12 slices of your favorite bread (such as ciabatta or sourdough)
- 8 slices of fresh mozzarella cheese
- 4 large ripe tomatoes, sliced
- 1 cup fresh basil leaves
- 2 tablespoons olive oil
- Salt and pepper to taste
- Balsamic glaze (optional)
Cooking Instructions:
- Prepare the Bread: Start by preheating your grill or skillet over medium heat. Lightly brush each slice of bread with olive oil on both sides. Place the bread on the grill or skillet and toast until golden brown on each side. This should take about 2-3 minutes per side.
- Layer the Ingredients: Once the bread is toasted, lay the slices out on a clean surface. Begin layering your sandwich by placing two slices of fresh mozzarella on one half of each pair of toasted bread slices.
- Add the Tomatoes and Basil: Top the mozzarella with slices of ripe tomato, ensuring even coverage. Sprinkle a pinch of salt and pepper over the tomatoes to enhance their natural flavor. Next, add a generous handful of fresh basil leaves over the tomatoes.
- Finish and Serve: If desired, drizzle a light balsamic glaze over the basil for an added touch of sweetness and acidity. Place the other slices of toasted bread on top to complete the sandwich. Press down gently and cut each sandwich in half before serving.
- Serve Immediately: Enjoy your Caprese Breakfast Sandwich while the bread is warm and the mozzarella is slightly melted.
Extra Tips:
For the best results, use the freshest ingredients you can find. Fresh mozzarella and vine-ripened tomatoes make a significant difference in flavor. If you want to add a bit more protein to your breakfast, consider adding a slice of prosciutto or a fried egg to each sandwich.
Additionally, if you don’t have a grill or skillet, you can toast the bread in a toaster and then assemble the sandwiches. Finally, for a gluten-free option, simply substitute the bread with your preferred gluten-free variety.
Savory Egg and Cheese Croissant

Start your morning with a delightful Savory Egg and Cheese Croissant, a quick and satisfying breakfast option that combines fluffy scrambled eggs, melted cheese, and buttery croissants.
Perfect for those busy mornings when you need something delicious yet simple, this recipe is sure to become a family favorite. With just a few ingredients and minimal effort, you can whip up a tasty breakfast that will keep everyone energized and happy.
This sandwich features fresh eggs cooked to perfection, paired with creamy cheese, all nestled inside a warm, flaky croissant. Whether you’re serving it for a special weekend brunch or a quick weekday breakfast, this dish caters to all ages. Make it your own by adding your favorite toppings or serve it with a side of fruit for a balanced meal.
Ingredients (Serves 4-6):
- 6 large croissants
- 8 large eggs
- 1 cup shredded cheddar cheese
- 1/2 cup milk
- Salt and pepper to taste
- 2 tablespoons butter
- Optional: sliced ham, spinach, or cooked bacon
Cooking Instructions:
- Preheat the Oven: Begin by preheating your oven to 350°F (175°C). This will guarantee that the croissants are warm and slightly crispy when served.
- Prepare the Eggs: In a medium bowl, whisk together the eggs, milk, salt, and pepper until the mixture is well combined and slightly frothy.
- Cook the Eggs: In a large non-stick skillet, melt the butter over medium heat. Once the butter is melted and begins to foam, pour in the egg mixture. Stir gently with a spatula, making sure the eggs cook slowly and evenly. Cook until they’re just set but still soft and slightly runny. Remove from heat.
- Assemble the Sandwiches: Slice the croissants in half horizontally. On the bottom half of each croissant, place a generous portion of the cooked eggs. Top with shredded cheddar cheese and any optional ingredients like ham or spinach for added flavor.
- Melt the Cheese: Transfer the assembled croissants to a baking sheet and place in the preheated oven. Bake for about 5 minutes, or until the cheese has melted and the croissants are warm.
- Serve: Remove from the oven and top each sandwich with the other half of the croissant. Serve immediately while the sandwiches are warm and the cheese is gooey.
Extra Tips:
To make your Savory Egg and Cheese Croissant even more delicious, consider using different types of cheese such as Swiss or Gouda for a unique twist.
If you want to speed up the process in the morning, scramble the eggs the night before and store them in an airtight container in the refrigerator. Simply reheat them gently in the microwave before assembling the sandwiches.
For added flavor, sprinkle some chives or a dash of hot sauce over the eggs before closing the croissant. Enjoy your breakfast with a side of fresh fruit or a revitalizing glass of orange juice for a complete meal.
Mediterranean Veggie Pita

Mediterranean Veggie Pita is a delightful and nutritious breakfast option that’s both quick to prepare and satisfying to eat. This recipe combines the fresh and vibrant flavors of the Mediterranean with the convenience of a sandwich, making it a perfect choice for busy mornings. The combination of crisp vegetables, creamy hummus, and tangy feta cheese stuffed into a soft pita bread creates a harmonious blend of textures and tastes.
Whether you’re a fan of Mediterranean cuisine or just looking for a healthy, delicious breakfast idea, this Mediterranean Veggie Pita is sure to become a favorite.
One of the great things about this recipe is its versatility. You can easily adapt it to suit your personal preferences or dietary needs. For instance, you can add grilled chicken for extra protein, use whole wheat pita for more fiber, or include a variety of vegetables depending on what you have on hand.
This recipe serves 4-6 people, making it ideal for a family breakfast or a small gathering. It’s also a fantastic option for meal prepping, as the ingredients can be prepared in advance and assembled quickly in the morning.
Ingredients (Serves 4-6):
- 4-6 whole wheat pita breads
- 1 cup hummus
- 1 cup cherry tomatoes, halved
- 1 cucumber, sliced
- 1 red bell pepper, sliced
- 1/2 red onion, thinly sliced
- 1 cup crumbled feta cheese
- 1/2 cup kalamata olives, pitted and sliced
- 1/4 cup fresh parsley, chopped
- 1 tablespoon olive oil
- Salt and pepper to taste
Cooking Instructions:
- Prepare the Vegetables: Begin by washing all the vegetables thoroughly. Slice the cucumber, red bell pepper, and red onion. Halve the cherry tomatoes and set all the vegetables aside in separate bowls for easy assembly.
- Warm the Pita Bread: Preheat a non-stick skillet over medium heat. Place the pita breads in the skillet one at a time, warming each side for about 1-2 minutes until they’re soft and pliable. You can also warm them in the oven at 350°F (175°C) for about 5 minutes.
- Assemble the Pitas: Take a warm pita bread and spread a generous layer of hummus on one side. Layer the sliced cucumber, cherry tomatoes, red bell pepper, and red onion on top of the hummus.
- Add the Extras: Sprinkle crumbled feta cheese and sliced kalamata olives over the vegetables. Drizzle a small amount of olive oil over everything, and season with salt and pepper to taste.
- Finish with Fresh Herbs: Garnish each pita with a sprinkle of chopped fresh parsley for an added burst of flavor and color.
- Serve Immediately: Fold the pita in half or roll it up, if preferred, and serve immediately while the pita is still warm.
Extra Tips:
For an extra touch of flavor, consider adding a splash of fresh lemon juice over the assembled pita before serving. If you prefer a bit of heat, a pinch of red pepper flakes can add a nice kick.
To save time in the morning, you can pre-slice the vegetables and store them in airtight containers in the refrigerator. This will allow you to quickly assemble the pitas without any hassle.
Additionally, if you’re serving these pitas for lunch or a picnic, wrap them in parchment paper to keep them neatly contained. Enjoy your Mediterranean Veggie Pita as a healthy and flavorful start to your day!
Bacon, Egg, and Spinach Muffin

Start your day off right with a delicious and hearty Bacon, Egg, and Spinach Muffin. This scrumptious sandwich brings together the classic breakfast flavors of crispy bacon, creamy eggs, and nutritious spinach, all nestled within a perfectly toasted English muffin.
It’s a quick and satisfying meal that you can whip up in no time, making it ideal for busy mornings. Whether you’re feeding a family or preparing a quick breakfast for yourself, this recipe will have you looking forward to waking up and indulging in its delightful taste.
The Bacon, Egg, and Spinach Muffin isn’t only easy to prepare, but it’s also packed with essential nutrients to keep you energized throughout the day. The combination of protein from the eggs and bacon, along with the fiber and vitamins from the spinach, makes this breakfast sandwich a balanced and wholesome meal.
The recipe serves 4-6 people, so it’s perfect for a family breakfast or a small gathering. With just a few ingredients and some simple steps, you’ll have a satisfying breakfast ready in minutes.
Ingredients (Serves 4-6):
- 6 English muffins
- 12 slices of bacon
- 6 large eggs
- 1 cup fresh spinach
- 1 cup shredded cheddar cheese
- Salt and pepper to taste
- 2 tablespoons butter
Cooking Instructions:
- Prepare the Bacon: Preheat your oven to 400°F (200°C). Place the bacon slices on a baking sheet lined with parchment paper. Bake for 15-20 minutes, or until the bacon is crispy. Remove from oven and let it drain on a paper towel-lined plate.
- Prepare the Muffins: While the bacon is cooking, slice the English muffins in half and toast them lightly in a toaster or under a broiler until golden brown. Set aside.
- Cook the Eggs: In a large skillet, melt the butter over medium heat. Crack the eggs into the skillet and season with salt and pepper. Cook the eggs to your desired doneness—either sunny-side up or scrambled. If you prefer scrambled eggs, beat them in a bowl first and pour them into the skillet, stirring occasionally until cooked.
- Wilt the Spinach: Add the spinach to the skillet with the eggs, stirring gently until the spinach is wilted. This should take about 2-3 minutes.
- Assemble the Sandwiches: Place a slice of cheese on the bottom half of each English muffin. Top with a spoonful of the egg and spinach mixture, followed by 2 slices of bacon. Cover with the top half of the English muffin.
- Melt the Cheese: For an extra cheesy sandwich, set the assembled muffins on a baking sheet and place them in the oven for about 2 minutes, or until the cheese has melted. Serve warm.
Extra Tips:
To save time in the morning, consider cooking the bacon the night before and reheating it briefly in the oven or microwave before assembling the sandwiches.
You can also customize the muffins by adding avocado slices, tomato, or a dash of hot sauce for an extra kick. If you’re serving fewer people, the ingredients can easily be adjusted to suit your needs.
Enjoy your Bacon, Egg, and Spinach Muffin with a side of fresh fruit or a glass of freshly squeezed orange juice for a complete breakfast experience.
Smoked Salmon Bagel Delight

Start your morning with a gourmet touch by indulging in a Smoked Salmon Bagel Delight. This quick and easy breakfast option brings together the rich, savory flavors of smoked salmon with the soft and chewy texture of a classic bagel. The creamy spread of cream cheese infused with herbs complements the salmon perfectly, while fresh toppings add a delightful crunch.
Whether you’re rushing out the door or enjoying a leisurely weekend breakfast, this dish is sure to satisfy your cravings and keep you energized for the day. Ideal for serving 4-6 people, this dish isn’t only looks elegant but is also packed with nutrients.
Smoked salmon provides a generous dose of omega-3 fatty acids, while the fresh vegetables offer essential vitamins and minerals. The bagels serve as a hearty base, providing the necessary carbohydrates to kickstart your day. With a few simple ingredients and a quick assembly, you can create a breakfast masterpiece that feels indulgent yet remains effortlessly simple.
Ingredients for 4-6 servings:
- 4-6 bagels
- 8 ounces of smoked salmon
- 8 ounces of cream cheese
- 1 tablespoon fresh dill, chopped
- 1 tablespoon capers
- 1 small red onion, thinly sliced
- 1 lemon, sliced into wedges
- 1 medium cucumber, thinly sliced
- Freshly ground black pepper to taste
- Optional: 1 tomato, thinly sliced
Cooking Instructions:
- Prepare the Cream Cheese Spread: In a small bowl, mix the cream cheese with the freshly chopped dill until well combined. This adds an aromatic herb flavor to the spread.
- Slice the Bagels: Using a sharp bread knife, carefully slice each bagel in half horizontally. Toast them lightly if preferred, which adds a nice crunch to your bite.
- Assemble the Base Layer: Spread a generous amount of the dill cream cheese mixture on each half of the bagels. Confirm the entire surface is covered for consistent flavor in every bite.
- Layer the Smoked Salmon: Place a few slices of smoked salmon over the cream cheese on each bagel half, ensuring an even distribution for a balanced taste.
- Add the Fresh Toppings: Top the salmon with thin slices of red onion, cucumber, capers, and optionally, tomato. These ingredients add freshness and a variety of textures.
- Season and Serve: Finish with a squeeze of lemon juice and a sprinkle of freshly ground black pepper. Serve immediately, accompanied by extra lemon wedges for those who like an extra citrusy tang.
Extra Tips:
For an even richer flavor, let the cream cheese mixture sit for 10-15 minutes to allow the dill to infuse fully. When choosing smoked salmon, opt for high-quality, thinly sliced options for the best taste and texture.
If you prefer a gluten-free option, substitute regular bagels with gluten-free varieties available in most grocery stores. Finally, personalize your bagel delight with additional toppings like avocado slices or a sprinkle of everything bagel seasoning for an extra twist.
Sweet and Savory Apple Cheddar Melt

Sweet and Savory Apple Cheddar Melt is the perfect blend of flavors to invigorate your morning. This sandwich combines the crisp, revitalizing taste of apples with the rich, creamy texture of melted cheddar cheese, all encased in perfectly toasted bread.
It’s an ideal breakfast option for those who love a mix of sweet and savory flavors. Whether you’re preparing this for a family brunch or a quick weekday breakfast, the Apple Cheddar Melt is sure to be a hit with its delightful balance of textures and tastes.
This recipe serves 4-6 people and is designed to be both simple and satisfying. The Sweet and Savory Apple Cheddar Melt can be made in under 20 minutes, making it a convenient choice for busy mornings.
With just a few easy steps and minimal ingredients, you can create a delicious breakfast that will please both children and adults alike. Serve this melt with a side of fresh fruit or a hot cup of coffee to start your day on a high note.
Ingredients:
- 8 slices of whole-grain bread
- 2 large apples (Granny Smith or Honeycrisp work well)
- 2 cups sharp cheddar cheese, shredded
- 2 tablespoons butter
- 1 tablespoon honey
- 1 teaspoon cinnamon
- A pinch of salt
Instructions:
- Prepare the Ingredients: Start by washing the apples thoroughly. Core and thinly slice them into even pieces. Grate the cheddar cheese if not pre-shredded.
- Prepare the Butter Mixture: In a small bowl, mix the softened butter with honey, cinnamon, and a pinch of salt. Stir until everything is well combined.
- Assemble the Sandwiches: Lay out the slices of bread on a clean surface. Spread the butter mixture evenly on one side of each slice of bread. On the unbuttered side, layer apple slices evenly, and then top with a generous amount of shredded cheddar cheese.
- Cook the Sandwiches: Heat a non-stick skillet over medium heat. Place the sandwiches in the skillet, buttered side down. Cook for about 3-4 minutes on each side, or until the bread is golden brown and the cheese is thoroughly melted.
- Serve: Once cooked, remove the sandwiches from the skillet. Let them cool slightly before cutting in half and serving warm.
Extra Tips:
For an extra burst of flavor, consider adding a sprinkle of nutmeg or a drizzle of balsamic glaze to the apple slices before adding the cheese.
If you prefer a tangier taste, opt for a sharp or extra sharp cheddar. To promote even cooking, press down slightly on the sandwiches with a spatula while they’re in the skillet. This will help the cheese melt evenly and bind the ingredients together.
For a healthier version, use whole-grain or gluten-free bread and opt for reduced-fat cheese. Enjoy your Sweet and Savory Apple Cheddar Melt with a side of fresh fruit or yogurt for a well-rounded breakfast.
Classic Ham and Swiss Roll-Up

Start your morning off right with a delicious and satisfying Classic Ham and Swiss Roll-Up. This quick sandwich breakfast recipe is perfect for those who are short on time but still crave a homemade meal. The combination of savory ham and creamy Swiss cheese wrapped in a soft tortilla makes for a delightful breakfast treat that’s easy to prepare and even easier to enjoy.
Ideal for busy mornings, this dish can be made in advance and quickly reheated for a nutritious start to your day. These roll-ups are perfect for serving a crowd or for meal prepping for the week. Whether you’re hosting a brunch or just looking to spice up your morning routine, these Classic Ham and Swiss Roll-Ups are sure to please.
With just a few simple ingredients, you can create a flavorful and filling meal that will keep you satisfied until lunchtime. Plus, the ingredients are versatile enough that you can easily swap them out to suit your personal taste preferences.
Ingredients (serving size: 4-6 people):
- 6 large flour tortillas
- 12 slices of deli ham
- 12 slices of Swiss cheese
- 1/4 cup of Dijon mustard
- 1/4 cup of mayonnaise
- 1 cup of fresh spinach leaves (optional)
- Butter or oil for greasing the pan
Cooking Instructions:
- Prepare the Spread: In a small bowl, mix together the Dijon mustard and mayonnaise until well combined. This will be used as a spread to add flavor and moisture to your roll-up.
- Assemble the Roll-Ups: Lay out a tortilla on a clean surface. Spread a thin layer of the mustard-mayo mixture evenly over the entire surface of the tortilla. This guarantees that every bite is flavorful.
- Layer the Fillings: Place 2 slices of ham and 2 slices of Swiss cheese over one half of the tortilla. Add a small handful of fresh spinach leaves on top of the cheese, if using. The spinach adds a nice texture and a touch of greens to your breakfast.
- Roll the Tortilla: Starting from the side with the fillings, carefully roll the tortilla tightly to enclose the ingredients. Make sure to roll it firmly so that the roll-up holds together.
- Cook the Roll-Ups: Preheat a skillet over medium heat and lightly grease it with butter or oil. Place the roll-ups seam side down in the skillet. Cook for 2-3 minutes on each side or until the tortillas are golden brown and the cheese has melted.
- Serve: Remove from the skillet and let them cool for a minute before slicing each roll-up into 2-3 pieces for easy serving. Enjoy your Classic Ham and Swiss Roll-Up warm.
Extra Tips:
For added variety, try incorporating different types of cheese or adding sliced tomatoes for a burst of freshness. If you prefer a spicier kick, consider spreading a thin layer of your favorite hot sauce or adding jalapeños to the filling.
These roll-ups can be made ahead of time and stored in the refrigerator for up to two days; simply reheat in the oven or microwave before serving. The key to a perfect roll-up is to ascertain all fillings are evenly distributed and that the tortilla is rolled tightly to prevent any ingredients from falling out.
Zesty Tomato and Basil Panini
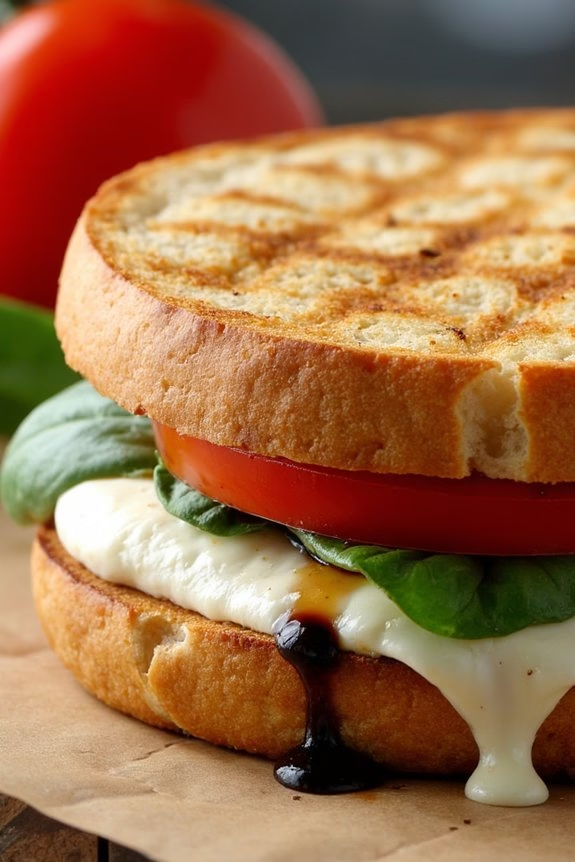
Zesty Tomato and Basil Panini is a delightful twist on your traditional breakfast sandwich, offering a burst of fresh flavors with every bite. This panini takes the classic combination of tomato and basil and elevates it with a zesty kick, making it a perfect way to start your morning. The combination of ripe tomatoes, aromatic fresh basil, and melty cheese all pressed between slices of crusty bread creates a mouthwatering dish that’s both satisfying and invigorating.
This recipe is designed to serve 4-6 people, making it perfect for a family breakfast or a brunch gathering with friends. The preparation is straightforward, and the result is a restaurant-quality panini that you can easily make at home. Whether you’re a seasoned cook or just beginning your culinary journey, this Zesty Tomato and Basil Panini is a recipe you’ll want to keep in your repertoire.
Ingredients:
- 8 slices of ciabatta bread or another rustic bread
- 4 medium ripe tomatoes, sliced
- 1 cup fresh basil leaves
- 8 slices of mozzarella cheese
- 4 tablespoons olive oil
- 2 tablespoons balsamic glaze
- Salt and pepper, to taste
- 1 teaspoon red pepper flakes (optional)
Instructions:
- Prepare the Ingredients:
- Begin by slicing the tomatoes evenly, making sure they’re about 1/4 inch thick. Rinse and dry the fresh basil leaves. Set these aside for easy assembly later.
- Assemble the Panini:
- Lay out four slices of bread on a clean surface. Drizzle each slice with a bit of olive oil. Layer each slice with two slices of mozzarella cheese, followed by several slices of tomato. Add a handful of basil leaves on top of the tomatoes.
- Season and Add Zest:
- Lightly sprinkle salt, pepper, and red pepper flakes (if using) over the basil. Drizzle a small amount of balsamic glaze over each sandwich for that zesty touch.
- Complete the Sandwich:
- Top each sandwich with another slice of bread. Press down gently to help everything stay together.
- Cook the Panini:
- Preheat a panini press or a skillet over medium heat. Brush the outside of each sandwich with olive oil. If using a skillet, place a heavy pan on top to press the sandwiches down. Cook for about 3-4 minutes on each side or until the bread is golden brown and the cheese is melted.
- Serve:
- Once done, remove the panini from the heat. Let them cool slightly before slicing them in half. Serve warm with an extra drizzle of balsamic glaze if desired.
Extra Tips:
To guarantee your Zesty Tomato and Basil Panini is as flavorful as possible, choose tomatoes that are firm yet ripe for the best taste and texture. If your panini press is large enough, you can cook multiple sandwiches at once to save time.
Additionally, be sure to use fresh mozzarella for the creamiest melt and the freshest basil leaves to maximize flavor. If you prefer a slightly less spicy kick, you can omit the red pepper flakes or adjust the amount to suit your preference.
Peanut Butter Banana Wrap

Peanut Butter Banana Wraps are a quick and delicious breakfast option that can be whipped up in no time. Perfect for mornings when you’re on the go or just want something simple yet satisfying, these wraps offer a delightful combination of creamy peanut butter, sweet bananas, and a hint of honey, all wrapped up in a soft tortilla. Not only are they easy to make, but they also provide a good boost of energy to help you start your day on the right note.
This recipe is designed to serve 4-6 people and can be easily adjusted to cater to more or fewer servings as needed. These wraps aren’t only nutritious but also customizable, allowing you to add your favorite toppings or ingredients. Whether you prefer a touch of cinnamon, a sprinkling of granola, or a few slices of fresh strawberries, these wraps can be tailored to suit your taste.
Ingredients:
- 4-6 large whole wheat tortillas
- 1 cup creamy peanut butter
- 4-6 ripe bananas
- 4 tablespoons honey
- Optional: cinnamon, granola, or strawberries for topping
Instructions:
- Prepare the Ingredients: Begin by gathering all your ingredients. Peel the bananas and place them on a cutting board. If using optional toppings like strawberries, wash and slice them accordingly.
- Spread the Peanut Butter: Lay each tortilla flat on a clean surface. Spread approximately 2-3 tablespoons of creamy peanut butter evenly over each tortilla using a butter knife or spatula.
- Add the Bananas: Place one peeled banana at the edge of each tortilla. If the banana is too long, you can trim it to fit the width of the tortilla.
- Drizzle the Honey: Pour about 1 tablespoon of honey over the banana on each tortilla. This will add a nice sweetness to the wrap.
- Add Optional Toppings: If desired, sprinkle a pinch of cinnamon or a handful of granola over the peanut butter. Add any additional toppings like strawberries at this point.
- Roll the Wraps: Starting from the edge with the banana, carefully roll the tortilla tightly around the banana. Make sure the wrap is secure to prevent the filling from spilling out.
- Serve or Store: Once all the wraps are assembled, they can be served immediately. If you prefer to store them, wrap each one tightly in plastic wrap or foil and refrigerate for up to a day.
Extra Tips:
To enhance the flavor of your Peanut Butter Banana Wraps, consider warming the tortillas slightly before assembling. This makes them more pliable and easier to roll.
Additionally, using a good quality natural peanut butter can make a significant difference in taste. If you or your guests have any dietary restrictions, feel free to substitute almond butter or sunflower seed butter in place of peanut butter.
These wraps can also be cut into smaller pieces to serve as a fun and healthy breakfast snack for children.
Southwest Egg Burrito

Start your day with a burst of flavor by making this delicious Southwest Egg Burrito. Perfect for busy mornings, this breakfast dish combines the comforting warmth of eggs with the spicy kick of southwestern ingredients. It’s a filling, protein-rich meal that will keep you energized throughout the morning.
Whether you’re cooking for your family or meal-prepping for the week, these burritos offer a satisfying and convenient breakfast option. The Southwest Egg Burrito is easily customizable to suit your taste preferences. You can add or remove ingredients based on what you have on hand or what you enjoy most.
This recipe is designed to serve 4-6 people, making it ideal for a family breakfast or a small gathering. With its vibrant flavors and simple preparation, the Southwest Egg Burrito is sure to become a breakfast favorite.
Ingredients (serves 4-6):
- 8 large eggs
- 1/4 cup milk
- Salt and pepper, to taste
- 1 tablespoon olive oil
- 1 cup diced bell peppers (any color)
- 1/2 cup diced red onion
- 1 cup canned black beans, drained and rinsed
- 1/2 cup corn kernels (fresh, frozen, or canned)
- 1 cup shredded cheddar cheese
- 1/4 cup chopped fresh cilantro
- 6 large flour tortillas
- 1 avocado, sliced
- Salsa, for serving
Cooking Instructions:
- Prepare the Egg Mixture: Crack the eggs into a mixing bowl, add milk, and season with salt and pepper. Whisk until the mixture is well combined and slightly frothy.
- Cook the Vegetables: In a large non-stick skillet, heat the olive oil over medium heat. Add the diced bell peppers and red onion, stirring occasionally, until the vegetables are tender, about 5 minutes.
- Scramble the Eggs: Pour the egg mixture into the skillet with the cooked vegetables. Stir gently with a spatula, allowing the eggs to cook through. Once the eggs are scrambled and mostly set, stir in the black beans and corn. Cook for another 2 minutes, until everything is heated through.
- Assemble the Burritos: Lay out the flour tortillas on a clean surface. Evenly distribute the scrambled egg mixture among the tortillas. Sprinkle shredded cheddar cheese over the top, and add a few slices of avocado.
- Wrap the Burritos: Starting from one end, roll each tortilla tightly to enclose the filling. You can secure each burrito with a toothpick if necessary.
- Warm the Burritos: Optionally, you can warm the wrapped burritos in the skillet or in the oven at a low temperature for a few minutes to melt the cheese and heat through the tortillas.
- Serve: Garnish the burritos with fresh cilantro and serve immediately with your favorite salsa on the side.
Extra Tips:
For a spicier kick, consider adding diced jalapeños or a dash of hot sauce to the egg mixture before cooking. If you’re meal-prepping, these burritos can be wrapped individually in foil and stored in the refrigerator for up to 3 days.
Reheat them in a microwave or oven before serving. Feel free to experiment with different cheeses or add cooked bacon or sausage for extra protein. Additionally, to save time in the morning, you can prepare the filling the night before and store it in the fridge, assembling the burritos quickly in the morning.
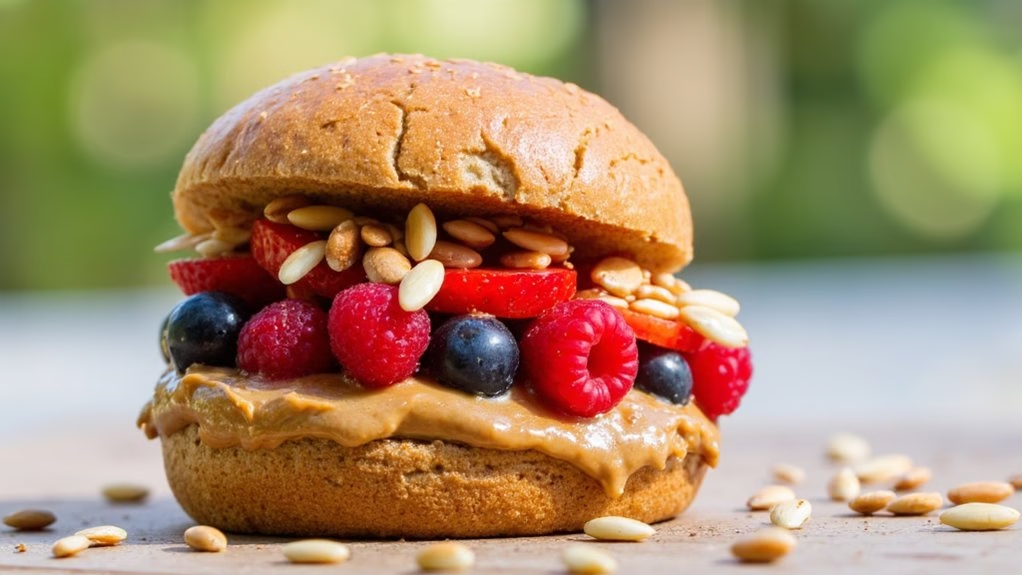
Nutty Berry Breakfast Slider
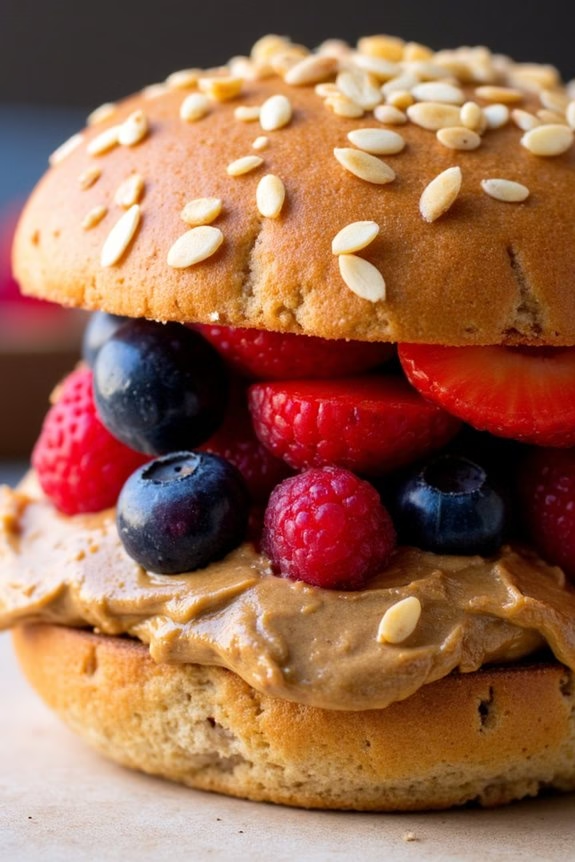
Nutty Berry Breakfast Slider is a delightful and nutrient-rich way to start your day. This breakfast slider combines the creaminess of nut butter with the freshness of mixed berries, all sandwiched between soft, whole grain slider buns. Not only is it incredibly easy to prepare, but it’s also packed with flavors and textures that make it an instant favorite for all ages.
Perfect for busy mornings, this recipe can be prepared in just a few minutes, guaranteeing that you and your family have a wholesome and delicious breakfast without the hassle. Whether you’re rushing out the door or taking a leisurely morning, Nutty Berry Breakfast Sliders provide a balanced meal with the right mix of carbohydrates, protein, and healthy fats.
Ingredients for Serving Size of 4-6 People:
- 8-12 whole grain slider buns
- 1 cup creamy almond butter (or any nut butter of choice)
- 1 cup mixed fresh berries (such as strawberries, blueberries, raspberries)
- 2 tablespoons honey (optional)
- 1/4 cup chopped nuts (such as almonds, walnuts, or pecans)
- 1 teaspoon vanilla extract (optional)
- A pinch of cinnamon (optional)
Cooking Instructions:
- Prepare the Ingredients: Start by washing the mixed berries thoroughly and pat them dry with a paper towel. Chop larger berries like strawberries into smaller pieces to guarantee they fit well within the sliders.
- Make the Nutty Spread: In a small bowl, mix the almond butter with honey, vanilla extract, and a pinch of cinnamon for added flavor. Stir well to combine all the ingredients into a smooth, aromatic spread.
- Assemble the Sliders: Slice the whole grain slider buns in half horizontally. On the bottom half of each bun, spread a generous layer of the prepared nutty mixture.
- Add the Berries: Evenly distribute the mixed berries over the nutty spread on each slider. Make sure each bun has an ample amount of berries to guarantee a burst of fruity flavor in every bite.
- Top with Nuts: Sprinkle a small quantity of chopped nuts over the berries for added crunch and texture.
- Close the Sliders: Place the top half of the slider buns over the berries and nuts, gently pressing down to secure the fillings.
- Serve and Enjoy: Serve the Nutty Berry Breakfast Sliders fresh. They can be enjoyed as is or slightly warmed in a toaster oven for a few minutes to give the buns a gentle crisp.
Extra Tips:
For an enhanced flavor experience, consider toasting the chopped nuts lightly in a pan before adding them to the sliders. This will bring out their natural oils and intensify their flavor.
If you’re storing these sliders for later, it’s recommended to keep the nut butter and berry mixture separate and assemble them just before serving to prevent the buns from becoming soggy.
Feel free to experiment with different nut butters or berries based on your preference or dietary needs.