

The holiday season is right around the corner, and I’m so excited to share these unique Christmas appetizers with you. From cranberry and brie puff pastry to pomegranate goat cheese balls, these recipes are anything but ordinary. Each appetizer brings its own delightful twist to the table. Your guests will remember these festive flavors long after the party’s over. Stay tuned for the full list of these unforgettable holiday starters!
Cranberry-Brie Puff Pastry Bites
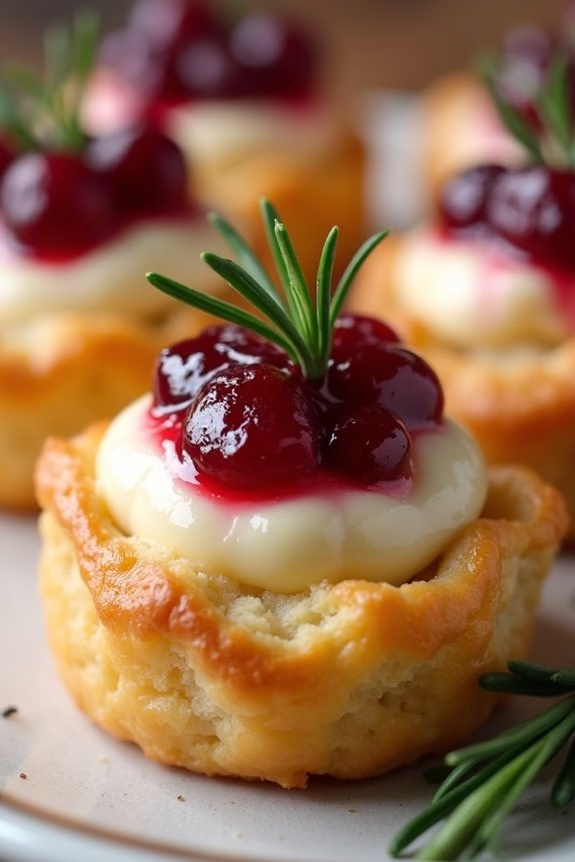
Cranberry-Brie Puff Pastry Bites are the perfect festive appetizer to serve during the holiday season. These delightful bites combine the rich creaminess of Brie cheese with the sweet tartness of cranberry sauce, all encased in a buttery, flaky puff pastry shell. Not only are they delicious, but they’re also incredibly easy to make, making them a great option for those hosting holiday gatherings or attending potlucks.
The blend of flavors and textures in these bites is sure to impress your guests and leave them reaching for more. This recipe is designed to serve 4-6 people, making it an ideal choice for small gatherings or as part of a larger spread of appetizers. Preparing these Cranberry-Brie Puff Pastry Bites requires minimal ingredients and effort, yet the end result is a show-stopping appetizer that looks and tastes like it took much longer to prepare.
With a little prep work and some time in the oven, you’ll have a crowd-pleaser ready to serve in no time.
Ingredients for 4-6 servings:
- 1 sheet of puff pastry, thawed
- 1/2 cup cranberry sauce (homemade or store-bought)
- 4 oz Brie cheese, cut into small cubes
- 1 egg, beaten (for egg wash)
- 1 tablespoon chopped fresh rosemary (optional)
Cooking Instructions:
- Preheat the Oven: Start by preheating your oven to 375°F (190°C). This guarantees that the puff pastry will bake evenly and develop a golden, flaky crust.
- Prepare the Puff Pastry: Roll out the thawed sheet of puff pastry on a lightly floured surface. Using a sharp knife or a pizza cutter, cut the pastry into 12 equal squares.
- Assemble the Bites: Place a small cube of Brie cheese in the center of each puff pastry square. Top each piece of Brie with about a teaspoon of cranberry sauce. If desired, sprinkle a pinch of chopped rosemary on top for added flavor.
- Fold and Seal: Gently fold each corner of the puff pastry square over the filling to meet in the center, pinching the edges to seal. This will create a little parcel that holds the filling securely inside.
- Egg Wash: Brush the tops of each assembled puff pastry bite with the beaten egg. This will give them a beautiful golden color as they bake.
- Bake: Place the assembled bites on a baking sheet lined with parchment paper. Bake in the preheated oven for about 15-20 minutes, or until the pastry is puffed and golden brown.
- Cool and Serve: Allow the bites to cool for a few minutes before serving. They can be enjoyed warm or at room temperature, making them versatile for any occasion.
Extra Tips:
When working with puff pastry, it’s important to keep it cool, as it can become sticky if it warms up too much. If your pastry becomes difficult to work with, consider placing it back in the refrigerator for a few minutes.
Additionally, feel free to experiment with different jams or cheeses to put your own spin on this recipe. A sprinkle of chopped nuts, such as pecans or walnuts, can also add an extra layer of texture and flavor if desired.
Prosciutto-Wrapped Asparagus With Balsamic Glaze

Prosciutto-Wrapped Asparagus With Balsamic Glaze is a delightful and elegant appetizer that’s perfect for any festive gathering, especially during the Christmas season. This recipe combines the savory goodness of prosciutto with the crispness of fresh asparagus, all elevated by a sweet and tangy balsamic glaze. The combination of flavors and textures will surely impress your guests and leave them wanting more.
It’s a simple yet sophisticated dish that won’t take up much of your time but will definitely add a gourmet touch to your holiday spread. Not only is Prosciutto-Wrapped Asparagus With Balsamic Glaze delicious, but it’s also visually appealing, making it a standout on your appetizer table. The vibrant green of the asparagus wrapped in the delicate, pink-hued prosciutto, and drizzled with the dark, glossy glaze creates a beautiful presentation.
This dish is also versatile, as it can be enjoyed warm or at room temperature, making it a convenient option for holiday parties where timing can be unpredictable. Whether you’re hosting a large gathering or a small family dinner, this appetizer is sure to be a hit.
Ingredients (serving size: 4-6 people):
- 24 asparagus spears, trimmed
- 12 slices of prosciutto, halved lengthwise
- 2 tablespoons olive oil
- Salt and freshly ground black pepper, to taste
- 1/2 cup balsamic vinegar
- 1 tablespoon honey
Cooking Instructions:
- Prepare the Asparagus: Preheat your oven to 400°F (200°C). Trim the woody ends off the asparagus spears and lightly toss them in a bowl with olive oil, salt, and pepper.
- Wrap with Prosciutto: Take each asparagus spear and wrap it with a half slice of prosciutto, starting at the base and spiraling upwards. Place the wrapped spears on a baking sheet lined with parchment paper.
- Bake the Asparagus: Once all the asparagus are wrapped, transfer the baking sheet to the preheated oven. Bake the asparagus for about 10-12 minutes, or until the prosciutto is crispy and the asparagus is tender but still has a slight crunch.
- Prepare the Balsamic Glaze: While the asparagus is baking, pour the balsamic vinegar into a small saucepan over medium heat. Stir in the honey and bring to a gentle simmer. Reduce the heat and let it simmer for about 10-15 minutes, or until the mixture has reduced and thickened to a syrupy consistency. Remove from heat and allow it to cool slightly.
- Serve the Appetizer: Once the asparagus is ready, remove it from the oven and let it cool slightly. Arrange the spears on a serving platter and drizzle generously with the balsamic glaze. Serve warm or at room temperature.
Extra Tips:
To guarantee the best results, choose asparagus spears that are medium in thickness. Very thin spears may overcook quickly, while very thick ones mightn’t cook through properly by the time the prosciutto is crispy.
If you find your balsamic glaze thickening too much as it cools, you can gently reheat it and add a teaspoon of water to achieve the desired consistency. For an added touch of flavor, consider adding a sprinkle of grated Parmesan cheese over the wrapped asparagus before baking.
Smoked Salmon and Avocado Crostini
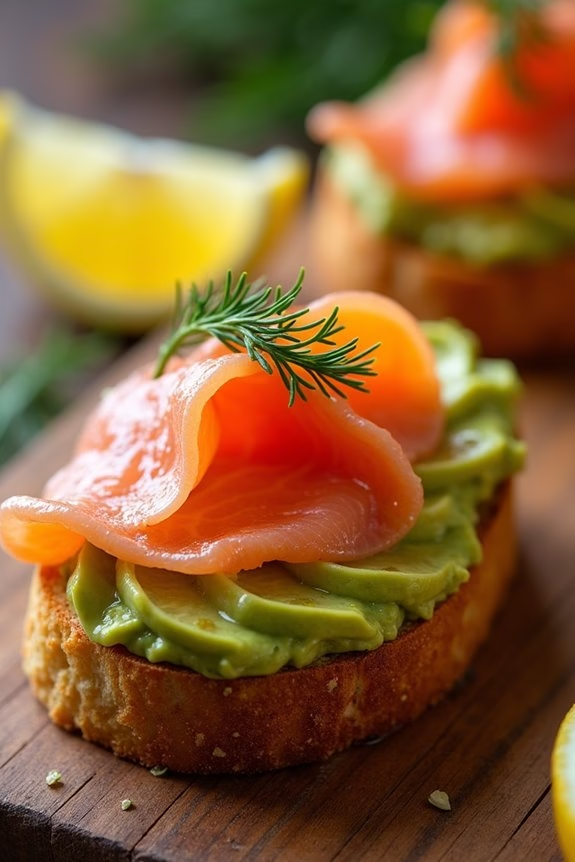
Smoked Salmon and Avocado Crostini is a delightful appetizer that combines the rich, smoky flavor of salmon with the creamy texture of ripe avocado, all atop a crisp, toasted crostini. Perfect for a Christmas gathering, this dish offers a sophisticated taste that’s both invigorating and satisfying.
The combination of flavors and textures makes it a crowd-pleaser, and it’s visually appealing, adding a touch of elegance to your holiday spread. This appetizer isn’t only delicious but also easy to prepare, making it an excellent choice for entertaining.
The key is to use high-quality ingredients, as they’ll shine through in the simplicity of the dish. The crostini provides a crunchy base, the avocado adds creaminess, and the smoked salmon delivers a savory punch, all enhanced by a hint of lemon juice and dill. This recipe serves 4-6 people, making it perfect for a small gathering or as part of a larger selection of appetizers.
Ingredients:
- 1 baguette, sliced into 1/2-inch thick slices
- 2 tablespoons olive oil
- 2 ripe avocados
- 1 tablespoon lemon juice
- Salt and pepper to taste
- 200 grams of smoked salmon
- Fresh dill for garnish
- 1 lemon, cut into wedges
Cooking Instructions:
- Prepare the Crostini: Preheat your oven to 375°F (190°C). Arrange the baguette slices on a baking sheet and brush both sides lightly with olive oil. Bake for about 10 minutes or until they’re golden brown and crisp. Allow them to cool slightly.
- Prepare the Avocado Spread: In a medium bowl, mash the avocados with a fork until smooth. Stir in the lemon juice, and season with salt and pepper to taste. Mix until well combined.
- Assemble the Crostini: Spread a generous layer of the avocado mixture onto each toasted crostini. Top each with a slice of smoked salmon.
- Garnish and Serve: Add a small sprig of fresh dill on top of each crostini for garnish. Serve the crostini on a platter with lemon wedges on the side for guests to squeeze over the top if desired.
Extra Tips:
For the best flavor, make sure to use ripe avocados that are soft to the touch but not overripe. When selecting smoked salmon, opt for a high-quality brand to guarantee a rich, smoky taste.
You can prepare the avocado spread ahead of time, but only assemble the crostini just before serving to keep them crisp. If you want to add an extra touch, consider sprinkling a few capers on top for a briny contrast, or a pinch of red pepper flakes for a slight kick.
Pomegranate Goat Cheese Balls
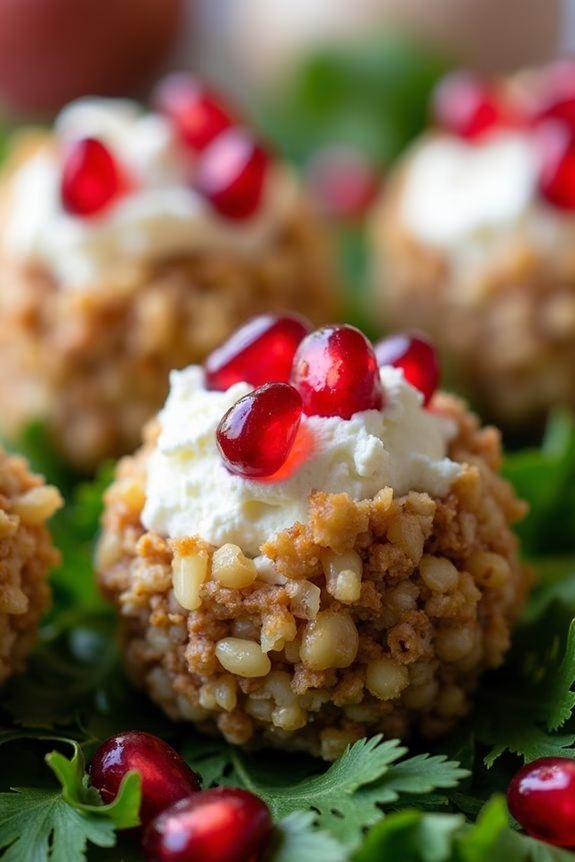
Pomegranate Goat Cheese Balls are a delightful appetizer perfect for Christmas gatherings. These bite-sized treats combine the tangy creaminess of goat cheese with the sweet and tart flavor of fresh pomegranate seeds. Rolled in a mix of crushed nuts and herbs, these cheese balls not only taste amazing but also add a pop of color to your holiday table.
They’re easy to make ahead of time, allowing you more time to enjoy the festivities with family and friends. Creating these Pomegranate Goat Cheese Balls is a breeze, requiring just a few ingredients and simple steps. With a serving size that accommodates 4-6 people, this recipe is ideal for intimate gatherings or as part of a larger spread.
The combination of textures and flavors makes these cheese balls a crowd-pleaser, and they pair beautifully with a variety of beverages, from sparkling wines to festive cocktails.
Ingredients (serves 4-6):
- 8 ounces of goat cheese
- 1/2 cup of cream cheese
- 1/2 cup of pomegranate seeds
- 1/2 cup of finely chopped walnuts or pecans
- 1/4 cup of finely chopped fresh parsley
- 1 teaspoon of honey
- 1/2 teaspoon of salt
- 1/4 teaspoon of black pepper
- Crackers or crostini for serving (optional)
Instructions:
- Prepare the Cheese Mixture: In a medium-sized bowl, combine the goat cheese and cream cheese. Use a fork or spatula to thoroughly mix them until smooth and well-blended. Stir in the honey, salt, and black pepper.
- Shape the Cheese Balls: Using a tablespoon or small ice cream scoop, spoon out portions of the cheese mixture and roll them into small balls using your hands. Aim for about 12-15 balls, depending on your desired size.
- Prep the Coating: In a separate shallow dish, mix the chopped walnuts or pecans with the chopped parsley. Spread the mixture evenly across the dish.
- Roll and Coat: Gently roll each cheese ball in the nut and herb mixture, pressing lightly to confirm the coating adheres well to the surface.
- Add Pomegranate Seeds: Place the coated cheese balls on a platter. Gently press a few pomegranate seeds into the surface of each cheese ball to add a burst of color and flavor.
- Chill: Cover the platter with plastic wrap and refrigerate for at least 30 minutes to allow the flavors to meld and the cheese to firm up.
- Serve: Arrange the cheese balls on a serving platter with crackers or crostini, if desired, and serve immediately.
Extra Tips: For the best results, use fresh goat cheese, as it provides the smoothest texture for the cheese balls. Feel free to experiment with different nuts or herbs for the coating, such as pistachios or chives, to suit your taste preferences.
If you want to prepare these cheese balls in advance, you can store them in an airtight container in the refrigerator for up to two days. Just be sure to add the pomegranate seeds right before serving to maintain their freshness and vibrant appearance.
Spicy Maple Bacon-Wrapped Brussels Sprouts
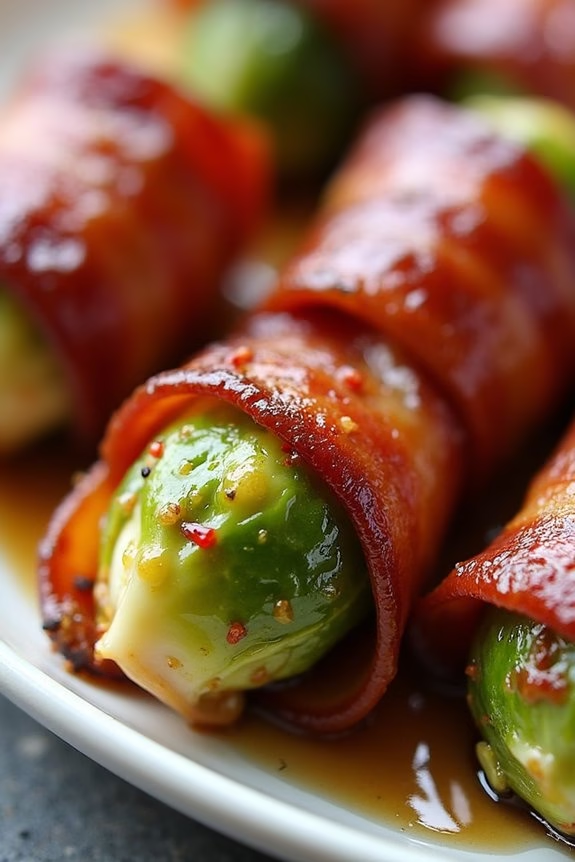
Spicy Maple Bacon-Wrapped Brussels Sprouts are a delightful appetizer that combines the earthy flavors of Brussels sprouts with the rich taste of crispy bacon, all elevated by a touch of spicy sweetness from maple syrup and chili flakes. This dish is perfect for holiday gatherings, offering a balance of savory, sweet, and spicy flavors that will tantalize your taste buds.
The Brussels sprouts become tender on the inside and slightly crispy on the outside, while the bacon adds a satisfying crunch and smoky flavor, making it a crowd-pleaser for Christmas parties.
This recipe is designed to serve 4-6 people, making it an ideal choice for small to medium-sized gatherings. The key to this dish is the combination of maple syrup and chili flakes, which adds a unique twist to the traditional bacon-wrapped Brussels sprouts. Whether you’re a fan of Brussels sprouts or looking to convert skeptics, this recipe is sure to impress with its festive presentation and delicious taste.
Ingredients (for 4-6 servings):
- 1 pound Brussels sprouts, trimmed and halved
- 12 slices of bacon
- 1/4 cup pure maple syrup
- 1/2 teaspoon chili flakes
- Salt and pepper to taste
- Toothpicks for securing
Cooking Instructions:
- Preheat the Oven: Start by preheating your oven to 400°F (200°C). This will guarantee that your Brussels sprouts cook evenly and the bacon becomes crispy.
- Prepare the Brussels Sprouts: Trim the ends of the Brussels sprouts and cut them in half lengthwise. This will help them cook more evenly and allow the flavors to penetrate the sprouts better.
- Wrap with Bacon: Take each Brussels sprout half and wrap it with a slice of bacon, securing it with a toothpick. Make sure the bacon covers the Brussels sprouts entirely, as this will ensure they remain juicy and flavorful.
- Make the Glaze: In a small bowl, combine the maple syrup and chili flakes. Stir well to mix the flavors thoroughly. The chili flakes will add a subtle heat that complements the sweetness of the maple syrup.
- Coat the Brussels Sprouts: Using a brush, generously coat each bacon-wrapped Brussels sprout with the maple syrup and chili mixture. Make sure to cover all sides for maximum flavor.
- Bake in the Oven: Place the coated Brussels sprouts on a baking sheet lined with parchment paper. Bake in the preheated oven for 25-30 minutes, or until the bacon is crispy and the Brussels sprouts are tender.
- Serve Warm: Once cooked, remove the Brussels sprouts from the oven and allow them to cool slightly. Serve them warm as an appetizer, and watch them disappear quickly!
Extra Tips: To guarantee the bacon gets crispy, you can partially cook it in the microwave or on the stove for a few minutes before wrapping it around the Brussels sprouts. This will help render some of the fat and speed up the cooking process in the oven.
Also, for additional spice, you can adjust the amount of chili flakes according to your preference. If you prefer a sweeter glaze, feel free to add a bit more maple syrup. Remember to use high-quality maple syrup for the best flavor.
Caprese Christmas Wreath
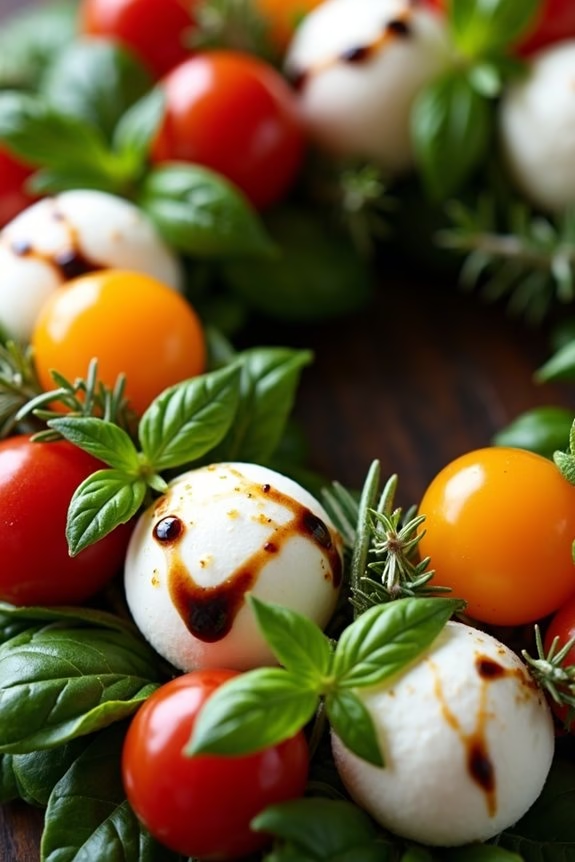
The Caprese Christmas Wreath is a festive and delightful appetizer perfect for any holiday gathering. This dish brings together the classic flavors of a traditional Caprese salad with a creative presentation that resembles a holiday wreath. Fresh mozzarella, ripe tomatoes, and aromatic basil come together with a drizzle of balsamic glaze to create a light and vibrant appetizer that’s both visually appealing and delicious.
This recipe is simple to prepare and can be made in advance, making it an ideal choice for busy holiday hosts. The Caprese Christmas Wreath not only showcases the colors of the season but also provides a light and invigorating option amidst the often heavy holiday fare. It serves 4-6 people, making it perfect for smaller gatherings or as part of a larger appetizer spread.
Ingredients:
- 12 ounces fresh mozzarella balls (ciliegine or bocconcini)
- 2 cups cherry or grape tomatoes (red and yellow)
- 1 cup fresh basil leaves
- 1/4 cup extra-virgin olive oil
- 2 tablespoons balsamic glaze
- Salt and pepper to taste
- Optional: Fresh rosemary sprigs for garnish
Instructions:
- Prepare the Ingredients: Begin by draining the fresh mozzarella balls and place them in a bowl. Rinse the cherry or grape tomatoes and pat them dry. If the tomatoes are large, consider slicing them in half.
- Assemble the Wreath: On a large serving platter, start arranging the fresh basil leaves in a circular pattern to form the base of the wreath. Layer the mozzarella balls and tomatoes on top of the basil, alternating between the mozzarella and tomatoes to create a balanced and colorful appearance.
- Season and Drizzle: Drizzle the extra-virgin olive oil over the arranged wreath. Lightly sprinkle with salt and pepper to enhance the flavors. Finish by drizzling the balsamic glaze in a gentle swirl over the entire wreath for a touch of sweetness and visual appeal.
- Garnish: If desired, tuck a few fresh rosemary sprigs around the wreath to mimic the look of a traditional Christmas wreath and add an aromatic element.
- Serve and Enjoy: Allow the flavors to meld together for about 10-15 minutes at room temperature before serving. This dish can be enjoyed on its own or served with crusty bread or crackers.
Extra Tips:
For an extra burst of flavor, consider marinating the mozzarella balls in the olive oil with a pinch of salt and pepper for about 30 minutes before assembling the wreath. This will infuse the cheese with additional taste, enhancing the overall dish.
Additionally, if you prefer a more tangy flavor, use a balsamic reduction instead of balsamic glaze for a thicker consistency and more intense taste. Make sure to adjust the amount of balsamic used based on personal preference to avoid overpowering the fresh ingredients.
Fig and Blue Cheese Tartlets
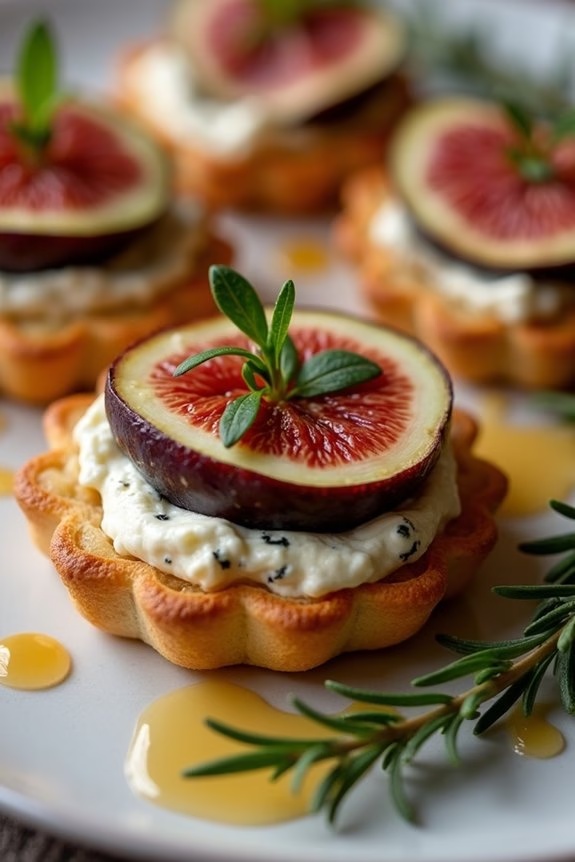
These Fig and Blue Cheese Tartlets are a delightful appetizer that combines the sweetness of figs with the tangy creaminess of blue cheese, all nestled in a flaky pastry shell. Perfect for a holiday gathering, these tartlets offer a sophisticated flavor profile that will impress your guests. The contrast between the rich, savory blue cheese and the natural sweetness of figs creates a harmonious balance that’s further enhanced by the buttery pastry.
Ideal for serving a small group of 4-6 people, this recipe is both simple and elegant, making it a perfect addition to your Christmas spread. The tartlets are easy to prepare ahead of time and can be served either warm or at room temperature, allowing you to focus on enjoying your time with family and friends rather than spending too much time in the kitchen.
Ingredients:
- 1 sheet of puff pastry, thawed
- 6 fresh figs, sliced
- 1/2 cup crumbled blue cheese
- 1/4 cup honey
- 1 tablespoon fresh thyme leaves
- 1 egg, beaten (for egg wash)
- Salt and pepper to taste
Instructions:
- Preheat the Oven: Begin by preheating your oven to 400°F (200°C). This will guarantee that your puff pastry cooks evenly and becomes beautifully golden and flaky.
- Prepare the Puff Pastry: On a lightly floured surface, roll out the puff pastry sheet to smooth out any creases. Cut the pastry into 12 equal squares and place them on a baking sheet lined with parchment paper.
- Assemble the Tartlets: Place a slice of fresh fig on each square of pastry. Sprinkle a generous amount of crumbled blue cheese over the figs. Drizzle each tartlet with a small amount of honey, and sprinkle with fresh thyme leaves for added flavor.
- Egg Wash and Season: Brush the edges of the puff pastry with the beaten egg to give them a nice golden color when baked. Season the tartlets with a pinch of salt and pepper.
- Bake the Tartlets: Transfer the baking sheet to the preheated oven and bake for 15-20 minutes or until the pastry is puffed and golden brown and the cheese is melted.
- Serve: Allow the tartlets to cool slightly before serving. These can be enjoyed warm or at room temperature.
Extra Tips:
For an extra layer of flavor, consider adding a touch of balsamic glaze over the tartlets just before serving. This will enhance the sweetness of the figs and add a subtle tartness that complements the blue cheese.
If fresh figs are unavailable, dried figs can be rehydrated slightly with warm water or a splash of orange juice. Additionally, you can prepare the tartlets a day in advance and store them in the refrigerator. Simply reheat them in the oven for a few minutes before serving to regain their crispy texture.
Sweet Potato and Chorizo Bites
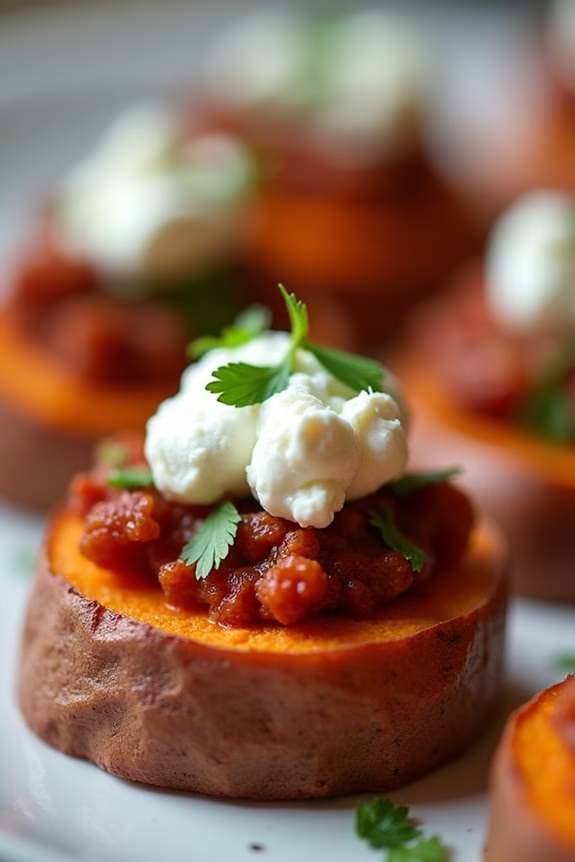
The holiday season is a time for celebration and indulgence, and what better way to kick off your Christmas festivities than with a delicious appetizer that combines the sweet and savory flavors of sweet potatoes and spicy chorizo?
These Sweet Potato and Chorizo Bites are perfect for your Christmas gathering, offering a delightful combination of textures and tastes that will leave your guests wanting more. The natural sweetness of the roasted sweet potatoes pairs perfectly with the rich, spiced chorizo, creating a mouthwatering bite-sized treat that’s both festive and satisfying.
This recipe is simple yet impressive, making it an ideal choice for holiday entertaining. With just a handful of ingredients and a little preparation, you can create a dish that looks and tastes gourmet without spending hours in the kitchen.
Whether you’re hosting a casual get-together or a formal dinner, these Sweet Potato and Chorizo Bites will be a hit with everyone. Perfect for a serving size of 4-6 people, this appetizer is sure to become a staple in your holiday recipe collection.
Ingredients:
- 2 large sweet potatoes, peeled and sliced into 1/4-inch rounds
- 1 tablespoon olive oil
- Salt and pepper to taste
- 8 ounces chorizo, casing removed and crumbled
- 1/4 cup sour cream
- 1 tablespoon fresh cilantro, chopped
- 1 tablespoon lime juice
- 1/4 cup crumbled feta cheese
Instructions:
- Prepare the Sweet Potatoes: Preheat your oven to 400°F (200°C). Line a baking sheet with parchment paper. Arrange the sweet potato slices on the baking sheet in a single layer. Drizzle with olive oil and sprinkle with salt and pepper. Toss to coat evenly.
- Roast the Sweet Potatoes: Place the baking sheet in the preheated oven and roast the sweet potatoes for 20-25 minutes, flipping halfway through, until they’re tender and slightly caramelized around the edges.
- Cook the Chorizo: While the sweet potatoes are roasting, heat a skillet over medium heat. Add the crumbled chorizo and cook, stirring occasionally, until browned and cooked through, about 5-7 minutes. Drain any excess fat and set aside.
- Prepare the Sour Cream Mixture: In a small bowl, mix together the sour cream, chopped cilantro, and lime juice. Stir until well combined and set aside.
- Assemble the Bites: Once the sweet potatoes are done, remove them from the oven and let them cool slightly. Top each sweet potato slice with a spoonful of cooked chorizo, a dollop of the sour cream mixture, and a sprinkle of crumbled feta cheese.
- Serve: Arrange the Sweet Potato and Chorizo Bites on a serving platter and garnish with a little extra cilantro if desired. Serve warm or at room temperature.
Extra Tips:
When selecting chorizo, you can choose between Spanish or Mexican chorizo. Spanish chorizo is typically cured and drier, while Mexican chorizo is fresh and requires cooking. Both will work well in this recipe, but Mexican chorizo is preferred if you want a softer texture.
If you’re preparing this dish ahead of time, you can roast the sweet potatoes and cook the chorizo in advance, then assemble just before serving. For an added touch, consider drizzling a bit of balsamic glaze over the assembled bites to enhance the flavors.
Roasted Beet Hummus With Pita Chips
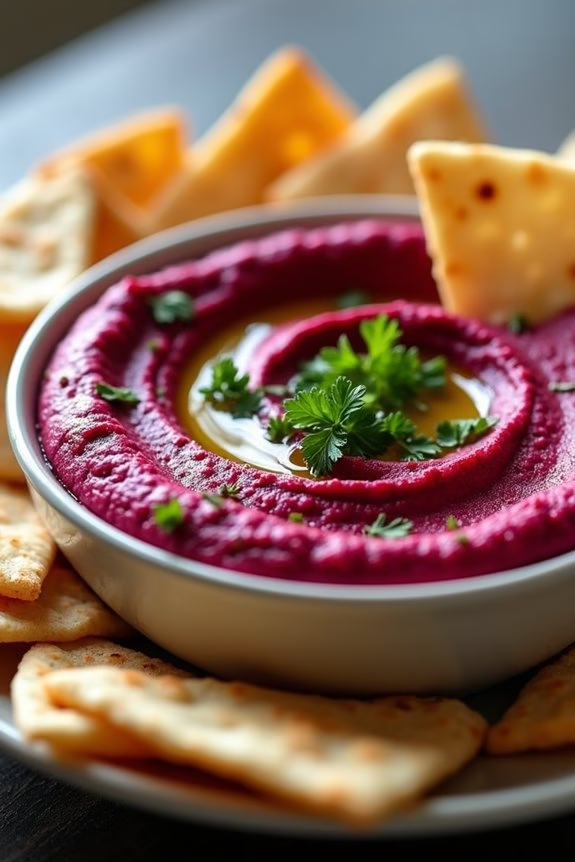
Roasted Beet Hummus with Pita Chips is a vibrant and flavorful appetizer that’s perfect for your Christmas gatherings. The earthy sweetness of roasted beets combines beautifully with the creamy texture of chickpeas to create a hummus that not only tastes amazing but also adds a stunning pop of color to your holiday spread.
This dish isn’t only delicious but also healthy, making it a great option for guests who are looking for lighter fare amidst the holiday indulgence.
Pita chips add the perfect crunch to complement the smooth hummus. They’re incredibly easy to make at home, and the freshness really elevates the dish. Roasting the beets enhances their natural sweetness, and when blended with the traditional hummus ingredients like tahini, garlic, and lemon juice, you get a dip that’s both familiar yet excitingly different.
This recipe serves 4-6 people, making it ideal for a small gathering or as part of a larger appetizer spread.
Ingredients:
- 2 medium-sized beets
- 1 can (15 oz) chickpeas, drained and rinsed
- 3 tablespoons tahini
- 2 tablespoons olive oil
- 2 garlic cloves
- Juice of 1 lemon
- 1 teaspoon ground cumin
- Salt to taste
- 6 whole wheat pita breads
- 2 tablespoons olive oil (for pita chips)
- Salt and pepper to taste
- Fresh parsley for garnish
Cooking Instructions:
- Preheat the Oven: Start by preheating your oven to 400°F (200°C). This temperature is ideal for roasting the beets and crisping the pita chips.
- Prepare the Beets: Wash the beets thoroughly and wrap each one in aluminum foil. Place them on a baking sheet and roast in the preheated oven for about 45-60 minutes, or until they’re tender when pierced with a fork. Once done, remove from the oven and allow them to cool.
- Make the Pita Chips: While the beets are roasting, cut the pita breads into triangles. Arrange the pieces in a single layer on a baking sheet. Drizzle with olive oil and sprinkle with salt and pepper. Bake in the oven for about 10-12 minutes, or until they’re golden and crispy. Remove and let them cool.
- Prepare the Hummus: Once the beets are cool enough to handle, peel off the skins. Roughly chop the beets and add them to a food processor along with the chickpeas, tahini, olive oil, garlic, lemon juice, cumin, and salt. Blend until smooth and creamy. You may need to scrape down the sides of the bowl a few times to verify everything is well incorporated.
- Adjust Seasoning: Taste the hummus and adjust the seasoning as needed. You can add more lemon juice, salt, or cumin according to your preference.
- Serve: Transfer the beet hummus to a serving bowl and garnish with a drizzle of olive oil and chopped fresh parsley. Serve alongside the homemade pita chips for dipping.
Extra Tips:
For the best results, make sure the beets are completely cool before blending to prevent the hummus from becoming too runny. You can prepare the hummus a day ahead and store it in the refrigerator, which can enhance the flavors as they meld together.
If you prefer a spicier kick, consider adding a pinch of cayenne pepper to the hummus. Always taste and adjust seasonings to suit your personal preference, and enjoy the vibrant taste and color this dish brings to your holiday table.
Curried Deviled Eggs With Mango Chutney

Curried Deviled Eggs With Mango Chutney is a delightful twist on the traditional deviled egg, bringing a burst of exotic flavors to your Christmas appetizer spread. The creamy yolk filling is spiced with curry powder, creating a savory contrast to the sweet and tangy mango chutney that tops each egg.
This dish isn’t only visually appealing but also a fantastic conversation starter that will leave your guests impressed and wanting more. These eggs are an excellent choice for any holiday gathering, as they’re simple to prepare and offer a unique taste that stands out among more conventional holiday appetizers.
Curried Deviled Eggs With Mango Chutney are perfect for serving 4-6 people, making them ideal for a small gathering or as part of a larger appetizer selection. With a few simple ingredients and minimal preparation time, you can create a dish that elevates your Christmas table.
The combination of textures and flavors will add an exciting new dimension to your holiday menu, and the inclusion of mango chutney provides a sweet note that balances the richness of the eggs. This recipe is sure to become a festive favorite in your household.
Ingredients:
- 6 large eggs
- 3 tablespoons mayonnaise
- 1 tablespoon curry powder
- 1 teaspoon Dijon mustard
- Salt and pepper to taste
- 2 tablespoons mango chutney
- Fresh cilantro or parsley for garnish
Cooking Instructions:
- Boil the Eggs: Place the eggs in a single layer in a saucepan and cover them with water. Bring the water to a boil over medium-high heat. Once boiling, turn off the heat and cover the saucepan. Let the eggs sit in the hot water for about 10-12 minutes.
- Prepare the Eggs: After the eggs have cooked, transfer them to a bowl of ice water to cool completely. Once cooled, peel the eggs and slice them in half lengthwise. Carefully remove the yolks and place them in a small mixing bowl.
- Make the Filling: Mash the yolks with a fork until they’re crumbly. Add the mayonnaise, curry powder, Dijon mustard, salt, and pepper. Mix until the filling is smooth and well combined.
- Assemble the Deviled Eggs: Spoon or pipe the yolk mixture back into the egg whites, evenly dividing the filling among the egg halves.
- Top with Chutney: Place a small dollop of mango chutney on top of each filled egg. Make sure to balance the amount so as not to overpower the curry flavor.
- Garnish and Serve: Garnish each egg with a small sprig of fresh cilantro or parsley for a pop of color. Arrange the deviled eggs on a platter and serve immediately.
Extra Tips: When making Curried Deviled Eggs With Mango Chutney, confirm that your eggs are cooked to perfection by using the ice water bath to stop the cooking process immediately. This will help prevent overcooked, rubbery whites and maintain a bright yolk color.
If you prefer a finer filling texture, consider using a food processor to blend the yolk mixture. For added spice, you can include a dash of cayenne pepper or paprika in the yolk mixture. Finally, you can prepare the eggs a day in advance, but add the chutney and garnish just before serving to maintain their freshness and presentation.
Pear and Gorgonzola Flatbread
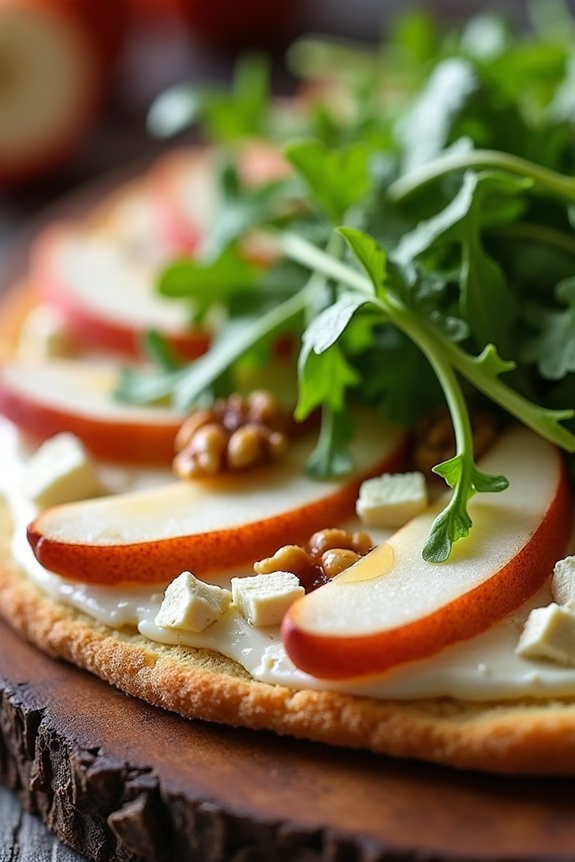
Looking for a festive appetizer to impress your guests this Christmas? Try this Pear and Gorgonzola Flatbread. It’s a delightful combination of sweet and savory flavors that will tantalize your taste buds.
This elegant dish is perfect for any holiday gathering, featuring the sweetness of ripe pears, the sharpness of Gorgonzola cheese, and the earthy crunch of walnuts, all atop a crisp flatbread base. Not only is it delicious, but it’s also simple to prepare, making it a stress-free addition to your Christmas menu.
The harmonious blend of flavors and textures in this Pear and Gorgonzola Flatbread makes it an ideal choice for those looking to add a touch of sophistication to their holiday appetizers. With its visually appealing presentation and gourmet taste, this flatbread is sure to be a crowd-pleaser.
It’s an excellent option for serving 4-6 people, making it perfect for small gatherings or as part of a larger spread. This recipe is designed to bring joy to your festive table and create lasting memories with friends and family.
Ingredients (for 4-6 servings):
- 2 large flatbreads or naan
- 2 ripe pears, thinly sliced
- 1 cup crumbled Gorgonzola cheese
- 1/2 cup walnuts, roughly chopped
- 2 tablespoons honey
- 1 tablespoon olive oil
- 2 cups arugula or mixed greens
- Salt and pepper to taste
Cooking Instructions:
- Preheat the Oven: Begin by preheating your oven to 400°F (200°C). This guarantees that the flatbreads bake evenly and become crisp without burning.
- Prepare the Flatbreads: Place the flatbreads or naan on a baking sheet lined with parchment paper. Brush each flatbread with olive oil to provide a base for the toppings and prevent them from drying out.
- Layer the Ingredients: Evenly distribute the pear slices across the flatbreads. Follow with a generous sprinkling of crumbled Gorgonzola cheese and chopped walnuts. The cheese will melt slightly, binding the toppings together.
- Bake: Place the baking sheet in the preheated oven and bake the flatbreads for about 10-12 minutes, or until the cheese is melted and the edges are golden brown. Keep a close watch to avoid overcooking.
- Add Fresh Greens: Once baked, remove the flatbreads from the oven and allow them to cool slightly. Top each flatbread with a handful of arugula or mixed greens for a fresh, peppery contrast to the rich toppings.
- Drizzle with Honey: Just before serving, drizzle each flatbread with honey. This adds a touch of sweetness that enhances the flavors of the pears and cheese.
- Season and Serve: Season with a pinch of salt and pepper to taste. Cut the flatbreads into slices and serve warm as an appetizer.
Extra Tips:
For the best results, choose pears that are ripe but still firm to guarantee they slice easily and maintain their shape during cooking.
If you prefer a slightly more robust flavor, consider using blue cheese instead of Gorgonzola. Toasting the walnuts before adding them to the flatbread can bring out their nutty flavor, adding an extra layer of depth to the dish.
Finally, if you’re preparing this dish in advance, wait to add the arugula and honey until just before serving to keep the greens fresh and the honey from soaking into the flatbread.
Mini Lobster Rolls With Lemon Aioli

Indulge in the holiday spirit with these delectable Mini Lobster Rolls With Lemon Aioli, a sophisticated yet simple appetizer perfect for your Christmas gathering.
These rolls capture the essence of luxurious seafood combined with a zesty lemon aioli, offering a revitalizing and rich flavor profile. The tender chunks of succulent lobster meat paired with the creamy and tangy aioli will leave your guests craving more. Ideal for a serving size of 4-6 people, these rolls aren’t only easy to prepare but also a delightful addition to your festive menu.
The key to these mini lobster rolls lies in the quality of the lobster meat and the balance of flavors in the aioli. Fresh, succulent lobster is complemented by a light, citrusy aioli, which enhances the natural sweetness of the seafood. Serve these rolls warm in soft, toasted buns, guaranteeing they’re an irresistible treat that will elevate your Christmas appetizer spread.
Ingredients:
- 1 pound cooked lobster meat, chopped
- 6 mini brioche buns or hot dog rolls
- 1/4 cup mayonnaise
- 1 tablespoon fresh lemon juice
- 1 teaspoon lemon zest
- 1 teaspoon Dijon mustard
- Salt and pepper to taste
- 2 tablespoons unsalted butter, melted
- 2 tablespoons finely chopped chives
- Optional: lettuce leaves for lining the buns
Cooking Instructions:
1. Prepare the Lemon Aioli: In a small mixing bowl, whisk together the mayonnaise, fresh lemon juice, lemon zest, and Dijon mustard.
Season the aioli with salt and pepper to taste. Mix until all ingredients are well combined and the aioli is smooth. Set aside in the refrigerator to chill while you prepare the lobster rolls.
2. Toast the Buns: Preheat a skillet or grill pan over medium heat. Brush the inside of the mini brioche buns or hot dog rolls with melted butter.
Place the buns open side down on the skillet and toast them until they’re golden brown and crisp, approximately 2-3 minutes. Remove from heat and set aside.
3. Mix the Lobster Filling: In a large bowl, combine the chopped lobster meat with half of the prepared lemon aioli.
Gently toss to guarantee the lobster meat is evenly coated. If desired, add more aioli to taste, keeping in mind that the filling should be creamy but not overly saucy.
4. Assemble the Rolls: If using lettuce, line each toasted bun with a small piece of lettuce to add a fresh crunch.
Spoon the lobster mixture into each bun, filling them generously. Garnish the top of each lobster roll with finely chopped chives for a pop of color and flavor.
5. Serve: Arrange the mini lobster rolls on a serving platter and serve immediately while the buns are still warm and the filling is fresh.
Extra Tips:
For the best flavor, use fresh lobster meat if possible. If you’re using frozen lobster, make sure it’s thoroughly thawed and drained to avoid excess moisture in the rolls.
When making the aioli, adjust the lemon juice to taste, adding more if you prefer a tangier flavor. Additionally, you can prepare the aioli a day in advance to allow the flavors to meld together.
These mini lobster rolls can be made a few hours ahead of your event; just keep them covered in the refrigerator and toast the buns just before serving for maximum freshness. Enjoy!
Truffle Mushroom Arancini

Truffle Mushroom Arancini is a delightful Italian appetizer that brings together the earthy flavors of mushrooms and the luxurious aroma of truffles in a crispy, bite-sized package.
These golden, deep-fried risotto balls are perfect for your Christmas feasts, offering a sophisticated and decadent start to your festive meal. With a creamy mushroom-infused center and a crispy exterior, these arancini are bound to impress your guests and elevate your holiday dining experience.
Traditionally made with leftover risotto, this version of arancini combines Arborio rice, fresh mushrooms, and a hint of truffle oil for an irresistible depth of flavor. Served with a simple garlic aioli or marinara sauce, these Truffle Mushroom Arancini are perfect for sharing and can be prepared ahead of time, allowing you to enjoy the festivities with ease.
This recipe serves 4-6 people.
Ingredients:
- 2 cups Arborio rice
- 4 cups chicken or vegetable broth
- 1 cup finely chopped mushrooms (such as cremini or button mushrooms)
- 2 tablespoons olive oil
- 1 small onion, finely chopped
- 2 cloves garlic, minced
- 1/2 cup dry white wine
- 1/2 cup grated Parmesan cheese
- 2 tablespoons unsalted butter
- 1 tablespoon truffle oil
- Salt and pepper to taste
- 2 large eggs
- 1 cup all-purpose flour
- 1 1/2 cups breadcrumbs
- Vegetable oil for frying
Cooking Instructions:
- Prepare the Risotto: In a large saucepan, heat the olive oil over medium heat. Add the chopped onion and garlic, sautéing until translucent. Stir in the mushrooms and cook until they’re soft and golden.
- Cook the Rice: Add the Arborio rice to the pan, stirring continuously for about 2 minutes until the rice is slightly translucent. Pour in the white wine and let it simmer until absorbed.
- Add Broth: Gradually add the broth, one cup at a time, stirring frequently and allowing each addition to be absorbed before adding the next. Continue this process until the rice is creamy and fully cooked, about 18-20 minutes.
- Finish the Risotto: Remove the risotto from heat. Stir in the Parmesan cheese, butter, and truffle oil. Season with salt and pepper to taste. Let the mixture cool completely and refrigerate for at least an hour to firm up.
- Form the Arancini: Once the risotto is chilled, take a small handful and shape it into a ball about the size of a golf ball. Repeat until all the risotto is used.
- Coat the Arancini: Set up a breading station with three bowls: one with flour, one with beaten eggs, and one with breadcrumbs. Roll each ball first in the flour, then dip in the egg, and finally coat with breadcrumbs.
- Fry the Arancini: In a deep pan, heat the vegetable oil to 350°F (175°C). Fry the arancini in batches, turning occasionally, until they’re golden brown and crispy, about 3-4 minutes per batch. Remove with a slotted spoon and drain on paper towels.
- Serve: Serve the Truffle Mushroom Arancini warm with your choice of dipping sauce such as garlic aioli or marinara sauce.
Extra Tips:
To guarantee your arancini are perfectly crispy, make sure the risotto is thoroughly chilled before shaping and frying. This helps the balls hold their shape and prevents them from falling apart during frying.
If you find the mixture too sticky, wet your hands with a little water to make shaping easier. Additionally, the truffle oil should be added sparingly to avoid overpowering the delicate mushroom flavor. Adjust the seasoning to your taste and enjoy these luxurious bites as a festive appetizer.
Cranberry Salsa With Jalapeño Cream Cheese Dip
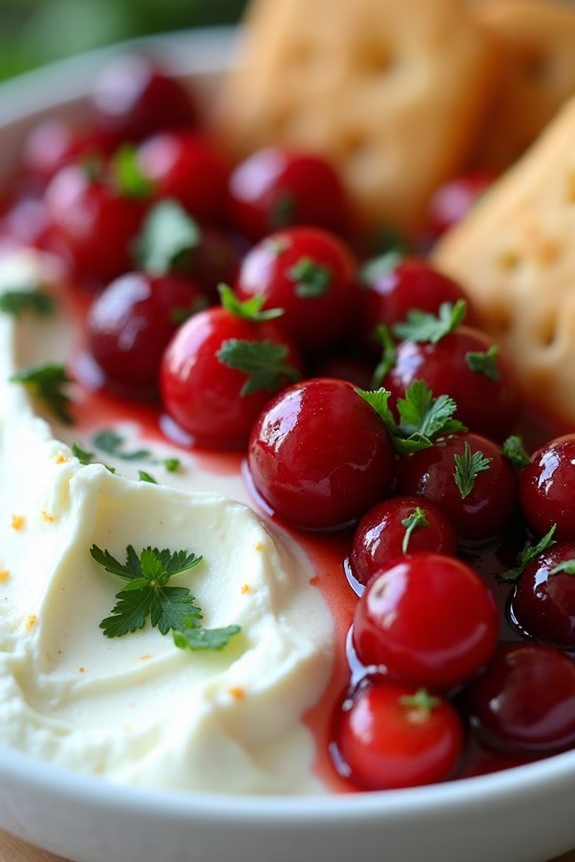
Cranberry Salsa with Jalapeño Cream Cheese Dip is a vibrant and festive appetizer perfect for your holiday gatherings. This recipe combines the tartness of fresh cranberries with the heat of jalapeños and the smooth richness of cream cheese, creating a delightful balance of flavors.
It’s a crowd-pleaser that’s not only visually appealing but also tantalizes the taste buds with every bite. This dish is ideal for serving 4-6 people, making it perfect for intimate holiday gatherings or as an appetizer at a larger party.
The combination of the sweet and spicy salsa with the creamy dip makes it a versatile dish that pairs well with crackers, toasted bread, or even as a topping for grilled meats. Whether you’re hosting friends or family, this appetizer will surely make your holiday table shine.
Ingredients:
- 1 bag (12 ounces) fresh cranberries
- 1/4 cup sugar
- 1/4 cup honey
- 1/4 cup fresh cilantro, chopped
- 1 medium jalapeño, seeded and finely chopped
- 1/4 cup red onion, finely chopped
- 1 tablespoon lime juice
- 1/4 teaspoon salt
- 1 block (8 ounces) cream cheese, softened
- Crackers or toasted bread, for serving
Instructions:
- Prepare the Cranberries: Rinse the cranberries under cold water and drain them well. Place the cranberries in a food processor and pulse them a few times until they’re coarsely chopped. Be careful not to over-process them into a puree.
- Make the Salsa: Transfer the chopped cranberries to a mixing bowl. Add the sugar, honey, chopped cilantro, jalapeño, red onion, lime juice, and salt. Stir well to combine all the ingredients. Cover the bowl with plastic wrap and refrigerate for at least 2 hours or overnight. This allows the flavors to meld together beautifully.
- Prepare the Cream Cheese Dip: About 30 minutes before serving, remove the cream cheese from the refrigerator to allow it to soften. Spread the softened cream cheese evenly on a serving platter or shallow dish.
- Assemble the Dish: Just before serving, take the cranberry salsa out of the refrigerator. Stir it once more to make sure it’s well mixed. Spoon the salsa over the layer of cream cheese, spreading it evenly across the surface.
- Serve: Serve the Cranberry Salsa with Jalapeño Cream Cheese Dip with crackers or toasted bread on the side. Enjoy the perfect combination of creamy, spicy, and sweet flavors!
Extra Tips:
For an extra touch of flavor, consider adding a pinch of orange zest to the cranberry salsa for a citrusy note. If you prefer a milder dip, reduce the amount of jalapeño or remove the seeds entirely.
Additionally, for a smoother spread, you can whip the cream cheese slightly before spreading it on the platter. This dish can be prepared a day in advance, making it convenient for holiday preparations. Just assemble it right before serving to guarantee the cream cheese stays fresh and creamy.