

When it comes to Christmas dinners, there’s something so comforting about those traditional recipes that have been part of our holiday celebrations for generations. The aroma of Roast Turkey with Herb Stuffing or the sweet allure of a Honey-Glazed Ham brings back cherished memories. These dishes tell stories and connect us to our loved ones, both past and present. I’m excited to share some classic recipes that never fail to capture the holiday spirit. Are you ready to explore these time-honored favorites?
Roast Turkey With Herb Stuffing
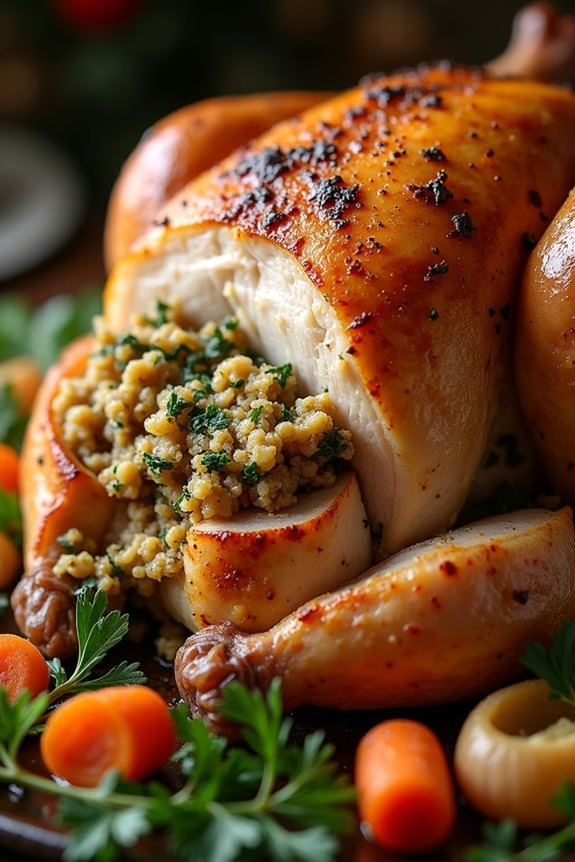
Roast Turkey With Herb Stuffing is a quintessential dish that graces many holiday tables, often being the centerpiece of a traditional Christmas dinner. This classic recipe combines the tender, juicy flavors of a perfectly roasted turkey with the aromatic and savory notes of herb stuffing. The turkey is seasoned with a blend of fresh herbs and spices, creating a delightful crust, while the stuffing inside absorbs the rich flavors of the turkey juices, resulting in a harmonious blend of textures and tastes.
This recipe is designed to serve 4-6 people, making it perfect for a small family gathering or an intimate holiday celebration. The preparation involves using fresh ingredients that enhance the natural flavors of the turkey and stuffing. By following these detailed instructions, you’ll achieve a delicious and memorable Christmas dinner that’s sure to impress your family and guests.
Ingredients for 4-6 servings:
- 1 whole turkey (8-10 lbs)
- 1/4 cup olive oil
- Salt and freshly ground black pepper
- 1 lemon, halved
- 1 bunch fresh thyme
- 1 bunch fresh sage
- 1 bunch fresh rosemary
- 1 medium onion, quartered
- 2 carrots, peeled and chopped
- 2 stalks celery, chopped
- 1/2 cup unsalted butter, melted
- 3 cups cubed bread (preferably day-old)
- 1/2 cup chicken broth
- 1/2 cup chopped fresh parsley
- 2 cloves garlic, minced
- 1 teaspoon dried thyme
- 1 teaspoon dried sage
- 1 teaspoon dried rosemary
Cooking Instructions:
- Prepare the Turkey: Preheat your oven to 325°F (165°C). Remove the giblets from the turkey, rinse it inside and out under cold water, and pat it dry with paper towels. Place the turkey on a roasting rack inside a large roasting pan.
- Season the Turkey: Rub the turkey skin with olive oil, salt, and black pepper. Squeeze the juice of the lemon halves over the turkey and place the lemon halves inside the cavity along with the fresh thyme, sage, and rosemary.
- Prepare the Stuffing: In a large bowl, combine the cubed bread, melted butter, chicken broth, chopped parsley, minced garlic, dried thyme, sage, and rosemary. Mix until the bread cubes are moistened and the ingredients are well combined.
- Stuff the Turkey: Carefully stuff the prepared herb mixture into the cavity of the turkey. Don’t overfill; any leftover stuffing can be placed in a separate baking dish to cook alongside the turkey.
- Roast the Turkey: Scatter the onion, carrots, and celery around the turkey in the roasting pan. Cover the turkey loosely with aluminum foil and place it in the preheated oven. Roast the turkey for approximately 3 to 3.5 hours, or until a meat thermometer inserted into the thickest part of the thigh reads 165°F (75°C).
- Baste and Finish: During the final hour of roasting, remove the foil to allow the skin to become golden and crisp. Baste the turkey every 30 minutes with the pan juices to keep it moist and flavorful.
- Rest and Serve: Once the turkey is done, remove it from the oven and let it rest for at least 20 minutes before carving. This allows the juices to redistribute throughout the meat, guaranteeing each slice is juicy. Serve the turkey with the herb stuffing and roasted vegetables.
Extra Tips:
For the best results, verify your turkey is completely thawed before cooking. Using a meat thermometer is essential to prevent overcooking and confirming the turkey is safe to eat.
If you prefer a crispier skin, you can increase the oven temperature to 400°F (200°C) during the last 15 minutes of roasting. Allowing the turkey to rest before carving is important as it helps retain its moisture, resulting in a tender and juicy dish.
Finally, remember to carve the turkey with a sharp knife for clean, precise slices.
Honey-Glazed Ham
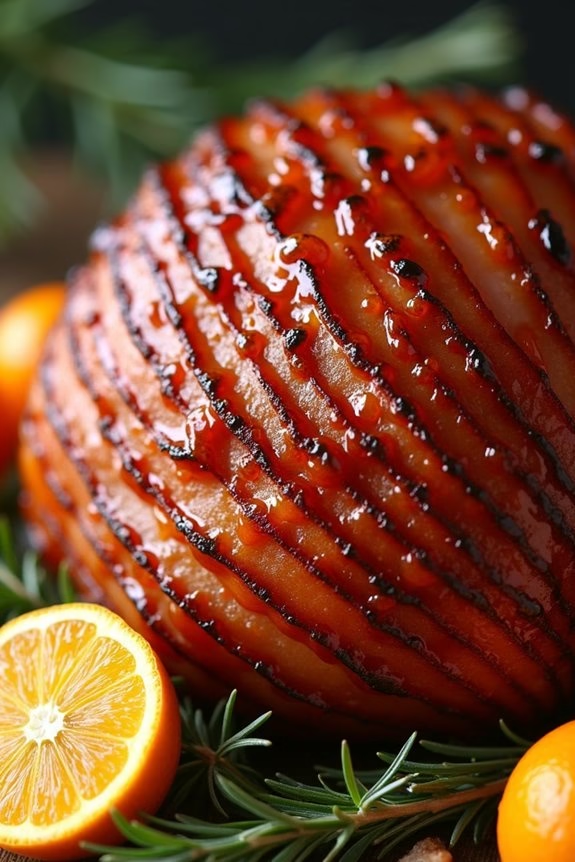
The Honey-Glazed Ham is a quintessential centerpiece for traditional Christmas dinners, known for its sweet and savory flavor that perfectly complements the holiday season. This delightful dish involves a succulent ham coated with a luscious honey glaze, resulting in a caramelized exterior that’s both visually appealing and delicious.
The cooking process is relatively simple, making it an ideal choice for both seasoned cooks and those new to preparing holiday meals. With a few carefully selected ingredients and some patience, you can create a honey-glazed ham that will impress your family and guests.
When selecting your ham, aim for a bone-in, spiral-cut ham, which will guarantee even cooking and easy serving. The glaze, made from honey, brown sugar, and a hint of mustard, will seep into the meat, enhancing its natural flavors. The aroma of the ham baking with the glaze will fill your home with a festive and inviting scent, setting the perfect atmosphere for Christmas.
Whether served hot out of the oven or cold as leftovers, this honey-glazed ham promises to be a highlight of your holiday feast.
Ingredients for 4-6 people:
- 1 fully cooked bone-in spiral-cut ham (approximately 5-6 pounds)
- 1 cup honey
- 1/2 cup brown sugar
- 2 tablespoons Dijon mustard
- 1/2 cup apple cider vinegar
- 1 teaspoon ground cloves
- 1/4 teaspoon ground cinnamon
Cooking Instructions:
- Preheat the Oven: Begin by preheating your oven to 325°F (165°C). This will guarantee that the ham cooks evenly and achieves a perfect glaze.
- Prepare the Ham: Place the ham in a roasting pan with the flat side down. If your ham isn’t spiral-cut, score the surface in a diamond pattern, cutting about 1/4 inch deep. This will allow the glaze to penetrate the meat.
- Make the Glaze: In a small saucepan, combine the honey, brown sugar, Dijon mustard, apple cider vinegar, ground cloves, and ground cinnamon. Heat the mixture over medium heat, stirring occasionally, until the sugar is dissolved and the glaze is smooth.
- Apply the Glaze: Once the glaze is ready, pour half of it over the ham, making sure to cover the entire surface. Reserve the remaining glaze for later use.
- Bake the Ham: Cover the roasting pan with aluminum foil and place it in the preheated oven. Bake the ham for approximately 1.5 to 2 hours, basting with the reserved glaze every 30 minutes.
- Final Glaze and Broil: Remove the foil during the last 20 minutes of baking to allow the glaze to caramelize. If desired, place the ham under the broiler for an additional 3-5 minutes to achieve a more pronounced caramelization.
- Rest and Serve: Once done, remove the ham from the oven and let it rest for about 10 minutes before slicing. This allows the juices to redistribute, guaranteeing moist and flavorful servings.
Extra Tips:
When choosing a ham, look for one labeled as “fully cooked” to simplify the process. If you prefer a less sweet glaze, adjust the amount of honey and brown sugar to taste.
To enhance the presentation, consider garnishing the platter with fresh herbs or fruit slices. Remember, the key to a beautifully glazed ham is patience; take your time with the glazing process to guarantee even coverage and a rich, caramelized finish. Enjoy your delicious holiday centerpiece!
Prime Rib Roast
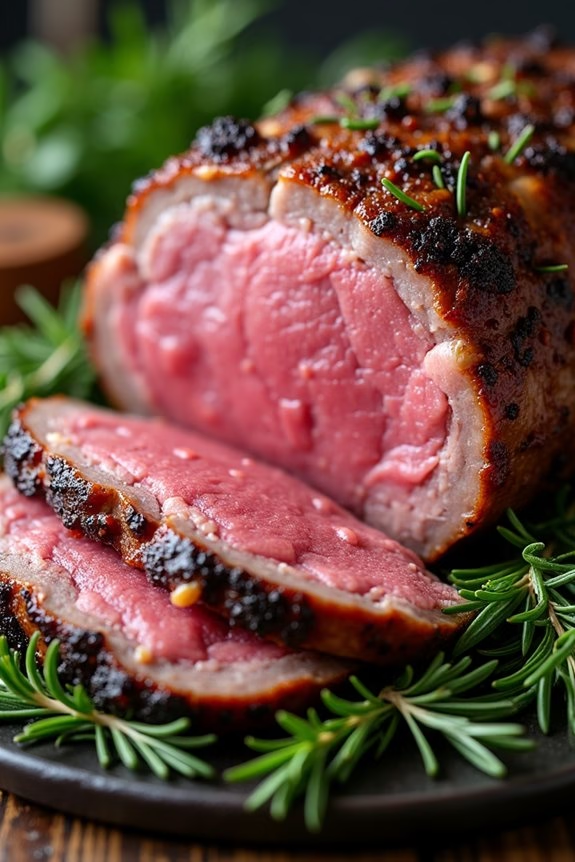
A prime rib roast is a classic centerpiece for a traditional Christmas dinner, known for its rich flavor and succulent texture. This dish is perfect for a holiday gathering, as it not only serves as a show-stopping main course but also fills the home with a delightful aroma. The key to a perfect prime rib is choosing a high-quality cut of meat and cooking it slowly to guarantee it remains juicy and tender.
Whether you’re hosting a big family gathering or an intimate Christmas dinner, a prime rib roast is sure to impress your guests and leave them craving for more.
To achieve the perfect prime rib roast, it’s vital to season the meat well and allow it to rest before and after cooking. This will enhance the natural flavors of the beef and help it to cook evenly. The result is a beautifully cooked roast with a flavorful crust and a tender, juicy interior.
Pair it with your favorite sides, such as roasted vegetables, mashed potatoes, or a fresh green salad, to complete your festive meal. Here’s how you can prepare a prime rib roast for 4-6 people.
Ingredients (Serves 4-6 people)
- 1 (4-5 pounds) bone-in prime rib roast
- 2 tablespoons olive oil
- 4 cloves garlic, minced
- 1 tablespoon fresh rosemary, chopped
- 1 tablespoon fresh thyme, chopped
- 2 teaspoons coarse sea salt
- 1 teaspoon freshly ground black pepper
- 1 cup beef broth
- Kitchen twine (optional)
Cooking Instructions
- Preparation: Remove the prime rib from the refrigerator at least 2 hours before cooking to allow it to come to room temperature. This helps the roast cook more evenly.
- Season the Roast: Preheat your oven to 450°F (230°C). In a small bowl, combine olive oil, minced garlic, rosemary, thyme, sea salt, and black pepper. Rub this mixture all over the prime rib, guaranteeing it’s coated evenly. If desired, tie the roast with kitchen twine to help it maintain its shape during cooking.
- Initial High-Temperature Cooking: Place the seasoned prime rib on a rack in a roasting pan, bone side down. Roast in the preheated oven for 20 minutes. This initial high-temperature cooking will create a crust on the outside of the meat.
- Lower the Oven Temperature: After 20 minutes, reduce the oven temperature to 325°F (165°C). Continue roasting until the internal temperature reaches 120°F (49°C) for medium-rare, approximately 1.5 to 2 hours, depending on the size of the roast. Use a meat thermometer inserted into the thickest part of the roast to check the temperature.
- Rest the Roast: Remove the prime rib from the oven and transfer it to a cutting board. Cover it loosely with aluminum foil and let it rest for at least 20 minutes. Resting allows the juices to redistribute within the meat, resulting in a tender and juicy roast.
- Prepare the Jus: While the roast is resting, pour the beef broth into the roasting pan and place it over medium heat on the stovetop. Scrape up any browned bits from the bottom of the pan with a wooden spoon. Simmer for a few minutes until slightly reduced, then strain into a gravy boat or serving dish.
- Slice and Serve: Once rested, slice the prime rib roast into thick slices and serve with the prepared jus on the side.
Extra Tips
When cooking a prime rib roast, it’s important to invest in a good-quality meat thermometer to confirm the roast is cooked to your desired level of doneness. Remember that the roast will continue to cook slightly as it rests, so it’s best to remove it from the oven a few degrees before it reaches the target temperature.
Additionally, if you prefer a garlic crust, consider adding a bit of Dijon mustard to the seasoning rub for an extra layer of flavor. Enjoy your delicious prime rib roast as the highlight of your traditional Christmas dinner!
Classic Beef Wellington
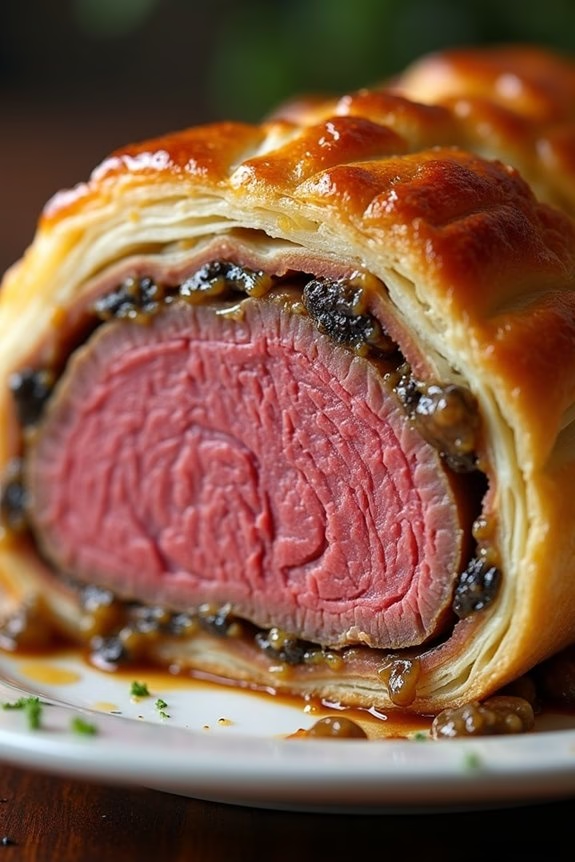
Beef Wellington is a traditional British dish that has become a beloved classic at Christmas dinners around the world. This dish features a tender beef tenderloin coated with flavorful mushroom duxelles and a layer of prosciutto, all enveloped in a golden, flaky puff pastry. The combination of textures and flavors makes it a centerpiece that exudes elegance and sophistication.
Despite its seemingly complex nature, preparing Beef Wellington is a rewarding culinary endeavor that’s sure to impress your family and guests.
The key to a perfect Beef Wellington is in the preparation and assembly of its components. The beef tenderloin should be seared to lock in juices and flavor, while the mushroom duxelles provide an earthy complement. The prosciutto acts as a barrier to prevent the pastry from getting soggy, guaranteeing a crispy, golden crust.
With a little patience and attention to detail, you can create a stunning dish that not only looks impressive but also delivers a rich and savory taste that’s synonymous with festive celebrations.
Ingredients (serves 4-6):
- 2 pounds beef tenderloin, trimmed and tied
- Salt and freshly ground black pepper
- 2 tablespoons olive oil
- 1 pound mushrooms, finely chopped
- 2 tablespoons unsalted butter
- 2 tablespoons Dijon mustard
- 12 slices of prosciutto
- Flour, for dusting
- 1 pound puff pastry
- 2 egg yolks, beaten with 1 tablespoon water (for egg wash)
Instructions:
- Prepare the Beef: Season the beef tenderloin generously with salt and pepper. In a large skillet over medium-high heat, add olive oil and sear the beef on all sides until browned, about 2 minutes per side. Remove from skillet and brush with Dijon mustard while still warm. Allow to cool completely.
- Make the Mushroom Duxelles: In the same skillet, melt butter and add the finely chopped mushrooms. Cook over medium heat until the mushrooms release their moisture and become dry and golden, about 10 minutes. Season with salt and pepper. Set aside to cool.
- Assemble the Wellington: Lay a large piece of plastic wrap on a flat surface. Arrange the slices of prosciutto into a shingled layer. Spread the mushroom duxelles evenly over the prosciutto. Place the cooled beef tenderloin on top. Using the plastic wrap, tightly roll the prosciutto and mushrooms around the beef, securing the shape. Refrigerate for 30 minutes.
- Wrap in Puff Pastry: Preheat the oven to 400°F (200°C). Roll out the puff pastry on a floured surface to a thickness of about 1/4 inch. Remove the beef from the plastic wrap and place it in the center of the pastry. Fold the pastry over the beef, trimming any excess and sealing the edges with the beaten egg yolk. Brush the entire pastry with egg wash.
- Bake the Wellington: Place the wrapped beef seam-side down on a baking sheet lined with parchment paper. Use a sharp knife to score the pastry lightly. Bake in the preheated oven until the pastry is golden brown and the beef reaches the desired doneness, about 25-30 minutes for medium-rare. Allow to rest for 10 minutes before slicing.
Extra Tips:
When preparing Beef Wellington, it’s essential to work swiftly with puff pastry to prevent it from becoming too warm and difficult to handle.
Confirm all components, especially the mushrooms and the beef, are completely cooled before assembly to avoid melting the pastry. For an extra layer of flavor, consider adding a thin layer of pâté on top of the mushroom duxelles.
Additionally, using a meat thermometer will help confirm your beef is cooked to perfection, with a medium-rare center being the most traditional choice for this dish.
Yorkshire Pudding
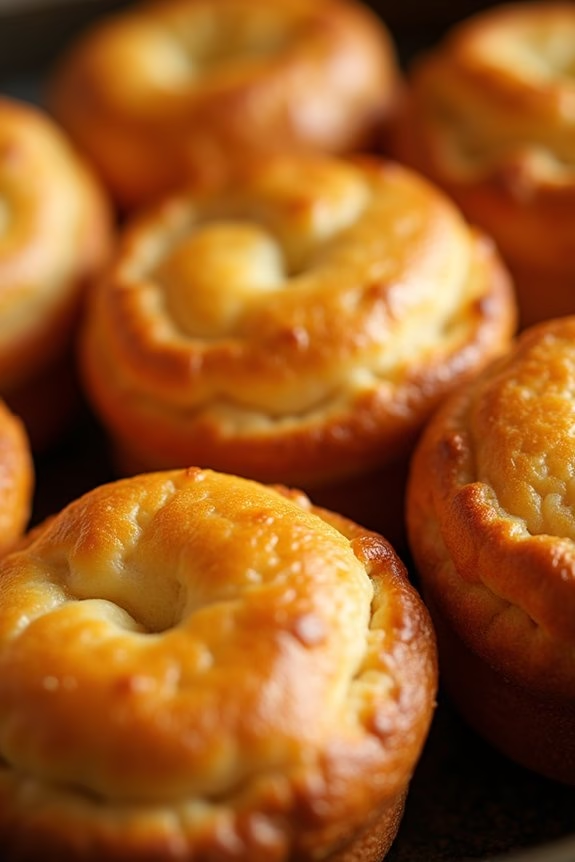
Yorkshire Pudding is a classic British side dish that traditionally accompanies roast dinners, especially during Christmas feasts. These light and airy puddings are made from a simple batter of eggs, flour, and milk, and are typically cooked in the fat drippings from a roast, adding a rich, savory flavor.
The result is a crispy exterior with a soft, doughy interior, perfect for soaking up gravy and bringing a delightful texture contrast to the meal. This recipe for Yorkshire Pudding serves 4-6 people and is a must-try for anyone looking to add a touch of British tradition to their holiday table.
While the dish itself is straightforward to prepare, achieving the perfect rise and texture demands attention to detail and a few simple techniques. Follow the steps below to create your own batch of golden, puffed Yorkshire Puddings that will surely impress your family and guests.
Ingredients:
- 1 cup all-purpose flour
- 1 cup whole milk
- 3 large eggs
- 1/2 teaspoon salt
- 2 tablespoons beef drippings or vegetable oil
Cooking Instructions:
1. Preheat the Oven: Preheat your oven to 425°F (220°C). Place a muffin tin or a Yorkshire pudding tin in the oven to heat as well. The hot tin is essential for the puddings to rise properly.
2. Prepare the Batter: In a mixing bowl, whisk together the flour and salt. In a separate bowl, beat the eggs and then whisk in the milk. Gradually add the milk and egg mixture to the flour, whisking continuously until you have a smooth batter.
Let the batter rest for at least 30 minutes at room temperature to allow the flour to fully absorb the liquid.
3. Heat the Fat: Once the oven is fully heated, remove the hot tin. Carefully add about 1/2 teaspoon of beef drippings or vegetable oil into each cup of the tin. Return the tin to the oven and heat the fat until it’s smoking hot, about 5 minutes.
4. Pour and Bake: Quickly pour the batter into the hot, greased tin cups, filling them about halfway. The batter should sizzle when it hits the hot fat. Bake in the oven for 20-25 minutes without opening the door, until the puddings are puffed up and golden brown.
5. Serve Immediately: Remove the Yorkshire puddings from the oven and serve immediately while they’re still warm and crisp. They pair perfectly with gravy or as a side to your roast dinner.
Extra Tips:
For the best Yorkshire Pudding, make sure that the batter is smooth and well-rested, as this helps develop a better structure for rising. The key to achieving a high rise is using a hot tin and hot fat, which creates steam and lifts the batter.
Avoid opening the oven door during baking, as any drop in temperature can cause the puddings to collapse. If you prefer a richer flavor, substitute some of the milk with cream. Additionally, using beef drippings enhances the traditional taste, but vegetable oil can be used as a substitute for a lighter option.
Creamy Mashed Potatoes
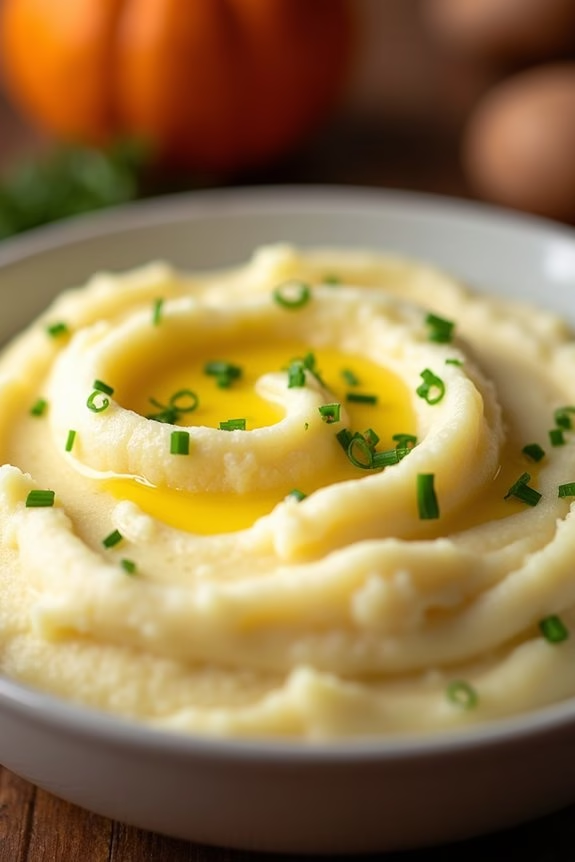
Creamy mashed potatoes are a quintessential part of any traditional Christmas dinner. Their smooth, buttery texture complements a wide range of holiday dishes, making them a favorite among family and friends. This recipe focuses on achieving that perfect blend of creaminess and flavor that will leave your guests asking for more.
Using simple ingredients and a straightforward process, you can create a delicious side dish that pairs beautifully with roasted meats, gravies, and vegetables. The key to perfect mashed potatoes lies in selecting the right type of potato, such as Yukon Gold or Russet, which have the ideal starch content for mashing.
By boiling them to just the right tenderness and combining them with rich butter and cream, you’ll create a dish that’s both comforting and indulgent. Whether you’re an experienced cook or a beginner, this recipe will guide you through each step to guarantee your mashed potatoes are a hit at your holiday gathering.
Ingredients (serves 4-6):
- 2 pounds of Yukon Gold or Russet potatoes
- 1/2 cup unsalted butter
- 1 cup heavy cream
- Salt to taste
- Freshly ground black pepper to taste
- Optional: 2 cloves of garlic, minced
- Optional: 2 tablespoons chopped fresh chives
Cooking Instructions:
- Prepare the Potatoes:
- Peel the potatoes and cut them into evenly sized chunks, roughly 1-2 inches in size. This guarantees they cook evenly.
- Boil the Potatoes:
- Place the potato chunks in a large pot and cover them with cold water. Add a generous pinch of salt to the water.
- Bring the water to a boil over medium-high heat. Once boiling, reduce the heat to simmer and cook the potatoes for 15-20 minutes, or until they’re easily pierced with a fork.
- Drain and Dry:
- Drain the potatoes thoroughly in a colander. To remove excess moisture, return the drained potatoes to the hot pot and let them sit for a minute or two, allowing the residual heat to evaporate any remaining water.
- Mash the Potatoes:
- Add the butter to the hot potatoes, allowing it to melt slightly. Use a potato masher or a ricer to mash the potatoes until they’re smooth.
- Add Cream and Season:
- Gradually add the heavy cream while stirring continuously until you reach your desired consistency.
- Season the mashed potatoes with salt and freshly ground black pepper to taste. If using, stir in the minced garlic for added flavor.
- Garnish and Serve:
- Transfer the mashed potatoes to a serving dish. If desired, garnish with freshly chopped chives before serving.
Extra Tips:
For a lighter version, you can substitute part of the heavy cream with milk. Be mindful not to over-mash the potatoes as this can result in a gummy texture.
If you want to experiment with flavors, consider adding roasted garlic or a hint of nutmeg. Always taste the mashed potatoes before serving to adjust the seasoning as needed. Enjoy your creamy mashed potatoes as a delightful addition to your Christmas dinner spread!
Green Bean Casserole
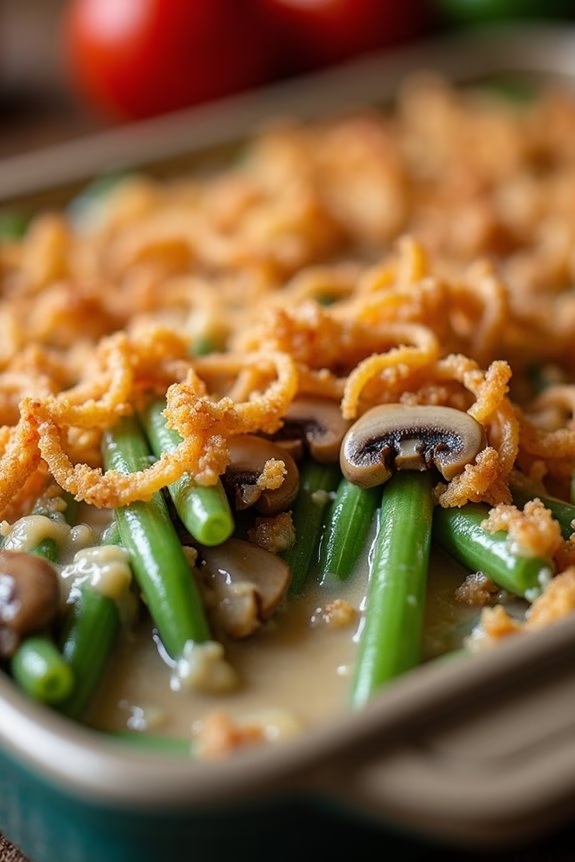
Green Bean Casserole is a beloved dish often featured on the Christmas dinner table. This classic comfort food combines tender green beans with a rich, creamy mushroom sauce, and is topped with crispy fried onions for an irresistible crunch.
Originating in the mid-20th century, this dish has become a staple of holiday gatherings due to its simplicity, delicious flavor, and the joy it brings to diners of all ages. Whether you’re a seasoned cook or a kitchen novice, this recipe is straightforward to follow, guaranteeing you serve up a memorable dish for your festive feast.
The marriage of fresh green beans and a savory mushroom sauce is a match made in culinary heaven. The key to a perfect Green Bean Casserole lies in balancing the flavors and textures, making sure each bite provides a delightful contrast. The creamy sauce binds the green beans beautifully, while the fried onions add a delightful crunch that elevates the dish.
This recipe serves 4-6 people and is sure to be a crowd-pleaser at any Christmas dinner.
Ingredients:
- 1 pound fresh green beans, trimmed and cut into 1-inch pieces
- 2 tablespoons unsalted butter
- 1 small onion, finely chopped
- 2 cloves garlic, minced
- 8 ounces cremini mushrooms, sliced
- 3 tablespoons all-purpose flour
- 1 cup chicken or vegetable broth
- 1 cup half-and-half or heavy cream
- Salt and pepper to taste
- 1 cup crispy fried onions
Instructions:
- Preheat the Oven: Begin by preheating your oven to 350°F (175°C) to make certain it’s ready for baking once the casserole is assembled.
- Prepare the Green Beans: In a large pot of boiling salted water, blanch the green beans for about 5 minutes until they’re bright green and tender-crisp. Immediately drain and transfer them to a bowl of ice water to stop the cooking process. Drain once more and set aside.
- Make the Mushroom Sauce: Melt the butter in a large skillet over medium heat. Add the chopped onion and cook until softened, about 3 minutes. Stir in the garlic and mushrooms, cooking until the mushrooms release their moisture and begin to brown, approximately 5-7 minutes.
- Thicken the Sauce: Sprinkle the flour over the mushroom mixture, stirring constantly for about 1 minute to cook off the raw flour taste. Gradually whisk in the broth and half-and-half, bringing the mixture to a simmer. Continue to cook, stirring frequently, until the sauce is thickened and coats the back of a spoon, about 5 minutes. Season with salt and pepper to taste.
- Combine and Bake: In a large mixing bowl, combine the blanched green beans with the mushroom sauce, making sure the beans are evenly coated. Transfer the mixture to a greased 9×13-inch baking dish. Sprinkle the crispy fried onions evenly over the top.
- Bake the Casserole: Place the baking dish in the preheated oven and bake for 25-30 minutes, or until the top is golden brown and the sauce is bubbling. Allow the casserole to cool slightly before serving.
Extra Tips:
For a deeper flavor, consider adding a splash of soy sauce or Worcestershire sauce to the mushroom sauce. If you prefer a thicker sauce, feel free to adjust the amount of flour or reduce the liquid slightly.
For those who wish to lighten the dish, using evaporated milk instead of half-and-half can be a good alternative without sacrificing creaminess. Finally, for added texture, you can include toasted almonds or additional fresh herbs like thyme or parsley in the casserole.
Roasted Brussels Sprouts With Bacon
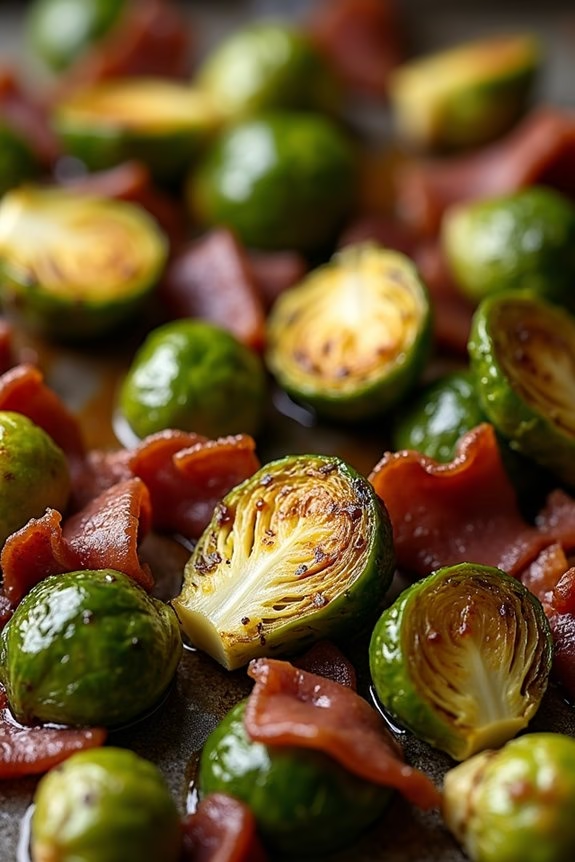
Roasted Brussels Sprouts With Bacon is a delightful addition to any traditional Christmas dinner. This dish combines the earthy flavor of Brussels sprouts with the rich, savory taste of crispy bacon, creating a perfect balance of flavors. The roasting process brings out the natural sweetness of the Brussels sprouts while adding a delicious caramelized texture.
This side dish isn’t only simple to make but also pairs beautifully with a variety of main courses, making it an ideal choice for a festive meal.
For this recipe, the Brussels sprouts are trimmed and halved, guaranteeing they cook evenly and absorb the flavors of the bacon. The bacon is cooked until crispy, then combined with the Brussels sprouts and roasted together for a harmonious blend of textures. A touch of olive oil, salt, and pepper enhances the dish without overpowering the natural flavors.
This recipe serves 4-6 people, making it perfect for a family gathering or holiday celebration.
Ingredients:
- 1 ½ pounds Brussels sprouts, trimmed and halved
- 6 slices of bacon, chopped
- 2 tablespoons olive oil
- Salt, to taste
- Freshly ground black pepper, to taste
Instructions:
1. Preheat the Oven: Begin by preheating your oven to 400°F (200°C). This temperature guarantees that the Brussels sprouts roast evenly and develop a nice golden color.
2. Prepare the Brussels Sprouts: Rinse the Brussels sprouts under cold water, then trim the ends and remove any yellow or damaged leaves. Cut each sprout in half to guarantee even cooking.
3. Cook the Bacon: In a large skillet over medium heat, add the chopped bacon. Cook until the bacon is crispy and the fat has rendered. This usually takes about 5-7 minutes.
Once cooked, remove the bacon with a slotted spoon and set aside, leaving the bacon fat in the skillet.
4. Combine Ingredients: In a large mixing bowl, combine the halved Brussels sprouts with the rendered bacon fat, olive oil, salt, and pepper. Toss until the sprouts are evenly coated.
5. Roast the Brussels Sprouts: Spread the Brussels sprouts in a single layer on a baking sheet. Roast in the preheated oven for 20-25 minutes, stirring halfway through, until they’re tender and caramelized.
6. Add Bacon and Serve: Once the Brussels sprouts are done roasting, remove them from the oven and transfer to a serving dish. Sprinkle the crispy bacon pieces over the top and toss gently to combine. Serve immediately for the best flavor and texture.
Extra Tips:
To enhance the dish further, consider adding a splash of balsamic vinegar or a sprinkle of Parmesan cheese just before serving. These additions can elevate the flavors and add a touch of sophistication to the dish.
If you prefer your Brussels sprouts to have a hint of sweetness, try drizzling a bit of maple syrup during the last few minutes of roasting. Additionally, keeping an eye on the Brussels sprouts as they roast is essential to prevent them from burning, as oven temperatures can vary.
Cranberry Sauce

Cranberry sauce is a quintessential part of any traditional Christmas dinner. Its tangy, sweet flavor complements the savory dishes on the table, making it a festive favorite.
This homemade cranberry sauce is easy to prepare and far superior to the canned version, offering a fresh and vibrant taste that enhances the holiday meal. Made with just a few simple ingredients, it’s the perfect accompaniment to roast turkey and other festive delights.
This recipe yields a serving size sufficient for 4-6 people, ensuring there’s plenty to go around the table. The sauce not only adds a burst of color to your Christmas spread but also a delightful contrast of textures and flavors. With a touch of citrus and spice, this cranberry sauce is sure to become a cherished part of your holiday tradition.
Ingredients for 4-6 People:
- 1 bag (12 oz) fresh or frozen cranberries
- 1 cup granulated sugar
- 1 cup water
- 1 tablespoon orange zest
- 1/4 cup fresh orange juice
- 1 cinnamon stick
- A pinch of salt
Cooking Instructions:
- Prepare the Ingredients: Begin by rinsing the cranberries under cold water if using fresh ones. Discard any that are damaged or soft. If using frozen cranberries, there’s no need to thaw them first.
- Combine Ingredients: In a medium-sized saucepan, combine the cranberries, sugar, water, orange zest, and orange juice. Add the cinnamon stick and a pinch of salt to enhance the flavors.
- Cook the Sauce: Place the saucepan over medium heat. Stir occasionally until the sugar dissolves. Bring the mixture to a boil, then reduce the heat to a simmer.
- Simmer and Thicken: Allow the sauce to simmer for about 10-15 minutes. The cranberries will pop as they cook. Stir occasionally, and continue cooking until the sauce thickens to your desired consistency.
- Cool and Serve: Once thickened, remove the saucepan from heat. Discard the cinnamon stick. Allow the sauce to cool at room temperature, where it will thicken further as it cools. Serve the cranberry sauce at room temperature or slightly chilled.
Extra Tips:
For an added layer of flavor, you can also stir in a tablespoon of brandy or port wine after removing the sauce from the heat.
If you prefer a smoother texture, you can blend the sauce with an immersion blender or pass it through a sieve to remove the cranberry skins.
Remember, cranberry sauce can be made a day in advance and stored in the refrigerator, allowing the flavors to meld beautifully.
Whether you serve it with turkey or use it as a spread on leftover sandwiches, this homemade cranberry sauce is sure to be a hit at your Christmas dinner!
Sweet Potato Casserole

Sweet Potato Casserole is a beloved traditional Christmas dish that combines the natural sweetness of sweet potatoes with a delightful crunchy topping. This dish is perfect for the holiday table as it balances sweet and savory flavors, offering a comforting and heartwarming experience.
The rich, creamy texture of the sweet potato filling, complemented by a buttery pecan topping, makes it a standout side dish for your festive feast. Whether you’re hosting a family gathering or enjoying an intimate dinner, Sweet Potato Casserole is sure to be a hit among guests of all ages.
The harmonious blend of ingredients in Sweet Potato Casserole creates a dish that’s both indulgent and nourishing. Sweet potatoes aren’t only delicious but also packed with vitamins and fiber, making them a wholesome addition to your Christmas meal.
The casserole can be prepared in advance, allowing you to spend more quality time with loved ones on the big day. Serve this delightful dish alongside your favorite holiday entrees for a well-rounded, festive dinner experience.
Ingredients (serving size: 4-6 people):
- 4 cups mashed sweet potatoes (about 4-5 medium sweet potatoes)
- 1/2 cup granulated sugar
- 2 large eggs
- 1/3 cup melted unsalted butter
- 1/2 cup whole milk
- 1 teaspoon vanilla extract
- 1/2 teaspoon salt
- 1/2 teaspoon ground cinnamon
- 1/4 teaspoon ground nutmeg
Topping:
- 1/2 cup all-purpose flour
- 1/2 cup packed brown sugar
- 1/4 cup melted unsalted butter
- 1 cup chopped pecans
Cooking Instructions:
- Preheat the Oven: Set your oven to 350°F (175°C) to allow it to heat while you prepare the casserole.
- Cook the Sweet Potatoes: Peel and cube the sweet potatoes. Boil in a large pot of water until tender, about 20 minutes. Drain well and mash until smooth.
- Prepare the Filling: In a large bowl, combine the mashed sweet potatoes, granulated sugar, eggs, melted butter, milk, vanilla extract, salt, cinnamon, and nutmeg. Mix until smooth and well combined.
- Assemble the Casserole: Pour the sweet potato mixture into a greased 9×13-inch baking dish and spread evenly.
- Prepare the Topping: In a separate bowl, stir together the flour and brown sugar. Add the melted butter and mix until crumbly. Stir in the chopped pecans.
- Add the Topping: Sprinkle the pecan topping evenly over the sweet potato mixture in the baking dish.
- Bake the Casserole: Place the dish in the preheated oven and bake for 30-35 minutes, or until the topping is golden brown and crispy.
- Cool and Serve: Allow the casserole to cool slightly before serving. This will help the flavors meld together and make serving easier.
Extra Tips:
For an added layer of flavor, consider adding a hint of maple syrup or orange zest to the sweet potato mixture. You can also prepare the casserole a day in advance; simply cover and refrigerate it before baking.
When ready to serve, bake as directed, adding an extra 5-10 minutes to the baking time if needed. This advanced preparation makes hosting a holiday meal less stressful and allows you to enjoy more time with your guests.
Traditional Christmas Pudding
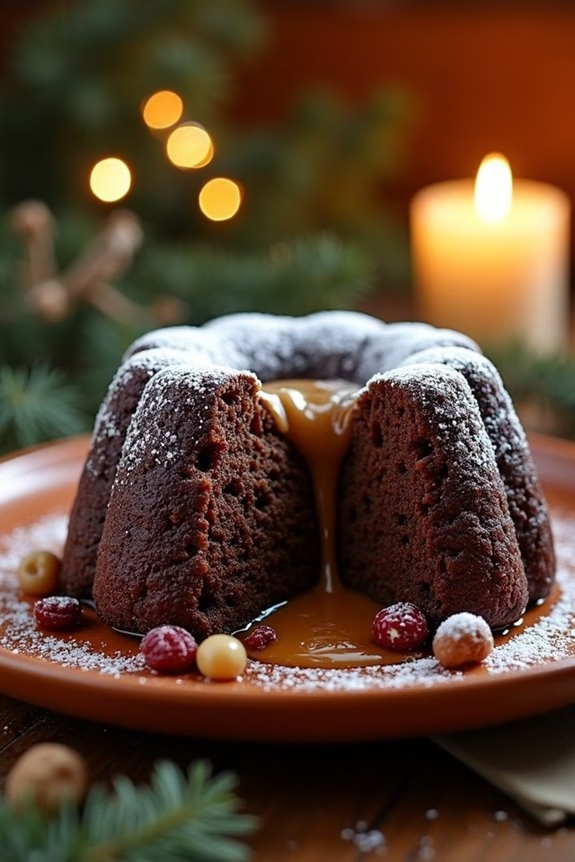
Traditional Christmas Pudding is a quintessential dessert that graces many tables during the festive season. This classic British treat is dense, rich, and full of flavors that evoke the warmth of the holidays. Originally, Christmas pudding was made several weeks before Christmas, allowing the flavors to develop and mature. The aromatic blend of spices, dried fruits, and a hint of brandy makes it a perfect conclusion to a hearty Christmas meal. Steaming the pudding not only enhances its flavors but also gives it a moist, luscious texture.
The preparation of Traditional Christmas Pudding is a festive activity in itself, often involving the entire family. On “Stir-up Sunday,” the last Sunday before Advent, families traditionally gather to mix the pudding ingredients and make a wish. Once the mixture is prepared, it’s steamed for several hours, resulting in a pudding that’s rich in flavor and tradition. The pudding is often served with a dollop of brandy butter or custard, making it a truly indulgent treat.
Ingredients (serving size: 4-6 people):
- 150g all-purpose flour
- 150g breadcrumbs
- 150g suet or unsalted butter
- 150g dark brown sugar
- 150g raisins
- 150g currants
- 150g sultanas
- 50g mixed peel
- 100g chopped nuts
- 1 grated apple
- 1 grated carrot
- 1 lemon (zest and juice)
- 1 teaspoon mixed spice
- 1 teaspoon cinnamon
- 1/2 teaspoon nutmeg
- 3 large eggs
- 150ml stout or dark ale
- 50ml brandy
Cooking Instructions:
- Prepare the Mixing Bowl: Begin by thoroughly greasing a 1.2-liter pudding basin with butter. This will help the pudding slide out easily after steaming.
- Mix the Dry Ingredients: In a large mixing bowl, combine the flour, breadcrumbs, suet (or butter), sugar, dried fruits, mixed peel, nuts, grated apple, and carrot. Stir well to guarantee that all the fruits and nuts are evenly distributed.
- Add Flavorings and Liquids: Grate the zest of the lemon over the mixture and squeeze in its juice. Add the mixed spice, cinnamon, and nutmeg. Crack the eggs into the bowl, pour in the stout and brandy, and stir everything together until well combined. The mixture should be of a dropping consistency.
- Make a Wish and Stir: Invite everyone in the household to take turns stirring the mixture. Traditionally, each person makes a wish while stirring.
- Fill the Pudding Basin: Spoon the mixture into the prepared pudding basin, pressing it down gently. Cover the top with a double layer of baking parchment, followed by a layer of foil. Secure it by tying a string around the basin.
- Steam the Pudding: Place the pudding basin in a large saucepan and fill the pan with water until it reaches halfway up the side of the basin. Bring the water to a simmer, cover the pan with a lid, and steam the pudding for about 4-5 hours. Check occasionally to ascertain the water level remains consistent, topping up with boiling water as needed.
- Cool and Store: Once steamed, remove the pudding from the pan and allow it to cool completely. Once cooled, replace the parchment and foil with a fresh layer, then store in a cool, dark place until Christmas Day.
- Reheat Before Serving: On the day of serving, re-steam the pudding for 1-2 hours until it’s heated through. Turn it onto a serving plate and serve with brandy butter or custard.
Extra Tips:
For the best flavor, try making your Christmas pudding at least a month in advance. This allows the flavors to mature and deepen. If you prefer a non-alcoholic version, replace the brandy with orange juice.
Always check the water level during steaming to prevent it from boiling dry, which can spoil the pudding. If you like a little more texture, substitute some of the dried fruits with chopped dried apricots or figs.
Mince Pies
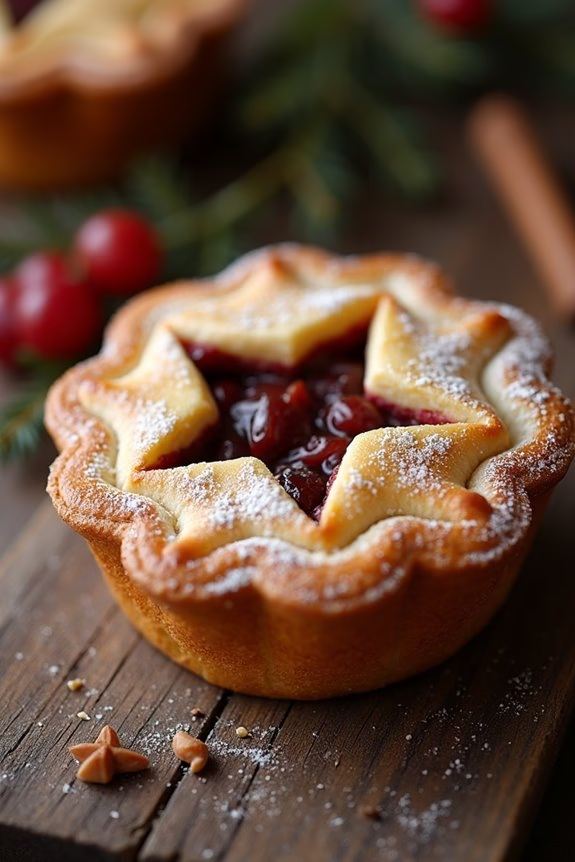
Mince pies are a quintessential part of a traditional Christmas dinner, offering a delightful blend of sweet and spicy flavors wrapped in a buttery pastry. Originally, mince pies were made with meat, but today’s versions are typically filled with a mixture of dried fruits, spices, and sometimes a splash of brandy or rum.
These delightful pastry treats make for a perfect dessert or a festive snack, embodying the warmth and joy of the holiday season.
The filling of mince pies, known as mincemeat, is a rich and aromatic mixture that can be prepared in advance to allow the flavors to meld beautifully. The pastry, meanwhile, is a tender shortcrust that crumbles perfectly with each bite.
Making mince pies at home allows you to imbue them with personal touches, whether that’s a dash of extra cinnamon or a hint of orange zest. This recipe yields 12-18 mince pies, serving 4-6 people.
Ingredients:
- 1 ½ cups (200g) all-purpose flour
- ½ cup (115g) unsalted butter, chilled and diced
- 3 tablespoons (40g) granulated sugar
- 1 large egg, beaten
- 1-2 tablespoons cold water
- 1 ½ cups (300g) prepared mincemeat
- 1 egg, beaten (for egg wash)
- Powdered sugar, for dusting
Cooking Instructions:
- Prepare the Pastry: In a large bowl, mix the flour and sugar together. Add the diced butter and rub it into the flour mixture using your fingertips until it resembles breadcrumbs.
- Form the Dough: Add the beaten egg to the flour mixture and work it in using a fork or your hands. Add cold water, a tablespoon at a time, until the dough comes together. Knead it lightly, wrap in plastic wrap, and refrigerate for 30 minutes.
- Preheat the Oven: Set your oven to 400°F (200°C) and grease a 12-hole muffin tin.
- Roll Out the Dough: On a lightly floured surface, roll out the dough to about 1/8 inch thickness. Cut out circles using a round cutter slightly larger than the muffin tin holes and place them in the tin.
- Fill the Pastry Cases: Spoon approximately 1 tablespoon of mincemeat into each pastry case. Be careful not to overfill.
- Top the Mince Pies: Roll out the remaining pastry and cut out smaller circles, stars, or other shapes for the tops. Place them over the mincemeat.
- Egg Wash: Brush the tops of the pies with beaten egg to give them a golden finish.
- Bake: Place the muffin tin in the preheated oven and bake for 15-20 minutes until the pastry is golden brown.
- Cool and Serve: Allow the mince pies to cool slightly in the tin before transferring them to a wire rack. Dust with powdered sugar before serving.
Extra Tips:
To enhance the flavor of your mincemeat, consider adding a splash of brandy or rum before filling the pies. If you prefer a sweeter pastry, you can increase the sugar slightly or add a pinch of cinnamon to the dough.
For a more festive touch, use cookie cutters to create decorative pastry tops. These mince pies can also be made ahead of time and stored in an airtight container for up to a week, making them an excellent choice for planning ahead during the busy holiday season.
Gingerbread Cookies

Gingerbread cookies are a quintessential part of traditional Christmas dinners, infusing the festive air with their warm, spicy aroma. These cookies aren’t only delicious but also fun to make, especially when decorated with icing and candies. They’re perfect for sharing with family and friends, making them a staple on holiday dessert tables.
Whether you enjoy them with a glass of milk or a cup of tea, gingerbread cookies are certain to add a touch of sweetness to your Christmas celebrations.
The origins of gingerbread trace back centuries, with recipes historically varying from region to region, each bringing its unique twist to the classic treat. This particular recipe yields a batch of cookies with a chewy center and crisp edges, flavored with a blend of ginger, cinnamon, and cloves, and sweetened with molasses. Perfect for a serving size of 4-6 people, this recipe allows for enough cookies to enjoy and share.
Ingredients (Serving Size: 4-6 People):
- 3 cups all-purpose flour
- 3/4 cup packed brown sugar
- 3/4 teaspoon baking soda
- 1 tablespoon ground ginger
- 1 tablespoon ground cinnamon
- 1/2 teaspoon ground cloves
- 1/2 teaspoon salt
- 12 tablespoons (1 1/2 sticks) unsalted butter, softened
- 3/4 cup molasses
- 2 tablespoons milk
- 1 large egg
- 1 teaspoon vanilla extract
Instructions:
- Prepare the Dough: In a large mixing bowl, combine the flour, brown sugar, baking soda, ginger, cinnamon, cloves, and salt. Mix well to guarantee the spices are evenly distributed. Add the softened butter and mix until the mixture resembles coarse crumbs.
- Mix Wet Ingredients: In a separate bowl, whisk together the molasses, milk, egg, and vanilla extract until well combined. Gradually add this mixture to the dry ingredients, stirring until a soft dough forms.
- Chill the Dough: Divide the dough into two equal parts, flatten into disks, and wrap each in plastic wrap. Refrigerate for at least 1 hour or until firm, which will make the dough easier to roll out and shape.
- Preheat the Oven: Set your oven to 350°F (175°C) and line two baking sheets with parchment paper to prevent the cookies from sticking.
- Roll Out the Dough: On a lightly floured surface, roll out one disk of dough to about 1/4-inch thickness. Use cookie cutters to cut out shapes, and place them on the prepared baking sheets, leaving some space between each cookie.
- Bake the Cookies: Bake the cookies in the preheated oven for 8-10 minutes, or until the edges begin to brown. Remove from the oven and let them cool on the baking sheets for a few minutes before transferring them to a wire rack to cool completely.
- Decorate: Once completely cooled, decorate the cookies with icing, sprinkles, or any decorations of your choice.
Extra Tips: For the best results, make sure your butter is softened to room temperature before mixing it with the dry ingredients, as this will help achieve the perfect texture for your gingerbread cookies.
If you prefer a crisper cookie, you can bake them a minute or two longer, but keep a close eye to prevent burning. Additionally, the dough can be made ahead of time and kept in the refrigerator for up to 3 days or frozen for up to a month, allowing you more flexibility with your holiday baking schedule.