
Indian cuisine offers a rich tapestry of flavors that always satisfies. From the creamy delight of Butter Chicken to the aromatic allure of Biryani, these timeless recipes have a magical way of enchanting our taste buds. Passed down through generations, each dish carries its own unique story and flavor profile. Let’s embark on a flavorful journey together.
Butter Chicken (Murgh Makhani)

Butter Chicken, also known as Murgh Makhani, is a popular Indian dish known for its rich and creamy flavor. Originating from the Indian subcontinent, this dish has gained worldwide recognition for its unique taste and tantalizing aroma. The succulent pieces of chicken are marinated in a blend of spices and yogurt, then cooked in a rich tomato-based sauce, creating a perfect balance between spice and creaminess. The dish is traditionally served with naan or rice, making it a delightful meal for any occasion.
The preparation of Butter Chicken involves two main components: marinating the chicken and preparing the sauce. The marination process allows the chicken to absorb the flavors of the spices, making it tender and flavorful. Meanwhile, the sauce is made with butter, tomato puree, and an array of spices, creating a velvety texture and deep flavor. While the process might seem elaborate, the end result is a dish that’s both comforting and indulgent, perfect for family gatherings or special celebrations.
Ingredients for 4-6 servings:
- 1 kg boneless chicken, cut into cubes
- 1 cup plain yogurt
- 2 tablespoons lemon juice
- 2 teaspoons ground cumin
- 2 teaspoons cayenne pepper
- 2 teaspoons garam masala
- 2 teaspoons ground coriander
- Salt to taste
- 6 tablespoons butter
- 1 large onion, finely chopped
- 2 teaspoons minced garlic
- 2 teaspoons grated fresh ginger
- 1 cup tomato puree
- 1 cup heavy cream
- 1 teaspoon ground turmeric
- 1 teaspoon chili powder
- 1/4 cup chopped fresh cilantro
- 1/4 cup water (optional, for adjusting sauce consistency)
Cooking Instructions:
- Marinate the Chicken: In a large bowl, mix the yogurt, lemon juice, cumin, cayenne pepper, garam masala, ground coriander, and salt. Add the chicken pieces and stir until well-coated. Cover and refrigerate for at least 1 hour, allowing the flavors to penetrate the chicken.
- Cook the Chicken: Preheat your oven to 200°C (390°F). Spread the marinated chicken pieces on a baking sheet and bake for 10-15 minutes until just cooked through. Alternatively, you can grill the chicken on a stovetop grill pan, turning occasionally. Remove from heat and set aside.
- Prepare the Sauce: In a large skillet, melt the butter over medium heat. Add the chopped onion and cook until translucent. Stir in the garlic and ginger, cooking for another minute until fragrant.
- Add Spices and Tomato Puree: Stir in the ground turmeric, chili powder, and tomato puree. Cook for 5-7 minutes, stirring occasionally, until the sauce thickens and the oil begins to separate from the mixture.
- Incorporate Cream and Chicken: Reduce the heat to low. Slowly stir in the heavy cream, mixing continuously to prevent curdling. Add the baked/grilled chicken pieces to the sauce, stirring to coat them evenly. Cook for an additional 10 minutes to allow the flavors to blend.
- Adjust Seasoning and Serve: Taste and adjust the seasoning with salt if needed. If the sauce is too thick, add a little water to reach your desired consistency. Garnish with chopped cilantro before serving.
Extra Tips: For an extra smoky flavor, you can add a couple of drops of liquid smoke or a small piece of charred coal in a bowl, covered, inside the pan towards the end of cooking. This will mimic the traditional tandoor flavor. Always verify the chicken is cooked thoroughly, but avoid overcooking to maintain its tenderness. To enhance the creaminess, you can add a tablespoon of cashew nut paste along with the cream. Enjoy your Butter Chicken with freshly made naan or basmati rice for a complete meal.
Biryani

Chicken Biryani is a classic Indian dish that combines the rich, aromatic flavors of spices with tender chicken and fragrant basmati rice. This one-pot dish is perfect for family gatherings or special occasions, offering a delightful blend of textures and flavors.
The origins of Biryani trace back to Persian cuisine, and it has since become a staple in Indian households, with each region adding its unique twist to the basic recipe. Here, we present a traditional Chicken Biryani recipe that serves 4-6 people, capturing the essence of Indian culinary artistry.
The process of making Chicken Biryani involves marinating the chicken in a mixture of spices and yogurt, cooking it to perfection, and layering it with partially cooked basmati rice. The dish is then sealed and simmered, allowing the flavors to meld into a harmonious symphony. The result is a richly flavored and aromatic dish that’s as pleasing to the eyes as it’s to the taste buds. Follow this recipe for a satisfying and authentic Biryani experience in your own kitchen.
Ingredients (Serves 4-6 people)
- 500 grams chicken, cut into pieces
- 2 cups basmati rice
- 1 cup plain yogurt
- 2 large onions, thinly sliced
- 2 tomatoes, chopped
- 2 tablespoons ginger-garlic paste
- 4 green chilies, slit
- 1 teaspoon red chili powder
- 1 teaspoon turmeric powder
- 1 tablespoon coriander powder
- 1 teaspoon garam masala
- Salt to taste
- 1/2 cup fresh coriander leaves, chopped
- 1/2 cup fresh mint leaves, chopped
- 1/4 cup ghee (clarified butter)
- 4 cups water
- 2 tablespoons lemon juice
- 2-3 bay leaves
- 4-5 cloves
- 4-5 cardamom pods
- 1 cinnamon stick
- A pinch of saffron strands (optional)
- 1/4 cup warm milk (for saffron)
Cooking Instructions
- Marinate the Chicken: In a large bowl, combine the chicken pieces with yogurt, ginger-garlic paste, red chili powder, turmeric powder, coriander powder, garam masala, salt, half of the chopped coriander and mint leaves, and lemon juice. Mix well, cover, and refrigerate for at least 1 hour, preferably overnight, to allow the flavors to penetrate the chicken.
- Prepare the Rice: Rinse the basmati rice under cold water until the water runs clear. Soak the rice in water for 30 minutes, then drain and set aside.
- Cook the Onions: Heat half of the ghee in a large, deep pan over medium heat. Add the sliced onions and sauté until golden brown and caramelized. Remove half of the onions and set aside for garnishing.
- Cook the Chicken: In the same pan, add bay leaves, cloves, cardamom pods, and cinnamon stick. Sauté for a minute until fragrant. Add the marinated chicken and cook on medium heat until the chicken is cooked through and the oil starts to separate from the mixture. Add chopped tomatoes and cook until they soften.
- Parboil the Rice: In a separate large pot, bring 4 cups of water to a boil. Add the soaked rice and a pinch of salt. Cook the rice until it’s 70% cooked (parboiled), then drain and set aside.
- Assemble the Biryani: Preheat your oven to 180°C (350°F). Layer the partially cooked rice over the chicken in the pan. Sprinkle the reserved caramelized onions, remaining coriander and mint leaves, and saffron strands soaked in warm milk (if using) over the rice. Drizzle the remaining ghee evenly on top.
- Cook on Dum: Cover the pan with a tight-fitting lid or seal with aluminum foil. Place the pan in the oven and bake for 20-25 minutes. Alternatively, you can cook it on the stovetop over low heat for the same duration. This step allows the rice to fully cook and absorb the flavors from the chicken.
- Serve: Once cooked, gently fluff the biryani with a fork, being careful not to break the rice grains. Serve hot with raita or your favorite side dish.
Extra Tips
- For an added depth of flavor, you can add a few drops of kewra or rose water to the biryani just before sealing it for cooking.
- It’s crucial not to overcook the rice during the parboiling stage to ensure the grains remain separate and fluffy.
- If you prefer a spicier biryani, adjust the number of green chilies and red chili powder according to your taste.
- Always use good quality basmati rice for the best aroma and texture in your biryani.
- If time permits, allow the biryani to rest for 10 minutes after cooking before serving to let the flavors settle.
Paneer Tikka

Paneer Tikka is a classic Indian dish that’s perfect for vegetarians and loved by all for its rich flavors and delightful texture. Originating from North India, this dish consists of chunks of paneer (Indian cottage cheese) marinated in a blend of spices and yogurt, then grilled to perfection.
Paneer Tikka is often served as an appetizer or a starter at parties and gatherings, and it pairs beautifully with mint chutney or a fresh salad.
The secret to a perfect Paneer Tikka lies in the marination process which imbues the paneer with deep flavors and a tender texture. The marination is a blend of tangy yogurt, robust Indian spices, and a hint of lemon juice, which not only tenderizes the paneer but also imparts a smoky aroma when grilled.
Whether you choose to cook the Paneer Tikka in a tandoor, on a grill, or even in an oven, the result is a mouth-watering dish that captures the essence of Indian cooking.
Ingredients (Serves 4-6):
- 500 grams paneer, cut into 1-inch cubes
- 1 cup thick yogurt
- 2 tablespoons gram flour (besan)
- 2 tablespoons lemon juice
- 1 tablespoon ginger-garlic paste
- 1 teaspoon red chili powder
- 1 teaspoon turmeric powder
- 1 teaspoon garam masala
- 1 teaspoon chaat masala
- Salt to taste
- 2 tablespoons vegetable oil
- 1 large onion, cut into chunks
- 1 large green bell pepper, cut into chunks
- 1 large red bell pepper, cut into chunks
- Wooden or metal skewers
Cooking Instructions:
- Prepare the Marinade: In a large mixing bowl, combine the thick yogurt, gram flour, lemon juice, ginger-garlic paste, red chili powder, turmeric powder, garam masala, chaat masala, and salt. Mix well until all the ingredients are thoroughly combined into a smooth paste.
- Marinate the Paneer and Vegetables: Add the paneer cubes, onion chunks, and bell pepper chunks into the marinade. Gently mix to make sure that all the pieces are well-coated with the marinade. Cover the bowl and let it sit in the refrigerator for at least 1 hour, allowing the paneer and vegetables to absorb the flavors.
- Prepare the Skewers: If using wooden skewers, soak them in water for about 30 minutes to prevent them from burning during grilling. Thread the marinated paneer and vegetables alternately onto the skewers.
- Grill the Paneer Tikka: Preheat your grill or oven to 200°C (390°F). Lightly brush the skewers with vegetable oil to prevent sticking. Place them on the grill or a baking sheet if using the oven. Cook for about 15-20 minutes, turning occasionally, until the paneer and vegetables are charred at the edges and cooked through.
- Serve: Once cooked, remove the skewers from the grill or oven. Sprinkle a little extra chaat masala and lemon juice over the top for added flavor. Serve hot with mint chutney and lemon wedges on the side.
Extra Tips:
To guarantee the best results for your Paneer Tikka, make sure the paneer is firm and fresh, as this will help it hold its shape during cooking.
If you prefer a spicier version, adjust the amount of red chili powder according to your taste. Additionally, if you don’t have access to a grill, you can use a stovetop grill pan or bake the skewers in a preheated oven.
Finally, try experimenting with different vegetables like zucchini or mushrooms to add variety to the dish.
Rogan Josh

Rogan Josh is a classic Indian dish that hails from the beautiful region of Kashmir. Known for its deep red color and rich, aromatic flavors, Rogan Josh is a must-try for anyone who appreciates the nuances of Indian cuisine. Traditionally made with lamb or goat, the meat is slow-cooked in a blend of spices that includes cardamom, cinnamon, and cloves, resulting in a tender, flavorful dish that’s perfect for any occasion.
The unique blend of spices and the slow-cooking process are what give Rogan Josh its distinctive flavor profile, making it a favorite among Indian dishes.
This recipe for Rogan Josh serves 4-6 people and is an ideal choice for a hearty family dinner or a festive gathering. Each step is designed to guarantee that the meat is tender and the flavors are well-developed, offering a truly authentic taste of Indian cooking. The dish is best served with steamed rice or naan, allowing you to enjoy every drop of its rich, flavorful sauce.
Ingredients:
- 1 kg lamb or goat meat, cut into chunks
- 4 tablespoons vegetable oil or ghee
- 2 large onions, finely chopped
- 4 garlic cloves, minced
- 2-inch piece of ginger, grated
- 1 cup plain yogurt
- 2 teaspoons ground coriander
- 2 teaspoons ground cumin
- 1 teaspoon ground paprika
- 1 teaspoon cayenne pepper
- 1 teaspoon ground turmeric
- 4 green cardamom pods
- 2 cinnamon sticks
- 4 cloves
- 2 bay leaves
- 1 teaspoon garam masala
- Salt to taste
- Fresh coriander leaves for garnish
Instructions:
- Prepare the Meat: Start by washing the lamb or goat meat thoroughly. Pat it dry with paper towels and set aside in a bowl. This helps remove any excess moisture and prepares the meat for marination.
- Marinate the Meat: In the bowl with the meat, add the yogurt, ground coriander, ground cumin, paprika, cayenne pepper, and salt. Mix well to guarantee the meat is evenly coated. Cover the bowl with cling film and let it marinate in the refrigerator for at least 1 hour, or overnight for best results.
- Heat the Oil: In a large, heavy-bottomed pan, heat the vegetable oil or ghee over medium heat. Once hot, add the chopped onions and sauté until they become golden brown, about 10 minutes.
- Add Aromatics: Add the minced garlic and grated ginger to the pan and sauté for another 2-3 minutes until fragrant. Be careful not to let them burn.
- Cook the Spices: Add the cardamom pods, cinnamon sticks, cloves, and bay leaves to the pan. Stir for a minute to release their aromas and flavors.
- Brown the Meat: Add the marinated meat to the pan and cook on high heat. Stir occasionally until the meat is browned all over, which should take about 10-15 minutes.
- Simmer the Dish: Reduce the heat to low and add a cup of water to the pan. Cover and let it simmer for about 1.5 to 2 hours, stirring occasionally, until the meat is tender and the sauce has thickened.
- Finish with Garam Masala: Stir in the garam masala and adjust the salt to taste. Let it cook for another 5 minutes to blend the flavors.
- Serve: Garnish with fresh coriander leaves and serve hot with steamed rice or naan.
Extra Tips: For the best results, use bone-in meat, as it adds more flavor to the dish. If you prefer a milder dish, adjust the amount of cayenne pepper and paprika according to your taste. Patience is key with Rogan Josh; the longer you let it simmer, the more tender and flavorful the meat will become. Additionally, using ghee instead of vegetable oil can enhance the richness of the dish.
Samosa

Samosas are a popular and delicious Indian snack that can be enjoyed at any time of the day. They’re crispy, golden-brown pastries filled with a savory mixture of spices, potatoes, peas, and sometimes meat, making them a perfect appetizer or a quick snack.
Originating from the Indian subcontinent, samosas have become a favorite worldwide due to their unique flavors and crispy texture. The traditional samosa is made by wrapping the spiced filling in a thin flour-based dough, which is then deep-fried until perfectly golden and crisp.
Making samosas at home is a fun and rewarding experience, allowing you to customize the filling to your taste preferences. Whether you’re serving them as an appetizer at a party or enjoying them with a cup of chai, homemade samosas are bound to impress your family and friends.
While the preparation may seem intricate, following the steps carefully will result in a delightful treat. Below is a recipe for making samosas that serves 4-6 people.
Ingredients:
- 2 cups all-purpose flour
- 1 teaspoon salt
- 2 tablespoons vegetable oil or ghee
- 1/2 cup water
- 3 medium potatoes, boiled and diced
- 1 cup frozen peas
- 1 tablespoon vegetable oil
- 1 teaspoon cumin seeds
- 1 teaspoon coriander powder
- 1/2 teaspoon garam masala
- 1/2 teaspoon turmeric powder
- 1/2 teaspoon red chili powder (optional)
- Salt to taste
- 2 tablespoons chopped fresh cilantro
- Vegetable oil for deep frying
Cooking Instructions:
1. Prepare the Dough: In a large mixing bowl, combine the all-purpose flour and salt. Add the vegetable oil or ghee and mix until the mixture resembles coarse crumbs. Gradually add water and knead the dough until it’s smooth and firm.
Cover the dough with a damp cloth and let it rest for 30 minutes.
2. Prepare the Filling: Heat 1 tablespoon of vegetable oil in a pan over medium heat. Add the cumin seeds and allow them to sizzle for a few seconds. Add the boiled and diced potatoes and peas to the pan.
Stir in the coriander powder, garam masala, turmeric powder, red chili powder, and salt. Mix well and cook for 5-7 minutes, allowing the flavors to blend. Add the chopped cilantro and stir. Remove from heat and let the filling cool.
3. Shape the Samosas: Divide the rested dough into equal-sized balls. Roll each ball into a thin oval or circle. Cut each circle in half to form two semicircles.
Take one semicircle and form it into a cone shape by folding the straight edge together, sealing it with a little water. Fill the cone with the prepared filling and seal the open edges, guaranteeing there are no gaps.
4. Fry the Samosas: Heat vegetable oil in a deep pan or wok over medium heat. Once the oil is hot, fry the samosas in batches until they’re golden-brown and crispy, about 3-5 minutes per batch.
Be careful not to overcrowd the pan. Remove the fried samosas with a slotted spoon and drain them on paper towels.
5. Serve: Serve the samosas hot with mint chutney or tamarind sauce for dipping.
Extra Tips:
To achieve the perfect crispy texture, verify that the samosa dough is kneaded well and rested adequately. When frying, make sure the oil is at the right temperature; if the oil is too hot, the samosas will brown too quickly without cooking through.
Conversely, if the oil is too cold, the samosas will absorb too much oil and become greasy. Finally, experiment with the filling by adding other ingredients like minced meat or paneer to suit your taste.
Chole Bhature

Chole Bhature is a beloved North Indian dish that brings together the spicy, tangy flavors of chickpea curry (Chole) with the fluffy, soft texture of deep-fried bread (Bhature). This dish is a staple in many Indian households and is often enjoyed as a hearty breakfast or lunch.
Originating from the Punjab region, Chole Bhature is cherished for its rich flavors and satisfying nature. Perfect for special occasions or a weekend indulgence, this dish is sure to impress family and friends with its aromatic spices and delightful taste.
The magic of Chole Bhature lies in its combination of textures and flavors. The Chole, made with boiled chickpeas cooked in a medley of spices, offers a tangy and spicy burst of flavor with every bite. The Bhature, on the other hand, is a rich, slightly tangy bread that complements the chickpea curry perfectly, offering a balance of softness and crispiness.
Together, they create a dish that isn’t only filling but also deeply satisfying, perfect for anyone looking to explore the depths of Indian cuisine. Below is a detailed recipe to prepare Chole Bhature for 4-6 people.
Ingredients:
*For Chole:*
- 2 cups chickpeas (kabuli chana), soaked overnight
- 2 large onions, finely chopped
- 2 large tomatoes, pureed
- 1 tablespoon ginger-garlic paste
- 2-3 green chilies, slit
- 2 teaspoons cumin seeds
- 2 teaspoons coriander powder
- 1 teaspoon turmeric powder
- 2 teaspoons red chili powder
- 1 teaspoon garam masala
- 1 teaspoon amchur (dried mango powder)
- Salt to taste
- 4 tablespoons oil
- Fresh coriander leaves, chopped (for garnish)
For Bhature:
- 2 cups all-purpose flour (maida)
- 1/4 cup semolina (sooji)
- 1/2 cup yogurt
- 1 teaspoon baking powder
- 1/2 teaspoon baking soda
- Salt to taste
- Water (as needed)
- Oil for deep frying
Cooking Instructions:
*To Make Chole:*
- Boil the Chickpeas: Drain the soaked chickpeas and transfer them to a pressure cooker. Add enough water to cover the chickpeas along with a pinch of salt. Pressure cook for about 4-5 whistles or until chickpeas are tender. Set aside.
- Prepare the Masala: In a large pan, heat oil over medium heat. Add cumin seeds and allow them to splutter. Add chopped onions and sauté until golden brown. Add ginger-garlic paste and green chilies, and sauté for another 2 minutes.
- Cook the Tomatoes: Add the tomato puree to the pan and cook until the oil starts to separate from the masala.
- Add Spices: Mix in coriander powder, turmeric powder, red chili powder, and salt. Stir well and cook for 2-3 minutes.
- Combine Chickpeas and Masala: Add the boiled chickpeas into the masala mixture along with some of the water from the boiled chickpeas. Mix well and let it simmer for 10-15 minutes, allowing the flavors to meld together.
- Finish with Spices: Add garam masala and amchur powder. Stir and cook for another 5 minutes. Garnish with fresh coriander leaves before serving.
*To Make Bhature:*
- Prepare the Dough: In a mixing bowl, combine all-purpose flour, semolina, baking powder, baking soda, and salt. Add yogurt and mix well. Gradually add water to form a smooth and soft dough.
- Rest the Dough: Cover the dough with a damp cloth and let it rest for at least 1-2 hours to allow it to rise.
- Shape the Bhature: Divide the dough into equal portions and roll each portion into a ball. Flatten and roll out into circles using a rolling pin, about 6 inches in diameter.
- Fry the Bhature: Heat oil in a deep frying pan over medium heat. Once hot, carefully slide in the rolled-out dough. Fry until it puffs up and turns golden brown on both sides. Remove and drain excess oil on paper towels.
Extra Tips:
For the best results, make certain the chickpeas are thoroughly cooked before adding them to the masala. A hint of lemon juice can be added to the Chole to enhance the tangy flavor if desired.
When making Bhature, make certain the oil is hot enough before frying, as this helps them puff up properly. If you prefer a spicier Chole, you can adjust the quantity of green chilies and red chili powder. Enjoy the Chole Bhature with a side of pickles and sliced onions for an authentic experience.
Masoor Dal Tadka

Masoor Dal Tadka is a classic Indian dish that’s both hearty and flavorful. It’s made using red lentils (masoor dal) which are simmered until tender and then spiced with a tempering of aromatic spices, onions, tomatoes, and garlic. This dish isn’t only nutritious but also incredibly satisfying, making it a popular choice for a comforting meal at home.
It’s typically served with steamed rice or warm Indian bread like roti or naan, and it perfectly captures the essence of Indian home cooking with its rich flavors and inviting aroma.
This recipe for Masoor Dal Tadka serves 4-6 people and is relatively simple to prepare, making it great for both everyday meals and special occasions. The key to a good dal tadka is in the tempering, or ‘tadka’, which is added to the cooked lentils at the end. This process infuses the lentils with the deep flavors of the spices, creating a dish that’s truly irresistible.
Whether you’re new to Indian cooking or a seasoned chef, this recipe will guide you through making a delicious Masoor Dal Tadka that your family and friends will love.
Ingredients:
- 1 cup red lentils (masoor dal)
- 4 cups water
- 2 tablespoons ghee (clarified butter) or oil
- 1 teaspoon cumin seeds
- 1 medium onion, finely chopped
- 2 tomatoes, finely chopped
- 4 cloves garlic, minced
- 1 teaspoon grated ginger
- 2 green chilies, slit (optional)
- 1 teaspoon turmeric powder
- 1 teaspoon red chili powder
- 1 teaspoon garam masala
- Salt to taste
- 2 tablespoons chopped fresh cilantro (coriander) leaves
- Juice of half a lemon
Instructions:
- Prepare the Lentils:
- Rinse the red lentils thoroughly under cold water until the water runs clear. This helps remove excess starch and prevents the dal from becoming too starchy.
- In a large pot, combine the rinsed lentils with 4 cups of water. Add turmeric powder and salt. Bring it to a boil over medium-high heat.
- Cook the Lentils:
- Once it begins to boil, reduce the heat to low and let it simmer. Cook the lentils for about 20-25 minutes or until they’re soft and fully cooked, stirring occasionally to prevent sticking. Skim off any foam that forms on the surface.
- Prepare the Tadka (Tempering):
- In a separate pan, heat ghee or oil over medium heat. Add the cumin seeds and let them sizzle for a few seconds until aromatic.
- Add the chopped onions and sauté until they turn golden brown. Stir in the minced garlic, grated ginger, and green chilies, and sauté for another minute.
- Cook the Tadka:
- Add the chopped tomatoes to the pan and cook until they soften and the oil begins to separate from the masala. This should take about 5-7 minutes.
- Stir in the red chili powder and garam masala. Mix well and cook for another minute.
- Combine Lentils and Tadka:
- Once the lentils are cooked, add the prepared tadka to the pot of lentils. Mix everything together thoroughly and let it simmer for an additional 5 minutes to allow the flavors to meld.
- Finish the Dish:
- Turn off the heat and add fresh cilantro and lemon juice. Stir well to combine. Adjust salt and spices as needed.
- Serve:
- Serve hot, garnished with additional cilantro if desired, alongside steamed rice or your choice of Indian bread.
Extra Tips:
For a richer flavor, you can add a small pinch of asafoetida (hing) to the tempering along with the cumin seeds. If you prefer a spicier dal, you can increase the amount of red chili powder or add more green chilies.
To make the dish even creamier, consider adding a tablespoon of cream or yogurt just before serving. Always taste and adjust the seasoning at the end to affirm the perfect balance of flavors.
Palak Paneer

Palak Paneer is a classic North Indian dish that combines tender paneer cubes with a vibrant, flavorful spinach gravy. This vegetarian dish is rich in nutrients and offers a delightful blend of spices that makes it a favorite in Indian households. The creamy spinach sauce absorbs the flavors of the spices, while the paneer provides a mild, cheesy texture that balances the dish perfectly.
Palak Paneer isn’t only delicious but also packed with iron and protein, making it a healthy choice for family meals. This dish is often enjoyed with naan, roti, or rice, making it a versatile addition to any meal.
The preparation involves blanching spinach leaves to brighten their color and preserve nutrients, followed by blending them into a smooth puree. The creamy spinach gravy is then cooked with a mix of aromatic spices before adding the paneer. This dish is best served hot, allowing the flavors to meld beautifully. Whether you’re new to Indian cuisine or a seasoned cook, Palak Paneer is a dish that offers a taste of authentic Indian flavors with each bite.
Ingredients for 4-6 servings:
- 500 grams fresh spinach leaves
- 200 grams paneer, cut into cubes
- 2 tablespoons ghee or vegetable oil
- 1 teaspoon cumin seeds
- 1 large onion, finely chopped
- 2 tomatoes, pureed
- 1 tablespoon ginger-garlic paste
- 2 green chilies, slit lengthwise
- 1 teaspoon coriander powder
- 1/2 teaspoon cumin powder
- 1/2 teaspoon garam masala
- 1/4 teaspoon turmeric powder
- 1/2 cup fresh cream (optional)
- Salt to taste
- Water as needed
Cooking Instructions:
- Blanch the Spinach: Rinse the spinach leaves thoroughly under running water. Boil a pot of water and add the spinach leaves. Let them blanch for 2-3 minutes until they wilt. Immediately transfer the leaves to a bowl of ice-cold water to preserve their bright green color. Drain and set aside.
- Make Spinach Puree: In a blender, add the blanched spinach along with a little water and blend until smooth. Set aside the spinach puree for later use.
- Prepare Paneer: If desired, lightly fry the paneer cubes in a teaspoon of oil until golden on all sides. This step is optional but enhances the flavor and texture of the paneer.
- Cook the Masala: Heat ghee or oil in a pan over medium heat. Add cumin seeds and let them splutter. Add the chopped onions and sauté until they turn golden brown. Stir in the ginger-garlic paste and green chilies, cooking for another minute until fragrant.
- Add Tomatoes and Spices: Pour in the tomato puree, and cook until the oil starts to separate from the mixture. Add coriander powder, cumin powder, turmeric powder, and salt. Cook for 2-3 minutes, making sure the spices are well combined.
- Incorporate Spinach and Paneer: Add the spinach puree to the pan, mixing well with the masala. Let it simmer for about 5-7 minutes. Add the paneer cubes and gently stir to coat them in the spinach sauce. If using cream, add it now and mix well.
- Finish with Garam Masala: Sprinkle garam masala over the dish and give it a final stir. Cook for an additional 2 minutes, allowing the flavors to meld together.
- Serve: Remove from heat and serve hot with naan, roti, or rice.
Extra Tips:
For a richer flavor, you can use butter instead of oil or ghee. If you prefer a spicier dish, increase the amount of green chilies or add a pinch of red chili powder. When blending the spinach, you can add a few mint leaves for a revitalizing twist.
Also, make sure not to overcook the paneer as it can become chewy. Storing leftovers in the refrigerator is possible, but the dish is best enjoyed fresh to appreciate its vibrant flavors fully.
Hyderabadi Dum Biryani

Hyderabadi Dum Biryani is a classic Indian dish that showcases the rich culinary heritage of Hyderabad. Known for its aromatic and flavorful layers of basmati rice, succulent pieces of meat, and a perfect blend of spices, this biryani is cooked using the traditional “dum” method, which involves slow-cooking the ingredients in a sealed pot to allow the flavors to meld beautifully. The result is a fragrant, delectable dish that’s perfect for special occasions or a delightful family meal.
The origins of Hyderabadi Dum Biryani trace back to the kitchens of the Nizams of Hyderabad, where it was a culinary masterpiece that combined Mughlai and Iranian influences. The dish has evolved over time but remains a beloved staple in Indian cuisine. The key to an authentic Hyderabadi Dum Biryani lies in selecting high-quality ingredients, precise cooking techniques, and patience to guarantee the layers of rice and meat are perfectly cooked and infused with aromatic spices.
Ingredients for 4-6 servings:
- 1 kg basmati rice
- 1 kg chicken or mutton, cut into pieces
- 200 grams yogurt
- 2 large onions, thinly sliced
- 4 tablespoons ginger-garlic paste
- 3-4 green chilies, slit
- ½ cup fresh mint leaves, chopped
- ½ cup fresh coriander leaves, chopped
- 2 teaspoons red chili powder
- 1 teaspoon turmeric powder
- 2 teaspoons garam masala
- 2 teaspoons coriander powder
- 1 teaspoon cumin powder
- 1 tablespoon lemon juice
- ½ cup ghee or clarified butter
- ¼ cup cooking oil
- 1 teaspoon saffron strands soaked in ¼ cup warm milk
- Salt to taste
- 4 cups water
Cooking Instructions:
- Preparation of Meat: Marinate the chicken or mutton with yogurt, ginger-garlic paste, red chili powder, turmeric powder, garam masala, coriander powder, cumin powder, lemon juice, salt, and half of the mint and coriander leaves. Allow it to marinate for at least 2-3 hours in the refrigerator for best results.
- Preparing the Rice: Rinse the basmati rice thoroughly and soak it in water for about 30 minutes. Drain the rice and set aside.
- Cooking the Onions: In a large pot, heat the cooking oil and fry the sliced onions until they’re golden brown. Remove half of the fried onions and set aside for garnishing.
- Cooking the Meat: In the same pot with the remaining fried onions, add the marinated meat and cook on medium heat until the meat is tender. Add the green chilies, remaining mint and coriander leaves, and stir well.
- Cooking the Rice: In a separate large pot, bring 4 cups of water to a boil. Add the soaked and drained rice to the boiling water. Cook the rice until it’s 70% cooked, then drain the water and set the rice aside.
- Layering the Biryani: In the pot with the cooked meat, spread a layer of the partially cooked rice over the meat. Drizzle half of the saffron milk and ghee over the rice. Add another layer of rice, followed by the remaining saffron milk and ghee. Top with the reserved fried onions.
- Dum Cooking: Seal the pot with aluminum foil or a tight-fitting lid to prevent steam from escaping. Cook on low heat for 25-30 minutes, allowing the flavors to infuse and the rice to finish cooking. Alternatively, you can place a heavy pan on top of the lid for better sealing.
- Serving: Carefully mix the layers of rice and meat before serving to guarantee even distribution of flavors. Garnish with additional mint and coriander leaves if desired.
Extra Tips:
For the perfect Hyderabadi Dum Biryani, use high-quality basmati rice for its long grains and fragrant aroma. Verify the rice isn’t overcooked before layering, as it will continue to cook during the ‘dum’ process. Adjust the spice levels according to your preference, and remember that the slow-cooking method is key to achieving the authentic taste and texture of this dish. If possible, use a heavy-bottomed pot to prevent the biryani from burning at the bottom. Enjoy your flavorful creation with raita or a side salad.
Aloo Gobi

Aloo Gobi is a classic Indian vegetarian dish that combines potatoes (aloo) and cauliflower (gobi) with a blend of spices to create a flavorful and satisfying meal. This dish is a staple in many Indian households and is known for its simplicity, yet rich taste. Aloo Gobi can be enjoyed as a main course or as a side dish, and it pairs beautifully with warm naan or steamed basmati rice.
The beauty of Aloo Gobi lies in its versatility and ease of preparation. It’s a one-pot dish that requires minimal effort but results in a hearty and aromatic meal. The secret to a delicious Aloo Gobi is the perfect balance of spices, which enhances the natural flavors of the vegetables. This dish isn’t only delicious but also nutritious, making it a perfect choice for anyone looking to enjoy a healthy and flavorful meal.
Ingredients (for 4-6 servings):
- 3 medium-sized potatoes, peeled and diced
- 1 medium-sized cauliflower, cut into florets
- 2 tablespoons vegetable oil
- 1 teaspoon cumin seeds
- 1 large onion, finely chopped
- 2 teaspoons ginger-garlic paste
- 2 medium tomatoes, chopped
- 1 teaspoon turmeric powder
- 1 teaspoon red chili powder
- 1 teaspoon coriander powder
- 1 teaspoon garam masala
- Salt to taste
- 2 tablespoons chopped fresh cilantro (coriander leaves)
- 1 tablespoon lemon juice
Cooking Instructions:
- Prepare the Vegetables: Start by washing the potatoes and cauliflower thoroughly. Peel and dice the potatoes into medium-sized cubes. Cut the cauliflower into small florets and set aside.
- Heat the Oil: In a large pan, heat 2 tablespoons of vegetable oil over medium heat. Once the oil is hot, add 1 teaspoon of cumin seeds and let them sizzle for a few seconds until fragrant.
- Cook the Onions: Add the finely chopped onion to the pan and sauté until it becomes translucent and golden brown. This should take about 5-7 minutes.
- Add Aromatics: Stir in 2 teaspoons of ginger-garlic paste and cook for another 1-2 minutes until the raw smell dissipates.
- Add Tomatoes and Spices: Add the chopped tomatoes, turmeric powder, red chili powder, and coriander powder to the pan. Cook until the tomatoes break down and the mixture becomes a thick paste, stirring occasionally.
- Combine Potatoes and Cauliflower: Add the diced potatoes and cauliflower florets to the pan. Stir well to coat the vegetables with the spice mixture.
- Season and Simmer: Add salt to taste and half a cup of water to the pan. Cover and let the mixture simmer on low heat for about 20-25 minutes, or until the potatoes and cauliflower are tender and cooked through.
- Finish with Garam Masala and Lemon Juice: Once the vegetables are cooked, sprinkle garam masala over the dish and stir well. Add the lemon juice and cook for another 2 minutes.
- Garnish and Serve: Turn off the heat and sprinkle chopped fresh cilantro over the Aloo Gobi. Serve hot with naan or rice.
Extra Tips: For an extra depth of flavor, you can roast the cauliflower florets in the oven before adding them to the dish. This not only enhances the flavor but also gives the cauliflower a lovely texture.
If you prefer a richer taste, you can add a tablespoon of ghee (clarified butter) along with the oil at the beginning. Additionally, if you like your Aloo Gobi spicier, feel free to adjust the amount of red chili powder according to your taste preference.
Tandoori Chicken

Tandoori Chicken is a classic Indian dish that has gained popularity worldwide for its vibrant flavors and succulent texture. Originating from the Indian subcontinent, this dish traditionally involves marinating chicken in a blend of yogurt and spices and then cooking it in a tandoor, a cylindrical clay oven. The high heat of the tandoor imparts a smoky aroma and charred exterior to the chicken while keeping it juicy on the inside.
While not everyone has access to a tandoor, this recipe will guide you on how to achieve similar results using a conventional oven or grill.
The preparation of Tandoori Chicken is a celebration of spices, including cumin, coriander, and garam masala, which are balanced by the tanginess of yogurt and the acidity of lemon juice. This dish is perfect for a family dinner or a festive gathering, serving around 4-6 people. Whether you serve it with naan, rice, or a fresh salad, Tandoori Chicken is sure to impress with its beautiful presentation and delicious flavors.
Ingredients (Serves 4-6)
- 1.5 kg (about 3.3 lbs) chicken, cut into pieces (preferably drumsticks and thighs)
- 1 cup plain yogurt
- 2 tablespoons lemon juice
- 2 tablespoons vegetable oil
- 4 cloves garlic, minced
- 1-inch piece of ginger, grated
- 2 teaspoons ground cumin
- 2 teaspoons ground coriander
- 1 teaspoon garam masala
- 1 teaspoon turmeric powder
- 1 teaspoon red chili powder
- Salt to taste
- Fresh cilantro leaves, for garnish
- Lime wedges, for serving
Cooking Instructions
- Prepare the Marinade: In a large mixing bowl, combine the yogurt, lemon juice, vegetable oil, minced garlic, grated ginger, ground cumin, ground coriander, garam masala, turmeric powder, red chili powder, and salt. Mix well to form a smooth marinade.
- Marinate the Chicken: Make shallow cuts on the chicken pieces to allow the marinade to penetrate. Add the chicken to the bowl and coat each piece thoroughly with the marinade. Cover the bowl with plastic wrap and refrigerate for at least 4 hours, or preferably overnight, to let the flavors meld.
- Preheat the Oven/Grill: If using an oven, preheat it to 240°C (475°F). If using a grill, light it up and set it to medium-high heat.
- Cook the Chicken: Arrange the marinated chicken pieces on a baking sheet lined with aluminum foil if using an oven, or on the grill grates if grilling. Cook for about 25-30 minutes, turning the pieces halfway through, until the chicken is cooked through and has a slightly charred exterior.
- Check for Doneness: Use a meat thermometer to verify the chicken’s internal temperature has reached 75°C (165°F). The juices should run clear when pierced with a fork.
- Serve: Transfer the cooked chicken to a serving platter. Garnish with fresh cilantro leaves and serve with lime wedges on the side.
Extra Tips
When making Tandoori Chicken, it’s essential to allow sufficient marinating time—this step is key for infusing the chicken with robust flavors.
If possible, opt for bone-in chicken pieces as they tend to remain juicier during cooking. For a spicier kick, adjust the amount of red chili powder to your preference.
Additionally, to mimic the smoky aroma of a tandoor, consider adding a few drops of liquid smoke to the marinade or broiling the chicken for an extra 2-3 minutes at the end of cooking.
Malai Kofta

Malai Kofta is a delectable and rich dish that hails from the Indian subcontinent, known for its creamy sauce and soft, melt-in-the-mouth koftas (dumplings). Traditionally, this dish is served during special occasions and is a favorite in many Indian households. The koftas are usually made from a combination of paneer (Indian cottage cheese) and potatoes, which are then simmered in a rich, creamy tomato-based gravy. The result is a dish that’s luxurious and indulgent, perfect for impressing guests or enjoying a cozy family meal.
The beauty of Malai Kofta lies in its balance of flavors and textures—the softness of the koftas perfectly complements the velvety sauce. This recipe provides a step-by-step guide to making Malai Kofta for a serving size of 4-6 people. Whether you’re new to Indian cooking or an experienced cook, this recipe will help you create a dish that’s both authentic and delicious.
Ingredients for Koftas:
- 200 grams paneer, grated
- 2 medium potatoes, boiled and mashed
- 2 tablespoons all-purpose flour
- 1 teaspoon garam masala
- Salt to taste
- Oil for frying
- 2 tablespoons raisins
- 2 tablespoons cashews, chopped
Ingredients for Gravy:
- 3 tablespoons oil
- 1 bay leaf
- 1 teaspoon cumin seeds
- 2 onions, finely chopped
- 1 tablespoon ginger-garlic paste
- 3 large tomatoes, pureed
- 1 teaspoon turmeric powder
- 1 teaspoon red chili powder
- 1 teaspoon coriander powder
- 1 teaspoon garam masala
- Salt to taste
- 1 cup heavy cream
- 2 tablespoons cashew paste
Cooking Instructions:
- Prepare the Koftas:
- In a mixing bowl, combine grated paneer and mashed potatoes. Add all-purpose flour, garam masala, salt, raisins, and chopped cashews. Mix well to form a smooth dough.
- Divide the mixture into equal portions and shape them into small round balls.
- Heat oil in a deep frying pan over medium heat. Once hot, carefully slide in the koftas and fry until golden brown on all sides. Remove and drain on paper towels. Set aside.
- Prepare the Gravy:
- Heat oil in a large pan over medium heat. Add the bay leaf and cumin seeds, allowing them to splutter.
- Add the finely chopped onions and sauté until translucent and golden brown. Add the ginger-garlic paste and sauté for another minute until the raw smell disappears.
- Stir in the tomato puree, turmeric powder, red chili powder, coriander powder, and salt. Cook on medium heat until the oil begins to separate from the masala.
- Add the garam masala, cashew paste, and cream. Mix well and let it simmer for a few minutes until the gravy thickens.
- Combine Koftas and Gravy:
- Gently place the fried koftas into the simmering gravy. Carefully coat the koftas with the sauce.
- Let the koftas simmer in the gravy for 3-4 minutes on low heat to absorb the flavors. Be cautious while stirring to prevent the koftas from breaking.
- Serve:
- Turn off the heat and let the Malai Kofta rest for a few minutes. Garnish with a swirl of cream or chopped coriander leaves before serving.
Extra Tips:
When making the koftas, verify the mixture isn’t too wet; otherwise, they may break during frying. If necessary, add more flour to bind the mixture. For a richer flavor, you can also add a pinch of saffron to the gravy. If you prefer a thicker gravy, let it simmer longer, stirring occasionally. This dish pairs beautifully with naan, roti, or steamed basmati rice. Enjoy your homemade Malai Kofta with family and friends for a satisfying meal.
Dosa

Dosa, a popular South Indian delicacy, is a crisp and savory crepe-like dish made from fermented rice and urad dal (black gram) batter. It’s typically enjoyed as a breakfast item, but it can be relished at any time of day.
Originating from Tamil Nadu, Dosa has become a staple across Indian households and is adored for its versatility and simplicity. Although it takes some time for the batter to ferment, the actual cooking process is quite swift, making it a convenient option for a wholesome meal.
The traditional Dosa is often paired with sambar (a lentil-based vegetable stew) and coconut chutney, enhancing its flavor profile. The fermentation process not only aids in developing the characteristic tangy taste but also enriches the dish with probiotics, making it a healthy choice.
Once you master the art of spreading the batter thinly on a hot griddle, Dosas are an absolute delight to prepare and serve. Here’s a classic recipe for making Dosa that serves 4-6 people.
Ingredients (Serving Size: 4-6)
- 2 cups rice (preferably parboiled rice)
- 1/2 cup urad dal (skinned black gram)
- 1/2 teaspoon fenugreek seeds
- Salt to taste
- Water as needed
- Oil or ghee for cooking
Cooking Instructions
- Soak Ingredients: Begin by washing the rice and urad dal separately under running water. Soak the rice and fenugreek seeds in one bowl and the urad dal in another bowl for at least 4-5 hours or overnight.
- Grind the Batter: Drain the water from the soaked rice and urad dal. In a blender, first grind the urad dal into a smooth, fluffy paste, adding water as needed. Transfer to a large mixing bowl. Next, grind the rice and fenugreek seeds to a slightly coarse consistency. Combine both pastes in the mixing bowl.
- Ferment the Batter: Mix the batter well with your hand to incorporate air and to guarantee a smooth consistency. Cover the bowl with a lid and let the batter ferment in a warm place for 8-12 hours or until it doubles in volume and becomes slightly frothy.
- Prepare the Batter: Once fermented, add salt to the batter and mix gently. If the batter is too thick, add a little water to achieve a pouring consistency.
- Heat the Pan: Preheat a non-stick or cast-iron griddle over medium heat. Sprinkle a few drops of water on the surface; if it sizzles and evaporates, the pan is ready.
- Cook the Dosa: Lightly grease the pan with oil or ghee. Pour a ladleful of batter onto the center of the pan and quickly spread it in a circular motion with the back of the ladle to form a thin, even circle.
- Crisp the Dosa: Drizzle a few drops of oil around the edges of the dosa. Cook until the edges start lifting from the pan and the bottom turns golden brown. Flip if desired, but traditionally, dosas are cooked on one side only.
- Serve: Fold the dosa and remove it from the pan. Serve hot with sambar and coconut chutney.
Extra Tips
For a perfect dosa, confirm the batter has fermented well, as this affects both the texture and flavor. The temperature and humidity can influence fermentation time, so adjust accordingly.
Use a well-seasoned pan to prevent sticking and achieve a crisp texture. If the dosa breaks or sticks to the pan, the batter may need more water or the pan might be too hot.
Practice makes perfect, so don’t be discouraged if your first few dosas aren’t flawless. Enjoy the process and savor the delicious results!
Gulab Jamun

Gulab Jamun is a beloved Indian dessert that’s often served at festivals, weddings, and special occasions. These sweet, soft, and spongy balls are made from a dough consisting of milk solids and flour, which are deep-fried and then soaked in a fragrant sugar syrup. The name “Gulab Jamun” is derived from the Persian words “gulab,” meaning rose, and “jamun,” referring to a type of Indian fruit.
This dessert is known for its rich flavor and melt-in-the-mouth texture, making it a favorite among sweet lovers. The preparation of Gulab Jamun requires a few simple ingredients, but it’s the technique that guarantees perfect results. The dough must be kneaded to the right consistency, and the frying must be done at a precise temperature to achieve the characteristic golden brown color.
The sugar syrup, infused with cardamom and rose water, adds a depth of flavor that’s both traditional and irresistible. When made perfectly, each bite of Gulab Jamun is a delightful combination of sweetness and aroma, sure to leave a lasting impression on anyone who tastes it.
Ingredients for 4-6 servings:
- 1 cup milk powder
- 1/4 cup all-purpose flour
- 1/4 teaspoon baking soda
- 1 tablespoon ghee (clarified butter)
- 1/2 cup milk
- Oil or ghee, for deep frying
For the sugar syrup:
- 1 1/2 cups sugar
- 1 1/2 cups water
- 4 cardamom pods, crushed
- 1 teaspoon rose water
- A few strands of saffron (optional)
Cooking Instructions:
- Prepare the Sugar Syrup: In a saucepan, combine the sugar, water, and crushed cardamom pods. Bring the mixture to a boil, stirring until the sugar dissolves completely. Reduce the heat and let it simmer for about 5-7 minutes until it slightly thickens. Add the rose water and saffron strands, then set aside to cool.
- Make the Dough: In a mixing bowl, combine milk powder, all-purpose flour, and baking soda. Mix well. Add the ghee and mix until the mixture resembles breadcrumbs. Gradually add milk and knead gently to form a soft dough. Be careful not to over-knead, as this can make the dough tough.
- Shape the Balls: Divide the dough into small, equal-sized portions and roll them into smooth balls without any cracks. If the dough is too sticky, lightly grease your palms with ghee.
- Heat the Oil: In a deep pan, heat oil or ghee over low to medium heat. The oil should be hot but not smoking. To test, drop a small piece of dough into the oil; it should rise slowly to the surface without browning too quickly.
- Fry the Balls: Gently slide the dough balls into the hot oil, making sure not to overcrowd the pan. Fry on low heat, stirring constantly, until they turn an even, golden brown. This should take about 7-8 minutes per batch.
- Soak in Syrup: Once the balls are fried, drain excess oil on a paper towel, then immediately transfer them to the warm sugar syrup. Let them soak for at least 1-2 hours to absorb the syrup thoroughly.
Extra Tips:
For the best results, confirm the dough is smooth and free from cracks; this prevents the balls from breaking apart during frying. The temperature of the oil is vital; if it’s too hot, the Gulab Jamun may brown quickly on the outside while remaining uncooked inside.
Soaking the Gulab Jamun in warm syrup allows them to absorb the syrup better, enhancing their flavor and guaranteeing they remain soft and juicy. Enjoy your Gulab Jamun warm or at room temperature for the best taste experience.
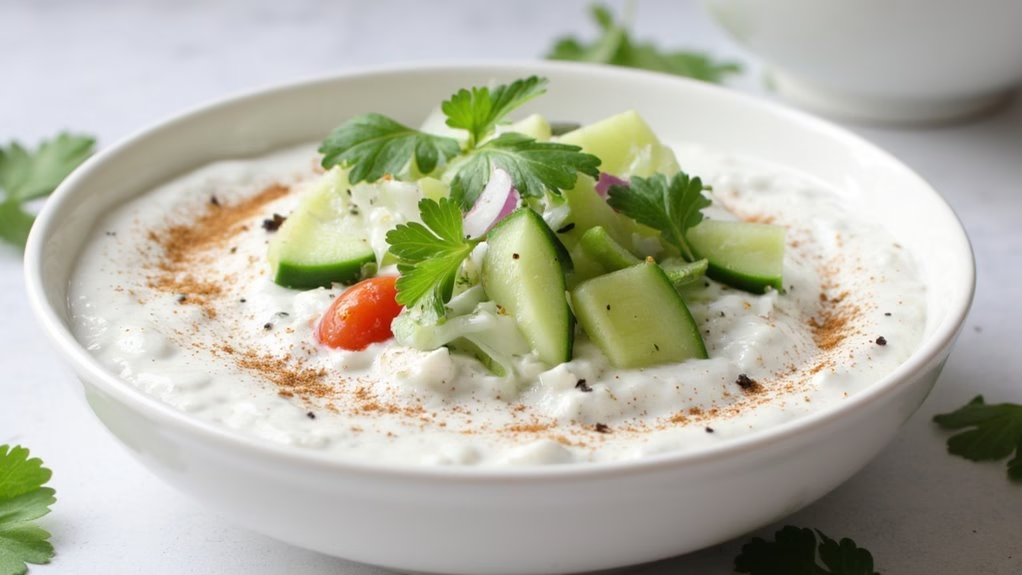
Raita

Raita is a revitalizing Indian side dish made with yogurt and a variety of vegetables or fruits, seasoned with herbs and spices. It’s a versatile dish that complements spicy meals by cooling down the palate, making it a staple in many Indian households.
There are numerous variations of raita, each offering a unique flavor profile, but the most common types include cucumber raita, boondi raita, and onion tomato raita. The simplicity of the dish allows for creativity while maintaining the core element of creamy yogurt.
Raita isn’t only delicious but also incredibly easy to prepare, making it a go-to dish for any occasion. The cooling properties of yogurt make it perfect for pairing with spicy Indian curries or biryanis. It’s best served chilled, and its preparation requires minimal effort and time.
This recipe will guide you through making a classic cucumber raita, which is both hydrating and flavorful, providing a delicious balance to your meal.
Ingredients for Cucumber Raita (Serves 4-6):
- 2 cups plain yogurt
- 1 large cucumber, peeled and grated
- 1 small onion, finely chopped
- 1 medium tomato, finely chopped
- 1-2 green chilies, finely chopped
- 2 tablespoons fresh coriander leaves, chopped
- 1 teaspoon roasted cumin powder
- 1/2 teaspoon black salt (or regular salt to taste)
- 1/4 teaspoon black pepper
- 1/4 teaspoon chaat masala (optional)
Cooking Instructions:
- Prepare the Ingredients: Begin by peeling and grating the cucumber. Make sure to squeeze out the excess water from the grated cucumber to prevent the raita from becoming too watery. Finely chop the onion, tomato, green chilies, and coriander leaves.
- Whisk the Yogurt: In a large mixing bowl, add the plain yogurt. Use a whisk to beat the yogurt until smooth and creamy. This step is important to achieve a consistent texture throughout the raita.
- Mix the Ingredients: Add the grated cucumber, chopped onion, tomato, green chilies, and coriander leaves to the whisked yogurt. Mix everything together gently until well combined.
- Season the Raita: Sprinkle the roasted cumin powder, black salt, black pepper, and chaat masala (if using) over the raita mixture. Stir well to guarantee the spices are evenly distributed throughout the dish.
- Chill and Serve: Cover the bowl with a lid or plastic wrap and refrigerate the raita for at least 30 minutes before serving. Chilling allows the flavors to meld together, enhancing the overall taste. Serve the cucumber raita cold as a side dish with your favorite Indian meal.
Extra Tips:
When making raita, it’s important to use fresh and high-quality yogurt, as it forms the base of the dish. If you prefer thicker raita, you can strain the yogurt using a muslin cloth to remove excess whey before adding other ingredients.
Adjust the seasoning according to your taste preference, and feel free to experiment with adding other ingredients like grated carrots or pomegranate seeds for additional flavor and texture.