
Easter is just around the corner, and my heart is set on finding the perfect cake to celebrate.
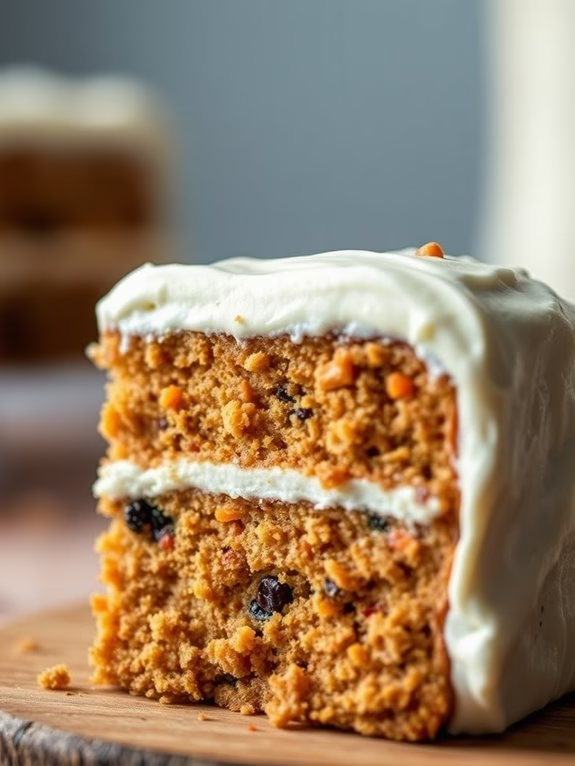
Last year’s carrot cake was a delightful hit, with its warm spices and irresistible cream cheese frosting.
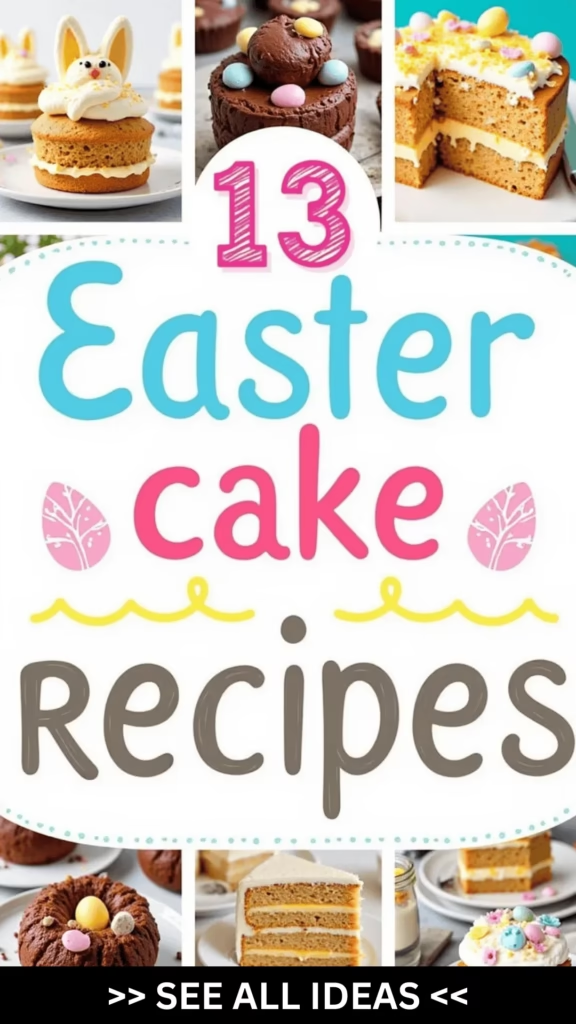
This time, I’m exploring 13 enchanting cake recipes, each bringing its own unique flair to the table.
From a sparkling lemon drizzle cake to a vibrant pistachio citrus layer cake, there’s so much deliciousness to consider.
I can’t wait to share which one will be the star of the show this Easter!
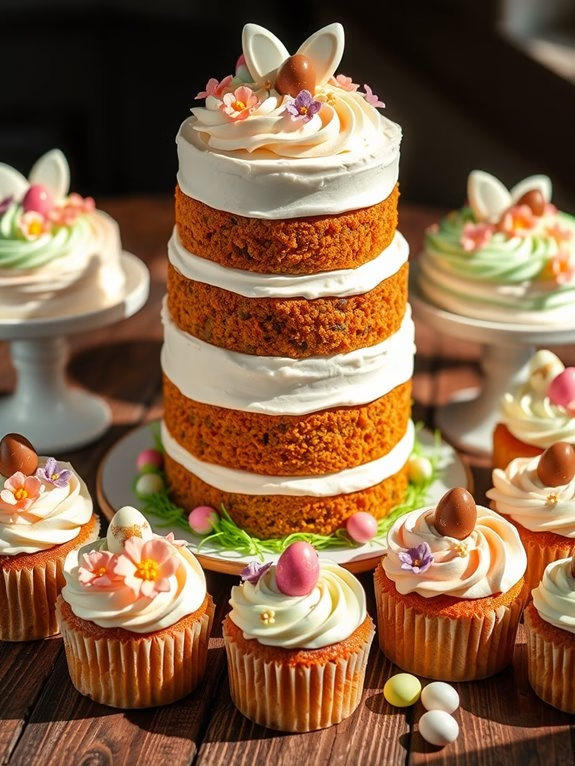
Classic Carrot Cake
Classic Carrot Cake
Carrot cake is a timeless dessert that brings a delightful blend of spices, moist cake layers, and creamy frosting to your Easter celebrations. This classic version is perfect for serving 4-6 people and combines the natural sweetness of carrots with a hint of cinnamon and nutmeg, making it a warm and comforting treat.
The cream cheese frosting adds a tangy contrast to the sweet and spiced cake, creating a perfect balance of flavors that will have your guests asking for seconds.
This recipe uses simple ingredients that are likely already in your pantry and refrigerator. The key to a great carrot cake lies in using freshly grated carrots, which guarantees the cake remains moist and flavorful.
Whether you’re a seasoned baker or trying your hand at baking for the first time, this classic carrot cake recipe is straightforward and rewarding, resulting in a dessert that’s sure to become a favorite in your home.
Ingredients (Serves 4-6)
- 1 1/2 cups all-purpose flour
- 1 teaspoon baking powder
- 1/2 teaspoon baking soda
- 1/2 teaspoon salt
- 1 teaspoon ground cinnamon
- 1/4 teaspoon ground nutmeg
- 1/2 cup vegetable oil
- 3/4 cup granulated sugar
- 1/4 cup brown sugar, packed
- 2 large eggs
- 1 teaspoon vanilla extract
- 1 1/2 cups grated carrots
- 1/4 cup chopped walnuts (optional)
- 1/4 cup raisins (optional)
Cream Cheese Frosting
- 1/2 cup unsalted butter, softened
- 8 oz cream cheese, softened
- 2 cups powdered sugar
- 1 teaspoon vanilla extract
Instructions
- Preheat and Prepare Pans: Preheat your oven to 350°F (175°C). Grease and flour two 8-inch round cake pans to prevent sticking.
- Mix Dry Ingredients: In a medium bowl, whisk together the flour, baking powder, baking soda, salt, cinnamon, and nutmeg. This guarantees the spices and leavening agents are evenly distributed.
- Blend Wet Ingredients: In a large bowl, beat together the vegetable oil, granulated sugar, and brown sugar until well combined. Add the eggs one at a time, beating well after each addition, then stir in the vanilla extract.
- Combine Mixtures: Gradually add the dry ingredients to the wet ingredients, mixing just until combined. Avoid overmixing to keep the cake tender.
- Add Carrots and Optional Mix-ins: Gently fold in the grated carrots, and if desired, the walnuts and raisins. This step gives the cake its characteristic flavor and texture.
- Bake the Cake: Divide the batter evenly between the prepared cake pans. Bake in the preheated oven for 25-30 minutes, or until a toothpick inserted into the center comes out clean. Allow the cakes to cool in the pans for about 10 minutes before transferring them to a wire rack to cool completely.
- Prepare the Frosting: While the cakes are cooling, prepare the cream cheese frosting. In a large bowl, beat together the softened butter and cream cheese until smooth. Gradually add the powdered sugar, beating until all is incorporated. Stir in the vanilla extract.
- Assemble the Cake: Once the cakes are completely cool, place one layer on a serving plate and spread a generous amount of frosting on top. Place the second cake layer on top and frost the top and sides of the cake with the remaining cream cheese frosting.
Extra Tips
For the best results, use freshly grated carrots instead of pre-shredded ones, as they tend to be dryer and less flavorful.
If you prefer a nuttier flavor, lightly toast the walnuts before adding them to the batter. To guarantee your cake is moist, avoid overbaking by checking it a few minutes before the suggested baking time.
If you find the frosting too runny, chill it in the refrigerator for about 15 minutes before using it to frost the cake. Enjoy your classic carrot cake with a cup of coffee or tea for a delightful Easter treat!
Lemon Drizzle Delight

Lemon Drizzle Delight is a heavenly Easter cake that combines the bright and zesty flavors of lemon with a moist, tender crumb. This delightful cake is perfect for celebrating the Easter holiday, as its invigorating taste and vibrant appearance bring a sense of springtime joy to any gathering.
The cake features a luscious lemon-infused sponge that’s generously soaked in a tangy lemon syrup, creating an irresistible balance of sweet and tart that will have your guests coming back for more. The Lemon Drizzle Delight is finished with a drizzle of sweet lemon glaze, adding a glossy shine and an extra burst of citrus flavor.
It’s an ideal dessert for those who love the fresh taste of lemon and wish to offer something light yet indulgent. Whether you serve it as a centerpiece at your Easter brunch or as a sweet treat after dinner, this cake is sure to become a beloved tradition in your holiday celebrations.
Ingredients (Serving Size: 4-6 People)
- 1 cup unsalted butter, softened
- 1 cup granulated sugar
- 3 large eggs
- 1 teaspoon vanilla extract
- Zest of 2 lemons
- 1/4 cup fresh lemon juice
- 1 1/2 cups all-purpose flour
- 1 1/2 teaspoons baking powder
- 1/2 teaspoon salt
- 1/2 cup milk
For the Lemon Syrup:
- 1/4 cup fresh lemon juice
- 1/4 cup granulated sugar
For the Lemon Glaze:
- 1 cup powdered sugar
- 2 tablespoons fresh lemon juice
Cooking Instructions
- Preheat and Prepare: Preheat your oven to 350°F (175°C). Grease and flour a 9-inch round cake pan, making sure it’s fully coated to prevent sticking.
- Cream Butter and Sugar: In a large mixing bowl, cream together the softened butter and granulated sugar until light and fluffy. This should take about 3-4 minutes with an electric mixer on medium speed.
- Add Eggs and Flavorings: Add the eggs one at a time, mixing well after each addition. Stir in the vanilla extract, lemon zest, and lemon juice until well combined.
- Combine Dry Ingredients: In a separate bowl, whisk together the flour, baking powder, and salt. Gradually add this mixture to the wet ingredients, alternating with the milk, beginning and ending with the flour mixture. Mix until just combined, being careful not to overmix.
- Bake the Cake: Pour the batter into the prepared cake pan, smoothing the top with a spatula. Bake in the preheated oven for 30-35 minutes, or until a toothpick inserted into the center comes out clean.
- Make the Lemon Syrup: While the cake is baking, prepare the lemon syrup by combining lemon juice and sugar in a small saucepan over medium heat. Stir until the sugar has dissolved, then remove from heat.
- Soak the Cake: Once the cake has finished baking, remove it from the oven and allow it to cool in the pan for about 10 minutes. Poke small holes all over the surface of the cake using a skewer or toothpick, then slowly pour the lemon syrup over the cake, allowing it to soak in.
- Prepare the Lemon Glaze: In a small bowl, mix together the powdered sugar and lemon juice until smooth. If the glaze is too thick, add a little more lemon juice; if too thin, add more powdered sugar.
- Glaze the Cake: Once the cake is completely cool, remove it from the pan and place it on a serving plate. Drizzle the lemon glaze over the top, allowing it to drip down the sides.
Extra Tips
To guarantee your Lemon Drizzle Delight is as flavorful as possible, make sure to use fresh lemons for both the zest and juice. This will enhance the citrus flavor and provide a delightful aroma.
Be careful not to overbake the cake, as it should remain moist and tender. For an extra decorative touch, you can garnish the cake with thin lemon slices or a sprinkle of lemon zest before serving.
This cake can be stored in an airtight container at room temperature for up to three days, making it convenient to prepare ahead of time for Easter festivities. Enjoy!
Chocolate Easter Nest Cake
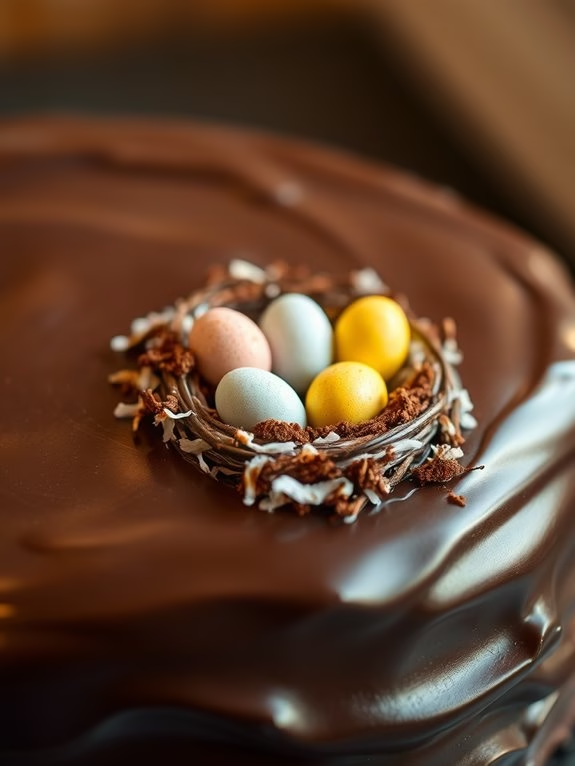
Chocolate Easter Nest Cake is a delightful dessert that brings a touch of whimsy and indulgence to any Easter celebration. This cake isn’t only a feast for the taste buds but also a visual masterpiece that captures the essence of Easter with its charming nest design. The rich, moist chocolate sponge is complemented by a smooth and creamy chocolate ganache, topped with delicate chocolate shavings and adorned with mini chocolate eggs. Perfect for serving at a family gathering or as a sweet treat after Easter brunch, this cake is sure to impress both children and adults alike.
Creating the perfect Chocolate Easter Nest Cake involves a blend of creativity and culinary skill. The cake combines the deep flavors of cocoa with the smoothness of melted chocolate, creating a dessert that’s both rich and light. The nest topping adds a fun, festive element, making it a centerpiece worthy of any Easter table.
With a serving size of 4-6 people, this cake is ideal for intimate gatherings, allowing everyone to indulge in a slice of Easter magic. Whether you’re an experienced baker or a novice in the kitchen, this recipe is accessible and rewarding, guaranteeing you’ll have a delicious and beautiful cake to share.
Ingredients (serving size 4-6 people):
- 1 cup all-purpose flour
- 1 cup granulated sugar
- ½ cup unsweetened cocoa powder
- 1 teaspoon baking powder
- ½ teaspoon baking soda
- ½ teaspoon salt
- 2 large eggs
- ½ cup whole milk
- ¼ cup vegetable oil
- 1 teaspoon vanilla extract
- ½ cup boiling water
- ¾ cup heavy cream
- 200g dark chocolate, chopped (for ganache)
- 1 cup shredded coconut (for nest)
- 1 tablespoon cocoa powder (for nest)
- Mini chocolate eggs for decoration
Cooking Instructions:
- Preheat and Prepare: Preheat your oven to 350°F (175°C). Grease and line an 8-inch round cake pan with parchment paper to guarantee easy removal of the cake once baked.
- Mix Dry Ingredients: In a large mixing bowl, whisk together the flour, sugar, cocoa powder, baking powder, baking soda, and salt until well combined. This guarantees all the dry ingredients are evenly distributed.
- Combine Wet Ingredients: Add the eggs, milk, oil, and vanilla extract to the dry ingredients. Mix on medium speed until smooth and well blended. This creates the base batter for your cake.
- Add Boiling Water: Carefully stir in the boiling water. The batter will be thin, but this step is vital for a moist chocolate cake.
- Bake the Cake: Pour the batter into the prepared cake pan. Bake in the preheated oven for 30-35 minutes or until a toothpick inserted into the center comes out clean. Remove from the oven and let it cool in the pan for 10 minutes before transferring to a wire rack to cool completely.
- Make the Ganache: Heat the heavy cream in a small saucepan until it begins to simmer. Remove from heat and add the chopped dark chocolate. Let it sit for a couple of minutes and then stir until smooth. Allow the ganache to cool slightly until it thickens.
- Decorate the Cake: Once the cake is completely cool, spread the chocolate ganache evenly over the top and sides. To create the nest, mix shredded coconut with cocoa powder until fully coated. Arrange the coconut around the top edge of the cake to form a nest shape.
- Add the Eggs: Place the mini chocolate eggs inside the coconut nest to complete the decoration. Chill the cake for at least 30 minutes before serving to set the ganache.
Extra Tips:
For an even richer flavor, you can substitute half of the dark chocolate with milk chocolate in the ganache. If you prefer a less sweet cake, reduce the sugar by a quarter cup. To add more texture, consider sprinkling chopped nuts over the ganache before adding the coconut nest.
Remember to let the cake cool completely before applying the ganache to prevent it from melting off. This recipe can be easily doubled for larger gatherings, and you can use colorful sprinkles or additional Easter-themed decorations to make the cake even more festive.
Raspberry Almond Torte
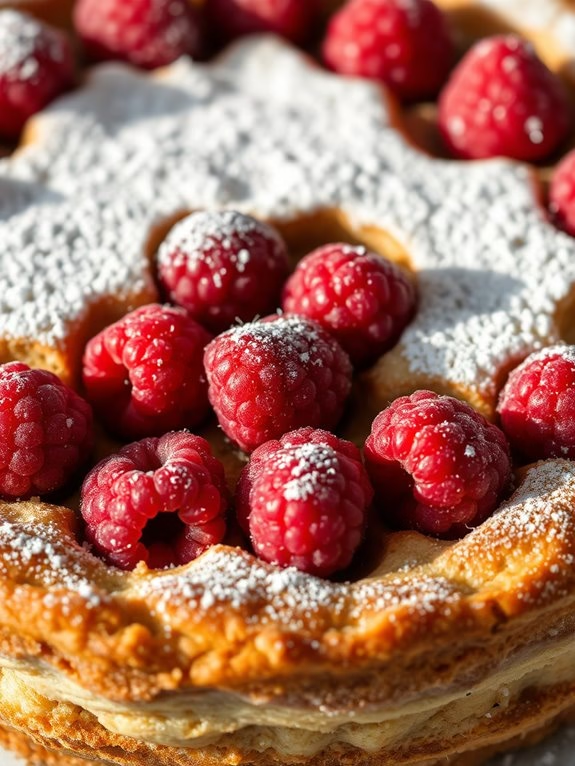
Raspberry Almond Torte is a delightful dessert that combines the nutty richness of almonds with the sweet-tart flavor of fresh raspberries. This elegant cake is perfect for celebrating Easter or any special occasion. The almond flour gives the torte a wonderfully moist and tender crumb, while the raspberries provide a burst of color and flavor. Topped with a light dusting of powdered sugar or a dollop of whipped cream, this torte is sure to impress your family and friends.
To make this Raspberry Almond Torte, you’ll first need to prepare a simple batter using almond flour, eggs, sugar, and butter. The torte is then baked to a golden brown and topped with a generous layer of fresh raspberries. As the torte bakes, the juices from the raspberries seep into the cake, adding extra moisture and flavor. This recipe serves 4-6 people, making it ideal for a small gathering.
Ingredients:
- 1 cup almond flour
- 4 large eggs
- 1 cup granulated sugar
- 1/2 cup unsalted butter, melted
- 1 teaspoon vanilla extract
- 1/2 teaspoon almond extract
- 1/4 teaspoon salt
- 1 cup fresh raspberries
- Powdered sugar, for dusting (optional)
Instructions:
- Preheat the Oven: Begin by preheating your oven to 350°F (175°C). Grease a 9-inch springform pan or line it with parchment paper to prevent sticking.
- Mix Dry Ingredients: In a medium bowl, whisk together the almond flour and salt. This helps to evenly distribute the salt and break up any lumps in the almond flour.
- Beat Eggs and Sugar: In a large mixing bowl, beat the eggs and granulated sugar with an electric mixer on medium-high speed until the mixture is pale and thick, about 3-4 minutes.
- Combine Ingredients: Reduce the mixer speed to low and gradually add the melted butter, vanilla extract, and almond extract to the egg mixture. Mix until fully incorporated.
- Fold in Almond Flour: Gently fold the almond flour mixture into the wet ingredients using a spatula. Be careful not to overmix, as this can deflate the batter.
- Add Raspberries: Pour the batter into the prepared pan and smooth the top. Evenly distribute the fresh raspberries over the surface of the batter, pressing them down slightly.
- Bake the Torte: Bake in the preheated oven for 35-40 minutes, or until the top is golden brown and a toothpick inserted into the center comes out clean.
- Cool and Serve: Allow the torte to cool in the pan for 10 minutes before removing the sides of the springform pan. Transfer to a wire rack to cool completely. Dust with powdered sugar before serving, if desired.
Extra Tips:
To enhance the flavor, consider toasting the almond flour lightly in a dry skillet before adding it to the batter. This will bring out a deeper nutty flavor.
It’s also important to use fresh raspberries for the best taste and texture; however, if using frozen raspberries, don’t thaw them before adding to the batter to prevent the torte from becoming too wet.
Finally, if you prefer, you can substitute half of the raspberries with blueberries for a mixed berry twist.
Vanilla Bean Celebration
Vanilla Bean Celebration Cake
Celebrate Easter with a delightful Vanilla Bean Celebration Cake, a dessert that showcases the classic flavors of vanilla in a moist and tender cake. This cake is perfect for family gatherings and holiday celebrations, with its rich vanilla aroma and delicate crumb. The key to this recipe is using high-quality vanilla beans, which infuse the cake with a natural and robust vanilla flavor that’s sure to impress your guests.
The Vanilla Bean Celebration Cake is paired with a creamy vanilla bean frosting, adding an extra layer of sweetness and flavor. This cake isn’t only delicious but also beautiful, making it a centerpiece on your Easter dessert table. With its elegant simplicity, this cake is an example of the timeless appeal of vanilla, creating a dessert that’s both comforting and sophisticated.
Ingredients (serves 4-6 people):
- 2 1/2 cups all-purpose flour
- 2 1/2 teaspoons baking powder
- 1/2 teaspoon salt
- 1 1/2 cups granulated sugar
- 3/4 cup unsalted butter, softened
- 3 large eggs
- 1 tablespoon vanilla bean paste
- 1 cup whole milk
- 1/2 cup sour cream
Vanilla Bean Frosting:
- 1 cup unsalted butter, softened
- 4 cups powdered sugar
- 2 teaspoons vanilla bean paste
- 2-3 tablespoons heavy cream
Cooking Instructions:
- Preheat the Oven: Preheat your oven to 350°F (175°C). Grease and flour two 8-inch round cake pans, ensuring they’re well-coated to prevent the cake from sticking.
- Mix Dry Ingredients: In a large bowl, whisk together the all-purpose flour, baking powder, and salt. Set this mixture aside as you prepare the wet ingredients.
- Cream Butter and Sugar: In a separate large mixing bowl, cream the softened butter and granulated sugar together using an electric mixer on medium speed until light and fluffy, about 3-4 minutes.
- Add Eggs and Vanilla: Add the eggs one at a time to the butter and sugar mixture, beating well after each addition. Stir in the vanilla bean paste until fully incorporated.
- Combine Wet and Dry Ingredients: Gradually add the flour mixture to the wet ingredients, alternating with the milk and sour cream. Begin and end with the flour mixture. Mix until just combined, being careful not to overmix.
- Bake the Cake: Divide the batter evenly between the prepared cake pans. Smooth the tops, then bake in the preheated oven for 25-30 minutes, or until a toothpick inserted into the center comes out clean.
- Cool the Cake: Remove the cakes from the oven and allow them to cool in the pans for 10 minutes. Then, turn them out onto a wire rack to cool completely.
- Prepare Frosting: To make the frosting, beat the softened butter on medium speed until creamy. Gradually add the powdered sugar, one cup at a time, beating well after each addition. Stir in the vanilla bean paste and heavy cream, mixing until the frosting is smooth and spreadable.
- Assemble the Cake: Place one cake layer on a serving plate and spread a layer of frosting on top. Place the second cake layer on top and apply a crumb coat of frosting. Chill the cake for 15 minutes, then apply the final layer of frosting. Decorate as desired.
Extra Tips:
For the best flavor, use high-quality vanilla bean paste, which provides a more intense vanilla flavor than extract. If possible, bake the cakes a day in advance; this allows the flavors to meld and the cake to become even moister.
Make sure the cake layers are completely cool before frosting to prevent the frosting from melting. You can also add a touch of elegance by garnishing the cake with edible flowers or fresh berries for a visually stunning presentation.
Coconut Cream Dream
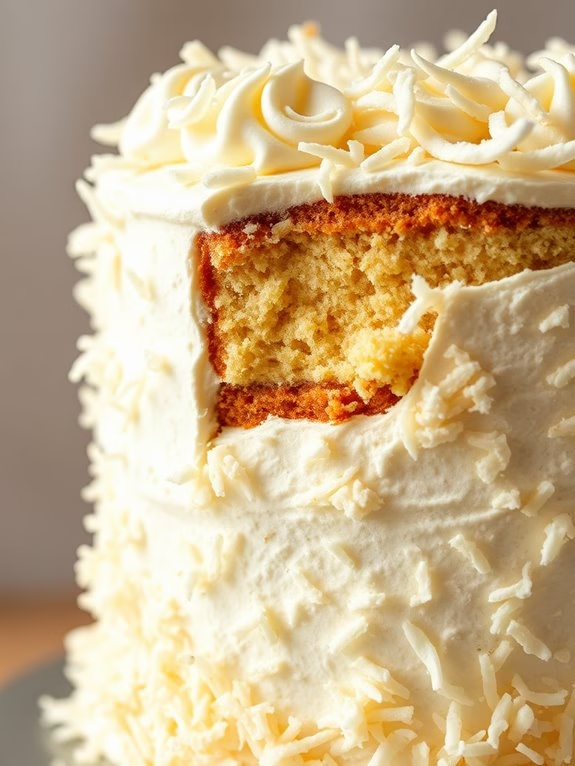
Coconut Cream Dream is a delightful and decadent Easter cake that combines the light, fluffy texture of a classic sponge with the rich, tropical flavors of coconut and cream.
It’s an ideal centerpiece for any Easter celebration, pleasing both the eyes and the palate with its elegant presentation and sumptuous taste. This cake isn’t only delicious but also relatively simple to prepare, allowing you to spend less time in the kitchen and more time with family and friends.
The Coconut Cream Dream cake is made up of moist coconut cake layers filled with a luscious coconut cream filling and topped with a whipped cream frosting. The outside is adorned with shredded coconut, which not only enhances the flavor but also gives the cake an irresistible, snow-like appearance.
This recipe serves 4-6 people, making it perfect for an intimate gathering or family dessert after an Easter feast.
Ingredients:
For the Cake:
- 1 cup granulated sugar
- 1/2 cup unsalted butter, softened
- 2 large eggs
- 1 teaspoon vanilla extract
- 1 1/2 cups all-purpose flour
- 1 1/2 teaspoons baking powder
- 1/4 teaspoon salt
- 1/2 cup coconut milk
For the Coconut Cream Filling:
- 1 cup heavy cream
- 1/4 cup powdered sugar
- 1/2 cup shredded coconut
For the Whipped Cream Frosting:
- 1 cup heavy cream
- 1/4 cup powdered sugar
- 1 teaspoon coconut extract
For Garnish:
– 1 cup shredded coconut
Cooking Instructions:
- Preheat and Prepare Pans: Preheat your oven to 350°F (175°C). Grease and flour two 8-inch round cake pans to prevent sticking.
- Make the Cake Batter: In a large bowl, cream together the sugar and butter until light and fluffy. Add the eggs one at a time, beating well after each addition. Stir in the vanilla extract.
- Combine Dry Ingredients: In a separate bowl, whisk together the flour, baking powder, and salt. Gradually add the dry ingredients to the creamed mixture, alternating with the coconut milk, until just combined.
- Bake the Cakes: Divide the batter evenly between the prepared cake pans. Bake in the preheated oven for 25-30 minutes, or until a toothpick inserted into the center comes out clean. Let the cakes cool in the pans for 10 minutes before transferring them to a wire rack to cool completely.
- Prepare the Coconut Cream Filling: In a mixing bowl, whip the heavy cream until soft peaks form. Gradually add the powdered sugar, continuing to whip until stiff peaks form. Gently fold in the shredded coconut.
- Assemble the Cake: Place one cake layer on a serving plate. Spread the coconut cream filling evenly over the top. Place the second cake layer on top, gently pressing down.
- Make the Whipped Cream Frosting: In a clean bowl, whip the heavy cream until soft peaks form. Gradually add the powdered sugar and coconut extract, whipping until stiff peaks form.
- Frost the Cake: Spread the whipped cream frosting evenly over the top and sides of the cake. Sprinkle the shredded coconut evenly over the top and sides for a beautiful, snow-like finish.
Extra Tips:
For the best results, verify all your ingredients are at room temperature before starting. This helps the cake batter mix more smoothly and results in a more consistent texture.
When whipping cream, keep your bowl and beaters cold to achieve the stiff peaks needed for the filling and frosting. If you want an even more pronounced coconut flavor, consider lightly toasting the shredded coconut for garnish before applying it to the cake.
This not only enhances the coconut taste but also adds a slight crunch to each bite.
Funfetti Spring Surprise

Funfetti Spring Surprise Cake Recipe
Celebrate the joy of Easter with a delightful Funfetti Spring Surprise Cake that’s as much fun to make as it’s to eat. This colorful cake is bursting with sprinkles in every bite and features a surprise layer of spring-themed candies in the center. It’s the perfect addition to any Easter gathering, bringing smiles and sweet delights to your holiday table.
This cake isn’t just a treat for the taste buds but also a beautiful centerpiece that captures the essence of spring with its vibrant colors and playful design. The Funfetti Spring Surprise Cake is designed to serve 4-6 people, making it an ideal choice for small family gatherings or intimate celebrations.
Whether you’re a seasoned baker or a novice in the kitchen, this recipe is straightforward and rewarding, with each step crafted to guarantee a delicious and visually appealing dessert. The key to this cake’s charm lies in its hidden surprise layer, which adds an unexpected element of fun and excitement.
Follow the easy instructions below to create a cake that’s sure to become a family favorite.
Ingredients:
- 2 ½ cups all-purpose flour
- 1 ½ cups granulated sugar
- 1 tablespoon baking powder
- ½ teaspoon baking soda
- ½ teaspoon salt
- 1 cup unsalted butter, softened
- 1 cup buttermilk, room temperature
- 4 large eggs, room temperature
- 2 teaspoons vanilla extract
- 1 cup rainbow sprinkles
- 1 cup assorted spring-themed candies (such as chocolate eggs or jellybeans)
- 3 cups powdered sugar
- ½ cup unsalted butter, softened (for frosting)
- 2 teaspoons vanilla extract (for frosting)
- 2-4 tablespoons heavy cream (for frosting)
- Extra sprinkles for decoration
Cooking Instructions:
- Preheat and Prep: Preheat your oven to 350°F (175°C). Grease and flour two 9-inch round cake pans, making certain they’re fully coated to prevent sticking.
- Mix Dry Ingredients: In a large bowl, whisk together the flour, baking powder, baking soda, and salt. This will evenly distribute the leavening agents.
- Cream Butter and Sugar: In a separate bowl, use an electric mixer to cream the softened butter and granulated sugar until light and fluffy, about 3-4 minutes.
- Combine Wet Ingredients: Add the eggs, one at a time, to the butter mixture, beating well after each addition. Mix in the vanilla extract.
- Incorporate Dry Ingredients and Buttermilk: Gradually add the dry ingredients to the butter mixture alternately with the buttermilk, starting and ending with the flour mixture. Mix until just combined.
- Add Sprinkles: Gently fold in the rainbow sprinkles with a spatula, being careful not to overmix, as this can cause the colors to bleed.
- Bake the Cakes: Divide the batter evenly between the prepared cake pans. Bake for 25-30 minutes or until a toothpick inserted into the center comes out clean. Let the cakes cool in the pans for 10 minutes, then transfer to a wire rack to cool completely.
- Prepare the Frosting: In a bowl, beat the softened butter until creamy. Gradually add the powdered sugar, vanilla extract, and 2 tablespoons of heavy cream. Beat until smooth. Add more cream as needed to reach your desired consistency.
- Assemble the Cake: Place one cake layer on a serving plate. Hollow out a small circle in the center, about 1 inch deep, and fill with the spring-themed candies. Spread a layer of frosting around the edge of the cake, then place the second cake layer on top.
- Frost the Cake: Spread a thin layer of frosting over the entire cake (crumb coat) and refrigerate for 15 minutes. Apply a final layer of frosting and decorate with additional sprinkles.
Extra Tips:
For the best results, make certain all your ingredients are at room temperature before you begin mixing, as this will help them combine more smoothly.
When folding in the sprinkles, be gentle to avoid color bleeding, which can happen if overmixed. If you want more height or a larger surprise center, consider adding an additional cake layer by doubling the recipe.
Finally, if you prefer a different frosting flavor, feel free to experiment with lemon or almond extracts for a unique twist that complements the spring theme.
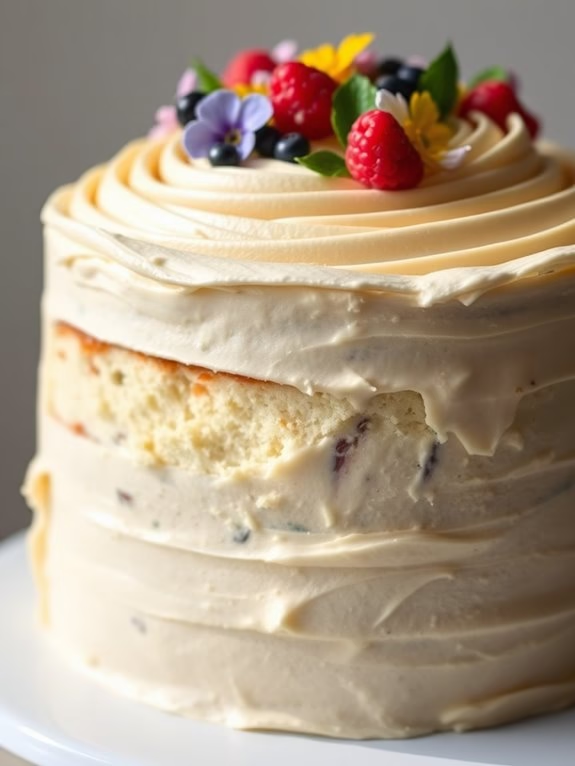
Red Velvet Blossom
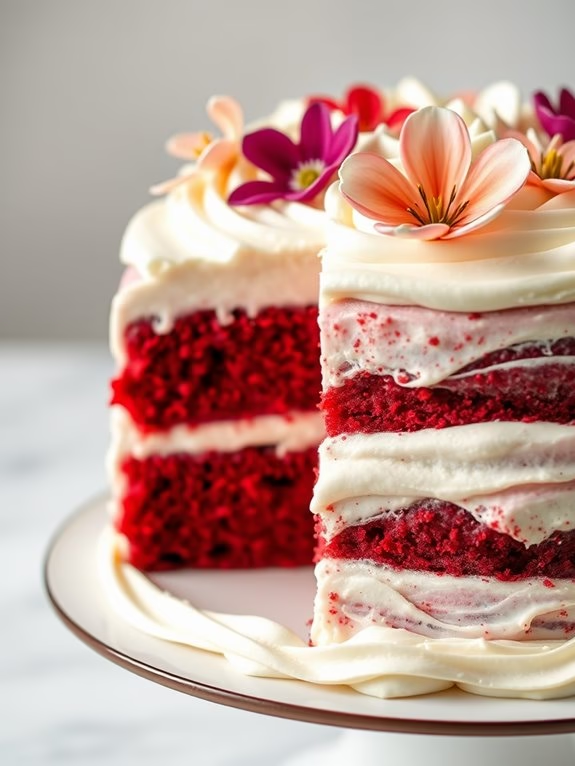
Red Velvet Blossom is a delightful Easter cake that combines the classic flavors of red velvet with a charming floral twist. This cake isn’t only delicious but also visually stunning, making it the perfect centerpiece for your Easter celebration.
The rich, velvety texture of the cake is complemented by a creamy frosting and adorned with delicate edible flowers, creating a dessert that’s as pleasing to the eye as it’s to the palate.
The Red Velvet Blossom cake is designed to serve 4-6 people, making it ideal for small gatherings or family celebrations. The recipe incorporates traditional ingredients that give red velvet its distinctive flavor, as well as some creative touches to enhance its appearance and taste.
Whether you’re an experienced baker or a novice, this recipe provides a step-by-step guide to help you create a stunning and delicious cake that will impress your guests.
Ingredients:
- 2 1/2 cups all-purpose flour
- 1 1/2 cups granulated sugar
- 1 teaspoon baking soda
- 1 teaspoon salt
- 1 teaspoon cocoa powder
- 1 1/2 cups vegetable oil
- 1 cup buttermilk, room temperature
- 2 large eggs
- 2 tablespoons red food coloring
- 1 teaspoon vanilla extract
- 1 teaspoon white vinegar
- 1/2 cup unsalted butter, softened
- 8 ounces cream cheese, softened
- 4 cups powdered sugar
- 1 teaspoon vanilla extract
- Edible flowers for decoration
Instructions:
- Preheat and Prepare Pans: Preheat your oven to 350°F (175°C). Grease and flour two 9-inch round cake pans, then line the bottom with parchment paper to prevent sticking.
- Mix Dry Ingredients: In a medium bowl, sift together the flour, sugar, baking soda, salt, and cocoa powder. This guarantees even distribution and prevents lumps in the batter.
- Combine Wet Ingredients: In a large mixing bowl, whisk together the vegetable oil, buttermilk, eggs, red food coloring, vanilla extract, and vinegar until well combined.
- Incorporate Dry into Wet: Gradually add the dry ingredients to the wet mixture, mixing on low speed until just combined. Be careful not to overmix, as this can result in a dense cake.
- Bake the Cakes: Divide the batter evenly between the prepared cake pans. Bake for 25-30 minutes, or until a toothpick inserted into the center comes out clean. Allow the cakes to cool in the pans for 10 minutes, then turn them out onto a wire rack to cool completely.
- Prepare the Frosting: In a large bowl, beat together the softened butter and cream cheese until smooth. Gradually add the powdered sugar and vanilla extract, mixing until the frosting is creamy and spreadable.
- Assemble the Cake: Place one cake layer on a serving platter. Spread a layer of frosting over the top, then place the second cake layer on top. Frost the top and sides of the cake with the remaining frosting.
- Decorate with Flowers: Gently place the edible flowers on top of the cake in a decorative pattern. This adds a beautiful, springtime touch to your Red Velvet Blossom.
Extra Tips:
When working with red food coloring, be sure to wear gloves to prevent staining your hands. Additionally, using gel food coloring rather than liquid can help achieve a more vibrant shade of red without altering the texture of the batter.
For an added flavor dimension, you can infuse the frosting with a hint of lemon zest or almond extract. If you’re unable to find edible flowers, consider using fresh berries or chocolate shavings for decoration.
Finally, always store the cake in the refrigerator to keep the cream cheese frosting fresh.
Strawberry Shortcake Bliss
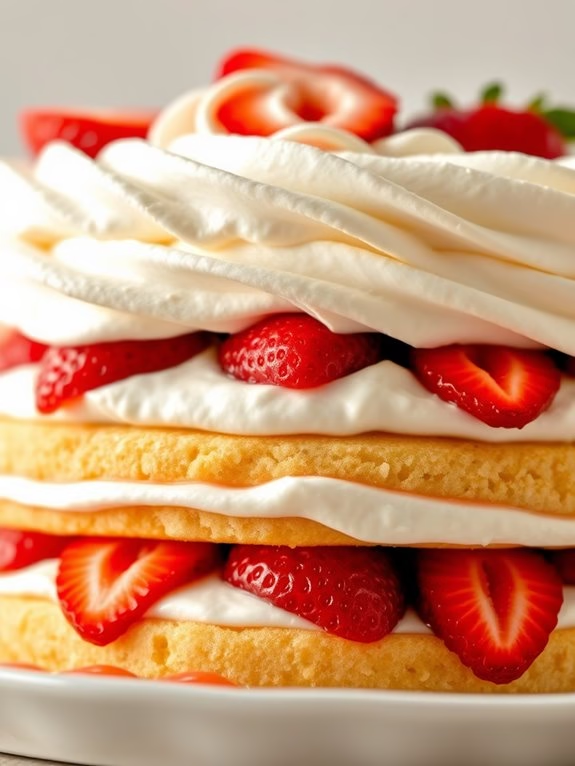
Strawberry Shortcake Bliss
Celebrate Easter with a delightful Strawberry Shortcake Bliss, a dessert that perfectly combines the lightness of sponge cake with the sweetness of fresh strawberries and the creaminess of whipped cream. This cake is a rejuvenating way to end your Easter feast, offering both elegance and simplicity.
The vibrant red strawberries layered between fluffy cake and clouds of whipped cream create a visual and taste sensation that will impress your family and guests.
This recipe is designed to serve 4-6 people, making it ideal for a small gathering. The key to a perfect Strawberry Shortcake Bliss lies in using fresh, ripe strawberries and high-quality cream. This guarantees that every bite is bursting with flavor and texture.
Whether you’re an experienced baker or a novice, this recipe is straightforward and rewarding, promising a delicious outcome without the fuss.
Ingredients:
- 1 1/2 cups all-purpose flour
- 1/2 cup granulated sugar
- 1 tablespoon baking powder
- 1/2 teaspoon salt
- 1/2 cup unsalted butter, chilled and cubed
- 1/2 cup whole milk
- 1 teaspoon vanilla extract
- 1 large egg
- 2 cups fresh strawberries, hulled and sliced
- 1/4 cup granulated sugar (for strawberries)
- 1 cup heavy whipping cream
- 1 tablespoon powdered sugar
- 1/2 teaspoon vanilla extract (for whipped cream)
Instructions:
- Prepare the Strawberries: In a medium bowl, combine the sliced strawberries with 1/4 cup of granulated sugar. Stir well and let them macerate for at least 30 minutes. This will create a sweet syrup as the strawberries release their juices.
- Preheat the Oven: Preheat your oven to 400°F (200°C) and grease a round 8-inch cake pan or a muffin tin if you prefer individual shortcakes.
- Make the Cake Batter: In a large mixing bowl, whisk together the flour, 1/2 cup of granulated sugar, baking powder, and salt. Cut in the cubed butter using a pastry cutter or your fingers until the mixture resembles coarse crumbs.
- Mix Wet Ingredients: In a separate bowl, mix the milk, vanilla extract, and egg until well combined. Pour this mixture into the dry ingredients and stir gently until just combined.
- Bake the Cake: Pour the batter into the prepared cake pan and smooth the top. Bake in the preheated oven for 15-20 minutes or until a toothpick inserted into the center comes out clean. Let the cake cool in the pan for 10 minutes before transferring it to a wire rack to cool completely.
- Whip the Cream: In a chilled bowl, beat the heavy whipping cream with an electric mixer until soft peaks form. Add the powdered sugar and vanilla extract, and continue to beat until stiff peaks form.
- Assemble the Cake: Once the cake has cooled, slice it horizontally in half. Place the bottom half on a serving plate, layer with half of the macerated strawberries and their syrup, followed by a generous layer of whipped cream. Place the top half of the cake on top, and repeat with the remaining strawberries and cream.
- Chill and Serve: Chill the assembled cake in the refrigerator for at least 30 minutes before serving to allow the flavors to meld together.
Extra Tips:
When making Strawberry Shortcake Bliss, verify that the butter is cold when incorporating it into the flour mixture for a flakier texture.
Chilling the mixing bowl and beaters in the freezer for a few minutes before whipping the cream can help achieve a stiffer consistency more quickly.
If you prefer a more intense strawberry flavor, consider adding a tablespoon of strawberry jam to the macerated strawberries.
Finally, feel free to experiment with other berries or a mix for a unique twist on this classic dessert.
Pistachio Citrus Layer
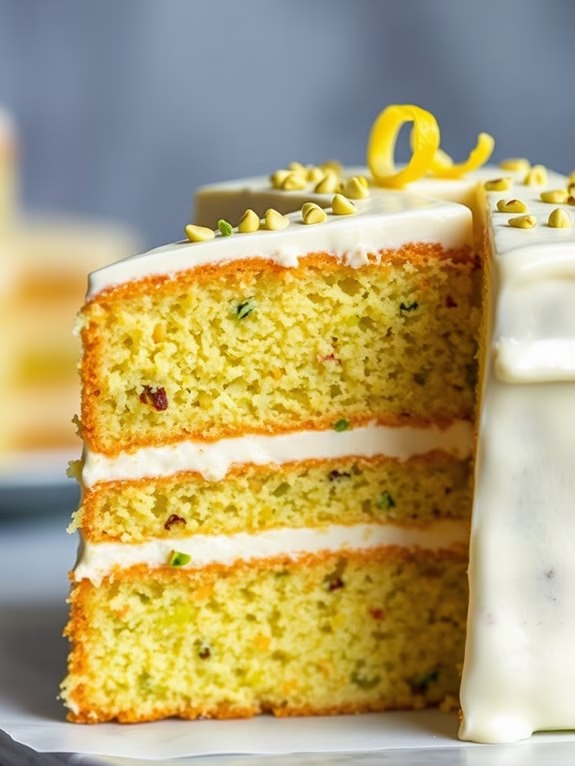
Pistachio Citrus Layer Cake Recipe
This delightful Pistachio Citrus Layer Cake is a perfect treat for your Easter celebrations. The combination of nutty pistachios and zesty citrus creates a revitalizing and flavorful cake that stands out on any dessert table.
With its light and fluffy layers, this cake is both impressive and delicious, making it an ideal choice for those looking to add a touch of elegance to their festive gatherings. The cake is crafted with layers of tender pistachio sponge, infused with a hint of citrus, and topped with a luscious cream cheese frosting.
Each slice offers a harmonious blend of sweet, tangy, and nutty flavors, making it a crowd-pleaser among both adults and children. Whether you’re hosting a brunch or an afternoon tea, this Pistachio Citrus Layer Cake is sure to be a hit.
Ingredients (Serves 4-6):
- 1 cup all-purpose flour
- 1 cup shelled pistachios, finely ground
- 1 1/2 teaspoons baking powder
- 1/4 teaspoon salt
- 1/2 cup unsalted butter, softened
- 1 cup granulated sugar
- 3 large eggs
- 1 teaspoon vanilla extract
- Zest of 2 lemons
- Juice of 1 lemon
- 1/2 cup whole milk
- 8 oz cream cheese, softened
- 1/2 cup powdered sugar
- 1 teaspoon vanilla extract (for frosting)
- 1 tablespoon lemon juice (for frosting)
Cooking Instructions:
- Preheat and Prepare: Preheat your oven to 350°F (175°C). Grease and line two 8-inch round cake pans with parchment paper to guarantee easy removal of the cakes after baking.
- Mix Dry Ingredients: In a medium bowl, whisk together the flour, ground pistachios, baking powder, and salt. This helps to evenly distribute the baking powder and salt throughout the flour and pistachios.
- Cream Butter and Sugar: In a large mixing bowl, cream the softened butter and granulated sugar together using an electric mixer on medium speed until light and fluffy, about 3-4 minutes. This step incorporates air into the mixture, which is essential for a light cake.
- Add Eggs and Flavorings: Add the eggs one at a time to the butter mixture, beating well after each addition. Mix in the vanilla extract, lemon zest, and lemon juice until well combined.
- Combine Wet and Dry Mixtures: Gradually add the dry ingredients to the wet mixture, alternating with the milk, starting and ending with the dry ingredients. Mix until just combined, being careful not to overmix the batter.
- Bake the Cakes: Divide the batter evenly between the prepared cake pans. Smooth the tops with a spatula and bake in the preheated oven for 25-30 minutes, or until a toothpick inserted in the center comes out clean.
- Cool the Cakes: Allow the cakes to cool in the pans for about 10 minutes before transferring them to a wire rack to cool completely.
- Prepare the Frosting: In a medium bowl, beat the cream cheese until smooth. Gradually add the powdered sugar, vanilla extract, and lemon juice, and continue beating until the frosting is smooth and creamy.
- Assemble the Cake: Place one cake layer on a serving platter and spread a generous amount of frosting on top. Place the second cake layer on top and spread the remaining frosting over the top and sides of the cake.
- Garnish and Serve: If desired, garnish the cake with additional lemon zest or chopped pistachios. Slice and serve the cake to your guests.
Extra Tips:
For the best flavor, use freshly ground pistachios. You can easily do this by pulsing shelled pistachios in a food processor until finely ground. Be careful not to over-process, or you’ll end up with pistachio butter.
Additionally, verify all your ingredients are at room temperature before you start, as this helps with even mixing and a smoother batter. Finally, letting the cake cool completely before frosting is essential to avoid the frosting melting and sliding off the cake.
Enjoy your delicious Pistachio Citrus Layer Cake!
Honey Lavender Harmony
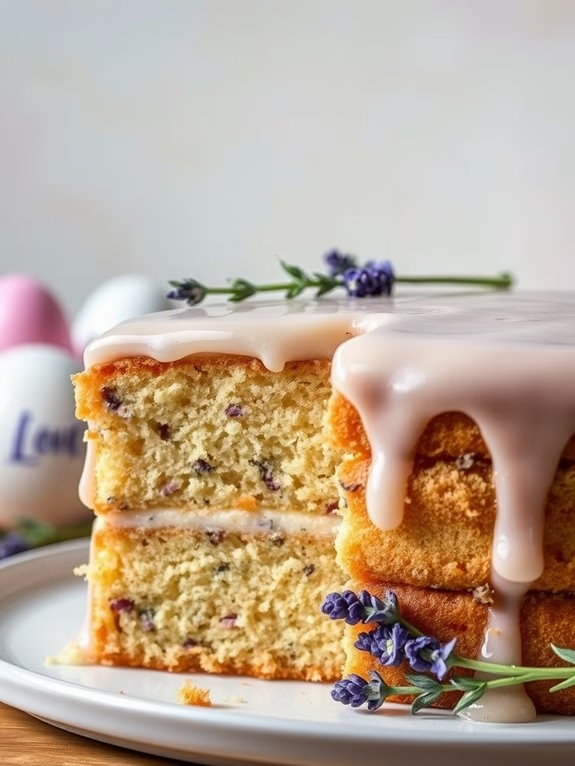
Honey Lavender Harmony Cake
For an Easter celebration that combines elegance and a touch of the unexpected, the Honey Lavender Harmony Cake is the perfect choice. This delicately flavored cake brings together the subtle floral notes of lavender with the rich sweetness of honey, creating a harmonious blend that’s both sophisticated and delightful.
The tender crumb of the cake, paired with a luscious honey-lavender glaze, makes it an ideal centerpiece for your Easter dessert table. Whether you’re hosting a brunch or a dinner, this cake is sure to impress your guests with its unique taste and beautiful presentation.
The Honey Lavender Harmony Cake is designed to serve 4-6 people, making it a wonderful option for an intimate gathering. The recipe uses simple, wholesome ingredients that are easy to find and prepare. The key to achieving the perfect flavor balance is using culinary-grade dried lavender, which provides just the right amount of floral essence without overpowering the dish.
Follow the steps below to create a cake that’s as pleasing to the palate as it’s to the eye.
Ingredients:
- 1 1/2 cups all-purpose flour
- 1 1/2 teaspoons baking powder
- 1/4 teaspoon salt
- 1 tablespoon culinary-grade dried lavender
- 1/2 cup unsalted butter, softened
- 1 cup granulated sugar
- 2 large eggs
- 1 teaspoon vanilla extract
- 1/2 cup whole milk
- 1/4 cup honey
For the Honey Lavender Glaze:
- 1/4 cup honey
- 1 tablespoon dried lavender
- 1 tablespoon lemon juice
- 1 tablespoon water
Instructions:
- Preheat and Prepare: Preheat your oven to 350°F (175°C). Grease and flour a 9-inch round cake pan, or line it with parchment paper for easier removal.
- Mix Dry Ingredients: In a medium-sized bowl, whisk together the flour, baking powder, salt, and dried lavender. This guarantees that the lavender is evenly distributed throughout the batter.
- Cream Butter and Sugar: In a large bowl, beat the softened butter and granulated sugar together with an electric mixer until light and fluffy, about 3 minutes.
- Add Wet Ingredients: Add the eggs one at a time, beating well after each addition. Mix in the vanilla extract until fully incorporated.
- Combine: Gradually add the dry ingredients to the wet mixture, alternating with the milk, beginning and ending with the dry ingredients. Mix at low speed until just combined, being careful not to overmix.
- Add Honey: Gently fold in the honey until the batter is smooth and consistent.
- Bake: Pour the batter into the prepared cake pan and smooth the top with a spatula. Bake in the preheated oven for 25-30 minutes, or until a toothpick inserted into the center of the cake comes out clean.
- Prepare Glaze: While the cake is baking, make the honey lavender glaze. In a small saucepan, combine honey, dried lavender, lemon juice, and water. Bring to a gentle simmer over low heat, stirring occasionally until the honey is completely melted and infused with lavender flavor. Strain to remove the lavender bits and set aside.
- Cool and Glaze: Once the cake is done, let it cool in the pan for about 10 minutes before transferring it to a wire rack. Drizzle the honey lavender glaze over the warm cake, allowing it to soak in.
- Serve: Allow the cake to cool completely before serving. Slice and enjoy with a cup of tea or coffee.
Extra Tips:
When working with lavender, it’s important to use a light hand, as the flavor can quickly become overwhelming. Using culinary-grade lavender guarantees it’s safe for consumption and free from any additives. If you can’t find it in stores, it can often be purchased online.
Additionally, the glaze can be prepared in advance and stored in the refrigerator for up to a week. Simply reheat gently before drizzling over the cake. To add an extra touch of elegance, garnish the cake with a few sprigs of fresh lavender or edible flowers before serving.
Pineapple Upside-Down Treat

Pineapple Upside-Down Treat
The Pineapple Upside-Down Treat is a classic dessert that brings a perfect balance of sweetness and tanginess, making it an ideal addition to your Easter celebration. This cake isn’t just visually appealing with its caramelized pineapple and cherry topping but also a delight to the taste buds. The moist and buttery cake base perfectly complements the tropical flavors of the pineapple and the slight tartness of the maraschino cherries.
Whether serving it warm right out of the oven or chilled, this treat is sure to be a hit among guests of all ages. Preparing this Pineapple Upside-Down Treat is quite straightforward, making it a great option even for those who may not consider themselves expert bakers. With a few simple ingredients and a bit of time, you can create a dessert that looks impressive and tastes divine.
The following recipe serves 4-6 people, guaranteeing there’s enough to go around while still leaving everyone wanting more. Gather your ingredients, follow the steps carefully, and you’ll have a delicious cake that captures the essence of spring and Easter festivities.
Ingredients for 4-6 Servings
- 1/4 cup unsalted butter
- 1/2 cup packed brown sugar
- 1 can (20 oz) pineapple slices in juice, drained
- 8 maraschino cherries, drained
- 1 1/3 cups all-purpose flour
- 1 cup granulated sugar
- 1 1/2 teaspoons baking powder
- 1/2 teaspoon salt
- 1/2 cup milk
- 1/4 cup vegetable oil
- 1 teaspoon vanilla extract
- 1 large egg
Cooking Instructions
- Prepare the Topping: Preheat your oven to 350°F (175°C). In a 9-inch round cake pan, melt the butter over low heat. Once melted, evenly sprinkle the brown sugar over the butter. Arrange the pineapple slices over the brown sugar, placing one cherry in the center of each pineapple ring.
- Make the Batter: In a medium bowl, whisk together the flour, granulated sugar, baking powder, and salt. In another bowl, combine the milk, vegetable oil, vanilla extract, and egg. Gradually add the wet ingredients to the dry ingredients, stirring until just combined. Be careful not to overmix the batter.
- Combine and Bake: Pour the batter over the pineapple and cherries in the cake pan, spreading it evenly. Place the pan in the preheated oven and bake for 40-45 minutes, or until a toothpick inserted in the center comes out clean.
- Cool and Invert: Allow the cake to cool in the pan for about 5 minutes. Run a knife around the edge of the pan to loosen the cake. Carefully place a serving plate upside down over the pan, then invert the pan and plate together. Leave the pan on top for a few minutes to guarantee the brown sugar topping drips over the cake.
- Serve: Once the cake is completely inverted and the pan is removed, slice and serve the cake warm or at room temperature.
Extra Tips
For an extra moist cake, consider reserving a few tablespoons of the pineapple juice and adding it to the batter. Additionally, if you prefer a deeper caramel flavor, allow the butter and brown sugar mixture to cook a little longer before adding the pineapple slices.
Be sure to keep an eye on the cake as it bakes to prevent over-browning, and cover with foil if necessary during the last 10 minutes of baking. For an added twist, try adding a pinch of cinnamon or nutmeg to the batter for a subtle spice that complements the pineapple and cherry flavors beautifully.
Matcha Green Tea Indulgence
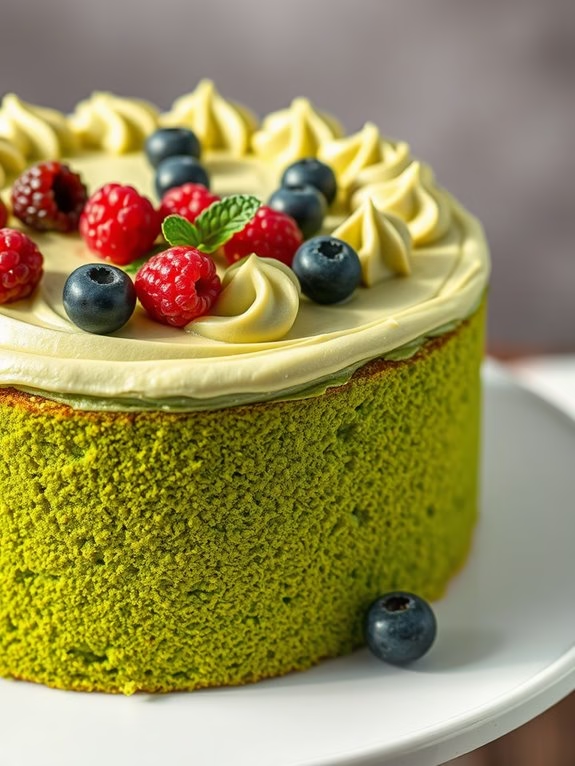
Matcha Green Tea Indulgence Cake
Easter is the perfect time to experiment with vibrant and unique flavors, and what better way to elevate your dessert table than with a Matcha Green Tea Indulgence Cake? This cake is the epitome of sophistication, combining the earthy notes of matcha with a light and fluffy sponge. The subtle bitterness of matcha is beautifully balanced with a sweet and creamy frosting, making it a delightful centerpiece for your Easter celebrations.
This cake isn’t only a treat for the taste buds but also a visual delight with its striking green color, making it a perfect addition to your holiday festivities.
This Matcha Green Tea Indulgence Cake is designed to serve 4-6 people, making it ideal for small family gatherings or intimate Easter parties. The recipe is straightforward and uses easily accessible ingredients, guaranteeing that even novice bakers can achieve impressive results. With the right balance of flavors and textures, this cake is sure to become a favorite among matcha enthusiasts and those looking to try something new.
Follow this recipe to bring a touch of elegance to your Easter dessert spread.
Ingredients:
- 1 cup all-purpose flour
- 1 tablespoon matcha green tea powder
- 1 teaspoon baking powder
- 1/4 teaspoon salt
- 3/4 cup granulated sugar
- 1/2 cup unsalted butter, softened
- 2 large eggs
- 1 teaspoon vanilla extract
- 1/2 cup whole milk
- 1 cup heavy cream
- 2 tablespoons powdered sugar
- 1 teaspoon matcha green tea powder (for frosting)
- Fresh berries (optional, for decoration)
Cooking Instructions:
- Prepare the Dry Ingredients: Preheat your oven to 350°F (175°C). In a medium-sized bowl, sift together the all-purpose flour, matcha green tea powder, baking powder, and salt. This guarantees that all dry ingredients are well combined and free of lumps.
- Cream the Butter and Sugar: In a large mixing bowl, use an electric mixer to cream the softened butter and granulated sugar together until light and fluffy, about 3-4 minutes. This process incorporates air into the mixture, resulting in a lighter cake texture.
- Add Eggs and Vanilla: Beat in the eggs one at a time, guaranteeing each egg is fully incorporated before adding the next. Mix in the vanilla extract. This step helps to emulsify the mixture, providing structure to the cake.
- Combine Wet and Dry Ingredients: Gradually add the dry ingredients to the butter mixture, alternating with the milk, beginning and ending with the dry ingredients. Mix just until combined to avoid overmixing, which can make the cake dense.
- Bake the Cake: Pour the batter into a greased and floured 9-inch round cake pan. Smooth the top with a spatula and bake in the preheated oven for 25-30 minutes, or until a toothpick inserted into the center comes out clean. Let the cake cool in the pan for 10 minutes, then transfer to a wire rack to cool completely.
- Prepare the Matcha Frosting: In a chilled mixing bowl, whip the heavy cream with an electric mixer until soft peaks form. Gradually add the powdered sugar and matcha green tea powder, continuing to whip until stiff peaks form. This creates a thick and stable frosting perfect for spreading.
- Assemble the Cake: Once the cake is completely cooled, spread the matcha frosting evenly over the top and sides. Garnish with fresh berries if desired for a pop of color and additional flavor.
Extra Tips:
For the best flavor, choose high-quality matcha powder, as it will greatly affect the taste and color of your cake. If you prefer a stronger matcha flavor, you can increase the amount of matcha powder in both the cake and frosting.
When whipping the cream for frosting, guarantee that your bowl and beaters are well-chilled to achieve the best volume and texture. This cake pairs wonderfully with a cup of green tea, enhancing the matcha experience.
Enjoy your Matcha Green Tea Indulgence Cake as a sophisticated and revitalizing end to your Easter meal!