
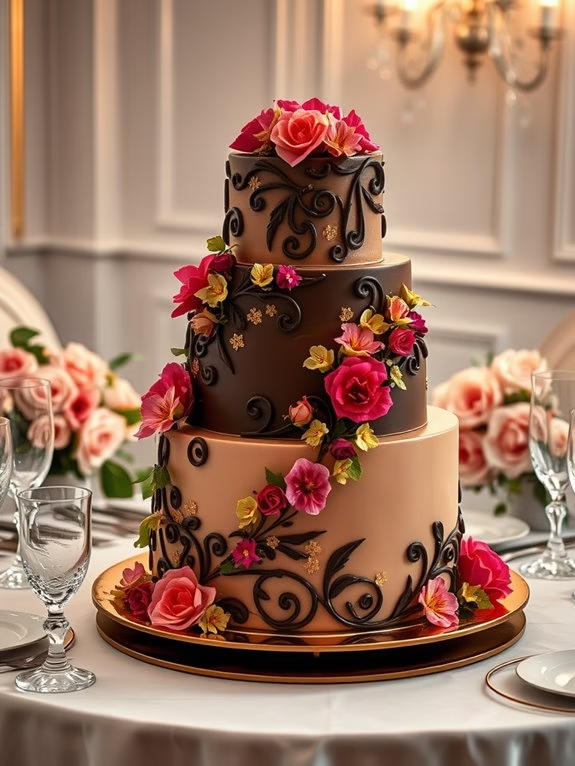
When it comes to celebrating another fabulous year, a birthday cake should be as unforgettable as the memories you’re creating.
Each slice should tell a delicious tale, whether it’s the rich, velvety embrace of a Chocolate Truffle or the sophisticated layers of a Tiramisu. Maybe it’s the tangy surprise of a Lemon Raspberry Delight or the bold energy of an Espresso Layer Cake.
These 12 stunning recipes promise more than just a sweet ending; they’re a journey for your taste buds. Which cake will capture the essence of your celebration?
Decadent Chocolate Truffle Cake
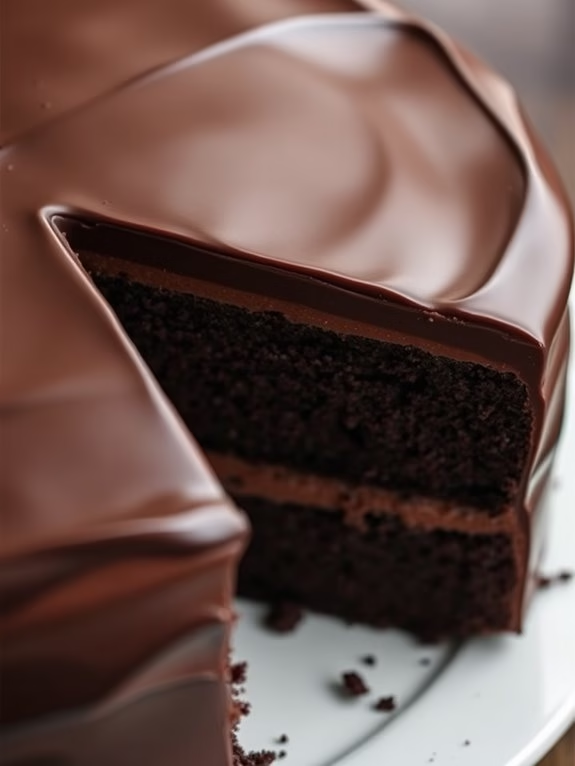
Indulge in the rich and luxurious flavors of a Decadent Chocolate Truffle Cake, the perfect birthday treat for adults who appreciate the finer things in life. This cake combines the intense taste of dark chocolate with a silky smooth truffle layer, creating a dessert that’s both sophisticated and irresistible.
Whether you’re hosting a birthday celebration or simply want to spoil yourself and loved ones, this cake will surely make the occasion memorable.
The Decadent Chocolate Truffle Cake features a moist chocolate cake base topped with a luscious truffle ganache, creating a harmonious blend of textures and flavors. The use of high-quality dark chocolate guarantees a deep, complex flavor profile that chocolate lovers will adore.
This recipe serves 4-6 people, making it ideal for intimate gatherings or small parties. With a few simple ingredients and careful attention to detail, you can create this elegant masterpiece in your own kitchen.
Ingredients:
- 1 cup all-purpose flour
- 1/2 cup unsweetened cocoa powder
- 1 tsp baking soda
- 1/2 tsp salt
- 1/2 cup unsalted butter, softened
- 1 cup granulated sugar
- 2 large eggs
- 1 tsp vanilla extract
- 1 cup buttermilk
- 8 oz dark chocolate, chopped
- 1 cup heavy cream
- 2 tbsp unsalted butter
Cooking Instructions:
- Prepare the Oven and Pans: Preheat your oven to 350°F (175°C). Grease and flour two 8-inch round cake pans and set them aside.
- Mix the Dry Ingredients: In a medium bowl, whisk together the flour, cocoa powder, baking soda, and salt until well combined.
- Cream the Butter and Sugar: In a large mixing bowl, beat the softened butter and granulated sugar together with an electric mixer on medium speed until light and fluffy, about 3-4 minutes.
- Add Eggs and Vanilla: Add the eggs one at a time to the butter-sugar mixture, beating well after each addition. Stir in the vanilla extract.
- Combine Wet and Dry Ingredients: Gradually add the dry ingredients to the wet mixture, alternating with the buttermilk, starting and ending with the dry ingredients. Mix until just combined.
- Bake the Cake Layers: Divide the batter evenly between the prepared cake pans. Bake for 25-30 minutes, or until a toothpick inserted into the center comes out clean. Allow the cakes to cool in the pans for 10 minutes, then transfer them to a wire rack to cool completely.
- Prepare the Truffle Ganache: In a small saucepan, heat the heavy cream over medium heat until it begins to simmer. Remove from heat and pour it over the chopped dark chocolate in a heatproof bowl. Let it sit for 2 minutes, then stir until the chocolate is completely melted and smooth. Stir in the 2 tablespoons of butter until fully incorporated.
- Assemble the Cake: Once the cake layers are completely cooled, place one layer on a serving plate. Spread a generous amount of ganache over the top. Place the second layer on top and cover the entire cake with the remaining ganache, smoothing it out with a spatula.
- Chill the Cake: Refrigerate the cake for at least 1 hour to allow the ganache to set before serving.
Extra Tips:
For the best results, use high-quality dark chocolate with at least 70% cocoa content. This will give your cake a rich, decadent flavor that’s perfect for adult palates.
If possible, make the cake a day ahead to allow the flavors to meld together even more beautifully. When slicing, use a sharp knife dipped in hot water for clean, smooth cuts. Enjoy your Decadent Chocolate Truffle Cake with a glass of red wine or a cup of espresso for a truly indulgent experience.
Classic Red Velvet Elegance

Classic Red Velvet Elegance
Red Velvet Cake is a timeless classic that combines the rich taste of cocoa with the subtle tang of buttermilk, creating a delightful flavor that stands out on its own. Its vibrant red hue, smooth cream cheese frosting, and moist texture make it the perfect centerpiece for any adult birthday celebration.
This recipe elevates the traditional Red Velvet Cake into an elegant dessert that’s both visually stunning and deliciously indulgent, sure to impress your guests.
Crafting the perfect Red Velvet Cake requires a balance of flavors and textures. The cake should be moist and tender, with a hint of cocoa that complements the tangy cream cheese frosting. By using high-quality ingredients and following the steps carefully, you can achieve a cake that not only tastes divine but also looks beautiful.
Whether you’re an experienced baker or a novice, this recipe is designed to help you create a show-stopping dessert for any special occasion.
Ingredients (Serves 4-6 people):
- 2 ½ cups all-purpose flour
- 1 ½ cups granulated sugar
- 1 teaspoon baking soda
- 1 teaspoon salt
- 1 teaspoon cocoa powder
- 1 ½ cups vegetable oil
- 1 cup buttermilk, room temperature
- 2 large eggs, room temperature
- 2 tablespoons red food coloring
- 1 teaspoon vanilla extract
- 1 teaspoon white vinegar
- 1 pound cream cheese, softened
- 2 sticks unsalted butter, softened
- 4 cups confectioners’ sugar
- 1 teaspoon vanilla extract
Instructions:
- Preheat and Prepare Pans: Start by preheating your oven to 350°F (175°C). Grease and flour two 9-inch round cake pans, or line them with parchment paper to prevent sticking.
- Mix Dry Ingredients: In a medium bowl, sift together the flour, sugar, baking soda, salt, and cocoa powder. This guarantees that all dry ingredients are well combined and free of lumps.
- Combine Wet Ingredients: In a large bowl, whisk together the vegetable oil, buttermilk, eggs, food coloring, vanilla extract, and vinegar. Mix until all ingredients are thoroughly combined.
- Blend Mixtures: Gradually add the dry ingredients to the wet ingredients, mixing with a hand mixer on low speed. Blend until the batter is smooth and all ingredients are fully incorporated.
- Bake the Cake: Divide the batter evenly between the prepared cake pans. Smooth the tops with a spatula, then bake in the preheated oven for 25-30 minutes, or until a toothpick inserted into the center comes out clean.
- Cool the Cakes: Remove the cakes from the oven and allow them to cool in the pans for about 10 minutes. Then, transfer them to a wire rack to cool completely.
- Prepare the Frosting: In a large bowl, beat the cream cheese and butter together until creamy. Gradually add the confectioners’ sugar, one cup at a time, beating well after each addition. Stir in the vanilla extract until the frosting is smooth and fluffy.
- Assemble the Cake: Place one cake layer on a serving platter and spread a generous amount of cream cheese frosting on top. Place the second layer on top and cover the entire cake with the remaining frosting, using a spatula to create swirls or peaks for decoration.
- Chill and Serve: For best results, refrigerate the cake for at least an hour before serving to allow the frosting to set. Slice and serve to your guests, enjoying the elegance and flavor of this classic Red Velvet Cake.
Extra Tips:
When making the Classic Red Velvet Cake, it’s important to verify that all ingredients are at room temperature. This helps the batter mix more evenly and results in a smoother texture.
Additionally, be careful not to overmix the batter once the dry ingredients are added, as this can lead to a dense cake. If you want to add a personal touch, consider incorporating finely chopped nuts or fresh berries into the layers for an extra burst of flavor and texture.
Zesty Lemon Raspberry Delight
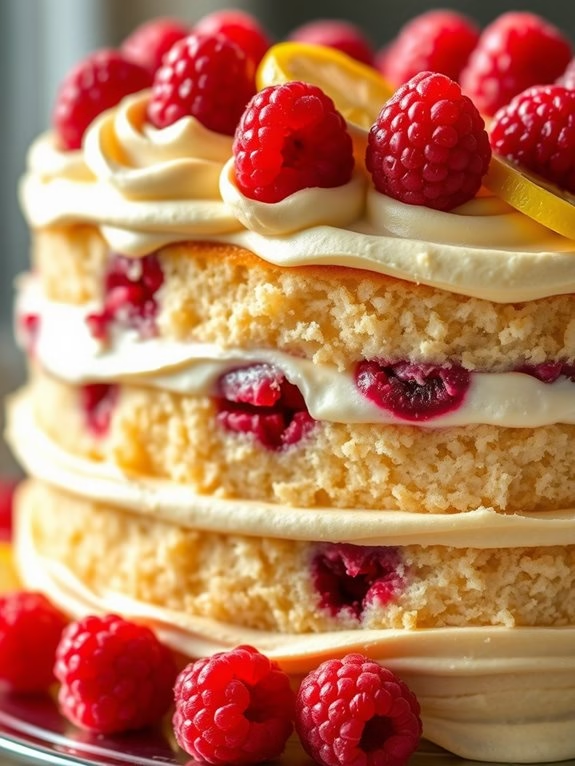
Zesty Lemon Raspberry Delight is a sophisticated twist on the classic birthday cake, perfect for adult celebrations that call for a burst of fresh and tangy flavors. This cake combines the tartness of lemons with the sweet and juicy raspberries, creating a harmonious balance that’s both invigorating and indulgent. The light, fluffy lemon cake layers are complemented by a creamy raspberry filling and a smooth lemon buttercream frosting, making each bite an exquisite experience.
Ideal for summer gatherings or any special occasion, this cake can easily serve 4 to 6 people, making it perfect for intimate celebrations. The vibrant colors and flavors of the Zesty Lemon Raspberry Delight not only make it a feast for the eyes but also a delightful treat for the taste buds. Whether you’re a seasoned baker or a novice in the kitchen, this recipe will guide you through creating a stunning cake that will impress your guests and leave them craving more.
Ingredients (Serves 4-6):
- 1 1/2 cups all-purpose flour
- 1 teaspoon baking powder
- 1/2 teaspoon baking soda
- 1/4 teaspoon salt
- 1/2 cup unsalted butter, softened
- 1 cup granulated sugar
- 2 large eggs
- 1 teaspoon vanilla extract
- Zest and juice of 2 lemons
- 1/2 cup buttermilk
- 1 cup fresh raspberries
- 1/2 cup raspberry jam
- 1 cup unsalted butter, softened (for frosting)
- 3 cups powdered sugar
- 2 tablespoons lemon juice (for frosting)
- Additional raspberries and lemon slices for garnish
Cooking Instructions:
- Preheat and Prepare Pans: Preheat your oven to 350°F (175°C). Grease and flour two 8-inch round cake pans, then line the bottoms with parchment paper for easy removal.
- Mix Dry Ingredients: In a medium bowl, whisk together the flour, baking powder, baking soda, and salt. Set aside.
- Cream Butter and Sugar: In a large bowl, using a hand mixer or stand mixer, beat the softened butter and granulated sugar together until light and fluffy, about 3 minutes.
- Add Wet Ingredients: Beat in the eggs one at a time, ensuring each is fully incorporated before adding the next. Add the vanilla extract, lemon zest, and lemon juice, mixing until well combined.
- Combine Wet and Dry: Gradually add the dry ingredients to the wet mixture, alternating with the buttermilk, beginning and ending with the dry ingredients. Mix until just combined.
- Fold in Raspberries: Gently fold in the fresh raspberries with a spatula, ensuring they’re evenly distributed without breaking them.
- Bake the Cakes: Divide the batter evenly between the prepared cake pans. Bake for 25-30 minutes, or until a toothpick inserted into the center of the cakes comes out clean. Let the cakes cool in the pans for 10 minutes, then turn them out onto a wire rack to cool completely.
- Prepare Frosting: In a clean bowl, beat the softened butter with a mixer until creamy. Gradually add the powdered sugar, beating until smooth. Add the lemon juice and beat until the frosting is light and fluffy.
- Assemble the Cake: Place one cake layer on a serving plate. Spread the raspberry jam evenly over the top. Place the second cake layer on top. Use a spatula to spread the lemon buttercream frosting over the top and sides of the cake.
- Garnish: Decorate the cake with additional fresh raspberries and lemon slices for a decorative touch.
Extra Tips:
To maximize the lemon flavor in your Zesty Lemon Raspberry Delight, consider using lemon extract in place of vanilla extract for an extra citrus punch. If raspberries aren’t in season, frozen raspberries can be used, but be sure to thaw and drain them well to avoid excess moisture in the cake.
For a more professional finish, use a cake turntable when frosting the cake, which allows for smoother and more even icing. Finally, store any leftovers in an airtight container in the refrigerator to maintain freshness.
Rich Espresso Layer Cake
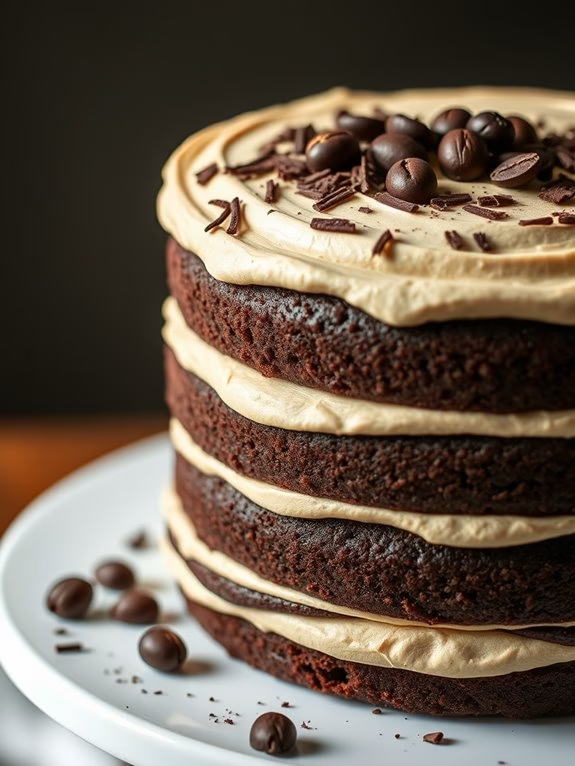
Rich Espresso Layer Cake
Indulge in the ultimate birthday celebration with this decadent Rich Espresso Layer Cake, perfect for adult palates seeking a sophisticated twist on traditional cake flavors. This cake combines the rich, bold taste of espresso with a moist, tender crumb, layered with a luxurious espresso-infused buttercream frosting. The perfect balance of bitterness from the espresso and sweetness from the chocolate creates a mouth-watering dessert that’s sure to impress your guests at any gathering.
Infuse your celebration with the rich aroma and irresistible flavor of coffee and chocolate with this delightful cake. Designed to serve 4-6 people, this cake is crafted with high-quality ingredients to guarantee the best possible taste and texture. Whether you’re a coffee aficionado or simply a lover of rich desserts, this cake will become a memorable centerpiece for your special occasion.
With a few simple steps, you can create a show-stopping dessert that combines elegance, flavor, and a touch of class. Follow this recipe to make a Rich Espresso Layer Cake that will leave your guests raving and coming back for seconds.
Ingredients:
- 1 ¾ cups all-purpose flour
- ¾ cup unsweetened cocoa powder
- 1 ½ teaspoons baking powder
- ½ teaspoon baking soda
- ½ teaspoon salt
- 2 teaspoons instant espresso powder
- 1 cup granulated sugar
- ½ cup packed brown sugar
- 2 large eggs, at room temperature
- ¾ cup buttermilk, at room temperature
- ½ cup strong brewed espresso, cooled
- ½ cup vegetable oil
- 2 teaspoons vanilla extract
Espresso Buttercream Frosting:
- 1 cup unsalted butter, softened
- 3 cups powdered sugar
- 2 tablespoons brewed espresso, cooled
- 1 teaspoon vanilla extract
- ¼ teaspoon salt
Instructions:
- Preheat Oven and Prepare Pans: Preheat your oven to 350°F (175°C). Grease and flour two 8-inch round cake pans, then line the bottoms with parchment paper for easy removal.
- Mix Dry Ingredients: In a medium bowl, whisk together the flour, cocoa powder, baking powder, baking soda, salt, and instant espresso powder. Set aside.
- Combine Wet Ingredients: In a large bowl, beat the granulated sugar, brown sugar, and eggs together until light and fluffy. Mix in the buttermilk, brewed espresso, vegetable oil, and vanilla extract until fully combined.
- Combine Mixtures: Gradually add the dry ingredients to the wet ingredients, mixing until just combined. Be careful not to overmix, as this can lead to a dense cake.
- Bake the Cakes: Divide the batter evenly between the prepared cake pans. Bake in the preheated oven for 25-30 minutes, or until a toothpick inserted into the center comes out clean. Allow the cakes to cool in the pans for 10 minutes before transferring them to a wire rack to cool completely.
- Prepare the Frosting: In a large bowl, beat the softened butter until creamy. Gradually add the powdered sugar, one cup at a time, beating well after each addition. Add the brewed espresso, vanilla extract, and salt, and continue to beat until the frosting is smooth and fluffy.
- Assemble the Cake: Place one cake layer on a serving platter and spread a generous amount of espresso buttercream frosting over the top. Place the second cake layer on top and frost the top and sides of the cake with the remaining frosting.
- Decorate: If desired, decorate the cake with chocolate shavings, espresso beans, or a dusting of cocoa powder for an elegant finish.
Extra Tips:
To enhance the flavor of the espresso in your cake, consider using a high-quality espresso powder or freshly brewed espresso from your favorite coffee shop. If you don’t have buttermilk, you can make a substitute by mixing ¾ cup of milk with 1 tablespoon of lemon juice or white vinegar and letting it sit for a few minutes until it thickens.
When frosting the cake, make sure the layers are completely cooled to prevent the buttercream from melting. If you find the frosting to be too thin, add more powdered sugar to reach your desired consistency. Enjoy your Rich Espresso Layer Cake with a hot cup of coffee or a glass of milk for the ultimate dessert experience.
Salted Caramel Dream
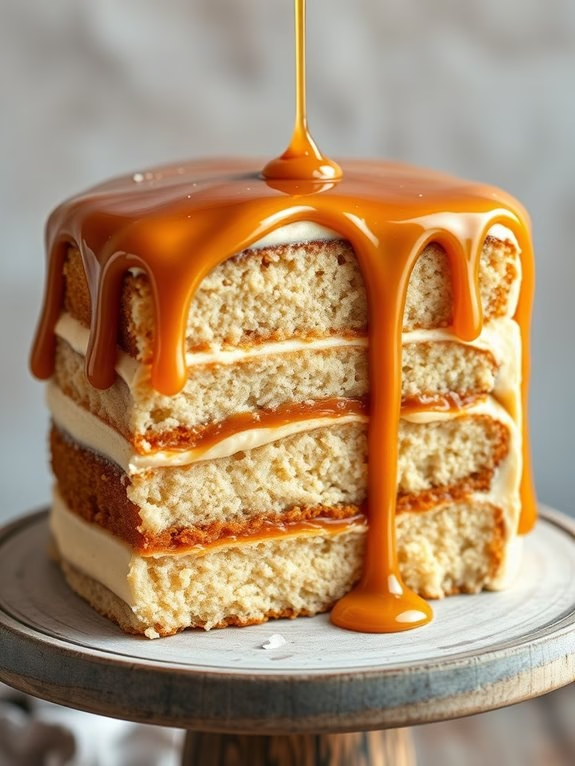
Indulge in the rich and luxurious flavors of a Salted Caramel Dream birthday cake, crafted especially for adult taste buds. This cake is a decadent combination of moist layers infused with the deep, buttery notes of caramel and a hint of sea salt to elevate its sweetness.
Perfect for a sophisticated birthday celebration, this cake is bound to impress with its rich textures and harmonious flavors, offering a grown-up twist on the traditional birthday treat.
The Salted Caramel Dream cake is designed to serve 4-6 people, making it ideal for intimate gatherings. The recipe brings together the buttery richness of caramel with the subtle crunch of sea salt, layered beautifully between soft, fluffy cake layers, and topped with a luscious salted caramel frosting.
Whether you’re a seasoned baker or a home cook looking to try something new, this recipe promises a delightful and rewarding baking experience.
Ingredients:
- 1 ½ cups all-purpose flour
- 1 ½ teaspoons baking powder
- ½ teaspoon baking soda
- ¼ teaspoon salt
- ¾ cup unsalted butter, softened
- 1 cup granulated sugar
- 2 large eggs
- 1 teaspoon vanilla extract
- ½ cup buttermilk
- ½ cup salted caramel sauce (store-bought or homemade)
- 1 teaspoon sea salt flakes
For the Caramel Frosting:
- 1 cup unsalted butter, softened
- 3 cups powdered sugar
- ½ cup salted caramel sauce
- 1 teaspoon vanilla extract
- Pinch of sea salt
Cooking Instructions:
- Preheat and Prepare Pans: Preheat your oven to 350°F (175°C). Grease and line two 8-inch round cake pans with parchment paper to guarantee easy release.
- Mix Dry Ingredients: In a medium bowl, whisk together the flour, baking powder, baking soda, and salt. This will assure the leavening agents are evenly distributed.
- Cream Butter and Sugar: In a large mixing bowl, cream the softened butter and granulated sugar together using an electric mixer on medium speed until light and fluffy, about 3-5 minutes.
- Add Eggs and Vanilla: Beat in the eggs one at a time, making sure each is fully incorporated before adding the next. Mix in the vanilla extract.
- Combine Wet and Dry Ingredients: Gradually add the dry ingredient mixture to the butter mixture, alternating with the buttermilk, beginning and ending with the dry ingredients. Mix until just combined.
- Incorporate Caramel and Salt: Gently fold in the salted caramel sauce and sea salt flakes until evenly distributed.
- Bake the Cakes: Divide the batter evenly between the prepared pans. Bake in the preheated oven for 20-25 minutes or until a toothpick inserted into the center comes out clean. Allow the cakes to cool in the pans for 10 minutes, then transfer to a wire rack to cool completely.
- Prepare the Frosting: In a large bowl, beat the softened butter until creamy. Gradually add the powdered sugar, beating until smooth. Mix in the salted caramel sauce, vanilla extract, and a pinch of sea salt until the frosting is smooth and fluffy.
- Assemble the Cake: Place one cake layer on a serving plate. Spread a generous amount of caramel frosting on top. Place the second cake layer on top and cover the entire cake with the remaining frosting. Drizzle with additional salted caramel sauce if desired.
Extra Tips:
To enhance the flavor of your Salted Caramel Dream cake, consider using high-quality sea salt flakes to provide the perfect balance against the sweetness of the caramel.
If you’re making your own caramel sauce, be sure to let it cool completely before incorporating it into the cake and frosting to prevent any melting issues.
Additionally, chilling the cake layers slightly before frosting them can make the assembly process smoother and result in a cleaner finish. Enjoy this elegant cake with a cup of espresso or your favorite dessert wine for an unforgettable birthday celebration.
Black Forest Indulgence
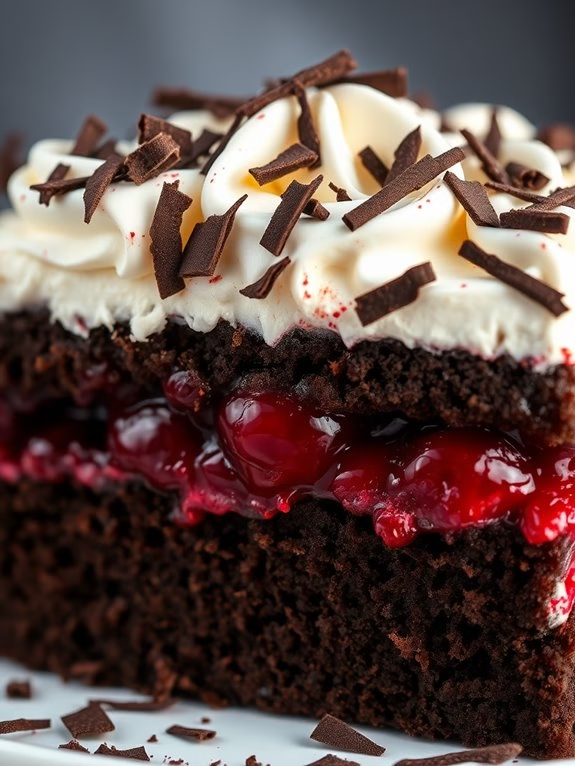
Black Forest Indulgence is a decadent and sophisticated take on the classic Black Forest cake, designed specifically for adults who appreciate rich flavors and a hint of sophistication in their desserts. This sumptuous cake is a layered masterpiece combining deep, dark chocolate sponge, luscious cherry compote, and a smooth, boozy whipped cream that elevates the traditional flavors to new heights.
Perfect for celebrating special occasions or as a show-stopping birthday treat, this cake will impress and delight your guests with every bite.
Inspired by the famous German dessert, Black Forest Indulgence is made with high-quality ingredients that enhance its rich taste and texture. The moist chocolate layers are infused with a hint of coffee to deepen the chocolate flavor, while the cherry filling is spiked with kirsch, a cherry liqueur, to add an adult twist.
The cake is finished with a light, fluffy whipped cream that’s also imbued with a touch of kirsch, offering a balance of sweetness and sophistication. This recipe serves 4-6 people, making it an ideal choice for intimate gatherings or a special birthday celebration.
Ingredients:
- 1 1/2 cups all-purpose flour
- 1 1/2 teaspoons baking powder
- 1/2 teaspoon baking soda
- 3/4 cup unsweetened cocoa powder
- 1/2 teaspoon salt
- 1 cup granulated sugar
- 1/2 cup unsalted butter, softened
- 2 large eggs
- 1 teaspoon vanilla extract
- 3/4 cup buttermilk
- 1/4 cup strong brewed coffee, cooled
- 1 1/2 cups pitted dark cherries (fresh or frozen)
- 1/4 cup kirsch (cherry liqueur)
- 1/4 cup granulated sugar (for cherries)
- 2 cups heavy whipping cream
- 2 tablespoons powdered sugar
- 2 tablespoons kirsch (for whipped cream)
- Dark chocolate shavings, for garnish
Cooking Instructions:
- Preparation of Cake Batter: Preheat your oven to 350°F (175°C). Grease and flour two 9-inch round cake pans. In a medium bowl, whisk together the flour, baking powder, baking soda, cocoa powder, and salt. Set aside.
- Mixing Wet Ingredients: In a large bowl, cream together the granulated sugar and softened butter until light and fluffy. Add the eggs one at a time, beating well after each addition. Stir in the vanilla extract.
- Combining Ingredients: Gradually add the dry ingredients to the wet ingredients, alternating with the buttermilk and coffee. Begin and end with the dry ingredients. Mix until just combined and the batter is smooth.
- Baking the Cake Layers: Divide the batter evenly between the prepared cake pans. Bake in the preheated oven for 25-30 minutes, or until a toothpick inserted into the center comes out clean. Remove from the oven and allow the cakes to cool in the pans for 10 minutes, then transfer to a wire rack to cool completely.
- Preparing the Cherry Compote: In a small saucepan over medium heat, combine the pitted cherries, kirsch, and granulated sugar. Cook, stirring occasionally, until the mixture thickens slightly and the cherries are softened, about 10 minutes. Remove from heat and let cool.
- Making the Whipped Cream: In a large chilled bowl, whip the heavy cream with an electric mixer until soft peaks form. Add the powdered sugar and kirsch, and continue to whip until stiff peaks form.
- Assembling the Cake: Place one cake layer on a serving plate. Spread half of the cherry compote over the cake, followed by a layer of whipped cream. Place the second cake layer on top and repeat with the remaining cherry compote and whipped cream.
- Garnishing: Use a spatula to spread the remaining whipped cream over the top and sides of the cake. Decorate with dark chocolate shavings.
Extra Tips:
For a truly indulgent experience, make certain to use high-quality chocolate and fresh cherries if available.
When whipping the cream, make sure that your bowl and beaters are well-chilled to achieve the best consistency. If you don’t have kirsch on hand, you can substitute it with another fruit brandy or omit the alcohol entirely for a non-alcoholic version.
Allow the cake to chill in the refrigerator for at least an hour before serving to let the flavors meld together beautifully.
Lush Coconut Lime Fusion
Lush Coconut Lime Fusion Cake
Indulge in the tropical flavors of this Lush Coconut Lime Fusion cake, a perfect treat for adult birthdays that brings a revitalizing twist to the traditional cake. This cake combines the vibrant zest of lime with the rich creaminess of coconut, creating a dessert that’s both sophisticated and indulgent.
Ideal for those who appreciate a blend of tangy and sweet, this cake will transport your taste buds to a sunny paradise with every bite.
The Lush Coconut Lime Fusion cake is layered with a moist coconut sponge, infused with lime zest, and topped with a decadent coconut-lime buttercream. Each layer is delicately balanced to guarantee the flavors shine through without overpowering one another.
Designed to serve 4-6 people, this cake is perfect for intimate gatherings or celebrations where quality trumps quantity.
Ingredients:
- 1 1/2 cups all-purpose flour
- 1 cup granulated sugar
- 1/2 cup unsalted butter
- 3 large eggs
- 1 teaspoon vanilla extract
- 1/2 cup coconut milk
- 1/4 cup shredded coconut
- Zest of 2 limes
- 1 teaspoon baking powder
- 1/4 teaspoon salt
For the Buttercream:
- 1 cup unsalted butter, softened
- 3 cups powdered sugar
- 2 tablespoons coconut milk
- Zest and juice of 1 lime
Cooking Instructions:
- Preheat and Prepare Pans: Preheat your oven to 350°F (175°C). Grease and flour two 8-inch round cake pans, or line them with parchment paper.
- Mix Dry Ingredients: In a medium bowl, whisk together the flour, baking powder, and salt. Set aside.
- Cream Butter and Sugar: In a large bowl, beat the unsalted butter and granulated sugar until light and fluffy, about 3-4 minutes. Add the eggs one at a time, mixing well after each addition. Stir in the vanilla extract.
- Combine Wet and Dry Ingredients: Gradually add the dry ingredients to the butter mixture, alternating with the coconut milk. Begin and end with the dry ingredients. Mix until just combined.
- Add Coconut and Lime Zest: Gently fold in the shredded coconut and lime zest until evenly distributed in the batter.
- Bake the Cake: Divide the batter evenly between the prepared cake pans. Bake for 20-25 minutes, or until a toothpick inserted into the center of the cakes comes out clean. Allow the cakes to cool in the pans for 10 minutes before transferring them to a wire rack to cool completely.
- Prepare the Buttercream: In a large bowl, beat the softened butter until creamy. Gradually add the powdered sugar, beating well after each addition. Mix in the coconut milk, lime zest, and lime juice until the buttercream is smooth and fluffy.
- Assemble the Cake: Once the cakes are completely cool, place one layer on a serving plate. Spread a generous amount of buttercream over the top. Place the second cake layer on top and cover the entire cake with the remaining buttercream.
- Garnish and Serve: Optionally, garnish the cake with additional lime zest or toasted coconut flakes for an extra touch of elegance. Slice and serve to your guests.
Extra Tips:
For an extra burst of flavor, consider adding a tablespoon of lime juice to the cake batter for a more pronounced lime taste.
Make sure the butter is at room temperature for both the cake and the buttercream to achieve the best texture.
If you find the frosting too thick, adjust the consistency by adding a bit more coconut milk until it reaches your desired spreadability.
Additionally, if you’re planning to make the cake a day ahead, store it in the refrigerator and let it come to room temperature before serving to enhance the flavors.
Boozy Bourbon Pecan Treat
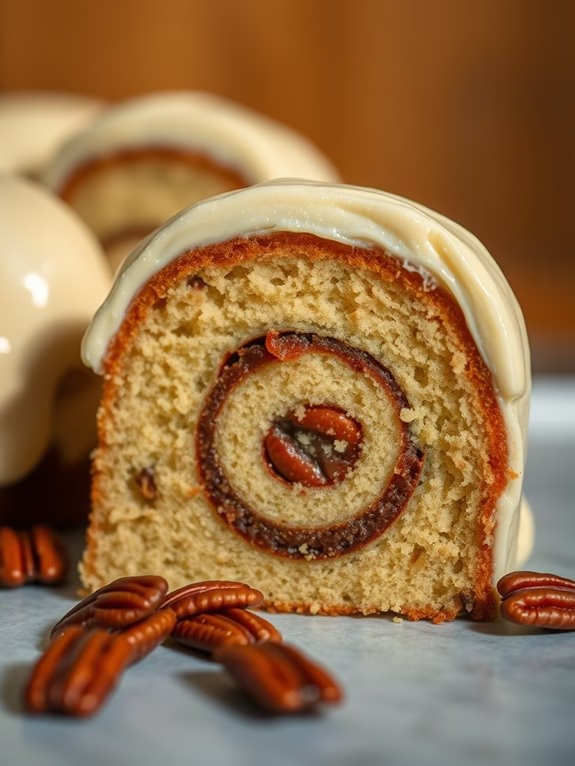
Boozy Bourbon Pecan Treat
Indulge in the rich flavors of a Boozy Bourbon Pecan Treat, an adult twist on the classic birthday cake that brings together the warmth of bourbon and the nutty crunch of pecans. This delightful cake is perfect for those who appreciate a sophisticated dessert with a hint of spirited elegance. Each bite offers a balanced blend of sweetness and warmth, making it an ideal centerpiece for an adult birthday celebration or any special occasion.
This recipe combines a moist and tender cake base with a luscious bourbon-infused frosting, topped with caramelized pecans for a delightful texture contrast. Designed to serve 4-6 people, this cake is both impressive and easy to prepare, allowing you to enjoy the celebration with minimal fuss. Gather your ingredients and follow these steps to create a memorable dessert that will impress your guests and add a touch of luxury to any gathering.
Ingredients (Serves 4-6):
- 1 1/2 cups all-purpose flour
- 1 cup granulated sugar
- 1/2 cup unsalted butter, softened
- 1/2 cup whole milk
- 1/4 cup bourbon
- 2 large eggs
- 1 teaspoon vanilla extract
- 1 teaspoon baking powder
- 1/2 teaspoon baking soda
- 1/4 teaspoon salt
- 1 cup pecans, chopped
- 1/4 cup brown sugar
- 1/4 cup heavy cream
- 1/4 cup bourbon (for frosting)
- 1/2 cup unsalted butter (for frosting)
- 2 cups powdered sugar (for frosting)
Cooking Instructions:
- Preheat the Oven: Preheat your oven to 350°F (175°C). Grease and flour a 9-inch round cake pan to guarantee easy release after baking.
- Mix Dry Ingredients: In a medium bowl, whisk together the flour, baking powder, baking soda, and salt. Set aside for later use.
- Cream Butter and Sugar: In a large mixing bowl, use an electric mixer to cream the softened butter and granulated sugar until light and fluffy. This should take about 3-4 minutes.
- Add Wet Ingredients: Gradually add the eggs, one at a time, beating well after each addition. Mix in the vanilla extract and bourbon until well combined.
- Combine Dry and Wet Mixtures: Alternately add the flour mixture and milk to the creamed mixture, beginning and ending with the flour mixture. Mix until just combined, being careful not to overmix.
- Fold in Pecans: Gently fold in the chopped pecans with a spatula, confirming they’re evenly distributed throughout the batter.
- Bake the Cake: Pour the batter into the prepared cake pan and smooth the top with a spatula. Bake for 25-30 minutes, or until a toothpick inserted into the center comes out clean. Allow the cake to cool in the pan for 10 minutes before transferring it to a wire rack to cool completely.
- Prepare the Frosting: In a medium saucepan, melt the butter over medium heat. Stir in the brown sugar and heavy cream, bringing the mixture to a boil. Remove from heat and let it cool slightly before stirring in the bourbon.
- Mix the Frosting: Gradually add the powdered sugar to the bourbon mixture, whisking until smooth and creamy. Adjust the consistency with more powdered sugar if needed.
- Assemble the Cake: Once the cake is completely cooled, spread the bourbon frosting evenly over the top and sides. Garnish with additional chopped pecans if desired.
Extra Tips:
When making this Boozy Bourbon Pecan Treat, confirm that all ingredients, especially the butter and eggs, are at room temperature before beginning. This helps the batter mix more evenly and results in a lighter cake.
If you prefer a stronger bourbon flavor, you can increase the bourbon in the frosting by a tablespoon or two, but be mindful of the frosting’s consistency.
For a more pronounced pecan flavor, consider toasting the pecans in the oven for a few minutes before incorporating them into the batter. Enjoy this cake with a side of vanilla ice cream or a dollop of whipped cream for an extra indulgent experience.
Sophisticated Tiramisu Layered Cake
Sophisticated Tiramisu Layered Cake is the perfect dessert for an adult birthday celebration. This elegant twist on the classic Italian dessert combines rich layers of coffee-soaked ladyfingers, creamy mascarpone filling, and a whisper of cocoa to create a decadent treat that’s both visually stunning and irresistibly delicious.
The interplay of coffee and chocolate flavors is enhanced by the subtle sweetness of the mascarpone, making it a sophisticated choice for those with a refined palate. Ideal for gatherings of 4-6 people, this cake not only satisfies the sweet tooth but also provides a delightful experience with its delicate textures and layers.
As you prepare this cake, you’ll find that the process is as enjoyable as the end result. Whether you’re a seasoned baker or a novice looking to impress, this recipe offers a rewarding challenge.
Ingredients:
- 1 1/2 cups strong brewed espresso or coffee, cooled
- 2 tablespoons coffee liqueur (optional)
- 3 large eggs, separated
- 1 cup granulated sugar, divided
- 1 teaspoon vanilla extract
- 1 1/2 cups mascarpone cheese
- 1 1/4 cups heavy cream
- 2 packs of ladyfinger biscuits (approximately 24-30 pieces)
- Unsweetened cocoa powder, for dusting
- Dark chocolate shavings or curls, for garnish (optional)
Instructions:
- Prepare the Coffee Mixture: In a shallow dish, combine the cooled espresso or coffee with the coffee liqueur (if using) and set aside. This mixture will be used to soak the ladyfingers, infusing them with a rich coffee flavor.
- Separate and Beat Eggs: Carefully separate the egg yolks from the whites. In a mixing bowl, beat the egg yolks with 3/4 cup of sugar until the mixture becomes thick and pale. Stir in the vanilla extract.
- Prepare Mascarpone Filling: Gently fold the mascarpone cheese into the egg yolk mixture until smooth and creamy. Be careful not to overmix, which can lead to a runny filling.
- Whip the Cream: In a separate bowl, whip the heavy cream until soft peaks form. Gradually add the remaining 1/4 cup of sugar and continue whipping until stiff peaks are achieved.
- Combine Fillings: Gently fold the whipped cream into the mascarpone mixture until fully incorporated, creating a light and airy filling.
- Assemble the Cake: Quickly dip each ladyfinger into the coffee mixture, making sure they’re soaked but not overly saturated. Arrange a layer of soaked ladyfingers in the bottom of a rectangular or square baking dish.
- Layer the Fillings: Spread half of the mascarpone filling over the layer of ladyfingers. Repeat the process with another layer of soaked ladyfingers and the remaining mascarpone filling.
- Chill the Cake: Cover the assembled cake with plastic wrap and refrigerate for at least 4 hours, or overnight for the best results. This allows the flavors to meld and the cake to set properly.
- Finish and Serve: Before serving, dust the top of the cake generously with cocoa powder. Optionally, garnish with dark chocolate shavings or curls for an extra touch of elegance.
For the best results, make sure that all ingredients are at room temperature before beginning, especially the mascarpone, which can be difficult to incorporate if too cold.
Additionally, if you’re short on time, consider using store-bought ladyfingers to simplify the process. The cake is best served chilled, so plan to keep it refrigerated until just before serving. Enjoy the complex flavors of this sophisticated tiramisu cake with a glass of dessert wine or a cup of espresso for a truly indulgent experience.
Tropical Mango Passion Surprise
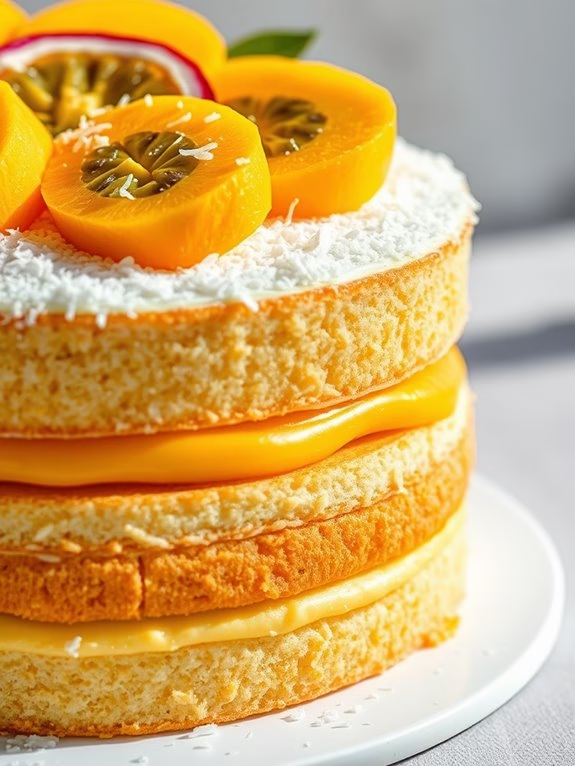
Tropical Mango Passion Surprise
Indulge in the exotic flavors of the Tropical Mango Passion Surprise, a delightful birthday cake recipe designed specifically for adults who appreciate a touch of the tropics. This cake is a celebration of sweet, juicy mangoes and tangy passion fruit, perfectly balanced with a hint of coconut for an unforgettable taste experience.
The light and airy sponge cake is layered with a luscious mango-passion fruit mousse, making it a revitalizing treat for any birthday celebration. This cake isn’t only delicious but also visually stunning, with its vibrant colors and tropical decorations.
Ideal for a gathering of 4-6 people, the Tropical Mango Passion Surprise is the perfect centerpiece for a sophisticated birthday party. Whether you’re celebrating by the poolside or hosting a themed dinner indoors, this cake is sure to impress your guests and leave them craving for more.
Ingredients (Serves 4-6)
- 1 1/2 cups all-purpose flour
- 1 teaspoon baking powder
- 1/2 teaspoon salt
- 1/2 cup unsalted butter, softened
- 1 cup granulated sugar
- 2 large eggs
- 1 teaspoon vanilla extract
- 1/2 cup coconut milk
- 1 cup mango puree
- 1/2 cup passion fruit pulp
- 1 tablespoon gelatin
- 1/4 cup cold water
- 1 cup heavy cream
- 1/4 cup powdered sugar
- 1/4 cup shredded coconut for garnish
- Slices of fresh mango and passion fruit for decoration
Cooking Instructions
- Preheat and Prepare: Preheat your oven to 350°F (175°C). Grease and flour two 8-inch round cake pans, then set them aside.
- Mix Dry Ingredients: In a medium bowl, whisk together the flour, baking powder, and salt. Set this dry mixture aside.
- Cream Butter and Sugar: In a large bowl, beat the softened butter and granulated sugar until light and fluffy. This should take about 3-4 minutes.
- Add Eggs and Vanilla: Beat in the eggs one at a time, making sure each is fully incorporated before adding the next. Stir in the vanilla extract.
- Combine Wet and Dry Ingredients: Gradually add the dry ingredients to the wet ingredients, alternating with the coconut milk. Begin and end with the dry ingredients, mixing until just combined.
- Bake the Cakes: Divide the batter evenly between the prepared cake pans. Bake in the preheated oven for 25-30 minutes, or until a toothpick inserted in the center comes out clean. Allow the cakes to cool in the pans for 10 minutes, then turn them out onto a wire rack to cool completely.
- Prepare the Mousse: In a small bowl, sprinkle gelatin over cold water and let it sit for about 5 minutes. In a saucepan, heat the mango puree and passion fruit pulp over medium heat. Stir in the gelatin mixture until fully dissolved, then remove from heat and let it cool to room temperature.
- Whip the Cream: In a separate bowl, whip the heavy cream with powdered sugar until stiff peaks form. Gently fold the cooled mango-passion fruit mixture into the whipped cream until well combined.
- Assemble the Cake: Place one layer of cake on a serving platter. Spread half of the mango-passion fruit mousse over the top. Place the second cake layer on top and spread the remaining mousse over it.
- Garnish: Sprinkle shredded coconut across the top of the cake, then decorate with slices of fresh mango and passion fruit. Chill the cake in the refrigerator for at least 2 hours before serving.
Extra Tips
When preparing the Tropical Mango Passion Surprise, make sure to use ripe mangoes for the best flavor and sweetness. If fresh passion fruit is unavailable, you can use canned passion fruit pulp.
When whipping the cream, make sure it’s very cold to achieve the best texture. To further enhance the tropical vibe, consider adding a splash of rum to the mousse for an adult twist.
This cake can be made a day in advance, allowing the flavors to meld beautifully, making it even more delicious for your birthday celebration.
Elegant Almond Amaretto Cake

Elegant Almond Amaretto Cake
Celebrate special occasions with a touch of sophistication by preparing an Elegant Almond Amaretto Cake. This delicately flavored dessert combines the nutty richness of almonds with the aromatic warmth of amaretto, creating a truly luxurious experience for the palate.
Perfect for adult birthday celebrations, this cake isn’t only a treat to eat but also a feast for the eyes with its flawless texture and elegant presentation. Whether you’re hosting a small gathering or a more intimate celebration, this cake is sure to impress your guests and become a memorable highlight of the event.
The Elegant Almond Amaretto Cake is crafted with layers of tender almond cake, brushed with a generous soak of amaretto liqueur, and adorned with a silky almond buttercream frosting. Each bite offers a harmonious blend of flavors that’s both indulgent and refined.
This recipe serves 4-6 people, making it ideal for a cozy celebration. With its simple yet sophisticated profile, this cake is a proof of the idea that elegance often lies in simplicity.
Ingredients (Serves 4-6):
- 1 cup all-purpose flour
- 1 cup almond flour
- 1 cup granulated sugar
- 1/2 cup unsalted butter, softened
- 4 large eggs
- 1 teaspoon baking powder
- 1/2 teaspoon salt
- 1/2 cup milk
- 1/3 cup amaretto liqueur
- 1 teaspoon vanilla extract
- 1/2 teaspoon almond extract
- 1/2 cup sliced almonds (for garnish)
For the Almond Buttercream Frosting:
- 1 cup unsalted butter, softened
- 4 cups powdered sugar
- 1/4 cup heavy cream
- 1/4 cup almond liqueur
- 1/2 teaspoon almond extract
Instructions:
- Preheat the Oven: Begin by preheating your oven to 350°F (175°C). Grease and flour an 8-inch round cake pan, making sure it’s well-coated to prevent sticking.
- Mix Dry Ingredients: In a medium bowl, whisk together the all-purpose flour, almond flour, baking powder, and salt. Set aside.
- Cream the Butter and Sugar: In a large mixing bowl, cream together the softened butter and granulated sugar until light and fluffy. This should take about 3-4 minutes with an electric mixer on medium speed.
- Incorporate the Eggs: Add the eggs one at a time, beating well after each addition to guarantee a smooth batter. Mix in the almond and vanilla extracts.
- Combine the Mixture: Gradually add the dry ingredients to the butter mixture, alternating with the milk, beginning and ending with the flour mixture. Mix until just combined.
- Bake the Cake: Pour the batter into the prepared cake pan and smooth the top with a spatula. Bake for 30-35 minutes, or until a toothpick inserted into the center comes out clean.
- Cool and Soak: Allow the cake to cool in the pan for 10 minutes, then transfer to a wire rack. Once cooled, brush the top with amaretto liqueur, allowing it to soak into the cake for enhanced flavor.
- Prepare the Buttercream: In a large bowl, beat the softened butter until creamy. Gradually add powdered sugar, one cup at a time, beating well. Mix in the almond liqueur, almond extract, and heavy cream until smooth and spreadable.
- Frost the Cake: Once the cake is completely cool, spread the almond buttercream frosting evenly over the top and sides. Garnish with sliced almonds for an elegant finish.
Extra Tips:
For an even more refined taste, consider toasting the sliced almonds before using them as a garnish. This simple step enhances their flavor and adds a delightful crunch to each slice.
Additionally, if you prefer a less sweet frosting, reduce the powdered sugar by half a cup and adjust the consistency with more heavy cream if needed.
To make the cake extra moist, you can double the amaretto soak, but be sure to let the cake rest overnight so the flavors meld beautifully. Enjoy this cake with a glass of almond liqueur or a cup of coffee to complement its rich flavors.
Spiced Chai Tea Infusion
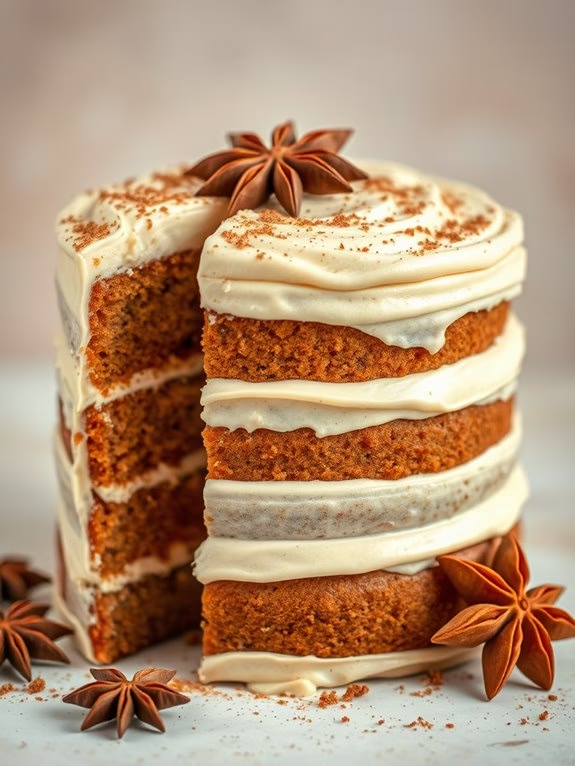
Spiced Chai Tea Infusion Birthday Cake
This Spiced Chai Tea Infusion Birthday Cake is a sophisticated twist for any adult’s birthday celebration. It brings together the warm, soothing flavors of chai tea with the rich, creamy texture of a classic cake. The infusion of chai spices such as cardamom, cinnamon, and ginger offers a unique flavor profile that elevates the traditional birthday cake experience.
Perfect for a cozy gathering, this cake pairs beautifully with a hot cup of tea or a glass of chilled white wine. The cake’s moist and tender crumb is achieved by using a blend of cake flour and finely steeped chai tea, guaranteeing that each bite is perfumed with aromatic spices. A creamy chai-infused frosting adds another layer of indulgence, making this cake not only delicious but also a visual treat.
It’s ideal for those who appreciate the more nuanced flavors of adulthood while still cherishing the joy and festivity of a birthday celebration.
Ingredients (Serves 4-6)
- 2 cups cake flour
- 1 ½ teaspoons baking powder
- ½ teaspoon baking soda
- ½ teaspoon salt
- 1 teaspoon ground cinnamon
- ½ teaspoon ground cardamom
- ¼ teaspoon ground ginger
- 1 ¼ cups granulated sugar
- ½ cup unsalted butter, softened
- 2 large eggs
- 1 teaspoon vanilla extract
- 1 cup whole milk
- 2 chai tea bags
- 1 cup powdered sugar
- ½ cup cream cheese, softened
- 1 tablespoon heavy cream
- 1 teaspoon ground cloves
Cooking Instructions
- Preheat and Prepare: Preheat your oven to 350°F (175°C). Grease and flour two 8-inch round cake pans, and set aside.
- Steep the Tea: Heat the whole milk until steaming, then steep the chai tea bags in the milk for about 10 minutes. Remove the tea bags and let the milk cool to room temperature.
- Mix Dry Ingredients: In a medium bowl, whisk together the cake flour, baking powder, baking soda, salt, cinnamon, cardamom, and ginger.
- Cream Butter and Sugar: In a large mixing bowl, cream the softened butter and granulated sugar until light and fluffy. This should take about 3-4 minutes using a hand mixer or stand mixer on medium speed.
- Add Eggs and Vanilla: Beat in the eggs one at a time, guaranteeing each is fully incorporated before adding the next. Mix in the vanilla extract.
- Combine Mixtures: Alternately add the dry ingredients and the cooled chai-infused milk to the butter mixture, beginning and ending with the dry ingredients. Mix until just combined.
- Bake the Cake: Divide the batter evenly between the prepared cake pans. Bake in the preheated oven for 25-30 minutes, or until a toothpick inserted into the center of the cakes comes out clean. Allow the cakes to cool in the pans for 10 minutes before transferring to a wire rack to cool completely.
- Make the Frosting: In a separate bowl, beat together the cream cheese, powdered sugar, heavy cream, and ground cloves until smooth and creamy.
- Frost and Assemble: Once the cakes are completely cool, spread a layer of frosting on top of one cake layer. Place the second cake layer on top, then frost the top and sides of the cake.
Extra Tips
For the best flavor, consider making the cake a day in advance to allow the spices to meld and deepen overnight. Guarantee the butter and cream cheese are at room temperature before starting to prevent lumps in your frosting.
If you’re looking for a more intense chai flavor, you can add a teaspoon of chai spice blend to the frosting mix. Finally, to enhance the presentation, garnish the cake with a light dusting of ground cinnamon or a few whole star anise for a touch of elegance.