
Running late in the morning but still want a wholesome breakfast?
I’ve been there, and that’s why I’ve put together a list of quick and delicious breakfast recipes.
From overnight oats with fresh berries to a savory spinach and cheese omelette made in a mug, these recipes are perfect for busy mornings.
Ready to make your mornings smoother with these delightful ideas?
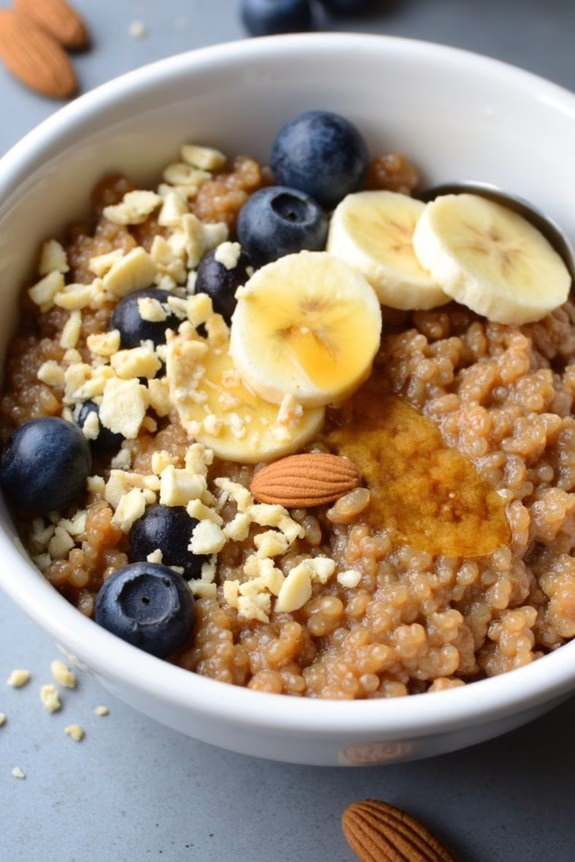
Overnight Oats With Fresh Berries

Overnight Oats with Fresh Berries is a delightful and nutritious breakfast option that’s perfect for those hectic mornings when you need a quick yet satisfying meal. This recipe allows you to prepare a wholesome breakfast the night before, so you can enjoy a hassle-free morning. The combination of creamy oats, sweet and tangy fresh berries, and a hint of honey or maple syrup creates a perfect balance of flavors.
Plus, the added chia seeds provide an extra boost of fiber and protein, ensuring you stay full and energized throughout the morning. This breakfast dish isn’t only delicious but also highly customizable. You can use any type of milk or yogurt to suit your dietary preferences, and the berries can be swapped out for any of your favorite fruits.
The oats soak up all the flavors overnight, becoming soft and flavorful by morning. This makes Overnight Oats with Fresh Berries a versatile and convenient breakfast choice that you can prepare in advance to save time without sacrificing nutrition or taste.
Ingredients (Serving Size: 4-6 people):
- 3 cups rolled oats
- 3 cups milk (dairy or non-dairy)
- 1 cup Greek yogurt
- 2 tablespoons chia seeds
- 2 tablespoons honey or maple syrup
- 1 teaspoon vanilla extract
- 2 cups mixed fresh berries (e.g., strawberries, blueberries, raspberries)
- 1/2 cup chopped nuts (e.g., almonds, walnuts) – optional
- Pinch of salt
Cooking Instructions:
- Combine Ingredients: In a large bowl, mix together the rolled oats, milk, Greek yogurt, chia seeds, honey or maple syrup, vanilla extract, and a pinch of salt. Stir until all ingredients are well combined.
- Refrigerate Overnight: Cover the bowl with plastic wrap or a lid, and place it in the refrigerator to soak overnight, or for at least 6 hours. This allows the oats to absorb the liquid and soften, while the chia seeds expand and thicken the mixture.
- Prepare Berries: Before serving, wash and dry the fresh berries. If you’re using larger berries like strawberries, consider slicing them into smaller pieces for easier consumption.
- Assemble the Dish: When ready to serve, give the oat mixture a good stir. Spoon portions into bowls and top each serving with a generous amount of fresh berries.
- Garnish: If desired, sprinkle chopped nuts over the top for added crunch and nutritional benefits.
Extra Tips:
For the best texture, make sure to use rolled oats rather than quick oats, as they hold up better overnight. Feel free to adjust the sweetness to your preference by adding more or less honey or syrup.
You can also experiment with different flavors by adding spices such as cinnamon or nutmeg to the oat mixture. If you prefer a warm breakfast, you can gently heat the oats in the microwave before adding the berries.
Overnight oats are highly versatile, so feel free to adapt this recipe to suit your tastes and dietary needs.
Avocado Toast With Poached Egg
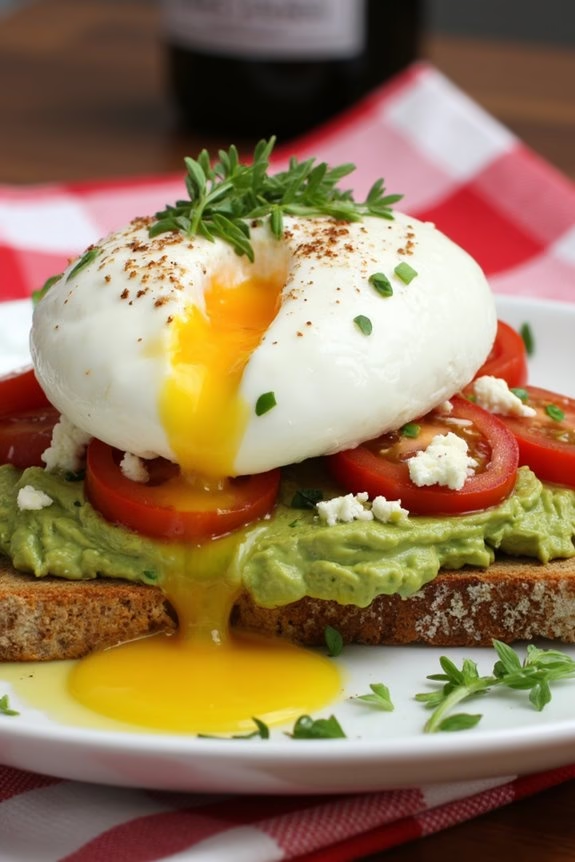
Avocado Toast with Poached Egg is a delightful and nutritious breakfast option that combines creamy avocado, perfectly poached eggs, and crispy toast. This dish isn’t only quick to prepare but also packed with flavors and nutrients, making it ideal for busy mornings.
With its vibrant colors and rich textures, Avocado Toast with Poached Egg offers a satisfying meal that will keep you energized throughout the day.
This breakfast recipe is a crowd-pleaser, suitable for serving 4-6 people. It’s perfect for a family breakfast or brunch gathering, and its simplicity allows even novice cooks to achieve impressive results. Whether you’re looking to impress guests or simply want to enjoy a wholesome meal, this recipe will quickly become a favorite in your kitchen.
Ingredients:
- 4-6 ripe avocados
- 8-12 eggs
- 8-12 slices of whole-grain bread
- 2 tablespoons of white vinegar
- Salt and pepper to taste
- Optional toppings: cherry tomatoes, red pepper flakes, feta cheese, or microgreens
- Olive oil for drizzling
Cooking Instructions:
- Prepare the Avocados: Cut the avocados in half, remove the pits, and scoop the flesh into a bowl. Mash the avocado with a fork until it reaches your desired level of smoothness. Season with salt and pepper to taste. Set aside.
- Toast the Bread: Preheat your toaster or oven. Toast the slices of whole-grain bread until they’re golden brown and crispy. This usually takes about 3-5 minutes.
- Poach the Eggs: Fill a large saucepan with water and bring it to a gentle simmer. Add the white vinegar to the water. Crack each egg into a small bowl. Gently slide the eggs one at a time into the simmering water. Poach for 3-4 minutes for a runny yolk or longer if you prefer a firmer yolk. Use a slotted spoon to remove the eggs and drain them on a paper towel.
- Assemble the Toasts: Spread a generous amount of mashed avocado on each slice of toasted bread. Carefully place a poached egg on top of the avocado. Season with additional salt and pepper if desired.
- Add Optional Toppings: If using, sprinkle cherry tomatoes, red pepper flakes, feta cheese, or microgreens over the top for added flavor and presentation.
- Serve Immediately: Drizzle a little olive oil over the top, and serve the Avocado Toast with Poached Egg immediately for the best taste and texture.
Extra Tips:
When poaching eggs, use the freshest eggs possible, as they hold their shape better. If you’re new to poaching eggs, consider using a small bowl to slide the egg into the water, which helps maintain its form.
Adjust the level of mashing for the avocado according to your preference; some prefer a chunkier texture, while others like it smoother. Finally, don’t shy away from experimenting with different toppings to add unique flavors and textures to your toast.
Quick Greek Yogurt Parfait

Start your day with a delicious and nutritious Quick Greek Yogurt Parfait that will delight your taste buds and provide you with the energy you need to tackle the morning.
This parfait is a perfect combination of creamy Greek yogurt, fresh fruits, crunchy granola, and a drizzle of honey, creating a symphony of flavors and textures. It’s not only quick to prepare but also versatile, allowing you to customize it with your favorite ingredients.
Ideal for a family breakfast or a small gathering, this recipe serves 4-6 people, making it a wonderful choice for a group who craves a healthy start. In just a few minutes, you’ll have a delightful dish that requires no cooking and can be easily adjusted to suit dietary preferences or seasonal fruit availability.
Ingredients for 4-6 servings:
- 4 cups plain Greek yogurt
- 2 cups mixed fresh berries (such as strawberries, blueberries, raspberries)
- 1 cup granola
- 4 tablespoons honey
- 1 teaspoon vanilla extract
- 1/2 cup sliced almonds or nuts of choice (optional)
- Fresh mint leaves (for garnish, optional)
Instructions:
- Prepare the Yogurt Base: In a large bowl, combine the Greek yogurt with the vanilla extract. Stir the mixture well until the vanilla is evenly distributed throughout the yogurt.
- Layer the Parfait: Take 4-6 serving glasses or bowls, and start by adding a generous spoonful of the yogurt mixture at the bottom of each glass.
- Add the Fruit: Evenly distribute a portion of the mixed berries over the yogurt layer in each glass. The vibrant colors of the berries won’t only add flavor but also make your parfait visually appealing.
- Sprinkle the Granola: Add a layer of granola on top of the berries. This will add a delightful crunch to your parfait, enhancing the texture.
- Repeat the Layers: Repeat the yogurt, berries, and granola layers until the glasses are filled, ending with a final layer of yogurt on top.
- Drizzle with Honey: Drizzle a tablespoon of honey over each parfait. The honey will add a touch of sweetness and bring all the flavors together.
- Garnish and Serve: If desired, sprinkle sliced almonds on top for additional crunch, and garnish with fresh mint leaves. Serve immediately to enjoy the parfait at its most revitalizing.
Extra Tips:
For the best flavor, use fresh, seasonal fruits and a high-quality granola that complements the yogurt.
You can substitute honey with maple syrup or agave nectar if preferred. Feel free to experiment with different nuts or add seeds like chia or flax for an extra nutritional boost.
Preparing the parfaits in advance is possible, but add the granola just before serving to make sure it remains crunchy.
Enjoy your Quick Greek Yogurt Parfait as a speedy breakfast or a invigorating snack any time of day!
Banana and Almond Butter Wrap
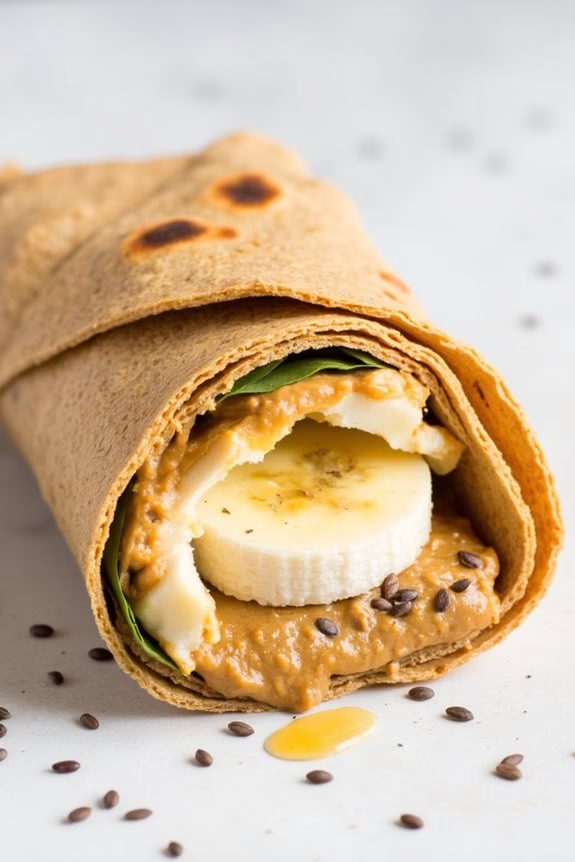
A Banana and Almond Butter Wrap is a quick and nutritious breakfast option that’s perfect for busy mornings. This recipe combines the creamy richness of almond butter with the natural sweetness of bananas, all wrapped up in a soft tortilla. The combination not only tastes delicious but also offers a good balance of carbohydrates, proteins, and healthy fats, making it an ideal choice for a satisfying start to your day.
Whether you’re looking for a quick breakfast solution or a snack on the go, this wrap comes together in just minutes, providing you with the energy needed to kick-start your day.
This wrap isn’t only simple to prepare but also highly versatile. You can easily customize it with your favorite add-ins, such as honey, chia seeds, or even a sprinkle of cinnamon for added flavor. The recipe is designed to serve 4-6 people, making it great for family breakfasts or meal prep for the week.
With just a few ingredients and minimal preparation, you can enjoy a delicious and wholesome breakfast that everyone will love.
Ingredients for 4-6 People:
- 4-6 whole wheat tortillas
- 4-6 ripe bananas
- 1 cup almond butter
- 1/4 cup honey (optional)
- 1/4 cup chia seeds (optional)
- 1 teaspoon ground cinnamon (optional)
Cooking Instructions:
- Prepare the Ingredients: Lay out all your ingredients on the countertop. If using honey, chia seeds, or cinnamon, have them ready for assembly.
- Spread the Almond Butter: Take a whole wheat tortilla and spread approximately 2 tablespoons of almond butter evenly across the surface, leaving a small border around the edges.
- Add the Banana: Peel a banana and place it in the center of the tortilla. If the banana is too large, you can slice it in half lengthwise to fit better.
- Add Optional Ingredients: If you’re using honey, drizzle a small amount over the banana. Sprinkle chia seeds and a pinch of cinnamon over the almond butter and banana for added flavor and nutrition.
- Wrap it Up: Fold in the sides of the tortilla over the banana, then roll the tortilla tightly from the bottom up, ensuring all ingredients are enclosed.
- Slice and Serve: Once wrapped, use a sharp knife to slice the wrap in half for easier handling. Repeat the process for the remaining tortillas.
Extra Tips:
For an even richer flavor, consider toasting the wrap lightly on a skillet for a few minutes on each side until golden brown. This will give the exterior a slight crunch while keeping the inside soft and creamy.
If you prefer a sweeter wrap, use ripe bananas as they’re naturally sweeter. This recipe also works well with peanut butter or any nut butter of your choice if almond butter isn’t available.
For those who enjoy an extra crunch, adding a handful of granola inside the wrap can provide a delightful texture contrast.
Spinach and Cheese Omelette in a Mug

Spinach and Cheese Omelette in a Mug is the perfect solution for those busy mornings when you need a quick yet nutritious breakfast. This delightful dish combines the freshness of spinach with the creamy goodness of cheese, all cooked effortlessly in a mug using a microwave. It’s an ideal breakfast choice for individuals who want to start their day with a protein-packed meal without spending much time in the kitchen.
Furthermore, the flexibility of this recipe allows you to customize it to your taste by adding various herbs or other veggies you might’ve on hand. This recipe is designed to serve 4-6 people, making it great for a family breakfast or a small brunch gathering. The simplicity of this dish doesn’t compromise its flavor or nutritional value.
With just a few ingredients and minimal equipment, you can create a breakfast that’s both satisfying and delicious. The following ingredients list and step-by-step instructions will guide you through making this wholesome omelette, guaranteeing you have a fantastic meal ready in minutes.
Ingredients (Serving size: 4-6 people):
- 12 large eggs
- 2 cups fresh spinach, chopped
- 1 cup shredded cheese (cheddar, mozzarella, or your choice)
- 1/2 cup milk
- Salt and pepper to taste
- 1 teaspoon garlic powder (optional)
- 1 teaspoon butter or cooking spray for greasing
Cooking Instructions:
- Prepare the Mugs: Lightly grease the inside of 4-6 microwave-safe mugs using butter or cooking spray. This will prevent the omelette from sticking to the sides and make it easier to clean.
- Mix the Eggs: In a large mixing bowl, crack the eggs and add the milk. Whisk together until well combined. Season the egg mixture with salt, pepper, and garlic powder if using.
- Add Spinach and Cheese: Stir in the chopped spinach and shredded cheese into the egg mixture. Confirm that the ingredients are evenly distributed throughout the mixture.
- Portion the Mixture: Pour the egg mixture evenly into the prepared mugs, filling each mug about halfway to leave room for the omelette to rise as it cooks.
- Microwave the Omelettes: Place the mugs in the microwave and cook on high for about 1.5 to 2 minutes. Check the omelette and if needed, continue to microwave in 30-second intervals until the eggs are fully cooked and firm.
- Serve and Enjoy: Carefully remove the mugs from the microwave (they will be hot) and let them sit for a minute before serving. You can garnish with additional cheese or fresh herbs if desired.
Extra Tips: When making a Spinach and Cheese Omelette in a Mug, you can experiment with different cheese varieties to find your favorite combination. Be cautious not to overfill the mugs, as the eggs will expand while cooking.
For added flavor, consider including ingredients like diced tomatoes, bell peppers, or a dash of hot sauce. If you prefer your spinach more wilted, you can sauté it briefly before adding it to the egg mixture. Finally, always use a microwave-safe mug to guarantee safety during cooking.
Peanut Butter and Banana Smoothie
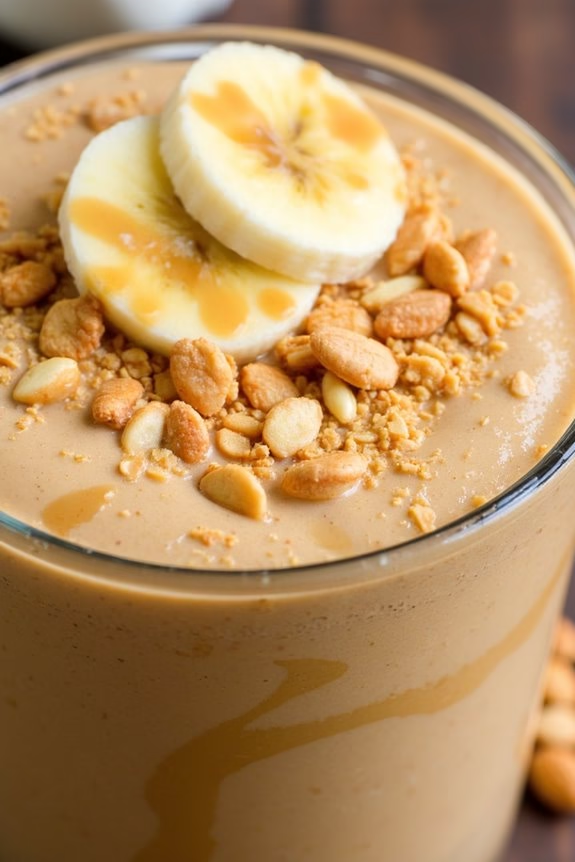
Peanut Butter and Banana Smoothie is a delicious and nutritious option for those busy mornings when you need a quick breakfast fix. This smoothie packs a punch with protein, healthy fats, and natural sugars to keep you energized throughout the morning.
It’s creamy, satisfying, and can be prepared in minutes, making it the perfect go-to breakfast for both adults and kids alike. This smoothie combines the rich, nutty flavor of peanut butter with the sweet, creamy texture of ripe bananas.
It’s not only tasty but also incredibly versatile, allowing you to adjust the ingredients to suit your taste or dietary needs. Whether you’re rushing out the door or simply looking for an easy breakfast solution, this Peanut Butter and Banana Smoothie will become a staple in your routine.
Ingredients (serving size: 4-6 people):
- 4 ripe bananas
- 1 cup of smooth peanut butter
- 3 cups of milk (dairy or non-dairy)
- 1/4 cup of honey or maple syrup
- 2 teaspoons of vanilla extract
- 1/4 cup of Greek yogurt (optional for extra creaminess)
- 1 cup of ice cubes
Instructions:
- Prepare the Bananas: Peel the bananas and break them into chunks. This makes it easier for them to blend smoothly with the other ingredients.
- Combine Ingredients: In a blender, add the banana chunks, peanut butter, milk, honey or maple syrup, vanilla extract, and Greek yogurt if you’re using it.
- Blend the Mixture: Start blending on a low speed to break down the larger chunks, then gradually increase the speed to medium-high. Blend until the mixture is smooth and creamy.
- Add Ice: Once the mixture is smooth, add the ice cubes and blend again until the ice is fully integrated and the smoothie is chilled to your liking.
- Taste and Adjust: Taste the smoothie and adjust sweetness or consistency if needed. You can add more honey or syrup for sweetness, or a little more milk if you prefer a thinner consistency.
- Serve: Pour the smoothie into glasses and serve immediately for the best taste and texture. Enjoy your revitalizing and nourishing breakfast!
Extra Tips:
For an added nutritional boost, consider adding supplements like a scoop of protein powder or a tablespoon of chia seeds to your smoothie.
If you want to make it even quicker in the morning, measure out the ingredients the night before and store them in the fridge, so all you need to do is blend them in the morning. Additionally, using frozen bananas instead of fresh ones can make your smoothie even creamier and eliminate the need for ice.
Instant Pot Breakfast Quinoa
Start your day off right with a nutritious and delicious Instant Pot Breakfast Quinoa. This quick and easy breakfast recipe is perfect for those busy mornings when you need something wholesome and filling. Packed with protein and fiber, quinoa is a fantastic alternative to traditional breakfast grains like oatmeal. The beauty of using an Instant Pot is that it greatly reduces cooking time, allowing you to enjoy a warm, flavorful breakfast in no time.
This Instant Pot Breakfast Quinoa is versatile and can be customized to suit your taste preferences. Whether you prefer sweet or savory, you can add your favorite toppings like fresh fruits, nuts, or a drizzle of honey to enhance the flavors. Ideal for serving 4-6 people, this recipe is great for family breakfasts or meal prepping for the week. Let’s explore how you can make this delightful breakfast dish.
Ingredients (serves 4-6):
- 1 cup quinoa, rinsed and drained
- 2 cups almond milk or any milk of choice
- 1 cup water
- 1 tablespoon maple syrup or honey
- 1 teaspoon vanilla extract
- 1 teaspoon ground cinnamon
- 1/4 teaspoon salt
- Optional toppings: fresh berries, sliced bananas, nuts, seeds, and additional honey or maple syrup
Cooking Instructions:
- Prepare the Quinoa: Start by rinsing 1 cup of quinoa under cold water in a fine mesh strainer. This step is essential to remove the natural coating called saponin, which can make the quinoa taste bitter.
- Combine Ingredients: Add the rinsed quinoa, 2 cups of almond milk, 1 cup of water, 1 tablespoon of maple syrup, 1 teaspoon of vanilla extract, 1 teaspoon of ground cinnamon, and 1/4 teaspoon of salt into the Instant Pot. Stir everything together to combine.
- Cook the Quinoa: Secure the lid on the Instant Pot and verify the valve is set to the sealing position. Select the “Pressure Cook” or “Manual” setting and adjust the time to 1 minute. Note that it will take a few minutes for the Instant Pot to come to pressure before the timer begins.
- Natural Release: Once the cooking time is complete, allow the pressure to release naturally for 10 minutes. Afterward, carefully switch the valve to the venting position to release any remaining pressure. Remove the lid.
- Fluff and Serve: Use a fork to fluff the quinoa gently. Serve warm in bowls and top with your choice of toppings such as fresh berries, sliced bananas, nuts, or a drizzle of honey or maple syrup.
Extra Tips:
For an even richer flavor, consider toasting the quinoa in the Instant Pot using the “Sauté” function before adding the liquid ingredients. This step enhances the nutty flavor of quinoa.
You can also experiment with different types of milk, such as coconut or oat milk, to find your preferred taste and texture. If you want to add more protein, consider mixing in a scoop of your favorite protein powder after cooking.
Quinoa stores well in the fridge, so feel free to make a larger batch and reheat individual servings throughout the week for a quick breakfast option.
Microwave Scrambled Eggs With Veggies

Microwave Scrambled Eggs With Veggies is a quick and nutritious breakfast option that requires minimal preparation and cooking time. Perfect for busy mornings, this dish guarantees you get a healthy start to your day with the added benefit of vegetables. The combination of fluffy eggs and colorful veggies creates a delightful meal that’s both satisfying and visually appealing.
Whether you’re a student rushing to class or a professional heading to work, this recipe is designed to fuel you up in just a few minutes.
The beauty of this recipe lies in its versatility and simplicity. By using a microwave, you can cut down on cooking time without compromising on taste or nutrition. The vegetables can be customized to your preference, allowing you to incorporate whatever you have on hand.
For a serving size of 4-6 people, this recipe is perfect for small family breakfasts or brunch gatherings. It’s not only quick but also fun to make, especially if you involve family members or friends in the preparation process.
Ingredients:
- 12 large eggs
- 1 cup of milk
- 1 cup of diced bell peppers (any color)
- 1 cup of chopped spinach
- 1/2 cup of diced onions
- 1/2 cup of grated cheese (optional)
- Salt and pepper to taste
- 2 tablespoons of butter or cooking spray
Cooking Instructions:
- Preparation: Crack the eggs into a large microwave-safe bowl. Add the milk, salt, and pepper. Whisk the mixture until it’s well blended and slightly frothy.
- Add Vegetables: Stir in the diced bell peppers, chopped spinach, and diced onions into the egg mixture. Make sure the vegetables are evenly distributed throughout the mixture.
- Grease the Bowl: Use butter or cooking spray to lightly grease the sides of the bowl to prevent the eggs from sticking as they cook.
- Microwave Cooking: Place the bowl in the microwave and cook on high for about 3-4 minutes, stirring halfway through. Check for doneness; the eggs should be set but still slightly creamy.
- Add Cheese: If using cheese, sprinkle it over the top of the cooked eggs. Return the bowl to the microwave for another 30 seconds to a minute, or until the cheese is melted.
- Serving: Carefully remove the bowl from the microwave (it will be hot) and give the eggs a final stir. Serve immediately while hot.
Extra Tips:
- Adjust the cooking time based on the power of your microwave. Start with 3 minutes and add more time in 30-second intervals if needed.
- Feel free to experiment with different vegetables, such as mushrooms, tomatoes, or zucchini, for varied flavors.
- Adding a splash of hot sauce or a sprinkle of fresh herbs like chives or parsley can enhance the flavor of your scrambled eggs.
- If you prefer your eggs fluffier, you can use a handheld mixer to beat the eggs before microwaving.
- Always use a microwave-safe bowl and handle it with care as it will be hot after cooking.
Chia Seed Pudding With Mango
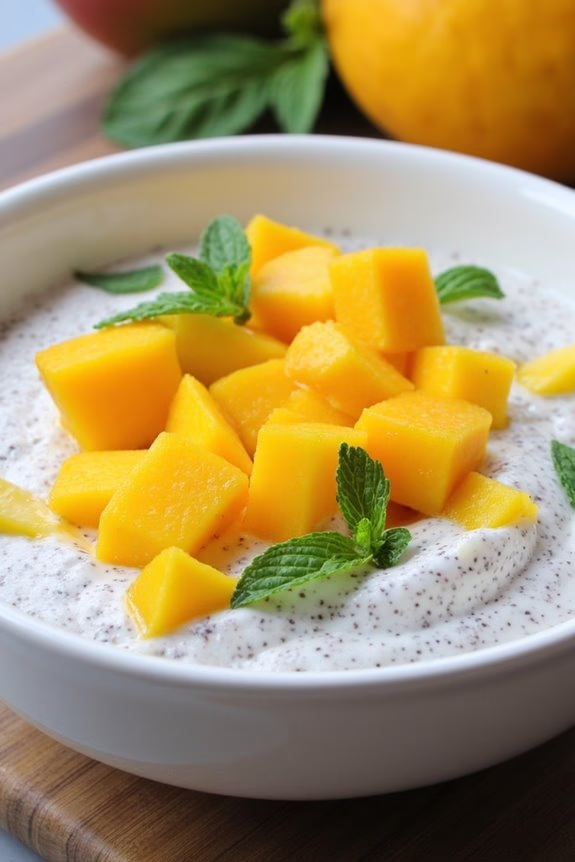
Chia Seed Pudding With Mango is a delightful and nutritious breakfast option that’s both quick to prepare and incredibly satisfying. This dish combines the creamy texture of chia seeds soaked in almond milk with the tropical sweetness of ripe mangoes. Chia seeds are a powerhouse of nutrients, providing fiber, protein, and omega-3 fatty acids, making this pudding not just delicious but also a healthy start to your day. The mango adds a burst of flavor and a natural sweetness that will brighten your morning meal.
This recipe is perfect for busy mornings as it can be prepared the night before, allowing the chia seeds to absorb the liquid and swell into a pudding-like consistency. The addition of fresh mango not only enhances the nutritional value but also adds a vibrant color, making it as pleasing to the eyes as it’s to the palate.
Whether you’re feeding a family or preparing for a small gathering, this recipe serves 4-6 people and is sure to please everyone at the breakfast table.
Ingredients (serving size: 4-6 people):
- 1 cup chia seeds
- 4 cups almond milk (or any other milk of choice)
- 1/4 cup honey or maple syrup
- 1 teaspoon vanilla extract
- 3 ripe mangoes, peeled and diced
- Fresh mint leaves for garnish (optional)
Cooking Instructions:
- Mix the Chia Seed Base: In a large mixing bowl, combine the chia seeds, almond milk, honey or maple syrup, and vanilla extract. Stir the mixture thoroughly to guarantee the chia seeds are evenly distributed throughout the liquid.
- Refrigerate Overnight: Cover the bowl with plastic wrap or a lid, and place it in the refrigerator for at least 4 hours, or preferably overnight. This allows the chia seeds to soak up the liquid and transform into a pudding-like texture.
- Prepare the Mango: Once the chia seed pudding is ready, peel and dice the mangoes. Set aside a portion of the diced mango for garnishing.
- Assemble the Pudding: Spoon the chia seed pudding into individual serving bowls. Top each serving with a generous amount of diced mango.
- Garnish and Serve: If desired, garnish with fresh mint leaves for an added burst of color and flavor. Serve immediately or keep refrigerated until ready to enjoy.
Extra Tips:
For an extra burst of flavor, consider adding a sprinkle of cinnamon or nutmeg to the chia seed mixture before refrigerating. If you prefer a thicker pudding, reduce the amount of almond milk slightly.
Alternatively, for a creamier consistency, you can use coconut milk instead of almond milk. Feel free to experiment with different fruits, such as berries or bananas, to mix up the flavors.
For those with a sweet tooth, adding a dollop of Greek yogurt or a sprinkle of granola on top can provide an additional texture and taste contrast. Enjoy your Chia Seed Pudding With Mango as a revitalizing, wholesome breakfast or a healthy snack.
Whole Wheat English Muffin Sandwich
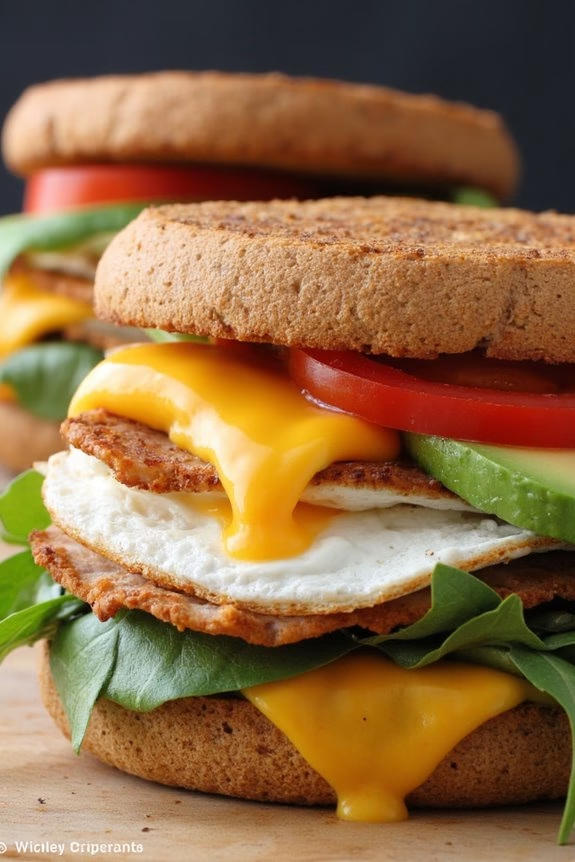
Start your day with a nutritious and filling breakfast by making Whole Wheat English Muffin Sandwiches. These sandwiches aren’t only quick to prepare but also packed with flavor and energy to kick-start your morning. Utilizing whole wheat English muffins as the base, these sandwiches are a healthier alternative to traditional breakfast sandwiches. You can customize them with your favorite ingredients, ensuring that even the pickiest eaters will find something to enjoy.
Perfect for a family breakfast or a brunch gathering, this recipe serves 4-6 people. Each sandwich features a balance of protein, dairy, and fresh vegetables, ensuring a well-rounded meal. The muffins are toasted to perfection, providing a satisfying crunch, while the additional ingredients offer a variety of textures and flavors. With just a few simple steps, you can have a delicious and wholesome breakfast ready in no time.
Ingredients (Serving Size: 4-6 people):
- 4-6 whole wheat English muffins
- 4-6 large eggs
- 4-6 slices of turkey or ham
- 4-6 slices of cheddar cheese
- 1 large tomato, sliced
- 1 avocado, sliced
- Salt and pepper to taste
- 2 tablespoons of butter
- Optional: spinach or arugula leaves
Instructions:
- Prepare the Ingredients: Start by slicing the tomato and avocado. If you’re adding spinach or arugula, rinse and pat them dry. Set these aside for later use.
- Toast the Muffins: Cut the English muffins in half and toast them until they’re golden brown. You can use a toaster or a preheated oven set to 350°F (175°C) for about 5 minutes. This will add a nice crunch to your sandwich.
- Cook the Eggs: Melt the butter in a non-stick pan over medium heat. Crack the eggs into the pan and cook to your desired level of doneness, whether that be sunny-side-up, over-easy, or scrambled. Season with salt and pepper. Once cooked, remove from the pan and set aside.
- Warm the Meat and Cheese: In the same pan, place the slices of turkey or ham to heat them slightly, just enough to warm them. Add a slice of cheddar cheese on top of each piece of meat and let it melt slightly.
- Assemble the Sandwiches: On each toasted muffin half, layer a slice of tomato, some avocado, the cooked egg, meat with melted cheese, and spinach or arugula if using. Top with the other half of the muffin.
- Serve: Serve the sandwiches immediately while the muffins are still warm and the cheese is gooey. They pair well with a fresh fruit salad or a glass of orange juice.
Extra Tips: For an added burst of flavor, consider spreading a thin layer of pesto or hummus on the muffins before assembling. If you prefer a spicy kick, add a dash of hot sauce over the eggs. To save time, prep all your ingredients the night before, such as slicing the avocado and tomato, and storing them in airtight containers in the fridge. Additionally, these sandwiches can be wrapped in foil and kept warm in an oven set to a low temperature if you need to prepare them in advance.
Apple and Cinnamon Overnight Quinoa

Apple and Cinnamon Overnight Quinoa is a delightful and nutritious way to start your day. Combining the wholesome goodness of quinoa with the sweet and spicy flavors of apple and cinnamon, this dish is both satisfying and healthy. Perfect for busy mornings, this recipe can be prepared the night before, allowing you to wake up to a ready-made breakfast that requires no additional effort.
Quinoa is a protein-rich grain that provides a great source of energy to kickstart your day, while apples add natural sweetness and fiber. Cinnamon not only enhances the flavor but also offers anti-inflammatory properties. By preparing this dish overnight, the quinoa absorbs the flavors of the apple and cinnamon, creating a rich, creamy texture that’s both comforting and delicious. This recipe serves 4-6 people, making it ideal for a family breakfast or meal prep for the week.
Ingredients:
- 1 cup quinoa, rinsed
- 2 cups almond milk (or milk of choice)
- 2 tablespoons maple syrup
- 1 teaspoon vanilla extract
- 1 teaspoon ground cinnamon
- 1/4 teaspoon salt
- 2 medium apples, peeled, cored, and chopped
- 1/2 cup chopped nuts (such as walnuts or pecans)
- Optional toppings: yogurt, additional syrup, or fresh fruit
Cooking Instructions:
- Prepare the Quinoa Base: In a medium saucepan, combine the rinsed quinoa, almond milk, maple syrup, vanilla extract, ground cinnamon, and salt. Stir well to combine the ingredients.
- Cook the Quinoa: Place the saucepan over medium-high heat and bring the mixture to a gentle boil. Once boiling, reduce the heat to low, cover the saucepan, and let it simmer for about 15 minutes, or until the quinoa is tender and has absorbed most of the liquid.
- Add the Apples and Nuts: Once the quinoa is cooked, remove the saucepan from the heat. Stir in the chopped apples and nuts, ensuring they’re evenly distributed throughout the quinoa.
- Chill Overnight: Transfer the quinoa mixture to a large airtight container or individual serving jars. Seal the container and place it in the refrigerator to chill overnight. This allows the flavors to meld and the quinoa to achieve a creamy consistency.
- Serve and Enjoy: In the morning, give the quinoa a good stir. Serve it cold or warm it up slightly in the microwave if you prefer a warm breakfast. Top with yogurt, additional syrup, or fresh fruit as desired.
Extra Tips:
For an extra burst of flavor, consider adding a pinch of nutmeg or a splash of apple cider to the quinoa mixture before cooking. If you prefer a sweeter breakfast, adjust the amount of maple syrup to your taste or add a drizzle of honey before serving.
This dish is versatile, so feel free to experiment with different types of milk or nuts to suit your preferences. Additionally, if you’re short on time, you can prepare this recipe two days in advance and store it in the refrigerator, making it a convenient option for busy weeks.
Berry and Nut Breakfast Bowl
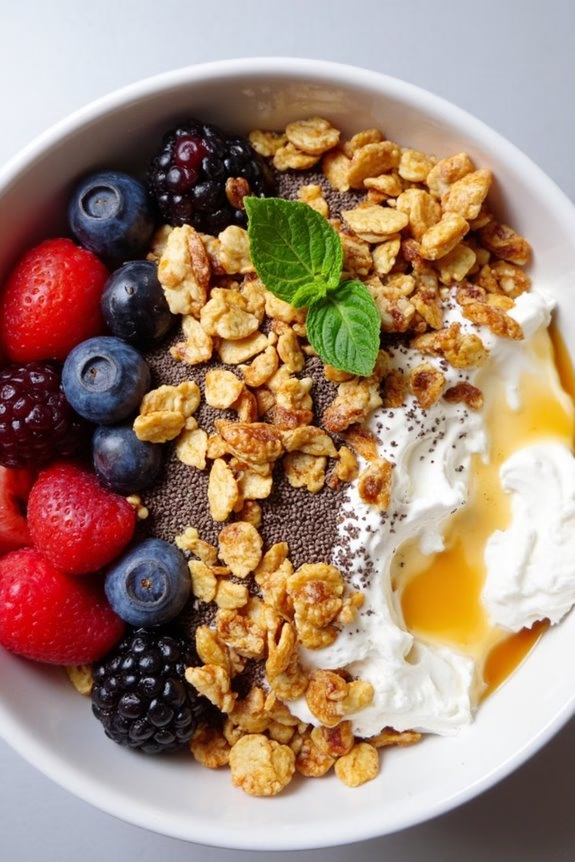
Kickstart your morning with a revitalizing and nutritious Berry and Nut Breakfast Bowl. This dish is a perfect blend of sweet, tart berries and crunchy nuts, offering a delightful texture and flavor combination that satisfies both your taste buds and nutritional needs. Not only is this breakfast bowl packed with antioxidants, fiber, and healthy fats, but it also requires minimal preparation time, making it an ideal choice for those busy mornings when you need a quick yet wholesome meal.
Whether you’re hosting a weekend brunch or simply looking for a speedy breakfast option, this Berry and Nut Breakfast Bowl is sure to become a favorite in your culinary repertoire.
Crafting this delightful breakfast bowl is as simple as gathering a few fresh ingredients and combining them into a vibrant, colorful masterpiece. The use of seasonal berries guarantees that each serving is bursting with natural sweetness and flavor.
Paired with a selection of nuts, seeds, and a creamy base, this dish is both satisfying and nourishing. Perfect for serving 4-6 people, this recipe can be easily adjusted to accommodate more or fewer servings, making it versatile for any occasion.
Let’s plunge into the ingredients and steps needed to bring this Berry and Nut Breakfast Bowl to life.
Ingredients for 4-6 servings:
- 2 cups mixed fresh berries (e.g., strawberries, blueberries, raspberries)
- 1 cup Greek yogurt or plant-based yogurt
- 1/2 cup granola
- 1/2 cup mixed nuts (e.g., almonds, walnuts, pecans)
- 2 tablespoons chia seeds
- 2 tablespoons honey or maple syrup
- 1 teaspoon vanilla extract
- Fresh mint leaves for garnish (optional)
Cooking Instructions:
- Prepare the Base: In a large mixing bowl, combine the Greek yogurt (or plant-based yogurt) with the vanilla extract. Stir until the vanilla is evenly distributed throughout the yogurt. This will serve as the creamy base for your breakfast bowl.
- Wash and Prepare the Berries: Rinse the mixed berries thoroughly under cold water to remove any dirt or residue. Pat them dry with a clean towel and set aside. If using larger berries like strawberries, slice them into bite-sized pieces.
- Assemble the Bowl: In each serving bowl, start by adding a generous scoop of the yogurt mixture. Top with a layer of sliced berries, ensuring a vibrant mix of colors and flavors.
- Add Crunch: Sprinkle a handful of granola over the berries for added texture. Follow this with a scattering of mixed nuts and chia seeds, ensuring even distribution across the bowl.
- Sweeten: Drizzle honey or maple syrup over the top, adding a touch of sweetness that complements the tartness of the berries.
- Garnish and Serve: If desired, garnish each bowl with a few fresh mint leaves for a hint of freshness. Serve immediately and enjoy the delightful combination of flavors and textures.
Extra Tips:
To enhance the flavor and nutritional value of your Berry and Nut Breakfast Bowl, consider using a variety of seasonal berries and nuts. You can also experiment with different types of yogurt, such as flavored or low-fat options, to suit your dietary preferences.
If you’re preparing the bowl ahead of time, keep the granola separate until just before serving to maintain its crunchiness. Additionally, feel free to adjust the sweetness by adding more or less honey or syrup according to your taste.
Enjoy your breakfast bowl chilled for a revitalizing start to your day.
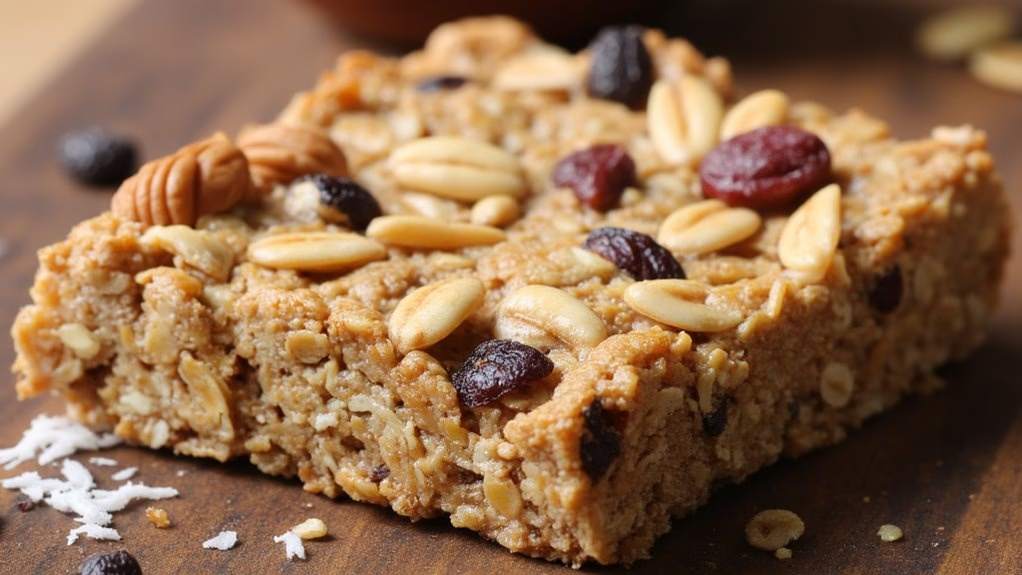
Quick and Easy Granola Bars
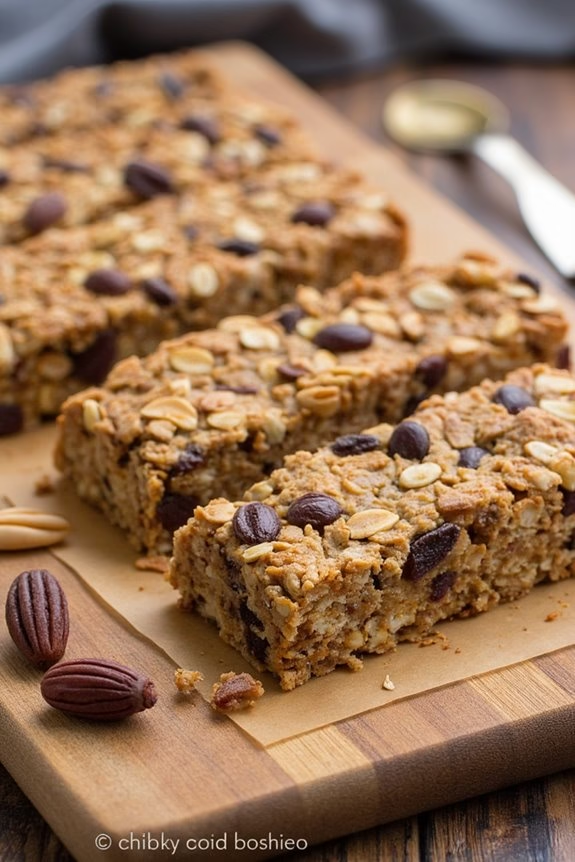
Granola bars are a perfect on-the-go breakfast option for those busy mornings when you need a nutritious start but don’t have the time to sit down for a meal.
These homemade Quick and Easy Granola Bars aren’t only simple to prepare, but they also allow you to control the sweetness and tailor the ingredients to your preference. Whether you enjoy them as a quick breakfast or a midday snack, these bars are bound to become a staple in your kitchen.
Made with wholesome oats, nuts, seeds, and a touch of honey or maple syrup, these granola bars are both delicious and satisfying. They require minimal cooking time and can be stored easily, making them a convenient option to prepare ahead of time.
Suitable for a serving size of 4-6 people, this recipe guarantees that you have enough to share with family or keep some for later in the week.
Ingredients:
- 2 cups rolled oats
- 1 cup mixed nuts (such as almonds, walnuts, or pecans), roughly chopped
- 1/2 cup seeds (such as sunflower seeds or pumpkin seeds)
- 1/2 cup dried fruit (such as raisins, cranberries, or apricots), chopped
- 1/4 cup honey or maple syrup
- 1/4 cup natural peanut butter or almond butter
- 1/4 cup unsweetened shredded coconut (optional)
- 1 teaspoon vanilla extract
- 1/2 teaspoon ground cinnamon
- 1/4 teaspoon salt
Cooking Instructions:
- Preheat and Prepare Pan: Preheat your oven to 350°F (175°C). Line a 9×9 inch baking pan with parchment paper, leaving some overhang on the sides for easy removal later.
- Toast Ingredients: Spread the rolled oats, mixed nuts, and seeds evenly on a baking sheet. Toast them in the preheated oven for about 10 minutes, stirring halfway through, until they’re lightly golden and fragrant. This step enhances the flavor of the granola bars.
- Mix Wet Ingredients: In a small saucepan over low heat, combine the honey or maple syrup and nut butter. Stir continuously until the mixture is smooth and well combined. Remove from heat and stir in the vanilla extract.
- Combine Dry and Wet Mixtures: In a large mixing bowl, combine the toasted oats, nuts, seeds, dried fruit, shredded coconut (if using), cinnamon, and salt. Pour the honey-nut butter mixture over the dry ingredients and mix well until everything is evenly coated.
- Press into Pan: Transfer the mixture to the prepared baking pan. Use a spatula or your hands to press the mixture firmly and evenly into the pan, making certain the bars hold together well.
- Chill and Set: Refrigerate the pan for at least 2 hours, or until the bars are set and firm. This step is vital for making sure the bars hold their shape when cut.
- Cut and Serve: Once set, lift the granola mixture out of the pan using the parchment paper overhang. Use a sharp knife to cut into bars or squares of your desired size.
Extra Tips:
For those who prefer a bit of variety, feel free to experiment with different nuts, seeds, or dried fruits based on your taste preferences or what you have on hand.
If you’d like a bit of chocolate, consider adding a handful of mini chocolate chips to the mix after the wet ingredients have been stirred in.
To make the bars even healthier, you can reduce the amount of sweetener or use a sugar-free alternative.
These bars can be stored in an airtight container at room temperature for up to a week or in the refrigerator for up to two weeks. Enjoy your homemade granola bars as a quick breakfast or a delicious snack anytime!