

Hey there, lovely bakers! 🎃 With Halloween right around the corner, it’s time to whip up some frightfully delightful cupcakes that are as easy as they are fun. Whether you’re crafting creepy crawly spider cupcakes or topping them with ghostly meringues, these spooktacular treats will add joy to your celebrations without the fuss. Perfect for busy days when you want to impress with minimal effort. Ready to sprinkle a little magic into your kitchen? Let’s get started!
Creepy Crawly Spider Cupcakes
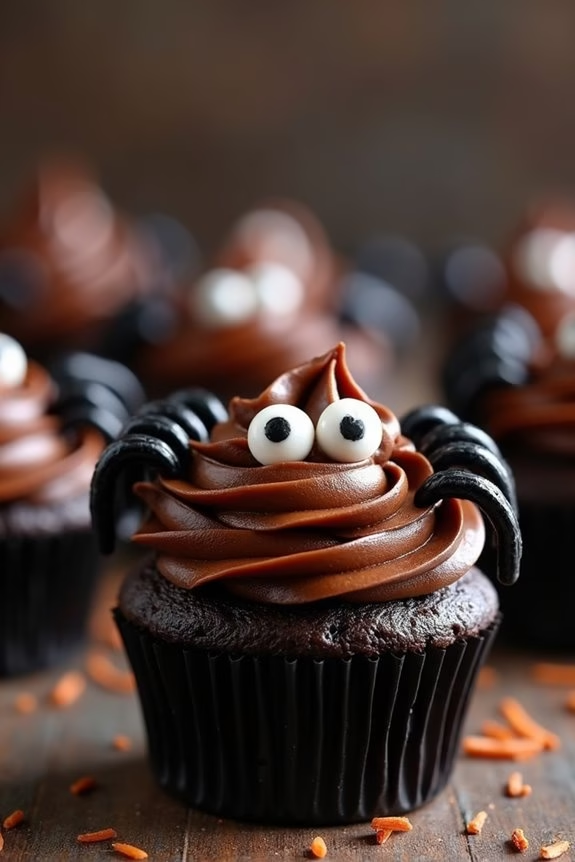
Creepy Crawly Spider Cupcakes are a ghoulish delight that will send shivers down the spines of all your guests at your Halloween gathering. These deliciously spooky treats aren’t only a feast for the eyes but also a scrumptious delight for the taste buds.
With their rich, moist chocolate base and eerie spider decorations, these cupcakes are perfect for adding a chilling twist to your dessert table. Whether you’re hosting a Halloween party or simply looking to add a bit of fun to your family dinner, these Creepy Crawly Spider Cupcakes are sure to impress.
Making these cupcakes is as fun as it’s simple. The combination of classic chocolate cupcakes topped with creative spider decorations will have everyone reaching for seconds. The secret to their creepiness lies in the careful decoration using licorice and candy eyes to create the appearance of spiders crawling across the top of each cupcake.
With a serving size of 4-6 people, this recipe guarantees that everyone can enjoy these delightfully eerie treats. So, get ready to initiate a baking adventure that’s both spooky and delicious!
Ingredients (Serves 4-6):
- 1 cup all-purpose flour
- 1/2 cup unsweetened cocoa powder
- 1 teaspoon baking powder
- 1/2 teaspoon baking soda
- 1/4 teaspoon salt
- 1/2 cup unsalted butter, softened
- 1 cup granulated sugar
- 2 large eggs
- 1 teaspoon vanilla extract
- 1/2 cup whole milk
- 1 cup chocolate frosting
- Black licorice strings
- Candy eyes
Cooking Instructions:
- Preheat the Oven: Begin by preheating your oven to 350°F (175°C). Line a muffin tin with cupcake liners to prepare for the batter.
- Mix Dry Ingredients: In a medium bowl, whisk together the flour, cocoa powder, baking powder, baking soda, and salt. Set aside.
- Cream Butter and Sugar: In a large bowl, cream together the softened butter and granulated sugar using an electric mixer on medium speed until light and fluffy, about 2-3 minutes.
- Add Eggs and Vanilla: Add the eggs one at a time, beating well after each addition. Stir in the vanilla extract.
- Combine Wet and Dry Ingredients: Gradually add the dry ingredients to the wet mixture, alternating with the milk. Begin and end with the dry ingredients, mixing just until combined.
- Fill the Cupcake Liners: Divide the batter evenly among the prepared cupcake liners, filling each about two-thirds full.
- Bake: Place the muffin tin in the preheated oven and bake for 18-20 minutes, or until a toothpick inserted into the center of a cupcake comes out clean. Allow the cupcakes to cool in the tin for 5 minutes, then transfer to a wire rack to cool completely.
- Decorate: Once the cupcakes are completely cool, frost each one with chocolate frosting. Cut the licorice strings into small pieces to create spider legs and arrange them on top of the frosting. Add candy eyes to complete the spider decoration.
Extra Tips:
When decorating your Creepy Crawly Spider Cupcakes, feel free to get creative with the spider designs. You can use different colored licorice or candy eyes to give each cupcake its unique personality.
If you want to add an extra layer of flavor, consider adding a pinch of cinnamon or a splash of espresso to the batter for a warm, aromatic touch. These cupcakes can also be made a day in advance and stored in an airtight container to save time on the day of your event.
Enjoy creating these spooky treats and have a happy Halloween!
Ghostly Meringue Toppers
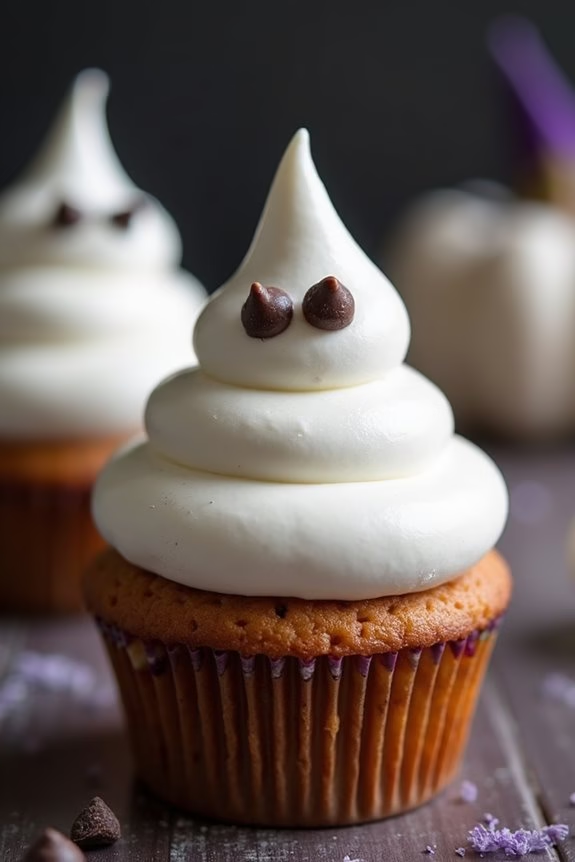
If you’re planning a spooky Halloween party or just want to add a touch of haunting elegance to your dessert table, these Ghostly Meringue Toppers are the perfect addition to your Halloween cupcakes.
These airy and light meringue ghosts aren’t only adorable but also deliciously sweet, making them an ideal topper for any cupcake flavor of your choice. Their ghostly appearance will be a hit with both kids and adults alike, adding a whimsical yet eerie charm to your festive treats.
To create these delightful Ghostly Meringue Toppers, you’ll start by whipping up a simple meringue mixture that’s piped into ghost shapes before being baked until crisp. The meringue mixture is easy to prepare and requires just a few basic ingredients that you likely already have in your pantry.
Once baked, the meringue ghosts can be placed atop cupcakes for a spooky, yet sweet, finishing touch. This recipe is perfect for serving 4-6 people, guaranteeing everyone gets to enjoy a piece of these ghostly delights.
Ingredients (serving size: 4-6 people)
- 3 large egg whites
- 3/4 cup granulated sugar
- 1/4 teaspoon cream of tartar
- 1/2 teaspoon vanilla extract
- Pinch of salt
- Mini chocolate chips or edible black gel for eyes
Cooking Instructions
1. Preheat the Oven: Preheat your oven to 200°F (93°C). Line a baking sheet with parchment paper. This low temperature is essential to make sure the meringues dry out rather than bake.
2. Prepare the Meringue: In a clean, dry mixing bowl, add the egg whites and cream of tartar. Using an electric mixer, beat on medium speed until soft peaks form. Gradually add the granulated sugar, a tablespoon at a time, while continuing to beat.
Increase the speed to high and beat until stiff, glossy peaks form and the sugar is fully dissolved. This should take about 5-7 minutes. Add in the vanilla extract and a pinch of salt, and beat briefly until just combined.
3. Pipe the Ghosts: Transfer the meringue mixture to a piping bag fitted with a large round tip. Pipe ghost shapes onto the prepared baking sheet by squeezing the bag to form a base and then pulling upwards to create a tapered top, resembling a ghost.
Space the ghosts about 1 inch apart to allow for any expansion.
4. Add the Eyes: Gently press two mini chocolate chips or dots of edible black gel onto each ghost to form eyes. Be careful not to deflate the meringue.
5. Bake the Meringues: Place the baking sheet in the preheated oven and bake for 1.5 to 2 hours, or until the meringues are dry to the touch and can easily be lifted from the parchment paper.
Turn off the oven and leave the meringues inside to cool completely, ideally overnight, to prevent them from cracking.
6. Decorate the Cupcakes: Once the meringues are completely cool, carefully place them on top of your cupcakes. You can use a small dab of frosting to secure them if needed.
Extra Tips
To guarantee your meringue reaches the perfect consistency, make sure all your equipment is completely clean and free of grease, as any fat residue can prevent the egg whites from whipping properly.
Also, avoid making meringues on a humid day, as moisture in the air can affect their texture and prevent them from drying out properly. If you notice any leftover meringue mixture after piping the ghosts, feel free to pipe additional small meringue shapes or dots to enjoy as standalone treats or to decorate other desserts.
Witch Hat Chocolate Cones

For a hauntingly delightful Halloween treat, Witch Hat Chocolate Cones are the perfect blend of spooky and sweet. These whimsical cupcakes feature a rich chocolate base topped with a crispy cone dipped in dark chocolate, creating the iconic silhouette of a witch’s hat. The combination of textures and flavors makes them an irresistible addition to any Halloween party spread, and they’re bound to captivate both the eyes and taste buds of your guests.
Crafting these Witch Hat Chocolate Cones is a fun and engaging activity, perfect for involving little ones in Halloween preparations. Each element, from the cupcake to the chocolate-dipped cone, is simple to assemble, yet together they create an impressive and festive dessert. The result isn’t only visually striking but also deliciously decadent, making these cupcakes a standout treat that fits right into the spooky season.
Ingredients (Serving Size: 4-6 People)
- 1 cup all-purpose flour
- 1 cup granulated sugar
- 1/2 cup unsweetened cocoa powder
- 1 teaspoon baking powder
- 1/2 teaspoon baking soda
- 1/4 teaspoon salt
- 1/2 cup unsalted butter, melted
- 2 large eggs
- 1 teaspoon vanilla extract
- 1/2 cup whole milk
- 1/2 cup hot water
- 6 sugar cones
- 1 cup dark chocolate chips
- Halloween sprinkles
- 1 cup buttercream frosting (store-bought or homemade)
Instructions
- Preheat and Prepare: Preheat your oven to 350°F (175°C) and line a cupcake tray with paper liners. This will guarantee your cupcakes bake evenly and are easy to remove from the tray.
- Mix Dry Ingredients: In a large bowl, whisk together the flour, sugar, cocoa powder, baking powder, baking soda, and salt. This mixture will form the base of your chocolate cupcakes.
- Combine Wet Ingredients: In another bowl, combine the melted butter, eggs, and vanilla extract. Gradually add the milk, stirring until the mixture is smooth.
- Create Batter: Slowly add the wet ingredients to the dry ingredients, mixing until just combined. Stir in the hot water to create a smooth, pourable batter.
- Bake Cupcakes: Divide the batter evenly among the cupcake liners, filling each about two-thirds full. Bake in the preheated oven for 18-20 minutes, or until a toothpick inserted into the center comes out clean. Allow them to cool completely on a wire rack.
- Prepare Witch Hat Cones: While the cupcakes are cooling, melt the dark chocolate chips in a microwave-safe bowl, stirring every 30 seconds until smooth. Dip the rim of each sugar cone into the melted chocolate, then adorn with Halloween sprinkles. Allow them to set on parchment paper.
- Assemble and Decorate: Once the cupcakes are cooled, spread a generous amount of buttercream frosting on top of each one. Carefully place a decorated cone on top of the frosting, pressing gently to secure it. Add more sprinkles around the base of the cone for extra flair.
Extra Tips
For best results, verify your cupcakes are completely cooled before frosting to prevent the buttercream from melting. Use high-quality dark chocolate for the cones to achieve a rich flavor and smooth finish.
If you want a pop of color, consider using colored frosting or adding edible glitter to the cones. These Witch Hat Chocolate Cones can be made a day in advance; simply store them in an airtight container to keep them fresh.
Enjoy the process, and don’t be afraid to get creative with your decorations!
Monster Eye Surprise
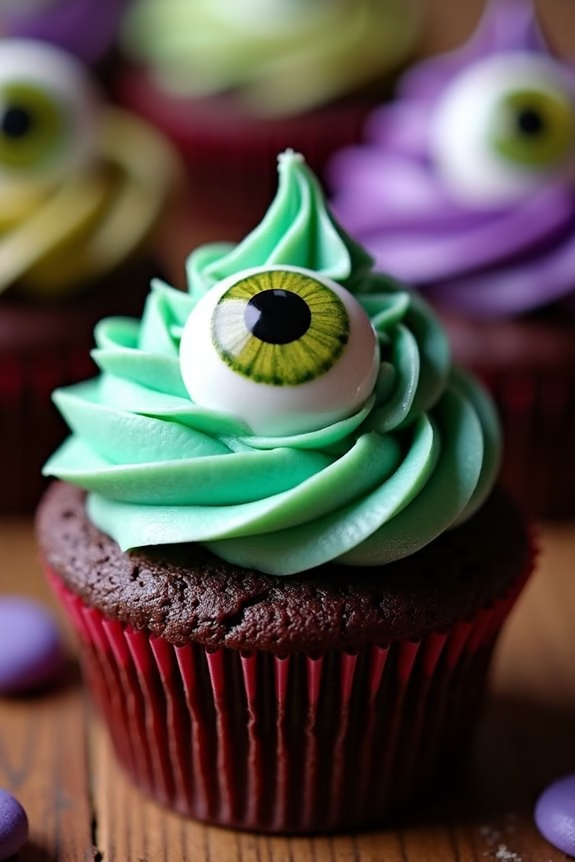
If you’re looking to add a bit of spook to your Halloween dessert table, these Monster Eye Surprise cupcakes are the perfect treat. These cupcakes aren’t only fun to make but also a delight to eat, offering a sweet surprise in every bite. With their creepy yet playful monster eye decoration, they’re sure to be a hit at any Halloween gathering. The combination of moist chocolate cake, a gooey candy center, and a decorative monster eye topping will leave your guests both impressed and intrigued.
The Monster Eye Surprise cupcakes begin with a rich chocolate cupcake base, which is then filled with a hidden candy center to create a delightful surprise. The cupcakes are topped with a swirl of vibrant frosting and finished with an eerie candy eye, giving them their unique monster appearance. This recipe yields 12 cupcakes, making it perfect for a serving size of 4-6 people, depending on how many cupcakes each person would like to devour.
Now, let’s explore the ingredients you’ll need to bring these monstrous treats to life.
Ingredients:
- 1 cup all-purpose flour
- 1 cup granulated sugar
- 1/2 cup unsweetened cocoa powder
- 1 teaspoon baking soda
- 1/2 teaspoon baking powder
- 1/2 teaspoon salt
- 1/2 cup buttermilk
- 1/2 cup vegetable oil
- 1 large egg
- 1 teaspoon vanilla extract
- 1/2 cup hot water
- 12 chocolate candies (such as Rolos or mini peanut butter cups)
- 1 cup butter, softened (for frosting)
- 4 cups powdered sugar (for frosting)
- 2-3 tablespoons milk (for frosting)
- Gel food coloring (green, purple, or any monster color)
- Candy eyes
Instructions:
- Prepare the Oven and Cupcake Pan: Preheat your oven to 350°F (175°C). Line a 12-cup muffin tin with cupcake liners.
- Mix Dry Ingredients: In a large mixing bowl, combine the flour, sugar, cocoa powder, baking soda, baking powder, and salt. Whisk together until evenly mixed.
- Combine Wet Ingredients: In another bowl, whisk together the buttermilk, vegetable oil, egg, and vanilla extract until well combined.
- Create Batter: Gradually add the wet ingredients to the dry ingredients, mixing until just combined. Stir in the hot water until the batter is smooth. The batter will be thin, which is normal.
- Fill Cupcake Liners: Pour the batter into the prepared cupcake liners, filling each about two-thirds full.
- Add Candy Surprise: Place a chocolate candy in the center of each cupcake, pressing it gently into the batter.
- Bake Cupcakes: Bake in the preheated oven for 18-22 minutes, or until a toothpick inserted into the edge of a cupcake comes out clean. Allow the cupcakes to cool in the pan for a few minutes before transferring them to a wire rack to cool completely.
- Prepare Frosting: In a large bowl, beat the softened butter until creamy. Gradually add the powdered sugar, one cup at a time, mixing well after each addition. Add milk as needed to achieve a smooth consistency. Divide the frosting and tint each portion with desired gel food coloring.
- Decorate Cupcakes: Once the cupcakes are completely cool, pipe or spread the colored frosting onto each cupcake. Place a candy eye on top of each frosted cupcake to complete the monster look.
Extra Tips:
When making these Monster Eye Surprise cupcakes, verify the cupcakes are fully cooled before frosting to avoid melting the frosting. If you don’t have buttermilk on hand, you can make a substitute by adding a tablespoon of lemon juice or vinegar to a measuring cup and filling it with milk to the half-cup line; let it sit for a few minutes before using.
For the most vibrant frosting colors, gel food coloring is preferred over liquid. Finally, feel free to get creative with your monster designs by using additional candy decorations, such as gummy worms or sprinkles, to add personality to your cupcakes.
Pumpkin Patch Delights

Celebrate Halloween with these delightful Pumpkin Patch Delights Cupcakes that are both visually appealing and delicious. These cupcakes are inspired by the classic fall harvest and will add a festive touch to any gathering. With a spiced pumpkin base and topped with a creamy frosting, they’re perfect for both kids and adults who are looking to indulge in the flavors of autumn.
The decorative pumpkin patch theme not only makes these cupcakes a treat for the taste buds but also a feast for the eyes. The rich pumpkin flavor in the cupcakes pairs beautifully with the warm spices, creating a moist and flavorful base. The cupcakes are then topped with a smooth cream cheese frosting, which provides a tangy contrast to the sweet and spiced cake.
Decorated with little fondant pumpkins and green frosting vines, these cupcakes resemble a charming pumpkin patch. Suitable for a serving size of 4-6 people, this recipe is perfect for a small gathering or a family treat.
Ingredients (serving size: 4-6 people):
- 1 cup all-purpose flour
- 1 teaspoon baking powder
- 1/2 teaspoon baking soda
- 1/2 teaspoon ground cinnamon
- 1/4 teaspoon ground nutmeg
- 1/4 teaspoon ground ginger
- 1/4 teaspoon salt
- 1/2 cup pumpkin puree
- 1/2 cup granulated sugar
- 1/4 cup brown sugar
- 1/3 cup vegetable oil
- 2 large eggs
- 1 teaspoon vanilla extract
- 4 oz cream cheese, softened
- 1/4 cup unsalted butter, softened
- 2 cups powdered sugar
- 1/2 teaspoon vanilla extract
- Green food coloring
- Orange fondant
Cooking Instructions:
- Preheat the Oven: Preheat your oven to 350°F (175°C). Line a 12-cup muffin tin with cupcake liners for easy removal after baking.
- Mix Dry Ingredients: In a medium bowl, whisk together the flour, baking powder, baking soda, cinnamon, nutmeg, ginger, and salt. Set aside.
- Combine Wet Ingredients: In a large bowl, combine the pumpkin puree, granulated sugar, brown sugar, and vegetable oil. Mix until smooth. Add the eggs and vanilla extract, mixing until well incorporated.
- Incorporate Dry Mixture: Gradually add the dry ingredients to the wet mixture, stirring gently until just combined. Be careful not to overmix, as this can result in dense cupcakes.
- Bake the Cupcakes: Divide the batter evenly among the prepared muffin cups, filling each about 2/3 full. Bake in the preheated oven for 18-20 minutes, or until a toothpick inserted into the center comes out clean. Allow cupcakes to cool completely on a wire rack.
- Prepare the Frosting: In a mixing bowl, beat the softened cream cheese and butter together until smooth. Gradually add the powdered sugar and vanilla extract, beating until creamy. Reserve a small portion of the frosting and tint it green using the food coloring.
- Decorate the Cupcakes: Using a piping bag, frost the cooled cupcakes with the cream cheese frosting. Roll small balls of orange fondant to create mini pumpkins and place them on top of the cupcakes. Use the green frosting to pipe vines around the pumpkins.
Extra Tips:
For a more authentic pumpkin patch look, use a toothpick to create grooves on the fondant pumpkins, mimicking real pumpkins. If you prefer, you can make the cupcakes a day in advance and store them in an airtight container at room temperature.
The frosting can be made ahead and kept in the refrigerator; just bring it to room temperature before decorating. Don’t have fondant? Use candy pumpkins as an alternative for a quick and easy decoration.
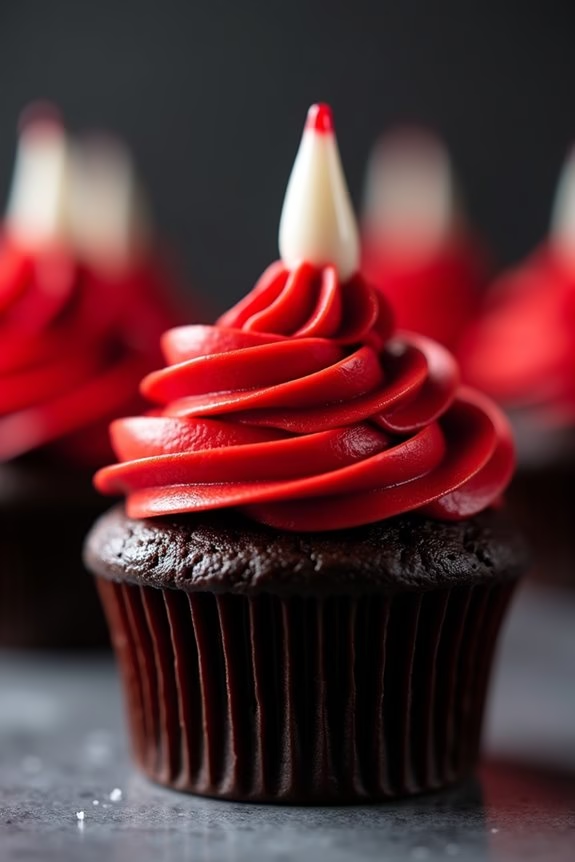
Bloody Red Velvet Bites
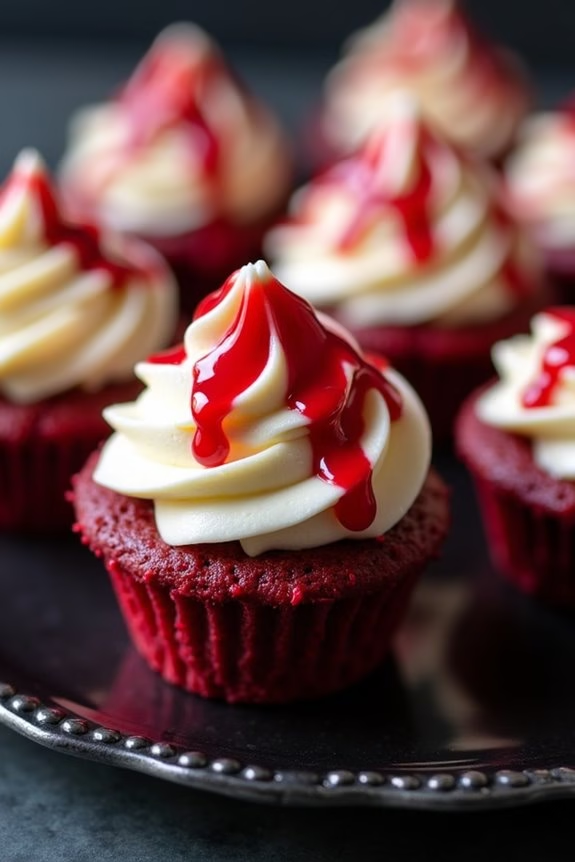
Delight and spook your guests this Halloween with these irresistibly moist and decadent Bloody Red Velvet Bites. These mini cupcakes aren’t only delicious but also visually striking, with their deep red hue and eerie “bloody” appearance. Perfect for a Halloween party or any festive gathering, they’re sure to be a hit with their rich cocoa flavor and creamy frosting.
Whether you’re a seasoned baker or new to the kitchen, these cupcakes are simple to make and will add a touch of ghoulish fun to your celebration.
The key to these Bloody Red Velvet Bites is achieving the right balance of flavors and textures. The cupcakes themselves are light and fluffy, with a hint of cocoa that complements their vivid color. Topped with a smooth cream cheese frosting and a drizzle of “blood” made from raspberry or strawberry sauce, each bite is a perfect combination of sweet and tangy.
Serve them on a dark platter for an extra spooky presentation, and watch as your guests devour these hauntingly good treats.
Ingredients (serves 4-6 people):
- 1 1/4 cups all-purpose flour
- 3/4 cup granulated sugar
- 1 tablespoon unsweetened cocoa powder
- 1/2 teaspoon baking soda
- 1/2 teaspoon salt
- 1/2 cup buttermilk
- 1/2 cup vegetable oil
- 1 large egg
- 1 tablespoon red food coloring
- 1/2 teaspoon vanilla extract
- 1/2 teaspoon white vinegar
- 8 ounces cream cheese, softened
- 1/4 cup unsalted butter, softened
- 2 cups powdered sugar
- 1/2 teaspoon vanilla extract
- Raspberry or strawberry sauce for “blood” effect
Cooking Instructions:
- Preheat and Prepare: Preheat your oven to 350°F (175°C) and line a mini muffin tin with paper liners. This guarantees that the cupcakes bake evenly and are easy to remove once done.
- Mix Dry Ingredients: In a medium bowl, whisk together the flour, sugar, cocoa powder, baking soda, and salt. This helps distribute the ingredients evenly.
- Combine Wet Ingredients: In a separate large bowl, combine the buttermilk, vegetable oil, egg, red food coloring, vanilla extract, and vinegar. Whisk until well combined and the color is uniform.
- Combine Mixtures: Gradually add the dry ingredients to the wet ingredients, stirring gently until just combined. Be careful not to overmix, as this can lead to dense cupcakes.
- Fill and Bake: Spoon the batter into the prepared muffin tin, filling each cup about two-thirds full. Bake for 15-18 minutes or until a toothpick inserted into the center of a cupcake comes out clean.
- Cool: Allow the cupcakes to cool in the tin for a few minutes before transferring them to a wire rack to cool completely.
- Make Frosting: In a large bowl, beat the cream cheese and butter together until smooth and creamy. Gradually add the powdered sugar and vanilla extract, beating until light and fluffy.
- Frost Cupcakes: Once the cupcakes are completely cool, pipe or spread the cream cheese frosting on top of each cupcake.
- Add the “Blood”: Drizzle the raspberry or strawberry sauce over the frosted cupcakes to create a “bloody” effect. Use a toothpick to create streaks for a more realistic look.
Extra Tips:
To achieve the perfect red velvet color, be sure to use gel-based red food coloring, which provides a more vibrant color without altering the texture of the batter. Additionally, if you prefer a less sweet frosting, you can reduce the amount of powdered sugar to taste.
For an extra spooky touch, consider adding Halloween-themed decorations like candy eyeballs or edible glitter. Remember, the key to successful cupcakes isn’t overbaking them, so keep a close eye on them as they bake to confirm they stay moist and tender.
Mummy Wrapped Cupcakes
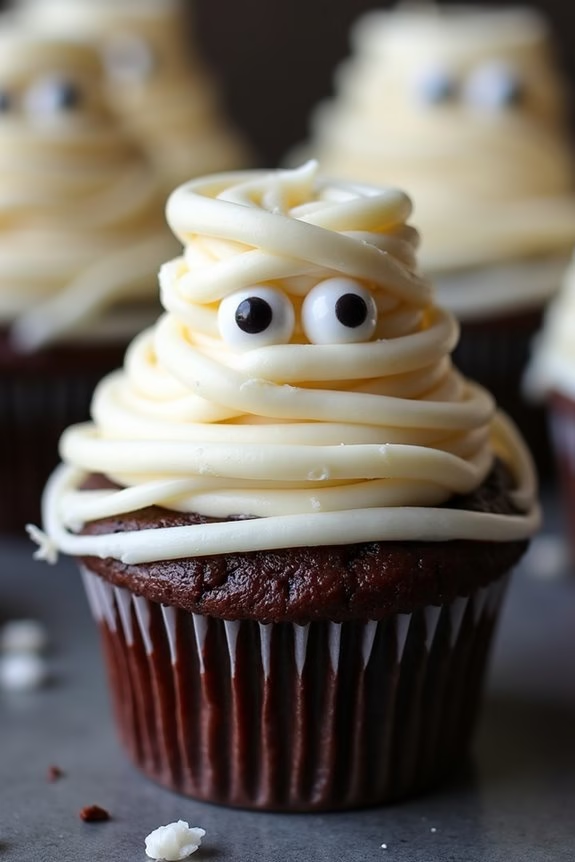
Mummy Wrapped Cupcakes are a fun and spooky treat that make a perfect addition to your Halloween festivities. These cupcakes aren’t only delicious, but they also bring a playful touch to your dessert table with their cute, mummy-like appearance. The combination of chocolate cupcakes and creamy vanilla frosting wrapped with white fondant gives them a ghoulishly delightful look that’s sure to impress both kids and adults alike.
Creating these Halloween themed cupcakes is a simple yet satisfying process. You’ll start by baking rich chocolate cupcakes and then use white fondant to create the mummy wrapping effect. A touch of food coloring and some candy eyes complete the transformation from ordinary cupcakes to spooky mummies. This recipe yields approximately 12 cupcakes, serving about 4-6 people, making it perfect for a small gathering or party.
Ingredients:
- 1 cup all-purpose flour
- 1/2 cup cocoa powder
- 1 cup granulated sugar
- 1/2 teaspoon baking soda
- 1/4 teaspoon salt
- 3/4 cup milk
- 1/2 cup vegetable oil
- 1 large egg
- 1 teaspoon vanilla extract
- 1 cup vanilla frosting
- 12 candy eyes
- 1 packet white fondant
- Black food coloring
Instructions:
- Preheat the Oven: Preheat your oven to 350°F (175°C) and line a 12-cup muffin tin with cupcake liners.
- Prepare the Batter: In a large mixing bowl, whisk together the flour, cocoa powder, sugar, baking soda, and salt. Add the milk, vegetable oil, egg, and vanilla extract to the dry ingredients and mix until well combined and smooth.
- Bake the Cupcakes: Divide the batter evenly among the cupcake liners, filling each about two-thirds full. Bake in the preheated oven for 18-20 minutes or until a toothpick inserted into the center of a cupcake comes out clean. Allow the cupcakes to cool completely on a wire rack.
- Frost the Cupcakes: Once the cupcakes have cooled, apply a thin layer of vanilla frosting on top of each cupcake as a base. This will help the fondant strips adhere to the cupcakes.
- Create Mummy Bandages: Roll out the white fondant to about 1/8-inch thickness. Cut the fondant into thin strips, approximately 1/4 inch wide, to resemble mummy bandages.
- Decorate the Cupcakes: Wrap the fondant strips randomly across the top of each cupcake, leaving small gaps to create a mummy-like effect. Use a small amount of frosting to attach two candy eyes to the visible part of the cupcake.
- Add Details: If desired, use a toothpick to add small black details around the eyes with black food coloring, giving them a more animated look.
Extra Tips:
When rolling out the fondant, dust your surface with a little powdered sugar to prevent sticking. If you don’t have candy eyes, you can make them using small drops of white fondant with a dot of black food coloring for the pupil.
Store the cupcakes in an airtight container to keep them fresh, and if you find the fondant difficult to work with, microwave it for a few seconds to soften it before rolling. Enjoy your spooky and delicious Mummy Wrapped Cupcakes!
Batty Chocolate Wings
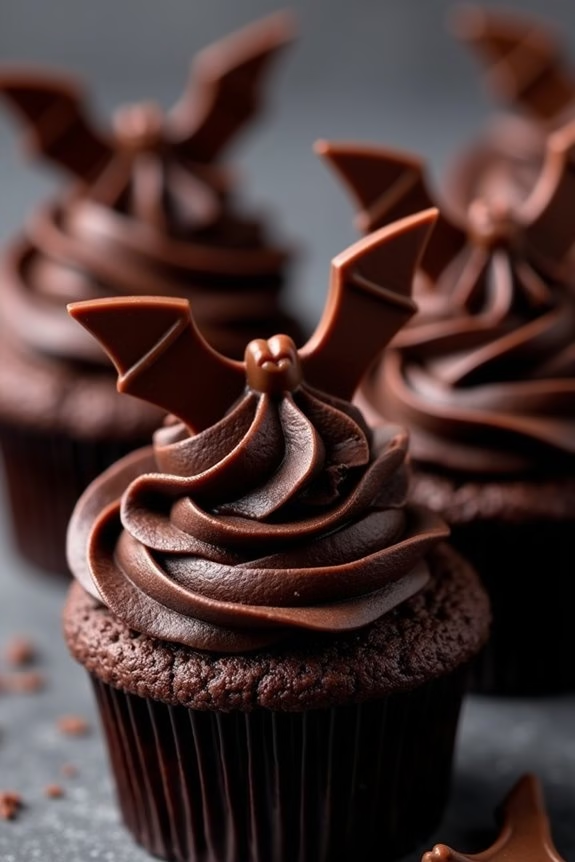
Halloween is the perfect time to release your creativity in the kitchen, and these Batty Chocolate Wings Cupcakes are a delightfully spooky treat that will thrill both kids and adults alike.
These cupcakes are a combination of rich chocolate cupcakes topped with creamy frosting and adorned with chocolate bat wings, making them an eye-catching addition to your Halloween dessert spread. Whether you’re hosting a Halloween party or just indulging in some festive fun, these cupcakes are sure to be a hit!
The secret to these cupcakes lies in the decorative bat wings, which are made from melted chocolate that’s shaped and hardened to form perfect, edible wings. The base is a moist chocolate cupcake, complemented by a luscious buttercream frosting that holds the wings in place.
These cupcakes serve 4-6 people, making them ideal for a small gathering or family treat. Let’s explore the ingredients and steps needed to create these spooktacular delights.
Ingredients for 4-6 servings:
- 1 cup all-purpose flour
- 1/2 cup unsweetened cocoa powder
- 1 cup granulated sugar
- 1 teaspoon baking powder
- 1/2 teaspoon baking soda
- 1/4 teaspoon salt
- 1/2 cup unsalted butter, melted
- 2 large eggs
- 1 teaspoon vanilla extract
- 1/2 cup buttermilk
- 1 cup semi-sweet chocolate chips
- 1/2 cup heavy cream
- 1 cup unsalted butter, softened (for frosting)
- 2 cups powdered sugar
- Black food coloring
- Parchment paper for bat wings
Cooking Instructions:
- Prepare the Bat Wings:
- Melt the semi-sweet chocolate chips in a microwave-safe bowl, stirring every 30 seconds until smooth.
- Transfer the melted chocolate into a piping bag or ziploc bag with a small corner snipped off.
- On a sheet of parchment paper, pipe bat wing shapes, approximately 2 inches in width, and let them cool and harden completely.
- Preheat the Oven and Prepare the Cupcake Liners:
- Preheat your oven to 350°F (175°C).
- Line a muffin tin with cupcake liners.
- Make the Cupcake Batter:
- In a large bowl, sift together the flour, cocoa powder, baking powder, baking soda, and salt.
- In another bowl, whisk together the melted butter and sugar until well combined. Add the eggs and vanilla extract, mixing until smooth.
- Gradually add the dry ingredients to the wet mixture, alternating with the buttermilk, starting and ending with the dry ingredients. Mix until the batter is smooth and combined.
- Bake the Cupcakes:
- Divide the batter evenly among the prepared cupcake liners, filling each about 2/3 full.
- Bake in the preheated oven for 18-20 minutes, or until a toothpick inserted in the center comes out clean.
- Remove from oven and let them cool in the pan for 5 minutes, then transfer to a wire rack to cool completely.
- Prepare the Frosting:
- In a mixing bowl, beat the softened butter until creamy.
- Gradually add the powdered sugar, beating until smooth and fluffy.
- Add a few drops of black food coloring and mix until the desired color is achieved.
- Assemble the Cupcakes:
- Once the cupcakes are completely cooled, pipe the black frosting onto each cupcake.
- Gently insert the hardened chocolate bat wings into the frosting on each cupcake.
Extra Tips:
To guarantee the chocolate bat wings maintain their shape, make sure they’re completely hardened before inserting them into the frosting. You can speed up this process by placing them in the refrigerator for a few minutes.
Additionally, if you don’t have buttermilk on hand, you can make a quick substitute by adding 1/2 tablespoon of white vinegar or lemon juice to 1/2 cup of milk and letting it sit for 5 minutes. This will give your cupcakes the same moist texture.
Don’t forget to have fun with the bat wing shapes – they can be as simple or as elaborate as you like!
Black Cat Whisker Cupcakes

Black Cat Whisker Cupcakes are the perfect treat to add a touch of spooky fun to your Halloween festivities. These cupcakes not only look festive with their black and orange decorations, but they also taste delicious with a rich chocolate base and creamy vanilla frosting. The whiskers made of licorice give them a fun and distinctive look, making them an exciting centerpiece for any Halloween party or gathering.
Whether you’re throwing a party for kids or adults, these cupcakes are certain to be a hit. Creating these cupcakes is a delightful process that involves baking chocolate cupcakes and decorating them with creativity. The chocolate base is rich and moist, while the vanilla frosting provides a creamy contrast.
The decorations—featuring black licorice whiskers, candy eyes, and chocolate ears—bring the black cat theme to life. With a little patience and the right ingredients, you can whip up these adorable and eerie cupcakes in no time. This recipe serves 4-6 people, making it perfect for a small gathering or a family treat.
Ingredients:
- 1 cup all-purpose flour
- 1 cup granulated sugar
- 1/3 cup unsweetened cocoa powder
- 1/2 teaspoon baking soda
- 1/4 teaspoon baking powder
- 1/4 teaspoon salt
- 1/2 cup unsalted butter, melted
- 2 large eggs
- 1 teaspoon vanilla extract
- 1/2 cup buttermilk
- Black food coloring
- 1 cup unsalted butter, softened (for frosting)
- 3 cups powdered sugar (for frosting)
- 2 teaspoons vanilla extract (for frosting)
- 2-3 tablespoons milk (for frosting)
- Black licorice strings
- Small candy eyes
- Chocolate chips or small chocolate candies (for ears)
Instructions:
- Preheat the Oven: Preheat your oven to 350°F (175°C) and line a 12-cup muffin tin with cupcake liners.
- Mix Dry Ingredients: In a large bowl, whisk together the flour, sugar, cocoa powder, baking soda, baking powder, and salt until well combined.
- Combine Wet Ingredients: In another bowl, mix the melted butter, eggs, vanilla extract, and buttermilk until smooth.
- Make the Batter: Gradually add the wet ingredients to the dry ingredients, mixing until just combined. Be careful not to overmix. Add a few drops of black food coloring to achieve a dark, spooky hue.
- Bake the Cupcakes: Divide the batter evenly among the cupcake liners. Bake for 18-20 minutes or until a toothpick inserted into the center comes out clean. Let them cool in the tin for 5 minutes before transferring them to a wire rack to cool completely.
- Prepare the Frosting: In a large bowl, beat the softened butter until creamy. Gradually add powdered sugar, vanilla extract, and milk, beating until smooth and fluffy. Add black food coloring until the desired shade is reached.
- Decorate the Cupcakes: Once the cupcakes are completely cool, spread or pipe the black frosting on top. Place two candy eyes near the top of each cupcake. Insert two chocolate chips or candies above the eyes for ears. Finally, cut the licorice strings into small lengths and stick three on each side of the cupcakes to create whiskers.
Extra Tips:
For the best results, make sure your cupcakes are completely cool before frosting to prevent the frosting from melting. When adding black food coloring, start with a small amount and gradually add more until the desired depth of color is achieved.
If you can’t find black licorice, you can substitute with chocolate-covered pretzel sticks for the whiskers. Additionally, for a fun variation, consider using orange frosting for a two-toned effect that adds extra flair to your Halloween treats.
Frankenstein’s Monster Faces
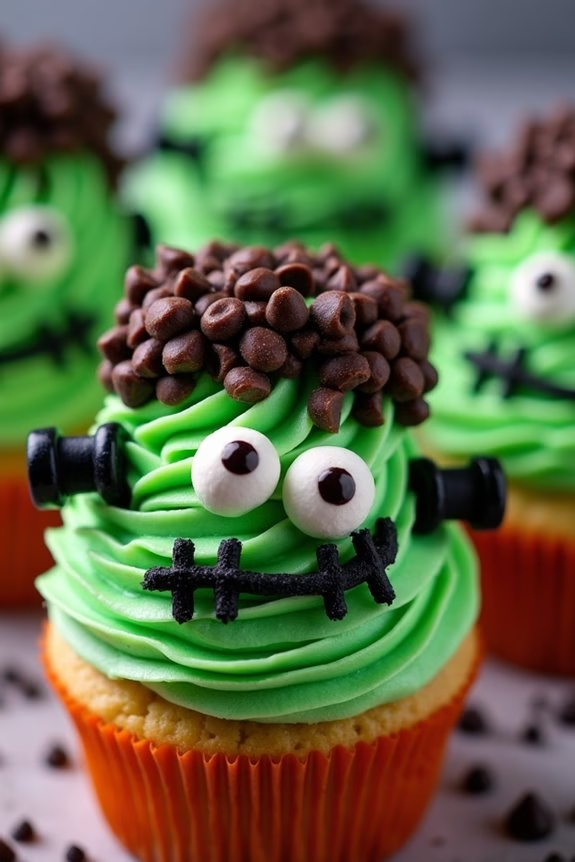
Halloween is the perfect time to release your creativity in the kitchen, and what better way to do so than by crafting spooky yet delicious Frankenstein’s Monster Faces Cupcakes? These ghoulish treats aren’t only fun to make but also a delight to serve at any Halloween gathering. With their green-tinted frosting and eerie details, they’ll surely be a hit among kids and adults alike.
To create these monstrous cupcakes, you’ll start with a basic chocolate cupcake base that’s moist and rich in flavor. The real magic lies in the decoration, where vibrant green frosting serves as Frankenstein’s face, and various candies and chocolate pieces bring his features to life. This recipe serves 4-6 people, making it perfect for a small Halloween party or a family gathering.
Ingredients:
- 1 cup all-purpose flour
- 1/2 cup unsweetened cocoa powder
- 1 cup granulated sugar
- 1/2 teaspoon baking soda
- 1/4 teaspoon salt
- 1/2 cup unsalted butter, softened
- 2 large eggs
- 1 teaspoon vanilla extract
- 1/2 cup buttermilk
- 1 1/2 cups green frosting
- 1/4 cup chocolate chips
- 12 mini marshmallows
- 12 black licorice strings
- 12 candy eyes
- Black decorating gel
Instructions:
- Preheat and Prepare: Preheat your oven to 350°F (175°C). Line a muffin tin with cupcake liners.
- Mix Dry Ingredients: In a medium bowl, whisk together the flour, cocoa powder, baking soda, and salt. Set aside.
- Cream Butter and Sugar: In a large bowl, using an electric mixer, cream the softened butter and granulated sugar together until light and fluffy.
- Add Eggs and Vanilla: Beat in the eggs one at a time, mixing well after each addition. Stir in the vanilla extract.
- Combine Wet and Dry Ingredients: Gradually add the dry ingredients to the creamed mixture, alternating with the buttermilk, starting and ending with the dry ingredients. Mix until just combined.
- Fill and Bake: Spoon the batter into the prepared muffin tin, filling each liner about two-thirds full. Bake in the preheated oven for 18-20 minutes, or until a toothpick inserted into the center comes out clean. Allow the cupcakes to cool completely on a wire rack.
- Decorate Frankenstein Faces: Once cooled, spread a generous amount of green frosting on each cupcake to create Frankenstein’s face. Place two candy eyes on each cupcake.
- Create Hair and Mouth: Use chocolate chips to form the hairline at the top of the cupcake. Draw a mouth using the black decorating gel.
- Add Bolts and Scars: Cut the mini marshmallows in half and attach one half to each side of the cupcake using a dab of frosting to create Frankenstein’s bolts. Use black licorice strings to make stitches or scars on his face.
- Finish and Serve: Once decorated, your Frankenstein’s Monster Faces Cupcakes are ready to serve!
Extra Tips:
For a smoother frosting application, let the cupcakes cool completely before spreading the frosting. If you want to add more texture to Frankenstein’s face, consider using a small offset spatula to create waves or ridges in the frosting.
To enhance the spooky presentation, place the cupcakes on a Halloween-themed platter or use decorative liners. If you’re short on time, you can use a boxed chocolate cake mix and store-bought frosting. Just remember, the fun lies in the decoration, so feel free to experiment with different candies and designs!
Candy Corn Swirl
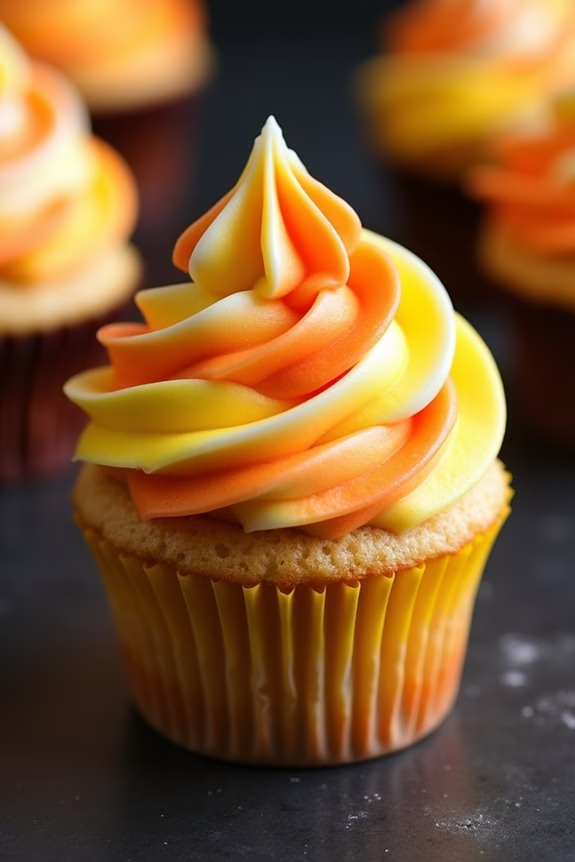
Celebrate Halloween with a fun and festive treat – Candy Corn Swirl Cupcakes! These delightful cupcakes are perfect for any spooky gathering with their vibrant colors and sweet flavors reminiscent of the classic Halloween candy. The cupcakes are made with a simple vanilla base, and their swirled frosting mimics the iconic hues of candy corn. Not only are they visually appealing, but they’re also a delicious addition to your Halloween dessert spread.
This recipe yields 12 to 18 cupcakes, making it suitable for a small party or family gathering. To achieve the perfect swirl effect, you’ll color the frosting in three sections: yellow, orange, and white, then combine them in a piping bag. The result is a stunning cupcake that looks just like a candy corn! Let’s explore the recipe for these delightful Halloween treats.
Ingredients for Candy Corn Swirl Cupcakes (serving size: 12-18 cupcakes):
- 1 ¾ cups all-purpose flour
- 1 ½ teaspoons baking powder
- ½ teaspoon baking soda
- ½ teaspoon salt
- ½ cup unsalted butter, softened
- 1 cup granulated sugar
- 2 large eggs
- 2 teaspoons vanilla extract
- ½ cup buttermilk
- Yellow food coloring
- Orange food coloring
- 2 cups powdered sugar
- ½ cup unsalted butter, softened (for frosting)
- 2 tablespoons heavy cream
- 1 teaspoon vanilla extract (for frosting)
Instructions:
- Preheat the Oven: Begin by preheating your oven to 350°F (175°C). Line a cupcake tin with 12-18 cupcake liners to prepare for baking.
- Mix Dry Ingredients: In a medium bowl, whisk together the flour, baking powder, baking soda, and salt. This will be your dry mixture.
- Cream Butter and Sugar: In a large bowl, cream together the softened butter and granulated sugar using an electric mixer on medium speed until light and fluffy, about 3-4 minutes.
- Add Eggs and Vanilla: Beat in the eggs, one at a time, mixing well after each addition. Add the vanilla extract and mix until fully incorporated.
- Combine Mixtures: Gradually add the dry mixture to the wet mixture, alternating with the buttermilk, beginning and ending with the flour mixture. Mix until just combined.
- Bake the Cupcakes: Divide the batter evenly among the prepared cupcake liners. Fill each about two-thirds full. Bake in the preheated oven for 18-20 minutes or until a toothpick inserted into the center comes out clean. Allow them to cool completely on a wire rack.
- Prepare the Frosting: In a large bowl, beat the softened butter until creamy. Gradually add the powdered sugar, heavy cream, and vanilla extract, beating on low speed until combined, then on high speed until fluffy.
- Color the Frosting: Divide the frosting into three separate bowls. Color one portion with yellow food coloring, another with orange, and leave the third portion white.
- Create the Swirl: Using a piping bag fitted with a large star tip, layer the yellow, orange, and white frostings side by side. Squeeze the piping bag gently to create a beautiful candy corn swirl on each cupcake.
Extra Tips:
For best results, use gel food coloring as it provides vibrant colors without altering the frosting’s consistency. Verify your cupcakes are completely cooled before frosting to prevent the buttercream from melting.
If you prefer a more intense candy corn flavor, consider adding a few drops of candy corn flavoring to the frosting. When creating the swirl, practice on a piece of parchment paper first to get the hang of the technique before decorating your cupcakes.
Enjoy your Candy Corn Swirl Cupcakes as a delightful treat at your Halloween festivities!
Vampire Fang Toppers
If you’re looking to add a chilling, yet delightful twist to your Halloween treats, Vampire Fang Toppers Halloween Cupcakes are the way to go. These themed cupcakes aren’t only visually striking but also deliciously sweet, making them perfect for a spooky celebration. The combination of rich chocolate cupcakes with eerie red-tinted frosting and menacing vampire fang toppers creates a dessert that’s as fun to make as it’s to eat.
Whether you’re hosting a Halloween party or simply want to surprise your family with a festive dessert, these cupcakes are sure to please ghouls and goblins of all ages.
To create these hauntingly delicious cupcakes, you’ll start by baking chocolate cupcakes from scratch or using your favorite boxed mix. Once the cupcakes have cooled, you’ll whip up a batch of red-tinted frosting to resemble blood. The crowning touch is, of course, the vampire fang toppers made from white chocolate or fondant.
The contrast of the dark cupcakes with the bright red frosting and white fang toppers makes for an eye-catching display that’s perfect for any haunted gathering.
Ingredients for 4-6 servings:
- 1 ½ cups all-purpose flour
- 1 cup granulated sugar
- ½ cup unsweetened cocoa powder
- 1 teaspoon baking soda
- ½ teaspoon salt
- 1 cup water
- ⅓ cup vegetable oil
- 1 tablespoon white vinegar
- 1 teaspoon vanilla extract
- 2 cups powdered sugar
- 1 cup unsalted butter (softened)
- 2-3 tablespoons heavy cream
- Red gel food coloring
- 12-18 vampire fang toppers (made from white chocolate or fondant)
Cooking Instructions:
- Prepare the Cupcake Batter: Preheat your oven to 350°F (175°C) and line a 12-cup muffin tin with cupcake liners. In a large bowl, whisk together the flour, sugar, cocoa powder, baking soda, and salt. In another bowl, mix the water, vegetable oil, vinegar, and vanilla extract. Combine the wet and dry ingredients, stirring until smooth.
- Bake the Cupcakes: Pour the batter evenly into the prepared muffin tin, filling each liner about two-thirds full. Bake in the preheated oven for 18-20 minutes or until a toothpick inserted into the center of a cupcake comes out clean. Allow the cupcakes to cool completely on a wire rack.
- Make the Frosting: In a mixing bowl, beat the softened butter until creamy. Gradually add the powdered sugar, heavy cream, and a few drops of red gel food coloring. Beat on medium speed until the frosting is light, fluffy, and a vibrant red color.
- Frost the Cupcakes: Once the cupcakes are completely cool, pipe or spread the red frosting generously on top of each cupcake. Confirm the frosting has a smooth, even surface to hold the fang toppers.
- Add the Vampire Fang Toppers: Carefully place a vampire fang topper into the center of each frosted cupcake, pressing gently so they stand upright without disturbing the frosting.
Extra Tips:
For an extra touch of realism, try adding a few drops of edible red gel or glaze to the tips of the fangs for a “blood-dripping” effect. If you prefer a different flavor for the cupcakes, vanilla or red velvet can also work well with this theme.
When making the vampire fang toppers, you can use a fang-shaped mold for white chocolate or mold the fangs by hand using fondant. Remember to chill the toppers if using chocolate to confirm they maintain their shape.
Finally, these cupcakes can be made a day in advance and stored in an airtight container to save time on the day of your event.
Graveyard Dirt Cupcakes

- 1 cup all-purpose flour
- 1 cup granulated sugar
- 1/2 cup unsweetened cocoa powder
- 1/2 teaspoon baking powder
- 1/2 teaspoon baking soda
- 1/4 teaspoon salt
- 1/4 cup vegetable oil
- 1/2 cup buttermilk
- 1 large egg
- 1 teaspoon vanilla extract
- 1/2 cup boiling water
- 1 cup chocolate sandwich cookies, crushed
- 1 cup chocolate frosting
- 12 gummy worms
- 6 candy tombstones or bone candies
Cooking Instructions
- Preheat the Oven: Begin by preheating your oven to 350°F (175°C). Line a muffin tin with cupcake liners to prepare for baking the cupcakes.
- Mix Dry Ingredients: In a large bowl, whisk together the flour, sugar, cocoa powder, baking powder, baking soda, and salt until well combined.
- Combine Wet Ingredients: In a separate bowl, mix the vegetable oil, buttermilk, egg, and vanilla extract. Whisk until smooth and uniform.
- Create the Batter: Gradually add the wet ingredients to the dry ingredients, stirring until just combined. Pour in the boiling water and mix until the batter is smooth and slightly thin.
- Fill the Cupcake Liners: Pour the batter into the prepared cupcake liners, filling each about two-thirds full.
- Bake: Place the muffin tin in the preheated oven and bake for 18 to 20 minutes, or until a toothpick inserted into the center of a cupcake comes out clean. Remove from the oven and allow to cool completely.
- Prepare the “Dirt” Topping: Once the cupcakes are cooled, spread a generous layer of chocolate frosting over each one. Sprinkle the crushed chocolate sandwich cookies on top to create the “dirt” layer.
- Decorate: Insert candy tombstones or bone candies into the cupcake to resemble gravestones. Add a couple of gummy worms to each cupcake to enhance the graveyard effect.
Extra Tips
For the best results, make certain the cupcakes are completely cooled before frosting to prevent the frosting from melting.
Feel free to get creative with your decorations, using additional Halloween-themed candies like candy eyeballs or small plastic spiders for an extra spooky touch.
When crushing the chocolate cookies, you can use a food processor or place them in a zip-lock bag and crush with a rolling pin.
This recipe can be easily doubled if you’re serving a larger crowd. Enjoy your eerie and delicious creations!
Zombie Brain Buttercream
Zombie Brain Buttercream Cupcakes are a perfect Halloween treat that combines spooky fun with delicious flavor. These cupcakes are sure to be a hit at any Halloween party, offering a delightful mix of moist cake topped with a gory yet tasty buttercream designed to mimic zombie brains. The vibrant colors and creepy design will captivate guests of all ages, making these cupcakes a memorable centerpiece for your Halloween celebration.
With just a few simple ingredients and some creative piping skills, you can transform ordinary cupcakes into a frightful dessert that everyone will enjoy.
The key to these ghoulish goodies is the buttercream frosting, which is tinted with food coloring to give it a realistic brain-like appearance. The cupcakes themselves can be any flavor you prefer, but a rich chocolate or red velvet base works particularly well for a spooky effect.
Once the cupcakes are baked and cooled, the buttercream is piped on top in a way that resembles the twisted, ridged surface of a brain. This recipe is designed to serve 4-6 people, making about a dozen cupcakes depending on their size.
Ingredients:
- 1 ½ cups all-purpose flour
- 1 cup granulated sugar
- ½ cup unsweetened cocoa powder (if making chocolate cupcakes)
- 1 teaspoon baking powder
- ½ teaspoon baking soda
- ¼ teaspoon salt
- 2 large eggs
- ½ cup vegetable oil
- 1 teaspoon vanilla extract
- ¾ cup buttermilk
- 1 cup unsalted butter (softened)
- 4 cups powdered sugar
- 2 teaspoons vanilla extract
- 2-4 tablespoons milk
- Red and black food coloring
- Cupcake liners
Cooking Instructions:
- Preheat and Prepare: Preheat your oven to 350°F (175°C) and line a cupcake tin with cupcake liners.
- Mix Dry Ingredients: In a large mixing bowl, whisk together the flour, sugar, cocoa powder (if using), baking powder, baking soda, and salt until well combined.
- Combine Wet Ingredients: In another bowl, beat the eggs with the vegetable oil and vanilla extract until smooth. Gradually add the buttermilk, mixing until well incorporated.
- Create Batter: Slowly add the wet ingredients to the dry ingredients, stirring just until combined. Be careful not to overmix to guarantee the cupcakes stay tender.
- Bake Cupcakes: Divide the batter evenly among the cupcake liners, filling each about two-thirds full. Bake for 18-20 minutes, or until a toothpick inserted in the center comes out clean. Let them cool completely on a wire rack.
- Prepare Buttercream: In a large bowl, beat the softened butter until creamy. Gradually add the powdered sugar, one cup at a time, mixing well after each addition. Stir in the vanilla extract and enough milk to reach your desired consistency.
- Tint and Pipe Frosting: Divide the buttercream into two portions. Tint one with red food coloring to achieve a brain-like pink shade. Use a small amount of black food coloring to add depth if desired. Fill a piping bag fitted with a round tip and pipe the frosting onto the cooled cupcakes in a brain pattern.
- Finishing Touches: Use a toothpick to create any additional lines or ridges in the frosting to enhance the brain effect.
Extra Tips:
When creating the brain pattern with the buttercream, practice on a piece of parchment paper first to get comfortable with the piping technique.
If you don’t have buttermilk on hand, you can make a substitute by adding a tablespoon of lemon juice or vinegar to regular milk and letting it sit for a few minutes.
For a more dramatic effect, consider adding edible blood drops using red gel icing or a small drizzle of raspberry sauce. Enjoy these creepy creations at your next Halloween gathering!
Haunted House Cupcake Village
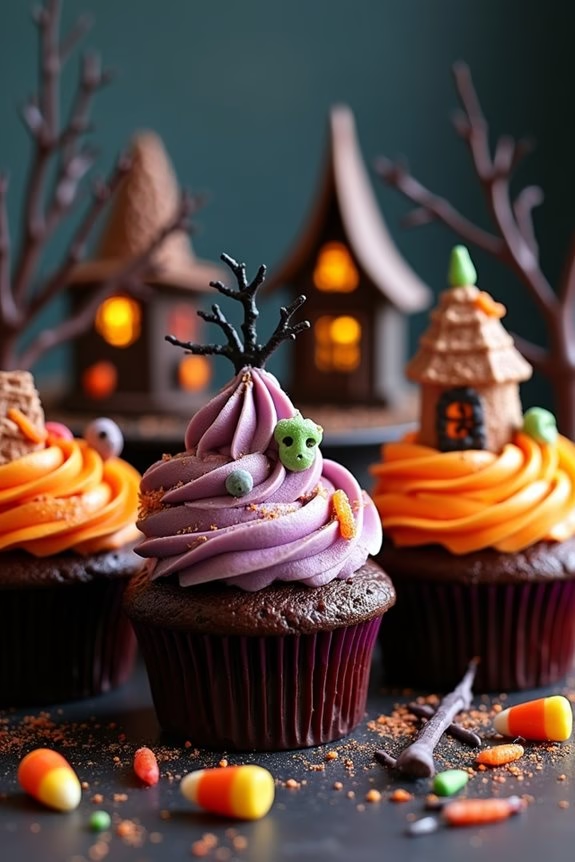
Introducing the Haunted House Cupcake Village, a whimsical and eerie dessert sure to enchant your Halloween festivities. These cupcakes aren’t just a delightful treat; they’re a canvas for creativity, allowing you to build a spooky village that’s both delicious and eye-catching. Each cupcake is adorned with miniature haunted house decorations, crafted with colorful icing and candies to bring a touch of the macabre to your Halloween table.
Perfectly portioned for a gathering of 4-6 people, this recipe provides you with the tools and techniques to transform simple cupcakes into a haunted masterpiece. The base of each cupcake is a rich, moist chocolate cake, topped with a choice of creamy buttercream frosting. The fun begins with decorating, where you can let your imagination run wild, creating ghostly windows, creepy trees, and haunted rooftops using an assortment of candies and edible decorations.
Ingredients (Serves 4-6 people):
For the Chocolate Cupcakes:
- 1 cup all-purpose flour
- 1 cup granulated sugar
- 1/3 cup unsweetened cocoa powder
- 1 teaspoon baking powder
- 1/2 teaspoon baking soda
- 1/4 teaspoon salt
- 1/2 cup buttermilk
- 1/4 cup vegetable oil
- 1 large egg
- 1 teaspoon vanilla extract
- 1/2 cup boiling water
For the Buttercream Frosting:
- 1 cup unsalted butter, softened
- 3-4 cups powdered sugar
- 1/4 cup heavy cream
- 1 teaspoon vanilla extract
- Food coloring (black, orange, green)
For Decorations:
- Mini marshmallows
- Various candies (e.g., candy corn, gummy worms)
- Chocolate sprinkles
- Edible glitter or shimmer dust
- Black licorice strings
- Assorted Halloween-themed edible toppers
Cooking Instructions:
- Preheat the Oven: Preheat your oven to 350°F (175°C) and line a cupcake pan with paper liners.
- Mix Dry Ingredients: In a large bowl, whisk together the flour, sugar, cocoa powder, baking powder, baking soda, and salt until well combined.
- Combine Wet Ingredients: In a separate bowl, mix the buttermilk, vegetable oil, egg, and vanilla extract until smooth.
- Create Batter: Gradually add the wet ingredients to the dry ingredients, mixing until just combined. Carefully stir in the boiling water; the batter will be thin.
- Bake Cupcakes: Divide the batter evenly among the cupcake liners, filling each about two-thirds full. Bake for 18-20 minutes, or until a toothpick inserted into the center comes out clean. Let cool completely on a wire rack.
- Prepare Frosting: Beat the softened butter in a large bowl until creamy. Gradually add the powdered sugar, one cup at a time, beating on low speed. Add heavy cream and vanilla extract, then beat on high until light and fluffy. Divide the frosting into separate bowls and tint with desired food coloring.
- Decorate the Village: Spread or pipe the colored buttercream onto each cupcake. Use candies and edible decorations to create haunted houses, spooky trees, and graveyard scenes on each cupcake. Arrange them together to form a village.
Extra Tips:
When decorating your Haunted House Cupcake Village, consider using a variety of textures and colors to add depth and intrigue to your creations.
Using edible markers can allow for more detailed designs, such as drawing windows and doors on mini marshmallows to mimic tiny haunted houses.
Remember that the frosting can act as a glue for heavier decorations, so don’t be afraid to get creative with your spooky embellishments!